Get Ready To Build
Hello, Developer! Welcome to Algorand!
This guide will help you set up your development environment and create your first Algorand project with AlgoKit. By the end of this guide, you’ll be set up to tackle the rest of the tutorials we have for you.
But first, what is AlgoKit?
AlgoKit is a developer toolbox for building on Algorand.
It provides a curated set of tools that work well together while still letting you stay in control. Use only what you need! Whether you’re writing a script, experimenting locally, or building a full application.
With support for TypeScript and Python, you can build smart contracts and interact with the chain using familiar languages, without losing access to lower-level primitives when needed.
Out of the box, AlgoKit provides:
- CLI (Command Line Interface) utilities for interacting with the network and managing projects
- A LocalNet environment for running a full Algorand network on your machine
- Language tooling for TypeScript and Python development
- Helpers and utilities for working with accounts, transactions, and assets
If you want to learn more about AlgoKit before diving in, check out the documentation linked below, and when you’re ready, head to the next section.
Prerequisites
Section titled “Prerequisites”Before installing AlgoKit, make sure you have the following:
- Python 3.12 or higher
- PipX
- Git
- Docker
- VSCode (recommended)
Recommended IDE (Intergrated Development Environment) Extensions
Section titled “Recommended IDE (Intergrated Development Environment) Extensions”To maximize your Algorand smart contract development experience, install dedicated Visual Studio Code extensions for Python and TypeScript. These extensions work alongside standard language servers to provide Algorand-specific validation, diagnostics, and code automation, so you get instant feedback and fixes as you write contracts.
The Algorand TypeScript language extension brings language server-powered capabilities to your smart contract authoring experience in Visual Studio Code. It extends the results from your installed TypeScript language server to provide Algorand TypeScript-specific diagnostics and code actions.
Requirements:
Section titled “Requirements:”- Visual Studio Code 1.80.0 or higher
- puya-ts 1.0.1 or higher
Quick Start
Section titled “Quick Start”-
Install this Algorand TypeScript language extension
-
Install the puya-ts package. We recommend adding it as a project dev dependency.
-
Enable the Algorand TypeScript language server (
algorandTypeScript.languageServer.enable) for your workspace (not required if using a new AlgoKit project) -
Open an Algorand TypeScript smart contract file (.algo.ts)
Configuration
Section titled “Configuration”Configure the language server with the following features:
-
algorandTypeScript.languageServer.enable: Enables the Algorand TypeScript language server. By default, the language server is disabled. -
algorandTypeScript.languageServer.logLevel: Configures the verbosity of the messages Algorand TypeScript language server displays in the output window.
For more details, refer to Typescript - Visual Studio Marketplace
The Algorand Python language extension brings language server-powered capabilities to your smart contract authoring experience in Visual Studio Code. It extends the results from your installed Python language server to provide Algorand Python-specific diagnostics and code actions.
Requirements:
Section titled “Requirements:”- Visual Studio Code 1.80.0 or higher
- Python extension for Visual Studio Code
- Python 3.12 or higher
- PuyaPy 5.3.0 or higher
Quick Start
Section titled “Quick Start”-
Install the Python extension for Visual Studio Code
-
Install the Algorand Python language extension
-
Install the PuyaPy package on your system. We recommend installing as a project dev dependency in your project venv.
-
Enable the Algorand Python language server (
algorandPython.languageServer.enable) for your workspace (not required if using a new AlgoKit project) -
Open a Python smart contract file (.py)
Configuration
Section titled “Configuration”Configure the language server with the following features:
-
algorandPython.languageServer.enable: Enables the Algorand Python language server. By default, the language server is disabled. -
algorandPython.languageServer.logLevel: Configures the verbosity of the messages Algorand Python language server displays in the output window. -
algorandPython.languageServer.debounceInterval: Configures the delay between receiving a code change and refreshing related diagnostics.
For more details, refer to Python - Visual Studio Marketplace
Install AlgoKit
Section titled “Install AlgoKit”-
To install AlgoKit, run the following command from a terminal.
pipx install algokit -
If you used AlgoKit before, update it with pipx:
pipx upgrade algokit -
After the installation completes, restart the terminal.
-
Ensure prerequisites are installed
-
Install Python3 using WinGet
- Install python 3.12:
winget install python.python.3.12 -
Restart the terminal to ensure Python and pip are available on the path
-
Install pipx:
pip install --user pipxpython -m pipx ensurepath -
Restart the terminal to ensure pipx is available on the path
-
Install AlgoKit via pipx:
pipx install algokit -
If you used AlgoKit before, update it with pipx:
pipx upgrade algokit -
Restart the terminal to ensure AlgoKit is available on the path
-
Ensure prerequisites are installed
-
Install AlgoKit with
pipxby running the following command from a terminal.pipx install algokit -
If you used AlgoKit before, update it with pipx:
pipx upgrade algokit -
After the installation completes, restart the terminal.
Verify the Installation
Section titled “Verify the Installation”To verify AlgoKit is installed correctly, run the following command:
algokit --versionOutput similar to the following should be displayed:
algokit, version 2.6.0Start a LocalNet
Section titled “Start a LocalNet”When building smart contracts, it is recommended to build and test on a local Algorand blockchain running on your computer first. Deploying and calling smart contracts on MainNet (the live public blockchain for production) costs real money. Deploying on TestNet (a replica of MainNet for testing) can slow down the iteration cycle of early projects. Therefore, it is recommended to first test on a local blockchain. Once everything works, move to TestNet for final testing, and then deploy to MainNet to launch your application.
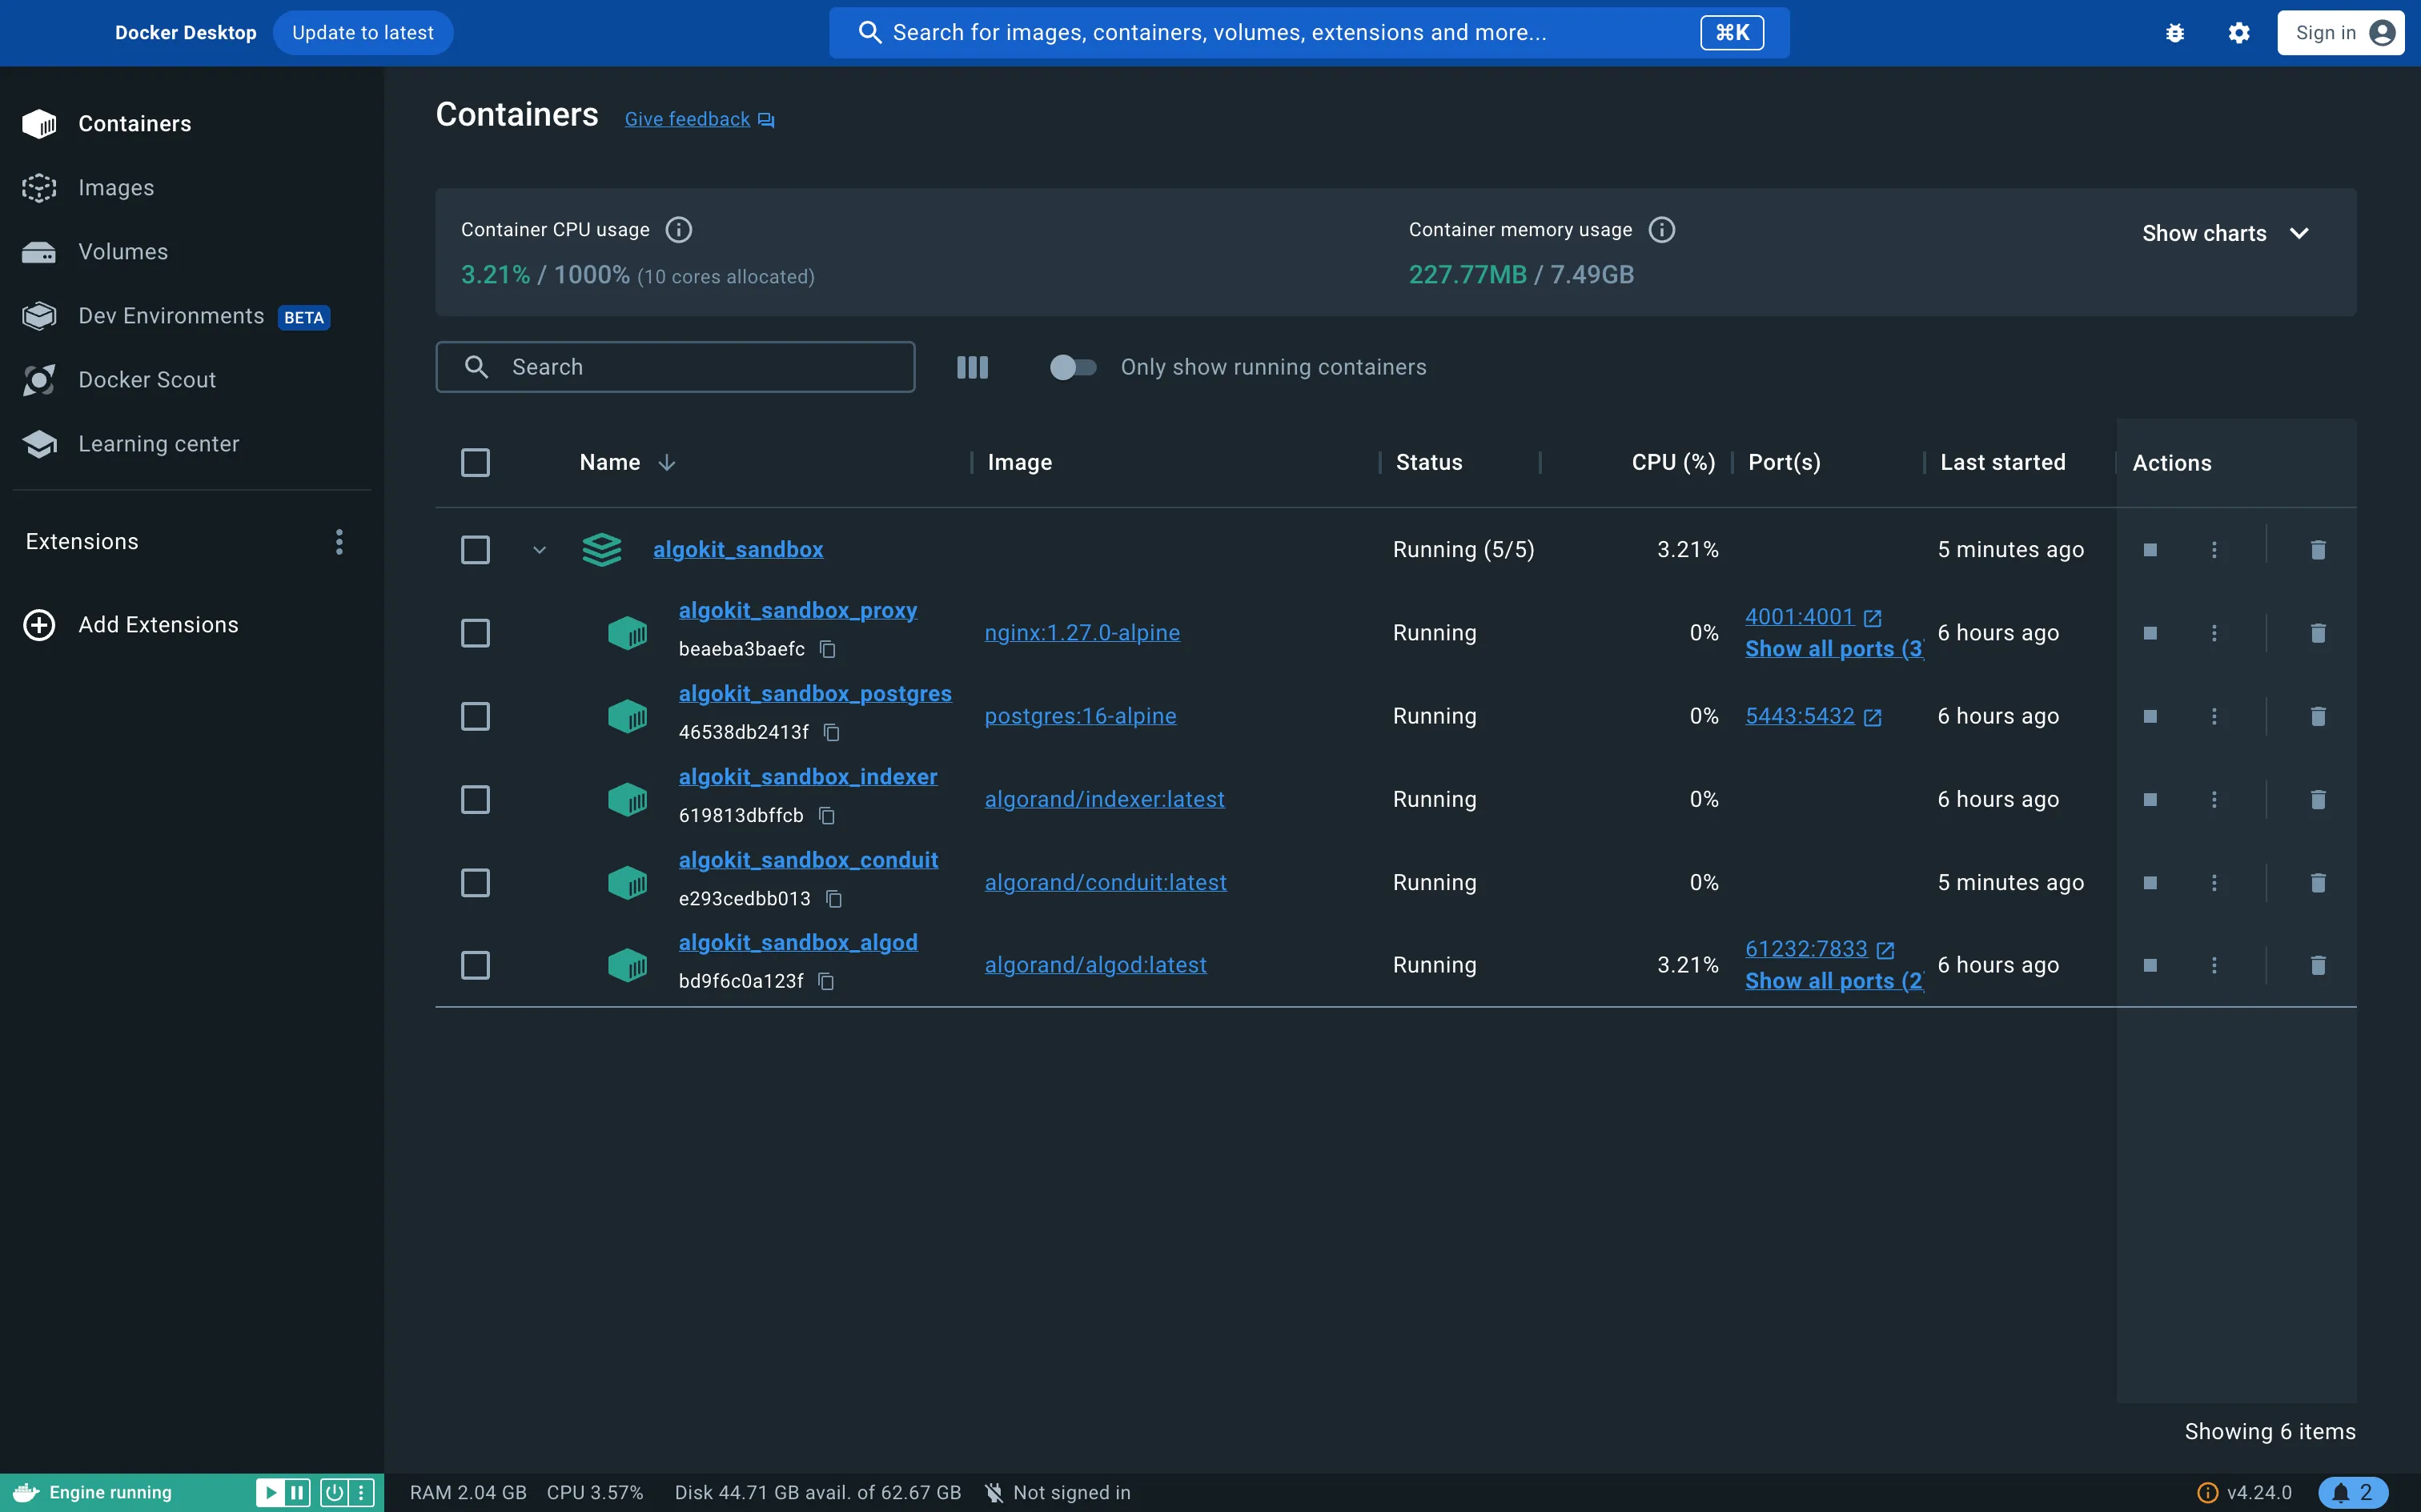
AlgoKit supports using a local version of the Algorand blockchain. To start an instance of this LocalNet, first open Docker Desktop on your computer and then run the following command from the terminal:
algokit localnet startThis should start an instance of the LocalNet within Docker. If you open the Docker Desktop application, you should see something similar to the following:
Create an AlgoKit project
Section titled “Create an AlgoKit project”Now, let’s create an Algorand project with AlgoKit. We will refer to these projects as “AlgoKit projects.” AlgoKit provides a series of templates for you to use depending on the type of project you want to create.
This guide will walk you through using either the TypeScript or Python smart contract starter template. Choose the language that you are most comfortable with.
For this guide, we will use the TypeScript smart contract starter template.
-
To create a new AlgoKit project, you can easily do so by running:
algokit initThis launches an interactive setup. You will first be prompted to select the type of project you want to create. For this quick start guide, we will use the TypeScript smart contract template, so select the Smart Contracts option.

AlgoKit Init: Select project template -
Next, AlgoKit will ask you what programming language you want to use for the smart contract. Let’s select TypeScript as our smart contract language by pressing Enter.

AlgoKit Init: Select smart contract language -
Then AlgoKit will ask you for the name of the project. Let’s name it hello-algorand, but if you want to name it differently, feel free to do so! After entering the name, press Enter to continue.

AlgoKit Init: Specifying folder name -
Next, you can set the name of the smart contract. We will keep it as it is for now.

AlgoKit Init : Naming the smart contract app -
Next, you can select the template preset. The Starter preset is for quickly implementing and testing certain features, whereas the Production preset is for production-ready applications. For this guide, let’s select Starter.
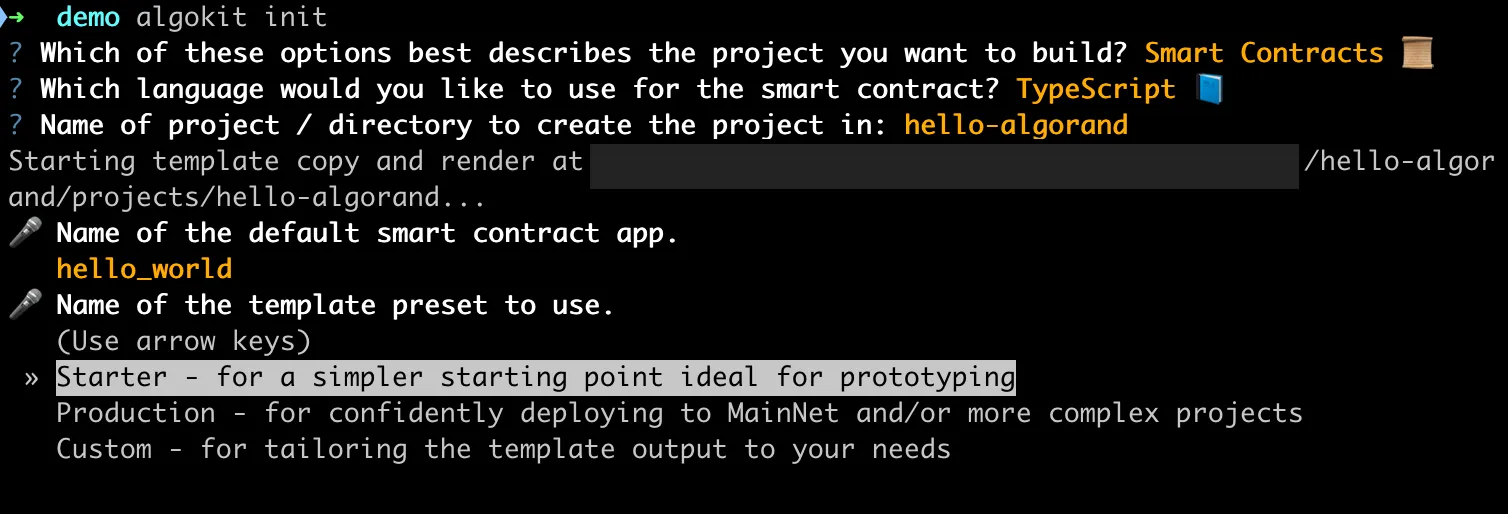
AlgoKit Init: Select template preset -
Then choose whether you want to run the
algokit project bootstrapcommand to install the necessary dependencies. Say yes by pressing “y”. This process can take a few minutes.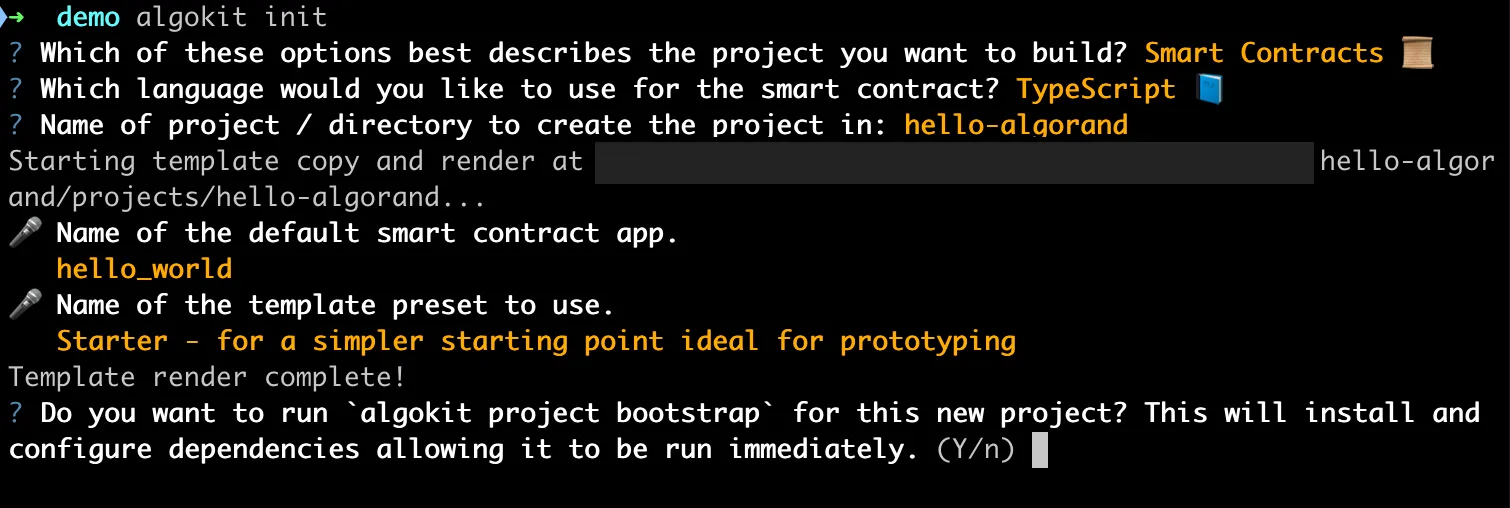
AlgoKit Init: Running the bootstrap command -
Finally, AlgoKit will ask you if you want to initialize a Git repository. Let’s say yes by pressing “y” so that we can easily push our AlgoKit project to GitHub.

AlgoKit Init: Initialize Git repository -
Once finished, VS Code should automatically be opened with the initialized project if VS Code is set as your default editor. If not,
cdinto the project directory and open the project in your IDE of choice. -
This starter app contains one smart contract written in Algorand TypeScript named
HelloWorldin thesmart_contracts/hello_world/contract.algo.tsfile. The contract has a method calledhellothat takes in aStringand returns aString.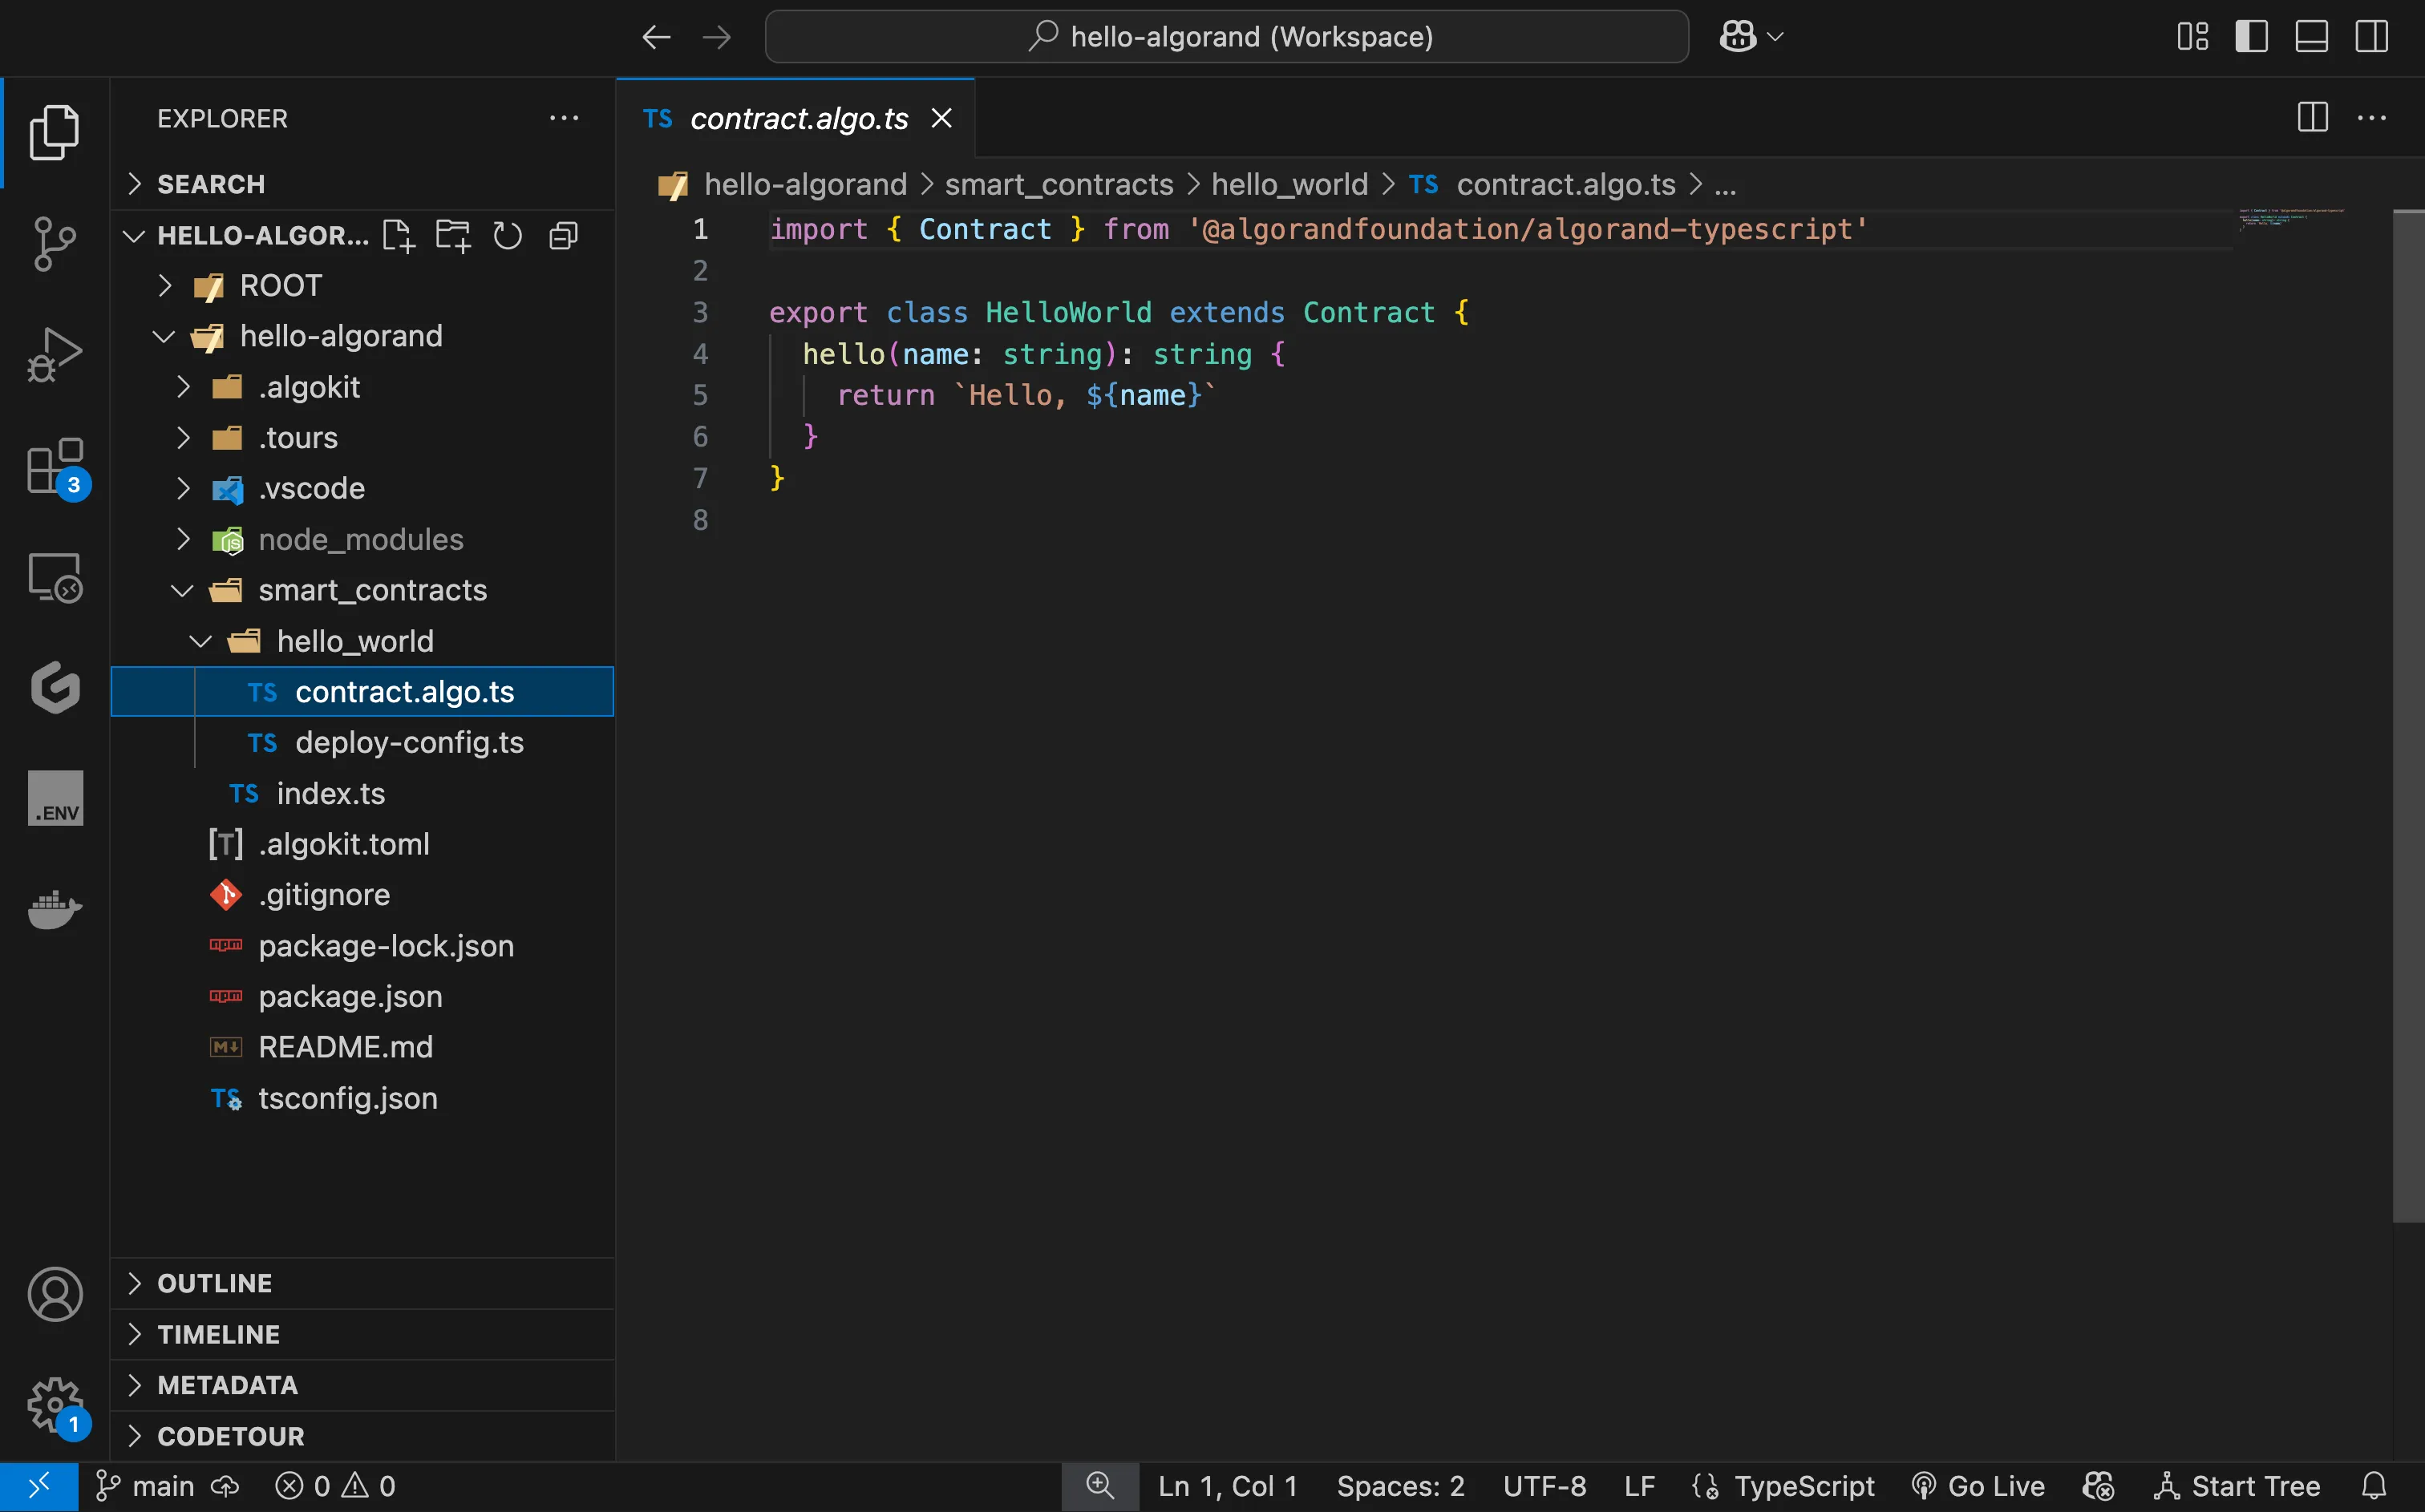
AlgoKit Starter Contract
For this guide, we will use the Python smart contract starter template.
-
To create a new AlgoKit project, you can easily do so by running:
algokit initThis will launch a guided menu system to create a specific project tailored to your needs. You will first be prompted to select the type of project you want to create. For this quick start guide, we will use the Python smart contract template, so select the Smart Contracts option.
AlgoKit Init: Select project template -
Next, AlgoKit will ask you what programming language you want to use for the smart contract. Let’s select Python as our smart contract language by pressing Enter.

AlgoKit Init: Select smart contract language -
Then AlgoKit will ask you for the name of the project. Let’s name it hello-algorand, but if you want to name it differently, feel free to do so! After writing the name, press Enter to continue.

AlgoKit Init: Specifying folder name -
Next, you can set the name of the smart contract. We will keep it as it is for now.
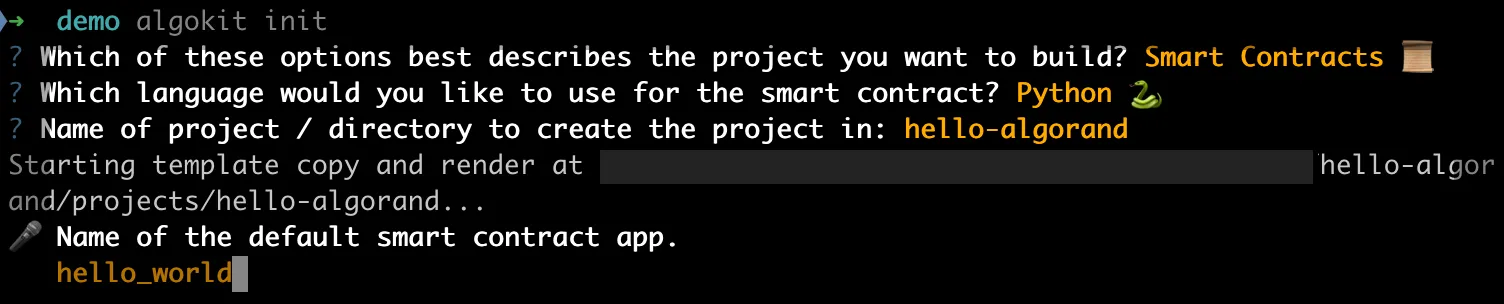
AlgoKit Init : Naming the smart contract app -
Next, you can select the template preset. The Starter preset is for quickly implementing and testing certain features, whereas the Production preset is for production-ready applications. For this guide, let’s select Starter.
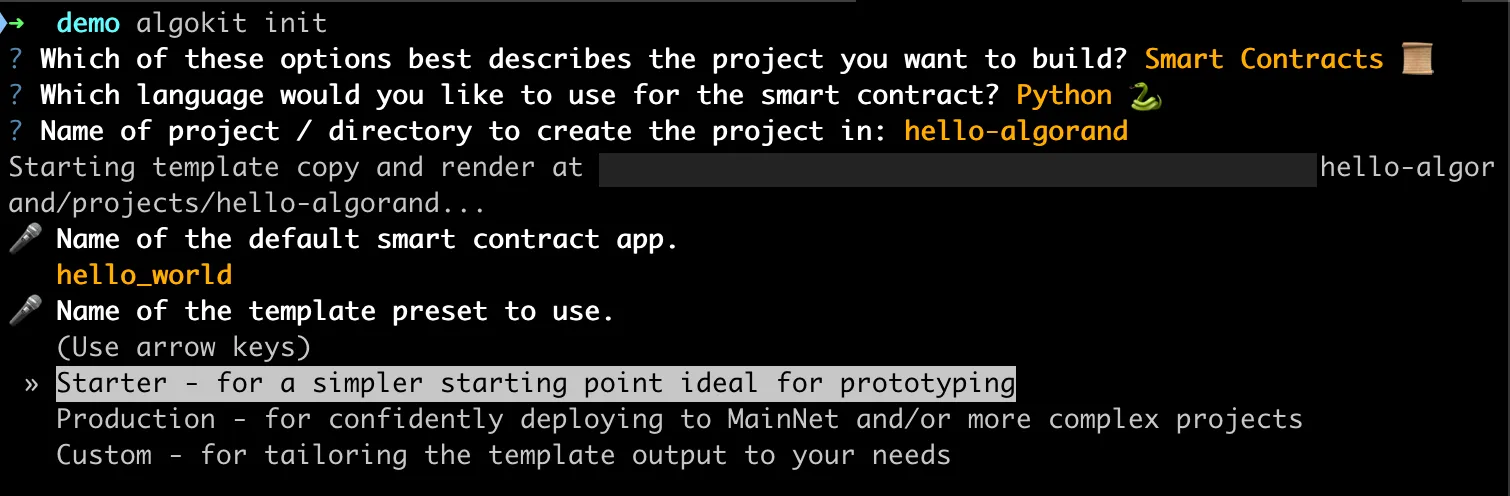
AlgoKit Init: Select template preset -
You’ll be prompted to choose what language you want to use for contract deployment. After writing your smart contract, you need to deploy and call the contract either from your frontend or backend. Since your deployment and interaction scripts are written in Python, select Python for this guide.

AlgoKit Init: Selecting language for contract deployment script -
Then choose whether you want to run the
algokit project bootstrapcommand to install the necessary dependencies. Say yes by pressing “y”. This process can take a few minutes.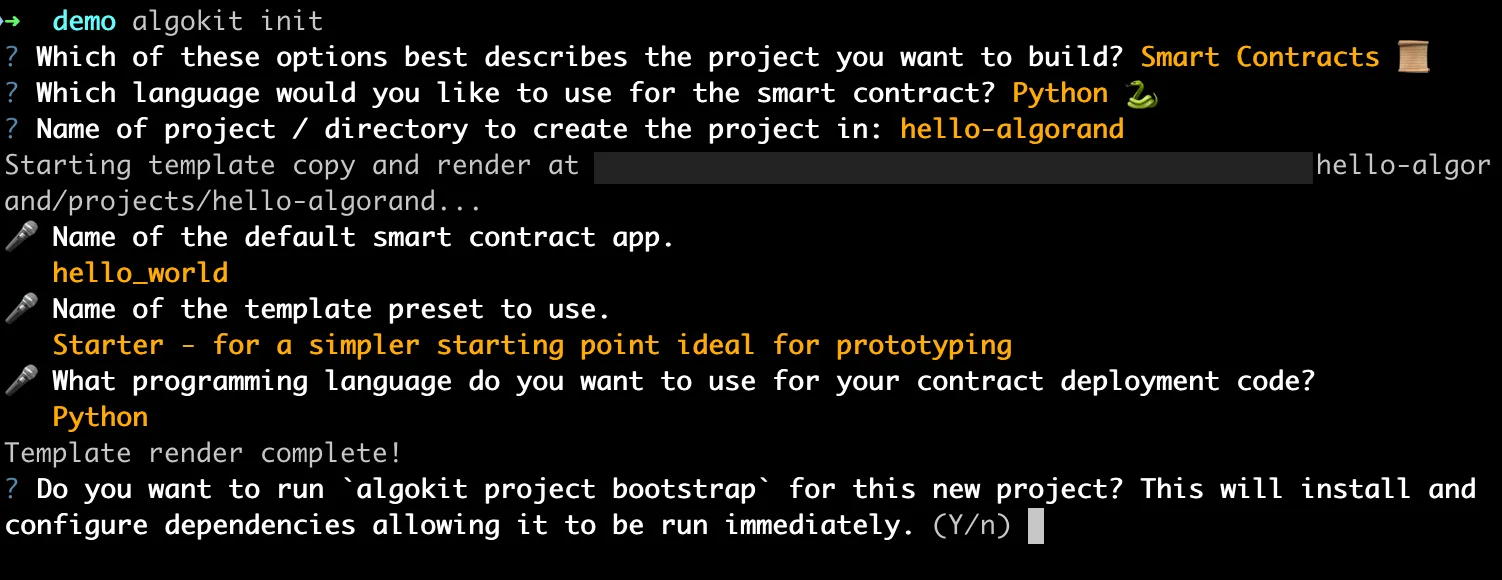
AlgoKit Init: Running the bootstrap command -
Finally, AlgoKit will ask you if you want to initialize a Git repository. Let’s say yes by pressing “y” so that we can easily push our AlgoKit project to GitHub.

AlgoKit Init: Initialize Git repository -
Once finished, VS Code should automatically be opened with the initialized project if VS Code is set as your default editor. If not,
cdinto the project directory and open the project in your IDE of choice. -
This starter app contains one smart contract written in Algorand Python named
HelloWorldin thesmart_contracts/hello_world/contract.pyfile. The contract has a method calledhellothat takes in aStringand returns aString.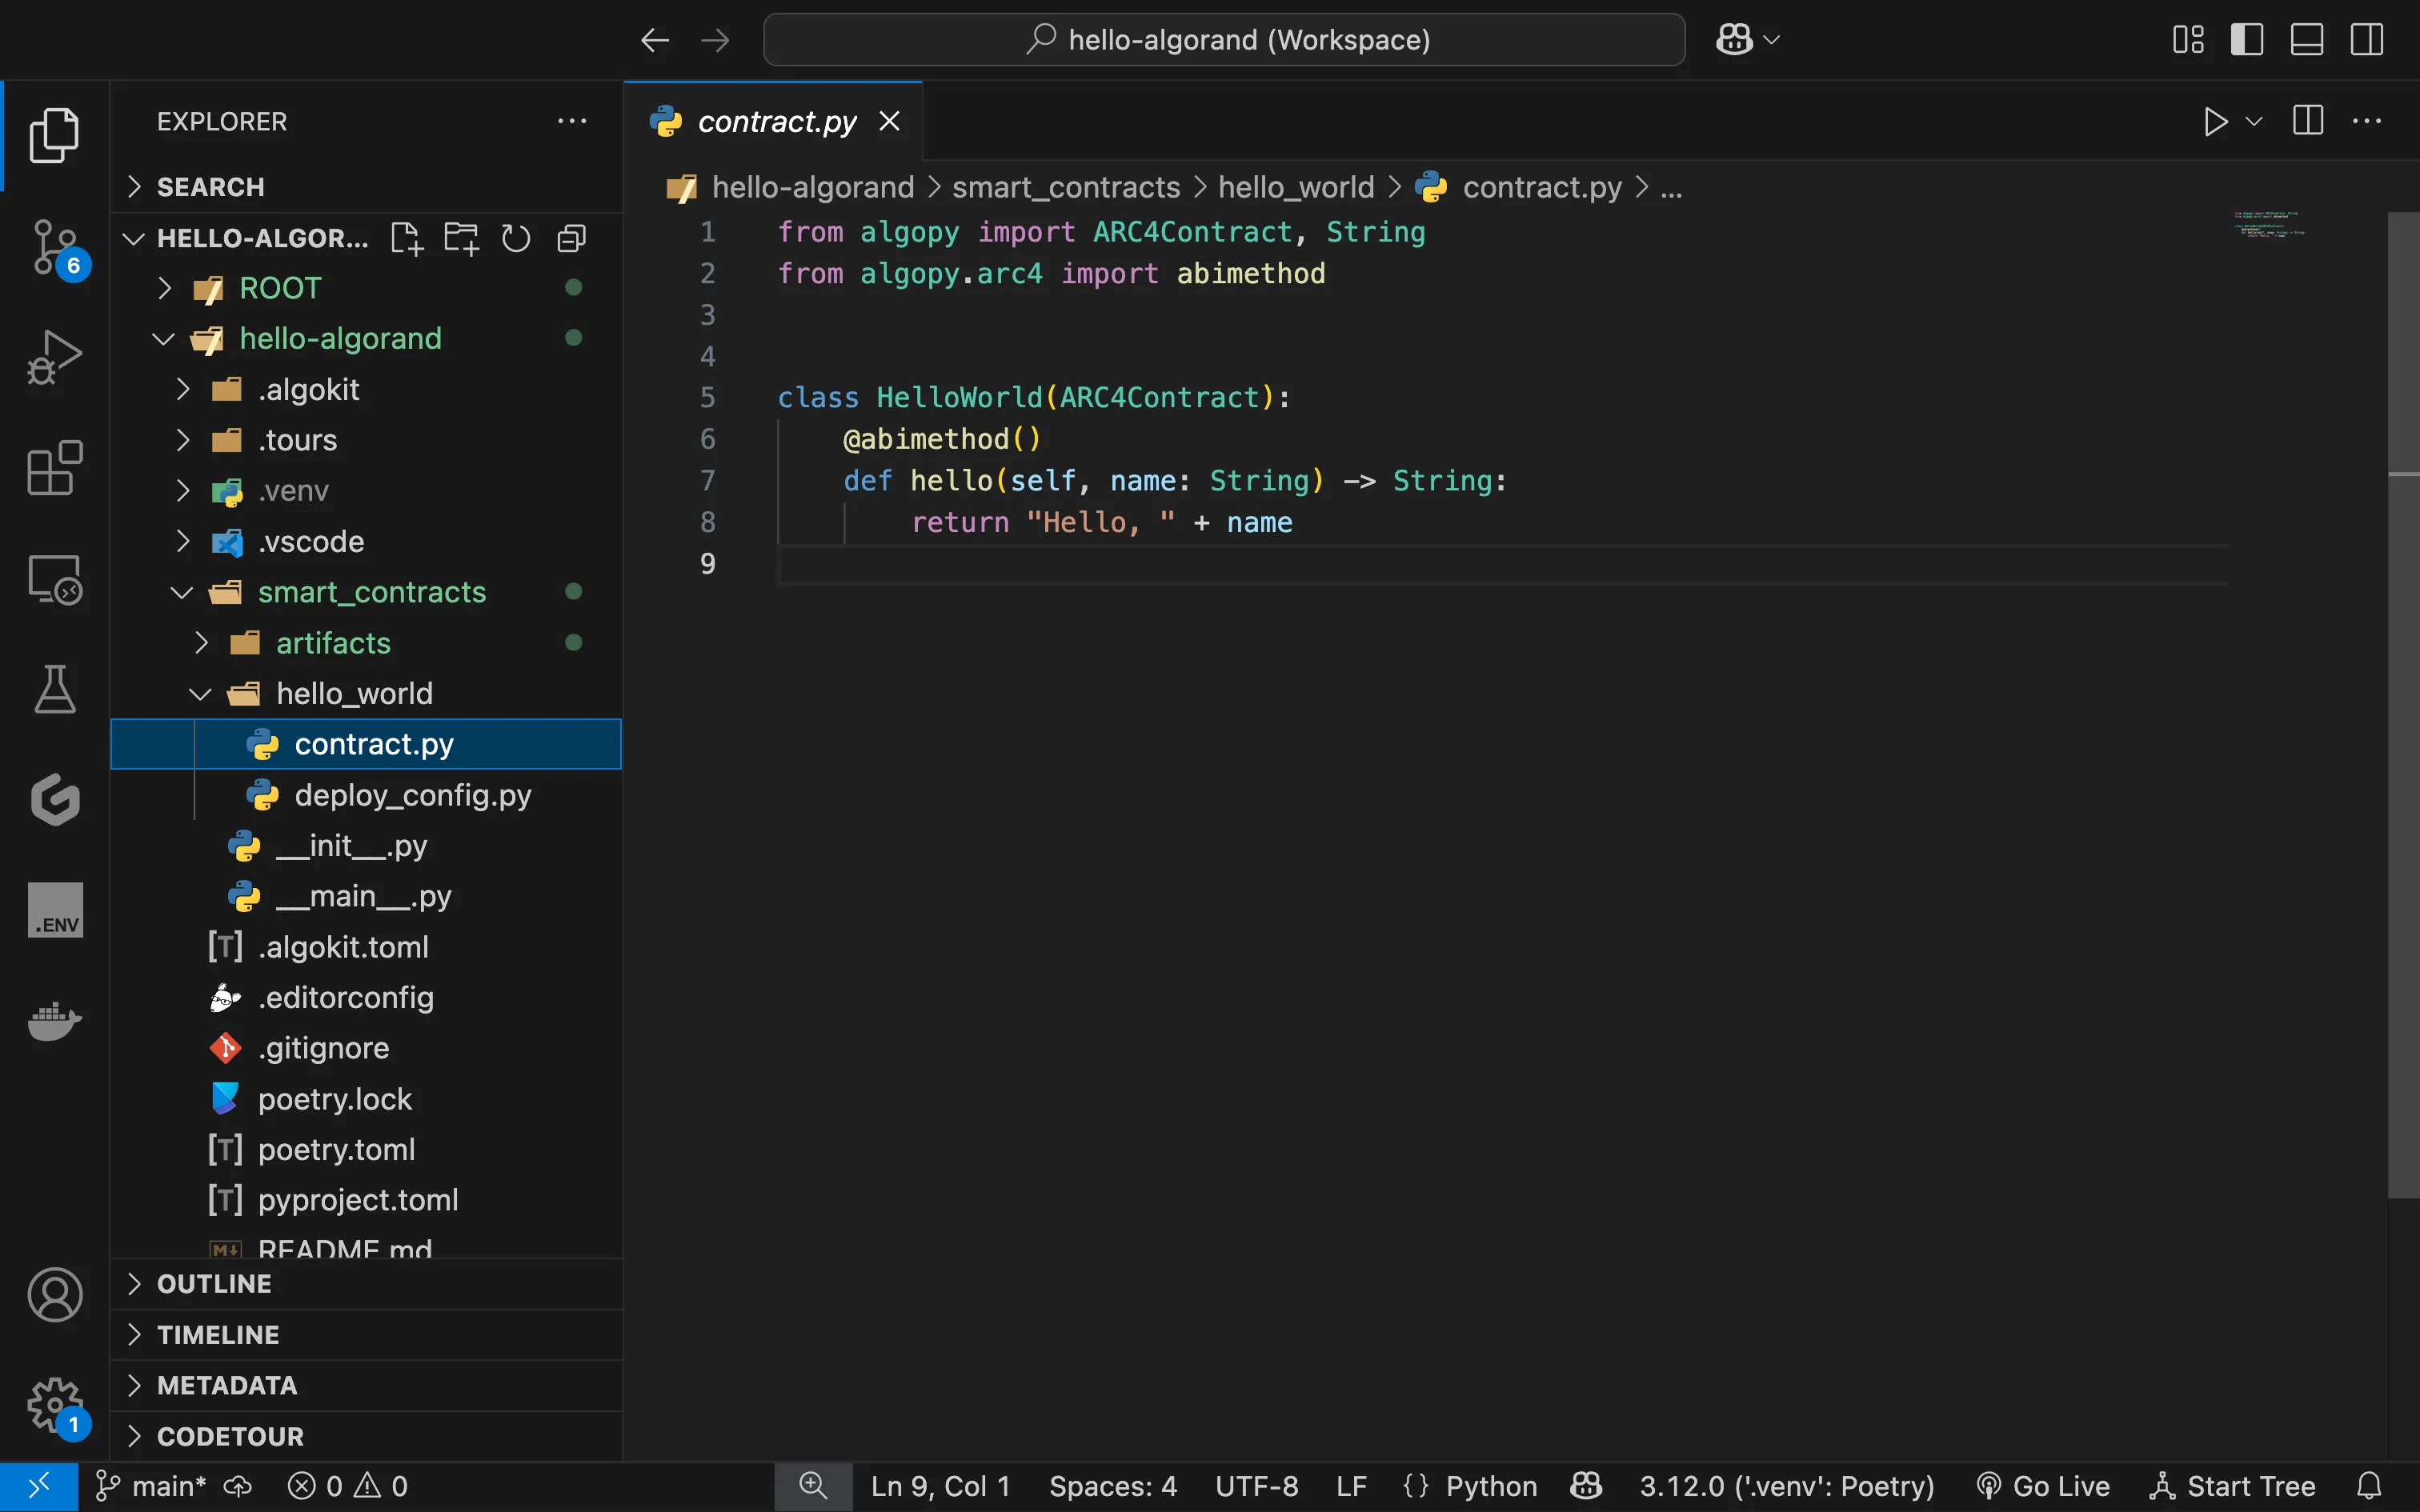
AlgoKit Starter Contract
Before Moving On
Section titled “Before Moving On”At this point, you should have:
- A running LocalNet
- A generated project
- Dependencies installed
If not, go back and double check the above steps before continuing.
Next Steps
Section titled “Next Steps”Great work! Now your machine should be set up with everything you need to build using AlgoKit.
We will return to this Smart contract template later on in this tutorial series, but first, we are going to take a look at one more tool that will help you throughout your development journey: (Live Onchain Resource Analyzer). When you’re ready, head to the next section.