Keys and Signing
Algorand uses Ed25519 elliptic-curve signatures to ensure high-speed, secure cryptographic operations. Every account in Algorand is built upon a public/private key pair, which plays a crucial role in signing and verifying transactions. To simplify key management and enhance security, Algorand provides various tools and transformations to make key handling more accessible to developers and end users.
This guide explores how public and private key pairs are generated and transformed into user-friendly formats like Algorand addresses, base64 private keys, and mnemonics. It also covers various methods for signing transactions, including direct key management through command-line tools like Algokey, programmatic signing using AlgoKit Utils in Python and TypeScript, and wallet-based signing with Pera Wallet integration.
By understanding these key management and signing methods, developers can ensure secure and efficient transactions on the Algorand network.
Keys and Addresses
Section titled “Keys and Addresses”Algorand uses Ed25519 high-speed, high-security elliptic-curve signatures. The keys are produced through standard, open-source cryptographic libraries packaged with each of the SDKs. The key generation algorithm takes a random value as input and outputs two 32-byte arrays, representing a public key and its associated private key. These are also referred to as a public/private key pair. These keys perform essential cryptographic functions like signing data and verifying signatures.
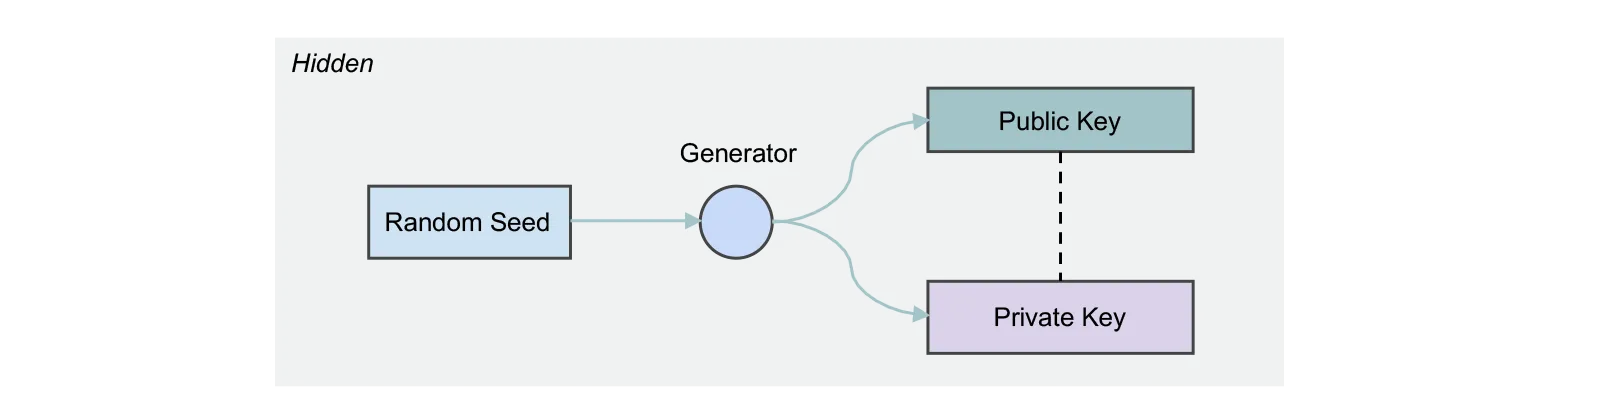
For reasons that include the need to make the keys human-readable and robust to human error when transferred, both the public and private keys transform. The output of these transformations is what most developers, and usually all end-users, see. The Algorand developer tools actively seek to mask the complexity involved in these transformations. So unless you are a protocol-level developer modifying cryptographic-related source code, you may never actually encounter the actual public/private key pair.
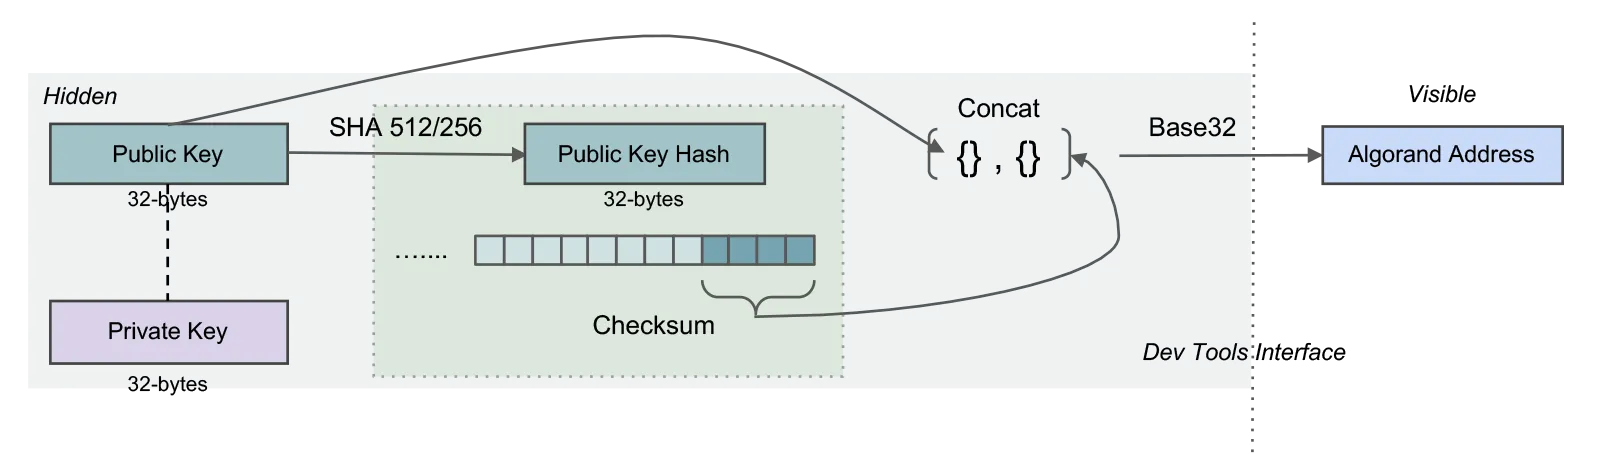
Transformation: Public Key to Algorand Address
Section titled “Transformation: Public Key to Algorand Address”The public key is transformed into an Algorand address by adding a 4-byte checksum to the end of the public key and then encoding it in base32. The result is what the developer and end-user recognize as an Algorand address. The address is 58 characters long.
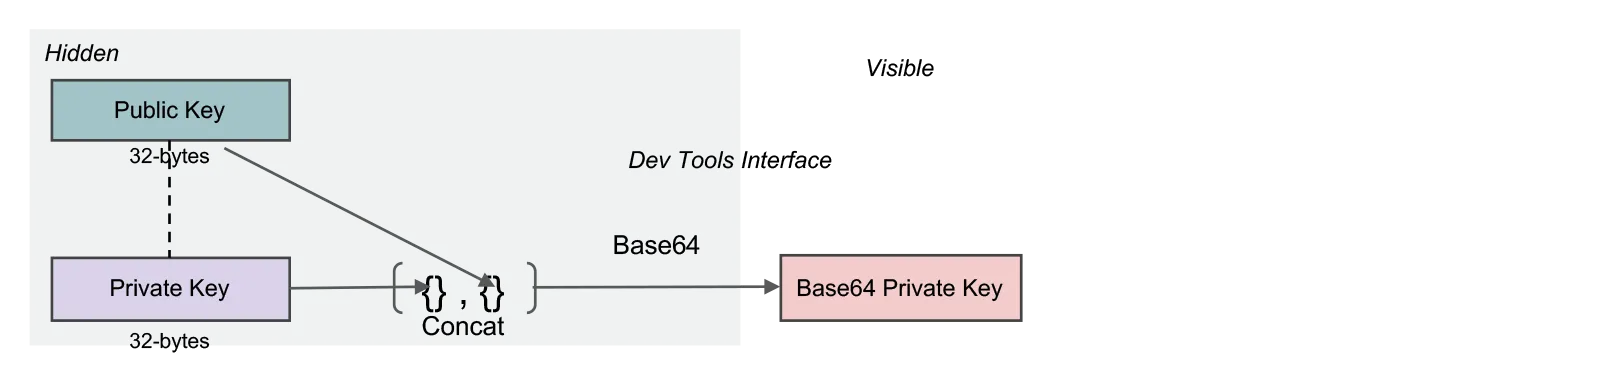
Transformation: Private Key to base64 private key
Section titled “Transformation: Private Key to base64 private key”A base64 encoded concatenation of the private and public keys is a representation of the private key most commonly used by developers interfacing with the SDKs. It is likely not a representation familiar to end users.
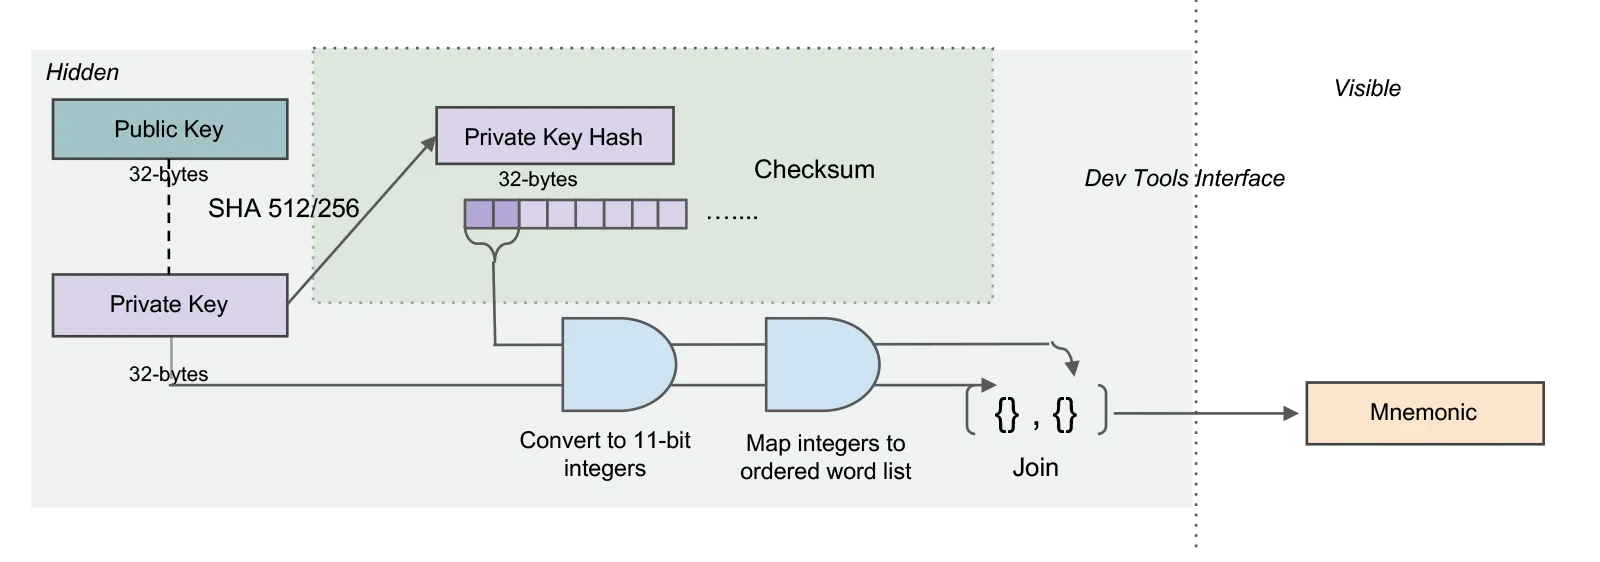
Transformation: Private Key to 25-word mnemonic
Section titled “Transformation: Private Key to 25-word mnemonic”The 25-word mnemonic is the most user-friendly representation of the private key. It is generated by converting the private key bytes into 11-bit integers and then mapping those integers to the bip-0039 English word list, where integer n maps to the word in the nth position in the list. By itself, this creates a 24-word mnemonic. A checksum is added by taking the first two bytes of the hash of the private key and converting them to 11-bit integers and then to their corresponding word in the word list. This word is added to the end of the 24 words to create a 25-word mnemonic.
This representation is called the private key mnemonic. You may also see it referred to as a passphrase.
To manage keys of an Algorand account and use them for signing, there are several methods and tools available. Here’s an overview of key management and signing processes:
Signing using accounts
Section titled “Signing using accounts”Using algokey
Section titled “Using algokey”Algokey is a command-line tool provided by Algorand for managing cryptographic keys. It enables users to generate, export, import, and sign transactions using private keys. To sign a transaction, users need access to their private key, either in the form of a keyfile or mnemonic phrase. The signed transaction can then be submitted to the Algorand network for validation and execution. This process ensures that transactions remain tamper-proof and are executed only by authorized entities. To sign a transaction using an account with algokey, you can use the following command.
algokey sign -t transaction.txn -k private_key.key -o signed_transaction.stxnUsing Algokit utils
Section titled “Using Algokit utils”AlgoKit Utils simplifies the management of standalone Algorand accounts, signing in both Python and TypeScript by abstracting the complexities of Algorand SDKs, allowing developers to generate new accounts, retrieve existing ones, and manage private keys securely. It also streamlines transaction signing by providing flexible signer management options:
Default signer
Section titled “Default signer”A default signer is used when no specific signer is provided. This helps streamline transaction signing processes, making it easier for developers to handle transactions without manually specifying signers each time.
"""Sets the default signer to use if no other signer is specified.If this isn't set and a transaction needs signing for a given sender then an errorwill be thrown from get_signer / get_account."""algorand_client.account.set_default_signer(account_a.signer)/** * Set up a default signer for transactions. * This will be used when no specific signer is provided. */algorand.account.setDefaultSigner(randomAccountA)Multiple signers
Section titled “Multiple signers”In certain use cases, multiple signers may be required to approve a transaction. This is particularly relevant in scenarios involving multi-signature accounts, where different parties must authorize transactions before they can be executed.
The below code registers multiple transaction signers at once. The setSignerFromAccount function tracks the given account for later signing. However, if you are generating accounts via the various methods on AccountManager (like random, fromMnemonic, logicsig, etc.) then they automatically get tracked.
"""Register multiple transaction signers at once.Demonstrates the fluent interface for registering signers."""algorand_client.account.set_signer_from_account(account_a)algorand_client.account.set_signer_from_account(account_b)algorand_client.account.set_signer_from_account(account_c)/** * Register multiple transaction signers at once. * Demonstrates the fluent interface for registering signers. */algorand.account .setSignerFromAccount(randomAccountA) .setSignerFromAccount(randomAccountB) .setSignerFromAccount(randomAccountC)Get signer
Section titled “Get signer”Get signer helps to retrieve the Transaction Signer for the given sender address, ready to sign a transaction for that sender.If no signer has been registered for that address then the default signer is used if registered and if not then an error is thrown.
"""Returns the TransactionSigner for the given sender address.If no signer has been registered for that address then the default signer is used if registered."""signer = algorand_client.account.get_signer(account_a.address)/** * Retrieve a transaction signer for a specific address. * Returns the registered signer or throws if none is found. */const signer = algorand.account.getSigner('ACCOUNT_ADDRESS')Override signer
Section titled “Override signer”Create an unsigned payment transaction and manually sign it. The transaction signer can be specified in the second argument to addTransaction.
account_a_signer = algorand_client.account.get_signer(account_b.address)
"""Create an unsigned payment transaction and manually sign it."""payment_txn = algorand_client.create_transaction.payment(    PaymentParams(        sender=account_a.address,        receiver=account_b.address,        amount=AlgoAmount(algo=1),        note=b"Payment from A to B",    ))
"""The transaction signer can be overridden in the second argument to `add_transaction`"""algorand_client.new_group().add_transaction( transaction=payment_txn, signer=account_a_signer).send()/** * Create an unsigned payment transaction and manually sign it. */
const accountASigner = algorand.account.getSigner('ACCOUNT_ADDRESS')
const paymentTxn = await algorand.createTransaction.payment({ sender: randomAccountA, receiver: randomAccountB, amount: algo(1), note: 'Payment from A to B',})
// The transaction signer can be overridden in the second argument to `addTransaction`const txnGroup = algorand.newGroup().addTransaction(paymentTxn, accountASigner)await txnGroup.send()Signing using Logic Signatures
Section titled “Signing using Logic Signatures”Logic signatures provide a programmable way to authorize transactions on the Algorand blockchain. Instead of relying solely on private key-based signatures, LogicSigs allow transaction approvals based on predefined conditions encoded in TEAL. It allow users to delegate signature authority without exposing their private key. LogicSigs allow fine-grained control over spending by defining transaction rules such as only allowing transfers to specific recipient addresses.
Only use smart signatures when absolutely required. In most cases, it is preferrable to use smart contract escrow accounts over smart signatures as smart signatures require the logic to be supplied for every transaction.
Signing using wallets
Section titled “Signing using wallets”Using UseWallet Library
Section titled “Using UseWallet Library”The UseWallet library provides an easy way to integrate multiple Algorand wallets, including Pera Wallet, without handling low-level SDK interactions. It simplifies connecting wallets, signing transactions, and sending them using a minimal setup.
To integrate Pera Wallet and other Algorand wallets with minimal setup, follow these steps:
- Install UseWallet using the command:
npm install @txnlab/use-wallet - Configure UseWallet Provider by wrapping your application in the
UseWalletProviderto enable wallet connections. - The useWallet hook provides two methods for signing Algorand transactions:
signTransactionsandtransactionSigner.
HD wallet
Section titled “HD wallet”(coming soon)