This is the full developer documentation for Algorand Developer Portal
# Algorand Developer Portal
> Everything you need to build solutions powered by the Algorand blockchain network.
Start your journey today
## Become an Algorand Developer
Follow our quick start guide to install Algorand’s developer toolkit and go from zero to deploying your "Hello, world" smart contract in mere minutes using TypeScript or Python pathways.
[Install AlgoKit](getting-started/algokit-quick-start)
### [AlgoKit code tutorials](https://tutorials.dev.algorand.co)
[Step-by-step introduction to Algorand through Utils TypeScript.](https://tutorials.dev.algorand.co)
### [Example gallery](https://examples.dev.algorand.co)
[Explore and launch batteries-included example apps.](https://examples.dev.algorand.co)
### [Connect in Discord](https://discord.gg/algorand)
[Meet other devs and get code support from the community.](https://discord.gg/algorand)
### [Contact the Foundation](https://algorand.co/algorand-foundation/contact)
[Reach out to the team directly with technical inquiries.](https://algorand.co/algorand-foundation/contact)
Join the network
## Run an Algorand node
[Install your node](/nodes/overview/)
Join the Algorand network with a validator node using accessible commodity hardware in a matter of minutes. Experience how easy it is to become a node-runner so you can participate in staking rewards, validate blocks, submit transactions, and read chain data.
# AlgoKit Compile
The AlgoKit Compile feature enables you to compile smart contracts (apps) and smart signatures (logic signatures) written in a supported high-level language to a format deployable on the Algorand Virtual Machine (AVM).
When running the compile command, AlgoKit will take care of working out which compiler you need and dynamically resolve it. Additionally, AlgoKit will detect if a matching compiler version is already installed globally on your machine or is included in your project and use that.
## Prerequisites
See [Compile Python - Prerequisites](#prerequisites-1) for details.
## What is Algorand Python & PuyaPy?
Algorand Python is a semantically and syntactically compatible, typed Python language that works with standard Python tooling and allows you to express smart contracts (apps) and smart signatures (logic signatures) for deployment on the Algorand Virtual Machine (AVM).
Algorand Python can be deployed to Algorand by using the PuyaPy optimising compiler, which takes Algorand Python and outputs [ARC-32](https://github.com/algorandfoundation/ARCs/blob/main/ARCs/arc-0032) application spec files (among other formats) which, [when deployed](https://github.com/algorandfoundation/algokit-cli/blob/main/docs/generate#1-typed-clients), will result in AVM bytecode execution semantics that match the given Python code.
If you want to learn more, check out the [PuyaPy docs](https://github.com/algorandfoundation/puya/blob/main/docs/index).
Below is an example Algorand Python smart contract.
```py
from algopy import ARC4Contract, arc4
class HelloWorldContract(ARC4Contract):
@arc4.abimethod
def hello(self, name: arc4.String) -> arc4.String:
return "Hello, " + name
```
For more complex examples, see the [examples](https://github.com/algorandfoundation/puya/tree/main/examples) in the [PuyaPy repo](https://github.com/algorandfoundation/puya).
## Usage
Available commands and possible usage are as follows:
```plaintext
Usage: algokit compile [OPTIONS] COMMAND [ARGS]...
Compile smart contracts and smart signatures written in a supported high-level language to a format deployable on
the Algorand Virtual Machine (AVM).
Options:
-v, --version TEXT The compiler version to pin to, for example, 1.0.0. If no version is specified, AlgoKit checks
if the compiler is installed and runs the installed version. If the compiler is not installed,
AlgoKit runs the latest version. If a version is specified, AlgoKit checks if an installed
version matches and runs the installed version. Otherwise, AlgoKit runs the specified version.
-h, --help Show this message and exit.
Commands:
py Compile Algorand Python contract(s) using the PuyaPy compiler.
python Compile Algorand Python contract(s) using the PuyaPy compiler.
```
### Compile Python
The command `algokit compile python` or `algokit compile py` will run the [PuyaPy](https://github.com/algorandfoundation/puya) compiler against the supplied Algorand Python smart contract.
All arguments supplied to the command are passed directly to PuyaPy, therefore this command supports all options supported by the PuyaPy compiler.
Any errors detected by PuyaPy during the compilation process will be printed to the output.
#### Prerequisites
PuyaPy requires Python 3.12+, so please ensure your Python version satisfies this requirement.
This command will attempt to resolve a matching installed PuyaPy compiler, either globally installed in the system or locally installed in your project (via [Poetry](https://python-poetry.org/)). If no appropriate match is found, the PuyaPy compiler will be dynamically run using [pipx](https://pipx.pypa.io/stable/). In this case pipx is also required.
#### Examples
To see a list of the supported PuyaPy options, run the following:
```shell
algokit compile python -h
```
To determine the version of the PuyaPy compiler in use, execute the following command:
```shell
algokit compile python --version
```
To compile a single Algorand Python smart contract and write the output to a specific location, run the following:
```shell
algokit compile python hello_world/contract.py --out-dir hello_world/out
```
To compile multiple Algorand Python smart contracts and write the output to a specific location, run the following:
```shell
algokit compile python hello_world/contract.py calculator/contract.py --out-dir my_contracts
```
To compile a directory of Algorand Python smart contracts and write the output to the default location, run the following:
```shell
algokit compile python my_contracts
```
# AlgoKit Completions
AlgoKit supports shell completions for zsh and bash shells, e.g.
**bash**
```plaintext
$ algokit
bootstrap completions config doctor explore goal init sandbox
```
**zsh**
```plaintext
$ ~ algokit
bootstrap -- Bootstrap AlgoKit project dependencies.
completions -- Install and Uninstall AlgoKit shell integration.
config -- Configure AlgoKit options.
doctor -- Run the Algorand doctor CLI.
explore -- Explore the specified network in the...
goal -- Run the Algorand goal CLI against the AlgoKit Sandbox.
init -- Initializes a new project.
sandbox -- Manage the AlgoKit sandbox.
```
## Installing
To setup the completions, AlgoKit provides commands that will modify the current users interactive shell script (`.bashrc`/`.zshrc`).
> **Note** If you would prefer AlgoKit to not modify your interactive shell scripts you can install the completions yourself by following the instructions [here](https://click.palletsprojects.com/en/8.1.x/shell-completion/).
To [install](../cli/index#install) completions for the current shell execute `algokit completions install`. You should see output similar to below:
```plaintext
$ ~ algokit completions install
AlgoKit completions installed for zsh 🎉
Restart shell or run `. ~/.zshrc` to enable completions
```
After installing the completions don’t forget to restart the shell to begin using them!
## Uninstalling
To [uninstall](../cli/index#uninstall) completions for the current shell run `algokit completions uninstall`:
```plaintext
$ ~ algokit completions uninstall
AlgoKit completions uninstalled for zsh 🎉
```
## Shell Option
To install/uninstall the completions for a specific [shell](../cli/index#shell) the `--shell` option can be used e.g. `algokit completions install --shell bash`.
To learn more about the `algokit completions` command, please refer to [completions](../cli/index#completions) in the AlgoKit CLI reference documentation.
# AlgoKit Config
The `algokit config` command allows you to manage various global settings used by AlgoKit CLI. This feature is essential for customizing your AlgoKit environment to suit your needs.
## Usage
This command group provides a set of subcommands to configure AlgoKit settings. Subcommands
* `version-prompt`: Configure the version prompt settings.
* `container-engine`: Configure the container engine settings.
### Version Prompt Configuration
```zsh
$ algokit config version-prompt [OPTIONS]
```
This command configures the version prompt settings for AlgoKit.
* `--enable`: Enable the version prompt.
* `--disable`: Disable the version prompt.
### Container Engine Configuration
```zsh
$ algokit config container-engine [OPTIONS]
```
This command configures the container engine settings for AlgoKit.
* `--engine`, -e: Specify the container engine to use (e.g., Docker, Podman). This option is required.
* `--path`, -p: Specify the path to the container engine executable. Optional.
## Further Reading
For in-depth details, visit the [configuration section](../cli/index#config) in the AlgoKit CLI reference documentation.
# AlgoKit TestNet Dispenser
The AlgoKit Dispenser feature allows you to interact with the AlgoKit TestNet Dispenser. This feature is essential for funding your wallet with TestNet ALGOs, refunding ALGOs back to the dispenser wallet, and getting information about current fund limits on your account.
## Usage
```zsh
$ algokit dispenser [OPTIONS] COMMAND [ARGS]...
```
This command provides a set of subcommands to interact with the AlgoKit TestNet Dispenser. Subcommands
* `login`: Login to your Dispenser API account.
* `logout`: Logout of your Dispenser API account.
* `fund`: Fund your wallet address with TestNet ALGOs.
* `refund`: Refund ALGOs back to the dispenser wallet address.
* `limit`: Get information about current fund limits on your account.
### API Documentation
For detailed API documentation, visit the [AlgoKit Dispenser API](https://github.com/algorandfoundation/algokit/blob/main/docs/testnet_api) documentation.
### CI Access Token
All dispenser commands can work in CI mode by using a CI access token that can be generated by passing `--ci` flag to `login` command. Once a token is obtained, setting the value to the following environment variable `ALGOKIT_DISPENSER_ACCESS_TOKEN` will enable CI mode for all dispenser commands. If both a user mode and CI mode access token is available, the CI mode will take precedence.
## Login
```zsh
$ algokit dispenser login [OPTIONS]
```
This command logs you into your Dispenser API account if you are not already logged in. Options
* `--ci`: Generate an access token for CI. Issued for 30 days.
* `--output`, -o: Output mode where you want to store the generated access token. Defaults to stdout. Only applicable when —ci flag is set.
* `--file`, -f: Output filename where you want to store the generated access token. Defaults to `ci_token.txt`. Only applicable when —ci flag is set and —output mode is `file`.
> Please note, algokit relies on [keyring](https://pypi.org/project/keyring/) for storing your API credentials. This implies that your credentials are stored in your system’s keychain. By default it will prompt for entering your system password unless you have set it up to always allow access for `algokit-cli` to obtain API credentials.
## Logout
```zsh
$ algokit dispenser logout
```
This command logs you out of your Dispenser API account if you are logged in.
## Fund
```zsh
$ algokit dispenser fund [OPTIONS]
```
This command funds your wallet address with TestNet ALGOs. Options
* `--receiver`, -r: Receiver [alias](./tasks/wallet#add) or address to fund with TestNet ALGOs. This option is required.
* `--amount`, -a: Amount to fund. Defaults to microAlgos. This option is required.
* `--whole-units`: Use whole units (Algos) instead of smallest divisible units (microAlgos). Disabled by default.
## Refund
```zsh
$ algokit dispenser refund [OPTIONS]
```
This command refunds ALGOs back to the dispenser wallet address. Options
* `--txID`, -t: Transaction ID of your refund operation. This option is required. The receiver address of the transaction must be the same as the dispenser wallet address that you can obtain by observing a `sender` field of [`fund`](#fund) transaction.
> Please note, performing a refund operation will not immediately change your daily fund limit. Your daily fund limit is reset daily at midnigth UTC. If you have reached your daily fund limit, you will not be able to perform a refund operation until your daily fund limit is reset.
## Limit
```zsh
$ algokit dispenser limit [OPTIONS]
```
This command gets information about current fund limits on your account. The limits reset daily. Options
* `--whole-units`: Use whole units (Algos) instead of smallest divisible units (microAlgos). Disabled by default.
## Further Reading
For in-depth details, visit the [dispenser section](../cli/index#dispenser) in the AlgoKit CLI reference documentation.
# AlgoKit Doctor
The AlgoKit Doctor feature allows you to check your AlgoKit installation along with its dependencies. This is useful for diagnosing potential issues with using AlgoKit.
## Functionality
The AlgoKit Doctor allows you to make sure that your system has the correct dependencies installed and that they satisfy the minimum required versions. All passed checks will appear in your command line natural color while warnings will be in yellow (warning) and errors or missing critical services will be in red (error). The critical services that AlgoKit will check for (since they are [directly used by certain commands](../../README#prerequisites)): Docker, docker compose and git.
Please run this command to if you are facing an issue running AlgoKit. It is recommended to run it before [submitting an issue to AlgoKit](https://github.com/algorandfoundation/algokit-cli/issues/new). You can copy the contents of the Doctor command message (in Markdown format) to your clipboard by providing the `-c` flag to the command as follows `algokit doctor -c`.
# Examples
For example, running `algokit doctor` with all prerequisites installed will result in output similar to the following:
```plaintext
$ ~ algokit doctor
timestamp: 2023-03-29T03:58:05+00:00
AlgoKit: 0.6.0
AlgoKit Python: 3.11.2 (main, Mar 24 2023, 00:16:47) [Clang 14.0.0 (clang-1400.0.29.202)] (location: /Users/algokit/.local/pipx/venvs/algokit)
OS: macOS-13.2.1-arm64-arm-64bit
docker: 20.10.22
docker compose: 2.15.1
git: 2.39.1
python: 3.10.9 (location: /Users/algokit/.asdf/shims/python)
python3: 3.10.9 (location: /Users/algokit/.asdf/shims/python3)
pipx: 1.2.0
poetry: 1.3.2
node: 18.12.1
npm: 8.19.2
brew: 4.0.10-34-gb753315
If you are experiencing a problem with AlgoKit, feel free to submit an issue via:
https://github.com/algorandfoundation/algokit-cli/issues/new
Please include this output, if you want to populate this message in your clipboard, run `algokit doctor -c`
```
The doctor command will indicate if there is any issues to address, for example:
If AlgoKit detects a newer version, this will be indicated next to the AlgoKit version
```plaintext
AlgoKit: 1.2.3 (latest: 4.5.6)
```
If the detected version of docker compose is unsupported, this will be shown:
```plaintext
docker compose: 2.1.3
Docker Compose 2.5.0 required to run `algokit localnet command`;
install via https://docs.docker.com/compose/install/
```
For more details about the `AlgoKit doctor` command, please refer to the [AlgoKit CLI reference documentation](../cli/index#doctor).
# AlgoKit explore
AlgoKit provides a quick shortcut to [explore](../cli/index#explore) various Algorand networks using [lora](https://lora.algokit.io/) including [AlgoKit LocalNet](./localnet)!
## LocalNet
The following three commands are all equivalent and will open lora pointing to the local [AlgoKit LocalNet](./localnet) instance:
* `algokit explore`
* `algokit explore localnet`
* `algokit localnet explore`
## Testnet
`algokit explore testnet` will open lora pointing to TestNet via the [node](https://algonode.io/api/).
## Mainnet
`algokit explore mainnet` will open lora pointing to MainNet via the [node](https://algonode.io/api/).
To learn more about the `algokit explore` command, please refer to [explore](../cli/index#explore) in the AlgoKit CLI reference documentation.
# AlgoKit Generate
The `algokit generate` [command](../cli/index#generate) is used to generate components used in an AlgoKit project. It also allows for custom generate commands which are loaded from the .algokit.toml file in your project directory.
## 1. Typed clients
The `algokit generate client` [command](../cli/index#client) can be used to generate a typed client from an [ARC-0032](https://arc.algorand.foundation/ARCs/arc-0032) or [ARC-0056](https://github.com/algorandfoundation/ARCs/pull/258) application specification with both Python and TypeScript available as target languages.
### Prerequisites
To generate Python clients an installation of pip and pipx is required. To generate TypeScript clients an installation of Node.js and npx is also required.
Each generated client will also have a dependency on `algokit-utils` libraries for the target language.
### Input file / directory
You can either specify a path to an ARC-0032 JSON file, an ARC-0056 JSON file or to a directory that is recursively scanned for `application.json`, `*.arc32.json`, `*.arc56.json` file(s).
### Output tokens
The output path is interpreted as relative to the current working directory, however an absolute path may also be specified e.g. `algokit generate client application.json --output /absolute/path/to/client.py`
There are two tokens available for use with the `-o`, `--output` [option](../cli/index#-o---output-):
* `{contract_name}`: This will resolve to a name based on the ARC-0032/ARC-0056 contract name, formatted appropriately for the target language.
* `{app_spec_dir}`: This will resolve to the parent directory of the `application.json`, `*.arc32.json`, `*.arc56.json` file which can be useful to output a client relative to its source file.
### Version Pinning
If you want to ensure typed client output stability across different environments and additionally protect yourself from any potential breaking changes introduced in the client generator packages, you can specify a version you’d like to pin to.
To make use of this feature, pass `-v`, `--version`, for example `algokit generate client --version 1.2.3 path/to/application.json`.
Alternatively, you can achieve output stability by installing the underlying [Python](https://github.com/algorandfoundation/algokit-client-generator-py) or [TypeScript](https://github.com/algorandfoundation/algokit-client-generator-ts) client generator package either locally in your project (via `poetry` or `npm` respectively) or globally on your system (via `pipx` or `npm` respectively). AlgoKit will search for a matching installed version before dynamically resolving.
### Usage
Usage examples of using a generated client are below, typed clients allow your favourite IDE to provide better intellisense to provide better discoverability of available operations and parameters.
#### Python
```python
# A similar working example can be seen in the algokit python template, when using Python deployment
from smart_contracts.artifacts.HelloWorldApp.client import (
HelloWorldAppClient,
)
app_client = HelloWorldAppClient(
algod_client,
creator=deployer,
indexer_client=indexer_client,
)
deploy_response = app_client.deploy(
on_schema_break=OnSchemaBreak.ReplaceApp,
on_update=OnUpdate.UpdateApp,
allow_delete=True,
allow_update=True,
)
response = app_client.hello(name="World")
```
#### TypeScript
```typescript
// A similar working example can be seen in the algokit python template with typescript deployer, when using TypeScript deployment
import { HelloWorldAppClient } from './artifacts/HelloWorldApp/client';
const appClient = new HelloWorldAppClient(
{
resolveBy: 'creatorAndName',
findExistingUsing: indexer,
sender: deployer,
creatorAddress: deployer.addr,
},
algod,
);
const app = await appClient.deploy({
allowDelete: isLocal,
allowUpdate: isLocal,
onSchemaBreak: isLocal ? 'replace' : 'fail',
onUpdate: isLocal ? 'update' : 'fail',
});
const response = await appClient.hello({ name: 'world' });
```
### Examples
To output a single application.json to a python typed client: `algokit generate client path/to/application.json --output client.py`
To process multiple application.json in a directory structure and output to a typescript client for each in the current directory: `algokit generate client smart_contracts/artifacts --output {contract_name}.ts`
To process multiple application.json in a directory structure and output to a python client alongside each application.json: `algokit generate client smart_contracts/artifacts --output {app_spec_path}/client.py`
## 2. Using Custom Generate Commands
Custom generate commands are defined in the `.algokit.toml` file within the project directory, typically supplied by community template builders or official AlgoKit templates. These commands are specified under the `generate` key and serve to execute a generator at a designated path with provided answer key/value pairs.
### Understanding `Generators`
A `generator` is essentially a compact, self-sufficient `copier` template. This template can optionally be defined within the primary `algokit templates` to offer supplementary functionality after a project is initialized from the template. For instance, the official [`algokit-python-template`](https://github.com/algorandfoundation/algokit-python-template/tree/main/template_content) provides a generator within the `.algokit/generators` directory. This generator can be employed for executing extra tasks on AlgoKit projects that have been initiated from this template, such as adding new smart contracts to an existing project. For a comprehensive explanation, please refer to the [`architecture decision record`](../architecture-decisions/2023-07-19_advanced_generate_command).
### Requirements
To utilize custom generate commands, you must have `copier` installed. This installation is included by default in the AlgoKit CLI. Therefore, no additional installation is necessary if you have already installed the `algokit cli`.
### How to Use
A custom command can be defined in the `.algokit.toml` as shown:
```toml
[generate.my_generator]
path = "path/to/my_generator"
description = "A brief description of the function of my_generator"
```
Following this, you can execute the command as follows:
`algokit generate my_generator --answer key value --path path/to/my_generator`
If no `path` is given, the command will use the path specified in the `.algokit.toml`. If no `answer` is provided, the command will initiate an interactive `copier` prompt to request answers (similar to `algokit init`).
The custom command employs the `copier` library to duplicate the files from the generator’s path to the current working directory, substituting any values from the `answers` dictionary.
### Examples
As an example, let’s use the `smart-contract` generator from the `algokit-python-template` to add new contract to an existing project based on that template. The `smart-contract` generator is defined as follows:
```toml
[algokit]
min_version = "v1.3.1"
... # other keys
[generate.smart_contract]
description = "Adds a new smart contract to the existing project"
path = ".algokit/generators/create_contract"
```
To execute this generator, ensure that you are operating from the same directory as the `.algokit.toml` file, and then run:
```bash
$ algokit generate
# The output will be as follows:
# Note how algokit dynamically injects a new `smart-contract` command based
# on the `.algokit.toml` file
Usage: algokit generate [OPTIONS] COMMAND [ARGS]...
Generate code for an Algorand project.
Options:
-h, --help Show this message and exit.
Commands:
client Create a typed ApplicationClient from an ARC-32 application.json
smart-contract Adds a new smart contract to the existing project
```
To execute the `smart-contract` generator, run:
```bash
$ algokit generate smart-contract
# or
$ algokit generate smart-contract -a contract_name "MyCoolContract"
```
#### Third Party Generators
It is important to understand that by default, AlgoKit will always prompt you before executing a generator to ensure it’s from a trusted source. If you are confident about the source of the generator, you can use the `--force` or `-f` option to execute the generator without this confirmation prompt. Be cautious while using this option and ensure the generator is from a trusted source. At the moment, a trusted source for a generator is defined as *a generator that is included in the official AlgoKit templates (e.g. `smart-contract` generator in `algokit-python-template`)*
# AlgoKit goal
AlgoKit goal command provides the user with a mechanism to run [goal cli](https://developer.algorand.org/docs/clis/goal/goal/) commands against the current [AlgoKit LocalNet](./localnet).
You can explore all possible goal commands by running `algokit goal` e.g.:
```plaintext
$ ~ algokit goal
GOAL is the CLI for interacting Algorand software instance. The binary 'goal' is installed alongside the algod binary and is considered an integral part of the complete installation. The binaries should be used in tandem - you should not try to use a version of goal with a different version of algod.
Usage:
goal [flags]
goal [command]
Available Commands:
account Control and manage Algorand accounts
app Manage applications
asset Manage assets
clerk Provides the tools to control transactions
completion Shell completion helper
help Help about any command
kmd Interact with kmd, the key management daemon
ledger Access ledger-related details
license Display license information
logging Control and manage Algorand logging
network Create and manage private, multi-node, locally-hosted networks
node Manage a specified algorand node
protocols
report
version The current version of the Algorand daemon (algod)
wallet Manage wallets: encrypted collections of Algorand account keys
Flags:
-d, --datadir stringArray Data directory for the node
-h, --help help for goal
-k, --kmddir string Data directory for kmd
-v, --version Display and write current build version and exit
Use "goal [command] --help" for more information about a command.
```
For instance, running `algokit goal report` would result in output like:
```plaintext
$ ~ algokit goal report
12885688322
3.12.2.dev [rel/stable] (commit #181490e3)
go-algorand is licensed with AGPLv3.0
source code available at https://github.com/algorand/go-algorand
Linux ff7828f2da17 5.15.49-linuxkit #1 SMP PREEMPT Tue Sep 13 07:51:32 UTC 2022 aarch64 GNU/Linux
Genesis ID from genesis.json: sandnet-v1
Last committed block: 0
Time since last block: 0.0s
Sync Time: 0.0s
Last consensus protocol: future
Next consensus protocol: future
Round for next consensus protocol: 1
Next consensus protocol supported: true
Last Catchpoint:
Genesis ID: sandnet-v1
Genesis hash: vEg1NCh6SSXwS6O5HAfjYCCNAs4ug328s3RYMr9syBg=
```
If the AlgoKit Sandbox `algod` docker container is not present or not running, the command will fail with a clear error, e.g.:
```plaintext
$ ~ algokit goal
Error: No such container: algokit_algod
Error: Error executing goal; ensure the Sandbox is started by executing `algokit sandbox status`
```
```plaintext
$ ~ algokit goal
Error response from daemon: Container 5a73961536e2c98e371465739053d174066c40d00647c8742f2bb39eb793ed7e is not running
Error: Error executing goal; ensure the Sandbox is started by executing `algokit sandbox status`
```
## Working with Files in the Container
When interacting with the container, especially if you’re using tools like goal, you might need to reference files or directories. Here’s how to efficiently deal with files and directories:
### Automatic File Mounting
When you specify a file or directory path in your `goal` command, the system will automatically mount that path from your local filesystem into the container. This way, you don’t need to copy files manually each time.
For instance, if you want to compile a `teal` file:
```plaintext
algokit goal clerk compile /Path/to/inputfile/approval.teal -o /Path/to/outputfile/approval.compiled
```
Here, `/Path/to/inputfile/approval.teal` and `/Path/to/outputfile/approval.compiled` are paths on your local file system, and they will be automatically accessible to the `goal` command inside the container.
### Manual Copying of Files
In case you want to manually copy files into the container, you can do so using `docker cp`:
```plaintext
docker cp foo.txt algokit_algod:/root
```
This command copies the `foo.txt` from your local system into the root directory of the `algokit_algod` container.
Note: Manual copying is optional and generally only necessary if you have specific reasons for doing so since the system will auto-mount paths specified in commands.
## Running multiple commands
If you want to run multiple commands or interact with the filesystem you can execute `algokit goal --console`. This will open a [Bash](https://www.gnu.org/software/bash/) shell session on the `algod` Docker container and from there you can execute goal directly, e.g.:
```bash
$ algokit goal --console
Opening Bash console on the algod node; execute `exit` to return to original console
root@82d41336608a:~# goal account list
[online] C62QEFC7MJBPHAUDMGVXGZ7WRWFAF3XYPBU3KZKOFHYVUYDGU5GNWS4NWU C62QEFC7MJBPHAUDMGVXGZ7WRWFAF3XYPBU3KZKOFHYVUYDGU5GNWS4NWU 4000000000000000 microAlgos
[online] DVPJVKODAVEKWQHB4G7N6QA3EP7HKAHTLTZNWMV4IVERJQPNGKADGURU7Y DVPJVKODAVEKWQHB4G7N6QA3EP7HKAHTLTZNWMV4IVERJQPNGKADGURU7Y 4000000000000000 microAlgos
[online] 4BH5IKMDDHEJEOZ7T5LLT4I7EVIH5XCOTX3TPVQB3HY5TUBVT4MYXJOZVA 4BH5IKMDDHEJEOZ7T5LLT4I7EVIH5XCOTX3TPVQB3HY5TUBVT4MYXJOZVA 2000000000000000 microAlgos
```
## Interactive Mode
Some `goal` commands require interactive input from the user. By default, AlgoKit will attempt to run commands in non-interactive mode first, and automatically switch to interactive mode if needed. You can force a command to run in interactive mode by using the `--interactive` flag:
```bash
$ algokit goal --interactive wallet new algodev
Please choose a password for wallet 'algodev':
Please confirm the password:
Creating wallet...
Created wallet 'algodev'
Your new wallet has a backup phrase that can be used for recovery.
Keeping this backup phrase safe is extremely important.
Would you like to see it now? (Y/n): n
```
This is particularly useful when you know a command will require user input, such as creating new accounts, importing keys, or signing transactions.
For more details about the `AlgoKit goal` command, please refer to the [AlgoKit CLI reference documentation](../cli/index#goal).
# AlgoKit Init
The `algokit init` [command](../cli/index#init) is used to quickly initialize new projects using official Algorand Templates or community provided templates. It supports a fully guided command line wizard experience, as well as fully scriptable / non-interactive functionality via command options.
## Quick start
For a quick start template with all of the defaults you can run: `algokit init` which will interactively guide you through picking the right stack to build your AlgoKit project. Afterwards, you should immediately be able to hit F5 to compile the hello world smart contract to the `smart_contracts/artifacts` folder (with breakpoint debugging - try setting a breakpoint in `smart_contracts/helloworld.py`) and open the `smart_contracts/helloworld.py` file and get linting, automatic formatting and syntax highlighting.
## Prerequisites
Git is a prerequisite for the init command as it is used to clone templates and initialize git repos. Please consult the [README](../../README#prerequisites) for installation instructions.
## Functionality
As outlined in [quick start](#quick-start), the simplest use of the command is to just run `algokit init` and you will then be guided through selecting a template and configuring options for that template. e.g.
```plaintext
$ ~ algokit init
? Which of these options best describes the project you want to start? `Smart Contract` | `Dapp Frontend` | `Smart Contract & Dapp Frontend` | `Custom`
? Name of project / directory to create the project in: my-cool-app
```
Once above 2 questions are answered, the `cli` will start instantiating the project and will start asking questions specific to the template you are instantiating. By default official templates such as `python`, `fullstack`, `react`, `python` include a notion of a `preset`. If you want to skip all questions and let the tool preset the answers tailored for a starter project you can pick `Starter`, for a more advanced project that includes unit tests, CI automation and other advanced features, pick `Production`. Lastly, if you prefer to modify the experience and tailor the template to your needs, pick the `Custom` preset.
If you want to accept the default for each option simply hit \[enter] or alternatively to speed things up you can run `algokit init --defaults` and they will be auto-accepted.
### Workspaces vs Standalone Projects
AlgoKit supports two distinct project structures: Workspaces and Standalone Projects. This flexibility allows developers to choose the most suitable approach for their project’s needs.
To initialize a project within a workspace, use the `--workspace` flag. If a workspace does not already exist, AlgoKit will create one for you by default (unless you disable it via `--no-workspace` flag). Once established, new projects can be added to this workspace, allowing for centralized management.
To create a standalone project, use the `--no-workspace` flag during initialization. This instructs AlgoKit to bypass the workspace structure and set up the project as an isolated entity.
For more details on workspaces and standalone projects, refer to the [AlgoKit Project documentation](./project#workspaces-vs-standalone-projects).
## Bootstrapping
You will also be prompted if you wish to run the [bootstrap](../cli/index#bootstrap) command, this is useful if you plan to immediately begin developing in the new project. If you passed in `--defaults` or `--bootstrap` then it will automatically run bootstrapping unless you passed in `--no-bootstrap`.
```plaintext
? Do you want to run `algokit bootstrap` to bootstrap dependencies for this new project so it can be run immediately? Yes
Installing Python dependencies and setting up Python virtual environment via Poetry
poetry: Creating virtualenv my-smart-contract in /Users/algokit/algokit-init/my-smart-contract/.venv
poetry: Updating dependencies
poetry: Resolving dependencies...
poetry:
poetry: Writing lock file
poetry:
poetry: Package operations: 53 installs, 0 updates, 0 removals
poetry:
poetry: • Installing pycparser (2.21)
---- other output omitted for brevity ----
poetry: • Installing ruff (0.0.171)
Copying /Users/algokit/algokit-init/my-smart-contract/smart_contracts/.env.template to /Users/algokit/algokit-init/my-smart-contract/smart_contracts/.env and prompting for empty values
? Would you like to initialise a git repository and perform an initial commit? Yes
🎉 Performed initial git commit successfully! 🎉
🙌 Project initialized at `my-smart-contract`! For template specific next steps, consult the documentation of your selected template 🧐
Your selected template comes from:
➡️ https://github.com/algorandfoundation/algokit-python-template
As a suggestion, if you wanted to open the project in VS Code you could execute:
> cd my-smart-contract && code .
```
After bootstrapping you are also given the opportunity to initialize a git repo, upon successful completion of the init command the project is ready to be used. If you pass in `--git` it will automatically initialise the git repository and if you pass in `--no-git` it won’t.
> Please note, when using `--no-workspaces`, algokit init will assume a max lookup depth of 1 for a fresh template based project. Otherwise it will assume a max depth of 2, since default algokit workspace structure is at most 2 levels deep.
## Options
There are a number of options that can be used to provide answers to the template prompts. Some of the options requiring further explanation are detailed below, but consult the CLI reference for all available [options](../cli/index#init).
## Community Templates
As well as the official Algorand templates shown when running the init command, community templates can also be provided by providing a URL via the prompt or the `--template-url` option.
e.g. `algokit init --template-url https://github.com/algorandfoundation/algokit-python-template` (that being the url of the official python template, the same as `algokit init -t python`).
The `--template-url` option can be combined with `--template-url-ref` to specify a specific commit, branch or tag
e.g. `algokit init --template-url https://github.com/algorandfoundation/algokit-python-template --template-url-ref 0232bb68a2f5628e910ee52f62bf13ded93fe672`
If the URL is not an official template there is a potential security risk and so to continue you must either acknowledge this prompt, or if you are in a non-interactive environment you can pass the `--UNSAFE-SECURITY-accept-template-url` option (but we generally don’t recommend this option so users can review the warning message first) e.g.
```plaintext
Community templates have not been reviewed, and can execute arbitrary code.
Please inspect the template repository, and pay particular attention to the values of \_tasks, \_migrations and \_jinja_extensions in copier.yml
? Continue anyway? Yes
```
If you want to create a community template, you can use the [AlgoKit guidelines on template building](https://github.com/algorandfoundation/algokit-cli/blob/main/docs/tutorials/algokit-template#creating-algokit-templates) and [Copier documentation](https://copier.readthedocs.io/en/stable/) as a starting point.
## Template Answers
Answers to specific template prompts can be provided with the `--answer {key} {value}` option, which can be used multiple times for each prompt. Quotes can be used for values with spaces e.g. `--answer author_name "Algorand Foundation"`.
To find out the key for a specific answer you can either look at `.algokit/.copier-answers.yml` in the root folder of a project created via `algokit init` or in the `copier.yaml` file of a template repo e.g. for the [python template](https://github.com/algorandfoundation/algokit-python-template/blob/main/copier.yaml).
## Non-interactive project initialization
By combining a number of options, it is possible to initialize a new project without any interaction. For example, to create a project named `my-smart-contract` using the `python` template with no git, no bootstrapping, the author name of `Algorand Foundation`, and defaults for all other values, you could execute the following:
```plaintext
$ ~ algokit init -n my-smart-contract -t python --no-git --no-bootstrap --answer author_name "Algorand Foundation" --defaults
🙌 Project initialized at `my-smart-contract`! For template specific next steps, consult the documentation of your selected template 🧐
Your selected template comes from:
➡️ https://github.com/algorandfoundation/algokit-python-template
As a suggestion, if you wanted to open the project in VS Code you could execute:
> cd my-smart-contract && code .
```
For more details about the `AlgoKit init` command, please refer to the [AlgoKit CLI reference documentation](../cli/index#init).
# AlgoKit LocalNet
The AlgoKit LocalNet feature allows you to manage (start, stop, reset, manage) a locally sandboxed private Algorand network. This allows you to interact and deploy changes against your own Algorand network without needing to worry about funding TestNet accounts, information you submit being publicly visible or being connected to an active Internet connection (once the network has been started).
AlgoKit LocalNet uses Docker images that are optimised for a great dev experience. This means the Docker images are small and start fast. It also means that features suited to developers are enabled such as KMD (so you can programmatically get faucet private keys).
The philosophy we take with AlgoKit LocalNet is that you should treat it as an ephemeral network. This means assume it could be reset at any time - don’t store data on there that you can’t recover / recreate. We have optimised the AlgoKit LocalNet experience to minimise situations where the network will get reset to improve the experience, but it can and will still happen in a number of situations.
## Prerequisites
AlgoKit LocalNet relies on Docker and Docker Compose being present and running on your system. Alternatively, you can use Podman as a replacement for Docker see [Podman support](#podman-support).
You can install Docker by following the [official installation instructions](https://docs.docker.com/get-docker/). Most of the time this will also install Docker Compose, but if not you can [follow the instructions](https://docs.docker.com/compose/install/) for that too.
If you are on Windows then you will need WSL 2 installed first, for which you can find the [official installation instructions](https://learn.microsoft.com/en-us/windows/wsl/install). If you are using Windows 10 then ensure you are on the latest version to reduce likelihood of installation problems.
Alternatively, the Windows 10/11 Pro+ supported [Hyper-V backend](https://docs.docker.com/desktop/install/windows-install/) for Docker can be used instead of the WSL 2 backend.
### Podman support
If you prefer to use [Podman](https://podman.io/) as your container engine, make sure to install and configure Podman first. Then you can set the default container engine that AlgoKit will use, by running: `algokit config container-engine podman`. See [Container-based LocalNet](#container-based-localnet) for more details.
## Known issues
The AlgoKit LocalNet is built with 30,000 participation keys generated and after 30,000 rounds is reached it will no longer be able to add rounds. At this point you can simply reset the LocalNet to continue development. Participation keys are slow to generate hence why they are pre-generated to improve experience.
## Supported operating environments
We rely on the official Algorand docker images for Indexer, Conduit and Algod, which means that AlgoKit LocalNet is supported on Windows, Linux and Mac on Intel and AMD chipsets (including Apple Silicon).
## Container-based LocalNet
AlgoKit cli supports both [Docker](https://www.docker.com/) and [Podman](https://podman.io/) as container engines. While `docker` is used by default, executing the below:
```plaintext
algokit config container-engine
# or
algokit config container-engine podman|docker
```
Will set the default container engine to use when executing `localnet` related commands via `subprocess`.
### Creating / Starting the LocalNet
To create / start your AlgoKit LocalNet instance you can run `algokit localnet start`. This will:
* Detect if you have Docker and Docker Compose installed
* Detect if you have the Docker engine running
* Create a new Docker Compose deployment for AlgoKit LocalNet if it doesn’t already exist
* (Re-)Start the containers
You can also specify additional options:
* `--name`: Specify a name for a custom LocalNet instance. This allows you to have multiple LocalNet configurations. Refer to [Named LocalNet Configuration Directory](#named-localnet-configuration-directory) for more details.
* `--config-dir`: Specify a custom configuration directory for the LocalNet.
* `--dev/--no-dev`: Control whether to launch ‘algod’ in developer mode or not. Defaults to ‘yes’ (developer mode enabled).
If it’s the first time running it on your machine then it will download the following images from DockerHub:
* [`algorand/algod`](https://hub.docker.com/r/algorand/algod) (\~500 MB)
* [`algorand/indexer`](https://hub.docker.com/r/algorand/indexer) (\~96 MB)
* [`algorand/conduit`](https://hub.docker.com/r/algorand/conduit) (\~98 MB)
* [`postgres:13-alpine`](https://hub.docker.com/_/postgres) (\~80 MB)
Once they have downloaded, it won’t try and re-download images unless you perform a `algokit localnet reset`.
Once the LocalNet has started, the following endpoints will be available:
* [algod](https://developer.algorand.org/docs/rest-apis/algod/v2/):
* address:
* token: `aaaaaaaaaaaaaaaaaaaaaaaaaaaaaaaaaaaaaaaaaaaaaaaaaaaaaaaaaaaaaaaa`
* [kmd](https://developer.algorand.org/docs/rest-apis/kmd/):
* address:
* token: `aaaaaaaaaaaaaaaaaaaaaaaaaaaaaaaaaaaaaaaaaaaaaaaaaaaaaaaaaaaaaaaa`
* [indexer](https://developer.algorand.org/docs/rest-apis/indexer/):
* address:
* tealdbg port:
* address:
### Creating / Starting a Named LocalNet
AlgoKit manages the default LocalNet environment and automatically keeps the configuration updated with any upstream changes. As a result, configuration changes are reset automatically by AlgoKit, so that developers always have access to a known good LocalNet configuration. This works well for the majority of scenarios, however sometimes developers need the control to make specific configuration changes for specific scenarios.
When you want more control, named LocalNet instances can be used by running `algokit localnet start --name {name}`. This command will set up and run a named LocalNet environment (based off the default), however AlgoKit will not update the environment or configuration automatically. From here developers are able to modify their named environment in any way they like, for example setting `DevMode: false` in `algod_network_template.json`.
Once you have a named LocalNet running, the AlgoKit LocalNet commands will target this instance. If at any point you’d like to switch back to the default LocalNet, simply run `algokit localnet start`.
### Specifying a custom LocalNet configuration directory
You can specify a custom LocalNet configuration directory by using the `--config-dir` option or by setting the `ALGOKIT_LOCALNET_CONFIG_DIR` environment variable. This allows you to have multiple LocalNet instances with different configurations in different directories, which is useful in ‘CI/CD’ scenarios where you can save your custom localnet in your version control and then run `algokit localnet start --config-dir /path/to/custom/config` to use it within your pipeline.
For example, to create a LocalNet instance with a custom configuration directory, you can run:
```plaintext
algokit localnet start --config-dir /path/to/custom/config
```
### Named LocalNet Configuration Directory
When running `algokit localnet start --name {name}`, AlgoKit stores configuration files in a specific directory on your system. The location of this directory depends on your operating system:
* **Windows**: We use the value of the `APPDATA` environment variable to determine the directory to store the configuration files. This is usually `C:\Users\USERNAME\AppData\Roaming`.
* **Linux or Mac**: We use the value of the `XDG_CONFIG_HOME` environment variable to determine the directory to store the configuration files. If `XDG_CONFIG_HOME` is not set, the default location is `~/.config`.
Assuming you have previously used a default LocalNet, the path `./algokit/sandbox/` will exist inside the configuration directory, containing the configuration settings for the default LocalNet instance. Additionally, for each named LocalNet instance you have created, the path `./algokit/sandbox_{name}/` will exist, containing the configuration settings for the respective named LocalNet instances.
It is important to note that only the configuration files for a named LocalNet instance should be changed. Any changes made to the default LocalNet instance will be reverted by AlgoKit.
You can use `--name` flag along with `--config-dir` option to specify a custom path for the LocalNet configuration directory. This allows you to manage multiple LocalNet instances with different configurations in different directories on your system.
### Controlling Algod Developer Mode
By default, AlgoKit LocalNet starts algod in developer mode. This mode enables certain features that are useful for development but may not reflect the behavior of a production network. You can control this setting using the `--dev/--no-dev` flag when starting the LocalNet:
```bash
algokit localnet start --no-dev # Starts algod without developer mode
algokit localnet start --dev # Starts algod with developer mode (default)
```
If you change this setting for an existing LocalNet instance, AlgoKit will prompt you to restart the LocalNet to apply the changes.
### Stopping and Resetting the LocalNet
To stop the LocalNet you can execute `algokit localnet stop`. This will turn off the containers, but keep them ready to be started again in the same state by executing `algokit localnet start`.
To reset the LocalNet you can execute `algokit localnet reset`, which will tear down the existing containers, refresh the container definition from the latest stored within AlgoKit and update to the latest Docker images. If you want to keep the same container spec and versions as you currently have, but quickly tear down and start a new instance then run `algokit localnet reset --no-update`.
### Viewing transactions in the LocalNet
You can see a web-based user interface of the current state of your LocalNet including all transactions by using the [AlgoKit Explore](./explore) feature, e.g. by executing `algokit localnet explore`.
### Executing goal commands against AlgoKit LocalNet
See the [AlgoKit Goal](./goal) feature. You can also execute `algokit localnet console` to open a [Bash shell which allows you to run the goal commandline](./goal#running-multiple-commands).
Note: if you want to copy files into the container so you can access them via goal then you can use the following:
```plaintext
docker cp foo.txt algokit_algod:/root
```
### Getting access to the private key of the faucet account
If you want to use the LocalNet then you need to get the private key of the initial wallet so you can transfer ALGOs out of it to other accounts you create.
There are two ways to do this:
**Option 1: Manually via goal**
```plaintext
algokit goal account list
algokit goal account export -a {address_from_an_online_account_from_above_command_output}
```
**Option 2: Automatically via kmd API**
Needing to do this manual step every time you spin up a new development environment or reset your LocalNet is frustrating. Instead, it’s useful to have code that uses the Sandbox APIs to automatically retrieve the private key of the default account.
AlgoKit Utils provides methods to help you do this:
* TypeScript - [`ensureFunded`](https://github.com/algorandfoundation/algokit-utils-ts/blob/main/docs/capabilities/transfer#ensurefunded) and [`getDispenserAccount`](https://github.com/algorandfoundation/algokit-utils-ts/blob/main/docs/capabilities/transfer#dispenser)
* Python - [`ensure_funded`](https://algorandfoundation.github.io/algokit-utils-py/html/apidocs/algokit_utils/algokit_utils.html#algokit_utils.ensure_funded) and [`get_dispenser_account`](https://algorandfoundation.github.io/algokit-utils-py/html/apidocs/algokit_utils/algokit_utils.html#algokit_utils.get_dispenser_account)
For more details about the `AlgoKit localnet` command, please refer to the [AlgoKit CLI reference documentation](../cli/index#localnet).
## GitHub Codespaces-based LocalNet
The AlgoKit LocalNet feature also supports running the LocalNet in a GitHub Codespace with port forwarding by utilizing the [GitHub CLI](https://github.com/cli/gh). This allows you to run the LocalNet without the need to use Docker. This is especially useful for scenarios where certain hardware or software limitations may prevent you from being able to run Docker.
To run the LocalNet in a GitHub Codespace, you can use the `algokit localnet codespace` command. By default without `--force` flag it will prompt you to delete stale codespaces created earlier (if any). Upon termination it will also prompt to delete the codespace that was used prior to termination.
Running an interactive session ensures that you have control over the lifecycle of your Codespace, preventing unnecessary usage and potential costs. GitHub Codespaces offers a free tier with certain limits, which you can review in the [GitHub Codespaces documentation](https://docs.github.com/en/codespaces/overview#pricing).
### Options
* `-m`, `--machine`: Specifies the GitHub Codespace machine type to use. Defaults to `basicLinux32gb`. Available options are `basicLinux32gb`, `standardLinux32gb`, `premiumLinux`, and `largePremiumLinux`. Refer to [GitHub Codespaces documentation](https://docs.github.com/en/codespaces/overview/machine-types) for more details.
* `-a`, `--algod-port`: Sets the port for the Algorand daemon. Defaults to `4001`.
* `-i`, `--indexer-port`: Sets the port for the Algorand indexer. Defaults to `8980`.
* `-k`, `--kmd-port`: Sets the port for the Algorand kmd. Defaults to `4002`.
* `-n`, `--codespace-name`: Specifies the name of the codespace. Defaults to a random name with a timestamp.
* `-t`, `--timeout`: Max duration for running the port forwarding process. Defaults to 1 hour. This timeout ensures the codespace **will automatically shut down** after the specified duration to prevent accidental overspending of free quota on GitHub Codespaces. [More details](https://docs.github.com/en/codespaces/setting-your-user-preferences/setting-your-timeout-period-for-github-codespaces).
* `-r`, `--repo-url`: The URL of the repository to use. Defaults to the AlgoKit base template repository (`algorandfoundation/algokit-base-template`). The reason why algokit-base-template is used by default is due to [.devcontainer.json](https://github.com/algorandfoundation/algokit-base-template/blob/main/template_content/.devcontainer.json) which defines the scripts that take care of setting up AlgoKit CLI during container start. You can use any custom repo as a base, however it’s important to ensure the reference [.devcontainer.json](https://github.com/algorandfoundation/algokit-base-template/blob/main/template_content/.devcontainer.json) file exists in your repository **otherwise there will be no ports to forward from the codespace**.
* `--force`, `-f`: Force deletes stale codespaces and skips confirmation prompts. Defaults to explicitly prompting for confirmation.
For more details about managing LocalNet in GitHub Codespaces, please refer to the [AlgoKit CLI reference documentation](../cli/index#codespace).
> Tip: By specifying alternative port values it is possible to have several LocalNet instances running where one is using default ports via `algokit localnet start` with Docker | Podman and the other relies on port forwarding via `algokit localnet codespace`.
# AlgoKit
The Algorand AlgoKit CLI is the one-stop shop tool for developers building on the Algorand network. The goal of AlgoKit is to help developers build and launch secure, automated production-ready applications rapidly.
## AlgoKit CLI commands
For details on how to use individual features see the following
* [Bootstrap](./project/bootstrap) - Bootstrap AlgoKit project dependencies
* [Compile](./compile) - Compile Algorand Python code
* [Completions](./completions) - Install shell completions for AlgoKit
* [Deploy](./project/deploy) - Deploy your smart contracts effortlessly to various networks
* [Dispenser](./dispenser) - Fund your TestNet account with ALGOs from the AlgoKit TestNet Dispenser
* [Doctor](./doctor) - Check AlgoKit installation and dependencies
* [Explore](./explore) - Explore Algorand Blockchains using lora
* [Generate](./generate) - Generate code for an Algorand project
* [Goal](./goal) - Run the Algorand goal CLI against the AlgoKit Sandbox
* [Init](./init) - Quickly initialize new projects using official Algorand Templates or community provided templates
* [LocalNet](./localnet) - Manage a locally sandboxed private Algorand network
* [Project](./project) - Manage an AlgoKit project workspace on your file system
* [Tasks](./tasks) - Perform a variety of useful operations on the Algorand blockchain
## Common AlgoKit CLI options
AlgoKit has a number of global options that can impact all commands. Note: these global options must be appended to `algokit` and appear before a command, e.g. `algokit -v localnet start`, but not `algokit localnet start -v`. The exception to this is `-h`, which can be appended to any command or sub-command to see contextual help information.
* `-h, --help` The help option can be used on any command to get details on any command, its sub-commands and options.
* `-v, --verbose` Enables DEBUG logging, useful when troubleshooting or if you want to peek under the covers and learn what AlgoKit CLI is doing.
* `--color / --no-color` Enables or disables output of console styling, we also support the [NO\_COLOR](https://no-color.org) environment variable.
* `--skip-version-check` Skips updated AlgoKit version checking and prompting for that execution, this can also be disabled [permanently on a given machine](./cli/index#version-prompt) with `algokit config version-prompt disable`.
See also the [AlgoKit CLI Reference](./cli/index), which details every command, sub-command and option.
## AlgoKit Tutorials
The following tutorials guide you through various scenarios:
* [AlgoKit quick start](./tutorials/intro)
* [Creating AlgoKit templates](./tutorials/algokit-template)
## Guiding Principles
AlgoKit is guided by the following solution principles which flow through to the applications created by developers.
1. **Cohesive developer tool suite**: Using AlgoKit should feel professional and cohesive, like it was designed to work together, for the developer; not against them. Developers are guided towards delivering end-to-end, high quality outcomes on MainNet so they and Algorand are more likely to be successful.
2. **Seamless onramp**: New developers have a seamless experience to get started and they are guided into a pit of success with best practices, supported by great training collateral; you should be able to go from nothing to debugging code in 5 minutes.
3. **Leverage existing ecosystem**: AlgoKit functionality gets into the hands of Algorand developers quickly by building on top of the existing ecosystem wherever possible and aligned to these principles.
4. **Sustainable**: AlgoKit should be built in a flexible fashion with long-term maintenance in mind. Updates to latest patches in dependencies, Algorand protocol development updates, and community contributions and feedback will all feed in to the evolution of the software.
5. **Secure by default**: Include defaults, patterns and tooling that help developers write secure code and reduce the likelihood of security incidents in the Algorand ecosystem. This solution should help Algorand be the most secure Blockchain ecosystem.
6. **Extensible**: Be extensible for community contribution rather than stifling innovation, bottle-necking all changes through the Algorand Foundation and preventing the opportunity for other ecosystems being represented (e.g. Go, Rust, etc.). This helps make developers feel welcome and is part of the developer experience, plus it makes it easier to add features sustainably.
7. **Meet developers where they are**: Make Blockchain development mainstream by giving all developers an idiomatic development experience in the operating system, IDE and language they are comfortable with so they can dive in quickly and have less they need to learn before being productive.
8. **Modular components**: Solution components should be modular and loosely coupled to facilitate efficient parallel development by small, effective teams, reduced architectural complexity and allowing developers to pick and choose the specific tools and capabilities they want to use based on their needs and what they are comfortable with.
# AlgoKit Project
`algokit project` is a collection of commands and command groups useful for managing algokit compliant [project workspaces](./init#workspaces).
## Overview
The `algokit project` command group is designed to simplify the management of AlgoKit projects. It provides a suite of tools to initialize, deploy, link, list, and run various components within a project workspace. This command group ensures that developers can efficiently handle the lifecycle of their projects, from bootstrapping to deployment and beyond.
### What is a Project?
In the context of AlgoKit, a “project” refers to a structured standalone or monorepo workspace that includes all the necessary components for developing, testing, and deploying Algorand applications. This may include smart contracts, frontend applications, and any associated configurations. In the context of the CLI, the `algokit project` commands help manage these components cohesively.
The orchestration between workspaces, standalone projects, and custom commands is designed to provide a seamless development experience. Below is a high-level overview of how these components interact within the AlgoKit ecosystem.
```mermaid
graph TD;
A[`algokit project` command group] --> B["Workspace (.algokit.toml)"];
A --> C["Standalone Project (.algokit.toml)"];
B --> D["Sub-Project 1 (.algokit.toml)"];
B --> E["Sub-Project 2 (.algokit.toml)"];
C --> F["Custom Commands defined in .algokit.toml"];
D --> F;
E --> F;
```
* **AlgoKit Project**: The root command that encompasses all project-related functionalities.
* **Workspace**: A root folder that is managing multiple related sub-projects.
* **Standalone Project**: An isolated project structure for simpler applications.
* **Custom Commands**: Commands defined by the user in the `.algokit.toml` and automatically injected into the `algokit project run` command group.
### Workspaces vs Standalone Projects
As mentioned, AlgoKit supports two distinct project structures: Workspaces and Standalone Projects. This flexibility allows developers to choose the most suitable approach for their project’s needs.
### Workspaces
Workspaces are designed for managing multiple related projects under a single root directory. This approach is beneficial for complex applications that consist of multiple sub-projects, such as a smart contract and a corresponding frontend application. Workspaces help in organizing these sub-projects in a structured manner, making it easier to manage dependencies and shared configurations.
To initialize a project within a workspace, use the `--workspace` flag. If a workspace does not already exist, AlgoKit will create one for you by default (unless you disable it via `--no-workspace` flag). Once established, new projects can be added to this workspace, allowing for centralized management.
To mark your project as `workspace` fill in the following in your `.algokit.toml` file:
```toml
[project]
type = 'workspace' # type specifying if the project is a workspace or standalone
projects_root_path = 'projects' # path to the root folder containing all sub-projects in the workspace
```
#### VSCode optimizations
AlgoKit has a set of minor optimizations for VSCode users that are useful to be aware of:
* Templates created with the `--workspace` flag automatically include a VSCode code-workspace file. New projects added to an AlgoKit workspace are also integrated into an existing VSCode workspace.
* Using the `--ide` flag with `init` triggers automatic prompts to open the project and, if available, the code workspace in VSCode.
#### Handling of the `.github` Folder
A key aspect of using the `--workspace` flag is how the `.github` folder is managed. This folder, which contains GitHub-specific configurations such as workflows and issue templates, is moved from the project directory to the root of the workspace. This move is necessary because GitHub does not recognize workflows located in subdirectories.
Here’s a simplified overview of what happens:
1. If a `.github` folder is found in your project, its contents are transferred to the workspace’s root `.github` folder.
2. Files with matching names in the destination are not overwritten; they’re skipped.
3. The original `.github` folder is removed if it’s left empty after the move.
4. A notification is displayed, advising you to review the moved `.github` contents to ensure everything is in order.
This process ensures that your GitHub configurations are properly recognized at the workspace level, allowing you to utilize GitHub Actions and other features seamlessly across your projects.
### Standalone Projects
Standalone projects are suitable for simpler applications or when working on a single component. This structure is straightforward, with each project residing in its own directory, independent of others. Standalone projects are ideal for developers who prefer simplicity or are focusing on a single aspect of their application and are sure that they will not need to add more sub-projects in the future.
To create a standalone project, use the `--no-workspace` flag during initialization. This instructs AlgoKit to bypass the workspace structure and set up the project as an isolated entity.
Both workspaces and standalone projects are fully supported by AlgoKit’s suite of tools, ensuring developers can choose the structure that best fits their workflow without compromising on functionality.
To mark your project as a standalone project fill in the following in your `.algokit.toml` file:
```toml
[project]
type = {'backend' | 'contract' | 'frontend'} # currently support 3 generic categories for standalone projects
name = 'my-project' # unique name for the project inside workspace
```
> We recommend using workspaces for most projects (hence enabled by default), as it provides a more organized and scalable approach to managing multiple sub-projects. However, standalone projects are a great choice for simple applications or when you are certain that you will not need to add more sub-projects in the future, for such cases simply append `--no-workspace` when using `algokit init` command. For more details on init command please refer to [init](./init) command docs.
## Features
Dive into the features of the `algokit project` command group:
* [bootstrap](./project/bootstrap) - Bootstrap your project with AlgoKit.
* [deploy](./project/deploy) - Deploy your smart contracts effortlessly to various networks.
* [link](./project/link) - Powerful feature designed to streamline the integration between `frontend` and `contract` projects
* [list](./project/list) - Enumerate all projects within an AlgoKit workspace.
* [run](./project/run) - Define custom commands and manage their execution via `algokit` cli.
# AlgoKit Project Bootstrap
The AlgoKit Project Bootstrap feature allows you to bootstrap different project dependencies by looking up specific files in your current directory and immediate sub directories by convention.
This is useful to allow for expedited initial setup for each developer e.g. when they clone a repository for the first time. It’s also useful to provide a quick getting started experience when initialising a new project via [AlgoKit Init](./init) and meeting our goal of “nothing to debugging code in 5 minutes”.
It can bootstrap one or all of the following (with other options potentially being added in the future):
* Python Poetry projects - Installs Poetry via pipx if its not present and then runs `poetry install`
* Node.js project - Checks if npm is installed and runs `npm install`
* dotenv (.env) file - Checks for `.env.template` files, copies them to `.env` (which should be in `.gitignore` so developers can safely make local specific changes) and prompts for any blank values (so the developer has an easy chance to fill in their initial values where there isn’t a clear default).
> **Note**: Invoking bootstrap from `algokit bootstrap` is not recommended. Please prefer using `algokit project bootstrap` instead.
## Usage
Available commands and possible usage as follows:
```plaintext
$ ~ algokit project bootstrap
Usage: algokit project bootstrap [OPTIONS] COMMAND [ARGS]...
Options:
-h, --help Show this message and exit.
Commands:
all Bootstrap all aspects of the current directory and immediate sub directories by convention.
env Bootstrap .env file in the current working directory.
npm Bootstrap Node.js project in the current working directory.
poetry Bootstrap Python Poetry and install in the current working directory.
```
## Functionality
### Bootstrap .env file
The command `algokit project bootstrap env` runs two main tasks in the current directory:
* Searching for `.env.template` file in the current directory and use it as template to create a new `.env` file in the same directory.
* Prompting the user to enter a value for any empty token values in the `env.` including printing the comments above that empty token
For instance, a sample `.env.template` file as follows:
```plaintext
SERVER_URL=https://myserver.com
# This is a mandatory field to run the server, please enter a value
# For example: 5000
SERVER_PORT=
```
Running the `algokit project bootstrap env` command while the above `.env.template` file in the current directory will result in the following:
```plaintext
$ ~ algokit project bootstrap env
Copying /Users/me/my-project/.env.template to /Users/me/my-project/.env and prompting for empty values
# This is a mandatory field to run the server, please enter a value value
# For example: 5000
? Please provide a value for SERVER_PORT:
```
And when the user enters a value for `SERVER_PORT`, a new `.env` file will be created as follows (e.g. if they entered `4000` as the value):
```plaintext
SERVER_URL=https://myserver.com
# This is a mandatory field to run the server, please enter a value
# For example: 5000
SERVER_PORT=4000
```
### Bootstrap Node.js project
The command `algokit project bootstrap npm` installs Node.js project dependencies if there is a `package.json` file in the current directory by running `npm install` command to install all node modules specified in that file. However, when running in CI mode **with** present `package-lock.json` file (either by setting the `CI` environment variable or using the `--ci` flag), it will run `npm ci` instead, which provides a cleaner and more deterministic installation. If `package-lock.json` is missing, it will show a clear error message and resolution instructions. If you don’t have `npm` available it will show a clear error message and resolution instructions.
Here is an example outcome of running `algokit project bootstrap npm` command:
```plaintext
$ ~ algokit project bootstrap npm
Installing npm dependencies
npm:
npm: added 17 packages, and audited 18 packages in 3s
npm:
npm: 2 packages are looking for funding
npm: run `npm fund` for details
npm:
npm: found 0 vulnerabilities
```
### Bootstrap Python poetry project
The command `algokit project bootstrap poetry` does two main actions:
* Checking for Poetry version by running `poetry --version` and upgrades it if required
* Installing Python dependencies and setting up Python virtual environment via Poetry in the current directory by running `poetry install`.
Here is an example of running `algokit project bootstrap poetry` command:
```plaintext
$ ~ algokit project bootstrap poetry
Installing Python dependencies and setting up Python virtual environment via Poetry
poetry:
poetry: Installing dependencies from lock file
poetry:
poetry: Package operations: 1 installs, 1 update, 0 removals
poetry:
poetry: • Installing pytz (2022.7)
poetry: • Updating copier (7.0.1 -> 7.1.0a0)
poetry:
poetry: Installing the current project: algokit (0.1.0)
```
### Bootstrap all
Execute `algokit project bootstrap all` to initiate `algokit project bootstrap env`, `algokit project bootstrap npm`, and `algokit project bootstrap poetry` commands within the current directory and all its immediate sub-directories. This comprehensive command is automatically triggered following the initialization of a new project through the [AlgoKit Init](./init) command.
#### Filtering Options
The `algokit project bootstrap all` command includes flags for more granular control over the bootstrapping process within [AlgoKit workspaces](../init#workspaces):
* `--project-name`: This flag allows you to specify one or more project names to bootstrap. Only projects matching the provided names will be bootstrapped. This is particularly useful in monorepos or when working with multiple projects in the same directory structure.
* `--type`: Use this flag to limit the bootstrapping process to projects of a specific type (e.g., `frontend`, `backend`, `contract`). This option streamlines the setup process by focusing on relevant project types, reducing the overall bootstrapping time.
These new flags enhance the flexibility and efficiency of the bootstrapping process, enabling developers to tailor the setup according to project-specific needs.
## Further Reading
To learn more about the `algokit project bootstrap` command, please refer to [bootstrap](/reference/algokit-cli/reference#bootstrap) in the AlgoKit CLI reference documentation.
# AlgoKit Project Deploy
Deploy your smart contracts effortlessly to various networks with the algokit project deploy feature. This feature is essential for automation in CI/CD pipelines and for seamless deployment to various Algorand network environments.
> **Note**: Invoking deploy from `algokit deploy` is not recommended. Please prefer using `algokit project deploy` instead.
## Usage
```sh
$ algokit project deploy [OPTIONS] [ENVIRONMENT_NAME] [EXTRA_ARGS]
```
This command deploys smart contracts from an AlgoKit compliant repository to the specified network.
### Options
* `--command, -C TEXT`: Specifies a custom deploy command. If this option is not provided, the deploy command will be loaded from the `.algokit.toml` file.
* `--interactive / --non-interactive, --ci`: Enables or disables the interactive prompt for mnemonics. When the CI environment variable is set, it defaults to non-interactive.
* `--path, -P DIRECTORY`: Specifies the project directory. If not provided, the current working directory will be used.
* `--deployer`: Specifies the deployer alias. If not provided and if the deployer is specified in `.algokit.toml` file its mnemonic will be prompted.
* `--dispenser`: Specifies the dispenser alias. If not provided and if the dispenser is specified in `.algokit.toml` file its mnemonic will be prompted.
* `-p, --project-name`: (Optional) Projects to execute the command on. Defaults to all projects found in the current directory. Option is mutually exclusive with `--command`.
* `-h, --help`: Show this message and exit.
* `[EXTRA_ARGS]...`: Additional arguments to pass to the deploy command. For instance, `algokit project deploy -- {custom args}`. This will ensure that the extra arguments are passed to the deploy command specified in the `.algokit.toml` file or directly via `--command` option.
## Environment files
AlgoKit `deploy` employs both a general and network-specific environment file strategy. This allows you to set environment variables that are applicable across all networks and others that are specific to a given network.
The general environment file (`.env`) should be placed at the root of your project. This file will be used to load environment variables that are common across deployments to all networks.
For each network you’re deploying to, you can optionally have a corresponding `.env.[network_name]` file. This file should contain environment variables specific to that network. Network-specific environment variables take precedence over general environment variables.
The directory layout would look like this:
```md
.
├── ... (your project files and directories)
├── .algokit.toml # Configuration file for AlgoKit
├── .env # (OPTIONAL) General environment variables common across all deployments
└── .env.[{mainnet|testnet|localnet|betanet|custom}] # (OPTIONAL) Environment variables specific to deployments to a network
```
> ⚠️ Please note that creating `.env` and `.env.[network_name]` files is only necessary if you’re deploying to a custom network or if you want to override the default network configurations provided by AlgoKit. AlgoKit comes with predefined configurations for popular networks like `TestNet`, `MainNet`, `BetaNet`, or AlgoKit’s `LocalNet`.
The logic for loading environment variables is as follows:
* If a `.env` file exists, the environment variables contained in it are loaded first.
* If a `.env.[network_name]` file exists, the environment variables in it are loaded, overriding any previously loaded values from the `.env` file for the same variables.
### Default Network Configurations
The `deploy` command assumes default configurations for `mainnet`, `localnet`, and `testnet` environments. If you’re deploying to one of these networks and haven’t provided specific environment variables, AlgoKit will use these default values:
* **Localnet**:
* `ALGOD_TOKEN`: “aaaaaaaaaaaaaaaaaaaaaaaaaaaaaaaaaaaaaaaaaaaaaaaaaaaaaaaaaaaaaaaa”
* `ALGOD_SERVER`: “”
* `ALGOD_PORT`: “4001”
* `INDEXER_TOKEN`: “aaaaaaaaaaaaaaaaaaaaaaaaaaaaaaaaaaaaaaaaaaaaaaaaaaaaaaaaaaaaaaaa”
* `INDEXER_SERVER`: “”
* `INDEXER_PORT`: “8980”
* **Mainnet**:
* `ALGOD_SERVER`: “”
* `INDEXER_SERVER`: “”
* **Testnet**:
* `ALGOD_SERVER`: “”
* `INDEXER_SERVER`: “”
These default values are used when no specific `.env.[network_name]` file is present and the corresponding environment variables are not set. This feature simplifies the deployment process for these common networks, reducing the need for manual configuration in many cases.
If you need to override these defaults or add additional configuration for these networks, you can still do so by creating the appropriate `.env.[network_name]` file or setting the environment variables explicitly or via generic `.env` file.
## AlgoKit Configuration File
AlgoKit uses a configuration file called `.algokit.toml` in the root of your project. The configuration file can be created using the `algokit init` command. This file will define the deployment commands for the various network environments that you want to target.
Here’s an example of what the `.algokit.toml` file might look like. When deploying it will prompt for the `DEPLOYER_MNEMONIC` secret unless it is already defined as an environment variable or is deploying to localnet.
```toml
[algokit]
min_version = "v{latest_version}"
[project]
... # project configuration and custom commands
[project.deploy]
command = "poetry run python -m smart_contracts deploy"
environment_secrets = [
"DEPLOYER_MNEMONIC",
]
[project.deploy.localnet]
environment_secrets = []
```
The `command` key under each `[project.deploy.{network_name}]` section should contain a string that represents the deployment command for that particular network. If a `command` key is not provided in a network-specific section, the command from the general `[project.deploy]` section will be used.
The `environment_secrets` key should contain a list of names of environment variables that should be treated as secrets. This can be defined in the general `[project.deploy]` section, as well as in the network-specific sections. The environment-specific secrets will be added to the general secrets during deployment.
The `[algokit]` section with the `min_version` key allows you to specify the minimum version of AlgoKit that the project requires.
This way, you can define common deployment logic and environment secrets in the `[project.deploy]` section, and provide overrides or additions for specific environments in the `[project.deploy.{environment_name}]` sections.
## Deploying to a Specific Network
The command requires a `ENVIRONMENT` argument, which specifies the network environment to which the smart contracts will be deployed. Please note, the `environment` argument is case-sensitive.
Example:
```sh
$ algokit project deploy testnet
```
This command deploys the smart contracts to the testnet.
## Deploying to a Specific Network from a workspace with project name filter
The command requires a `ENVIRONMENT` argument, which specifies the network environment to which the smart contracts will be deployed. Please note, the `environment` argument is case-sensitive.
Example:
Root `.algokit.toml`:
```toml
[project]
type = "workspace"
projects_root_dir = 'projects'
```
Contract project `.algokit.toml`:
```toml
[project]
type = "contract"
name = "myproject"
[project.deploy]
command = "{custom_deploy_command}"
```
```bash
$ algokit project deploy testnet --project-name myproject
```
This command deploys the smart contracts to TestNet from a sub project named ‘myproject’, which is available within the current workspace. All `.env` loading logic described in [Environment files](#environment-files) is applicable, execution from the workspace root orchestrates invoking the deploy command from the working directory of each applicable sub project.
## Custom Project Directory
By default, the deploy command looks for the `.algokit.toml` file in the current working directory. You can specify a custom project directory using the `--project-dir` option.
Example:
```sh
$ algokit project deploy testnet --project-dir="path/to/project"
```
## Custom Deploy Command
You can provide a custom deploy command using the `--custom-deploy-command` option. If this option is not provided, the deploy command will be loaded from the `.algokit.toml` file.
Example:
```sh
$ algokit project deploy testnet --custom-deploy-command="your-custom-command"
```
> ⚠️ Please note, chaining multiple commands with `&&` is **not** currently supported. If you need to run multiple commands, you can defer to a custom script. Refer to [run](../project/run#custom-command-injection) for scenarios where multiple sub-command invocations are required.
## CI Mode
By using the `--ci` or `--non-interactive` flag, you can skip the interactive prompt for mnemonics.
This is useful in CI/CD environments where user interaction is not possible. When using this flag, you need to make sure that the mnemonics are set as environment variables.
Example:
```sh
$ algokit project deploy testnet --ci
```
## Passing Extra Arguments
You can pass additional arguments to the deploy command. These extra arguments will be appended to the end of the deploy command specified in your `.algokit.toml` file or to the command specified directly via `--command` option.
To pass extra arguments, use `--` after the AlgoKit command and options to mark the distinction between arguments used by the CLI and arguments to be passed as extras to the deploy command/script.
Example:
```sh
$ algokit project deploy testnet -- my_contract_name --some_contract_related_param
```
In this example, `my_contract_name` and `--some_contract_related_param` are extra arguments that can be utilized by the custom deploy command invocation, for instance, to filter the deployment to a specific contract or modify deployment behavior.
## Example of a Full Deployment
```sh
$ algokit project deploy testnet --custom-deploy-command="your-custom-command"
```
This example shows how to deploy smart contracts to the testnet using a custom deploy command. This also assumes that .algokit.toml file is present in the current working directory, and .env.testnet file is present in the current working directory and contains the required environment variables for deploying to TestNet environment.
## Further Reading
For in-depth details, visit the [deploy](/reference/algokit-cli/reference#deploy) section in the AlgoKit CLI reference documentation.
# AlgoKit Project Link Command
The `algokit project link` command is a powerful feature designed to streamline the integration between `frontend` and `contract` typed projects within the AlgoKit ecosystem. This command facilitates the automatic path resolution and invocation of [`algokit generate client`](../generate#1-typed-clients) on `contract` projects available in the workspace, making it easier to integrate smart contracts with frontend applications.
## Usage
To use the `link` command, navigate to the root directory of your standalone frontend project and execute:
```sh
$ algokit project link [OPTIONS]
```
This command must be invoked from the root of a standalone ‘frontend’ typed project.
## Options
* `--project-name`, `-p`: Specify one or more contract projects for the command. If not provided, the command defaults to all contract projects in the current workspace. This option can be repeated to specify multiple projects.
* `--language`, `-l`: Set the programming language of the generated client code. The default is `typescript`, but you can specify other supported languages as well.
* `--all`, `-a`: Link all contract projects with the frontend project. This option is mutually exclusive with `--project-name`.
* `--fail-fast`, `-f`: Exit immediately if at least one client generation process fails. This is useful for CI/CD pipelines where you want to ensure all clients are correctly generated before proceeding.
* `--version`, `-v`: Allows specifying the version of the client generator to use when generating client code for contract projects. This can be particularly useful for ensuring consistency across different environments or when a specific version of the client generator includes features or fixes that are necessary for your project.
## How It Works
Below is a visual representation of the `algokit project link` command in action:
```mermaid
graph LR
F[Frontend Project] -->|algokit generate client| C1[Contract Project 1]
F -->|algokit generate client| C2[Contract Project 2]
F -->|algokit generate client| CN[Contract Project N]
C1 -->|algokit generate client| F
C2 -->|algokit generate client| F
CN -->|algokit generate client| F
classDef frontend fill:#f9f,stroke:#333,stroke-width:4px;
classDef contract fill:#bbf,stroke:#333,stroke-width:2px;
class F frontend;
class C1,C2,CN contract;
```
1. **Project Type Verification**: The command first verifies that it is being executed within a standalone frontend project by checking the project’s type in the `.algokit.toml` configuration file.
2. **Contract Project Selection**: Based on the provided options, it selects the contract projects to link. This can be all contract projects within the workspace, a subset specified by name, or a single project selected interactively.
3. **Client Code Generation**: For each selected contract project, it generates typed client code using the specified language. The generated code is placed in the frontend project’s directory specified for contract clients.
4. **Feedback**: The command provides feedback for each contract project it processes, indicating success or failure in generating the client code.
## Example
Linking all contract projects with a frontend project and generating TypeScript clients:
```sh
$ algokit project link --all -l typescript
```
This command will generate TypeScript clients for all contract projects and place them in the specified directory within the frontend project.
## Further Reading
To learn more about the `algokit project link` command, please refer to [link](/reference/algokit-cli/reference#link) in the AlgoKit CLI reference documentation.
# AlgoKit Project List Command
The `algokit project list` command is designed to enumerate all projects within an AlgoKit workspace. This command is particularly useful in workspace environments where multiple projects are managed under a single root directory. It provides a straightforward way to view all the projects that are part of the workspace.
## Usage
To use the `list` command, execute the following **anywhere** within an AlgoKit workspace:
```sh
$ algokit project list [OPTIONS] [WORKSPACE_PATH]
```
* `WORKSPACE_PATH` is an optional argument that specifies the path to the workspace. If not provided, the current directory (`.`) is used as the default workspace path.
## How It Works
1. **Workspace Verification**: Initially, the command checks if the specified directory (or the current directory by default) is an AlgoKit workspace. This is determined by looking for a `.algokit.toml` configuration file and verifying if the `project.type` is set to `workspace`.
2. **Project Enumeration**: If the directory is confirmed as a workspace, the command proceeds to enumerate all projects within the workspace. This is achieved by scanning the workspace’s subdirectories for `.algokit.toml` files and extracting project names.
3. **Output**: The names of all discovered projects are printed to the console. If the `-v` or `--verbose` option is used, additional details about each project are displayed.
## Example Output
```sh
workspace: {path_to_workspace} 📁
- myapp ({path_to_myapp}) 📜
- myproject-app ({path_to_myproject_app}) 🖥️
```
## Error Handling
If the command is executed in a directory that is not recognized as an AlgoKit workspace, it will issue a warning:
```sh
WARNING: No AlgoKit workspace found. Check [project.type] definition at .algokit.toml
```
This message indicates that either the current directory does not contain a `.algokit.toml` file or the `project.type` within the file is not set to `workspace`.
## Further Reading
To learn more about the `algokit project list` command, please refer to [list](/reference/algokit-cli/reference#list) in the AlgoKit CLI reference documentation.
# AlgoKit Project Run
The `algokit project run` command allows defining custom commands to execute at standalone project level or being orchestrated from a workspace containing multiple standalone projects.
## Usage
```sh
$ algokit project run [OPTIONS] COMMAND [ARGS]
```
This command executes a custom command defined in the `.algokit.toml` file of the current project or workspace.
### Options
* `-l, --list`: List all projects associated with the workspace command. (Optional)
* `-p, --project-name`: Execute the command on specified projects. Defaults to all projects in the current directory. (Optional)
* `-t, --type`: Limit execution to specific project types if executing from workspace. (Optional)
* `-s, --sequential`: Execute workspace commands sequentially, for cases where you do not have a preference on the execution order, but want to disable concurrency. (Optional, defaults to concurrent)
* `[ARGS]...`: Additional arguments to pass to the custom command. These will be appended to the end of the command specified in the `.algokit.toml` file.
To get detailed help on the above options, execute:
```bash
algokit project run {name_of_your_command} --help
```
### Workspace vs Standalone Projects
AlgoKit supports two main types of project structures: Workspaces and Standalone Projects. This flexibility caters to the diverse needs of developers, whether managing multiple related projects or focusing on a single application.
* **Workspaces**: Ideal for complex applications comprising multiple sub-projects. Workspaces facilitate organized management of these sub-projects under a single root directory, streamlining dependency management and shared configurations.
* **Standalone Projects**: Suited for simpler applications or when working on a single component. This structure offers straightforward project management, with each project residing in its own directory, independent of others.
> Please note, instantiating a workspace inside a workspace (aka ‘workspace nesting’) is not supported and not recommended. When you want to add a new project into existing workspace make sure to run `algokit init` **from the root of the workspace**
### Custom Command Injection
AlgoKit enhances project automation by allowing the injection of custom commands into the `.algokit.toml` configuration file. This feature enables developers to tailor the project setup to their specific needs, automating tasks such as deploying to different network environments or integrating with CI/CD pipelines.
## How It Works
The orchestration between workspaces, standalone projects, and custom commands is designed to provide a seamless development experience. Below is a high-level overview of how these components interact within the AlgoKit ecosystem.
```mermaid
graph TD;
A[AlgoKit Project] --> B["Workspace (.algokit.toml)"];
A --> C["Standalone Project (.algokit.toml)"];
B --> D["Sub-Project 1 (.algokit.toml)"];
B --> E["Sub-Project 2 (.algokit.toml)"];
C --> F["Custom Commands defined in .algokit.toml"];
D --> F;
E --> F;
```
* **AlgoKit Project**: The root command that encompasses all project-related functionalities.
* **Workspace**: A root folder that is managing multiple related sub-projects.
* **Standalone Project**: An isolated project structure for simpler applications.
* **Custom Commands**: Commands defined by the user in the `.algokit.toml` and automatically injected into the `algokit project run` command group.
### Workspace cli options
Below is only visible and available when running from a workspace root.
* `-l, --list`: List all projects associated with the workspace command. (Optional)
* `-p, --project-name`: Execute the command on specified projects. Defaults to all projects in the current directory. (Optional)
* `-t, --type`: Limit execution to specific project types if executing from workspace. (Optional) To get a detailed help on the above commands execute:
```bash
algokit project run {name_of_your_command} --help
```
## Examples
Assume you have a default workspace with the following structure:
```bash
my_workspace
├── .algokit.toml
├── projects
│ ├── project1
│ │ └── .algokit.toml
│ └── project2
│ └── .algokit.toml
```
The workspace configuration file is defined as follows:
```toml
# ... other non [project.run] related metadata
[project]
type = 'workspace'
projects_root_path = 'projects'
# ... other non [project.run] related metadata
```
Standalone configuration files are defined as follows:
```toml
# ... other non [project.run] related metadata
[project]
type = 'contract'
name = 'project_a'
[project.run]
hello = { commands = ['echo hello'], description = 'Prints hello' }
# ... other non [project.run] related metadata
```
```toml
# ... other non [project.run] related metadata
[project]
type = 'frontend'
name = 'project_b'
[project.run]
hello = { commands = ['echo hello'], description = 'Prints hello' }
# ... other non [project.run] related metadata
```
Executing `algokit project run hello` from the root of the workspace will concurrently execute `echo hello` in both `project_a` and `project_b` directories.
Executing `algokit project run hello` from the root of `project_(a|b)` will execute `echo hello` in the `project_(a|b)` directory.
### Controlling Execution Order
Customize the execution order of commands in workspaces for precise control:
1. Define order in `.algokit.toml`:
```yaml
[project]
type = 'workspace'
projects_root_path = 'projects'
[project.run]
hello = ['project_a', 'project_b']
```
2. Execution behavior:
* Projects are executed in the specified order
* Invalid project names are skipped
* Partial project lists: Specified projects run first, others follow
> Note: Explicit order always triggers sequential execution.
### Controlling Concurrency
You can control whether commands are executed concurrently or sequentially:
1. Use command-line options:
```sh
$ algokit project run hello -s # or --sequential
$ algokit project run hello -c # or --concurrent
```
2. Behavior:
* Default: Concurrent execution
* Sequential: Use `-s` or `--sequential` flag
* Concurrent: Use `-c` or `--concurrent` flag or omit the flag (defaults to concurrent)
> Note: When an explicit order is specified in `.algokit.toml`, execution is always sequential regardless of these flags.
### Passing Extra Arguments
You can pass additional arguments to the custom command. These extra arguments will be appended to the end of the command specified in your `.algokit.toml` file.
Example:
```sh
$ algokit project run hello -- world
```
In this example, if the `hello` command in `.algokit.toml` is defined as `echo "Hello"`, the actual command executed will be `echo "Hello" world`.
## Further Reading
To learn more about the `algokit project run` command, please refer to [run](/reference/algokit-cli/reference#run) in the AlgoKit CLI reference documentation.
# AlgoKit Tasks
AlgoKit Tasks are a collection of handy tasks that can be used to perform various operations on Algorand blockchain.
## Features
* [Wallet Aliasing](./tasks/wallet) - Manage your Algorand addresses and accounts effortlessly with the AlgoKit Wallet feature. This feature allows you to create short aliases for your addresses and accounts on AlgoKit CLI.
* [Vanity Address Generation](./tasks/vanity_address) - Generate vanity addresses for your Algorand accounts with the AlgoKit Vanity feature. This feature allows you to generate Algorand addresses which contains a specific keyword of your choice.
* [Transfer Assets or Algos](./tasks/transfer) - Transfer Algos or Assets from one account to another with the AlgoKit Transfer feature. This feature allows you to transfer Algos or Assets from one account to another on Algorand blockchain.
* [Opt-(in|out) Assets](./tasks/opt) - Opt-in or opt-out of Algorand Asset(s). Supports single or multiple assets.
* [Signing transactions](./tasks/sign) - Sign goal clerk compatible Algorand transactions.
* [Sending transactions](./tasks/send) - Send signed goal clerk compatible Algorand transactions.
* [NFD lookups](./tasks/nfd) - Perform a lookup via NFD domain or address, returning the associated address or domain respectively using the AlgoKit CLI.
* [IPFS uploads](./tasks/ipfs) - Upload files to IPFS.
* [Asset minting](./tasks/mint) - Mint new fungible or non-fungible assets on Algorand.
* [Analyze TEAL code](./tasks/analyze) - Analyze TEAL code using [`tealer`](https://github.com/crytic/tealer) integration for common vulnerabilities.
# AlgoKit Task Analyze
The `analyze` task is a command-line utility that analyzes TEAL programs for common vulnerabilities using [Tealer](https://github.com/crytic/tealer) integration. It allows you to detect a range of common vulnerabilities in code written in TEAL. For full list of vulnerability detectors refer to [Tealer documentation](https://github.com/crytic/tealer?tab=readme-ov-file#detectors).
## Usage
```bash
algokit task analyze INPUT_PATHS [OPTIONS]
```
### Arguments
* `INPUT_PATHS`: Paths to the TEAL files or directories containing TEAL files to be analyzed. This argument is required.
### Options
* `-r, --recursive`: Recursively search for all TEAL files within any provided directories.
* `--force`: Force verification without the disclaimer confirmation prompt.
* `--diff`: Exit with a non-zero code if differences are found between current and last reports.
* `-o, --output OUTPUT_PATH`: Directory path where to store the reports of the static analysis.
* `-e, --exclude DETECTORS`: Exclude specific vulnerabilities from the analysis. Supports multiple exclusions in a single run.
## Example
```bash
algokit task analyze ./contracts -r --exclude rekey-to --exclude missing-fee-check
```
This command will recursively analyze all TEAL files in the `contracts` directory and exclude the `missing-fee-check` vulnerability from the analysis.
## Security considerations
This task uses [`tealer`](https://github.com/crytic/tealer), a third-party tool, to suggest improvements for your TEAL programs, but remember to always test your smart contracts code, follow modern software engineering practices and use the [guidelines for smart contract development](https://developer.algorand.org/docs/get-details/dapps/smart-contracts/guidelines/). This should not be used as a substitute for an actual audit.
# AlgoKit Task IPFS
The AlgoKit IPFS feature allows you to interact with the IPFS [InterPlanetary File System](https://ipfs.tech/) using the [Piñata provider](https://www.pinata.cloud/). This feature supports logging in and out of the Piñata provider, and uploading files to IPFS.
## Usage
Available commands and possible usage as follows:
```bash
$ ~ algokit task ipfs
Usage: algokit task ipfs [OPTIONS]
Upload files to IPFS using Pinata provider.
Options:
-f, --file PATH Path to the file to upload. [required]
-n, --name TEXT Human readable name for this upload, for use in file listings.
-h, --help Show this message and exit.
```
## Options
* `--file, -f PATH`: Specifies the path to the file to upload. This option is required.
* `--name, -n TEXT`: Specifies a human readable name for this upload, for use in file listings.
## Prerequisites
Before you can use this feature, you need to ensure that you have signed up for a Piñata account and have a JWT. You can sign up for a Piñata account by reading [quickstart](https://docs.pinata.cloud/docs/getting-started).
## Login
Please note, you need to login to the Piñata provider before you can upload files. You can do this using the `login` command:
```bash
$ algokit task ipfs login
```
This will prompt you to enter your Piñata JWT. Once you are logged in, you can upload files to IPFS.
## Upload
To upload a file to IPFS, you can use the `ipfs` command as follows:
```bash
$ algokit task ipfs --file {PATH_TO_YOUR_FILE}
```
This will upload the file to IPFS using the Piñata provider and return the CID (Content Identifier) of the uploaded file.
## Logout
If you want to logout from the Piñata provider, you can use the `logout` command:
```bash
$ algokit task ipfs logout
```
This will remove your Piñata JWT from the keyring.
## File Size Limit
Please note, the maximum file size that can be uploaded is 100MB. If you try to upload a file larger than this, you will receive an error.
## Further Reading
For in-depth details, visit the [ipfs section](/reference/algokit-cli/reference#ipfs) in the AlgoKit CLI reference documentation.
# AlgoKit Task Mint
The AlgoKit Mint feature allows you to mint new fungible or non-fungible assets on the Algorand blockchain. This feature supports the creation of assets, validation of asset parameters, and uploading of asset metadata and image to IPFS using the Piñata provider. Immutable assets are compliant with [ARC3](https://arc.algorand.foundation/ARCs/arc-0003), while mutable are based using [ARC19](https://arc.algorand.foundation/ARCs/arc-0019) standard.
## Usage
Available commands and possible usage as follows:
```bash
Usage: algokit task mint [OPTIONS]
Mint new fungible or non-fungible assets on Algorand.
Options:
--creator TEXT Address or alias of the asset creator. [required]
-n, --name TEXT Asset name. [required]
-u, --unit TEXT Unit name of the asset. [required]
-t, --total INTEGER Total supply of the asset. Defaults to 1.
-d, --decimals INTEGER Number of decimals. Defaults to 0.
-i, --image FILE Path to the asset image file to be uploaded to IPFS. [required]
-m, --metadata FILE Path to the ARC19 compliant asset metadata file to be uploaded to IPFS. If not
provided, a default metadata object will be generated automatically based on asset-
name, decimals and image. For more details refer to
https://arc.algorand.foundation/ARCs/arc-0003#json-metadata-file-schema.
--mutable / --immutable Whether the asset should be mutable or immutable. Refers to `ARC19` by default.
--nft / --ft Whether the asset should be validated as NFT or FT. Refers to NFT by default and
validates canonical definitions of pure or fractional NFTs as per ARC3 standard.
-n, --network [localnet|testnet|mainnet]
Network to use. Refers to `localnet` by default.
-h, --help Show this message and exit.
```
## Options
* `--creator TEXT`: Specifies the address or alias of the asset creator. This option is required.
* `-n, --name TEXT`: Specifies the asset name. This option is required.
* `-u, --unit TEXT`: Specifies the unit name of the asset. This option is required.
* `-t, --total INTEGER`: Specifies the total supply of the asset. Defaults to 1.
* `-d, --decimals INTEGER`: Specifies the number of decimals. Defaults to 0.
* `-i, --image PATH`: Specifies the path to the asset image file to be uploaded to IPFS. This option is required.
* `-m, --metadata PATH`: Specifies the path to the ARC19 compliant asset metadata file to be uploaded to IPFS. If not provided, a default metadata object will be generated automatically based on asset-name, decimals and image.
* `--mutable / --immutable`: Specifies whether the asset should be mutable or immutable. Refers to `ARC19` by default.
* `--nft / --ft`: Specifies whether the asset should be validated as NFT or FT. Refers to NFT by default and validates canonical definitions of pure or fractional NFTs as per ARC3 standard.
* `-n, --network [localnet|testnet|mainnet]`: Specifies the network to use. Refers to `localnet` by default.
## Example
To mint a new asset in interactive mode, you can use the mint command as follows:
```bash
$ algokit task mint
```
This will interactively prompt you for the required information, upload the asset image and metadata to IPFS using the Piñata provider and mint a new asset on the Algorand blockchain. The [asset’s metadata](https://arc.algorand.foundation/ARCs/arc-0003#json-metadata-file-schema) will be generated automatically based on the provided asset name, decimals, and image.
If you want to provide a custom metadata file, you can use the —metadata flag:
```bash
$ algokit task mint --metadata {PATH_TO_METADATA}
```
If the minting process is successful, the asset ID and transaction ID will be output to the console.
For non interactive mode, refer to usage section above for available options.
> Please note, creator account must have at least 0.2 Algos available to cover minimum balance requirements.
## Further Reading
For in-depth details, visit the [mint section](/reference/algokit-cli/reference#mint) in the AlgoKit CLI reference documentation.
# AlgoKit Task NFD Lookup
The AlgoKit NFD Lookup feature allows you to perform a lookup via NFD domain or address, returning the associated address or domain respectively using the AlgoKit CLI. The feature is powered by [NFDomains MainNet API](https://api-docs.nf.domains/).
## Usage
Available commands and possible usage as follows:
```bash
$ ~ algokit task nfd-lookup
Usage: algokit task nfd-lookup [OPTIONS] VALUE
Perform a lookup via NFD domain or address, returning the associated address or domain respectively.
Options:
-o, --output [full|tiny|address] Output format for NFD API response. Defaults to address|domain resolved.
-h, --help Show this message and exit.
```
## Options
* `VALUE`: Specifies the NFD domain or Algorand address to lookup. This argument is required.
* `--output, -o [full|tiny|address]`: Specifies the output format for NFD API response. Defaults to address|domain resolved.
> When using the `full` and `tiny` output formats, please be aware that these match the [views in get requests of the NFD API](https://api-docs.nf.domains/quick-start#views-in-get-requests). The `address` output format, which is used by default, refers to the respective domain name or address resolved and outputs it as a string (if found).
## Example
To perform a lookup, you can use the nfd-lookup command as follows:
```bash
$ algokit task nfd-lookup {NFD_DOMAIN_OR_ALGORAND_ADDRESS}
```
This will perform a lookup and return the associated address or domain. If you want to specify the output format, you can use the —output flag:
```bash
$ algokit task nfd-lookup {NFD_DOMAIN_OR_ALGORAND_ADDRESS} --output full
```
If the lookup is successful, the result will be output to the console in a JSON format.
## Further Reading
For in-depth details, visit the [nfd-lookup section](/reference/algokit-cli/reference#nfd-lookup) in the AlgoKit CLI reference documentation.
# AlgoKit Task Asset opt-(in|out)
AlgoKit Task Asset opt-(in|out) allows you to opt-in or opt-out of Algorand Asset(s). This task supports single or multiple assets.
## Usage
Available commands and possible usage as follows:
### Opt-in
```bash
Usage: algokit task opt-in [OPTIONS] ASSET_IDS...
Opt-in to an asset(s). This is required before you can receive an asset.
Use -n to specify localnet, testnet, or mainnet. To supply multiple asset IDs, separate them with a whitespace.
Options:
--account, -a TEXT Address or alias of the signer account. [required]
-n, --network [localnet|testnet|mainnet]
Network to use. Refers to `localnet` by default.
```
### Opt-out
```bash
Usage: algokit task opt-out [OPTIONS] [ASSET_IDS]...
Opt-out of an asset(s). You can only opt out of an asset with a zero balance.
Use -n to specify localnet, testnet, or mainnet. To supply multiple asset IDs, separate them with a whitespace.
Options:
--account, -a TEXT Address or alias of the signer account. [required]
--all Opt-out of all assets with zero balance.
-n, --network [localnet|testnet|mainnet]
Network to use. Refers to `localnet` by default.
```
## Options
* `ASSET_IDS`: Specifies the asset IDs to opt-in or opt-out. To supply multiple asset IDs, separate them with a whitespace.
* `--account`, `-a` TEXT: Specifies the address or alias of the signer account. This option is required.
* `--all`: Specifies to opt-out of all assets with zero balance.
* `-n`, `--network` \[localnet|testnet|mainnet]: Specifies the network to use. Refers to localnet by default.
## Example
Example
To opt-in to an asset(s), you can use the opt-in command as follows:
```bash
$ algokit task opt-in --account {YOUR_ACCOUNT} {ASSET_ID_1} {ASSET_ID_2} {ASSET_ID_3} ...
```
To opt-out of an asset(s), you can use the opt-out command as follows:
```bash
$ algokit task opt-out --account {YOUR_ACCOUNT} {ASSET_ID_1} {ASSET_ID_2} ...
```
To opt-out of all assets with zero balance, you can use the opt-out command with the `--all` flag:
```bash
$ algokit task opt-out --account {YOUR_ACCOUNT} --all
```
> Please note, the account must have sufficient balance to cover the transaction fees.
## Further Reading
For in-depth details, visit the [opt-in](/reference/algokit-cli/reference#opt-in) and [opt-out](/reference/algokit-cli/reference#opt-out) sections in the AlgoKit CLI reference documentation.
# AlgoKit Task Send
The AlgoKit Send feature allows you to send signed Algorand transaction(s) to a specified network using the AlgoKit CLI. This feature supports sending single or multiple transactions, either provided directly as a base64 encoded string or from a binary file.
## Usage
Available commands and possible usage as follows:
```bash
$ ~ algokit task send
Usage: algokit task send [OPTIONS]
Send a signed transaction to the given network.
Options:
-f, --file FILE Single or multiple message pack encoded signed transactions from binary file to
send. Option is mutually exclusive with transaction.
-t, --transaction TEXT Base64 encoded signed transaction to send. Option is mutually exclusive with file.
-n, --network [localnet|testnet|mainnet]
Network to use. Refers to `localnet` by default.
-h, --help Show this message and exit.
```
## Options
* `--file, -f PATH`: Specifies the path to a binary file containing single or multiple message pack encoded signed transactions to send. Mutually exclusive with `--transaction` option.
* `--transaction, -t TEXT`: Specifies a single base64 encoded signed transaction to send. Mutually exclusive with `--file` option.
* `--network, -n [localnet|testnet|mainnet]`: Specifies the network to which the transactions will be sent. Refers to `localnet` by default.
> Please note, `--transaction` flag only supports sending a single transaction. If you want to send multiple transactions, you can use the `--file` flag to specify a binary file containing multiple transactions.
## Example
To send a transaction, you can use the `send` command as follows:
```bash
$ algokit task send --file {PATH_TO_BINARY_FILE_CONTAINING_SIGNED_TRANSACTIONS}
```
This will send the transactions to the default `localnet` network. If you want to send the transactions to a different network, you can use the `--network` flag:
```bash
$ algokit task send --transaction {YOUR_BASE64_ENCODED_SIGNED_TRANSACTION} --network testnet
```
You can also pipe in the `stdout` of `algokit sign` command:
```bash
$ algokit task sign --account {YOUR_ACCOUNT_ALIAS OR YOUR_ADDRESS} --file {PATH_TO_BINARY_FILE_CONTAINING_TRANSACTIONS} --force | algokit task send --network {network_name}
```
If the transaction is successfully sent, the transaction ID (txid) will be output to the console. You can check the transaction status at the provided transaction explorer URL.
## Goal Compatibility
Please note, at the moment this feature only supports [`goal clerk`](https://developer.algorand.org/docs/clis/goal/clerk/clerk/) compatible transaction objects.
## Further Reading
For in-depth details, visit the [send section](/reference/algokit-cli/reference#send) in the AlgoKit CLI reference documentation.
# AlgoKit Task Sign
The AlgoKit Sign feature allows you to sign Algorand transaction(s) using the AlgoKit CLI. This feature supports signing single or multiple transactions, either provided directly as a base64 encoded string or from a binary file.
## Usage
Available commands and possible usage as follows:
```bash
$ ~ algokit task sign
Usage: algokit task sign [OPTIONS]
Sign goal clerk compatible Algorand transaction(s).
Options:
-a, --account TEXT Address or alias of the signer account. [required]
-f, --file PATH Single or multiple message pack encoded transactions from binary file to sign.
-t, --transaction TEXT Single base64 encoded transaction object to sign.
-o, --output PATH The output file path to store signed transaction(s).
--force Force signing without confirmation.
-h, --help Show this message and exit.
```
## Options
* `--account, -a TEXT`: Specifies the address or alias of the signer account. This option is required.
* `--file, -f PATH`: Specifies the path to a binary file containing single or multiple message pack encoded transactions to sign. Mutually exclusive with `--transaction` option.
* `--transaction, -t TEXT`: Specifies a single base64 encoded transaction object to sign. Mutually exclusive with `--file` option.
* `--output, -o PATH`: Specifies the output file path to store signed transaction(s).
* `--force`: If specified, it allows signing without interactive confirmation prompt.
> Please note, `--transaction` flag only supports signing a single transaction. If you want to sign multiple transactions, you can use the `--file` flag to specify a binary file containing multiple transactions.
## Example
To sign a transaction, you can use the `sign` command as follows:
```bash
$ algokit task sign --account {YOUR_ACCOUNT_ALIAS OR YOUR_ADDRESS} --file {PATH_TO_BINARY_FILE_CONTAINING_TRANSACTIONS}
```
This will prompt you to confirm the transaction details before signing. If you want to bypass the confirmation, you can use the `--force` flag:
```bash
$ algokit task sign --account {YOUR_ACCOUNT_ALIAS OR YOUR_ADDRESS} --transaction {YOUR_BASE64_ENCODED_TRANSACTION} --force
```
If the transaction is successfully signed, the signed transaction will be output to the console in a JSON format. If you want to write the signed transaction to a file, you can use the `--output` option:
```bash
$ algokit task sign --account {YOUR_ACCOUNT_ALIAS OR YOUR_ADDRESS} --transaction {YOUR_BASE64_ENCODED_TRANSACTION} --output /path/to/output/file
```
This will write the signed transaction to the specified file.
## Goal Compatibility
Please note, at the moment this feature only supports [`goal clerk`](https://developer.algorand.org/docs/clis/goal/clerk/clerk/) compatible transaction objects.
When `--output` option is not specified, the signed transaction(s) will be output to the console in a following JSON format:
```plaintext
[
{transaction_id: "TRANSACTION_ID", content: "BASE64_ENCODED_SIGNED_TRANSACTION"},
]
```
On the other hand, when `--output` option is specified, the signed transaction(s) will be stored to a file as a message pack encoded binary file.
### Encoding transactins for signing
Algorand provides a set of options in [py-algorand-sdk](https://github.com/algorand/py-algorand-sdk) and [js-algorand-sdk](https://github.com/algorand/js-algorand-sdk) to encode transactions for signing.
Encoding simple txn object in python:
```py
# Encoding single transaction as a base64 encoded string
algosdk.encoding.msgpack_encode({"txn": {YOUR_TXN_OBJECT}.dictify()}) # Resulting string can be passed directly to algokit task sign with --transaction flag
# Encoding multiple transactions as a message pack encoded binary file
algosdk.transaction.write_to_file([{YOUR_TXN_OBJECT}], "some_file.txn") # Resulting file path can be passed directly to algokit sign with --file flag
```
Encoding simple txn object in javascript:
```ts
Buffer.from(algosdk.encodeObj({ txn: txn.get_obj_for_encoding() })).toString('base64'); // Resulting string can be passed directly to algokit task sign with --transaction flag
```
## Further Reading
For in-depth details, visit the [sign section](/reference/algokit-cli/reference#sign) in the AlgoKit CLI reference documentation.
# AlgoKit Task Transfer
The AlgoKit Transfer feature allows you to transfer algos and assets between two accounts.
## Usage
Available commands and possible usage as follows:
```bash
$ ~ algokit task transfer
Usage: algokit task transfer [OPTIONS]
Transfer algos or assets from one account to another.
Options:
-s, --sender TEXT Address or alias of the sender account [required]
-r, --receiver TEXT Address or alias to an account that will receive the asset(s) [required]
--asset, --id INTEGER ASA asset id to transfer
-a, --amount INTEGER Amount to transfer [required]
--whole-units Use whole units (Algos | ASAs) instead of smallest divisible units (for example,
microAlgos). Disabled by default.
-n, --network [localnet|testnet|mainnet]
Network to use. Refers to `localnet` by default.
-h, --help Show this message and exit.
```
> Note: If you use a wallet address for the `sender` argument, you’ll be asked for the mnemonic phrase. To use a wallet alias instead, see the [wallet aliasing](wallet) task. For wallet aliases, the sender must have a stored `private key`, but the receiver doesn’t need one. This is because the sender signs and sends the transfer transaction, while the receiver reference only needs a valid Algorand address.
## Examples
### Transfer algo between accounts on LocalNet
```bash
$ ~ algokit task transfer -s {SENDER_ALIAS OR SENDER_ADDRESS} -r {RECEIVER_ALIAS OR RECEIVER_ADDRESS} -a {AMOUNT}
```
By default:
* the `amount` is in microAlgos. To use whole units, use the `--whole-units` flag.
* the `network` is `localnet`.
### Transfer asset between accounts on TestNet
```bash
$ ~ algokit task transfer -s {SENDER_ALIAS OR SENDER_ADDRESS} -r {RECEIVER_ALIAS OR RECEIVER_ADDRESS} -a {AMOUNT} --id {ASSET_ID} --network testnet
```
By default:
* the `amount` is smallest divisible unit of supplied `ASSET_ID`. To use whole units, use the `--whole-units` flag.
## Further Reading
For in-depth details, visit the [transfer section](/reference/algokit-cli/reference#transfer) in the AlgoKit CLI reference documentation.
# AlgoKit Task Vanity Address
The AlgoKit Vanity Address feature allows you to generate a vanity Algorand address. A vanity address is an address that contains a specific keyword in it. The keyword can only include uppercase letters A-Z and numbers 2-7. The longer the keyword, the longer it may take to generate a matching address.
## Usage
Available commands and possible usage as follows:
```bash
$ ~ algokit task vanity-address
Usage: algokit task vanity-address [OPTIONS] KEYWORD
Generate a vanity Algorand address. Your KEYWORD can only include letters A - Z and numbers 2 - 7. Keeping your
KEYWORD under 5 characters will usually result in faster generation. Note: The longer the KEYWORD, the longer it may
take to generate a matching address. Please be patient if you choose a long keyword.
Options:
-m, --match [start|anywhere|end]
Location where the keyword will be included. Default is start.
-o, --output [stdout|alias|file]
How the output will be presented.
-a, --alias TEXT Alias for the address. Required if output is "alias".
--file-path PATH File path where to dump the output. Required if output is "file".
-f, --force Allow overwriting an aliases without confirmation, if output option is 'alias'.
-h, --help Show this message and exit.
```
## Examples
Generate a vanity address with the keyword “ALGO” at the start of the address with default output to `stdout`:
```bash
$ ~ algokit task vanity-address ALGO
```
Generate a vanity address with the keyword “ALGO” at the start of the address with output to a file:
```bash
$ ~ algokit task vanity-address ALGO -o file -f vanity-address.txt
```
Generate a vanity address with the keyword “ALGO” anywhere in the address with output to a file:
```bash
$ ~ algokit task vanity-address ALGO -m anywhere -o file -f vanity-address.txt
```
Generate a vanity address with the keyword “ALGO” at the start of the address and store into a [wallet alias](wallet):
```bash
$ ~ algokit task vanity-address ALGO -o alias -a my-vanity-address
```
## Further Reading
For in-depth details, visit the [vanity-address section](/reference/algokit-cli/reference#vanity-address) in the AlgoKit CLI reference documentation.
# AlgoKit Task Wallet
Manage your Algorand addresses and accounts effortlessly with the AlgoKit Wallet feature. This feature allows you to create short aliases for your addresses and accounts on AlgoKit CLI.
## Usage
Available commands and possible usage as follows:
```bash
$ ~ algokit task wallet
Usage: algokit task wallet [OPTIONS] COMMAND [ARGS]...
Create short aliases for your addresses and accounts on AlgoKit CLI.
Options:
-h, --help Show this message and exit.
Commands:
add Add an address or account to be stored against a named alias.
get Get an address or account stored against a named alias.
list List all addresses and accounts stored against a named alias.
remove Remove an address or account stored against a named alias.
reset Remove all aliases.
```
## Commands
### Add
This command adds an address or account to be stored against a named alias. If the `--mnemonic` flag is used, it will prompt the user for a mnemonic phrase interactively using masked input. If the `--force` flag is used, it will allow overwriting an existing alias. Maximum number of aliases that can be stored at a time is 50.
```bash
algokit wallet add [OPTIONS] ALIAS_NAME
```
> Please note, the command is not designed to be used in CI scope, there is no option to skip interactive masked input of the mnemonic, if you want to alias an `Account` (both private and public key) entity.
#### Options
* `--address, -a TEXT`: Specifies the address of the account. This option is required.
* `--mnemonic, -m`: If specified, it prompts the user for a mnemonic phrase interactively using masked input.
* `--force, -f`: If specified, it allows overwriting an existing alias without interactive confirmation prompt.
### Get
This command retrieves an address or account stored against a named alias.
```bash
algokit wallet get ALIAS
```
### List
This command lists all addresses and accounts stored against a named alias. If a record contains a `private_key` it will show a boolean flag indicating whether it exists, actual private key values are never exposed. As a user you can obtain the content of the stored aliases by navigating to your dedicated password manager (see [keyring details](https://pypi.org/project/keyring/)).
```bash
algokit wallet list
```
### Remove
This command removes an address or account stored against a named alias. You must confirm the prompt interactively or pass `--force` | `-f` flag to ignore the prompt.
```bash
algokit wallet remove ALIAS [--force | -f]
```
### Reset
This command removes all aliases. You must confirm the prompt interactively or pass `--force` | `-f` flag to ignore the prompt.
```bash
algokit wallet reset [--force | -f]
```
## Keyring
AlgoKit relies on the [keyring](https://pypi.org/project/keyring/) library, which provides an easy way to interact with the operating system’s password manager. This abstraction allows AlgoKit to securely manage sensitive information such as mnemonics and private keys.
When you use AlgoKit to store a mnemonic, it is never printed or exposed directly in the console. Instead, the mnemonic is converted and stored as a private key in the password manager. This ensures that your sensitive information is kept secure.
To retrieve the stored mnemonic, you will need to manually navigate to your operating system’s password manager. The keyring library supports a variety of password managers across different operating systems. Here are some examples:
* On macOS, it uses the Keychain Access app.
* On Windows, it uses the Credential Manager.
* On Linux, it can use Secret Service API, KWallet, or an in-memory store depending on your setup.
> Remember, AlgoKit is designed to keep your sensitive information secure however your storage is only as secure as the device on which it is stored. Always ensure to maintain good security practices on your device, especially when dealing with mnemonics that are to be used on MainNet.
### Keyring on WSL2
WSL2 environments don’t have a keyring backend installed by default. If you want to leverage this feature, you’ll need to install one yourself. See [this GitHub issue for info](https://github.com/jaraco/keyring/issues/566#issuecomment-1792544475).
## Further Reading
For in-depth details, visit the [wallet section](/reference/algokit-cli/reference#wallet) in the AlgoKit CLI reference documentation.
# Intro to AlgoKit
AlgoKit is a comprehensive software development kit designed to streamline and accelerate the process of building decentralized applications on the Algorand blockchain. At its core, AlgoKit features a powerful command-line interface (CLI) tool that provides developers with an array of functionalities to simplify blockchain development. Along with the CLI, AlgoKit offers a suite of libraries, templates, and tools that facilitate rapid prototyping and deployment of secure, scalable, and efficient applications. Whether you’re a seasoned blockchain developer or new to the ecosystem, AlgoKit offers everything you need to harness the full potential of Algorand’s impressive tech and innovative consensus algorithm.
## AlgoKit CLI
AlgoKit CLI is a powerful set of command line tools for Algorand developers. Its goal is to help developers build and launch secure, automated, production-ready applications rapidly.
### AlgoKit CLI commands
Here is the list of commands that you can use with AlgoKit CLI.
* [Bootstrap](/algokit/algokit-cli/project/bootstrap) - Bootstrap AlgoKit project dependencies
* [Compile](/algokit/algokit-cli/compile) - Compile Algorand Python code
* [Completions](/algokit/algokit-cli/completions) - Install shell completions for AlgoKit
* [Deploy](/algokit/algokit-cli/project/deploy) - Deploy your smart contracts effortlessly to various networks
* [Dispenser](/algokit/algokit-cli/dispenser) - Fund your TestNet account with ALGOs from the AlgoKit TestNet Dispenser
* [Doctor](/algokit/algokit-cli/doctor) - Check AlgoKit installation and dependencies
* [Explore](/algokit/algokit-cli/explore) - Explore Algorand Blockchains using lora
* [Generate](/algokit/algokit-cli/generate) - Generate code for an Algorand project
* [Goal](/algokit/algokit-cli/goal) - Run the Algorand goal CLI against the AlgoKit Sandbox
* [Init](/algokit/algokit-cli/init) - Quickly initialize new projects using official Algorand Templates or community provided templates
* [LocalNet](/algokit/algokit-cli/localnet) - Manage a locally sandboxed private Algorand network
* [Project](/algokit/algokit-cli/project) - Perform a variety of AlgoKit project workspace related operations like bootstrapping development environment, deploying smart contracts, running custom commands, and more
* [Task](/algokit/algokit-cli/tasks) - Perform a variety of useful operations like signing & sending transactions, minting ASAs, creating vanity address, and more, on the Algorand blockchain
To learn more about AlgoKit CLI, refer to the following resources:
[AlgoKit CLI Documentation ](/algokit/algokit-cli/overview)Learn more about using and configuring AlgoKit CLI
[AlgoKit CLI Repo ](https://github.com/algorandfoundation/algokit-cli)Explore the codebase and contribute to its development
## Algorand Python
If you are a Python developer, you no longer need to learn a complex smart contract language to write smart contracts.
Algorand Python is a semantically and syntactically compatible, typed Python language that works with standard Python tooling and allows you to write Algorand smart contracts (apps) and logic signatures in Python. Since the code runs on the Algorand virtual machine(AVM), there are limitations and minor differences in behaviors from standard Python, but all code you write with Algorand Python is Python code.
Here is an example of a simple Hello World smart contract written in Algorand Python:
```py
from algopy import ARC4Contract, String, arc4
class HelloWorld(ARC4Contract):
@arc4.abimethod()
def hello(self, name: String) -> String:
return "Hello, " + name + "!"
```
To learn more about Algorand Python, refer to the following resources:
[Algorand Python Documentation ](/concepts/smart-contracts/languages/python/)Learn more about the design and implementation of Algorand Python
[Algorand Python Repo ](https://github.com/algorandfoundation/puya)Explore the codebase and contribute to its development
## Algorand TypeScript
If you are a TypeScript developer, you no longer need to learn a complex smart contract language to write smart contracts.
Algorand TypeScript is a semantically and syntactically compatible, typed TypeScript language that works with standard TypeScript tooling and allows you to write Algorand smart contracts (apps) and logic signatures in TypeScript. Since the code runs on the Algorand virtual machine(AVM), there are limitations and minor differences in behaviors from standard TypeScript, but all code you write with Algorand TypeScript is TypeScript code.
Here is an example of a simple Hello World smart contract written in Algorand TypeScript:
```ts
import { Contract } from '@algorandfoundation/algorand-typescript';
export class HelloWorld extends Contract {
hello(name: string): string {
return `Hello, ${name}`;
}
}
```
To learn more about Algorand TypeScript, refer to the following resources:
[Algorand TypeScript Documentation ](/concepts/smart-contracts/languages/typescript/)Learn more about the design and implementation of Algorand TypeScript
[Algorand TypeScript Repo ](https://github.com/algorandfoundation/puya-ts)Explore the codebase and contribute to its development
## AlgoKit Utils
AlgoKit Utils is a utility library recommended for you to use for all chain interactions like sending transactions, creating tokens(ASAs), calling smart contracts, and reading blockchain records. The goal of this library is to provide intuitive, productive utility functions that make it easier, quicker, and safer to build applications on Algorand. Largely, these functions wrap the underlying Algorand SDK but provide a higher-level interface with sensible defaults and capabilities for common tasks.
AlgoKit Utils is available in TypeScript and Python.
### Capabilities
The library helps you interact with and develop against the Algorand blockchain with a series of end-to-end capabilities as described below:
* [**AlgorandClient**](https://github.com/algorandfoundation/algokit-utils-ts/blob/main/docs/capabilities/algorand-client.md) - The key entrypoint to the AlgoKit Utils functionality
* Core capabilities
* [**Client management**](https://github.com/algorandfoundation/algokit-utils-ts/blob/main/docs/capabilities/client.md) - Creation of (auto-retry) algod, indexer and kmd clients against various networks resolved from environment or specified configuration
* [**Account management**](https://github.com/algorandfoundation/algokit-utils-ts/blob/main/docs/capabilities/account.md) - Creation and use of accounts including mnemonic, rekeyed, multisig, transaction signer ([useWallet](https://github.com/TxnLab/use-wallet) for dApps and Atomic Transaction Composer compatible signers), idempotent KMD accounts and environment variable injected
* [**Algo amount handling**](https://github.com/algorandfoundation/algokit-utils-ts/blob/main/docs/capabilities/amount.md) - Reliable and terse specification of microAlgo and Algo amounts and conversion between them
* [**Transaction management**](https://github.com/algorandfoundation/algokit-utils-ts/blob/main/docs/capabilities/transaction.md) - Ability to send single, grouped or Atomic Transaction Composer transactions with consistent and highly configurable semantics, including configurable control of transaction notes (including ARC-0002), logging, fees, multiple sender account types, and sending behavior
* Higher-order use cases
* [**App management**](https://github.com/algorandfoundation/algokit-utils-ts/blob/main/docs/capabilities/app.md) - Creation, updating, deleting, calling (ABI and otherwise) smart contract apps and the metadata associated with them (including state and boxes)
* [**App deployment**](https://github.com/algorandfoundation/algokit-utils-ts/blob/main/docs/capabilities/app-deploy.md) - Idempotent (safely retryable) deployment of an app, including deploy-time immutability and permanence control and TEAL template substitution
* [**ARC-0032 Application Spec client**](https://github.com/algorandfoundation/algokit-utils-ts/blob/main/docs/capabilities/app-client.md) - Builds on top of the App management and App deployment capabilities to provide a high productivity application client that works with ARC-0032 application spec defined smart contracts (e.g. via Beaker)
* [**Algo transfers**](https://github.com/algorandfoundation/algokit-utils-ts/blob/main/docs/capabilities/transfer.md) - Ability to easily initiate algo transfers between accounts, including dispenser management and idempotent account funding
* [**Automated testing**](https://github.com/algorandfoundation/algokit-utils-ts/blob/main/docs/capabilities/testing.md) - Terse, robust automated testing primitives that work across any testing framework (including jest and vitest) to facilitate fixture management, quickly generating isolated and funded test accounts, transaction logging, indexer wait management and log capture
* [**Indexer lookups / searching**](https://github.com/algorandfoundation/algokit-utils-ts/blob/main/docs/capabilities/indexer.md) - Type-safe indexer API wrappers (no more `Record` pain), including automatic pagination control
To learn more about AlgoKit Utils, refer to the following resources:
[Algorand Utils Typescript Documentation ](/algokit/utils/typescript/overview)Learn more about the design and implementation of Algorand Utils
[Algorand Utils Typescript Repo ](https://github.com/algorandfoundation/algokit-utils-ts#algokit-typescript-utilities)Explore the codebase and contribute to its development
[Algorand Utils Python Documentation ](/algokit/utils/python/overview)Learn more about the design and implementation of Algorand Utils
[Algorand Utils Python Repo ](https://github.com/algorandfoundation/algokit-utils-py#readme)Explore the codebase and contribute to its development
## AlgoKit LocalNet
The AlgoKit LocalNet feature allows you to manage (start, stop, reset, manage) a locally sandboxed private Algorand network. This allows you to interact with and deploy changes against your own Algorand network without needing to worry about funding TestNet accounts, whether the information you submit is publicly visible, or whether you are connected to an active Internet connection (once the network has been started).
AlgoKit LocalNet uses Docker images optimized for a great developer experience. This means the Docker images are small and start fast. It also means that features suited to developers are enabled, such as KMD (so you can programmatically get faucet private keys).
To learn more about AlgoKit Localnet, refer to the following resources:
[AlgoKit Localnet Documentation ](/algokit/algokit-cli/localnet)Learn more about using and configuring AlgoKit Localnet
[AlgoKit Localnet GitHub Repository ](https://github.com/algorandfoundation/algokit-cli/blob/main/docs/features/localnet.md)Explore the source code and technical implementation details
## AVM Debugger
The AlgoKit AVM VS Code debugger extension provides a convenient way to debug any Algorand Smart Contracts written in TEAL.
To learn more about the AVM debugger, refer to the following resources:
[AVM Debugger Documentation ](algokit/avm-debugger)Learn more about using and configuring the AVM Debugger
[AVM Debugger Extension Repo ](https://marketplace.visualstudio.com/items?itemName=AlgorandFoundation.algokit-avm-vscode-debugger)Explore the AVM Debugger codebase and contribute to its development
## Client Generator
The client generator generates a type-safe smart contract client for the Algorand Blockchain that wraps the application client in AlgoKit Utils and tailors it to a specific smart contract. It does this by reading an ARC-0032 application spec file and generating a client that exposes methods for each ABI method in the target smart contract, along with helpers to create, update, and delete the application.
To learn more about the client generator, refer to the following resources:
[Client Generator TypeScript Documentation ](/algokit/client-generator/typescript)Learn more about the TypeScript client generator for Algorand smart contracts
[Client Generator TypeScript Repo ](https://github.com/algorandfoundation/algokit-client-generator-ts)Explore the TypeScript client generator codebase and contribute to its development
[Client Generator Python Documentation ](/algokit/client-generator/python)Learn more about the Python client generator for Algorand smart contracts
[Client Generator Python Repo ](https://github.com/algorandfoundation/algokit-client-generator-py)Explore the Python client generator codebase and contribute to its development
## Testnet Dispenser
The AlgoKit TestNet Dispenser API provides functionalities to interact with the Dispenser service. This service enables users to fund and refund assets.
To learn more about the testnet dispenser, refer to the following resources:
[Testnet Dispenser Documentation ](/algokit/utils/typescript/dispenser-client)Learn more about using and configuring the AlgoKit TestNet Dispenser
[Testnet Dispenser Repo ](https://github.com/algorandfoundation/algokit/blob/main/docs/testnet_api.md)Explore the technical implementation and contribute to its development
## AlgoKit Tools and Versions
While AlgoKit as a *collection* was bumped to Version 3.0 on March 26, 2025, it is important to note that the individual tools in the kit are on different package version numbers. In the future this may be changed to epoch versioning so that it is clear that all packages are part of the same epoch release.
| Tool | Repository | AlgoKit 3.0 Min Version |
| ------------------------------------------ | ------------------------------- | ----------------------- |
| Command Line Interface (CLI) | algokit-cli | 2.6.0 |
| Utils (Python) | algokit-utils-py | 4.0.0 |
| Utils (TypeScript) | algokit-utils-ts | 9.0.0 |
| Client Generator (Python) | algokit-client-generator-py | 2.1.0 |
| Client Generator (TypeScript) | algokit-client-generator-ts | 5.0.0 |
| Subscriber (Python) | algokit-subscriber-py | 1.0.0 |
| Subscriber (TypeScript) | algokit-subscriber-ts | 3.2.0 |
| Puya Compiler | puya | 4.5.3 |
| Puya Compiler, TypeScript | puya-ts | 1.0.0-beta.58 |
| AVM Unit Testing (Python) | algorand-python-testing | 0.5.0 |
| AVM Unit Testing (TypeScript) | algorand-typescript-testing | 1.0.0-beta.30 |
| Lora the Explorer | algokit-lora | 1.2.0 |
| AVM VSCode Debugger | algokit-avm-vscode-debugger | 1.1.5 |
| Utils Add-On for TypeScript Debugging | algokit-utils-ts-debug | 1.0.4 |
| Base Project Template | algokit-base-template | 1.1.0 |
| Python Smart Contract Project Template | algokit-python-template | 1.6.0 |
| TypeScript Smart Contract Project Template | algokit-typescript-template | 0.3.1 |
| React Vite Frontend Project Template | algokit-react-frontend-template | 1.1.1 |
| Fullstack Project Template | algokit-fullstack-template | 2.1.4 |
# AVM Debugger
> Tutorial on how to debug a smart contract using AVM Debugger
The AVM VSCode debugger enables inspection of blockchain logic through `Simulate Traces` - JSON files containing detailed transaction execution data without on-chain deployment. The extension requires both trace files and source maps that link original code (TEAL or Puya) to compiled instructions. While the extension works independently, projects created with algokit templates include utilities that automatically generate these debugging artifacts. For full list of available capabilities of debugger extension refer to this [documentation](https://github.com/microsoft/vscode-mock-debug).
This tutorial demonstrates the workflow using a Python-based Algorand project. We will walk through identifying and fixing a bug in an Algorand smart contract using the Algorand Virtual Machine (AVM) Debugger. We’ll start with a simple, smart contract containing a deliberate bug, and by using the AVM Debugger, we’ll pinpoint and fix the issue. This guide will walk you through setting up, debugging, and fixing a smart contract using this extension.
## Prerequisites
* Visual Studio Code (version 1.80.0 or higher)
* Node.js (version 18.x or higher)
* [algokit-cli](/algokit/algokit-intro) installed
* [Algokit AVM VSCode Debugger](https://github.com/microsoft/vscode-mock-debug) extension installed
* Basic understanding of [Algorand smart contracts using Python](/concepts/smart-contracts/languages/python)
Note
The extension is designed to debug both raw TEAL sourcemaps and sourcemaps generated via Puya compiler on the Algorand Virtual Machine. It provides a step-by-step debugging experience by utilizing transaction execution traces and compiled source maps of your smart contract.
## Step 1: Setup the Debugging Environment
Install the Algokit AVM VSCode Debugger extension from the VSCode Marketplace by going to extensions in VSCode, then search for Algokit AVM Debugger and click install. You should see the output like the following:
## Step 2: Set Up the Example Smart Contract
We aim to debug smart contract code in a project generated via `algokit init`. Refer to set up [Algokit](/algokit/algokit-intro). Here’s the Algorand Python code for an `tictactoe` smart contract. The bug is in the `move` method, where `games_played` is updated by `2` for guest and `1` for host (which should be updated by 1 for both guest and host).
Remove `hello_world` folder Create a new tic tac toe smart contract starter via `algokit generate smart-contract -a contract_name "TicTacToe"` Replace the content of `contract.py` with the code below.
* Python
```py
# pyright: reportMissingModuleSource=false
from typing import Literal, Tuple, TypeAlias
from algopy import (
ARC4Contract,
BoxMap,
Global,
LocalState,
OnCompleteAction,
Txn,
UInt64,
arc4,
gtxn,
itxn,
op,
subroutine,
urange,
)
Board: TypeAlias = arc4.StaticArray[arc4.Byte, Literal[9]]
HOST_MARK = 1
GUEST_MARK = 2
class GameState(arc4.Struct, kw_only=True):
board: Board
host: arc4.Address
guest: arc4.Address
is_over: arc4.Bool
turns: arc4.UInt8
class TicTacToe(ARC4Contract):
def __init__(self) -> None:
self.id_counter = UInt64(0)
self.games_played = LocalState(UInt64)
self.games_won = LocalState(UInt64)
self.games = BoxMap(UInt64, GameState)
@subroutine
def opt_in(self) -> None:
self.games_played[Txn.sender] = UInt64(0)
self.games_won[Txn.sender] = UInt64(0)
@arc4.abimethod(allow_actions=[OnCompleteAction.NoOp, OnCompleteAction.OptIn])
def new_game(self, mbr: gtxn.PaymentTransaction) -> UInt64:
if Txn.on_completion == OnCompleteAction.OptIn:
self.opt_in()
self.id_counter += 1
assert mbr.receiver == Global.current_application_address
pre_new_game_box, exists = op.AcctParamsGet.acct_min_balance(
Global.current_application_address
)
assert exists
self.games[self.id_counter] = GameState(
board=arc4.StaticArray[arc4.Byte, Literal[9]].from_bytes(op.bzero(9)),
host=arc4.Address(Txn.sender),
guest=arc4.Address(),
is_over=arc4.Bool(False), # noqa: FBT003
turns=arc4.UInt8(),
)
post_new_game_box, exists = op.AcctParamsGet.acct_min_balance(
Global.current_application_address
)
assert exists
assert mbr.amount == (post_new_game_box - pre_new_game_box)
return self.id_counter
@arc4.abimethod
def delete_game(self, game_id: UInt64) -> None:
game = self.games[game_id].copy()
assert game.guest == arc4.Address() or game.is_over.native
assert Txn.sender == self.games[game_id].host.native
pre_del_box, exists = op.AcctParamsGet.acct_min_balance(
Global.current_application_address
)
assert exists
del self.games[game_id]
post_del_box, exists = op.AcctParamsGet.acct_min_balance(
Global.current_application_address
)
assert exists
itxn.Payment(
receiver=game.host.native, amount=pre_del_box - post_del_box
).submit()
@arc4.abimethod(allow_actions=[OnCompleteAction.NoOp, OnCompleteAction.OptIn])
def join(self, game_id: UInt64) -> None:
if Txn.on_completion == OnCompleteAction.OptIn:
self.opt_in()
assert self.games[game_id].host.native != Txn.sender
assert self.games[game_id].guest == arc4.Address()
self.games[game_id].guest = arc4.Address(Txn.sender)
@arc4.abimethod
def move(self, game_id: UInt64, x: UInt64, y: UInt64) -> None:
game = self.games[game_id].copy()
assert not game.is_over.native
assert game.board[self.coord_to_matrix_index(x, y)] == arc4.Byte()
assert Txn.sender == game.host.native or Txn.sender == game.guest.native
is_host = Txn.sender == game.host.native
if is_host:
assert game.turns.native % 2 == 0
self.games[game_id].board[self.coord_to_matrix_index(x, y)] = arc4.Byte(
HOST_MARK
)
else:
assert game.turns.native % 2 == 1
self.games[game_id].board[self.coord_to_matrix_index(x, y)] = arc4.Byte(
GUEST_MARK
)
self.games[game_id].turns = arc4.UInt8(
self.games[game_id].turns.native + UInt64(1)
)
is_over, is_draw = self.is_game_over(self.games[game_id].board.copy())
if is_over:
self.games[game_id].is_over = arc4.Bool(True)
self.games_played[game.host.native] += UInt64(1)
self.games_played[game.guest.native] += UInt64(2) # incorrect code here
if not is_draw:
winner = game.host if is_host else game.guest
self.games_won[winner.native] += UInt64(1)
@arc4.baremethod(allow_actions=[OnCompleteAction.CloseOut])
def close_out(self) -> None:
pass
@subroutine
def coord_to_matrix_index(self, x: UInt64, y: UInt64) -> UInt64:
return 3 * y + x
@subroutine
def is_game_over(self, board: Board) -> Tuple[bool, bool]:
for i in urange(3):
# Row check
if board[3 * i] == board[3 * i + 1] == board[3 * i + 2] != arc4.Byte():
return True, False
# Column check
if board[i] == board[i + 3] == board[i + 6] != arc4.Byte():
return True, False
# Diagonal check
if board[0] == board[4] == board[8] != arc4.Byte():
return True, False
if board[2] == board[4] == board[6] != arc4.Byte():
return True, False
# Draw check
if (
board[0]
== board[1]
== board[2]
== board[3]
== board[4]
== board[5]
== board[6]
== board[7]
== board[8]
!= arc4.Byte()
):
return True, True
return False, False
```
Add the below deployment code in `deploy.config` file:
* Python
```py
import logging
import algokit_utils
from algosdk.v2client.algod import AlgodClient
from algosdk.v2client.indexer import IndexerClient
from algokit_utils import (
EnsureBalanceParameters,
TransactionParameters,
ensure_funded,
)
from algokit_utils.beta.algorand_client import AlgorandClient
import base64
import algosdk.abi
from algokit_utils import (
EnsureBalanceParameters,
TransactionParameters,
ensure_funded,
)
from algokit_utils.beta.algorand_client import AlgorandClient
from algokit_utils.beta.client_manager import AlgoSdkClients
from algokit_utils.beta.composer import PayParams
from algosdk.atomic_transaction_composer import TransactionWithSigner
from algosdk.util import algos_to_microalgos
from algosdk.v2client.algod import AlgodClient
from algosdk.v2client.indexer import IndexerClient
logger = logging.getLogger(__name__)
# define deployment behaviour based on supplied app spec
def deploy(
algod_client: AlgodClient,
indexer_client: IndexerClient,
app_spec: algokit_utils.ApplicationSpecification,
deployer: algokit_utils.Account,
) -> None:
from smart_contracts.artifacts.tictactoe.tic_tac_toe_client import (
TicTacToeClient,
)
app_client = TicTacToeClient(
algod_client,
creator=deployer,
indexer_client=indexer_client,
)
app_client.deploy(
on_schema_break=algokit_utils.OnSchemaBreak.AppendApp,
on_update=algokit_utils.OnUpdate.AppendApp,
)
last_game_id = app_client.get_global_state().id_counter
algorand = AlgorandClient.from_clients(AlgoSdkClients(algod_client, indexer_client))
algorand.set_suggested_params_timeout(0)
host = algorand.account.random()
ensure_funded(
algorand.client.algod,
EnsureBalanceParameters(
account_to_fund=host.address,
min_spending_balance_micro_algos=algos_to_microalgos(200_000),
),
)
print(f"balance of host address: ",algod_client.account_info(host.address)["amount"]);
print(f"host address: ",host.address);
ensure_funded(
algorand.client.algod,
EnsureBalanceParameters(
account_to_fund=app_client.app_address,
min_spending_balance_micro_algos=algos_to_microalgos(10_000),
),
)
print(f"app_client address: ",app_client.app_address);
game_id = app_client.opt_in_new_game(
mbr=TransactionWithSigner(
txn=algorand.transactions.payment(
PayParams(
sender=host.address,
receiver=app_client.app_address,
amount=2_500 + 400 * (5 + 8 + 75),
)
),
signer=host.signer,
),
transaction_parameters=TransactionParameters(
signer=host.signer,
sender=host.address,
boxes=[(0, b"games" + (last_game_id + 1).to_bytes(8, "big"))],
),
)
guest = algorand.account.random()
ensure_funded(
algorand.client.algod,
EnsureBalanceParameters(
account_to_fund=guest.address,
min_spending_balance_micro_algos=algos_to_microalgos(10),
),
)
app_client.opt_in_join(
game_id=game_id.return_value,
transaction_parameters=TransactionParameters(
signer=guest.signer,
sender=guest.address,
boxes=[(0, b"games" + game_id.return_value.to_bytes(8, "big"))],
),
)
moves = [
((0, 0), (2, 2)),
((1, 1), (2, 1)),
((0, 2), (2, 0)),
]
for host_move, guest_move in moves:
app_client.move(
game_id=game_id.return_value,
x=host_move[0],
y=host_move[1],
transaction_parameters=TransactionParameters(
signer=host.signer,
sender=host.address,
boxes=[(0, b"games" + game_id.return_value.to_bytes(8, "big"))],
accounts=[guest.address],
),
)
# app_client.join(game_id=game_id.return_value)
app_client.move(
game_id=game_id.return_value,
x=guest_move[0],
y=guest_move[1],
transaction_parameters=TransactionParameters(
signer=guest.signer,
sender=guest.address,
boxes=[(0, b"games" + game_id.return_value.to_bytes(8, "big"))],
accounts=[host.address],
),
)
game_state = algosdk.abi.TupleType(
[
algosdk.abi.ArrayStaticType(algosdk.abi.ByteType(), 9),
algosdk.abi.AddressType(),
algosdk.abi.AddressType(),
algosdk.abi.BoolType(),
algosdk.abi.UintType(8),
]
).decode(
base64.b64decode(
algorand.client.algod.application_box_by_name(
app_client.app_id, box_name=b"games" + game_id.return_value.to_bytes(8, "big")
)["value"]
)
)
assert game_state[3]
```
## Step 3: Compile & Deploy the Smart Contract
To enable debugging mode and full tracing for each step in the execution, go to `main.py` file and add:
```python
from algokit_utils.config import config
config.configure(debug=True, trace_all=True)
```
For more details, refer to [Debugger](/algokit/utils/python/debugging):
Next compile the smart contract using AlgoKit:
```bash
algokit project run build
```
This will generate the following files in artifacts: `approval.teal`, `clear.teal`, `clear.puya.map`, `approval.puya.map` and `arc32.json` files. The `.puya.map` files are result of the execution of puyapy compiler (which project run build command orchestrated and invokes automatically). The compiler has an option called `--output-source-maps` which is enabled by default.
Deploy the smart contract on localnet:
```bash
algokit project deploy localnet
```
This will automatically generate `*.appln.trace.avm.json` files in `debug_traces` folder, `.teal` and `.teal.map` files in sources.
The `.teal.map` files are source maps for TEAL and those are automatically generated every time an app is deployed via `algokit-utils`. Even if the developer is only interested in debugging puya source maps, the teal source maps would also always be available as a backup in case there is a need to fall back to more lower level source map.
### Expected Behavior
The expected behavior is that `games_played` should be updated by `1` for both guest and host
### Bug
When `move` method is called, `games_played` will get updated incorrectly for guest player.
## Step 4: Start the debugger
In the VSCode, go to run and debug on left side. This will load the compiled smart contract into the debugger. In the run and debug, select debug TEAL via Algokit AVM Debugger. It will ask to select the appropriate `debug_traces` file.
Note
This vscode launch config is pre bundled with the template. And there is also an alternative execution option where a developer needs to open the json file representing the trace they want to debug and click on the debug button on the top right corner (which will appear specifically on trace json files when extension is installed).
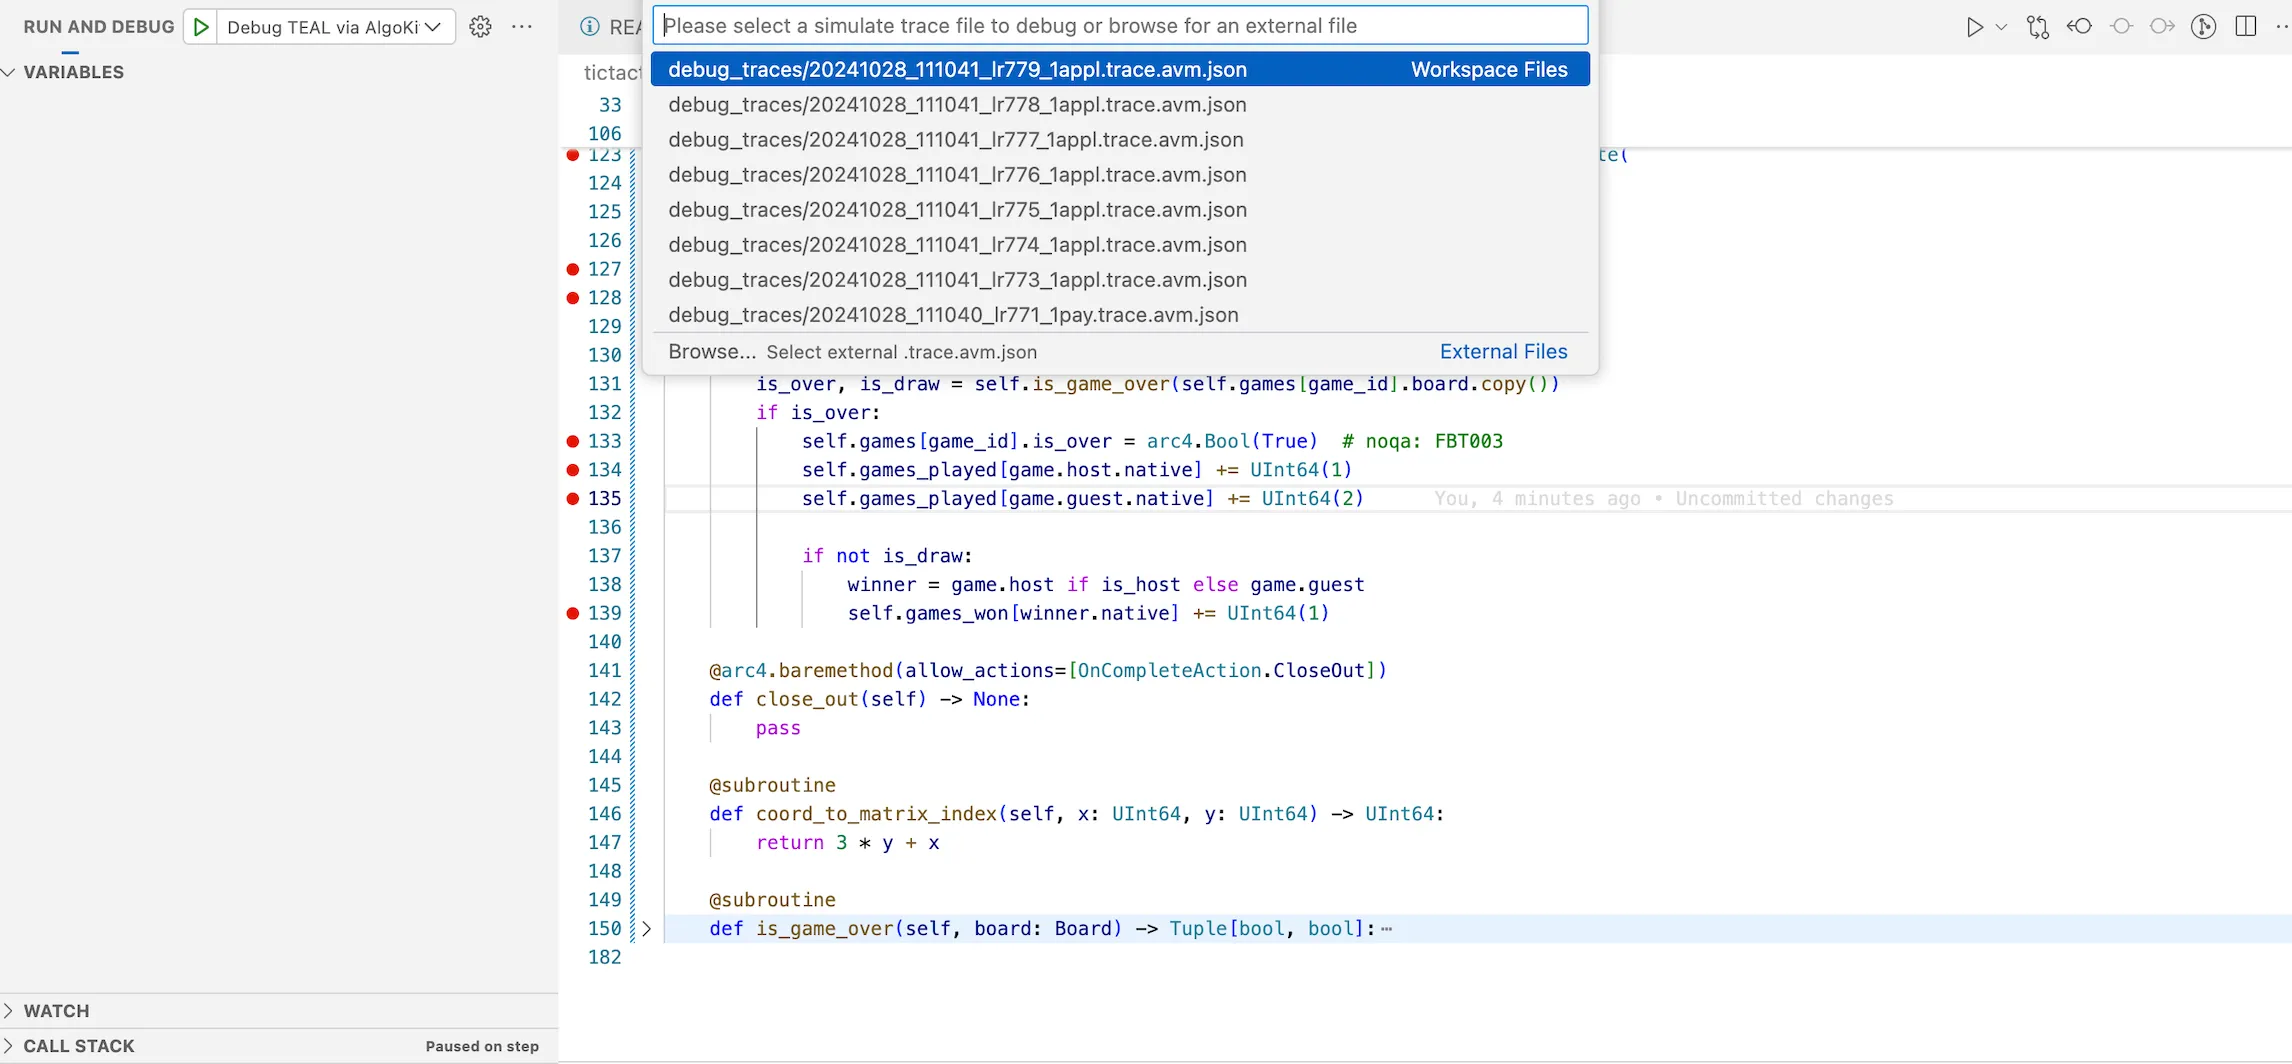
Figure: Load Debugger in VSCode
Next it will ask you to select the source map file. Select the `approval.puya.map` file. Which would indicate to the debug extension that you would like to debug the given trace file using Puya sourcemaps, allowing you to step through high level python code. If you need to change the debugger to use TEAL or puya sourcemaps for other frontends such as Typescript, remove the individual record from `.algokit/sources/sources.avm.json` file or run the [debugger commands via VSCode command palette](https://github.com/algorandfoundation/algokit-avm-vscode-debugger#vscode-commands)
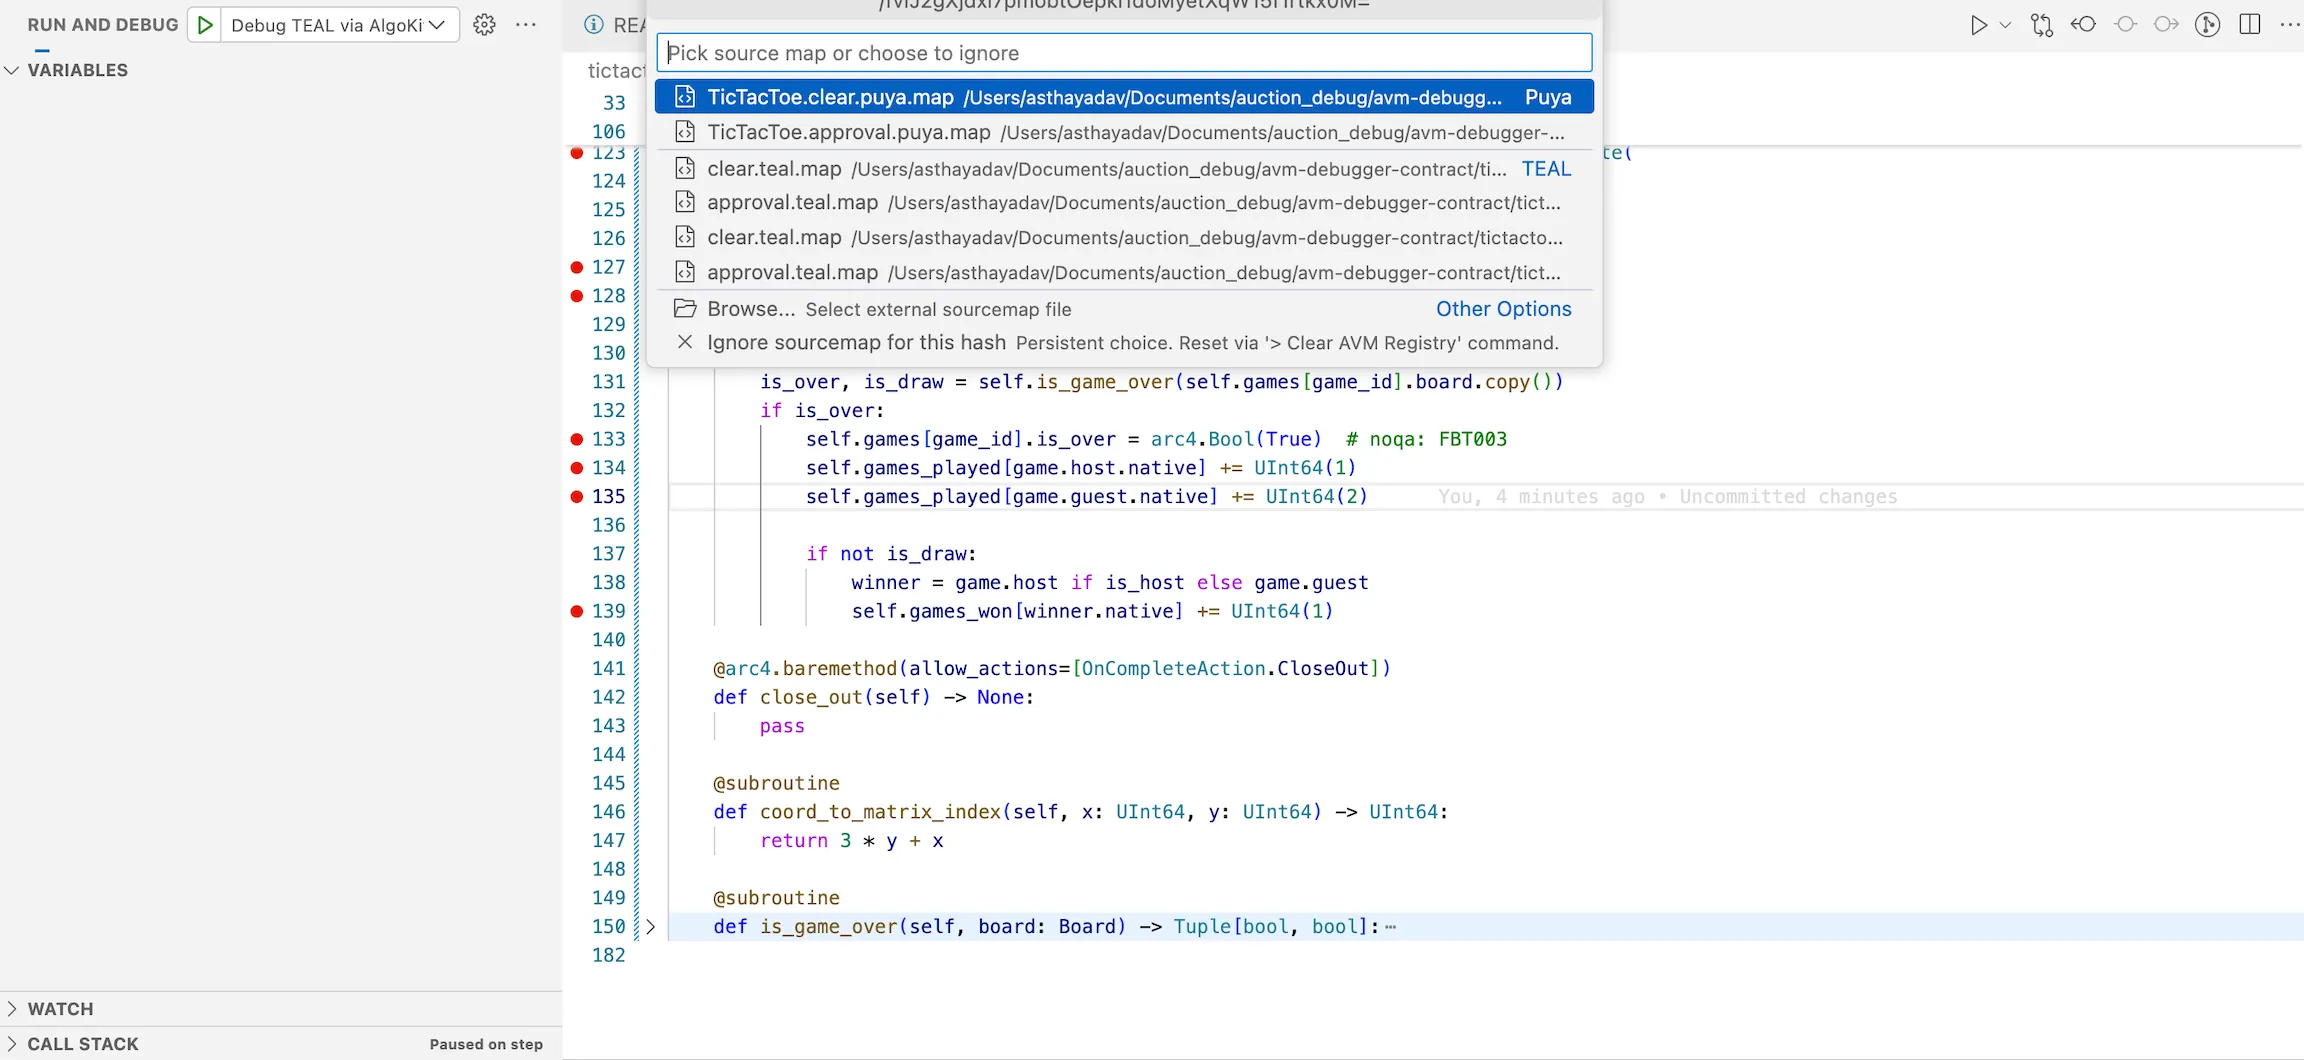
## Step 5: Debugging the smart contract
Let’s now debug the issue:
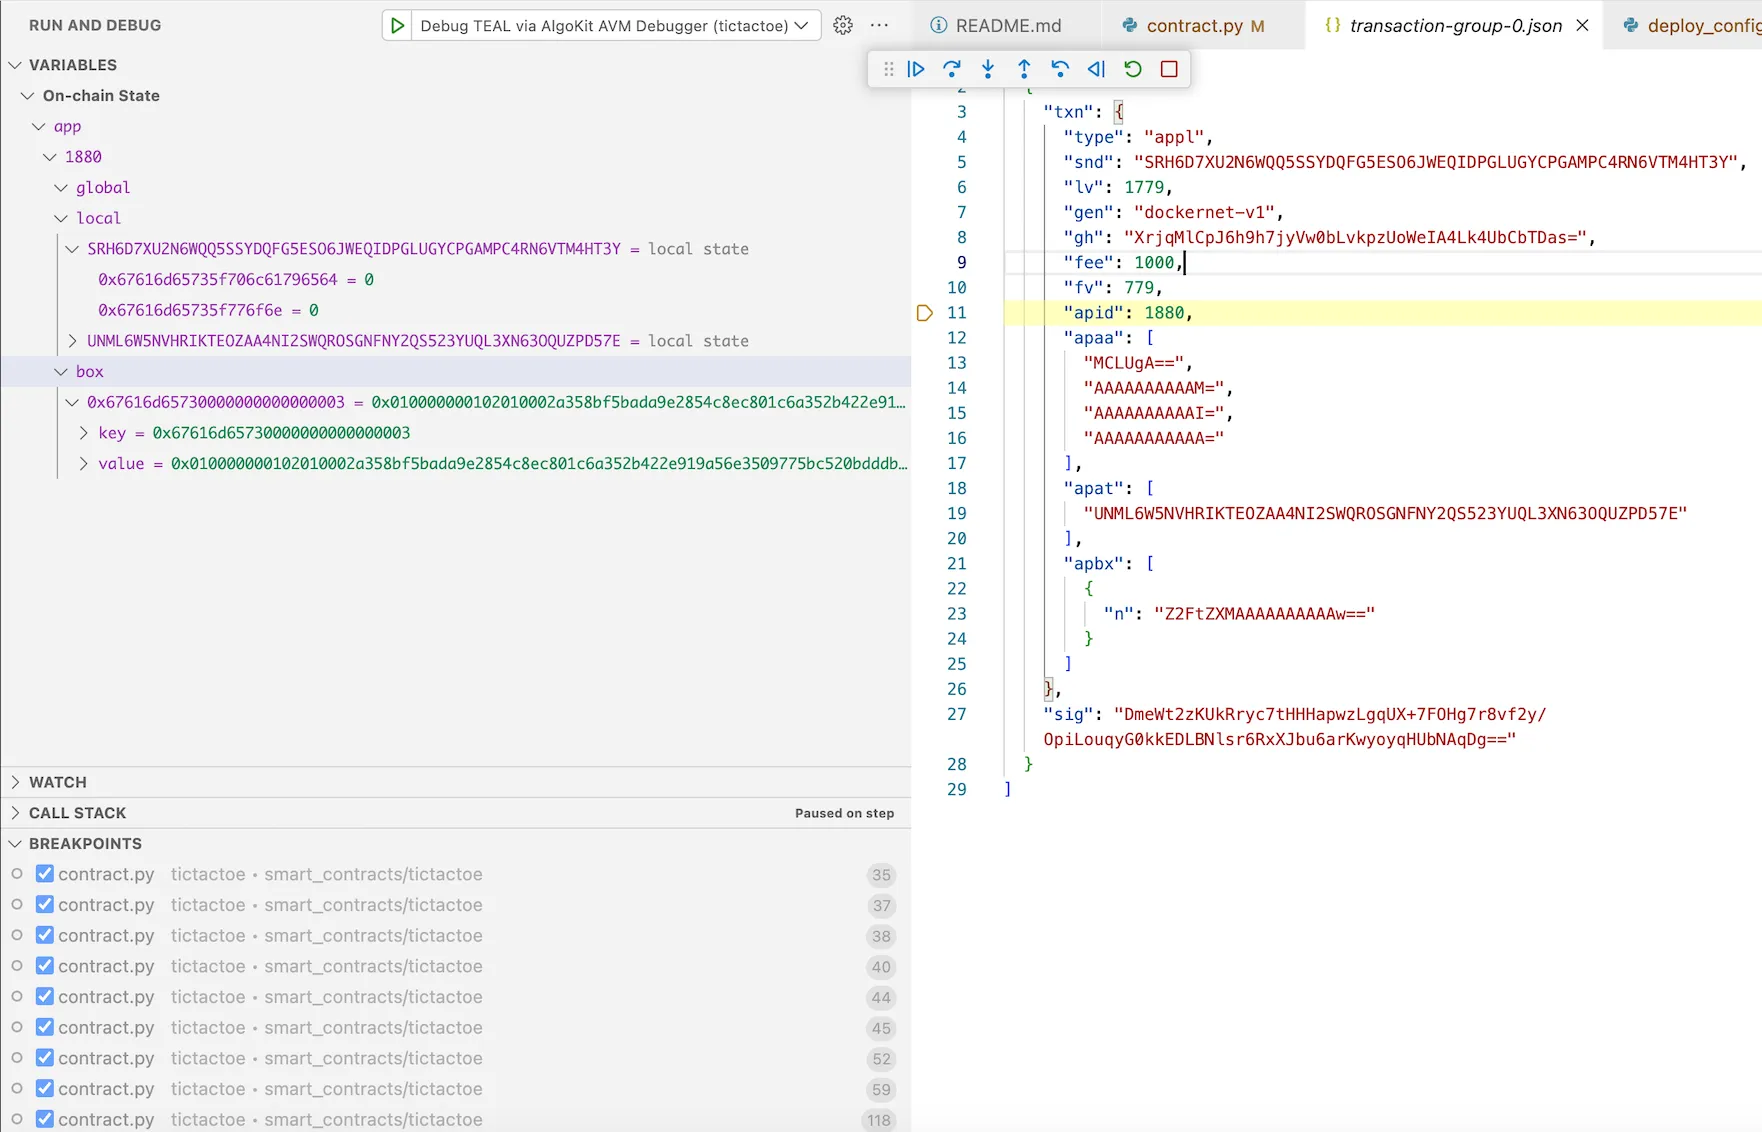
Enter into the `app_id` of the `transaction_group.json` file. This opens the contract. Set a breakpoint in the `move` method. You can also add additional breakpoints.
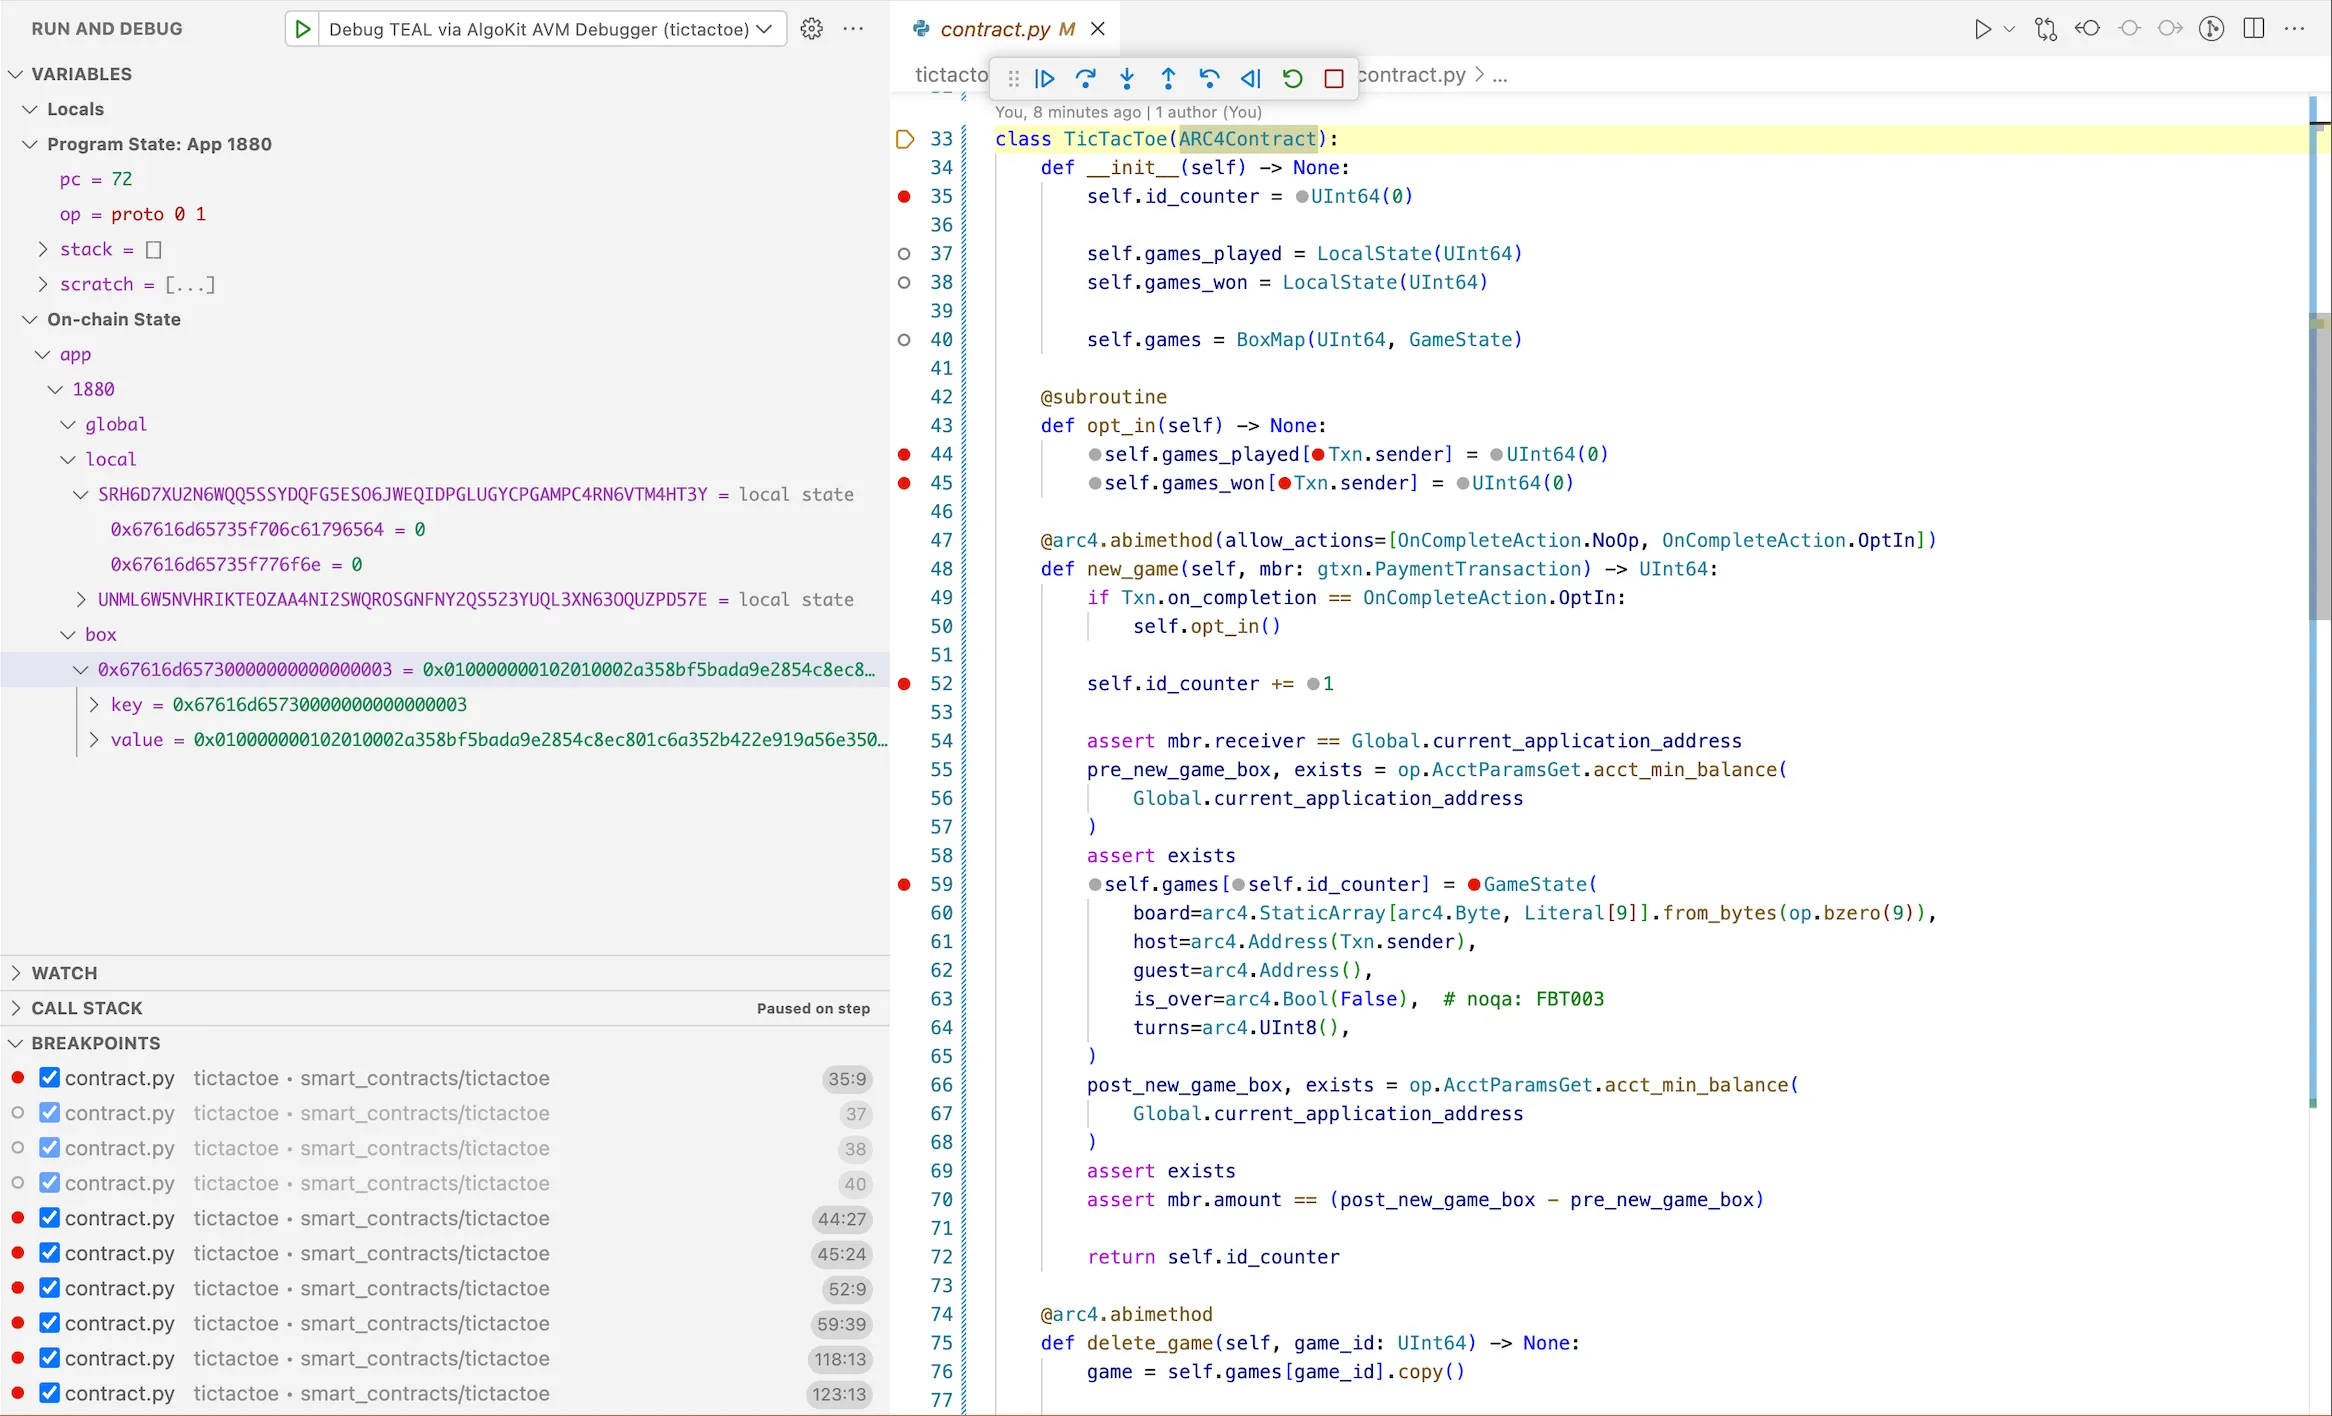
On left side, you can see `Program State` which includes `program counter`, `opcode`, `stack`, `scratch space`. In `On-chain State` you will be able to see `global`, `local` and `box` storages for the application id deployed on localnet.
:::note: We have used localnet but the contracts can be deployed on any other network. A trace file is in a sense agnostic of the network in which the trace file was generated in. As long as its a complete simulate trace that contains state, stack and scratch states in the execution trace - debugger will work just fine with those as well. :::
Once you start step operations of debugging, it will get populated according to the contract. Now you can step-into the code.
## Step 6: Analyze the Output
Observe the `games_played` variable for guest is increased by 2 (incorrectly) whereas for host is increased correctly.
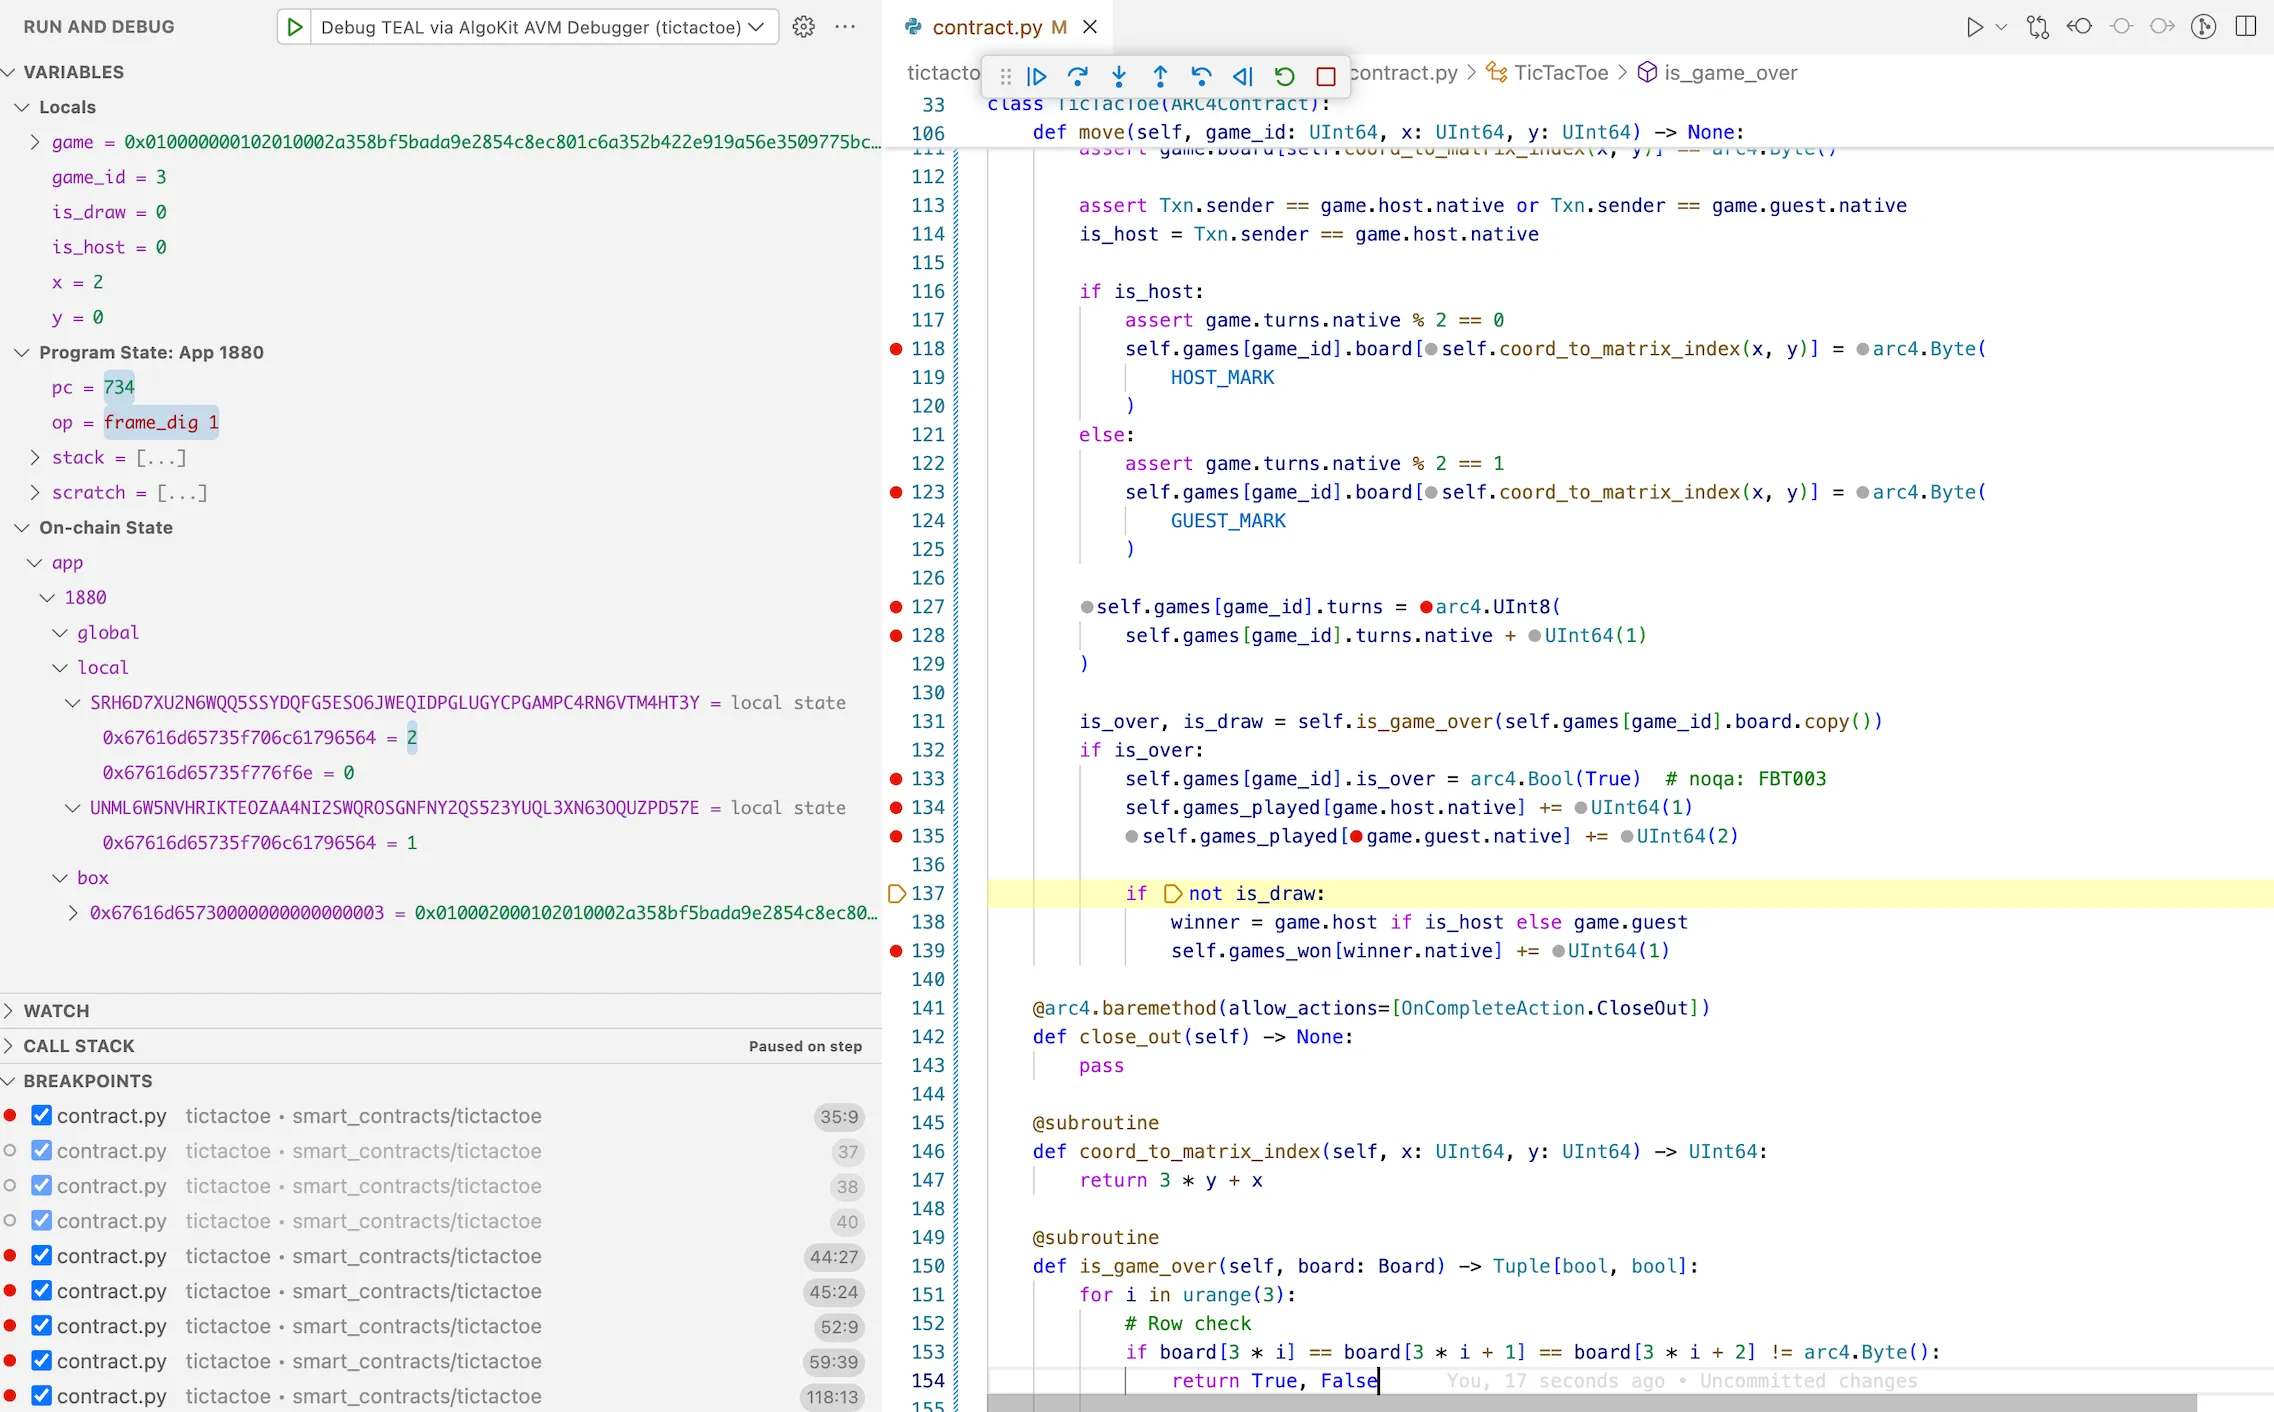
## Step 7: Fix the Bug
Now that we’ve identified the bug, let’s fix it in our original smart contract in `move` method:
* Python
```py
@arc4.abimethod
def move(self, game_id: UInt64, x: UInt64, y: UInt64) -> None:
game = self.games[game_id].copy()
assert not game.is_over.native
assert game.board[self.coord_to_matrix_index(x, y)] == arc4.Byte()
assert Txn.sender == game.host.native or Txn.sender == game.guest.native
is_host = Txn.sender == game.host.native
if is_host:
assert game.turns.native % 2 == 0
self.games[game_id].board[self.coord_to_matrix_index(x, y)] = arc4.Byte(
HOST_MARK
)
else:
assert game.turns.native % 2 == 1
self.games[game_id].board[self.coord_to_matrix_index(x, y)] = arc4.Byte(
GUEST_MARK
)
self.games[game_id].turns = arc4.UInt8(
self.games[game_id].turns.native + UInt64(1)
)
is_over, is_draw = self.is_game_over(self.games[game_id].board.copy())
if is_over:
self.games[game_id].is_over = arc4.Bool(True)
self.games_played[game.host.native] += UInt64(1)
self.games_played[game.guest.native] += UInt64(1) # changed here
if not is_draw:
winner = game.host if is_host else game.guest
self.games_won[winner.native] += UInt64(1)
```
## Step 8: Re-deploy
Re-compile and re-deploy the contract using the `step 3`.
## Step 9: Verify again using Debugger
Reset the `sources.avm.json` file, then restart the debugger selecting `approval.puya.source.map` file. Run through `steps 4 to 6` to verify that the `games_played` now updates as expected, confirming the bug has been fixed as seen below.
Note
You can alternatively also use `approval.teal.map` file instead of puya source map - for a lower-level TEAL debugging session. Refer to [Algokit AVM VSCode Debugger commands ](https://github.com/algorandfoundation/algokit-avm-vscode-debugger#vscode-command)via the VSCode command palette to automate clearing or editing the registry file.

## Summary
In this tutorial, we walked through the process of using the AVM debugger from AlgoKit Python utils to debug an Algorand Smart Contract. We set up a debugging environment, loaded a smart contract with a planted bug, stepped through the execution, and identified the issue. This process can be invaluable when developing and testing smart contracts on the Algorand blockchain. It’s highly recommended to thoroughly test your smart contracts to ensure they function as expected and prevent costly errors in production before deploying them to the main network.
## Next steps
To learn more, refer to documentation of the [debugger extension](/algokit/utils/python/debugging) to learn more about Debugging session.
# Application Client Usage
After using the cli tool to generate an application client you will end up with a TypeScript file containing several type definitions, an application factory class and an application client class that is named after the target smart contract. For example, if the contract name is `HelloWorldApp` then you will end up with `HelloWorldAppFactory` and `HelloWorldAppClient` classes. The contract name will also be used to prefix a number of other types in the generated file which allows you to generate clients for multiple smart contracts in the one project without ambiguous type names.
> !\[NOTE]
>
> If you are confused about when to use the factory vs client the mental model is: use the client if you know the app ID, use the factory if you don’t know the app ID (deferred knowledge or the instance doesn’t exist yet on the blockchain) or you have multiple app IDs
## Creating an application client instance
The first step to using the factory/client is to create an instance, which can be done via the constructor or more easily via an [`AlgorandClient`](https://github.com/algorandfoundation/algokit-utils-py/blob/main/docs/markdown/capabilities/algorand-client) instance via `algorand.client.get_typed_app_factory()` and `algorand.client.get_typed_app_client()` (see code examples below).
Once you have an instance, if you want an escape hatch to the [underlying untyped `AppClient` / `AppFactory`](https://github.com/algorandfoundation/algokit-utils-py/blob/main/docs/markdown/capabilities/app-client) you can access them as a property:
```python
# Untyped `AppFactory`
untypedFactory = factory.app_factory
# Untyped `AppClient`
untypedClient = client.app_client
```
### Get a factory
The [app factory](https://github.com/algorandfoundation/algokit-utils-py/blob/main/docs/markdown/capabilities/app-client) allows you to create and deploy one or more app instances and to create one or more app clients to interact with those (or other) app instances when you need to create clients for multiple apps.
If you only need a single client for a single, known app then you can skip using the factory and just [use a client](#get-a-client-by-app-id).
```python
# Via AlgorandClient
factory = algorand.client.get_typed_app_factory(HelloWorldAppFactory)
# Or, using the options:
factory_with_optional_params = algorand.client.get_typed_app_factory(
HelloWorldAppFactory,
default_sender="DEFAULTSENDERADDRESS",
app_name="OverriddenName",
compilation_params={
"deletable": True,
"updatable": False,
"deploy_time_params": {
"VALUE": "1",
},
},
version="2.0",
)
# Or via the constructor
factory = new HelloWorldAppFactory({
algorand,
})
# with options:
factory = new HelloWorldAppFactory({
algorand,
default_sender: "DEFAULTSENDERADDRESS",
app_name: "OverriddenName",
compilation_params={
"deletable": True,
"updatable": False,
"deploy_time_params": {
"VALUE": "1",
},
},
version: "2.0",
})
```
### Get a client by app ID
The typed [app client](https://github.com/algorandfoundation/algokit-utils-py/blob/main/docs/markdown/capabilities/app-client) can be retrieved by ID.
You can get one by using a previously created app factory, from an `AlgorandClient` instance and using the constructor:
```python
# Via factory
factory = algorand.client.get_typed_app_factory(HelloWorldAppFactory)
client = factory.get_app_client_by_id({ app_id: 123 })
client_with_optional_params = factory.get_app_client_by_id(
app_id=123,
default_sender="DEFAULTSENDERADDRESS",
app_name="OverriddenAppName",
# Can also pass in `approval_source_map`, and `clear_source_map`
)
# Via AlgorandClient
client = algorand.client.get_typed_app_client_by_id(HelloWorldAppClient, app_id=123)
client_with_optional_params = algorand.client.get_typed_app_client_by_id(
HelloWorldAppClient,
app_id=123,
default_sender="DEFAULTSENDERADDRESS",
app_name="OverriddenAppName",
# Can also pass in `approval_source_map`, and `clear_source_map`
)
# Via constructor
client = new HelloWorldAppClient(
algorand=algorand,
app_id=123,
)
client_with_optional_params = new HelloWorldAppClient(
algorand=algorand,
app_id=123,
default_sender="DEFAULTSENDERADDRESS",
app_name="OverriddenAppName",
# Can also pass in `approval_source_map`, and `clear_source_map`
)
```
### Get a client by creator address and name
The typed [app client](https://github.com/algorandfoundation/algokit-utils-py/blob/main/docs/markdown/capabilities/app-client) can be retrieved by looking up apps by name for the given creator address if they were deployed using [AlgoKit deployment conventions](https://github.com/algorandfoundation/algokit-utils-py/blob/main/docs/markdown/capabilities/app-deploy).
You can get one by using a previously created app factory:
```python
factory = algorand.client.get_typed_app_factory(HelloWorldAppFactory)
client = factory.get_app_client_by_creator_and_name(creator_address="CREATORADDRESS")
client_with_optional_params = factory.get_app_client_by_creator_and_name(
creator_address="CREATORADDRESS",
default_sender="DEFAULTSENDERADDRESS",
app_name="OverriddenAppName",
# Can also pass in `approval_source_map`, and `clear_source_map`
)
```
Or you can get one using an `AlgorandClient` instance:
```python
client = algorand.client.get_typed_app_client_by_creator_and_name(
HelloWorldAppClient,
creator_address="CREATORADDRESS",
)
client_with_optional_params = algorand.client.get_typed_app_client_by_creator_and_name(
HelloWorldAppClient,
creator_address="CREATORADDRESS",
default_sender="DEFAULTSENDERADDRESS",
app_name="OverriddenAppName",
ignore_cache=True,
# Can also pass in `app_lookup_cache`, `approval_source_map`, and `clear_source_map`
)
```
### Get a client by network
The typed [app client](https://github.com/algorandfoundation/algokit-utils-py/blob/main/docs/markdown/capabilities/app-client) can be retrieved by network using any included network IDs within the ARC-56 app spec for the current network.
You can get one by using a static method on the app client:
```python
client = HelloWorldAppClient.from_network(algorand)
client_with_optional_params = HelloWorldAppClient.from_network(
algorand,
default_sender="DEFAULTSENDERADDRESS",
app_name="OverriddenAppName",
# Can also pass in `approval_source_map`, and `clear_source_map`
)
```
Or you can get one using an `AlgorandClient` instance:
```python
client = algorand.client.get_typed_app_client_by_network(HelloWorldAppClient)
client_with_optional_params = algorand.client.get_typed_app_client_by_network(
HelloWorldAppClient,
default_sender="DEFAULTSENDERADDRESS",
app_name="OverriddenAppName",
# Can also pass in `approval_source_map`, and `clear_source_map`
)
```
## Deploying a smart contract (create, update, delete, deploy)
The app factory and client will variously include methods for creating (factory), updating (client), and deleting (client) the smart contract based on the presence of relevant on completion actions and call config values in the ARC-32 / ARC-56 application spec file. If a smart contract does not support being updated for instance, then no update methods will be generated in the client.
In addition, the app factory will also include a `deploy` method which will…
* create the application if it doesn’t already exist
* update or recreate the application if it does exist, but differs from the version the client is built on
* recreate the application (and optionally delete the old version) if the deployed version is incompatible with being updated to the client version
* do nothing in the application is already deployed and up to date.
You can find more specifics of this behaviour in the [algokit-utils](https://github.com/algorandfoundation/algokit-utils-py/blob/main/docs/markdown/capabilities/app-deploy) docs.
### Create
To create an app you need to use the factory. The return value will include a typed client instance for the created app.
```python
factory = algorand.client.get_typed_app_factory(HelloWorldAppFactory)
# Create the application using a bare call
result, client = factory.send.create.bare()
# Pass in some compilation flags
factory.send.create.bare(compilation_params={
"updatable": True,
"deletable": True,
})
# Create the application using a specific on completion action (ie. not a no_op)
factory.send.create.bare(params=CommonAppFactoryCallParams(on_complete=OnApplicationComplete.OptIn))
# Create the application using an ABI method (ie. not a bare call)
factory.send.create.namedCreate(
args=NamedCreateArgs(
arg1=123,
arg2="foo",
),
)
# Pass compilation flags and on completion actions to an ABI create call
factory.send.create.namedCreate({
args=NamedCreateArgs(
arg1=123,
arg2="foo",
), # Note also available as a typed tuple argument
compilation_params={
"updatable": True,
"deletable": True,
},
params=CommonAppFactoryCallParams(on_complete=OnApplicationComplete.OptIn),
})
```
If you want to get a built transaction without sending it you can use `factory.createTransaction.create...` rather than `factory.send.create...`. If you want to receive transaction parameters ready to pass in as an ABI argument or to an `TransactionComposer` call then you can use `factory.params.create...`.
### Update and Delete calls
To create an app you need to use the client.
```python
client = algorand.client.get_typed_app_client_by_id(HelloWorldAppClient, app_id=123)
# Update the application using a bare call
client.send.update.bare()
# Pass in compilation flags
client.send.update.bare(compilation_params={
"updatable": True,
"deletable": False,
})
# Update the application using an ABI method
client.send.update.namedUpdate(
args=NamedUpdateArgs(
arg1=123,
arg2="foo",
),
)
# Pass compilation flags
client.send.update.namedUpdate({
args=NamedUpdateArgs(
arg1=123,
arg2="foo",
),
compilation_params={
"updatable": True,
"deletable": True,
},
params=CommonAppCallParams(on_complete=OnApplicationComplete.OptIn),
)
# Delete the application using a bare call
client.send.delete.bare()
# Delete the application using an ABI method
client.send.delete.namedDelete()
```
If you want to get a built transaction without sending it you can use `client.create_transaction.update...` / `client.create_transaction.delete...` rather than `client.send.update...` / `client.send.delete...`. If you want to receive transaction parameters ready to pass in as an ABI argument or to an `TransactionComposer` call then you can use `client.params.update...` / `client.params.delete...`.
### Deploy call
The deploy call will make a create, update, or delete and create, or no call depending on what is required to have the deployed application match the client’s contract version and the configured `on_update` and `on_schema_break` parameters. As such the deploy method allows you to configure arguments for each potential call it may make (via `create_params`, `update_params` and `delete_params`). If the smart contract is not updatable or deletable, those parameters will be omitted.
These params values (`create_params`, `update_params` and `delete_params`) will only allow you to specify valid calls that are defined in the ARC-32 / ARC-56 app spec. You can control what call is made via the `method` parameter in these objects. If it’s left out (or set to `None`) then it will be a bare call, if set to the ABI signature of a call it will perform that ABI call. If there are arguments required for that ABI call then the type of the arguments will automatically populate in intellisense.
```ts
client.deploy({
createParams: {
onComplete: OnApplicationComplete.OptIn,
},
updateParams: {
method: 'named_update(uint64,string)string',
args: {
arg1: 123,
arg2: 'foo',
},
},
// Can leave this out and it will do an argumentless bare call (if that call is allowed)
//deleteParams: {}
allowUpdate: true,
allowDelete: true,
onUpdate: 'update',
onSchemaBreak: 'replace',
});
```
## Opt in and close out
Methods with an `opt_in` or `close_out` `onCompletionAction` are grouped under properties of the same name within the `send`, `createTransaction` and `params` properties of the client. If the smart contract does not handle one of these on completion actions, it will be omitted.
```python
# Opt in with bare call
client.send.opt_in.bare()
# Opt in with ABI method
client.create_transaction.opt_in.named_opt_in(args=NamedOptInArgs(arg1=123))
# Close out with bare call
client.params.close_out.bare()
# Close out with ABI method
client.send.close_out.named_close_out(args=NamedCloseOutArgs(arg1="foo"))
```
## Clear state
All clients will have a clear state method which will call the clear state program of the smart contract.
```python
client.send.clear_state()
client.create_transaction.clear_state()
client.params.clear_state()
```
## No-op calls
The remaining ABI methods which should all have an `on_completion_action` of `OnApplicationComplete.NoOp` will be available on the `send`, `create_transaction` and `params` properties of the client. If a bare no-op call is allowed it will be available via `bare`.
These methods will allow you to optionally pass in `on_complete` and if the method happens to allow other on-completes than no-op these can also be provided (and those methods will also be available via the on-complete sub-property too per above).
```python
# Call an ABI method which takes no args
client.send.some_method()
# Call a no-op bare call
client.create_transaction.bare()
# Call an ABI method, passing args in as a dictionary
client.params.some_other_method({ args: { arg1: 123, arg2: "foo" } })
```
## Method and argument naming
By default, names of names, types and arguments will be transformed to `snake_case` to match Python idiomatic semantics (names of classes would be converted to idiomatic `PascalCase` as per Python conventions). If you want to keep the names the same as what is in the ARC-32 / ARC-56 app spec file then you can pass the `-p` or `--preserve-names` property to the type generator.
### Method name clashes
The ARC-32 / ARC-56 specification allows two methods to have the same name, as long as they have different ABI signatures. On the client these methods will be emitted with a unique name made up of the method’s full signature. Eg. `create_string_uint32_void`.
## ABI arguments
Each generated method will accept ABI method call arguments in both a `tuple` and a `dataclass`, so you can use whichever feels more comfortable. The types that are accepted will automatically translate from the specified ABI types in the app spec to an equivalent python type.
```python
# ABI method which takes no args
client.send.no_args_method()
# ABI method with args
client.send.other_method(args=OtherMethodArgs(arg1=123, arg2="foo", arg3=bytes([1, 2, 3, 4])))
# Call an ABI method, passing args in as a tuple
client.send.yet_another_method(args=(1, 2, "foo"))
```
## Structs
If the method takes a struct as a parameter, or returns a struct as an output then it will automatically be allowed to be passed in and will be returned as the parsed struct object.
## Additional parameters
Each ABI method and bare call on the client allows the consumer to provide additional parameters as well as the core method / args / etc. parameters. This models the parameters that are available in the underlying [app factory / client](https://github.com/algorandfoundation/algokit-utils-py/blob/main/docs/markdown/capabilities/app-client).
```python
client.send.some_method(
args=SomeMethodArgs(arg1=123),
# Additional parameters go here
)
client.send.opt_in.bare({
# Additional parameters go here
})
```
## Composing transactions
Algorand allows multiple transactions to be composed into a single atomic transaction group to be committed (or rejected) as one.
### Using the fluent composer
The client exposes a fluent transaction composer which allows you to build up a group before sending it. The return values will be strongly typed based on the methods you add to the composer.
```python
result = client
.new_group()
.method_one(args=SomeMethodArgs(arg1=123), box_references=["V"])
# Non-ABI transactions can still be added to the group
.add_transaction(
client.app_client.create_transaction.fund_app_account(
FundAppAccountParams(
amount=AlgoAmount.from_micro_algos(5000)
)
)
)
.method_two(args=SomeOtherMethodArgs(arg1="foo"))
.send()
# Strongly typed as the return type of methodOne
result_of_method_one = result.returns[0]
# Strongly typed as the return type of methodTwo
result_of_method_two = result.returns[1]
```
### Manually with the TransactionComposer
Multiple transactions can also be composed using the `TransactionComposer` class.
```python
result = algorand
.new_group()
.add_app_call_method_call(
client.params.method_one(args=SomeMethodArgs(arg1=123), box_references=["V"])
)
.add_payment(
client.app_client.params.fund_app_account(
FundAppAccountParams(amount=AlgoAmount.from_micro_algos(5000))
)
)
.add_app_call_method_call(client.params.method_two(args=SomeOtherMethodArgs(arg1="foo")))
.send()
# returns will contain a result object for each ABI method call in the transaction group
for (return_value in result.returns) {
print(return_value)
}
```
## State
You can access local, global and box storage state with any state values that are defined in the ARC-32 / ARC-56 app spec.
You can do this via the `state` property which has 3 sub-properties for the three different kinds of state: `state.global`, `state.local(address)`, `state.box`. Each one then has a series of methods defined for each registered key or map from the app spec.
Maps have a `value(key)` method to get a single value from the map by key and a `getMap()` method to return all box values as a map. Keys have a `{keyName}()` method to get the value for the key and there will also be a `get_all()` method to get an object will all key values.
The properties will return values of the corresponding TypeScript type for the type in the app spec and any structs will be parsed as the struct object.
```python
factory = algorand.client.get_typed_app_factory(Arc56TestFactory, default_sender="SENDER")
result, client = factory.send.create.create_application(
args=[],
compilation_params={"deploy_time_params": {"some_number": 1337}},
)
assert client.state.global_state.global_key() == 1337
assert another_app_client.state.global_state.global_key() == 1338
assert client.state.global_state.global_map.value("foo") == {
foo: 13,
bar: 37,
}
client.appClient.fund_app_account(
FundAppAccountParams(amount=AlgoAmount.from_micro_algos(1_000_000))
)
client.send.opt_in.opt_in_to_application(
args=[],
)
assert client.state.local(defaultSender).local_key() == 1337
assert client.state.local(defaultSender).local_map.value("foo") == "bar"
assert client.state.box.box_key() == "baz"
assert client.state.box.box_map.value({
add: { a: 1, b: 2 },
subtract: { a: 4, b: 3 },
}) == {
sum: 3,
difference: 1,
}
```
# Application Client Usage
After using the cli tool to generate an application client you will end up with a TypeScript file containing several type definitions, an application factory class and an application client class that is named after the target smart contract. For example, if the contract name is `HelloWorldApp` then you will end up with `HelloWorldAppFactory` and `HelloWorldAppClient` classes. The contract name will also be used to prefix a number of other types in the generated file which allows you to generate clients for multiple smart contracts in the one project without ambiguous type names.
> !\[NOTE]
>
> If you are confused about when to use the factory vs client the mental model is: use the client if you know the app ID, use the factory if you don’t know the app ID (deferred knowledge or the instance doesn’t exist yet on the blockchain) or you have multiple app IDs
## Creating an application client instance
The first step to using the factory/client is to create an instance, which can be done via the constructor or more easily via an [`AlgorandClient`](https://github.com/algorandfoundation/algokit-utils-ts/blob/main/docs/capabilities/algorand-client) instance via `algorand.client.getTypedAppFactory()` and `algorand.client.getTypedAppClient*()` (see code examples below).
Once you have an instance, if you want an escape hatch to the [underlying untyped `AppClient` / `AppFactory`](https://github.com/algorandfoundation/algokit-utils-ts/blob/main/docs/capabilities/app-client) you can access them as a property:
```typescript
// Untyped `AppFactory`
const untypedFactory = factory.appFactory;
// Untyped `AppClient`
const untypedClient = client.appClient;
```
### Get a factory
The [app factory](https://github.com/algorandfoundation/algokit-utils-ts/blob/main/docs/capabilities/app-client) allows you to create and deploy one or more app instances and to create one or more app clients to interact with those (or other) app instances when you need to create clients for multiple apps.
If you only need a single client for a single, known app then you can skip using the factory and just [use a client](#get-a-client-by-app-id).
```typescript
// Via AlgorandClient
const factory = algorand.client.getTypedAppFactory(HelloWorldAppFactory);
// Or, using the options:
const factoryWithOptionalParams = algorand.client.getTypedAppFactory(HelloWorldAppFactory, {
defaultSender: 'DEFAULTSENDERADDRESS',
appName: 'OverriddenName',
deletable: true,
updatable: false,
deployTimeParams: {
VALUE: '1',
},
version: '2.0',
});
// Or via the constructor
const factory = new HelloWorldAppFactory({
algorand,
});
// with options:
const factory = new HelloWorldAppFactory({
algorand,
defaultSender: 'DEFAULTSENDERADDRESS',
appName: 'OverriddenName',
deletable: true,
updatable: false,
deployTimeParams: {
VALUE: '1',
},
version: '2.0',
});
```
### Get a client by app ID
The typed [app client](https://github.com/algorandfoundation/algokit-utils-ts/blob/main/docs/capabilities/app-client) can be retrieved by ID.
You can get one by using a previously created app factory, from an `AlgorandClient` instance and using the constructor:
```typescript
// Via factory
const factory = algorand.client.getTypedAppFactory(HelloWorldAppFactory);
const client = factory.getAppClientById({ appId: 123n });
const clientWithOptionalParams = factory.getAppClientById({
appId: 123n,
defaultSender: 'DEFAULTSENDERADDRESS',
appName: 'OverriddenAppName',
// Can also pass in `approvalSourceMap`, and `clearSourceMap`
});
// Via AlgorandClient
const client = algorand.client.getTypedAppClientById(HelloWorldAppClient, {
appId: 123n,
});
const clientWithOptionalParams = algorand.client.getTypedAppClientById(HelloWorldAppClient, {
appId: 123n,
defaultSender: 'DEFAULTSENDERADDRESS',
appName: 'OverriddenAppName',
// Can also pass in `approvalSourceMap`, and `clearSourceMap`
});
// Via constructor
const client = new HelloWorldAppClient({
algorand,
appId: 123n,
});
const clientWithOptionalParams = new HelloWorldAppClient({
algorand,
appId: 123n,
defaultSender: 'DEFAULTSENDERADDRESS',
appName: 'OverriddenAppName',
// Can also pass in `approvalSourceMap`, and `clearSourceMap`
});
```
### Get a client by creator address and name
The typed [app client](https://github.com/algorandfoundation/algokit-utils-ts/blob/main/docs/capabilities/app-client) can be retrieved by looking up apps by name for the given creator address if they were deployed using [AlgoKit deployment conventions](https://github.com/algorandfoundation/algokit-utils-ts/blob/main/docs/capabilities/app-deploy).
You can get one by using a previously created app factory:
```typescript
const factory = algorand.client.getTypedAppFactory(HelloWorldAppFactory);
const client = factory.getAppClientByCreatorAndName({ creatorAddress: 'CREATORADDRESS' });
const clientWithOptionalParams = factory.getAppClientByCreatorAndName({
creatorAddress: 'CREATORADDRESS',
defaultSender: 'DEFAULTSENDERADDRESS',
appName: 'OverriddenAppName',
// Can also pass in `approvalSourceMap`, and `clearSourceMap`
});
```
Or you can get one using an `AlgorandClient` instance:
```typescript
const client = algorand.client.getTypedAppClientByCreatorAndName(HelloWorldAppClient, {
creatorAddress: 'CREATORADDRESS',
});
const clientWithOptionalParams = algorand.client.getTypedAppClientByCreatorAndName(
HelloWorldAppClient,
{
creatorAddress: 'CREATORADDRESS',
defaultSender: 'DEFAULTSENDERADDRESS',
appName: 'OverriddenAppName',
ignoreCache: true,
// Can also pass in `appLookupCache`, `approvalSourceMap`, and `clearSourceMap`
},
);
```
### Get a client by network
The typed [app client](https://github.com/algorandfoundation/algokit-utils-ts/blob/main/docs/capabilities/app-client) can be retrieved by network using any included network IDs within the ARC-56 app spec for the current network.
You can get one by using a static method on the app client:
```typescript
const client = HelloWorldAppClient.fromNetwork({ algorand });
const clientWithOptionalParams = HelloWorldAppClient.fromNetwork({
algorand,
defaultSender: 'DEFAULTSENDERADDRESS',
appName: 'OverriddenAppName',
// Can also pass in `approvalSourceMap`, and `clearSourceMap`
});
```
Or you can get one using an `AlgorandClient` instance:
```typescript
const client = algorand.client.getTypedAppClientByNetwork(HelloWorldAppClient);
const clientWithOptionalParams = algorand.client.getTypedAppClientByNetwork(HelloWorldAppClient, {
defaultSender: 'DEFAULTSENDERADDRESS',
appName: 'OverriddenAppName',
// Can also pass in `approvalSourceMap`, and `clearSourceMap`
});
```
## Deploying a smart contract (create, update, delete, deploy)
The app factory and client will variously include methods for creating (factory), updating (client), and deleting (client) the smart contract based on the presence of relevant on completion actions and call config values in the ARC-32 / ARC-56 application spec file. If a smart contract does not support being updated for instance, then no update methods will be generated in the client.
In addition, the app factory will also include a `deploy` method which will…
* create the application if it doesn’t already exist
* update or recreate the application if it does exist, but differs from the version the client is built on
* recreate the application (and optionally delete the old version) if the deployed version is incompatible with being updated to the client version
* do nothing in the application is already deployed and up to date.
You can find more specifics of this behaviour in the [algokit-utils](https://github.com/algorandfoundation/algokit-utils-ts/blob/main/docs/capabilities/app-deploy) docs.
### Create
To create an app you need to use the factory. The return value will include a typed client instance for the created app.
```ts
const factory = algorand.client.getTypedAppFactory(HelloWorldAppFactory);
// Create the application using a bare call
const { result, appClient: client } = factory.send.create.bare();
// Pass in some compilation flags
factory.send.create.bare({
updatable: true,
deletable: true,
});
// Create the application using a specific on completion action (ie. not a no_op)
factory.send.create.bare({
onComplete: OnApplicationComplete.OptIn,
});
// Create the application using an ABI method (ie. not a bare call)
factory.send.create.namedCreate({
args: {
arg1: 123,
arg2: 'foo',
},
});
// Pass compilation flags and on completion actions to an ABI create call
factory.send.create.namedCreate({
args: {
arg1: 123,
arg2: 'foo',
},
updatable: true,
deletable: true,
onComplete: OnApplicationComplete.OptIn,
});
```
If you want to get a built transaction without sending it you can use `factory.createTransaction.create...` rather than `factory.send.create...`. If you want to receive transaction parameters ready to pass in as an ABI argument or to an `TransactionComposer` call then you can use `factory.params.create...`.
### Update and Delete calls
To create an app you need to use the client.
```ts
const client = algorand.client.getTypedAppClientById(HelloWorldAppClient, {
appId: 123n,
});
// Update the application using a bare call
client.send.update.bare();
// Pass in compilation flags
client.send.update.bare({
updatable: true,
deletable: false,
});
// Update the application using an ABI method
client.send.update.namedUpdate({
args: {
arg1: 123,
arg2: 'foo',
},
});
// Pass compilation flags
client.send.update.namedUpdate({
args: {
arg1: 123,
arg2: 'foo',
},
updatable: true,
deletable: true,
});
// Delete the application using a bare call
client.send.delete.bare();
// Delete the application using an ABI method
client.send.delete.namedDelete();
```
If you want to get a built transaction without sending it you can use `client.createTransaction.update...` / `client.createTransaction.delete...` rather than `client.send.update...` / `client.send.delete...`. If you want to receive transaction parameters ready to pass in as an ABI argument or to an `TransactionComposer` call then you can use `client.params.update...` / `client.params.delete...`.
### Deploy call
The deploy call will make a create, update, or delete and create, or no call depending on what is required to have the deployed application match the client’s contract version and the configured `onUpdate` and `onSchemaBreak` parameters. As such the deploy method allows you to configure arguments for each potential call it may make (via `createParams`, `updateParams` and `deleteParams`). If the smart contract is not updatable or deletable, those parameters will be omitted.
These params values (`createParams`, `updateParams` and `deleteParams`) will only allow you to specify valid calls that are defined in the ARC-32 / ARC-56 app spec. You can control what call is made via the `method` parameter in these objects. If it’s left out (or set to `undefined`) then it will be a bare call, if set to the ABI signature of a call it will perform that ABI call. If there are arguments required for that ABI call then the type of the arguments will automatically populate in intellisense.
```ts
client.deploy({
createParams: {
onComplete: OnApplicationComplete.OptIn,
},
updateParams: {
method: 'named_update(uint64,string)string',
args: {
arg1: 123,
arg2: 'foo',
},
},
// Can leave this out and it will do an argumentless bare call (if that call is allowed)
//deleteParams: {}
allowUpdate: true,
allowDelete: true,
onUpdate: 'update',
onSchemaBreak: 'replace',
});
```
## Opt in and close out
Methods with an `opt_in` or `close_out` `onCompletionAction` are grouped under properties of the same name within the `send`, `createTransaction` and `params` properties of the client. If the smart contract does not handle one of these on completion actions, it will be omitted.
```ts
// Opt in with bare call
client.send.optIn.bare();
// Opt in with ABI method
client.createTransaction.optIn.namedOptIn({ args: { arg1: 123 } });
// Close out with bare call
client.params.closeOut.bare();
// Close out with ABI method
client.send.closeOut.namedCloseOut({ args: { arg1: 'foo' } });
```
## Clear state
All clients will have a clear state method which will call the clear state program of the smart contract.
```ts
client.send.clearState();
client.createTransaction.clearState();
client.params.clearState();
```
## No-op calls
The remaining ABI methods which should all have an `onCompletionAction` of `OnApplicationComplete.NoOp` will be available on the `send`, `createTransaction` and `params` properties of the client. If a bare no-op call is allowed it will be available via `bare`.
These methods will allow you to optionally pass in `onComplete` and if the method happens to allow other on-completes than no-op these can also be provided (and those methods will also be available via the on-complete sub-property too per above).
```ts
// Call an ABI method which takes no args
client.send.someMethod();
// Call a no-op bare call
client.createTransaction.bare();
// Call an ABI method, passing args in as a dictionary
client.params.someOtherMethod({ args: { arg1: 123, arg2: 'foo' } });
```
## Method and argument naming
By default, names of names, types and arguments will be transformed to `camelCase` to match TypeScript idiomatic semantics. If you want to keep the names the same as what is in the ARC-32 / ARC-56 app spec file (e.g. `snake_case` etc.) then you can pass the `-p` or `--preserve-names` property to the type generator.
### Method name clashes
The ARC-32 / ARC-56 specification allows two methods to have the same name, as long as they have different ABI signatures. On the client these methods will be emitted with a unique name made up of the method’s full signature. Eg. createStringUint32Void.
Whilst TypeScript supports method overloading, in practice it would be impossible to reliably resolve the desired overload at run time once you factor in methods with default parameters.
## ABI arguments
Each generated method will accept ABI method call arguments in both a tuple and a dictionary format, so you can use whichever feels more comfortable. The types that are accepted will automatically translate from the specified ABI types in the app spec to an equivalent TypeScript type.
```ts
// ABI method which takes no args
client.send.noArgsMethod({ args: {} });
client.send.noArgsMethod({ args: [] });
// ABI method with args
client.send.otherMethod({ args: { arg1: 123, arg2: 'foo', arg3: new Uint8Array([1, 2, 3, 4]) } });
// Call an ABI method, passing args in as a tuple
client.send.yetAnotherMethod({ args: [1, 2, 'foo'] });
```
## Structs
If the method takes a struct as a parameter, or returns a struct as an output then it will automatically be allowed to be passed in and will be returned as the parsed struct object.
## Additional parameters
Each ABI method and bare call on the client allows the consumer to provide additional parameters as well as the core method / args / etc. parameters. This models the parameters that are available in the underlying [app factory / client](https://github.com/algorandfoundation/algokit-utils-ts/blob/main/docs/capabilities/app-client).
```ts
client.send.someMethod({
args: {
arg1: 123,
},
/* Additional parameters go here */
});
client.send.optIn.bare({
/* Additional parameters go here */
});
```
## Composing transactions
Algorand allows multiple transactions to be composed into a single atomic transaction group to be committed (or rejected) as one.
### Using the fluent composer
The client exposes a fluent transaction composer which allows you to build up a group before sending it. The return values will be strongly typed based on the methods you add to the composer.
```ts
const result = await client
.newGroup()
.methodOne({ args: { arg1: 123 }, boxReferences: ['V'] })
// Non-ABI transactions can still be added to the group
.addTransaction(client.appClient.createTransaction.fundAppAccount({ amount: (5000).microAlgo() }))
.methodTwo({ args: { arg1: 'foo' } })
.execute();
// Strongly typed as the return type of methodOne
const resultOfMethodOne = result.returns[0];
// Strongly typed as the return type of methodTwo
const resultOfMethodTwo = result.returns[1];
```
### Manually with the TransactionComposer
Multiple transactions can also be composed using the `TransactionComposer` class.
```ts
const result = algorand
.newGroup()
.addAppCallMethodCall(client.params.methodOne({ args: { arg1: 123 }, boxReferences: ['V'] }))
.addPayment(client.appClient.params.fundAppAccount({ amount: (5000).microAlgo() }))
.addAppCallMethodCall(client.params.methodTwo({ args: { arg1: 'foo' } }))
.execute();
// returns will contain a result object for each ABI method call in the transaction group
for (const { returnValue } of result.returns) {
console.log(returnValue);
}
```
## State
You can access local, global and box storage state with any state values that are defined in the ARC-32 / ARC-56 app spec.
You can do this via the `state` property which has 3 sub-properties for the three different kinds of state: `state.global`, `state.local(address)`, `state.box`. Each one then has a series of methods defined for each registered key or map from the app spec.
Maps have a `value(key)` method to get a single value from the map by key and a `getMap()` method to return all box values as a map. Keys have a `{keyName}()` method to get the value for the key and there will also be a `getAll()` method to get an object will all key values.
The properties will return values of the corresponding TypeScript type for the type in the app spec and any structs will be parsed as the struct object.
```typescript
const factory = algorand.client.getTypedAppFactory(Arc56TestFactory, { defaultSender: 'SENDER' });
const { appClient: client } = await factory.send.create.createApplication({
args: [],
deployTimeParams: { someNumber: 1337n },
});
expect(await client.state.global.globalKey()).toBe(1337n);
expect(await anotherAppClient.state.global.globalKey()).toBe(1338n);
expect(await client.state.global.globalMap.value('foo')).toEqual({ foo: 13n, bar: 37n });
await client.appClient.fundAppAccount({ amount: microAlgos(1_000_000) });
await client.send.optIn.optInToApplication({ args: [], populateAppCallResources: true });
expect(await client.state.local(defaultSender).localKey()).toBe(1337n);
expect(await client.state.local(defaultSender).localMap.value('foo')).toBe('bar');
expect(await client.state.box.boxKey()).toBe('baz');
expect(
await client.state.box.boxMap.value({
add: { a: 1n, b: 2n },
subtract: { a: 4n, b: 3n },
}),
).toEqual({
sum: 3n,
difference: 1n,
});
```
# AlgoKit Templates
> Overview of AlgoKit templates
## Using a Custom AlgoKit Template
To initialize a community AlgoKit template, you can either provide a URL to the community template during the interactive wizard or by passing in `--template-url` to `algokit init`. For example:
```shell
algokit init --template-url https://github.com/algorandfoundation/algokit-python-template
# This is the url of the official Python template. Replace with the community template URL.
# or
algokit init # and select the Custom Template option
```
When you select the `Custom Template` option during the interactive wizard, you will be prompted to provide the URL of the custom template.
```shell
Community templates have not been reviewed, and can execute arbitrary code.
Please inspect the template repository, and pay particular attention to the values of _tasks, _migrations and _jinja_extensions in copier.yml
Enter a custom project URL, or leave blank and press enter to go back to official template selection.
Note that you can use gh: as a shorthand for github.com and likewise gl: for gitlab.com
Valid examples:
- gh:copier-org/copier
- gl:copier-org/copier
- git@github.com:copier-org/copier.git
- git+https://mywebsiteisagitrepo.example.com/
- /local/path/to/git/repo
- /local/path/to/git/bundle/file.bundle
- ~/path/to/git/repo
- ~/path/to/git/repo.bundle
? Custom template URL: # Enter the URL of the custom template here
```
The `--template-url` option can be combined with `--template-url-ref` to specify a specific commit, branch or tag. For example:
```shell
algokit init --template-url https://github.com/algorandfoundation/algokit-python-templat --template-url-ref 9985005b7389c90c6afed685d75bb8e7608b2a96
```
If the URL is not an official template there is a potential security risk and so to continue you must either acknowledge this prompt, or if you are in a non-interactive environment you can pass the `--UNSAFE-SECURITY-accept-template-url` option (but we generally don’t recommend this option so users can review the warning message first) e.g.
```shell
Community templates have not been reviewed, and can execute arbitrary code.
Please inspect the template repository, and pay particular attention to the values of \_tasks, \_migrations and \_jinja_extensions in copier.yml
? Continue anyway? Yes
```
## Creating Custom AlgoKit Templates
If the official templates do not serve your needs, you can create custom AlgoKit templates tailored to your project requirements or industry needs. These custom templates can be used for your future projects or contributed to the Algorand developer community, enhancing the ecosystem with specialized solutions.
Creating templates in AlgoKit involves using various configuration files and a templating engine to generate project structures tailored to your needs. This guide will cover the key concepts and best practices for creating templates in AlgoKit. We will also refer to the official [`algokit-python-template`](https://github.com/algorandfoundation/algokit-python-template) as an example.
### Quick Start
For users who are keen on getting started with creating AlgoKit templates, you can follow these quick steps:
1. Click on `Use this template`->`Create a new repository` on [algokit-python-template](https://github.com/algorandfoundation/algokit-python-template) Github page. This will create a new reference repository with clean git history, allowing you to modify and transform the base Python template into your custom template.
2. Modify the cloned template according to your specific needs. The remainder of this tutorial will help you understand expected behaviors from the AlgoKit side, Copier, the templating framework, and key concepts related to the default files you will encounter in the reference template.
### Overview of AlgoKit Templates
AlgoKit templates are project scaffolds that can initialize new smart contract projects. These templates can include code files, configuration files, and scripts. AlgoKit uses Copier and the Jinja templating engine to create new projects based on these templates.
#### Copier/Jinja
AlgoKit uses Copier templates. Copier is a library that allows you to create project templates that can be easily replicated and customized. It’s often used along with Jinja. Jinja is a modern and designer-friendly templating engine for Python programming language. It’s used in Copier templates to substitute variables in files and file names. You can find more information in the [Copier documentation](https://copier.readthedocs.io/) and [Jinja documentation](https://jinja.palletsprojects.com/).
#### AlgoKit Functionality with Templates
AlgoKit provides the `algokit init` command to initialize a new project using a template. You can pass the template name using the `-t` flag or select a template from a list.
### Key Concepts
#### .algokit.toml
This file is the AlgoKit configuration file for this project, and it can be used to specify the minimum version of the AlgoKit. This is essential to ensure that projects created with your template are always compatible with the version of AlgoKit they are using.
Example from `algokit-python-template`:
```toml
[algokit]
min_version = "v1.1.0-beta.4"
```
This specifies that the template requires at least version `v1.1.0-beta.4` of AlgoKit.
#### Python Support: `pyproject.toml`
Python projects in AlgoKit can leverage various tools for dependency management and project configuration. While Poetry and the `pyproject.toml` file are common choices, they are not the only options. If you opt to use Poetry, you’ll rely on the pyproject.toml file to define the project’s metadata and dependencies. This configuration file can utilize the Jinja templating syntax for customization.
Example snippet from `algokit-python-template`:
```toml
[tool.poetry]
name = "{{ project_name }}"
version = "0.1.0"
description = "Algorand smart contracts"
authors = ["{{ author_name }} <{{ author_email }}>"]
readme = "README.md"
...
```
This example shows how project metadata and dependencies are defined in `pyproject.toml`, using Jinja syntax to allow placeholders for project metadata.
#### TypeScript Support: `package.json`
For TypeScript projects, the `package.json` file plays a similar role as `pyproject.toml` can do for Python projects. It specifies metadata about the project and lists the dependencies required for smart contract development.
Example snippet:
```json
{
"name": "{{ project_name }}",
"version": "1.0.0",
"description": "{{ project_description }}",
"scripts": {
"build": "tsc"
},
"devDependencies": {
"typescript": "^4.2.4",
"tslint": "^6.1.3",
"tslint-config-prettier": "^1.18.0"
}
}
```
This example shows how Jinja syntax is used within `package.json` to allow placeholders for project metadata and dependencies.
#### Bootstrap Option
When instantiating your template via AlgoKit CLI, it will optionally prompt the user to automatically run [algokit bootstrap](https://github.com/algorandfoundation/algokit-cli/blob/main/docs/features/bootstrap.md) after the project is initialized and can perform various setup tasks like installing dependencies or setting up databases.
* `env`: Searches for and copies a `.env*.template` file to an equivalent `.env*` file in the current working directory, prompting for any unspecified values. This feature is integral for securely managing environment variables, preventing sensitive data from inadvertently ending up in version control. By default, Algokit will scan for network-prefixed `.env` variables (e.g., `.env.localnet`), which can be particularly useful when relying on the [Algokit deploy command](https://github.com/algorandfoundation/algokit-cli/blob/deploy-command/docs/features/deploy.md). If no such prefixed files are located, Algokit will then attempt to load default `.env` files. This functionality provides greater flexibility for different network configurations.
* `poetry`: If your Python project uses Poetry for dependency management, the `poetry` command installs Poetry (if not present) and runs `poetry install` in the current working directory to install Python dependencies.
* `npm`: If you’re developing a JavaScript or TypeScript project, the `npm` command runs npm install in the current working directory to install Node.js dependencies.
* `all`: The `all` command runs all the aforementioned bootstrap sub-commands in the current directory and its subdirectories. This command is a comprehensive way to ensure all project dependencies and environment variables are correctly set up.
#### Predefined Copier Answers
Copier can prompt the user for input when initializing a new project, which is then passed to the template as variables. This is useful for customizing the new project based on user input.
Example:
copier.yaml
```yaml
project_name:
type: str
help: What is the name of this project?
placeholder: 'algorand-app'
```
This would prompt the user for the project name, and the input can then be used in the template using the Jinja syntax `{{ project_name }}`.
##### Default Behaviors
When creating an AlgoKit template, there are a few default behaviors that you can expect to be provided by algokit-cli itself without introducing any extra code to your templates:
* **Git**: If Git is installed on the user’s system and the user’s working directory is a Git repository, AlgoKit CLI will commit the newly created project as a new commit in the repository. This feature helps to maintain a clean version history for the project. If you wish to add a specific commit message for this action, you can specify a `commit_message` in the `_commit` option in your `copier.yaml` file.
* **VSCode**: If the user has Visual Studio Code (VSCode) installed and the path to VSCode is added to their system’s PATH, AlgoKit CLI will automatically open the newly created VSCode window unless the user provides specific flags into the init command.
* **Bootstrap**: AlgoKit CLI is equipped to execute a bootstrap script after a project has been initialized. This script, included in AlgoKit templates, can be automatically run to perform various setup tasks, such as installing dependencies or setting up databases. This is managed by AlgoKit CLI and not within the user-created codebase. By default, if a `bootstrap` task is defined in the `copier.yaml`, AlgoKit CLI will execute it unless the user opts out during the prompt.
By combining predefined Copier answers with these default behaviors, you can create a smooth, efficient, and intuitive initialization experience for the users of your template.
#### Executing Python Tasks in Templates
If you need to use Python scripts as tasks within your Copier templates, ensure that you have Python installed on the host machine. By convention, AlgoKit automatically detects the Python installation on your machine and fills in the `python_path` variable accordingly. This process ensures that any Python scripts included as tasks within your Copier templates will execute using the system’s Python interpreter. It’s important to note that the use of `_copier_python` is not recommended. Here’s an example of specifying a Python script execution in your `copier.yaml` without needing to explicitly use `_copier_python`:
```yaml
- '{{ python_path }} your_python_script.py'
```
If you’d like your template to be backwards compatible with versions of `algokit-cli` older than `v1.11.3` when executing custom python scripts via `copier` tasks, you can use a conditional statement to determine the Python path:
```yaml
- '{{ python_path if python_path else _copier_python }} your_python_script.py'
# _copier_python above is used for backwards compatibility with versions < v1.11.3 of the algokit cli
```
And to define `python_path` in your Copier questions:
```yaml
# Auto determined by algokit-cli from v1.11.3 to allow execution of python script
# in binary mode.
python_path:
type: str
help: Path to the sys.executable.
when: false
```
#### Working with Generators
After mastering the use of `copier` and building your templates based on the official AlgoKit template repositories, you can enhance your proficiency by learning to define `custom generators`. Essentially, generators are smaller-scope `copier` templates designed to provide additional functionality after a project has been initialized from the template.
For example, the official [`algokit-python-template`](https://github.com/algorandfoundation/algokit-python-template/tree/main/template_content) incorporates a generator in the `.algokit/generators` directory. This generator can be utilized to execute auxiliary tasks on AlgoKit projects that are initiated from this template, like adding new smart contracts to an existing project. For a comprehensive understanding, please consult the [`architecture decision record`](https://github.com/algorandfoundation/algokit-cli/blob/main/docs/architecture-decisions/2023-07-19_advanced_generate_command.md) and [`algokit generate documentation`](/algokit/algokit-cli/generate).
##### How to Create a Generator
Outlined below are the fundamental steps to create a generator. Although `copier` provides complete autonomy in structuring your template, you may prefer to define your generator to meet your specific needs. Nevertheless, as a starting point, we suggest:
1. Generate a new directory hierarchy within your template directory under the `.algokit/generators` folder (this is merely a suggestion; you can define your custom path if necessary and point to it via the algokit.toml file).
2. Develop a `copier.yaml` file within the generator directory and outline the generator’s behavior. This file bears similarities with the root `copier.yaml` file in your template directory, but it is exclusively for the generator. The `tasks` section of the `copier.yaml` file is where you can determine the generator’s behavior. Here’s an example of a generator that copies the `smart-contract` directory from the template to the current working directory:
```yaml
_task:
- "echo '==== Successfully initialized new smart contract 🚀 ===='"
contract_name:
type: str
help: Name of your new contract.
placeholder: 'my-new-contract'
default: 'my-new-contract'
_templates_suffix: '.j2'
```
Note that `_templates_suffix` must be different from the `_templates_suffix` defined in the root `copier.yaml` file. This is because the generator’s `copier.yaml` file is processed separately from the root `copier.yaml` file.
3. Develop your `generator` copier content and, when ready, test it by initiating a new project for your template and executing the generator command:
```shell
algokit generate
```
This should dynamically load and display your generator as an optional `cli` command that your template users can execute.
### Recommendations
* **Modularity**: Break your templates into modular components that can be combined in different ways.
* **Documentation**: Include README files and comments in your templates to explain how they should be used.
* **Versioning**: Use `.algokit.toml` to specify the minimum compatible version of AlgoKit.
* **Testing**: Include test configurations and scripts in your templates to encourage testing best practices.
* **Linting and Formatting**: Integrate linters and code formatters in your templates to ensure code quality.
* **Algokit Principle**: for details on generic principles for designing templates, refer to [algokit design principles](https://github.com/algorandfoundation/algokit-cli/blob/main/docs/algokit.md#guiding-principles).
### Conclusion
Creating custom templates in AlgoKit is a powerful way to streamline your development workflow for Algorand smart contracts using Python or TypeScript. Leveraging Copier and Jinja for templating and incorporating best practices for modularity, documentation, and coding standards can result in robust, flexible, and user-friendly templates that can be valuable to your projects and the broader Algorand community.
Happy coding!
# Language Guide
Algorand Python is conceptually two things:
1. A partial implementation of the Python programming language that runs on the AVM.
2. A framework for development of Algorand smart contracts and logic signatures, with Pythonic interfaces to underlying AVM functionality.
You can install the Algorand Python types from PyPi:
> `pip install algorand-python`
or
> `poetry add algorand-python`
***
As a partial implementation of the Python programming language, it maintains the syntax and semantics of Python. The subset of the language that is supported will grow over time, but it will never be a complete implementation due to the restricted nature of the AVM as an execution environment. As a trivial example, the `async` and `await` keywords, and all associated features, do not make sense to implement.
Being a partial implementation of Python means that existing developer tooling like IDE syntax highlighting, static type checkers, linters, and auto-formatters, will work out-of-the-box. This is as opposed to an approach to smart contract development that adds or alters language elements or semantics, which then requires custom developer tooling support, and more importantly, requires the developer to learn and understand the potentially non-obvious differences from regular Python.
The greatest advantage to maintaining semantic and syntactic compatibility, however, is only realised in combination with the framework approach. Supplying a set of interfaces representing smart contract development and AVM functionality required allows for the possibility of implementing those interfaces in pure Python! This will make it possible in the near future for you to execute tests against your smart contracts without deploying them to Algorand, and even step into and break-point debug your code from those tests.
The framework provides interfaces to the underlying AVM types and operations. By virtue of the AVM being statically typed, these interfaces are also statically typed, and require your code to be as well.
The most basic types on the AVM are `uint64` and `bytes[]`, representing unsigned 64-bit integers and byte arrays respectively. These are represented by `UInt64` and `Bytes` in Algorand Python. There are further “bounded” types supported by the AVM which are backed by these two simple primitives. For example, `bigint` represents a variably sized (up to 512-bits), unsigned integer, but is actually backed by a `bytes[]`. This is represented by `BigUInt` in Algorand Python.
Unfortunately, none of these types map to standard Python primitives. In Python, an `int` is unsigned, and effectively unbounded. A `bytes` similarly is limited only by the memory available, whereas an AVM `bytes[]` has a maximum length of 4096. In order to both maintain semantic compatibility and allow for a framework implementation in plain Python that will fail under the same conditions as when deployed to the AVM, support for Python primitives is [limited](lg-types#python-built-in-types).
For more information on the philosophy and design of Algorand Python, please see [“Principles”](principles#principles).
If you aren’t familiar with Python, a good place to start before continuing below is with the [official tutorial](https://docs.python.org/3/tutorial/index.html). Just beware that as mentioned above, [not all features are supported](./lg-unsupported-python-features).
## Table of Contents
```{toctree}
---
maxdepth: 3
---
lg-structure
lg-types
lg-control
lg-modules
lg-builtins
lg-errors
lg-data-structures
lg-storage
lg-logs
lg-transactions
lg-ops
lg-opcode-budget
lg-arc4
lg-arc28
lg-calling-apps
lg-compile
lg-unsupported-python-features
```
# ARC-28 - Structured event logging
[ARC-28](https://github.com/algorandfoundation/ARCs/blob/main/ARCs/arc-0028) provides a methodology for structured logging by Algorand smart contracts. It introduces the concept of Events, where data contained in logs may be categorized and structured.
Each Event is identified by a unique 4-byte identifier derived from its `Event Signature`. The Event Signature is a UTF-8 string comprised of the event’s name, followed by the names of the [ARC-4](./lg-arc4) data types contained in the event, all enclosed in parentheses (`EventName(type1,type2,...)`) e.g.:
```plaintext
Swapped(uint64,uint64)
```
Events are emitting by including them in the [log output](./lg-logs). The metadata that identifies the event should then be included in the ARC-4 contract output so that a calling client can parse the logs to parse the structured data out. This part of the ARC-28 spec isn’t yet implemented in Algorand Python, but it’s on the roadmap.
## Emitting Events
To emit an ARC-28 event in Algorand Python you can use the `emit` function, which appears in the `algopy.arc4` namespace for convenience since it heavily uses ARC-4 types and is essentially an extension of the ARC-4 specification. This function takes care of encoding the event payload to conform to the ARC-28 specification and there are 3 overloads:
* An [ARC-4 struct](./lg-arc4), from what the name of the struct will be used as a the event name and the struct parameters will be used as the event fields - `arc4.emit(Swapped(a, b))`
* An event signature as a [string literal (or module variable)](./lg-types), followed by the values - `arc4.emit("Swapped(uint64,uint64)", a, b)`
* An event name as a [string literal (or module variable)](./lg-types), followed by the values - `arc4.emit("Swapped", a, b)`
Here’s an example contract that emits events:
```python
from algopy import ARC4Contract, arc4
class Swapped(arc4.Struct):
a: arc4.UInt64
b: arc4.UInt64
class EventEmitter(ARC4Contract):
@arc4.abimethod
def emit_swapped(self, a: arc4.UInt64, b: arc4.UInt64) -> None:
arc4.emit(Swapped(b, a))
arc4.emit("Swapped(uint64,uint64)", b, a)
arc4.emit("Swapped", b, a)
```
It’s worth noting that the ARC-28 event signature needs to be known at compile time so the event name can’t be a dynamic type and must be a static string literal or string module constant. If you want to emit dynamic events you can do so using the [`log` method](./lg-logs), but you’d need to manually construct the correct series of bytes and the compiler won’t be able to emit the ARC-28 metadata so you’ll need to also manually parse the logs in your client.
Examples of manually constructing an event:
```python
# This is essentially what the `emit` method is doing, noting that a,b need to be encoded
# as a tuple so below (simple concat) only works for static ARC-4 types
log(arc4.arc4_signature("Swapped(uint64,uint64)"), a, b)
# or, if you wanted it to be truly dynamic for some reason,
# (noting this has a non-trivial opcode cost) and assuming in this case
# that `event_suffix` is already defined as a `String`:
event_name = String("Event") + event_suffix
event_selector = op.sha512_256((event_name + "(uint64)").bytes)[:4]
log(event_selector, UInt64(6))
```
# ARC-4 - Application Binary Interface
[ARC4](https://github.com/algorandfoundation/ARCs/blob/main/ARCs/arc-0004) defines a set of encodings and behaviors for authoring and interacting with an Algorand Smart Contract. It is not the only way to author a smart contract, but adhering to it will make it easier for other clients and users to interop with your contract.
To author an arc4 contract you should extend the `ARC4Contract` base class.
```python
from algopy import ARC4Contract
class HelloWorldContract(ARC4Contract):
...
```
## ARC-32 and ARC-56
[ARC32](https://github.com/algorandfoundation/ARCs/blob/main/ARCs/arc-0032) extends the concepts in ARC4 to include an Application Specification which more holistically describes a smart contract and its associated state.
ARC-32/ARC-56 Application Specification files are automatically generated by the compiler for ARC4 contracts as `.arc32.json` or `.arc56.json`
## Methods
Individual methods on a smart contract should be annotated with an `abimethod` decorator. This decorator is used to indicate a method which should be externally callable. The decorator itself includes properties to restrict when the method should be callable, for instance only when the application is being created or only when the OnComplete action is OptIn.
A method that should not be externally available should be annotated with a `subroutine` decorator.
Method docstrings will be used when outputting ARC-32 or ARC-56 application specifications, the following docstrings styles are supported ReST, Google, Numpydoc-style and Epydoc.
```python
from algopy import ARC4Contract, subroutine, arc4
class HelloWorldContract(ARC4Contract):
@arc4.abimethod(create=False, allow_actions=["NoOp", "OptIn"], name="external_name")
def hello(self, name: arc4.String) -> arc4.String:
return self.internal_method() + name
@subroutine
def internal_method(self) -> arc4.String:
return arc4.String("Hello, ")
```
## Router
Algorand Smart Contracts only have two possible programs that are invoked when making an ApplicationCall Transaction (`appl`). The “clear state” program which is called when using an OnComplete action of `ClearState` or the “approval” program which is called for all other OnComplete actions.
Routing is required to dispatch calls handled by the approval program to the relevant ABI methods. When extending `ARC4Contract`, the routing code is automatically generated for you by the PuyaPy compiler.
## Types
ARC4 defines a number of [data types](https://github.com/algorandfoundation/ARCs/blob/main/ARCs/arc-0004#types) which can be used in an ARC4 compatible contract and details how these types should be encoded in binary.
Algorand Python exposes these through a number of types which can be imported from the `algopy.arc4` module. These types represent binary encoded values following the rules prescribed in the ARC which can mean operations performed directly on these types are not as efficient as ones performed on natively supported types (such as `algopy.UInt64` or `algopy.Bytes`)
Where supported, the native equivalent of an ARC4 type can be obtained via the `.native` property. It is possible to use native types in an ABI method and the router will automatically encode and decode these types to their ARC4 equivalent.
### Booleans
**Type:** `algopy.arc4.Bool`\
**Encoding:** A single byte where the most significant bit is `1` for `True` and `0` for `False`\
**Native equivalent:** `builtins.bool`
### Unsigned ints
**Types:** `algopy.arc4.UIntN` (<= 64 bits) `algopy.arc4.BigUIntN` (> 64 bits)\
**Encoding:** A big endian byte array of N bits\
**Native equivalent:** `algopy.UInt64` or `puya.py.BigUInt`
Common bit sizes have also been aliased under `algopy.arc4.UInt8`, `algopy.arc4.UInt16` etc. A uint of any size between 8 and 512 bits (in intervals of 8bits) can be created using a generic parameter. It can be helpful to define your own alias for this type.
```python
import typing as t
from algopy import arc4
UInt40: t.TypeAlias = arc4.UIntN[t.Literal[40]]
```
### Unsigned fixed point decimals
**Types:** `algopy.arc4.UFixedNxM` (<= 64 bits) `algopy.arc4.BigUFixedNxM` (> 64 bits)\
**Encoding:** A big endian byte array of N bits where `encoded_value = value / (10^M)`\
**Native equivalent:** *none*
```python
import typing as t
from algopy import arc4
Decimal: t.TypeAlias = arc4.UFixedNxM[t.Literal[64], t.Literal[10]]
```
### Bytes and strings
**Types:** `algopy.arc4.DynamicBytes` and `algopy.arc4.String`\
**Encoding:** A variable length byte array prefixed with a 16-bit big endian header indicating the length of the data\
**Native equivalent:** `algopy.Bytes` and `algopy.String`
Strings are assumed to be utf-8 encoded and the length of a string is the total number of bytes, *not the total number of characters*.
### Static arrays
**Type:** `algopy.arc4.StaticArray`\
**Encoding:** See [ARC4 Container Packing](#arc4-container-packing)\
**Native equivalent:** *none*
An ARC4 StaticArray is an array of a fixed size. The item type is specified by the first generic parameter and the size is specified by the second.
```python
import typing as t
from algopy import arc4
FourBytes: t.TypeAlias = arc4.StaticArray[arc4.Byte, t.Literal[4]]
```
### Address
**Type:** `algopy.arc4.Address`\
**Encoding:** A byte array 32 bytes long **Native equivalent:** `algopy.Account`
Address represents an Algorand address’s public key, and can be used instead of `algopy.Account` when needing to reference an address in an ARC4 struct, tuple or return type. It is a subclass of `arc4.StaticArray[arc4.Byte, typing.Literal[32]]`
### Dynamic arrays
**Type:** `algopy.arc4.DynamicArray`\
**Encoding:** See [ARC4 Container Packing](#arc4-container-packing)\
**Native equivalent:** *none*
An ARC4 DynamicArray is an array of a variable size. The item type is specified by the first generic parameter. Items can be added and removed via `.pop`, `.append`, and `.extend`.
The current length of the array is encoded in a 16-bit prefix similar to the `arc4.DynamicBytes` and `arc4.String` types
```python
import typing as t
from algopy import arc4
UInt64Array: t.TypeAlias = arc4.DynamicArray[arc4.UInt64]
```
### Tuples
**Type:** `algopy.arc4.Tuple`\
**Encoding:** See [ARC4 Container Packing](#arc4-container-packing)\
**Native equivalent:** `builtins.tuple`
ARC4 Tuples are immutable statically sized arrays of mixed item types. Item types can be specified via generic parameters or inferred from constructor parameters.
### Structs
**Type:** `algopy.arc4.Struct`\
**Encoding:** See [ARC4 Container Packing](#arc4-container-packing)\
**Native equivalent:** `typing.NamedTuple`
ARC4 Structs are named tuples. The class keyword `frozen` can be used to indicate if a struct can be mutated. Items can be accessed and mutated via names instead of indexes. Structs do not have a `.native` property, but a NamedTuple can be used in ABI methods are will be encoded/decode to an ARC4 struct automatically.
```python
import typing
from algopy import arc4
Decimal: typing.TypeAlias = arc4.UFixedNxM[typing.Literal[64], typing.Literal[9]]
class Vector(arc4.Struct, kw_only=True, frozen=True):
x: Decimal
y: Decimal
```
### ARC4 Container Packing
ARC4 encoding rules are detailed explicitly in the [ARC](https://github.com/algorandfoundation/ARCs/blob/main/ARCs/arc-0004#encoding-rules). A summary is included here.
Containers are composed of a head and tail portion.
* For dynamic arrays, the head is prefixed with the length of the array encoded as a 16-bit number. This prefix is not included in offset calculation
* For fixed sized items (eg. Bool, UIntN, or a StaticArray of UIntN), the item is included in the head
* Consecutive Bool items are compressed into the minimum number of whole bytes possible by using a single bit to represent each Bool
* For variable sized items (eg. DynamicArray, String etc), a pointer is included to the head and the data is added to the tail. This pointer represents the offset from the start of the head to the start of the item data in the tail.
### Reference types
**Types:** `algopy.Account`, `algopy.Application`, `algopy.Asset`, `algopy.gtxn.PaymentTransaction`, `algopy.gtxn.KeyRegistrationTransaction`, `algopy.gtxn.AssetConfigTransaction`, `algopy.gtxn.AssetTransferTransaction`, `algopy.gtxn.AssetFreezeTransaction`, `algopy.gtxn.ApplicationCallTransaction`
The ARC4 specification allows for using a number of [reference types](https://github.com/algorandfoundation/ARCs/blob/main/ARCs/arc-0004#reference-types) in an ABI method signature where this reference type refers to…
* another transaction in the group
* an account in the accounts array (`apat` property of the transaction)
* an asset in the foreign assets array (`apas` property of the transaction)
* an application in the foreign apps array (`apfa` property of the transaction)
These types can only be used as parameters, and not as return types.
```python
from algopy import (
Account,
Application,
ARC4Contract,
Asset,
arc4,
gtxn,
)
class Reference(ARC4Contract):
@arc4.abimethod
def with_transactions(
self,
asset: Asset,
pay: gtxn.PaymentTransaction,
account: Account,
app: Application,
axfr: gtxn.AssetTransferTransaction
) -> None:
...
```
### Mutability
To ensure semantic compatability the compiler will also check for any usages of mutable ARC4 types (arrays and structs) and ensure that any additional references are copied using the `.copy()` method.
Python values are passed by reference, and when an object (eg. an array or struct) is mutated in one place, all references to that object see the mutated version. In Python this is managed via the heap. In Algorand Python these mutable values are instead stored on the stack, so when an additional reference is made (i.e. by assigning to another variable) a copy is added to the stack. Which means if one reference is mutated, the other references would not see the change. In order to keep the semantics the same, the compiler forces the addition of `.copy()` each time a new reference to the same object to match what will happen on the AVM.
Struct types can be indicated as `frozen` which will eliminate the need for a `.copy()` as long as the struct also contains no mutable fields (such as arrays or another mutable struct)
# Python builtins
Some common python builtins have equivalent `algopy` versions, that use an `UInt64` instead of a native `int`.
## len
The `len()` builtin is not supported, instead `algopy` types that have a length have a `.length` property of type `UInt64`. This is primarily due to `len()` always returning `int` and the CPython implementation enforcing that it returns *exactly* `int`.
## range
The `range()` builtin has an equivalent `algopy.urange` this behaves the same as the python builtin except that it returns an iteration of `UInt64` values instead of `int`.
## enumerate
The `enumerate()` builtin has an equivalent `algopy.uenumerate` this behaves the same as the python builtin except that it returns an iteration of `UInt64` index values and the corresponding item.
## reversed
The `reversed()` builtin is supported when iterating within a `for` loop and behaves the same as the python builtin.
## types
See [here](./lg-types#python-built-in-types)
# Calling other applications
The preferred way to call other smart contracts is using [`algopy.arc4.abi_call`](#algopyarc4abi_call), [`algopy.arc4.arc4_create`](#algopyarc4arc4_create) or [`algopy.arc4.arc4_update`](#algopyarc4arc4_update). These methods support type checking and encoding of arguments, decoding of results, group transactions, and in the case of `arc4_create` and `arc4_update` automatic inclusion of approval and clear state programs.
## `algopy.arc4.abi_call`
`algopy.arc4.abi_call` can be used to call other ARC4 contracts, the first argument should refer to an ARC4 method either by referencing an Algorand Python `algopy.arc4.ARC4Contract` method, an `algopy.arc4.ARC4Client` method generated from an ARC-32 app spec, or a string representing the ARC4 method signature or name. The following arguments should then be the arguments required for the call, these arguments will be type checked and converted where appropriate. Any other related transaction parameters such as `app_id`, `fee` etc. can also be provided as keyword arguments.
If the ARC4 method returns an ARC4 result then the result will be a tuple of the ARC4 result and the inner transaction. If the ARC4 method does not return a result, or if the result type is not fully qualified then just the inner transaction is returned.
```python
from algopy import Application, ARC4Contract, String, arc4, subroutine
class HelloWorld(ARC4Contract):
@arc4.abimethod()
def greet(self, name: String) -> String:
return "Hello " + name
@subroutine
def call_existing_application(app: Application) -> None:
greeting, greet_txn = arc4.abi_call(HelloWorld.greet, "there", app_id=app)
assert greeting == "Hello there"
assert greet_txn.app_id == 1234
```
### Alternative ways to use `arc4.abi_call`
#### ARC4Client method
A ARC4Client client represents the ARC4 abimethods of a smart contract and can be used to call abimethods in a type safe way
ARC4Client’s can be produced by using `puyapy --output-client=True` when compiling a smart contract (this would be useful if you wanted to publish a client for consumption by other smart contracts) An ARC4Client can also be be generated from an ARC-32 application.json using `puyapy-clientgen` e.g. `puyapy-clientgen examples/hello_world_arc4/out/HelloWorldContract.arc32.json`, this would be the recommended approach for calling another smart contract that is not written in Algorand Python or does not provide the source
```python
from algopy import arc4, subroutine
class HelloWorldClient(arc4.ARC4Client):
def hello(self, name: arc4.String) -> arc4.String: ...
@subroutine
def call_another_contract() -> None:
# can reference another algopy contract method
result, txn = arc4.abi_call(HelloWorldClient.hello, arc4.String("World"), app=...)
assert result == "Hello, World"
```
#### Method signature or name
An ARC4 method selector can be used e.g. `"hello(string)string` along with a type index to specify the return type. Additionally just a name can be provided and the method signature will be inferred e.g.
```python
from algopy import arc4, subroutine
@subroutine
def call_another_contract() -> None:
# can reference a method selector
result, txn = arc4.abi_call[arc4.String]("hello(string)string", arc4.String("Algo"), app=...)
assert result == "Hello, Algo"
# can reference a method name, the method selector is inferred from arguments and return type
result, txn = arc4.abi_call[arc4.String]("hello", "There", app=...)
assert result == "Hello, There"
```
## `algopy.arc4.arc4_create`
`algopy.arc4.arc4_create` can be used to create ARC4 applications, and will automatically populate required fields for app creation (such as approval program, clear state program, and global/local state allocation).
Like [`algopy.arc4.abi_call`](lg-transactions#arc4-application-calls) it handles ARC4 arguments and provides ARC4 return values.
If the compiled programs and state allocation fields need to be customized (for example due to template variables), this can be done by passing a `algopy.CompiledContract` via the `compiled` keyword argument.
```python
from algopy import ARC4Contract, String, arc4, subroutine
class HelloWorld(ARC4Contract):
@arc4.abimethod()
def greet(self, name: String) -> String:
return "Hello " + name
@subroutine
def create_new_application() -> None:
hello_world_app = arc4.arc4_create(HelloWorld).created_app
greeting, _txn = arc4.abi_call(HelloWorld.greet, "there", app_id=hello_world_app)
assert greeting == "Hello there"
```
## `algopy.arc4.arc4_update`
`algopy.arc4.arc4_update` is used to update an existing ARC4 application and will automatically populate the required approval and clear state program fields.
Like [`algopy.arc4.abi_call`](lg-transactions#arc4-application-calls) it handles ARC4 arguments and provides ARC4 return values.
If the compiled programs need to be customized (for example due to (for example due to template variables), this can be done by passing a `algopy.CompiledContract` via the `compiled` keyword argument.
```python
from algopy import Application, ARC4Contract, String, arc4, subroutine
class NewApp(ARC4Contract):
@arc4.abimethod()
def greet(self, name: String) -> String:
return "Hello " + name
@subroutine
def update_existing_application(existing_app: Application) -> None:
hello_world_app = arc4.arc4_update(NewApp, app_id=existing_app)
greeting, _txn = arc4.abi_call(NewApp.greet, "there", app_id=hello_world_app)
assert greeting == "Hello there"
```
## Using `itxn.ApplicationCall`
If the application being called is not an ARC4 contract, or an application specification is not available, then `algopy.itxn.ApplicationCall` can be used. This approach is generally more verbose than the above approaches, so should only be used if required. See [here](./lg-transactions#create-an-arc4-application-and-then-call-it) for an example
# Compiling to AVM bytecode
The PuyaPy compiler can compile Algorand Python smart contracts directly into AVM bytecode. Once compiled, this bytecode can be utilized to construct AVM Application Call transactions both on and off chain.
## Outputting AVM bytecode from CLI
The `--output-bytecode` option can be used to generate `.bin` files for smart contracts and logic signatures, producing an approval and clear program for each smart contract.
## Obtaining bytecode within other contracts
The `compile_contract` function takes an Algorand Python smart contract class and returns a `CompiledContract`, The global state, local state and program pages allocation parameters are derived from the contract by default, but can be overridden. This compiled contract can then be used to create an `algopy.itxn.ApplicationCall` transaction or used with the ARC4 functions.
The `compile_logicsig` takes an Algorand Python logic signature and returns a `CompiledLogicSig`, which can be used to verify if a transaction has been signed by a particular logic signature.
## Template variables
Algorand Python supports defining `algopy.TemplateVar` variables that can be substituted during compilation.
For example, the following contract has `UInt64` and `Bytes` template variables.
```{code-block}
:caption: templated_contract.py
from algopy import ARC4Contract, Bytes, TemplateVar, UInt64, arc4
class TemplatedContract(ARC4Contract):
@arc4.abimethod
def my_method(self) -> UInt64:
return TemplateVar[UInt64]("SOME_UINT")
@arc4.abimethod
def my_other_method(self) -> Bytes:
return TemplateVar[Bytes]("SOME_BYTES")
```
When compiling to bytecode, the values for these template variables must be provided. These values can be provided via the CLI, or through the `template_vars` parameter of the `compile_contract` and `compile_logicsig` functions.
### CLI
The `--template-var` option can be used to [define](compiler#defining-template-values) each variable.
For example to provide the values for the above example contract the following command could be used `puyapy --template-var SOME_UINT=123 --template-var SOME_BYTES=0xABCD templated_contract.py`
### Within other contracts
The functions `compile_contract` and `compile_logicsig` both have an optional `template_vars` parameter which can be used to define template variables. Variables defined in this manner take priority over variables defined on the CLI.
```python
from algopy import Bytes, UInt64, arc4, compile_contract, subroutine
from templated_contract import TemplatedContract
@subroutine
def create_templated_contract() -> None:
compiled = compile_contract(
TemplatedContract,
global_uints=2, # customize allocated global uints
template_vars={ # provide template vars
"SOME_UINT": UInt64(123),
"SOME_BYTES": Bytes(b"\xAB\xCD")
},
)
arc4.arc4_create(TemplatedContract, compiled=compiled)
```
# Control flow structures
Control flow in Algorand Python is similar to standard Python control flow, with support for if statements, while loops, for loops, and match statements.
## If statements
If statements work the same as Python. The conditions must be an expression that evaluates to bool, which can include a [String or Uint64](./lg-types) among others.
```python
if condition:
# block of code to execute if condition is True
elif condition2:
# block of code to execute if condition is False and condition2 is True
else:
# block of code to execute if condition and condition2 are both False
```
[See full example](https://github.com/algorandfoundation/puya/blob/main/test_cases/simplish/contract.py).
## Ternary conditions
Ternary conditions work the same as Python. The condition must be an expression that evaluates to bool, which can include a [String or Uint64](./lg-types) among others.
```python
value1 = UInt64(5)
value2 = String(">6") if value1 > 6 else String("<=6")
```
## While loops
While loops work the same as Python. The condition must be an expression that evaluates to bool, which can include a [String or Uint64](./lg-types) among others.
You can use `break` and `continue`.
```python
while condition:
# block of code to execute if condition is True
```
[See full example](https://github.com/algorandfoundation/puya/blob/main/test_cases/unssa/contract.py#L32-L83).
## For Loops
For loops are used to iterate over sequences, ranges and [ARC-4 arrays](./lg-arc4). They work the same as Python.
Algorand Python provides functions like `uenumerate` and `urange` to facilitate creating sequences and ranges; in-built Python `reversed` method works with these.
* `uenumerate` is similar to Python’s built-in enumerate function, but for UInt64 numbers; it allows you to loop over a sequence and have an automatic counter.
* `urange` is a function that generates a sequence of Uint64 numbers, which you can iterate over.
* `reversed` returns a reversed iterator of a sequence.
Here is an example of how you can use these functions in a contract:
```python
test_array = arc4.StaticArray(arc4.UInt8(), arc4.UInt8(), arc4.UInt8(), arc4.UInt8())
# urange: reversed items, forward index
for index, item in uenumerate(reversed(urange(4))):
test_array[index] = arc4.UInt8(item)
assert test_array.bytes == Bytes.from_hex("03020100")
```
[See full](https://github.com/algorandfoundation/puya/blob/main/test_cases/reversed_iteration/contract.py) [examples](https://github.com/algorandfoundation/puya/blob/main/test_cases/nested_loops/contract.py).
## Match Statements
Match statements work the same as Python and work for \[…]
```python
match value:
case pattern1:
# block of code to execute if pattern1 matches
case pattern2:
# block of code to execute if pattern2 matches
case _:
# Fallback
```
Note: Captures and patterns are not supported. Currently, there is only support for basic case/switch functionality; pattern matching and guard clauses are not currently supported.
[See full example](https://github.com/algorandfoundation/puya/blob/main/test_cases/match/contract.py).
# Data structures
In terms of data structures, Algorand Python currently provides support for [composite](https://en.wikipedia.org/wiki/Composite_data_type) data types and arrays.
In a restricted and costly computing environment such as a blockchain application, making the correct choice for data structures is crucial.
All ARC-4 data types are supported, and initially were the only choice of data structures in Algorand Python 1.0, other than statically sized native Python tuples. However, ARC-4 encoding is not an efficient encoding for mutations, additionally they were restricted in that they could only contain other ARC-4 types.
As of Algorand Python 2.7, two new array types were introduced `algopy.Array`, a mutable array type that supports statically sized native and ARC-4 elements and `algopy.ImmutableArray` that has an immutable API and supports dynamically sized native and ARC-4 elements.
## Mutability vs Immutability
A value with an immutable type cannot be modified. Some examples are `UInt64`, `Bytes`, `tuple` and `typing.NamedTuple`.
Aggregate immutable types such as `tuple` or `ImmutableArray` provide a way to produce modified values, this is done by returning a copy of the original value with the specified changes applied e.g.
```python
import typing
import algopy
# update a named tuple with _replace
class MyTuple(typing.NamedTuple):
foo: algopy.UInt64
bar: algopy.String
tup1 = MyTuple(foo=algopy.UInt64(12), bar=algopy.String("Hello"))
# this does not modify tup1
tup2 = tup1._replace(foo=algopy.UInt64(34))
assert tup1.foo != tup2.foo
# update immutable array by appending and reassigning
arr = algopy.ImmutableArray[MyTuple]()
arr = arr.append(tup1)
arr = arr.append(tup2)
```
Mutable types allow direct modification of a value and all references to this value are able to observe the change e.g.
```python
import algopy
# both my_arr and my_arr2 both point to the same array
my_arr = algopy.Array[algopy.UInt64]()
my_arr2 = my_arr
my_arr.append(algopy.UInt64(12))
assert my_arr.length == 1
assert my_arr2.length == 1
my_arr2.append(algopy.UInt64(34))
assert my_arr2.length == 2
assert my_arr.length == 2
```
## Static size vs Dynamic size
A static sized type is a type where its total size in memory is determinable at compile time, for example `UInt64` is always 8 bytes of memory. Aggregate types such as `tuple`, `typing.NamedTuple`, `arc4.Struct` and `arc4.Tuple` are static size if all their members are also static size e.g. `tuple[UInt64, UInt64]` is static size as it contains two static sized members.
Any type where its size is not statically defined is dynamically sized e.g. `Bytes`, `String`, `tuple[UInt64, String]` and `Array[UInt64]` are all dynamically sized.
## Algorand Python composite types
### `tuple`
This is a regular python tuple
* Immutable
* Members can be of any type
* Most useful as an anonymous type
* Each member is stored on the stack
### `typing.NamedTuple`
* Immutable
* Members can be of any type
* Members are described by a field name and type
* Modified copies can be made using `._replace`
* Each member is stored on the stack
### `arc4.Tuple`
* Can only contain other ARC-4 types
* Can be immutable if all members are also immutable
* Requires `.copy()` when mutable and creating additional references
* Encoded as a single ARC-4 value on the stack
### `arc4.Struct`
* Can only contain other ARC-4 types
* Members are described by a field name and type
* Can be immutable if using the `frozen` class option and all members are also immutable
* Requires `.copy()` when mutable and creating additional references
* Encoded as a single ARC-4 value on the stack
## Algorand Python array types
### `algopy.Array`
* Mutable, all references see modifications
* Only supports static size immutable types. Note: Supporting mutable elements would have the potential to quickly exhaust scratch slots in a program so for this reason this type is limited to immutable elements only
* May use scratch slots to store the data
* Cannot be put in storage or used in ABI method signatures
* An immutable copy can be made for storage or returning from a contract by using the `freeze` method e.g.
```python
import algopy
class SomeContract(algopy.arc4.ARC4Contract):
@algopy.arc4.abimethod()
def get_array(self) -> algopy.ImmutableArray[algopy.UInt64]:
arr = algopy.Array[algopy.UInt64]()
# modify arr as required
...
# return immutable copy
return arr.freeze()
```
### `algopy.ImmutableArray`
* Immutable
* Modifications are done by reassigning a modified copy of the original array
* Supports all immutable types
* Most efficient with static sized immutable types
* Can be put in storage or used in ABI method signatures
* Can be used to extend an `algopy.Array` to do modifications e.g.
```python
import algopy
class SomeContract(algopy.arc4.ARC4Contract):
@algopy.arc4.abimethod()
def modify_array(self, imm_array: algopy.ImmutableArray[algopy.UInt64]) -> None:
mutable_arr = algopy.Array[algopy.UInt64]()
mutable_arr.extend(imm_array)
...
```
### `algopy.arc4.DynamicArray` / `algopy.arc4.StaticArray`
* Supports only ARC-4 elements
* Elements often require conversion to native types
* Efficient for reading
* Requires `.copy()` if making additional references to the array
## Recommendations
* Prefer immutable structures such as `tuple` or `typing.NamedTuple` for aggregate types as these support all types and do not require `.copy()`
* If a function needs just a few values on a tuple it is more efficient to just pass those members rather than the whole tuple
* Prefer static sized types rather than dynamically sized types in arrays as they are more efficient in terms of op budgets
* Use `algopy.Array` when doing many mutations e.g. appending in a loop
* Use `algopy.Array.freeze` to convert an array to `algopy.ImmutableArray` for storage
* `algopy.ImmutableArray` can be used in storage and ABI methods, and will be viewed externally (i.e. in ARC-56 definitions) as the equivalent ARC-4 encoded type
* `algopy.ImmutableArray` can be converted to `algopy.Array` by extending a new `algopy.Array` with an `algopy.ImmutableArray`
# Error handling and assertions
In Algorand Python, error handling and assertions play a crucial role in ensuring the correctness and robustness of smart contracts.
## Assertions
Assertions allow you to immediately fail a smart contract if a [Boolean statement or value](./lg-types#bool) evaluates to `False`. If an assertion fails, it immediately stops the execution of the contract and marks the call as a failure.
In Algorand Python, you can use the Python built-in `assert` statement to make assertions in your code.
For example:
```python
@subroutine
def set_value(value: UInt64):
assert value > 4, "Value must be > 4"
```
### Assertion error handling
The (optional) string value provided with an assertion, if provided, will be added as a TEAL comment on the end of the assertion line. This works in concert with default AlgoKit Utils app client behaviour to show a TEAL stack trace of an error and thus show the error message to the caller (when source maps have been loaded).
## Explicit failure
For scenarios where you need to fail a contract explicitly, you can use the `op.err()` operation. This operation causes the TEAL program to immediately and unconditionally fail.
Alternatively `op.exit(0)` will achieve the same result. A non-zero value will do the opposite and immediately succeed.
## Exception handling
The AVM doesn’t provide error trapping semantics so it’s not possible to implement `raise` and `catch`.
For more details see [Unsupported Python features](lg-unsupported-python-features#raise-tryexceptfinally).
# Logging
Algorand Python provides a `log` method that allows you to emit debugging and event information as well as return values from your contracts to the caller.
This `log` method is a superset of the [AVM `log` method](./lg-ops) that adds extra functionality:
* You can log multiple items rather than a single item
* Items are concatenated together with an optional separator (which defaults to: `""`)
* Items are automatically converted to bytes for you
* Support for:
* `int` literals / module variables (encoded as raw bytes, not ASCII)
* `UInt64` values (encoded as raw bytes, not ASCII)
* `str` literals / module variables (encoded as UTF-8)
* `bytes` literals / module variables (encoded as is)
* `Bytes` values (encoded as is)
* `BytesBacked` values, which includes `String`, `BigUInt`, `Account` and all of the [ARC-4 types](./api-algopy.arc4) (encoded as their underlying bytes values)
Logged values are [available to the calling client](https://dev.algorand.co/reference/rest-apis/algod/#pendingtransactionresponse) and attached to the transaction record stored on the blockchain ledger.
If you want to emit ARC-28 events in the logs then there is a [purpose-built function for that](./lg-arc28).
Here’s an example contract that uses the log method in various ways:
```python
from algopy import BigUInt, Bytes, Contract, log, op
class MyContract(Contract):
def approval_program(self) -> bool:
log(0)
log(b"1")
log("2")
log(op.Txn.num_app_args + 3)
log(Bytes(b"4") if op.Txn.num_app_args else Bytes())
log(
b"5",
6,
op.Txn.num_app_args + 7,
BigUInt(8),
Bytes(b"9") if op.Txn.num_app_args else Bytes(),
sep="_",
)
return True
def clear_state_program(self) -> bool:
return True
```
# Module level constructs
You can write compile-time constant code at a module level and then use them in place of [Python built-in literal types](./lg-types#python-built-in-types).
For a full example of what syntax is currently possible see the [test case example](https://github.com/algorandfoundation/puya/blob/main/test_cases/module_consts/contract.py).
## Module constants
Module constants are compile-time constant, and can contain `bool`, `int`, `str` and `bytes`.
You can use fstrings and other compile-time constant values in module constants too.
For example:
```python
from algopy import UInt64, subroutine
SCALE = 100000
SCALED_PI = 314159
@subroutine
def circle_area(radius: UInt64) -> UInt64:
scaled_result = SCALED_PI * radius**2
result = scaled_result // SCALE
return result
@subroutine
def circle_area_100() -> UInt64:
return circle_area(UInt64(100))
```
## If statements
You can use if statements with compile-time constants in module constants.
For example:
```python
FOO = 42
if FOO > 12:
BAR = 123
else:
BAR = 456
```
## Integer math
Module constants can also be defined using common integer expressions.
For example:
```python
SEVEN = 7
TEN = 7 + 3
FORTY_NINE = 7 ** 2
```
## Strings
Module `str` constants can use f-string formatting and other common string expressions.
For example:
```python
NAME = "There"
MY_FORMATTED_STRING = f"Hello {NAME}" # Hello There
PADDED = f"{123:05}" # "00123"
DUPLICATED = "5" * 3 # "555"
```
## Type aliases
You can create type aliases to make your contract terser and more expressive.
For example:
```python
import typing
from algopy import arc4
VoteIndexArray: typing.TypeAlias = arc4.DynamicArray[arc4.UInt8]
Row: typing.TypeAlias = arc4.StaticArray[arc4.UInt8, typing.Literal[3]]
Game: typing.TypeAlias = arc4.StaticArray[Row, typing.Literal[3]]
Move: typing.TypeAlias = tuple[arc4.UInt64, arc4.UInt64]
Bytes32: typing.TypeAlias = arc4.StaticArray[arc4.Byte, typing.Literal[32]]
Proof: typing.TypeAlias = arc4.DynamicArray[Bytes32]
```
# Opcode budgets
Algorand Python provides a helper method for increasing the available opcode budget.
# AVM operations
Algorand Python allows you to do express every op code the AVM has available submodule. We generally recommend importing this entire submodule so you can use intellisense to discover the available methods:
```python
from algopy import UInt64, op, subroutine
@subroutine
def sqrt_16() -> UInt64:
return op.sqrt(16)
```
All ops are typed using Algorand Python types and have correct static type representations.
Many ops have higher-order functionality that Algorand Python exposes and would limit the need to reach for the underlying ops. For instance, there is first-class support for local and global storage so there is little need to use the likes of `app_local_get` et. al. But they are still exposed just in case you want to do something that Algorand Python’s abstractions don’t support.
## Txn
The `Txn` opcodes are so commonly used they have been exposed directly in the `algopy` module and can be easily imported to make it terser to access:
```python
from algopy import subroutine, Txn
@subroutine
def has_no_app_args() -> bool:
return Txn.num_app_args == 0
```
## Global
The `Global` opcodes are so commonly used they have been exposed directly in the `algopy` module and can be easily imported to make it terser to access:
```python
from algopy import subroutine, Global, Txn
@subroutine
def only_allow_creator() -> None:
assert Txn.sender == Global.creator_address, "Only the contract creator can perform this operation"
```
# Storing data on-chain
Algorand smart contracts have [three different types of on-chain storage](https://devdeveloper.algorand.co/concepts/smart-contracts/storage/overview/) they can utilise: [Global storage](#global-storage), [Local storage](#local-storage), [Box Storage](#box-storage), and [Scratch storage](#scratch-storage).
The life-cycle of a smart contract matches the semantics of Python classes when you consider deploying a smart contract as “instantiating” the class. Any calls to that smart contract are made to that instance of the smart contract, and any state assigned to `self.` variables will persist across different invocations (provided the transaction it was a part of succeeds, of course). You can deploy the same contract class multiple times, each will become a distinct and isolated instance.
During a single smart contract execution there is also the ability to use “temporary” storage either global to the contract execution via [Scratch storage](#scratch-storage), or local to the current method via [local variables and subroutine params](./lg-structure#subroutines).
## Global storage
Global storage is state that is stored against the contract instance and can be retrieved by key. There are [AVM limits to the amount of global storage that can be allocated to a contract](https://dev.algorand.co/concepts/smart-contracts/storage/overview/#global-storage).
This is represented in Algorand Python by either:
1. Assigning any [Algorand Python typed](./lg-types) value to an instance variable (e.g. `self.value = UInt64(3)`).
* Use this approach if you just require a terse API for getting and setting a state value
2. Using an instance of `GlobalState`, which gives some extra features to understand and control the value and the metadata of it (which propagates to the ARC-32 app spec file)
* Use this approach if you need to:
* Omit a default/initial value
* Delete the stored value
* Check if a value exists
* Specify the exact key bytes
* Include a description to be included in App Spec files (ARC32/ARC56)
For example:
```python
self.global_int_full = GlobalState(UInt64(55), key="gif", description="Global int full")
self.global_int_simplified = UInt64(33)
self.global_int_no_default = GlobalState(UInt64)
self.global_bytes_full = GlobalState(Bytes(b"Hello"))
self.global_bytes_simplified = Bytes(b"Hello")
self.global_bytes_no_default = GlobalState(Bytes)
global_int_full_set = bool(self.global_int_full)
bytes_with_default_specified = self.global_bytes_no_default.get(b"Default if no value set")
error_if_not_set = self.global_int_no_default.value
```
These values can be assigned anywhere you have access to `self` i.e. any instance methods/subroutines. The information about global storage is automatically included in the ARC-32 app spec file and thus will automatically appear within any [generated typed clients](https://github.com/algorandfoundation/algokit-cli/blob/main/docs/features/generate#1-typed-clients).
## Local storage
Local storage is state that is stored against the contract instance for a specific account and can be retrieved by key and account address. There are [AVM limits to the amount of local storage that can be allocated to a contract](https://dev.algorand.co/concepts/smart-contracts/storage/overview/#local-storage).
This is represented in Algorand Python by using an instance of `LocalState`.
For example:
```python
def __init__(self) -> None:
self.local = LocalState(Bytes)
self.local_with_metadata = LocalState(UInt64, key = "lwm", description = "Local with metadata")
@subroutine
def get_guaranteed_data(self, for_account: Account) -> Bytes:
return self.local[for_account]
@subroutine
def get_data_with_default(self, for_account: Account, default: Bytes) -> Bytes:
return self.local.get(for_account, default)
@subroutine
def get_data_or_assert(self, for_account: Account) -> Bytes:
result, exists = self.local.maybe(for_account)
assert exists, "no data for account"
return result
@subroutine
def set_data(self, for_account: Account, value: Bytes) -> None:
self.local[for_account] = value
@subroutine
def delete_data(self, for_account: Account) -> None:
del self.local[for_account]
```
These values can be assigned anywhere you have access to `self` i.e. any instance methods/subroutines. The information about local storage is automatically included in the ARC-32 app spec file and thus will automatically appear within any [generated typed clients](https://github.com/algorandfoundation/algokit-cli/blob/main/docs/features/generate#1-typed-clients).
## Box storage
We provide 3 different types for accessing box storage: Box, BoxMap, and BoxRef. We also expose raw operations via the [AVM ops](./lg-ops) module.
Before using box storage, be sure to familiarise yourself with the [requirements and restrictions](https://dev.algorand.co/concepts/smart-contracts/storage/overview/#boxes) of the underlying API.
The `Box` type provides an abstraction over storing a single value in a single box. A box can be declared against `self` in an `__init__` method (in which case the key must be a compile time constant); or as a local variable within any subroutine. `Box` proxy instances can be passed around like any other value.
Once declared, you can interact with the box via its instance methods.
```python
import typing as t
from algopy import Box, arc4, Contract, op
class MyContract(Contract):
def __init__(self) -> None:
self.box_a = Box(arc4.StaticArray[arc4.UInt32, t.Literal[20]], key=b"a")
def approval_program(self) -> bool:
box_b = Box(arc4.String, key=b"b")
box_b.value = arc4.String("Hello")
# Check if the box exists
if self.box_a:
# Reassign the value
self.box_a.value[2] = arc4.UInt32(40)
else:
# Assign a new value
self.box_a.value = arc4.StaticArray[arc4.UInt32, t.Literal[20]].from_bytes(op.bzero(20 * 4))
# Read a value
return self.box_a.value[4] == arc4.UInt32(2)
```
`BoxMap` is similar to the `Box` type, but allows for grouping a set of boxes with a common key and content type. A custom `key_prefix` can optionally be provided, with the default being to use the variable name as the prefix. The key can be a `Bytes` value, or anything that can be converted to `Bytes`. The final box name is the combination of `key_prefix + key`.
```python
from algopy import BoxMap, Contract, Account, Txn, String
class MyContract(Contract):
def __init__(self) -> None:
self.my_map = BoxMap(Account, String, key_prefix=b"a_")
def approval_program(self) -> bool:
# Check if the box exists
if Txn.sender in self.my_map:
# Reassign the value
self.my_map[Txn.sender] = String(" World")
else:
# Assign a new value
self.my_map[Txn.sender] = String("Hello")
# Read a value
return self.my_map[Txn.sender] == String("Hello World")
```
`BoxRef` is a specialised type for interacting with boxes which contain binary data. In addition to being able to set and read the box value, there are operations for extracting and replacing just a portion of the box data which is useful for minimizing the amount of reads and writes required, but also allows you to interact with byte arrays which are longer than the AVM can support (currently 4096).
```python
from algopy import BoxRef, Contract, Global, Txn
class MyContract(Contract):
def approval_program(self) -> bool:
my_blob = BoxRef(key=b"blob")
sender_bytes = Txn.sender.bytes
app_address = Global.current_application_address.bytes
assert my_blob.create(8000)
my_blob.replace(0, sender_bytes)
my_blob.splice(0, 0, app_address)
first_64 = my_blob.extract(0, 32 * 2)
assert first_64 == app_address + sender_bytes
assert my_blob.delete()
value, exists = my_blob.maybe()
assert not exists
assert my_blob.get(default=sender_bytes) == sender_bytes
my_blob.create(sender_bytes + app_address)
assert my_blob, "Blob exists"
assert my_blob.length == 64
return True
```
If none of these abstractions suit your needs, you can use the box storage [AVM ops](./lg-ops) to interact with box storage. These ops match closely to the opcodes available on the AVM.
For example:
```python
op.Box.create(b"key", size)
op.Box.put(Txn.sender.bytes, answer_ids.bytes)
(votes, exists) = op.Box.get(Txn.sender.bytes)
op.Box.replace(TALLY_BOX_KEY, index, op.itob(current_vote + 1))
```
See the [voting contract example](https://github.com/algorandfoundation/puya/tree/main/examples/voting/voting.py) for a real-world example that uses box storage.
## Scratch storage
To use stratch storage you need to [register the scratch storage that you want to use](./lg-structure#contract-class-configuration) and then you can use the scratch storage [AVM ops](./lg-ops).
For example:
```python
from algopy import Bytes, Contract, UInt64, op, urange
TWO = 2
TWENTY = 20
class MyContract(Contract, scratch_slots=(1, TWO, urange(3, TWENTY))):
def approval_program(self) -> bool:
op.Scratch.store(1, UInt64(5))
op.Scratch.store(2, Bytes(b"Hello World"))
for i in urange(3, 20):
op.Scratch.store(i, i)
assert op.Scratch.load_uint64(1) == UInt64(5)
assert op.Scratch.load_bytes(2) == b"Hello World"
assert op.Scratch.load_uint64(5) == UInt64(5)
return True
def clear_state_program(self) -> bool:
return True
```
# Program structure
An Algorand Python smart contract is defined within a single class. You can extend other contracts (through inheritance), and also define standalone functions and reference them. This also works across different Python packages - in other words, you can have a Python library with common functions and re-use that library across multiple projects!
## Modules
Algorand Python modules are files that end in `.py`, as with standard Python. Sub-modules are supported as well, so you’re free to organise your Algorand Python code however you see fit. The standard python import rules apply, including [relative vs absolute import](https://docs.python.org/3/reference/import.html#package-relative-imports) requirements.
A given module can contain zero, one, or many smart contracts and/or logic signatures.
A module can contain [contracts](#contract-classes), [subroutines](#subroutines), [logic signatures](#logic-signatures), and [compile-time constant code and values](lg-modules).
## Typing
Algorand Python code must be fully typed with [type annotations](https://docs.python.org/3/library/typing.html).
In practice, this mostly means annotating the arguments and return types of all functions.
## Subroutines
Subroutines are “internal” or “private” methods to a contract. They can exist as part of a contract class, or at the module level so they can be used by multiple classes or even across multiple projects.
You can pass parameters to subroutines and define local variables, both of which automatically get managed for you with semantics that match Python semantics.
All subroutines must be decorated with `algopy.subroutine`, like so:
```python
def foo() -> None: # compiler error: not decorated with subroutine
...
@algopy.subroutine
def bar() -> None:
...
```
```{note}
Requiring this decorator serves two key purposes:
1. You get an understandable error message if you try and use a third party package that wasn't
built for Algorand Python
1. It provides for the ability to modify the functions on the fly when running in Python itself, in
a future testing framework.
```
Argument and return types to a subroutine can be any Algorand Python variable type (except for\
[some inner transaction types](lg-transactions#inner-transaction-objects-cannot-be-passed-to-or-returned-from-subroutines) ).
Returning multiple values is allowed, this is annotated in the standard Python way with `tuple`:
```python
@algopy.subroutine
def return_two_things() -> tuple[algopy.UInt64, algopy.String]:
...
```
Keyword only and positional only argument list modifiers are supported:
```python
@algopy.subroutine
def my_method(a: algopy.UInt64, /, b: algopy.UInt64, *, c: algopy.UInt64) -> None:
...
```
In this example, `a` can only be passed positionally, `b` can be passed either by position or by name, and `c` can only be passed by name.
The following argument/return types are not currently supported:
* Type unions
* Variadic args like `*args`, `**kwargs`
* Python types such as `int`
* Default values are not supported
## Contract classes
An [Algorand smart contract](https://dev.algorand.co/concepts/smart-contracts/apps/) consists of two distinct “programs”; an approval program, and a clear-state program. These are tied together in Algorand Python as a single class.
All contracts must inherit from the base class `algopy.Contract` - either directly or indirectly, which can include inheriting from `algopy.ARC4Contract`.
The life-cycle of a smart contract matches the semantics of Python classes when you consider deploying a smart contract as “instantiating” the class. Any calls to that smart contract are made to that instance of the smart contract, and any state assigned to `self.` will persist across different invocations (provided the transaction it was a part of succeeds, of course). You can deploy the same contract class multiple times, each will become a distinct and isolated instance.
Contract classes can optionally implement an `__init__` method, which will be executed exactly once, on first deployment. This method takes no arguments, but can contain arbitrary code, including reading directly from the transaction arguments via `Txn`. This makes it a good place to put common initialisation code, particularly in ARC-4 contracts with multiple methods that allow for creation.
The contract class body should not contain any logic or variable initialisations, only method definitions. Forward type declarations are allowed.
Example:
```python
class MyContract(algopy.Contract):
foo: algopy.UInt64 # okay
bar = algopy.UInt64(1) # not allowed
if True: # also not allowed
bar = algopy.UInt64(2)
```
Only concrete (ie non-abstract) classes produce output artifacts for deployment. To mark a class as explicitly abstract, inherit from [`abc.ABC`](https://docs.python.org/3/library/abc.html#abc.ABC).
```{note}
The compiler will produce a warning if a Contract class is implicitly abstract, i.e. if any
abstract methods are unimplemented.
```
For more about inheritance and it’s role in code reuse, see the section in [Code reuse](lg-code-reuse#inheritance)
### Contract class configuration
When defining a contract subclass you can pass configuration options to the `algopy.Contract` base class per the API documentation.
Namely you can pass in:
* `name` - Which will affect the output TEAL file name if there are multiple non-abstract contracts in the same file and will also be used as the contract name in the ARC-32 application.json instead of the class name.
* `scratch_slots` - Which allows you to mark a slot ID or range of slot IDs as “off limits” to Puya so you can manually use them.
* `state_totals` - Which allows defining what values should be used for global and local uint and bytes storage values when creating a contract and will appear in ARC-32 app spec.
Full example:
```python
GLOBAL_UINTS = 3
class MyContract(
algopy.Contract,
name="CustomName",
scratch_slots=[5, 25, algopy.urange(110, 115)],
state_totals=algopy.StateTotals(local_bytes=1, local_uints=2, global_bytes=4, global_uints=GLOBAL_UINTS),
):
...
```
### Example: Simplest possible `algopy.Contract` implementation
For a non-ARC4 contract, the contract class must implement an `approval_program` and a `clear_state_program` method.
As an example, this is a valid contract that always approves:
```python
class Contract(algopy.Contract):
def approval_program(self) -> bool:
return True
def clear_state_program(self) -> bool:
return True
```
The return value of these methods can be either a `bool` that indicates whether the transaction should approve or not, or a `algopy.UInt64` value, where `UInt64(0)` indicates that the transaction should be rejected and any other value indicates that it should be approved.
### Example: Simple call counter
Here is a very simple example contract that maintains a counter of how many times it has been called (including on create).
```python
class Counter(algopy.Contract):
def __init__(self) -> None:
self.counter = algopy.UInt64(0)
def approval_program(self) -> bool:
match algopy.Txn.on_completion:
case algopy.OnCompleteAction.NoOp:
self.increment_counter()
return True
case _:
# reject all OnCompletionAction's other than NoOp
return False
def clear_state_program(self) -> bool:
return True
@algopy.subroutine
def increment_counter(self) -> None:
self.counter += 1
```
Some things to note:
* `self.counter` will be stored in the application’s [Global State](lg-storage#global-state).
* The return type of `__init__` must be `None`, per standard typed Python.
* Any methods other than `__init__`, `approval_program` or `clear_state_program` must be decorated with `@subroutine`.
### Example: Simplest possible `algopy.ARC4Contract` implementation
And here is a valid ARC4 contract:
```python
class ABIContract(algopy.ARC4Contract):
pass
```
A default `@algopy.arc4.baremethod` that allows contract creation is automatically inserted if no other public method allows execution on create.
The approval program is always automatically generated, and consists of a router which delegates based on the transaction application args to the correct public method.
A default `clear_state_program` is implemented which always approves, but this can be overridden.
### Example: An ARC4 call counter
```python
import algopy
class ARC4Counter(algopy.ARC4Contract):
def __init__(self) -> None:
self.counter = algopy.UInt64(0)
@algopy.arc4.abimethod(create="allow")
def invoke(self) -> algopy.arc4.UInt64:
self.increment_counter()
return algopy.arc4.UInt64(self.counter)
@algopy.subroutine
def increment_counter(self) -> None:
self.counter += 1
```
This functions very similarly to the [simple example](#example-simple-call-counter).
Things to note here:
* Since the `invoke` method has `create="allow"`, it can be called both as the method to create the app and also to invoke it after creation. This also means that no default bare-method create will be generated, so the only way to create the contract is through this method.
* The default options for `abimethod` is to only allow `NoOp` as an on-completion-action, so we don’t need to check this manually.
* The current call count is returned from the `invoke` method.
* Every method in an `AR4Contract` except for the optional `__init__` and `clear_state_program` methods must be decorated with one of `algopy.arc4.abimethod`, `alogpy.arc4.baremethod`, or `algopy.subroutine`. `subroutines` won’t be directly callable through the default router.
See the [ARC-4 section](lg-arc4) of this language guide for more info on the above.
## Logic signatures
[Logic signatures on Algorand](https://dev.algorand.co/concepts/smart-contracts/logic-sigs/) are stateless, and consist of a single program. As such, they are implemented as functions in Algorand Python rather than classes.
```python
@algopy.logicsig
def my_log_sig() -> bool:
...
```
Similar to `approval_program` or `clear_state_program` methods, the function must take no arguments, and return either `bool` or `algopy.UInt64`. The meaning is the same: a `True` value or non-zero `UInt64` value indicates success, `False` or `UInt64(0)` indicates failure.
Logic signatures can make use of subroutines that are not nested in contract classes.
# Transactions
Algorand Python provides types for accessing fields of other transactions in a group, as well as creating and submitting inner transactions from your smart contract.
The following types are available:
| Group Transactions | Inner Transaction Field sets | Inner Transaction |
| -------------------------------------------------------------------- | ------------------------------------------------ | ------------------------------------------------------------------------------ |
| [PaymentTransaction](algopy.gtxn.PaymentTransaction) | [Payment](algopy.itxn.Payment) | [PaymentInnerTransaction](algopy.itxn.PaymentInnerTransaction) |
| [KeyRegistrationTransaction](algopy.gtxn.KeyRegistrationTransaction) | [KeyRegistration](algopy.itxn.KeyRegistration) | [KeyRegistrationInnerTransaction](algopy.itxn.KeyRegistrationInnerTransaction) |
| [AssetConfigTransaction](algopy.gtxn.AssetConfigTransaction) | [AssetConfig](algopy.itxn.AssetConfig) | [AssetConfigInnerTransaction](algopy.itxn.AssetConfigInnerTransaction) |
| [AssetTransferTransaction](algopy.gtxn.AssetTransferTransaction) | [AssetTransfer](algopy.itxn.AssetTransfer) | [AssetTransferInnerTransaction](algopy.itxn.AssetTransferInnerTransaction) |
| [AssetFreezeTransaction](algopy.gtxn.AssetFreezeTransaction) | [AssetFreeze](algopy.itxn.AssetFreeze) | [AssetFreezeInnerTransaction](algopy.itxn.AssetFreezeInnerTransaction) |
| [ApplicationCallTransaction](algopy.gtxn.ApplicationCallTransaction) | [ApplicationCall](algopy.itxn.ApplicationCall) | [ApplicationCallInnerTransaction](algopy.itxn.ApplicationCallInnerTransaction) |
| [Transaction](algopy.gtxn.Transaction) | [InnerTransaction](algopy.itxn.InnerTransaction) | [InnerTransactionResult](algopy.itxn.InnerTransactionResult) |
## Group Transactions
Group transactions can be used as ARC4 parameters or instantiated from a group index.
### ARC4 parameter
Group transactions can be used as parameters in ARC4 method
For example to require a payment transaction in an ARC4 ABI method:
```python
import algopy
class MyContract(algopy.ARC4Contract):
@algopy.arc4.abimethod()
def process_payment(self, payment: algopy.gtxn.PaymentTransaction) -> None:
...
```
### Group Index
Group transactions can also be created using the group index of the transaction. If instantiating one of the type specific transactions they will be checked to ensure the transaction is of the expected type. [Transaction](algopy.gtxn.Transaction) is not checked for a specific type and provides access to all transaction fields
For example, to obtain a reference to a payment transaction:
```python
import algopy
@algopy.subroutine()
def process_payment(group_index: algopy.UInt64) -> None:
pay_txn = algopy.gtxn.PaymentTransaction(group_index)
...
```
## Inner Transactions
Inner transactions are defined using the parameter types, and can then be submitted individually by calling the `.submit()` method, or as a group by calling `submit_txns`
### Examples
#### Create and submit an inner transaction
```python
from algopy import Account, UInt64, itxn, subroutine
@subroutine
def example(amount: UInt64, receiver: Account) -> None:
itxn.Payment(
amount=amount,
receiver=receiver,
fee=0,
).submit()
```
#### Accessing result of a submitted inner transaction
```python
from algopy import Asset, itxn, subroutine
@subroutine
def example() -> Asset:
asset_txn = itxn.AssetConfig(
asset_name=b"Puya",
unit_name=b"PYA",
total=1000,
decimals=3,
fee=0,
).submit()
return asset_txn.created_asset
```
#### Submitting multiple transactions
```python
from algopy import Asset, Bytes, itxn, log, subroutine
@subroutine
def example() -> tuple[Asset, Bytes]:
asset1_params = itxn.AssetConfig(
asset_name=b"Puya",
unit_name=b"PYA",
total=1000,
decimals=3,
fee=0,
)
app_params = itxn.ApplicationCall(
app_id=1234,
app_args=(Bytes(b"arg1"), Bytes(b"arg1"))
)
asset1_txn, app_txn = itxn.submit_txns(asset1_params, app_params)
# log some details
log(app_txn.logs(0))
log(asset1_txn.txn_id)
log(app_txn.txn_id)
return asset1_txn.created_asset, app_txn.logs(1)
```
#### Create an ARC4 application, and then call it
```python
from algopy import Bytes, arc4, itxn, subroutine
HELLO_WORLD_APPROVAL: bytes = ...
HELLO_WORLD_CLEAR: bytes = ...
@subroutine
def example() -> None:
# create an application
application_txn = itxn.ApplicationCall(
approval_program=HELLO_WORLD_APPROVAL,
clear_state_program=HELLO_WORLD_CLEAR,
fee=0,
).submit()
app = application_txn.created_app
# invoke an ABI method
call_txn = itxn.ApplicationCall(
app_id=app,
app_args=(arc4.arc4_signature("hello(string)string"), arc4.String("World")),
fee=0,
).submit()
# extract result
hello_world_result = arc4.String.from_log(call_txn.last_log)
```
#### Create and submit transactions in a loop
```python
from algopy import Account, UInt64, itxn, subroutine
@subroutine
def example(receivers: tuple[Account, Account, Account]) -> None:
for receiver in receivers:
itxn.Payment(
amount=UInt64(1_000_000),
receiver=receiver,
fee=0,
).submit()
```
### Limitations
Inner transactions are powerful, but currently do have some restrictions in how they are used.
#### Inner transaction objects cannot be passed to or returned from subroutines
```python
from algopy import Application, Bytes, itxn, subroutine
@subroutine
def parameter_not_allowed(txn: itxn.PaymentInnerTransaction) -> None:
# this is a compile error
...
@subroutine
def return_not_allowed() -> itxn.PaymentInnerTransaction:
# this is a compile error
...
@subroutine
def passing_fields_allowed() -> Application:
txn = itxn.ApplicationCall(...).submit()
do_something(txn.txn_id, txn.logs(0)) # this is ok
return txn.created_app # and this is ok
@subroutine
def do_something(txn_id: Bytes): # this is just a regular subroutine
...
```
#### Inner transaction parameters cannot be reassigned without a `.copy()`
```python
from algopy import itxn, subroutine
@subroutine
def example() -> None:
payment = itxn.Payment(...)
reassigned_payment = payment # this is an error
copied_payment = payment.copy() # this is ok
```
#### Inner transactions cannot be reassigned
```python
from algopy import itxn, subroutine
@subroutine
def example() -> None:
payment_txn = itxn.Payment(...).submit()
reassigned_payment_txn = payment_txn # this is an error
txn_id = payment_txn.txn_id # this is ok
```
#### Inner transactions methods cannot be called if there is a subsequent inner transaction submitted or another subroutine is called
```python
from algopy import itxn, subroutine
@subroutine
def example() -> None:
app_1 = itxn.ApplicationCall(...).submit()
log_from_call1 = app_1.logs(0) # this is ok
# another inner transaction is submitted
itxn.ApplicationCall(...).submit()
# or another subroutine is called
call_some_other_subroutine()
app1_txn_id = app_1.txn_id # this is ok, properties are still available
another_log_from_call1 = app_1.logs(1) # this is not allowed as the array results may no longer be available, instead assign to a variable before submitting another transaction
```
# Types
Algorand Python exposes a number of types that provide a statically typed representation of the behaviour that is possible on the Algorand Virtual Machine.
```{contents}
:local:
:depth: 3
:class: this-will-duplicate-information-and-it-is-still-useful-here
```
## AVM types
The most basic [types on the AVM](https://devdeveloper.algorand.co/concepts/smart-contracts/avm/#stack-types) are `uint64` and `bytes[]`, representing unsigned 64-bit integers and byte arrays respectively. These are represented by [`UInt64`](./#uint64) and [`Bytes`](./#bytes) in Algorand Python.
There are further “bounded” types supported by the AVM, which are backed by these two simple primitives. For example, `bigint` represents a variably sized (up to 512-bits), unsigned integer, but is actually backed by a `bytes[]`. This is represented by [`BigUInt`](./#biguint) in Algorand Python.
### UInt64
`algopy.UInt64` represents the underlying AVM `uint64` type.
It supports all the same operators as `int`, except for `/`, you must use `//` for truncating division instead.
```python
# you can instantiate with an integer literal
num = algopy.UInt64(1)
# no arguments default to the zero value
zero = algopy.UInt64()
# zero is False, any other value is True
assert not zero
assert num
# Like Python's `int`, `UInt64` is immutable, so augmented assignment operators return new values
one = num
num += 1
assert one == 1
assert num == 2
# note that once you have a variable of type UInt64, you don't need to type any variables
# derived from that or wrap int literals
num2 = num + 200 // 3
```
[Further examples available here](https://github.com/algorandfoundation/puya/blob/main/test_cases/stubs/uint64.py).
### Bytes
`algopy.Bytes` represents the underlying AVM `bytes[]` type. It is intended to represent binary data, for UTF-8 it might be preferable to use [String](#string).
```python
# you can instantiate with a bytes literal
data = algopy.Bytes(b"abc")
# no arguments defaults to an empty value
empty = algopy.Bytes()
# empty is False, non-empty is True
assert data
assert not empty
# Like Python's `bytes`, `Bytes` is immutable, augmented assignment operators return new values
abc = data
data += b"def"
assert abc == b"abc"
assert data == b"abcdef"
# indexing and slicing are supported, and both return a Bytes
assert abc[0] == b"a"
assert data[:3] == abc
# check if a bytes sequence occurs within another
assert abc in data
```
```{hint}
Indexing a `Bytes` returning a `Bytes` differs from the behaviour of Python's bytes type, which
returns an `int`.
```
```python
# you can iterate
for i in abc:
...
# construct from encoded values
base32_seq = algopy.Bytes.from_base32('74======')
base64_seq = algopy.Bytes.from_base64('RkY=')
hex_seq = algopy.Bytes.from_hex('FF')
# binary manipulations ^, &, |, and ~ are supported
data ^= ~((base32_seq & base64_seq) | hex_seq)
# access the length via the .length property
assert abc.length == 3
```
```{note}
See [Python builtins](lg-builtins#len---length) for an explanation of why `len()` isn't supported.
```
[See a full example](https://github.com/algorandfoundation/puya/blob/main/test_cases/stubs/bytes.py).
### String
`String` is a special Algorand Python type that represents a UTF8 encoded string. It’s backed by `Bytes`, which can be accessed through the `.bytes`.
It works similarly to `Bytes`, except that it works with `str` literals rather than `bytes` literals. Additionally, due to a lack of AVM support for unicode data, indexing and length operations are not currently supported (simply getting the length of a UTF8 string is an `O(N)` operation, which would be quite costly in a smart contract). If you are happy using the length as the number of bytes, then you can call `.bytes.length`.
```python
# you can instantiate with a string literal
data = algopy.String("abc")
# no arguments defaults to an empty value
empty = algopy.String()
# empty is False, non-empty is True
assert data
assert not empty
# Like Python's `str`, `String` is immutable, augmented assignment operators return new values
abc = data
data += "def"
assert abc == "abc"
assert data == "abcdef"
# whilst indexing and slicing are not supported, the following tests are:
assert abc.startswith("ab")
assert abc.endswith("bc")
assert abc in data
# you can also join multiple Strings together with a seperator:
assert algopy.String(", ").join((abc, abc)) == "abc, abc"
# access the underlying bytes
assert abc.bytes == b"abc"
```
[See a full example](https://github.com/algorandfoundation/puya/blob/main/test_cases/stubs/string.py).
### BigUInt
`algopy.BigUInt` represents a variable length (max 512-bit) unsigned integer stored as `bytes[]` in the AVM.
It supports all the same operators as `int`, except for power (`**`), left and right shift (`<<` and `>>`) and `/` (as with `UInt64`, you must use `//` for truncating division instead).
Note that the op code costs for `bigint` math are an order of magnitude higher than those for `uint64` math. If you just need to handle overflow, take a look at the wide ops such as `addw`, `mulw`, etc - all of which are exposed through the `algopy.op` module.
Another contrast between `bigint` and `uint64` math is that `bigint` math ops don’t immediately error on overflow - if the result exceeds 512-bits, then you can still access the value via `.bytes`, but any further math operations will fail.
```python
# you can instantiate with an integer literal
num = algopy.BigUInt(1)
# no arguments default to the zero value
zero = algopy.BigUInt()
# zero is False, any other value is True
assert not zero
assert num
# Like Python's `int`, `BigUInt` is immutable, so augmented assignment operators return new values
one = num
num += 1
assert one == 1
assert num == UInt64(2)
# note that once you have a variable of type BigUInt, you don't need to type any variables
# derived from that or wrap int literals
num2 = num + 200 // 3
```
[Further examples available here](https://github.com/algorandfoundation/puya/blob/main/test_cases/stubs/biguint.py).
### bool
The semantics of the AVM `bool` bounded type exactly match the semantics of Python’s built-in `bool` type and thus Algorand Python uses the in-built `bool` type from Python.
Per the behaviour in normal Python, Algorand Python automatically converts various types to `bool` when they appear in statements that expect a `bool` e.g. `if`/`while`/`assert` statements, appear in Boolean expressions (e.g. next to `and` or `or` keywords) or are explicitly casted to a bool.
The semantics of `not`, `and` and `or` are special [per how these keywords work in Python](https://docs.python.org/3/reference/expressions.html#boolean-operations) (e.g. short circuiting).
```python
a = UInt64(1)
b = UInt64(2)
c = a or b
d = b and a
e = self.expensive_op(UInt64(0)) or self.side_effecting_op(UInt64(1))
f = self.expensive_op(UInt64(3)) or self.side_effecting_op(UInt64(42))
g = self.side_effecting_op(UInt64(0)) and self.expensive_op(UInt64(42))
h = self.side_effecting_op(UInt64(2)) and self.expensive_op(UInt64(3))
i = a if b < c else d + e
if a:
log("a is True")
```
[Further examples available here](https://github.com/algorandfoundation/puya/blob/main/test_cases/stubs/uint64.py).
### Account
`Account` represents a logical Account, backed by a `bytes[32]` representing the bytes of the public key (without the checksum). It has various account related methods that can be called from the type.
Also see `algopy.arc4.Address` if needing to represent the address as a distinct type.
### Asset
`Asset` represents a logical Asset, backed by a `uint64` ID. It has various asset related methods that can be called from the type.
### Application
`Application` represents a logical Application, backed by a `uint64` ID. It has various application related methods that can be called from the type.
## Python built-in types
Unfortunately, the [AVM types](#avm-types) don’t map to standard Python primitives. For instance, in Python, an `int` is unsigned, and effectively unbounded. A `bytes` similarly is limited only by the memory available, whereas an AVM `bytes[]` has a maximum length of 4096. In order to both maintain semantic compatibility and allow for a framework implementation in plain Python that will fail under the same conditions as when deployed to the AVM, support for Python primitives is limited.
In saying that, there are many places where built-in Python types can be used and over time the places these types can be used are expected to increase.
### bool
[Per above](#bool) Algorand Python has full support for `bool`.
### tuple
Python tuples are supported as arguments to subroutines, local variables, return types.
### typing.NamedTuple
Python named tuples are also supported using [`typing.NamedTuple`](https://docs.python.org/3/library/typing.html#typing.NamedTuple).
```{note}
Default field values and subclassing a NamedTuple are not supported
```
```python
import typing
import algopy
class Pair(typing.NamedTuple):
foo: algopy.Bytes
bar: algopy.Bytes
```
### None
`None` is not supported as a value, but is supported as a type annotation to indicate a function or subroutine returns no value.
### int, str, bytes, float
The `int`, `str` and `bytes` built-in types are currently only supported as [module-level constants](./lg-modules) or literals.
They can be passed as arguments to various Algorand Python methods that support them or when interacting with certain [AVM types](#avm-types) e.g. adding a number to a `UInt64`.
`float` is not supported.
## Template variables
Template variables can be used to represent a placeholder for a deploy-time provided value. This can be declared using the `TemplateVar[TYPE]` type where `TYPE` is the Algorand Python type that it will be interpreted as.
```python
from algopy import BigUInt, Bytes, TemplateVar, UInt64, arc4
from algopy.arc4 import UInt512
class TemplateVariablesContract(arc4.ARC4Contract):
@arc4.abimethod()
def get_bytes(self) -> Bytes:
return TemplateVar[Bytes]("SOME_BYTES")
@arc4.abimethod()
def get_big_uint(self) -> UInt512:
x = TemplateVar[BigUInt]("SOME_BIG_UINT")
return UInt512(x)
@arc4.baremethod(allow_actions=["UpdateApplication"])
def on_update(self) -> None:
assert TemplateVar[bool]("UPDATABLE")
@arc4.baremethod(allow_actions=["DeleteApplication"])
def on_delete(self) -> None:
assert TemplateVar[UInt64]("DELETABLE")
```
The resulting TEAL code that PuyaPy emits has placeholders with `TMPL_{template variable name}` that expects either an integer value or an encoded bytes value. This behaviour exactly matches what [AlgoKit Utils expects](https://github.com/algorandfoundation/algokit-utils-ts/blob/main/docs/capabilities/app-deploy#compilation-and-template-substitution).
For more information look at the API reference for `TemplateVar`.
## ARC-4 types
ARC-4 data types are a first class concept in Algorand Python. They can be passed into ARC-4 methods (which will translate to the relevant ARC-4 method signature), passed into subroutines, or instantiated into local variables. A limited set of operations are exposed on some ARC-4 types, but often it may make sense to convert the ARC-4 value to a native AVM type, in which case you can use the `native` property to retrieve the value. Most of the ARC-4 types also allow for mutation e.g. you can edit values in arrays by index.
Please see the [reference documentation](./api-algopy.arc4) for the different classes that can be used to represent ARC-4 values or the [ARC-4 documentation](./lg-arc4) for more information about ARC-4.
# Unsupported Python features
## raise, try/except/finally
Exception raising and exception handling constructs are not supported.
Supporting user exceptions would be costly to implement in terms of op codes.
Furthermore, AVM errors and exceptions are not “catch-able”, they immediately terminate the program.
Therefore, there is very little to no benefit of supporting exceptions and exception handling.
The preferred method of raising an error that terminates is through the use of [assert statements](lg-errors).
## with
Context managers are redundant without exception handling support.
## async
The AVM is not just single threaded, but all operations are effectively “blocking”, rendering asynchronous programming effectively useless.
## closures & lambdas
Without the support of function pointers, or other methods of invoking an arbitrary function, it’s not possible to return a function as a closure.
Nested functions/lambdas as a means of repeating common operations within a given function may be supported in the future.
## global keyword
Module level values are only allowed to be [constants](lg-modules#module-constants). No rebinding of module constants is allowed. It’s not clear what the meaning here would be, since there’s no real arbitrary means of storing state without associating it with a particular contract. If you do have need of such a thing, take a look at gload\_bytes or gload\_uint64 if the contracts are within the same transaction, otherwise AppGlobal.get\_ex\_bytes and AppGlobal.get\_ex\_uint64.
## Inheritance (outside of contract classes)
Polymorphism is also impossible to support without function pointers, so data classes (such as arc4.Struct) don’t currently allow for inheritance. Member functions there are not supported because we’re not sure yet whether it’s better to not have inheritance but allow functions on data classes, or to allow inheritance and disallow member functions.
Contract inheritance is a special case, since each concrete contract is compiled separately, true polymorphism isn’t required as all references can be resolved at compile time.
# Algorand Python
Algorand Python is a partial implementation of the Python programming language that runs on the AVM. It includes a statically typed framework for development of Algorand smart contracts and logic signatures, with Pythonic interfaces to underlying AVM functionality that works with standard Python tooling.
Algorand Python is compiled for execution on the AVM by PuyaPy, an optimising compiler that ensures the resulting AVM bytecode execution semantics that match the given Python code. PuyaPy produces output that is directly compatible with [AlgoKit typed clients](https://github.com/algorandfoundation/algokit-cli/blob/main/docs/features/generate#1-typed-clients) to make deployment and calling easy.
## Quick start
The easiest way to use Algorand Python is to instantiate a template with AlgoKit via `algokit init -t python`. This will give you a full development environment with intellisense, linting, automatic formatting, breakpoint debugging, deployment and CI/CD.
Alternatively, if you want to start from scratch you can do the following:
1. Ensure you have Python 3.12+
2. Install [AlgoKit CLI](https://github.com/algorandfoundation/algokit-cli?tab=readme-ov-file#install)
3. Check you can run the compiler:
```shell
algokit compile py -h
```
4. Install Algorand Python into your project `poetry add algorand-python`
5. Create a contract in a (e.g.) `contract.py` file:
```python
from algopy import ARC4Contract, arc4
class HelloWorldContract(ARC4Contract):
@arc4.abimethod
def hello(self, name: arc4.String) -> arc4.String:
return "Hello, " + name
```
6. Compile the contract:
```shell
algokit compile py contract.py
```
7. You should now have `HelloWorldContract.approval.teal` and `HelloWorldContract.clear.teal` on the file system!
8. We generally recommend using ARC-32 and [generated typed clients](https://github.com/algorandfoundation/algokit-cli/blob/main/docs/features/generate#1-typed-clients) to have the most optimal deployment and consumption experience; to do this you need to ask PuyaPy to output an ARC-32 compatible app spec file:
```shell
algokit compile py contract.py --output-arc32 --no-output-teal
```
9. You should now have `HelloWorldContract.arc32.json`, which can be generated into a client e.g. using AlgoKit CLI:
```shell
algokit generate client HelloWorldContract.arc32.json --output client.py
```
10. From here you can dive into the [examples](https://github.com/algorandfoundation/puya/tree/main/examples) or look at the [documentation](https://algorandfoundation.github.io/puya/).
## Programming with Algorand Python
To get started developing with Algorand Python, please take a look at the [Language Guide](./language-guide).
## Using the PuyaPy compiler
To see detailed guidance for using the PuyaPy compiler, please take a look at the [Compiler guide](./compiler).
```{toctree}
---
maxdepth: 2
caption: Contents
hidden: true
---
language-guide
principles
api
compiler
references/algopy_testing
references/avm_debugger
```
# Guiding Principles
## Familiarity
Where the base language (TypeScript/EcmaScript) doesn’t support a given feature natively (eg. unsigned fixed size integers), prior art should be used to inspire an API that is familiar to a user of the base language and transpilation can be used to ensure this code executes correctly.
## Leveraging TypeScript type system
TypeScript’s type system should be used where ever possible to ensure code is type safe before compilation to create a fast feedback loop and nudge users into the [pit of success](https://blog.codinghorror.com/falling-into-the-pit-of-success/).
## TEALScript compatibility
[TEALScript](https://github.com/algorandfoundation/tealscript/) is an existing TypeScript-like language to TEAL compiler however the source code is not executable TypeScript, and it does not prioritise semantic compatibility. Wherever possible, Algorand TypeScript should endeavour to be compatible with existing TEALScript contracts and where not possible migratable with minimal changes.
## Algorand Python
[Algorand Python](https://algorandfoundation.github.io/puya/) is the Python equivalent of Algorand TypeScript. Whilst there is a primary goal to produce an API which makes sense in the TypeScript ecosystem, a secondary goal is to minimise the disparity between the two APIs such that users who choose to, or are required to develop on both platforms are not facing a completely unfamiliar API.
# Architecture decisions
As part of developing Algorand TypeScript we are documenting key architecture decisions using [Architecture Decision Records (ADRs)](https://adr.github.io/). The following are the key decisions that have been made thus far:
* [2024-05-21: Primitive integer types](./architecture-decisions/2024-05-21_primitive-integer-types)
* [2024-05-21: Primitive byte and string types](./architecture-decisions/2024-05-21_primitive-bytes-and-strings)
# Inner Transactions
## Basic API
The `itxn` namespace exposes types for constructing inner transactions. There is a factory method for each transaction type which accepts an object containing fields specific to the transaction type. The factories then return a `*ItxnParams` object where `*` is the transaction type (eg. `PaymentItxnParams`). The params object has a `submit` to submit the transaction immediately, a `set` method to make further updates to the fields, and a `copy` method to clone the params object.
To submit multiple transactions in a group - use the `itxn.submitGroup` function.
```ts
import { itxn, Global, log } from '@algorandfoundation/algorand-typescript';
const assetParams = itxn.assetConfig({
total: 1000,
assetName: 'AST1',
unitName: 'unit',
decimals: 3,
manager: Global.currentApplicationAddress,
reserve: Global.currentApplicationAddress,
});
const asset1_txn = assetParams.submit();
log(asset1_txn.createdAsset.id);
```
Both the `submitGroup` and `params.submit()` functions return a `*InnerTxn` object per input params object which allow you to read application logs or created asset/application ids. There are restrictions on accessing these properties which come from the current AVM implementation. The restrictions are detailed below.
## Restrictions
The `*ItxnParams` objects cannot be passed between subroutines, or stored in arrays or application state. This is because they contain up to 20 fields each with many of the fields being of variable length. Storing this object would require encoding it to binary and would be very expensive and inefficient.
Submitting dynamic group sizes with `submitGroup` is not supported as the AVM is quite restrictive in how transaction results are accessed. [gitxn](https://developer.algorand.org/docs/get-details/dapps/avm/teal/opcodes/v11/#gitxn) op codes require transaction indexes to be referenced with a compile time constant value and this is obviously not possible with dynamic group sizes. An alternative API may be offered in the future which allows dynamic group sizes with the caveat of not having access to the transaction results.
## Pre-compiled contracts
If your contract needs to deploy other contracts then it’s likely you will need access to the compiled approval and clear state programs. The `compile` method takes a contract class and returns the compiled byte code along with some basic schema information.
```ts
import { itxn, compile } from '@algorandfoundation/algorand-typescript';
import { encodeArc4, methodSelector } from '@algorandfoundation/algorand-typescript/arc4';
const compiled = compile(Hello);
const helloApp = itxn
.applicationCall({
appArgs: [methodSelector(Hello.prototype.create), encodeArc4('hello')],
approvalProgram: compiled.approvalProgram,
clearStateProgram: compiled.clearStateProgram,
globalNumBytes: compiled.globalBytes,
})
.submit().createdApp;
```
If the contract you are compiling makes use of template variables - these will need to be resolved to a constant value.
```ts
const compiled = compile(HelloTemplate, { templateVars: { GREETING: 'hey' } });
```
## Strongly typed contract to contract
Assuming the contract you wish to compile extends the ARC4 `Contract` type, you can make use of `compileArc4` to produce a contract proxy object that makes it easy to invoke application methods with compile time type safety.
```ts
import { assert, itxn } from '@algorandfoundation/algorand-typescript';
import { compileArc4 } from '@algorandfoundation/algorand-typescript/arc4';
const compiled = compileArc4(Hello);
const app = compiled.call.create({
args: ['hello'],
}).itxn.createdApp;
const result = compiled.call.greet({
args: ['world'],
appId: app,
}).returnValue;
assert(result === 'hello world');
```
The proxy will automatically include approval and clear state program bytes + schema properties from the compiled contract, but these can also be overridden if required.
## Strongly typed ABI calls
If your use case does not require deploying another contract, and instead you are just calling methods then the `abiCall` method will allow you to do this in a strongly typed manner provided you have at bare minimum a compatible stub implementation of the target contract.
**A sample stub implementation**
```ts
export abstract class HelloStubbed extends Contract {
// Make sure the abi decorator matches the target implementation
@abimethod()
greet(name: string): string {
// Stub implementations don't need method bodies, as long as the type information is correct
err('stub only');
}
}
```
**Invocation using the stub**
```ts
const result3 = abiCall(HelloStubbed.prototype.greet, {
appId: app,
args: ['stubbed'],
}).returnValue;
assert(result3 === 'hello stubbed');
```
# AVM Operations
Algorand TypeScript allows you to express [every op code the AVM has available](https://dev.algorand.co/reference/algorand-teal/opcodes/) excluding those that manipulate the stack or control execution as these would interfere with the compiler. These are all exported from the [ops module](api/op/README). It is possible to import ops individually or via the entire namespace.
```ts
// Import op from module root
import { assert, Contract, op } from '@algorandfoundation/algorand-typescript';
// Import whole module from ./op
import * as op2 from '@algorandfoundation/algorand-typescript/op';
// Import individual ops
import { bzero } from '@algorandfoundation/algorand-typescript/op';
class MyContract extends Contract {
test() {
const a = bzero(8).bitwiseInvert();
const b = op2.btoi(a);
assert(b === 2 ** 64 - 1);
const c = op.shr(b, 32);
assert(c === 2 ** 32 - 1);
}
}
```
## Txn, Global, and other Enums
Many of the AVM ops which take an enum argument have been abstracted into a static type with a property or function per enum member
```ts
import { Contract, Global, log, Txn } from '@algorandfoundation/algorand-typescript';
import { AppParams } from '@algorandfoundation/algorand-typescript/op';
class MyContract extends Contract {
test() {
log(Txn.sender);
log(Txn.applicationArgs(0));
log(Global.groupId);
log(Global.creatorAddress);
log(...AppParams.appAddress(123));
}
}
```
# Program Structure
An Algorand TypeScript program is declared in a TypeScript module with a file extension of `.algo.ts`. Declarations can be split across multiple files, and types can be imported between these files using standard TypeScript import statements. The commonjs `require` function is not supported, and the asynchronous `import(...)` expression is also not supported as imports must be compile-time constant.
Algorand TypeScript constructs and types can be imported from the `@algorandfoundation/algorand-typescript` module, or one of its submodules. Compilation artifacts do not need to be exported unless you require them in another module; any non-abstract contract or logic signature discovered in your entry files will be output. Contracts and logic signatures discovered in non-entry files will not be output.
## Contracts
A contract in Algorand TypeScript is defined by declaring a class which extends the `Contract`, or `BaseContract` types exported by `@algorandfoundation/algorand-typescript`. See [ABI routing](./abi-routing) docs for more on the differences between these two options.
### ARC4 Contract
Contracts which extend the `Contract` type are ARC4 compatible contracts. Any `public` methods on the class will be exposed as ABI methods, callable from other contracts and off-chain clients. `private` and `protected` methods can only be called from within the contract itself, or its subclasses. Note that TypeScript methods are `public` by default if no access modifier is present. A contract is considered valid even if it has no methods, though its utility is questionable.
```ts
import { Contract } from '@algorandfoundation/algorand-typescript';
class DoNothingContract extends Contract {}
class HelloWorldContract extends Contract {
sayHello(name: string) {
return `Hello ${name}`;
}
}
```
### Contract Options
The `contract` decorator allows you to specify additional options and configuration for a contract such as which AVM version it targets, which scratch slots it makes use of, or the total global and local state which should be reserved for it. It should be placed on your contract class declaration.
```ts
import { Contract, contract } from '@algorandfoundation/algorand-typescript';
@contract({
name: 'My Contracts Name',
avmVersion: 11,
scratchSlots: [1, 2, 3],
stateTotals: { globalUints: 4, localUints: 0 },
})
class MyContract extends Contract {}
```
### Application Lifecycle Methods and other method options
The default `OnCompletionAction` (oca) for public methods is `NoOp`. To change this, a method should be decorated with the `abimethod` or `baremethod` decorators. These decorators can also be used to change the exported name of the method, determine if a method should be available on application create or not, and specify default values for arguments.
```ts
import type { uint64 } from '@algorandfoundation/algorand-typescript';
import { abimethod, baremethod, Contract, Uint64 } from '@algorandfoundation/algorand-typescript';
class AbiDecorators extends Contract {
@abimethod({ allowActions: 'NoOp' })
public justNoop(): void {}
@abimethod({ onCreate: 'require' })
public createMethod(): void {}
@abimethod({
allowActions: ['NoOp', 'OptIn', 'CloseOut', 'DeleteApplication', 'UpdateApplication'],
})
public allActions(): void {}
@abimethod({ readonly: true, name: 'overrideReadonlyName' })
public readonly(): uint64 {
return 5;
}
@baremethod()
public noopBare() {}
}
```
### Constructor logic and implicit create method
If a contract does not define an explicit create method (ie. `onCreate: 'allow'` or `onCreate: 'require'`) then the compiler will attempt to add a `bare` create method with no implementation. Without this, you would not be able to deploy the contract.
Contracts which define custom constructor logic will have this logic executed once on application create immediately before any other logic is executed.
```ts
export class MyContract extends Contract {
constructor() {
super();
log('This is executed on create only');
}
}
```
### Custom approval and clear state programs
The default implementation of a clear state program on a contract is to just return `true`, custom logic can be added by overriding the base implementation
The default implementation of an approval program on a contract is to perform ABI routing. Custom logic can be added by overriding the base implementation. If your implementation does not call `super.approvalProgram()` at some point, ABI routing will not function.
```ts
class Arc4HybridAlgo extends Contract {
override approvalProgram(): boolean {
log('before');
const result = super.approvalProgram();
log('after');
return result;
}
override clearStateProgram(): boolean {
log('clearing state');
return true;
}
someMethod() {
log('some method');
}
}
```
### Application State
Application state for a contract can be defined by declaring instance properties on a contract class using the relevant state proxy type. In the case of `GlobalState` it is possible to define an `initialValue` for the field. The logic to set this initial value will be injected into the contract’s constructor. Global and local state keys default to the property name, but can be overridden with the `key` option. Box proxies always require an explicit key.
```ts
import {
Contract,
uint64,
bytes,
GlobalState,
LocalState,
Box,
} from '@algorandfoundation/algorand-typescript';
export class ContractWithState extends Contract {
globalState = GlobalState({ initialValue: 123, key: 'customKey' });
localState = LocalState();
boxState = Box({ key: 'boxKey' });
}
```
### Custom approval and clear state programs
Contracts can optional override the default implementation of the approval and clear state programs. This covers some more advanced scenarios where you might need to perform logic before or after an ABI method; or perform custom method routing entirely. In the case of the approval program, calling `super.approvalProgram()` will perform the default behaviour of ARC4 routing. Note that the ‘Clear State’ action will be taken regardless of the outcome of the `clearStateProgram`, so care should be taken to ensure any clean up actions required are done in a way which cannot fail.
```ts
import { Contract, log } from '@algorandfoundation/algorand-typescript';
class Arc4HybridAlgo extends Contract {
override approvalProgram(): boolean {
log('before');
const result = super.approvalProgram();
log('after');
return result;
}
override clearStateProgram(): boolean {
log('clearing state');
return true;
}
someMethod() {
log('some method');
}
}
```
## BaseContract
If ARC4 routing and/or interoperability is not required, a contract can extend the `BaseContract` type which gives full control to the developer to implement the approval and clear state programs. If this type is extended directly it will not be possible to output ARC-32 or ARC-56 app spec files and related artifacts. Transaction arguments will also need to be decoded manually.
```ts
import { BaseContract, log, op } from '@algorandfoundation/algorand-typescript';
class DoNothingContract extends BaseContract {
public approvalProgram(): boolean {
return true;
}
public clearStateProgram(): boolean {
return true;
}
}
class HelloWorldContract extends BaseContract {
public approvalProgram(): boolean {
const name = String(op.Txn.applicationArgs(0));
log(`Hello, ${name}`);
this.notRouted();
return true;
}
public notRouted() {
log('This method is not public accessible');
}
}
```
# Logic Signatures
Logic signatures or smart signatures as they are sometimes referred to are single program constructs which can be used to sign transactions. If the logic defined in the program runs without error, the signature is considered valid - if the program crashes, or returns `0` or `false`, the signature is not valid and the transaction will be rejected. It is possible to delegate signature privileges for any standard account to a logic signature program such that any transaction signed with the logic signature program will pass on behalf of the delegating account provided the program logic succeeds. This is obviously a dangerous proposition and such a logic signature program should be meticulously designed to avoid abuse. You can read more about logic signatures on Algorand [here](https://dev.algorand.co/concepts/smart-contracts/logic-sigs/). Logic signature programs are stateless, and support a different subset of [op codes](https://dev.algorand.co/reference/algorand-teal/opcodes/) to smart contracts.
```ts
import { assert, LogicSig, Txn, Uint64 } from '@algorandfoundation/algorand-typescript';
export class AlwaysAllow extends LogicSig {
program() {
return true;
}
}
function feeIsZero() {
assert(Txn.fee === 0, 'Fee must be zero');
}
export class AllowNoFee extends LogicSig {
program() {
feeIsZero();
return Uint64(1);
}
}
```
# Storage
Algorand smart contracts have [three different types of on-chain storage](https://dev.algorand.co/concepts/smart-contracts/storage/overview/) they can utilise: [Global storage](#global-storage), [Local storage](#local-storage), and [Box Storage](#box-storage). They also have access to a transient form of storage in [Scratch space](#scratch-storage).
## Global storage
Global or Application storage is a key/value store of `bytes` or `uint64` values stored against a smart contract application. The number of values used must be declared when the application is first created and will affect the [minimum balance requirement](https://dev.algorand.co/concepts/smart-contracts/costs-constraints/#mbr) for the application. For ARC4 contracts this information is captured in the ARC32 and ARC56 specification files and automatically included in deployments.
Global storage values are declared using the [GlobalState](api/index/functions/GlobalState) function to create a [GlobalState](api/index/type-aliases/GlobalState) proxy object.
```ts
import {
GlobalState,
Contract,
uint64,
bytes,
Uint64,
contract,
} from '@algorandfoundation/algorand-typescript';
class DemoContract extends Contract {
// The property name 'globalInt' will be used as the key
globalInt = GlobalState({ initialValue: Uint64(1) });
// Explicitly override the key
globalBytes = GlobalState({ key: 'alternativeKey' });
}
// If using dynamic keys, state must be explicitly reserved
@contract({ stateTotals: { globalBytes: 5 } })
class DynamicAccessContract extends Contract {
test(key: string, value: string) {
// Interact with state using a dynamic key
const dynamicAccess = GlobalState({ key });
dynamicAccess.value = value;
}
}
```
## Local storage
Local or Account storage is a key/value store of `bytes` or `uint64` stored against a smart contract application *and* a single account which has opted into that contract. The number of values used must be declared when the application is first created and will affect the minimum balance requirement of an account which opts in to the contract. For ARC4 contracts this information is captured in the ARC32 and ARC56 specification files and automatically included in deployments.
```ts
import type { bytes, uint64 } from '@algorandfoundation/algorand-typescript';
import { abimethod, Contract, LocalState, Txn } from '@algorandfoundation/algorand-typescript';
import type { StaticArray, UintN } from '@algorandfoundation/algorand-typescript/arc4';
type SampleArray = StaticArray, 10>;
export class LocalStateDemo extends Contract {
localUint = LocalState({ key: 'l1' });
localUint2 = LocalState();
localBytes = LocalState({ key: 'b1' });
localBytes2 = LocalState();
localEncoded = LocalState();
@abimethod({ allowActions: 'OptIn' })
optIn() {}
public setState({ a, b }: { a: uint64; b: bytes }, c: SampleArray) {
this.localUint(Txn.sender).value = a;
this.localUint2(Txn.sender).value = a;
this.localBytes(Txn.sender).value = b;
this.localBytes2(Txn.sender).value = b;
this.localEncoded(Txn.sender).value = c.copy();
}
public getState() {
return {
localUint: this.localUint(Txn.sender).value,
localUint2: this.localUint2(Txn.sender).value,
localBytes: this.localBytes(Txn.sender).value,
localBytes2: this.localBytes2(Txn.sender).value,
localEncoded: this.localEncoded(Txn.sender).value.copy(),
};
}
public clearState() {
this.localUint(Txn.sender).delete();
this.localUint2(Txn.sender).delete();
this.localBytes(Txn.sender).delete();
this.localBytes2(Txn.sender).delete();
this.localEncoded(Txn.sender).delete();
}
}
```
## Box storage
We provide 3 different types for accessing box storage: [Box](./api/index/functions/Box), [BoxMap](./api/index/functions/BoxMap), and [BoxRef](./api/index/functions/BoxRef). We also expose raw operations via the [AVM ops](./lg-ops) module.
Before using box storage, be sure to familiarise yourself with the [requirements and restrictions](https://dev.algorand.co/concepts/smart-contracts/storage/box/) of the underlying API.
The `Box` type provides an abstraction over storing a single value in a single box. A box can be declared as a class field (in which case the key must be a compile time constant); or as a local variable within any subroutine. `Box` proxy instances can be passed around like any other value.
`BoxMap` is similar to the `Box` type, but allows for grouping a set of boxes with a common key and content type. A `keyPrefix` is specified when the `BoxMap` is created and the item key can be a `Bytes` value, or anything that can be converted to `Bytes`. The final box name is the combination of `keyPrefix + key`.
`BoxRef` is a specialised type for interacting with boxes which contain binary data. In addition to being able to set and read the box value, there are operations for extracting and replacing just a portion of the box data which is useful for minimizing the amount of reads and writes required, but also allows you to interact with byte arrays which are longer than the AVM can support (currently 4096).
```ts
import type { Account, uint64 } from '@algorandfoundation/algorand-typescript';
import {
Box,
BoxMap,
BoxRef,
Contract,
Txn,
assert,
} from '@algorandfoundation/algorand-typescript';
import { bzero } from '@algorandfoundation/algorand-typescript/op';
export class BoxContract extends Contract {
boxOne = Box({ key: 'one' });
boxMapTwo = BoxMap({ keyPrefix: 'two' });
boxRefThree = BoxRef({ key: 'three' });
test(): void {
if (!this.boxOne.exists) {
this.boxOne.value = 'Hello World';
}
this.boxMapTwo(Txn.sender).value = Txn.sender.balance;
const boxForSender = this.boxMapTwo(Txn.sender);
assert(boxForSender.exists);
if (this.boxRefThree.exists) {
this.boxRefThree.resize(8000);
} else {
this.boxRefThree.create({ size: 8000 });
}
this.boxRefThree.replace(0, bzero(0).bitwiseInvert());
this.boxRefThree.replace(4000, bzero(0));
}
}
```
## Scratch storage
Scratch storage persists for the lifetime of a group transaction and can be used to pass values between multiple calls and/or applications in the same group. Scratch storage for logic signatures is separate from that of the application calls and logic signatures do not have access to the scratch space of other transactions in the group.
Values can be written to scratch space using the `Scratch.store(...)` method and read from using `Scratch.loadUint64(...)` or `Scratch.loadBytes(...)` methods. These all take a scratch slot number between 0 and 255 inclusive and that scratch slot must be explicitly reserved by the contract using the `contract` options decorator.
```ts
import { assert, BaseContract, Bytes, contract } from '@algorandfoundation/algorand-typescript';
import { Scratch } from '@algorandfoundation/algorand-typescript/op';
@contract({ scratchSlots: [0, 1, { from: 10, to: 20 }] })
export class ReserveScratchAlgo extends BaseContract {
setThings() {
Scratch.store(0, 1);
Scratch.store(1, Bytes('hello'));
Scratch.store(15, 45);
}
approvalProgram(): boolean {
this.setThings();
assert(Scratch.loadUint64(0) === 1);
assert(Scratch.loadBytes(1) === Bytes('hello'));
assert(Scratch.loadUint64(15) === 45);
return true;
}
}
```
Scratch space can be read from group transactions using the `gloadUint64` and `gloadBytes` ops. These ops take the group index of the target transaction, and a scratch slot number.
```ts
import { gloadBytes, gloadUint64 } from '@algorandfoundation/algorand-typescript/op';
function test() {
const b = gloadBytes(0, 1);
const u = gloadUint64(1, 2);
}
```
# Types
Types in Algorand TypeScript can be divided into two camps, ‘native’ AVM types where the implementation is opaque, and it is up to the compiler and the AVM how the type is represented in memory; and ‘ARC4 Encoded types’ where the in memory representation is always a byte array, and the exact format is determined by the [ARC4 Spec](https://github.com/algorandfoundation/ARCs/blob/main/ARCs/arc-0004#encoding).
ARC4 defines an Application Binary Interface (ABI) for how data should be passed to and from a smart contract, and represents a sensible standard for how data should be represented at rest (eg. in Box storage or Application State). It is not necessarily the most optimal format for an in memory representation and for data which is being mutated. For this reason we offer both sets of types and a developer can choose the most appropriate one for their usage. As a beginner the native types will feel more natural to use, but it is useful to be aware of the encoded versions when it comes to optimizing your application.
## AVM Types
The most basic [types on the AVM](https://dev.algorand.co/concepts/smart-contracts/avm/#stack-types) are `uint64` and `bytes`, representing unsigned 64-bit integers and byte arrays respectively. These are represented by [`uint64`](./#uint64) and [`bytes`](./#bytes) in Algorand TypeScript.
There are further “bounded” types supported by the AVM, which are backed by these two simple primitives. For example, `biguint` represents a variably sized (up to 512-bits), unsigned integer, but is actually backed by a `byte[]`. This is represented by [`biguint`](./#biguint) in Algorand TypeScript.
### Uint64
`uint64` represents an unsigned 64-bit integer type that will error on both underflow (negative values) and overflows (values larger than 64-bit). It can be declared with a numeric literal and a type annotation of `uint64` or by using the `Uint64` factory method (think `number` (type) vs `Number` (a function for creating numbers))
```ts
import { Uint64, uint64 } from '@algorandfoundation/algorand-typescript';
const x: uint64 = 123;
demo(x);
// Type annotation is not required when `uint64` can be inferred from usage
demo(456);
function demo(y: uint64) {}
// `Uint64` constructor can be used to define `uint64` values which `number` cannot safely represent
const z = Uint64(2n ** 54n);
// No arg (returns 0), similar to Number()
demo(Uint64());
// Create from string representation (must be a string literal)
demo(Uint64('123456'));
// Create from a boolean
demo(Uint64(true));
// Create from a numeric expression
demo(Uint64(34 + 3435));
```
Math operations with the `uint64` work the same as EcmaScript’s `number` type however due to a hard limitation in TypeScript, it is not possible to control the type of these expressions - they will always be inferred as `number`. As a result, a type annotation will be required making use of the expression value if the type cannot be inferred from usage.
```ts
import { Uint64, uint64 } from '@algorandfoundation/algorand-typescript';
function add(x: uint64, y: uint64): uint64 {
return x + y; // uint64 inferred from function's return type
}
// uint64 inferred from assignment target
const x: uint64 = 123 + add(4, 5);
const a: uint64 = 50;
// Error because type of `b` will be inferred as `number`
const b = a * x;
// Ok
const c: uint64 = a * x;
// Ok
const d = Uint64(a * x);
```
### BigUint
`biguint` represents an unsigned integer of up to 512-bit. The leading `0` padding is variable and not guaranteed. Operations made using a `biguint` are more expensive in terms of [opcode budget](https://dev.algorand.co/concepts/smart-contracts/languages/teal/#dynamic-operational-cost) by an order of magnitude, as such - the `biguint` type should only be used when dealing with integers which are larger than 64-bit. A `biguint` can be declared with a bigint literal (A number with an `n` suffix) and a type annotation of `biguint`, or by using the `BigUint` factory method. The same constraints of the `uint64` type apply here with regards to required type annotations.
```ts
import { BigUint, bigint } from '@algorandfoundation/algorand-typescript';
const x: bigint = 123n;
demo(x);
// Type annotation is not required when `bigint` can be inferred from usage
demo(456n);
function demo(y: bigint) {}
// No arg (returns 0), similar to Number()
demo(BigUint());
// Create from string representation (must be a string literal)
demo(BigUint('123456'));
// Create from a boolean
demo(BigUint(true));
// Create from a numeric expression
demo(BigUint(34 + 3435));
```
### Bytes
`bytes` represents a variable length sequence of bytes up to a maximum length of 4096. Bytes values can be created from various string encodings using string literals using the `Bytes` factory function.
```ts
import { Bytes } from '@algorandfoundation/algorand-typescript';
const fromUtf8 = Bytes('abc');
const fromHex = Bytes.fromHex('AAFF');
const fromBase32 = Bytes.fromBase32('....');
const fromBase64 = Bytes.fromBase64('....');
const interpolated = Bytes`${fromUtf8}${fromHex}${fromBase32}${fromBase64}`;
const concatenated = fromUtf8.concat(fromHex).concat(fromBase32).concat(fromBase64);
```
### String
`string` literals and values are supported in Algorand TypeScript however most of the prototype is not implemented. Strings in EcmaScript are implemented using utf-16 characters and achieving semantic compatability for any prototype method which slices or splits strings based on characters would be non-trivial (and opcode expensive) to implement on the AVM with no clear benefit as string manipulation tasks can easily be performed off-chain. Algorand TypeScript APIs which expect a `bytes` value will often also accept a `string` value. In these cases, the `string` will be interpreted as a `utf8` encoded value.
```ts
const a = 'Hello';
const b = 'world';
const interpolate = `${a} ${b}`;
const concat = a + ' ' + b;
```
### Boolean
`bool` literals and values are supported in Algorand TypeScript. The `Boolean` factory function can be used to evaluate other values as `true` or `false` based on whether the underlying value is `truthy` or `falsey`.
```ts
import { uint64 } from '@algorandfoundation/algorand-typescript';
const one: uint64 = 1;
const zero: uint64 = 0;
const trueValues = [true, Boolean(one), Boolean('abc')] as const;
const falseValues = [false, Boolean(zero), Boolean('')] as const;
```
### Account, Asset, Application
These types represent the underlying Algorand entity and expose methods and properties for retrieving data associated with that entity. They are created by passing the relevant identifier to the respective factory methods.
```ts
import { Application, Asset, Account } from '@algorandfoundation/algorand-typescript';
const app = Application(123n); // Create from application id
const asset = Asset(456n); // Create from asset id
const account = Account('A7NMWS3NT3IUDMLVO26ULGXGIIOUQ3ND2TXSER6EBGRZNOBOUIQXHIBGDE'); // Create from account address
const account2 = Account(
Bytes.fromHex('07DACB4B6D9ED141B17576BD459AE6421D486DA3D4EF2247C409A396B82EA221'),
); // Create from account public key bytes
```
They can also be used in ABI method parameters where they will be created referencing the relevant `foreign_*` array on the transaction. See [ARC4 reference types](https://github.com/algorandfoundation/ARCs/blob/main/ARCs/arc-0004#reference-types)
### Group Transactions
The group transaction types expose properties and methods for reading attributes of other transactions in the group. They can be created explicitly by calling `gtxn.Transaction(n)` where `n` is the index of the desired transaction in the group, or they can be used in ABI method signatures where the ARC4 router will take care of providing the relevant transaction specified by the client. They should not be confused with the [itxn](lg-itxns) namespace which contains types for composing inner transactions
```ts
import { gtxn, Contract } from '@algorandfoundation/algorand-typescript';
class Demo extends Contract {
doThing(payTxn: gtxn.PayTxn): void {
const assetConfig = gtxn.AssetConfigTxn(1);
const txn = gtxn.Transaction(i);
switch (txn.type) {
case TransactionType.ApplicationCall:
log(txn.appId.id);
break;
case TransactionType.AssetTransfer:
log(txn.xferAsset.id);
break;
case TransactionType.AssetConfig:
log(txn.configAsset.id);
break;
case TransactionType.Payment:
log(txn.receiver);
break;
case TransactionType.KeyRegistration:
log(txn.voteKey);
break;
default:
log(txn.freezeAsset.id);
break;
}
}
}
```
### Arrays
**Immutable**
```ts
const myArray: uint64[] = [1, 2, 3];
const myOtherArray = ['a', 'b', 'c'];
```
Arrays in Algorand TypeScript can be declared using the array literal syntax and are explicitly typed using either the `T[]` shorthand or `Array` full name. The type can usually be inferred by uints will require a type hint. Native arrays are currently considered immutable (as if they were declared `readonly T[]`) as the AVM offers limited resources for storing mutable reference types in a heap. “Mutations” can be done using the pure methods available on the Array prototype.
```ts
let myArray: uint64[] = [1, 2, 3];
// Instead of .push
myArray = [...myArray, 4];
// Instead of index assignment
myArray = myArray.with(2, 3);
```
Similar to other supported native types, much of the full prototype of Array is not supported but this coverage may expand over time.
**Mutable**
```ts
import { MutableArray, uint64 } from '@algorandfoundation/algorand-typescript';
const myMutable = new MutableArray();
myMutable.push(1);
addToArray(myMutable);
assert(myMutable.pop() === 4);
function addToArray(x: MutableArray) {
x.push(4);
}
```
Mutable arrays can be declared using the [MutableArray](api/index/classes/MutableArray) type. This type makes use of [scratch space](https://dev.algorand.co/concepts/smart-contracts/languages/teal/#scratch-space-usage) as a heap in order to provide an array type with ‘pass by reference’ semantics. It is currently limited to fixed size item types.
### Tuples
```ts
import { Uint64, Bytes } from '@algorandfoundation/algorand-typescript';
const myTuple = [Uint64(1), 'test', false] as const;
const myOtherTuple: [string, bytes] = ['hello', Bytes('World')];
const myOtherTuple2: readonly [string, bytes] = ['hello', Bytes('World')];
```
Tuples can be declared by appending the `as const` keywords to an array literal expression, or by adding an explicit type annotation. Tuples are considered immutable regardless of how they are declared meaning `readonly [T1, T2]` is equivalent to `[T1, T2]`. Including the `readonly` keyword will improve intellisense and TypeScript IDE feedback at the expense of verbosity.
### Objects
```ts
import { Uint64, Bytes, uint64 } from '@algorandfoundation/algorand-typescript';
type NamedObj = { x: uint64; y: uint64 };
const myObj = { a: Uint64(123), b: Bytes('test'), c: false };
function test(obj: NamedObj): uint64 {
return (obj.x = obj.y);
}
```
Object types and literals are treated as named tuples. The types themselves can be declared with a name using a `type NAME = { ... }` expression, or anonymously using an inline type annotation `let x: { a: boolean } = { ... }`. If no type annotation is present, the type will be inferred from the assigned values. Object types are immutable and are treated as if they were declared with the `Readonly` helper type. i.e. `{ a: boolean }` is equivalent to `Readonly<{ a: boolean }>`. An object’s property can be updated using a spread expression.
```ts
import { Uint64 } from '@algorandfoundation/algorand-typescript';
let obj = { first: 'John', last: 'Doh' };
obj = { ...obj, first: 'Jane' };
```
## ARC4 Encoded Types
ARC4 encoded types live in the `/arc4` module
Where supported, the native equivalent of an ARC4 type can be obtained via the `.native` property. It is possible to use native types in an ABI method and the router will automatically encode and decode these types to their ARC4 equivalent.
### Booleans
**Type:** `@algorandfoundation/algorand-typescript/arc4::Bool` **Encoding:** A single byte where the most significant bit is `1` for `True` and `0` for `False` **Native equivalent:** `bool`
### Unsigned ints
**Types:** `@algorandfoundation/algorand-typescript/arc4::UIntN` **Encoding:** A big endian byte array of N bits **Native equivalent:** `uint64` or `biguint`
Common bit sizes have also been aliased under `@algorandfoundation/algorand-typescript/arc4::UInt8`, `@algorandfoundation/algorand-typescript/arc4::UInt16` etc. A uint of any size between 8 and 512 bits (in intervals of 8bits) can be created using a generic parameter. `Byte` is an alias of `UintN<8>`
### Unsigned fixed point decimals
**Types:** `@algorandfoundation/algorand-typescript/arc4::UFixedNxM` **Encoding:** A big endian byte array of N bits where `encoded_value = value / (10^M)` **Native equivalent:** *none*
### Bytes and strings
**Types:** `@algorandfoundation/algorand-typescript/arc4::DynamicBytes` and `@algorandfoundation/algorand-typescript/arc4::Str` **Encoding:** A variable length byte array prefixed with a 16-bit big endian header indicating the length of the data **Native equivalent:** `bytes` and `string`
Strings are assumed to be utf-8 encoded and the length of a string is the total number of bytes, *not the total number of characters*.
### StaticBytes
**Types:** `@algorandfoundation/algorand-typescript/arc4::StaticBytes` **Encoding:** A fixed length byte array **Native equivalent:** `bytes`
Like `DynamicBytes` but the length header can be omitted as the data is assumed to be of the specified length.
### Static arrays
**Type:** `@algorandfoundation/algorand-typescript/arc4::StaticArray` **Encoding:** See [ARC4 Container Packing](#arc4-container-packing) **Native equivalent:** *none*
An ARC4 StaticArray is an array of a fixed size. The item type is specified by the first generic parameter and the size is specified by the second.
### Address
**Type:** `@algorandfoundation/algorand-typescript/arc4::Address` **Encoding:** A byte array 32 bytes long **Native equivalent:** `Account`
Address represents an Algorand address’ public key, and can be used instead of `Account` when needing to reference an address in an ARC4 struct, tuple or return type. It is a subclass of `StaticArray`
### Dynamic arrays
**Type:** `@algorandfoundation/algorand-typescript/arc4::DynamicArray` **Encoding:** See [ARC4 Container Packing](#arc4-container-packing) **Native equivalent:** *none*
An ARC4 DynamicArray is an array of a variable size. The item type is specified by the first generic parameter. Items can be added and removed via `.pop`, `.append`, and `.extend`.
The current length of the array is encoded in a 16-bit prefix similar to the `arc4.DynamicBytes` and `arc4.String` types
### Tuples
**Type:** `@algorandfoundation/algorand-typescript/arc4::Tuple` **Encoding:** See [ARC4 Container Packing](#arc4-container-packing) **Native equivalent:** TypeScript tuple
ARC4 Tuples are immutable statically sized arrays of mixed item types. Item types can be specified via generic parameters or inferred from constructor parameters.
### Structs
**Type:** `@algorandfoundation/algorand-typescript/arc4::Struct` **Encoding:** See [ARC4 Container Packing](#arc4-container-packing) **Native equivalent:** *None*
ARC4 Structs are named tuples. Items can be accessed via names instead of indexes. They are also mutable
### ARC4 Container Packing
ARC4 encoding rules are detailed explicitly in the [ARC](https://github.com/algorandfoundation/ARCs/blob/main/ARCs/arc-0004#encoding-rules). A summary is included here.
Containers are composed of a head and a tail portion, with a possible length prefix if the container length is dynamic.
```plaintext
[Length (2 bytes)][Head bytes][Tail bytes]
^ Offsets are from the start of the head bytes
```
* Fixed length items (eg. bool, uintn, byte, or a static array of a fixed length item) are inserted directly into the head
* Variable length items (eg. bytes, string, dynamic array, or even a static array of a variable length item) are inserted into the tail. The head will include a 16-bit number representing the offset of the tail data, the offset is the total number of bytes in the head + the number of bytes preceding the tail data for this item (ie. the tail bytes of any previous items)
* Consecutive boolean values are packed into CEIL(N / 8) bytes where each bit will represent a single boolean value (big endian)
# Algorand TypeScript
Algorand TypeScript is a partial implementation of the TypeScript programming language that runs on the Algorand Virtual Machine (AVM). It includes a statically typed framework for development of Algorand smart contracts and logic signatures, with TypeScript interfaces to underlying AVM functionality that works with standard TypeScript tooling.
It maintains the syntax and semantics of TypeScript such that a developer who knows TypeScript can make safe assumptions about the behaviour of the compiled code when running on the AVM. Algorand TypeScript is also executable TypeScript that can be run and debugged on a Node.js virtual machine with transpilation to EcmaScript and run from automated tests.
Algorand TypeScript is compiled for execution on the AVM by PuyaTs, a TypeScript frontend for the [Puya](https://github.com/algorandfoundation/puya) optimising compiler that ensures the resulting AVM bytecode execution semantics that match the given TypeScript code. PuyaTs produces output that is directly compatible with AlgoKit typed clients to make deployment and calling easy.
# Lora Overview
> Overview of Lora, a live on-chain resource analyzer for Algorand
Algorand AlgoKit lora is a live on-chain resource analyzer, that enables developers to explore and interact with a configured Algorand network in a visual way.
## What is Lora?
AlgoKit lora is a powerful visual tool designed to streamline the Algorand local development experience. It acts as both a network explorer and a tool for building and testing your Algorand applications.
You can access lora by visiting in your browser or by running `algokit explore` when you have the [AlgoKit CLI](https://github.com/algorandfoundation/algokit-cli) installed.
## Key features
* Explore blocks, transactions, transaction groups, assets, accounts and applications on LocalNet, TestNet or MainNet.
* Visualise and understand complex transactions and transaction groups with the visual transaction view.
* View blocks in real time as they are produced on the connected network.
* Monitor and inspect real-time transactions related to an asset, account, or application with the live transaction view.
* Review historical transactions related to an asset, account, or application through the historical transaction view.
* Access detailed asset information and metadata when the asset complies with one of the ASA ARCs.
* Connected to your Algorand wallet and perform context specific actions.
* Fund an account in LocalNet or TestNet.
* Visually deploy, populate, simulate and call an app by uploading an ARC-4, ARC-32 or ARC-56 app spec via App lab.
* Craft, simulate and send transaction groups using Transaction wizard.
* Seamless integration into the existing AlgoKit ecosystem.
## Why Did We Build Lora?
An explorer is an essential tool for making blockchain data accessible and enables users to inspect and understand on-chain activities. Without these tools, it’s difficult to interpret data or gather the information and insights to fully harness the potential of the blockchain. Therefore it makes sense to have a high quality, officially supported and fully open-source tool available to the community.
Before developing Lora, we evaluated the existing tools in the community, but none fully met our desires.
As part of this evaluation we came up with several design goals, which are:
* **Developer-Centric User Experience**: Offer a rich user experience tailored for developers, with support for LocalNet, TestNet, and MainNet.
* **Open Source**: Fully open source and actively maintained.
* **Operationally Simple**: Operate using algod and indexer directly, eliminating the need for additional setup, deployment, or maintenance.
* **Visualize Complexity**: Enable Algorand developers to understand complex transactions and transaction groups by visually representing them.
* **Contextual Linking**: Allow users to see live and historical transactions in the context of related accounts, assets, or applications.
* **Performant**: Ensure a fast and seamless experience by minimizing requests to upstream services and utilizing caching to prevent unnecessary data fetching. Whenever possible, ancillary data should be fetched just in time with minimal over-fetching.
* **Support the Learning Journey**: Assist developers in discovering and learning about the Algorand ecosystem.
* **Seamless Integration**: Use and integrate seamlessly with the existing AlgoKit tools and enhance their usefulness.
* **Local Installation**: Allow local installation alongside the AlgoKit CLI and your existing dev tools.
# AlgoKit Templates
> Overview of AlgoKit templates
AlgoKit offers a curated collection of production-ready and starter templates, streamlining front-end and smart contract development. These templates provide a comprehensive suite of pre-configured tools and integrations, from boilerplate React projects with Algorand wallet integration to smart contract projects for Python and TypeScript. This enables developers to prototype and deploy robust, production-ready applications rapidly.
By leveraging AlgoKit templates, developers can significantly reduce setup time, ensure best practices in testing, compiling, and deploying smart contracts, and focus on building innovative blockchain solutions with confidence.
This page provides an overview of the official AlgoKit templates and guidance on creating and sharing your custom templates to suit your needs better or contribute to the community.
## Official Templates
AlgoKit provides several official templates to cater to different development needs. These templates will create a [standalone AlgoKit project](/algokit/project-structure#standalone-projects).
* Smart Contract Templates:
* [Algorand Python](https://github.com/algorandfoundation/algokit-python-template)
* [Algorand TypeScript](https://github.com/algorand-devrel/tealscript-algokit-template)
* [DApp React Frontend](https://github.com/algorandfoundation/algokit-react-frontend-template)
* [Fullstack (Smart Contract & DApp Frontend template)](https://github.com/algorandfoundation/algokit-fullstack-template)
## How to initialize a template
**To initialize using the `algokit` CLI**:
1. [Install AlgoKit](/getting-started/algokit-quick-start) and all the prerequisites mentioned in the installation guide.
2. Execute the command `algokit init`. This initiates an interactive wizard that assists in selecting the most appropriate template for your project requirements.
```shell
algokit init # This command will start an interactive wizard to select a template
```
**To initialize within GitHub Codespaces**:
1. Go to the [algokit-base-template](https://github.com/algorandfoundation/algokit-base-template) repository.
2. Initiate a new codespace by selecting the `Create codespace on main` option. You can find this by clicking the `Code` button and then navigating to the `Codespaces` tab.
3. Upon codespace preparation, `algokit` will automatically start `LocalNet` and present a prompt with the next steps. Executing `algokit init` will initiate the interactive wizard.
## Algorand Python Smart Contract Template
[Algorand Python Smart Contract Template Github Repo](https://github.com/algorandfoundation/algokit-python-template)
This template provides a production-ready baseline for developing and deploying [Python](https://github.com/algorandfoundation/puya) smart contracts.
To use it [install AlgoKit](https://github.com/algorandfoundation/algokit-cli#readme) and then either pass in `-t python` to `algokit init` or select the `python` template.
```shell
algokit init -t python
# or
algokit init # and select Smart Contracts & Python template
```
### Features
This template supports the following features:
* Compilation of multiple Algorand Python contracts to a predictable folder location and file layout where they can be deployed
* Deploy-time immutability and permanence control
* [Poetry](https://python-poetry.org/) for Python dependency management and virtual environment management
* Linting via [Ruff](https://github.com/charliermarsh/ruff) or [Flake8](https://flake8.pycqa.org/en/latest/)
* Formatting via [Black](https://github.com/psf/black)
* Type checking via [mypy](https://mypy-lang.org/)
* Testing via pytest (not yet used)
* Dependency vulnerability scanning via pip-audit (not yet used)
* VS Code configuration (linting, formatting, breakpoint debugging)
* dotenv (.env) file for configuration
* Automated testing of the compiled smart contracts
* [Output stability](https://github.com/algorandfoundation/algokit-cli/blob/main/docs/articles/output_stability.md) tests of the TEAL output
* CI/CD pipeline using GitHub Actions:
* Optionally pick deployments to Netlify or Vercel
### Getting started
Once the template is instantiated, you can follow the `README.md` file to see instructions on how to use the template.
* [Instructions for Starter template](https://github.com/algorandfoundation/algokit-python-template/blob/main/examples/starter_python/README.md)
* [Instructions for Production template](https://github.com/algorandfoundation/algokit-python-template/blob/main/examples/production_python/README.md)
## Algorand TypeScript Smart Contract Template
[Algorand TypeScript Smart Contract Template Github Repo](https://github.com/algorand-devrel/tealscript-algokit-template)
This template provides a baseline TealScript smart contract development environment.
To use it [install AlgoKit](https://github.com/algorandfoundation/algokit-cli#readme) and then either pass in `-t tealscript` to `algokit init` or select the `TypeScript` language option interactively during `algokit init.`
```shell
algokit init -t tealscript
# or
algokit init # and select Smart Contracts & TypeScript template
```
### Getting started
Once the template is instantiated, you can follow the [README.md](https://github.com/algorand-devrel/tealscript-algokit-template/blob/master/template_content/README.md) file for instructions on how to use it.
## DApp Frontend React Template
[DApp Frontend React Template Github Repo](https://github.com/algorandfoundation/algokit-react-frontend-template)
This template provides a baseline React web app for developing and integrating with any [ARC32](https://github.com/algorandfoundation/ARCs/blob/main/ARCs/arc-0032.md) compliant Algorand smart contracts.
To use it [install AlgoKit](https://github.com/algorandfoundation/algokit-cli#readme) and then either pass in `-t react` to `algokit init` or select the `react` template interactively during `algokit init`.
```shell
algokit init -t react
# or
algokit init # and select DApp Frontend template
```
### Features
This template supports the following features:
* React web app with [Tailwind CSS](https://tailwindcss.com/) and [TypeScript](https://www.typescriptlang.org/)
* Styled framework agnostic CSS components using [DaisyUI](https://daisyui.com/).
* Starter jest unit tests for typescript functions. It can be turned off if not needed.
* Starter [playwright](https://playwright.dev/) tests for end to end testing. It can be turned off if not needed.
* Integration with [use-wallet](https://github.com/txnlab/use-wallet) for connecting to Algorand wallets such as Pera, Defly, and Exodus.
* Example of performing a transaction.
* Dotenv support for environment variables and a local-only KMD provider that can connect the frontend component to an `algokit localnet` instance (docker required).
* CI/CD pipeline using GitHub Actions (Vercel or Netlify for hosting)
### Getting started
Once the template is instantiated, you can follow the `README.md` file to see instructions on how to use the template.
* [Instructions for Starter template](https://github.com/algorandfoundation/algokit-react-frontend-template/blob/main/examples/starter_react/README.md)
* [Instructions for Production template](https://github.com/algorandfoundation/algokit-react-frontend-template/blob/main/examples/production_react/README.md)
## Fullstack (Smart Contract + Frontend) Template
[Fullstack (Smart Contract + Frontend) Template Github Repo](https://github.com/algorandfoundation/algokit-fullstack-template)
This full-stack template provides both a baseline React web app and a production-ready baseline for developing and deploying `Algorand Python` and `TypeScript` smart contracts. It’s suitable for developing and integrating with any [ARC32](https://github.com/algorandfoundation/ARCs/blob/main/ARCs/arc-0032.md) compliant Algorand smart contracts.
To use this template, [install AlgoKit](https://github.com/algorandfoundation/algokit-cli#readme) and then either pass in `-t fullstack` to `algokit init` or select the relevant template interactively during `algokit init`.
```shell
algokit init -t fullstack
# or
algokit init # and select the Smart Contracts & DApp Frontend template
```
### Features
This template supports many features for developing full-stack applications using official AlgoKit templates. Using the full-stack template currently allows you to create a workspace that combines the following frontend template:
* [algokit-react-frontend-template](https://github.com/algorandfoundation/algokit-react-frontend-template) - A React web app with TypeScript, Tailwind CSS, and all Algorand-specific integrations pre-configured and ready for you to build.
And the following backend templates:
* [algokit-python-template](https://github.com/algorandfoundation/algokit-python-template) - An official starter for developing and deploying Algorand Python smart contracts.
* [algokit-tealscript-template](https://github.com/algorand-devrel/tealscript-algokit-template) - An official starter for developing and deploying TealScript smart contracts.
Initializing a fullstack algokit project will create an AlgoKit workspace with a frontend React web app and Algorand smart contract project inside the `projects` folder.
* .algokit.toml
* README.md
* {your\_workspace/project\_name}.code-workspace
* projects
* smart-contract
* frontend
# Project Structure
> Learn about the different types of AlgoKit projects and how to create them.
AlgoKit streamlines configuring components for development, testing, and deploying smart contracts to the blockchain and effortlessly sets up a project with all the necessary components. In this guide, we’ll explore what an AlgoKit project is and how you can use it to kickstart your own Algorand project.
## What is an AlgoKit Project?
In the context of AlgoKit, a “project” refers to a structured standalone or monorepo workspace that includes all the necessary components for developing, testing, and deploying Algorand applications, such as smart contracts, frontend applications, and any associated configurations.
## Two Types of AlgoKit Projects
AlgoKit supports two main types of project structures: Workspaces and Standalone Projects. This flexibility caters to the diverse needs of developers, whether managing multiple related projects or focusing on a single application.
* **Monorepo Workspace**: This workspace is ideal for complex applications comprising multiple subprojects. It facilitates the organized management of these subprojects under a single root directory, streamlining dependency management and shared configurations.
* **Standalone Project**: This structure is suitable for simpler applications or when working on a single component. It offers straightforward project management, with each project residing in its own directory, independent of others.
## AlgoKit Monorepo Workspace
Workspaces are designed to manage multiple related projects under a single root directory. This approach benefits complex applications with multiple sub-projects, such as a smart contract and a corresponding frontend application. Workspaces help organize these sub-projects in a structured manner, making managing dependencies and shared configurations easier.
Simply put, workspaces contain multiple AlgoKit standalone project folders within the `projects` folder and manage them from a single root directory:
* .algokit.toml
* README.md
* {your\_workspace/project\_name}.code-workspace
* projects
* standalone-project-1
* standalone-project-2
### Creating an AlgoKit Monorepo Workspace
To create an AlgoKit monorepo workspace, run the following command:
```shell
algokit init # Creates a workspace by default
# or
algokit init --workspace
```
Note
The `–-workspace` flag is enabled by default, so running `algokit init` will create an AlgoKit workspace.
### Adding a Sub-Project to an AlgoKit Workspace
Once established, new projects can be added to the workspace, allowing centralized management.
To add another sub-project within a workspace, run the following command at the root directory of the related AlgoKit workspace:
```shell
algokit init
```
Note
Please note that instantiating a workspace inside a workspace (aka ‘workspace nesting’) is not supported or recommended. When you want to add a new project to an existing workspace, run algokit init from the root of the workspace.
### Marking a Project as a Workspace
To mark your project as a workspace, fill in the following in your `.algokit.toml` file:
```toml
[project]
type = 'workspace' # type specifying if the project is a workspace or standalone
projects_root_path = 'projects' # path to the root folder containing all sub-projects in the workspace
```
### VSCode optimizations
AlgoKit has a set of minor optimizations for VSCode users that are useful to be aware of:
* Templates created with the `--workspace` flag automatically include a VSCode code-workspace file. New projects added to an AlgoKit workspace are also integrated into an existing VSCode workspace.
* Using the `--ide` flag with init triggers automatic prompts to open the project and, if available, the code workspace in VSCode.
### Handling of the .github Folder
A key aspect of using the `--workspace` flag is how the .github folder is managed. This folder, which contains GitHub-specific configurations, such as workflows and issue templates, are moved from the project directory to the root of the workspace. This move is necessary because GitHub does not recognize workflows located in subdirectories.
Here’s a simplified overview of what happens:
1. If a .github folder is found in your project, its contents are transferred to the workspace’s root .github folder.
2. Files with matching names in the destination are not overwritten; they’re skipped.
3. The original .github folder is removed if left empty after the move.
4. A notification is displayed advising you to review the moved .github contents to ensure everything is in order.
This process ensures that your GitHub configurations are appropriately recognized at the workspace level, allowing you to utilize GitHub Actions and other features seamlessly across your projects.
## Standalone Projects
Standalone projects are suitable for more straightforward applications or when working on a single component. This structure is straightforward, with each project residing in its directory, independent of others. Standalone projects are ideal for developers who prefer simplicity or focus on a single aspect of their application and are sure they will not need to add more sub-projects in the future.
### Creating a Standalone Project
To create a standalone project, use the `--no-workspace` flag during initialization.
```shell
algokit init -–no-workspace
```
This instructs AlgoKit to bypass the workspace structure and set up the project as an isolated entity.
### Marking a Project as a Standalone Project
To mark your project as a standalone project, fill in the following in your .algokit.toml file:
```toml
[project]
type = {'backend' | 'contract' | 'frontend'} # currently support 3 generic categories for standalone projects
name = 'my-project' # unique name for the project inside the workspace
```
Note
We recommend using workspaces for most projects (hence enabled by default), as it provides a more organized and scalable approach to managing multiple sub-projects. However, standalone projects are a great choice for simple applications, or when you are certain you will not need to add more sub-projects in the future. For such cases, append `--no-workspace` when using the algokit init command. For more details on the init command, please refer to [init](https://github.com/algorandfoundation/algokit-cli/blob/main/docs/features/init.md) command docs.
Both workspaces and standalone projects are fully supported by AlgoKit’s suite of tools, ensuring developers can choose the structure that best fits their workflow without compromising on functionality.
# Algorand transaction subscription / indexing
## Quick start
```{testcode}
# Import necessary modules
from algokit_subscriber import AlgorandSubscriber
from algosdk.v2client import algod
from algokit_utils import get_algod_client, get_algonode_config
# Create an Algod client
algod_client = get_algod_client(get_algonode_config("testnet", "algod", "")) # testnet used for demo purposes
# Create subscriber (example with filters)
subscriber = AlgorandSubscriber(
config={
"filters": [
{
"name": "filter1",
"filter": {
"type": "pay",
"sender": "AAAAAAAAAAAAAAAAAAAAAAAAAAAAAAAAAAAAAAAAAAAAAAAAAAAAY5HFKQ",
},
},
],
"watermark_persistence": {
"get": lambda: 0,
"set": lambda x: None
},
"sync_behaviour": "skip-sync-newest",
"max_rounds_to_sync": 100,
},
algod_client=algod_client,
)
# Set up subscription(s)
subscriber.on("filter1", lambda transaction, _: print(f"Received transaction: {transaction['id']}"))
# Set up error handling
subscriber.on_error(lambda error, _: print(f"Error occurred: {error}"))
# Either: Start the subscriber (if in long-running process)
# subscriber.start()
# OR: Poll the subscriber (if in cron job / periodic lambda)
result = subscriber.poll_once()
print(f"Polled {len(result['subscribed_transactions'])} transactions")
```
```{testoutput}
Polled 0 transactions
```
## Capabilities
* [Quick start](#quick-start)
* [Capabilities](#capabilities)
* [Notification *and* indexing](#notification-and-indexing)
* [Low latency processing](#low-latency-processing)
* [Watermarking and resilience](#watermarking-and-resilience)
* [Extensive subscription filtering](#extensive-subscription-filtering)
* [ARC-28 event subscription and reads](#arc-28-event-subscription-and-reads)
* [First-class inner transaction support](#first-class-inner-transaction-support)
* [State-proof support](#state-proof-support)
* [Simple programming model](#simple-programming-model)
* [Easy to deploy](#easy-to-deploy)
* [Fast initial index](#fast-initial-index)
* [Entry points](#entry-points)
* [Reference docs](#reference-docs)
* [Emit ARC-28 events](#emit-arc-28-events)
* [Algorand Python](#algorand-python)
* [TealScript](#tealscript)
* [PyTEAL](#pyteal)
* [TEAL](#teal)
* [Next steps](#next-steps)
### Notification *and* indexing
This library supports the ability to stay at the tip of the chain and power notification / alerting type scenarios through the use of the `sync_behaviour` parameter in both [`AlgorandSubscriber`](./subscriber) and [`get_subscribed_transactions`](./subscriptions). For example to stay at the tip of the chain for notification/alerting scenarios you could do:
```python
subscriber = AlgorandSubscriber({"sync_behavior": 'skip-sync-newest', "max_rounds_to_sync": 100, ...}, ...)
# or:
get_subscribed_transactions({"sync_behaviour": "skip-sync-newest", "max_rounds_to_sync": 100, ...}, ...)
```
The `current_round` parameter (availble when calling `get_subscribed_transactions`) can be used to set the tip of the chain. If not specified, the tip will be automatically detected. Whilst this is generally not needed, it is useful in scenarios where the tip is being detected as part of another process and you only want to sync to that point and no further.
The `max_rounds_to_sync` parameter controls how many rounds it will process when first starting when it’s not caught up to the tip of the chain. While it’s caught up to the chain it will keep processing as many rounds as are available from the last round it processed to when it next tries to sync (see below for how to control that).
If you expect your service will resiliently always stay running, should never get more than `max_rounds_to_sync` from the tip of the chain, there is a problem if it processes old records and you’d prefer it throws an error when losing track of the tip of the chain rather than continue or skip to newest you can set the `sync_behaviour` parameter to `fail`.
The `sync_behaviour` parameter can also be set to `sync-oldest-start-now` if you want to process all transactions once you start alerting/notifying. This requires that your service needs to keep running otherwise it could fall behind and start processing old records / take a while to catch back up with the tip of the chain. This is also a useful setting if you are creating an indexer that only needs to process from the moment the indexer is deployed rather than from the beginning of the chain. Note: this requires the [initial watermark](#watermarking-and-resilience) to start at 0 to work.
The `sync_behaviour` parameter can also be set to `sync-oldest`, which is a more traditional indexing scenario where you want to process every single block from the beginning of the chain. This can take a long time to process by default (e.g. days), noting there is a [fast catchup feature](#fast-initial-index). If you don’t want to start from the beginning of the chain you can [set the initial watermark](#watermarking-and-resilience) to a higher round number than 0 to start indexing from that point.
### Low latency processing
You can control the polling semantics of the library when using the [`AlgorandSubscriber`](./subscriber) by either specifying the `frequency_in_seconds` parameter to control the duration between polls or you can use the `wait_for_block_when_at_tip` parameter to indicate the subscriber should [call algod to ask it to inform the subscriber when a new round is available](https://dev.algorand.co/reference/rest-apis/algod/#waitforblock) so the subscriber can immediately process that round with a much lower-latency. When this mode is set, the subscriber intelligently uses this option only when it’s caught up to the tip of the chain, but otherwise uses `frequency_in_seconds` while catching up to the tip of the chain.
e.g.
```python
# When catching up to tip of chain will pool every 1s for the next 1000 blocks, but when caught up will poll algod for a new block so it can be processed immediately with low latency
subscriber = AlgorandSubscriber(config={
"frequency_in_seconds": 1,
"wait_for_block_when_at_tip": True,
"max_rounds_to_sync": 1000,
# ... other configuration options
}, ...)
...
subscriber.start()
```
If you are using [`get_subscribed_transactions`](./subscriptions) or the `pollOnce` method on `AlgorandSubscriber` then you can use your infrastructure and/or surrounding orchestration code to take control of the polling duration.
If you want to manually run code that waits for a given round to become available you can execute the following algosdk code:
```python
algod.status_after_block(round_number_to_wait_for)
```
### Watermarking and resilience
You can create reliable syncing / indexing services through a simple round watermarking capability that allows you to create resilient syncing services that can recover from an outage.
This works through the use of the `watermark_persistence` parameter in [`AlgorandSubscriber`](./subscriber) and `watermark` parameter in [`get_subscribed_transactions`](./subscriptions):
```python
def get_saved_watermark() -> int:
# Return the watermark from a persistence store e.g. database, redis, file system, etc.
pass
def save_watermark(new_watermark: int) -> None:
# Save the watermark to a persistence store e.g. database, redis, file system, etc.
pass
...
subscriber = AlgorandSubscriber({
"watermark_persistence": {
"get": get_saved_watermark,
"set": save_watermark
},
# ... other configuration options
}, ...)
# or:
watermark = get_saved_watermark()
result = get_subscribed_transactions(watermark=watermark, ...)
save_watermark(result.new_watermark)
```
By using a persistence store, you can gracefully respond to an outage of your subscriber. The next time it starts it will pick back up from the point where it last persisted. It’s worth noting this provides at least once delivery semantics so you need to handle duplicate events.
Alternatively, if you want to create at most once delivery semantics you could use the [transactional outbox pattern](https://microservices.io/patterns/data/transactional-outbox.html) and wrap a unit of work from a ACID persistence store (e.g. a SQL database with a serializable or repeatable read transaction) around the watermark retrieval, transaction processing and watermark persistence so the processing of transactions and watermarking of a single poll happens in a single atomic transaction. In this model, you would then process the transactions in a separate process from the persistence store (and likely have a flag on each transaction to indicate if it has been processed or not). You would need to be careful to ensure that you only have one subscriber actively running at a time to guarantee this delivery semantic. To ensure resilience you may want to have multiple subscribers running, but a primary node that actually executes based on retrieval of a distributed semaphore / lease.
If you are doing a quick test or creating an ephemeral subscriber that just needs to exist in-memory and doesn’t need to recover resiliently (useful with `sync_behaviour` of `skip-sync-newest` for instance) then you can use an in-memory variable instead of a persistence store, e.g.:
```python
watermark = 0
subscriber = AlgorandSubscriber(
config={
"watermark_persistence": {
"get": lambda: watermark,
"set": lambda new_watermark: globals().update(watermark=new_watermark)
},
# ... other configuration options
},
# ... other arguments
)
# or:
watermark = 0
result = get_subscribed_transactions(watermark=watermark, ...)
watermark = result.new_watermark
```
### Extensive subscription filtering
This library has extensive filtering options available to you so you can have fine-grained control over which transactions you are interested in.
There is a core type that is used to specify the filters [`TransactionFilter`](subscriptions#transactionfilter):
```python
subscriber = AlgorandSubscriber(config={'filters': [{'name': 'filterName', 'filter': {# Filter properties}}], ...}, ...)
# or:
get_subscribed_transactions(filters=[{'name': 'filterName', 'filter': {# Filter properties}}], ...)
```
Currently this allows you filter based on any combination (AND logic) of:
* Transaction type e.g. `filter: { type: "axfer" }` or `filter: {type: ["axfer", "pay"] }`
* Account (sender and receiver) e.g. `filter: { sender: "ABCDE..F" }` or `filter: { sender: ["ABCDE..F", "ZYXWV..A"] }` and `filter: { receiver: "12345..6" }` or `filter: { receiver: ["ABCDE..F", "ZYXWV..A"] }`
* Note prefix e.g. `filter: { note_prefix: "xyz" }`
* Apps
* ID e.g. `filter: { appId: 54321 }` or `filter: { appId: [54321, 12345] }`
* Creation e.g. `filter: { app_create: true }`
* Call on-complete(s) e.g. `filter: { app_on_complete: 'optin' }` or `filter: { app_on_complete: ['optin', 'noop'] }`
* ARC4 method signature(s) e.g. `filter: { method_signature: "MyMethod(uint64,string)" }` or `filter: { method_signature: ["MyMethod(uint64,string)uint64", "MyMethod2(unit64)"] }`
* Call arguments e.g.
```python
"filter": {
'app_call_arguments_match': lambda app_call_arguments:
len(app_call_arguments) > 1 and
app_call_arguments[1].decode('utf-8') == 'hello_world'
}
```
* Emitted ARC-28 event(s) e.g.
```python
'filter': {
'arc28_events': [{ 'group_name': "group1", 'event_name': "MyEvent" }];
}
```
Note: For this to work you need to [specify ARC-28 events in the subscription config](#arc-28-event-subscription-and-reads).
* Assets
* ID e.g. `'filter': { 'asset_id': 123456 }` or `'filter': { 'asset_id': [123456, 456789] }`
* Creation e.g. `'filter': { 'asset_create': true }`
* Amount transferred (min and/or max) e.g. `'filter': { 'type': 'axfer', 'min_amount': 1, 'max_amount': 100 }`
* Balance changes (asset ID, sender, receiver, close to, min and/or max change) e.g. `filter: { 'balance_changes': [{'asset_id': [15345, 36234], 'roles': [BalanceChangerole.Sender], 'address': "ABC...", 'min_amount': 1, 'max_amount': 2}]}`
* Algo transfers (pay transactions)
* Amount transferred (min and/or max) e.g. `'filter': { 'type': 'pay', 'min_amount': 1, 'max_amount': 100 }`
* Balance changes (sender, receiver, close to, min and/or max change) e.g. `'filter': { 'balance_changes': [{'roles': [BalanceChangeRole.Sender], 'address': "ABC...", 'min_amount': 1, 'max_amount': 2}]}`
You can supply multiple, named filters via the [`NamedTransactionFilter`](subscriptions#namedtransactionfilter) type. When subscribed transactions are returned each transaction will have a `filters_matched` property that will have an array of any filter(s) that caused that transaction to be returned. When using [`AlgorandSubscriber`](./subscriber), you can subscribe to events that are emitted with the filter name.
### ARC-28 event subscription and reads
You can [subscribe to ARC-28 events](#extensive-subscription-filtering) for a smart contract, similar to how you can [subscribe to events in Ethereum](https://docs.web3js.org/guides/events_subscriptions/).
Furthermore, you can receive any ARC-28 events that a smart contract call you subscribe to emitted in the [subscribed transaction object](subscriptions#subscribedtransaction).
Both subscription and receiving ARC-28 events work through the use of the `arc28Events` parameter in [`AlgorandSubscriber`](./subscriber) and [`get_subscribed_transactions`](./subscriptions):
```python
group1_events = {
"groupName": "group1",
"events": [
{
"name": "MyEvent",
"args": [
{"type": "uint64"},
{"type": "string"},
]
}
]
}
subscriber = AlgorandSubscriber(arc28_events=[group1_events], ...)
# or:
result = await get_subscribed_transactions(arc28_events=[group1_events], ...)
```
The `Arc28EventGroup` type has the following definition:
```python
class Arc28EventGroup(TypedDict):
"""
Specifies a group of ARC-28 event definitions along with instructions for when to attempt to process the events.
"""
group_name: str
"""The name to designate for this group of events."""
process_for_app_ids: list[int]
"""Optional list of app IDs that this event should apply to."""
process_transaction: NotRequired[Callable[[TransactionResult], bool]]
"""Optional predicate to indicate if these ARC-28 events should be processed for the given transaction."""
continue_on_error: bool
"""Whether or not to silently (with warning log) continue if an error is encountered processing the ARC-28 event data; default = False."""
events: list[Arc28Event]
"""The list of ARC-28 event definitions."""
class Arc28Event(TypedDict):
"""
The definition of metadata for an ARC-28 event as per the ARC-28 specification.
"""
name: str
"""The name of the event"""
desc: NotRequired[str]
"""An optional, user-friendly description for the event"""
args: list[Arc28EventArg]
"""The arguments of the event, in order"""
```
Each group allows you to apply logic to the applicability and processing of a set of events. This structure allows you to safely process the events from multiple contracts in the same subscriber, or perform more advanced filtering logic to event processing.
When specifying an [ARC-28 event filter](#extensive-subscription-filtering), you specify both the `group_name` and `event_name`(s) to narrow down what event(s) you want to subscribe to.
If you want to emit an ARC-28 event from your smart contract you can follow the [below code examples](#emit-arc-28-events).
### First-class inner transaction support
When you subscribe to transactions any subscriptions that cover an inner transaction will pick up that inner transaction and [return](subscriptions#subscribedtransaction) it to you correctly.
Note: the behaviour Algorand Indexer has is to return the parent transaction, not the inner transaction; this library will always return the actual transaction you subscribed to.
If you [receive](subscriptions#subscribedtransaction) an inner transaction then there will be a `parent_transaction_id` field populated that allows you to see that it was an inner transaction and how to identify the parent transaction.
The `id` of an inner transaction will be set to `{parent_transaction_id}/inner/{index-of-child-within-parent}` where `{index-of-child-within-parent}` is calculated based on uniquely walking the tree of potentially nested inner transactions. [This transaction in Allo.info](https://allo.info/tx/group/cHiEEvBCRGnUhz9409gHl%2Fvn00lYDZnJoppC3YexRr0%3D) is a good illustration of how inner transaction indexes are allocated (this library uses the same approach).
All [returned](subscriptions#subscribedtransaction) transactions will have an `inner-txns` property with any inner transactions of that transaction populated (recursively).
The `intra-round-offset` field in a [subscribed transaction or inner transaction within](subscriptions#subscribedtransaction) is calculated by walking the full tree depth-first from the first transaction in the block, through any inner transactions recursively starting from an index of 0. This algorithm matches the one in Algorand Indexer and ensures that all transactions have a unique index, but the top level transaction in the block don’t necessarily have a sequential index.
### State-proof support
You can subscribe to [state proof](https://dev.algorand.co/concepts/protocol/stateproofs) transactions using this subscriber library. At the time of writing state proof transactions are not supported by algosdk v2 and custom handling has been added to ensure this valuable type of transaction can be subscribed to.
The field level documentation of the [returned state proof transaction](subscriptions#subscribedtransaction) is comprehensively documented via [AlgoKit Utils](https://github.com/algorandfoundation/algokit-utils-ts/blob/main/src/types/indexer.ts#L277).
By exposing this functionality, this library can be used to create a [light client](https://dev.algorand.co/concepts/protocol/stateproofs).
### Simple programming model
This library is easy to use and consume through [easy to use, type-safe TypeScript methods and objects](#entry-points) and subscribed transactions have a [comprehensive and familiar model type](subscriptions#subscribedtransaction) with all relevant/useful information about that transaction (including things like transaction id, round number, created asset/app id, app logs, etc.) modelled on the indexer data model (which is used regardless of whether the transactions come from indexer or algod so it’s a consistent experience).
For more examples of how to use it see the [relevant documentation](subscriber).
### Easy to deploy
Because the [entry points](#entry-points) of this library are simple TypeScript methods to execute it you simply need to run it in a valid JavaScript execution environment. For instance, you could run it within a web browser if you want a user facing app to show real-time transaction notifications in-app, or in a Node.js process running in the myriad of ways Node.js can be run.
Because of that, you have full control over how you want to deploy and use the subscriber; it will work with whatever persistence (e.g. sql, no-sql, etc.), queuing/messaging (e.g. queues, topics, buses, web hooks, web sockets) and compute (e.g. serverless periodic lambdas, continually running containers, virtual machines, etc.) services you want to use.
### Fast initial index
When [subscribing to the chain](#notification-and-indexing) for the purposes of building an index you often will want to start at the beginning of the chain or a substantial time in the past when the given solution you are subscribing for started.
This kind of catch up takes days to process since algod only lets you retrieve a single block at a time and retrieving a block takes 0.5-1s. Given there are millions of blocks in MainNet it doesn’t take long to do the math to see why it takes so long to catch up.
This subscriber library has a unique, optional indexer catch up mode that allows you to use indexer to catch up to the tip of the chain in seconds or minutes rather than days for your specific filter.
This is really handy when you are doing local development or spinning up a new environment and don’t want to wait for days.
To make use of this feature, you need to set the `sync_behaviour` config to `catchup-with-indexer` and ensure that you pass `indexer` in to the [entry point](#entry-points) along with `algod`.
Any [filter](#extensive-subscription-filtering) you apply will be seamlessly translated to indexer searches to get the historic transactions in the most efficient way possible based on the apis indexer exposes. Once the subscriber is within `max_rounds_to_sync` of the tip of the chain it will switch to subscribing using `algod`.
To see this in action, you can run the Data History Museum example in this repository against MainNet and see it sync millions of rounds in seconds.
The indexer catchup isn’t magic - if the filter you are trying to catch up with generates an enormous number of transactions (e.g. hundreds of thousands or millions) then it will run very slowly and has the potential for running out of compute and memory time depending on what the constraints are in the deployment environment you are running in. In that instance though, there is a config parameter you can use `max_indexer_rounds_to_sync` so you can break the indexer catchup into multiple “polls” e.g. 100,000 rounds at a time. This allows a smaller batch of transactions to be retrieved and persisted in multiple batches.
To understand how the indexer behaviour works to know if you are likely to generate a lot of transactions it’s worth understanding the architecture of the indexer catchup; indexer catchup runs in two stages:
1. **Pre-filtering**: Any filters that can be translated to the [indexer search transactions endpoint](https://dev.algorand.co/reference/rest-apis/indexer/#lookuptransaction). This query is then run between the rounds that need to be synced and paginated in the max number of results (1000) at a time until all of the transactions are retrieved. This ensures we get round-based transactional consistency. This is the filter that can easily explode out though and take a long time when using indexer catchup. For avoidance of doubt, the following filters are the ones that are converted to a pre-filter:
* `sender` (single value)
* `receiver` (single value)
* `type` (single value)
* `note_prefix`
* `app_id` (single value)
* `asset_id` (single value)
* `min_amount` (and `type = pay` or `assetId` provided)
* `max_amount` (and `maxAmount < Number.MAX_SAFE_INTEGER` and `type = pay` or (`assetId` provided and `minAmount > 0`))
2. **Post-filtering**: All remaining filters are then applied in-memory to the resulting list of transactions that are returned from the pre-filter before being returned as subscribed transactions.
## Entry points
There are two entry points into the subscriber functionality. The lower level [`get_subscribed_transactions`](./subscriptions) method that contains the raw subscription logic for a single “poll”, and the [`AlgorandSubscriber`](./subscriber) class that provides a higher level interface that is easier to use and takes care of a lot more orchestration logic for you (particularly around the ability to continuously poll).
Both are first-class supported ways of using this library, but we generally recommend starting with the `AlgorandSubscriber` since it’s easier to use and will cover the majority of use cases.
## Reference docs
[See reference docs](./code/README).
## Emit ARC-28 events
To emit ARC-28 events from your smart contract you can use the following syntax.
### Algorand Python
```python
@arc4.abimethod
def emit_swapped(self, a: arc4.UInt64, b: arc4.UInt64) -> None:
arc4.emit("MyEvent", a, b)
```
OR:
```python
class MyEvent(arc4.Struct):
a: arc4.String
b: arc4.UInt64
# ...
@arc4.abimethod
def emit_swapped(self, a: arc4.String, b: arc4.UInt64) -> None:
arc4.emit(MyEvent(a, b))
```
### TealScript
```typescript
MyEvent = new EventLogger<{
stringField: string
intField: uint64
}>();
// ...
this.MyEvent.log({
stringField: "a"
intField: 2
})
```
### PyTEAL
```python
class MyEvent(pt.abi.NamedTuple):
stringField: pt.abi.Field[pt.abi.String]
intField: pt.abi.Field[pt.abi.Uint64]
# ...
@app.external()
def myMethod(a: pt.abi.String, b: pt.abi.Uint64) -> pt.Expr:
# ...
return pt.Seq(
# ...
(event := MyEvent()).set(a, b),
pt.Log(pt.Concat(pt.MethodSignature("MyEvent(byte[],uint64)"), event._stored_value.load())),
pt.Approve(),
)
```
Note: if your event doesn’t have any dynamic ARC-4 types in it then you can simplify that to something like this:
```python
pt.Log(pt.Concat(pt.MethodSignature("MyEvent(byte[],uint64)"), a.get(), pt.Itob(b.get()))),
```
### TEAL
```teal
method "MyEvent(byte[],uint64)"
frame_dig 0 // or any other command to put the ARC-4 encoded bytes for the event on the stack
concat
log
```
## Next steps
To dig deeper into the capabilities of `algokit-subscriber`, continue with the following sections.
```{toctree}
---
maxdepth: 2
caption: Contents
hidden: true
---
subscriber
subscriptions
api
```
# AlgorandSubscriber
`AlgorandSubscriber` is a class that allows you to easily subscribe to the Algorand Blockchain, define a series of events that you are interested in, and react to those events.
## Creating a subscriber
To create an `AlgorandSubscriber` you can use the constructor:
```python
class AlgorandSubscriber:
def __init__(self, config: AlgorandSubscriberConfig, algod_client: AlgodClient, indexer_client: IndexerClient | None = None):
"""
Create a new `AlgorandSubscriber`.
:param config: The subscriber configuration
:param algod_client: An algod client
:param indexer_client: An (optional) indexer client; only needed if `subscription.sync_behaviour` is `catchup-with-indexer`
"""
```
**TODO: Link to config type**
`watermark_persistence` allows you to ensure reliability against your code having outages since you can persist the last block your code processed up to and then provide it again the next time your code runs.
`max_rounds_to_sync` and `sync_behaviour` allow you to control the subscription semantics as your code falls behind the tip of the chain (either on first run or after an outage).
`frequency_in_seconds` allows you to control the polling frequency and by association your latency tolerance for new events once you’ve caught up to the tip of the chain. Alternatively, you can set `wait_for_block_when_at_tip` to get the subscriber to ask algod to tell it when there is a new block ready to reduce latency when it’s caught up to the tip of the chain.
`arc28_events` are any [ARC-28 event definitions](subscriptions#arc-28-events).
Filters defines the different subscription(s) you want to make, and is defined by the following interface:
```python
class NamedTransactionFilter(TypedDict):
"""Specify a named filter to apply to find transactions of interest."""
name: str
"""The name to give the filter."""
filter: TransactionFilter
"""The filter itself."""
class SubscriberConfigFilter(NamedTransactionFilter):
"""A single event to subscribe to / emit."""
mapper: NotRequired[Callable[[list['SubscribedTransaction']], list[Any]]]
"""
An optional data mapper if you want the event data to take a certain shape when subscribing to events with this filter name.
"""
```
The event name is a unique name that describes the event you are subscribing to. The [filter](subscriptions#transactionfilter) defines how to interpret transactions on the chain as being “collected” by that event and the mapper is an optional ability to map from the raw transaction to a more targeted type for your event subscribers to consume.
## Subscribing to events
Once you have created the `AlgorandSubscriber`, you can register handlers/listeners for the filters you have defined, or each poll as a whole batch.
You can do this via the `on`, `on_batch` and `on_poll` methods:
```python
def on(self, filter_name: str, listener: EventListener) -> 'AlgorandSubscriber':
"""
Register an event handler to run on every subscribed transaction matching the given filter name.
"""
def on_batch(self, filter_name: str, listener: EventListener) -> 'AlgorandSubscriber':
"""
Register an event handler to run on all subscribed transactions matching the given filter name
for each subscription poll.
"""
def on_before_poll(self, listener: EventListener) -> 'AlgorandSubscriber':
"""
Register an event handler to run before each subscription poll.
"""
def on_poll(self, listener: EventListener) -> 'AlgorandSubscriber':
"""
Register an event handler to run after each subscription poll.
"""
def on_error(self, listener: EventListener) -> 'AlgorandSubscriber':
"""
Register an event handler to run when an error occurs.
"""
```
The `EventListener` type is defined as:
```python
EventListener = Callable[[SubscribedTransaction, str], None]
"""
A function that takes a SubscribedTransaction and the event name.
"""
```
When you define an event listener it will be called, one-by-one in the order the registrations occur.
If you call `on_batch` it will be called first, with the full set of transactions that were found in the current poll (0 or more). Following that, each transaction in turn will then be passed to the listener(s) that subscribed with `on` for that event.
The default type that will be received is a `SubscribedTransaction`, which can be imported like so:
```python
from algokit_subscriber import SubscribedTransaction
```
See the [detail about this type](subscriptions#subscribedtransaction).
Alternatively, if you defined a mapper against the filter then it will be applied before passing the objects through.
If you call `on_poll` it will be called last (after all `on` and `on_batch` listeners) for each poll, with the full set of transactions for that poll and [metadata about the poll result](./subscriptions#transactionsubscriptionresult). This allows you to process the entire poll batch in one transaction or have a hook to call after processing individual listeners (e.g. to commit a transaction).
If you want to run code before a poll starts (e.g. to log or start a transaction) you can do so with `on_before_poll`.
## Poll the chain
There are two methods to poll the chain for events: `pollOnce` and `start`:
```python
def poll_once(self) -> TransactionSubscriptionResult:
"""
Execute a single subscription poll.
"""
def start(self, inspect: Callable | None = None, suppress_log: bool = False) -> None: # noqa: FBT001, FBT002
"""
Start the subscriber in a loop until `stop` is called.
This is useful when running in the context of a long-running process / container.
If you want to inspect or log what happens under the covers you can pass in an `inspect` callable that will be called for each poll.
"""
```
`poll_once` is useful when you want to take control of scheduling the different polls, such as when running a Lambda on a schedule or a process via cron, etc. - it will do a single poll of the chain and return the result of that poll.
`start` is useful when you have a long-running process or container and you want it to loop infinitely at the specified polling frequency from the constructor config. If you want to inspect or log what happens under the covers you can pass in an `inspect` lambda that will be called for each poll.
If you use `start` then you can stop the polling by calling `stop`, which will ensure everything is cleaned up nicely.
## Handling errors
To handle errors, you can register error handlers/listeners using the `on_error` method. This works in a similar way to the other `on*` methods.
When no error listeners have been registered, a default listener is used to re-throw any exception, so they can be caught by global uncaught exception handlers. Once an error listener has been registered, the default listener is removed and it’s the responsibility of the registered error listener to perform any error handling.
## Examples
See the [main README](../README#examples).
# get_subscribed_transactions
`get_subscribed_transactions` is the core building block at the centre of this library. It’s a simple, but flexible mechanism that allows you to enact a single subscription “poll” of the Algorand blockchain.
This is a lower level building block, you likely don’t want to use it directly, but instead use the [`AlgorandSubscriber` class](./subscriber.ts).
You can use this method to orchestrate everything from an index of all relevant data from the start of the chain through to simply subscribing to relevant transactions as they emerge at the tip of the chain. It allows you to have reliable at least once delivery even if your code has outages through the use of watermarking.
```python
def get_subscribed_transactions(
subscription: TransactionSubscriptionParams,
algod: AlgodClient,
indexer: IndexerClient | None = None
) -> TransactionSubscriptionResult:
"""
Executes a single pull/poll to subscribe to transactions on the configured Algorand
blockchain for the given subscription context.
"""
```
## TransactionSubscriptionParams
Specifying a subscription requires passing in a `TransactionSubscriptionParams` object, which configures the behaviour:
```python
class CoreTransactionSubscriptionParams(TypedDict):
filters: list['NamedTransactionFilter']
"""The filter(s) to apply to find transactions of interest."""
arc28_events: NotRequired[list['Arc28EventGroup']]
"""Any ARC-28 event definitions to process from app call logs"""
max_rounds_to_sync: NotRequired[int | None]
"""
The maximum number of rounds to sync from algod for each subscription pull/poll.
Defaults to 500.
"""
max_indexer_rounds_to_sync: NotRequired[int | None]
"""
The maximum number of rounds to sync from indexer when using `sync_behaviour: 'catchup-with-indexer'`.
"""
sync_behaviour: str
"""
If the current tip of the configured Algorand blockchain is more than `max_rounds_to_sync`
past `watermark` then how should that be handled.
"""
class TransactionSubscriptionParams(CoreTransactionSubscriptionParams):
watermark: int
"""
The current round watermark that transactions have previously been synced to.
"""
current_round: NotRequired[int]
"""
The current tip of the configured Algorand blockchain.
If not provided, it will be resolved on demand.
"""
```
## TransactionFilter
The [`filters` parameter](#transactionsubscriptionparams) allows you to specify a set of filters to return a subset of transactions you are interested in. Each filter contains a `filter` property of type `TransactionFilter`, which matches the following type:
```typescript
class TransactionFilter(TypedDict):
type: NotRequired[str | list[str]]
"""Filter based on the given transaction type(s)."""
sender: NotRequired[str | list[str]]
"""Filter to transactions sent from the specified address(es)."""
receiver: NotRequired[str | list[str]]
"""Filter to transactions being received by the specified address(es)."""
note_prefix: NotRequired[str | bytes]
"""Filter to transactions with a note having the given prefix."""
app_id: NotRequired[int | list[int]]
"""Filter to transactions against the app with the given ID(s)."""
app_create: NotRequired[bool]
"""Filter to transactions that are creating an app."""
app_on_complete: NotRequired[str | list[str]]
"""Filter to transactions that have given on complete(s)."""
asset_id: NotRequired[int | list[int]]
"""Filter to transactions against the asset with the given ID(s)."""
asset_create: NotRequired[bool]
"""Filter to transactions that are creating an asset."""
min_amount: NotRequired[int]
"""
Filter to transactions where the amount being transferred is greater
than or equal to the given minimum (microAlgos or decimal units of an ASA if type: axfer).
"""
max_amount: NotRequired[int]
"""
Filter to transactions where the amount being transferred is less than
or equal to the given maximum (microAlgos or decimal units of an ASA if type: axfer).
"""
method_signature: NotRequired[str | list[str]]
"""
Filter to app transactions that have the given ARC-0004 method selector(s) for
the given method signature as the first app argument.
"""
app_call_arguments_match: NotRequired[Callable[[list[bytes] | None], bool]]
"""Filter to app transactions that meet the given app arguments predicate."""
arc28_events: NotRequired[list[dict[str, str]]]
"""
Filter to app transactions that emit the given ARC-28 events.
Note: the definitions for these events must be passed in to the subscription config via `arc28_events`.
"""
balance_changes: NotRequired[list[dict[str, Union[int, list[int], str, list[str], 'BalanceChangeRole', list['BalanceChangeRole']]]]]
"""Filter to transactions that result in balance changes that match one or more of the given set of balance changes."""
custom_filter: NotRequired[Callable[[TransactionResult], bool]]
"""Catch-all custom filter to filter for things that the rest of the filters don't provide."""
```
Each filter you provide within this type will apply an AND logic between the specified filters, e.g.
```typescript
"filter": {
"type": "axfer",
"sender": "ABC..."
}
```
Will return transactions that are `axfer` type AND have a sender of `"ABC..."`.
### NamedTransactionFilter
You can specify multiple filters in an array, where each filter is a `NamedTransactionFilter`, which consists of:
```python
class NamedTransactionFilter(TypedDict):
"""Specify a named filter to apply to find transactions of interest."""
name: str
"""The name to give the filter."""
filter: TransactionFilter
"""The filter itself."""
```
This gives you the ability to detect which filter got matched when a transaction is returned, noting that you can use the same name multiple times if there are multiple filters (aka OR logic) that comprise the same logical filter.
## Arc28EventGroup
The [`arc28_events` parameter](#transactionsubscriptionparams) allows you to define any ARC-28 events that may appear in subscribed transactions so they can either be subscribed to, or be processed and added to the resulting [subscribed transaction object](#subscribedtransaction).
## TransactionSubscriptionResult
The result of calling `get_subscribed_transactions` is a `TransactionSubscriptionResult`:
```python
class TransactionSubscriptionResult(TypedDict):
"""The result of a single subscription pull/poll."""
synced_round_range: tuple[int, int]
"""The round range that was synced from/to"""
current_round: int
"""The current detected tip of the configured Algorand blockchain."""
starting_watermark: int
"""The watermark value that was retrieved at the start of the subscription poll."""
new_watermark: int
"""
The new watermark value to persist for the next call to
`get_subscribed_transactions` to continue the sync.
Will be equal to `synced_round_range[1]`. Only persist this
after processing (or in the same atomic transaction as)
subscribed transactions to keep it reliable.
"""
subscribed_transactions: list['SubscribedTransaction']
"""
Any transactions that matched the given filter within
the synced round range. This substantively uses the indexer transaction
format to represent the data with some additional fields.
"""
block_metadata: NotRequired[list['BlockMetadata']]
"""
The metadata about any blocks that were retrieved from algod as part
of the subscription poll.
"""
class BlockMetadata(TypedDict):
"""Metadata about a block that was retrieved from algod."""
hash: NotRequired[str | None]
"""The base64 block hash."""
round: int
"""The round of the block."""
timestamp: int
"""Block creation timestamp in seconds since epoch"""
genesis_id: str
"""The genesis ID of the chain."""
genesis_hash: str
"""The base64 genesis hash of the chain."""
previous_block_hash: NotRequired[str | None]
"""The base64 previous block hash."""
seed: str
"""The base64 seed of the block."""
rewards: NotRequired['BlockRewards']
"""Fields relating to rewards"""
parent_transaction_count: int
"""Count of parent transactions in this block"""
full_transaction_count: int
"""Full count of transactions and inner transactions (recursively) in this block."""
txn_counter: int
"""Number of the next transaction that will be committed after this block. It is 0 when no transactions have ever been committed (since TxnCounter started being supported)."""
transactions_root: str
"""
Root of transaction merkle tree using SHA512_256 hash function.
This commitment is computed based on the PaysetCommit type specified in the block's consensus protocol.
"""
transactions_root_sha256: str
"""
TransactionsRootSHA256 is an auxiliary TransactionRoot, built using a vector commitment instead of a merkle tree, and SHA256 hash function instead of the default SHA512_256. This commitment can be used on environments where only the SHA256 function exists.
"""
upgrade_state: NotRequired['BlockUpgradeState']
"""Fields relating to a protocol upgrade."""
```
## SubscribedTransaction
The common model used to expose a transaction that is returned from a subscription is a `SubscribedTransaction`, which can be imported like so:
```python
from algokit_subscriber import SubscribedTransaction
```
This type is substantively, based on the Indexer [`TransactionResult`](https://github.com/algorandfoundation/algokit-utils-ts/blob/main/src/types/indexer.ts#L77) [model](https://dev.algorand.co/reference/rest-apis/indexer#transaction) format. While the indexer type is used, the subscriber itself doesn’t have to use indexer - any transactions it retrieves from algod are transformed to this common model type. Beyond the indexer type it has some modifications to:
* Add the `parent_transaction_id` field so inner transactions have a reference to their parent
* Override the type of `inner-txns` to be `SubscribedTransaction[]` so inner transactions (recursively) get these extra fields too
* Add emitted ARC-28 events via `arc28_events`
* The list of filter(s) that caused the transaction to be matched
The definition of the type is:
```python
TransactionResult = TypedDict("TransactionResult", {
"id": str,
"tx-type": str,
"fee": int,
"sender": str,
"first-valid": int,
"last-valid": int,
"confirmed-round": NotRequired[int],
"group": NotRequired[None | str],
"note": NotRequired[str],
"logs": NotRequired[list[str]],
"round-time": NotRequired[int],
"intra-round-offset": NotRequired[int],
"signature": NotRequired['TransactionSignature'],
"application-transaction": NotRequired['ApplicationTransactionResult'],
"created-application-index": NotRequired[None | int],
"asset-config-transaction": NotRequired['AssetConfigTransactionResult'],
"created-asset-index": NotRequired[None | int],
"asset-freeze-transaction": NotRequired['AssetFreezeTransactionResult'],
"asset-transfer-transaction": NotRequired['AssetTransferTransactionResult'],
"keyreg-transaction": NotRequired['KeyRegistrationTransactionResult'],
"payment-transaction": NotRequired['PaymentTransactionResult'],
"state-proof-transaction": NotRequired['StateProofTransactionResult'],
"auth-addr": NotRequired[None | str],
"closing-amount": NotRequired[None | int],
"genesis-hash": NotRequired[str],
"genesis-id": NotRequired[str],
"inner-txns": NotRequired[list['TransactionResult']],
"rekey-to": NotRequired[str],
"lease": NotRequired[str],
"local-state-delta": NotRequired[list[dict]],
"global-state-delta": NotRequired[list[dict]],
"receiver-rewards": NotRequired[int],
"sender-rewards": NotRequired[int],
"close-rewards": NotRequired[int]
})
class SubscribedTransaction(TransactionResult):
"""
The common model used to expose a transaction that is returned from a subscription.
Substantively, based on the Indexer `TransactionResult` model format with some modifications to:
* Add the `parent_transaction_id` field so inner transactions have a reference to their parent
* Override the type of `inner_txns` to be `SubscribedTransaction[]` so inner transactions (recursively) get these extra fields too
* Add emitted ARC-28 events via `arc28_events`
* Balance changes in algo or assets
"""
parent_transaction_id: NotRequired[None | str]
"""The transaction ID of the parent of this transaction (if it's an inner transaction)."""
inner_txns: NotRequired[list['SubscribedTransaction']]
"""Inner transactions produced by application execution."""
arc28_events: NotRequired[list[EmittedArc28Event]]
"""Any ARC-28 events emitted from an app call."""
filters_matched: NotRequired[list[str]]
"""The names of any filters that matched the given transaction to result in it being 'subscribed'."""
balance_changes: NotRequired[list['BalanceChange']]
"""The balance changes in the transaction."""
class BalanceChange(TypedDict):
"""Represents a balance change effect for a transaction."""
address: str
"""The address that the balance change is for."""
asset_id: int
"""The asset ID of the balance change, or 0 for Algos."""
amount: int
"""The amount of the balance change in smallest divisible unit or microAlgos."""
roles: list['BalanceChangeRole']
"""The roles the account was playing that led to the balance change"""
class Arc28EventToProcess(TypedDict):
"""
Represents an ARC-28 event to be processed.
"""
group_name: str
"""The name of the ARC-28 event group the event belongs to"""
event_name: str
"""The name of the ARC-28 event that was triggered"""
event_signature: str
"""The signature of the event e.g. `EventName(type1,type2)`"""
event_prefix: str
"""The 4-byte hex prefix for the event"""
event_definition: Arc28Event
"""The ARC-28 definition of the event"""
class EmittedArc28Event(Arc28EventToProcess):
"""
Represents an ARC-28 event that was emitted.
"""
args: list[Any]
"""The ordered arguments extracted from the event that was emitted"""
args_by_name: dict[str, Any]
"""The named arguments extracted from the event that was emitted (where the arguments had a name defined)"""
```
## Examples
Here are some examples of how to use this method:
### Real-time notification of transactions of interest at the tip of the chain discarding stale records
If you ran the following code on a cron schedule of (say) every 5 seconds it would notify you every time the account (in this case the Data History Museum TestNet account `ER7AMZRPD5KDVFWTUUVOADSOWM4RQKEEV2EDYRVSA757UHXOIEKGMBQIVU`) sent a transaction. If the service stopped working for a period of time and fell behind then it would drop old records and restart notifications from the new tip.
```python
from algokit_subscriber import AlgorandSubscriber, SubscribedTransaction
from algokit_utils.beta.algorand_client import AlgorandClient
algorand = AlgorandClient.test_net()
watermark = 0
def get_watermark() -> int:
return watermark
def set_watermark(new_watermark: int) -> None:
global watermark # noqa: PLW0603
watermark = new_watermark
subscriber = AlgorandSubscriber(algod_client=algorand.client.algod, config={
'filters': [
{
'name': 'filter1',
'filter': {
'sender': 'ER7AMZRPD5KDVFWTUUVOADSOWM4RQKEEV2EDYRVSA757UHXOIEKGMBQIVU'
}
}
],
'wait_for_block_when_at_tip': True,
'watermark_persistence': {
'get': get_watermark,
'set': set_watermark
},
'sync_behaviour': 'skip-sync-newest',
'max_rounds_to_sync': 100
})
def notify_transactions(transaction: SubscribedTransaction, _: str) -> None:
# Implement your notification logic here
print(f"New transaction from {transaction['sender']}") # noqa: T201
subscriber.on('filter1', notify_transactions)
subscriber.start()
```
### Real-time notification of transactions of interest at the tip of the chain with at least once delivery
If you ran the following code on a cron schedule of (say) every 5 seconds it would notify you every time the account (in this case the Data History Museum TestNet account `ER7AMZRPD5KDVFWTUUVOADSOWM4RQKEEV2EDYRVSA757UHXOIEKGMBQIVU`) sent a transaction. If the service stopped working for a period of time and fell behind then it would pick up where it left off and catch up using algod (note: you need to connect it to a archival node).
```python
from algokit_subscriber import AlgorandSubscriber, SubscribedTransaction
from algokit_utils.beta.algorand_client import AlgorandClient
algorand = AlgorandClient.test_net()
watermark = 0
def get_watermark() -> int:
return watermark
def set_watermark(new_watermark: int) -> None:
global watermark # noqa: PLW0603
watermark = new_watermark
subscriber = AlgorandSubscriber(algod_client=algorand.client.algod, config={
'filters': [
{
'name': 'filter1',
'filter': {
'sender': 'ER7AMZRPD5KDVFWTUUVOADSOWM4RQKEEV2EDYRVSA757UHXOIEKGMBQIVU'
}
}
],
'wait_for_block_when_at_tip': True,
'watermark_persistence': {
'get': get_watermark,
'set': set_watermark
},
'sync_behaviour': 'sync-oldest-start-now',
'max_rounds_to_sync': 100
})
def notify_transactions(transaction: SubscribedTransaction, _: str) -> None:
# Implement your notification logic here
print(f"New transaction from {transaction['sender']}") # noqa: T201
subscriber.on('filter1', notify_transactions)
subscriber.start()
```
### Quickly building a reliable, up-to-date cache index of all transactions of interest from the beginning of the chain
If you ran the following code on a cron schedule of (say) every 30 - 60 seconds it would create a cached index of all assets created by the account (in this case the Data History Museum TestNet account `ER7AMZRPD5KDVFWTUUVOADSOWM4RQKEEV2EDYRVSA757UHXOIEKGMBQIVU`). Given it uses indexer to catch up you can deploy this into a fresh environment with an empty database and it will catch up in seconds rather than days.
```python
from algokit_subscriber import AlgorandSubscriber, SubscribedTransaction
from algokit_utils.beta.algorand_client import AlgorandClient
algorand = AlgorandClient.test_net()
watermark = 0
def get_watermark() -> int:
return watermark
def set_watermark(new_watermark: int) -> None:
global watermark # noqa: PLW0603
watermark = new_watermark
def save_transactions(transactions: list[SubscribedTransaction]) -> None:
# Implement your logic to save transactions here
pass
subscriber = AlgorandSubscriber(algod_client=algorand.client.algod, indexer_client=algorand.client.indexer, config={
'filters': [
{
'name': 'filter1',
'filter': {
'type': 'acfg',
'sender': 'ER7AMZRPD5KDVFWTUUVOADSOWM4RQKEEV2EDYRVSA757UHXOIEKGMBQIVU',
'asset_create': True
}
}
],
'wait_for_block_when_at_tip': True,
'watermark_persistence': {
'get': get_watermark,
'set': set_watermark
},
'sync_behaviour': 'catchup-with-indexer',
'max_rounds_to_sync': 1000
})
def process_transactions(transaction: SubscribedTransaction, _: str) -> None:
save_transactions([transaction])
subscriber.on('filter1', process_transactions)
subscriber.start()
```
# Algorand transaction subscription / indexing
## Quick start
```typescript
// Create subscriber
const subscriber = new AlgorandSubscriber(
{
filters: [
{
name: 'filter1',
filter: {
type: TransactionType.pay,
sender: 'ABC...',
},
},
],
/* ... other options (use intellisense to explore) */
},
algod,
optionalIndexer,
);
// Set up subscription(s)
subscriber.on('filter1', async transaction => {
// ...
});
//...
// Set up error handling
subscriber.onError(e => {
// ...
});
// Either: Start the subscriber (if in long-running process)
subscriber.start();
// OR: Poll the subscriber (if in cron job / periodic lambda)
subscriber.pollOnce();
```
## Capabilities
* [Quick start](#quick-start)
* [Capabilities](#capabilities)
* [Notification *and* indexing](#notification-and-indexing)
* [Low latency processing](#low-latency-processing)
* [Watermarking and resilience](#watermarking-and-resilience)
* [Extensive subscription filtering](#extensive-subscription-filtering)
* [ARC-28 event subscription and reads](#arc-28-event-subscription-and-reads)
* [First-class inner transaction support](#first-class-inner-transaction-support)
* [State-proof support](#state-proof-support)
* [Simple programming model](#simple-programming-model)
* [Easy to deploy](#easy-to-deploy)
* [Fast initial index](#fast-initial-index)
* [Entry points](#entry-points)
* [Reference docs](#reference-docs)
* [Emit ARC-28 events](#emit-arc-28-events)
* [Algorand Python](#algorand-python)
* [TealScript](#tealscript)
* [PyTEAL](#pyteal)
* [TEAL](#teal)
### Notification *and* indexing
This library supports the ability to stay at the tip of the chain and power notification / alerting type scenarios through the use of the `syncBehaviour` parameter in both [`AlgorandSubscriber`](./subscriber) and [`getSubscribedTransactions`](./subscriptions). For example to stay at the tip of the chain for notification/alerting scenarios you could do:
```typescript
const subscriber = new AlgorandSubscriber({syncBehaviour: 'skip-sync-newest', maxRoundsToSync: 100, ...}, ...)
// or:
getSubscribedTransactions({syncBehaviour: 'skip-sync-newest', maxRoundsToSync: 100, ...}, ...)
```
The `currentRound` parameter (availble when calling `getSubscribedTransactions`) can be used to set the tip of the chain. If not specified, the tip will be automatically detected. Whilst this is generally not needed, it is useful in scenarios where the tip is being detected as part of another process and you only want to sync to that point and no further.
The `maxRoundsToSync` parameter controls how many rounds it will process when first starting when it’s not caught up to the tip of the chain. While it’s caught up to the chain it will keep processing as many rounds as are available from the last round it processed to when it next tries to sync (see below for how to control that).
If you expect your service will resiliently always stay running, should never get more than `maxRoundsToSync` from the tip of the chain, there is a problem if it processes old records and you’d prefer it throws an error when losing track of the tip of the chain rather than continue or skip to newest you can set the `syncBehaviour` parameter to `fail`.
The `syncBehaviour` parameter can also be set to `sync-oldest-start-now` if you want to process all transactions once you start alerting/notifying. This requires that your service needs to keep running otherwise it could fall behind and start processing old records / take a while to catch back up with the tip of the chain. This is also a useful setting if you are creating an indexer that only needs to process from the moment the indexer is deployed rather than from the beginning of the chain. Note: this requires the [initial watermark](#watermarking-and-resilience) to start at 0 to work.
The `syncBehaviour` parameter can also be set to `sync-oldest`, which is a more traditional indexing scenario where you want to process every single block from the beginning of the chain. This can take a long time to process by default (e.g. days), noting there is a [fast catchup feature](#fast-initial-index). If you don’t want to start from the beginning of the chain you can [set the initial watermark](#watermarking-and-resilience) to a higher round number than 0 to start indexing from that point.
### Low latency processing
You can control the polling semantics of the library when using the [`AlgorandSubscriber`](./subscriber) by either specifying the `frequencyInSeconds` parameter to control the duration between polls or you can use the `waitForBlockWhenAtTip` parameter to indicate the subscriber should [call algod to ask it to inform the subscriber when a new round is available](https://dev.algorand.co/reference/rest-apis/algod/#waitforblock) so the subscriber can immediately process that round with a much lower-latency. When this mode is set, the subscriber intelligently uses this option only when it’s caught up to the tip of the chain, but otherwise uses `frequencyInSeconds` while catching up to the tip of the chain.
e.g.
```typescript
// When catching up to tip of chain will pool every 1s for the next 1000 blocks, but when caught up will poll algod for a new block so it can be processed immediately with low latency
const subscriber = new AlgorandSubscriber({frequencyInSeconds: 1, waitForBlockWhenAtTip: true, maxRoundsToSync: 1000, ...}, ...)
...
subscriber.start()
```
If you are using [`getSubscribedTransactions`](./subscriptions) or the `pollOnce` method on `AlgorandSubscriber` then you can use your infrastructure and/or surrounding orchestration code to take control of the polling duration.
If you want to manually run code that waits for a given round to become available you can execute the following algosdk code:
```typescript
await algod.statusAfterBlock(roundNumberToWaitFor).do();
```
It’s worth noting special care has been placed in the subscriber library to properly handle abort signalling. All asynchronous operations including algod polls and polling waits have abort signal handling in place so if you call `subscriber.stop()` at any point in time it should almost immediately, cleanly, exit and if you want to wait for the stop to finish you can `await subscriber.stop()`.
If you want to hook this up to Node.js process signals you can include code like this in your service entrypoint:
```typescript
['SIGINT', 'SIGTERM', 'SIGQUIT'].forEach(signal =>
process.on(signal, () => {
// eslint-disable-next-line no-console
console.log(`Received ${signal}; stopping subscriber...`);
subscriber.stop(signal);
}),
);
```
### Watermarking and resilience
You can create reliable syncing / indexing services through a simple round watermarking capability that allows you to create resilient syncing services that can recover from an outage.
This works through the use of the `watermarkPersistence` parameter in [`AlgorandSubscriber`](./subscriber) and `watermark` parameter in [`getSubscribedTransactions`](./subscriptions):
```typescript
async function getSavedWatermark(): Promise {
// Return the watermark from a persistence store e.g. database, redis, file system, etc.
}
async function saveWatermark(newWatermark: bigint): Promise {
// Save the watermark to a persistence store e.g. database, redis, file system, etc.
}
...
const subscriber = new AlgorandSubscriber({watermarkPersistence: {
get: getSavedWatermark, set: saveWatermark
}, ...}, ...)
// or:
const watermark = await getSavedWatermark()
const result = await getSubscribedTransactions({watermark, ...}, ...)
await saveWatermark(result.newWatermark)
```
By using a persistence store, you can gracefully respond to an outage of your subscriber. The next time it starts it will pick back up from the point where it last persisted. It’s worth noting this provides at least once delivery semantics so you need to handle duplicate events.
Alternatively, if you want to create at most once delivery semantics you could use the [transactional outbox pattern](https://microservices.io/patterns/data/transactional-outbox.html) and wrap a unit of work from a ACID persistence store (e.g. a SQL database with a serializable or repeatable read transaction) around the watermark retrieval, transaction processing and watermark persistence so the processing of transactions and watermarking of a single poll happens in a single atomic transaction. In this model, you would then process the transactions in a separate process from the persistence store (and likely have a flag on each transaction to indicate if it has been processed or not). You would need to be careful to ensure that you only have one subscriber actively running at a time to guarantee this delivery semantic. To ensure resilience you may want to have multiple subscribers running, but a primary node that actually executes based on retrieval of a distributed semaphore / lease.
If you are doing a quick test or creating an ephemeral subscriber that just needs to exist in-memory and doesn’t need to recover resiliently (useful with `syncBehaviour` of `skip-sync-newest` for instance) then you can use an in-memory variable instead of a persistence store, e.g.:
```typescript
let watermark = 0
const subscriber = new AlgorandSubscriber({watermarkPersistence: {
get: () => watermark, set: (newWatermark: bigint) => watermark = newWatermark
}, ...}, ...)
// or:
let watermark = 0
const result = await getSubscribedTransactions({watermark, ...}, ...)
watermark = result.newWatermark
```
### Extensive subscription filtering
This library has extensive filtering options available to you so you can have fine-grained control over which transactions you are interested in.
There is a core type that is used to specify the filters [`TransactionFilter`](subscriptions#transactionfilter):
```typescript
const subscriber = new AlgorandSubscriber({filters: [{name: 'filterName', filter: {/* Filter properties */}}], ...}, ...)
// or:
getSubscribedTransactions({filters: [{name: 'filterName', filter: {/* Filter properties */}}], ... }, ...)
```
Currently this allows you filter based on any combination (AND logic) of:
* Transaction type e.g. `filter: { type: TransactionType.axfer }` or `filter: {type: [TransactionType.axfer, TransactionType.pay] }`
* Account (sender and receiver) e.g. `filter: { sender: "ABCDE..F" }` or `filter: { sender: ["ABCDE..F", "ZYXWV..A"] }` and `filter: { receiver: "12345..6" }` or `filter: { receiver: ["ABCDE..F", "ZYXWV..A"] }`
* Note prefix e.g. `filter: { notePrefix: "xyz" }`
* Apps
* ID e.g. `filter: { appId: 54321 }` or `filter: { appId: [54321, 12345] }`
* Creation e.g. `filter: { appCreate: true }`
* Call on-complete(s) e.g. `filter: { appOnComplete: ApplicationOnComplete.optin }` or `filter: { appOnComplete: [ApplicationOnComplete.optin, ApplicationOnComplete.noop] }`
* ARC4 method signature(s) e.g. `filter: { methodSignature: "MyMethod(uint64,string)" }` or `filter: { methodSignature: ["MyMethod(uint64,string)uint64", "MyMethod2(unit64)"] }`
* Call arguments e.g.
```typescript
filter: {
appCallArgumentsMatch: appCallArguments =>
appCallArguments.length > 1 &&
Buffer.from(appCallArguments[1]).toString('utf-8') === 'hello_world';
}
```
* Emitted ARC-28 event(s) e.g.
```typescript
filter: {
arc28Events: [{ groupName: 'group1', eventName: 'MyEvent' }];
}
```
Note: For this to work you need to [specify ARC-28 events in the subscription config](#arc-28-event-subscription-and-reads).
* Assets
* ID e.g. `filter: { assetId: 123456n }` or `filter: { assetId: [123456n, 456789n] }`
* Creation e.g. `filter: { assetCreate: true }`
* Amount transferred (min and/or max) e.g. `filter: { type: TransactionType.axfer, minAmount: 1, maxAmount: 100 }`
* Balance changes (asset ID, sender, receiver, close to, min and/or max change) e.g. `filter: { balanceChanges: [{assetId: [15345n, 36234n], roles: [BalanceChangeRole.sender], address: "ABC...", minAmount: 1, maxAmount: 2}]}`
* Algo transfers (pay transactions)
* Amount transferred (min and/or max) e.g. `filter: { type: TransactionType.pay, minAmount: 1, maxAmount: 100 }`
* Balance changes (sender, receiver, close to, min and/or max change) e.g. `filter: { balanceChanges: [{roles: [BalanceChangeRole.sender], address: "ABC...", minAmount: 1, maxAmount: 2}]}`
You can supply multiple, named filters via the [`NamedTransactionFilter`](subscriptions#namedtransactionfilter) type. When subscribed transactions are returned each transaction will have a `filtersMatched` property that will have an array of any filter(s) that caused that transaction to be returned. When using [`AlgorandSubscriber`](./subscriber), you can subscribe to events that are emitted with the filter name.
### ARC-28 event subscription and reads
You can [subscribe to ARC-28 events](#extensive-subscription-filtering) for a smart contract, similar to how you can [subscribe to events in Ethereum](https://docs.web3js.org/guides/events_subscriptions/).
Furthermore, you can receive any ARC-28 events that a smart contract call you subscribe to emitted in the [subscribed transaction object](subscriptions#subscribedtransaction).
Both subscription and receiving ARC-28 events work through the use of the `arc28Events` parameter in [`AlgorandSubscriber`](./subscriber) and [`getSubscribedTransactions`](./subscriptions):
```typescript
const group1Events: Arc28EventGroup = {
groupName: 'group1',
events: [
{
name: 'MyEvent',
args: [
{type: 'uint64'},
{type: 'string'},
]
}
]
}
const subscriber = new AlgorandSubscriber({arc28Events: [group1Events], ...}, ...)
// or:
const result = await getSubscribedTransactions({arc28Events: [group1Events], ...}, ...)
```
The `Arc28EventGroup` type has the following definition:
```typescript
/** Specifies a group of ARC-28 event definitions along with instructions for when to attempt to process the events. */
export interface Arc28EventGroup {
/** The name to designate for this group of events. */
groupName: string;
/** Optional list of app IDs that this event should apply to */
processForAppIds?: bigint[];
/** Optional predicate to indicate if these ARC-28 events should be processed for the given transaction */
processTransaction?: (transaction: TransactionResult) => boolean;
/** Whether or not to silently (with warning log) continue if an error is encountered processing the ARC-28 event data; default = false */
continueOnError?: boolean;
/** The list of ARC-28 event definitions */
events: Arc28Event[];
}
/**
* The definition of metadata for an ARC-28 event per https://github.com/algorandfoundation/ARCs/blob/main/ARCs/arc-0028#event.
*/
export interface Arc28Event {
/** The name of the event */
name: string;
/** Optional, user-friendly description for the event */
desc?: string;
/** The arguments of the event, in order */
args: Array<{
/** The type of the argument */
type: string;
/** Optional, user-friendly name for the argument */
name?: string;
/** Optional, user-friendly description for the argument */
desc?: string;
}>;
}
```
Each group allows you to apply logic to the applicability and processing of a set of events. This structure allows you to safely process the events from multiple contracts in the same subscriber, or perform more advanced filtering logic to event processing.
When specifying an [ARC-28 event filter](#extensive-subscription-filtering), you specify both the `groupName` and `eventName`(s) to narrow down what event(s) you want to subscribe to.
If you want to emit an ARC-28 event from your smart contract you can follow the [below code examples](#emit-arc-28-events).
### First-class inner transaction support
When you subscribe to transactions any subscriptions that cover an inner transaction will pick up that inner transaction and [return](subscriptions#subscribedtransaction) it to you correctly.
Note: the behaviour Algorand Indexer has is to return the parent transaction, not the inner transaction; this library will always return the actual transaction you subscribed to.
If you [receive](subscriptions#subscribedtransaction) an inner transaction then there will be a `parentTransactionId` field populated that allows you to see that it was an inner transaction and how to identify the parent transaction.
The `id` of an inner transaction will be set to `{parentTransactionId}/inner/{index-of-child-within-parent}` where `{index-of-child-within-parent}` is calculated based on uniquely walking the tree of potentially nested inner transactions. [This transaction in Allo.info](https://allo.info/tx/group/cHiEEvBCRGnUhz9409gHl%2Fvn00lYDZnJoppC3YexRr0%3D) is a good illustration of how inner transaction indexes are allocated (this library uses the same approach).
All [returned](subscriptions#subscribedtransaction) transactions will have an `inner-txns` property with any inner transactions of that transaction populated (recursively).
The `intra-round-offset` field in a [subscribed transaction or inner transaction within](subscriptions#subscribedtransaction) is calculated by walking the full tree depth-first from the first transaction in the block, through any inner transactions recursively starting from an index of 0. This algorithm matches the one in Algorand Indexer and ensures that all transactions have a unique index, but the top level transaction in the block don’t necessarily have a sequential index.
### State-proof support
You can subscribe to [state proof](https://dev.algorand.co/concepts/protocol/stateproofs) transactions using this subscriber library. At the time of writing state proof transactions are not supported by algosdk v2 and custom handling has been added to ensure this valuable type of transaction can be subscribed to.
The field level documentation of the [returned state proof transaction](subscriptions#subscribedtransaction) is comprehensively documented via [AlgoKit Utils](https://github.com/algorandfoundation/algokit-utils-ts/blob/main/src/types/indexer.ts#L277).
By exposing this functionality, this library can be used to create a [light client](https://dev.algorand.co/concepts/protocol/stateproofs).
### Simple programming model
This library is easy to use and consume through [easy to use, type-safe TypeScript methods and objects](#entry-points) and subscribed transactions have a [comprehensive and familiar model type](subscriptions#subscribedtransaction) with all relevant/useful information about that transaction (including things like transaction id, round number, created asset/app id, app logs, etc.) modelled on the indexer data model (which is used regardless of whether the transactions come from indexer or algod so it’s a consistent experience).
Furthermore, the `AlgorandSubscriber` class has a familiar programming model based on the [Node.js EventEmitter](https://nodejs.org/en/learn/asynchronous-work/the-nodejs-event-emitter), but with async methods.
For more examples of how to use it see the [relevant documentation](subscriber).
### Easy to deploy
Because the [entry points](#entry-points) of this library are simple TypeScript methods to execute it you simply need to run it in a valid JavaScript execution environment. For instance, you could run it within a web browser if you want a user facing app to show real-time transaction notifications in-app, or in a Node.js process running in the myriad of ways Node.js can be run.
Because of that, you have full control over how you want to deploy and use the subscriber; it will work with whatever persistence (e.g. sql, no-sql, etc.), queuing/messaging (e.g. queues, topics, buses, web hooks, web sockets) and compute (e.g. serverless periodic lambdas, continually running containers, virtual machines, etc.) services you want to use.
### Fast initial index
When [subscribing to the chain](#notification-and-indexing) for the purposes of building an index you often will want to start at the beginning of the chain or a substantial time in the past when the given solution you are subscribing for started.
This kind of catch up takes days to process since algod only lets you retrieve a single block at a time and retrieving a block takes 0.5-1s. Given there are millions of blocks in MainNet it doesn’t take long to do the math to see why it takes so long to catch up.
This subscriber library has a unique, optional indexer catch up mode that allows you to use indexer to catch up to the tip of the chain in seconds or minutes rather than days for your specific filter.
This is really handy when you are doing local development or spinning up a new environment and don’t want to wait for days.
To make use of this feature, you need to set the `syncBehaviour` config to `catchup-with-indexer` and ensure that you pass `indexer` in to the [entry point](#entry-points) along with `algod`.
Any [filter](#extensive-subscription-filtering) you apply will be seamlessly translated to indexer searches to get the historic transactions in the most efficient way possible based on the apis indexer exposes. Once the subscriber is within `maxRoundsToSync` of the tip of the chain it will switch to subscribing using `algod`.
To see this in action, you can run the Data History Museum example in this repository against MainNet and see it sync millions of rounds in seconds.
The indexer catchup isn’t magic - if the filter you are trying to catch up with generates an enormous number of transactions (e.g. hundreds of thousands or millions) then it will run very slowly and has the potential for running out of compute and memory time depending on what the constraints are in the deployment environment you are running in. In that instance though, there is a config parameter you can use `maxIndexerRoundsToSync` so you can break the indexer catchup into multiple “polls” e.g. 100,000 rounds at a time. This allows a smaller batch of transactions to be retrieved and persisted in multiple batches.
To understand how the indexer behaviour works to know if you are likely to generate a lot of transactions it’s worth understanding the architecture of the indexer catchup; indexer catchup runs in two stages:
1. **Pre-filtering**: Any filters that can be translated to the [indexer search transactions endpoint](https://dev.algorand.co/reference/rest-apis/indexer#transaction). This query is then run between the rounds that need to be synced and paginated in the max number of results (1000) at a time until all of the transactions are retrieved. This ensures we get round-based transactional consistency. This is the filter that can easily explode out though and take a long time when using indexer catchup. For avoidance of doubt, the following filters are the ones that are converted to a pre-filter:
* `sender` (single value)
* `receiver` (single value)
* `type` (single value)
* `notePrefix`
* `appId` (single value)
* `assetId` (single value)
* `minAmount` (and `type = pay` or `assetId` provided)
* `maxAmount` (and `maxAmount < Number.MAX_SAFE_INTEGER` and `type = pay` or (`assetId` provided and `minAmount > 0`))
2. **Post-filtering**: All remaining filters are then applied in-memory to the resulting list of transactions that are returned from the pre-filter before being returned as subscribed transactions.
## Entry points
There are two entry points into the subscriber functionality. The lower level [`getSubscribedTransactions`](./subscriptions) method that contains the raw subscription logic for a single “poll”, and the [`AlgorandSubscriber`](./subscriber) class that provides a higher level interface that is easier to use and takes care of a lot more orchestration logic for you (particularly around the ability to continuously poll).
Both are first-class supported ways of using this library, but we generally recommend starting with the `AlgorandSubscriber` since it’s easier to use and will cover the majority of use cases.
## Reference docs
[See reference docs](./code/README).
## Emit ARC-28 events
To emit ARC-28 events from your smart contract you can use the following syntax.
### Algorand Python
```python
@arc4.abimethod
def emit_swapped(self, a: arc4.UInt64, b: arc4.UInt64) -> None:
arc4.emit("MyEvent", a, b)
```
OR:
```python
class MyEvent(arc4.Struct):
a: arc4.String
b: arc4.UInt64
# ...
@arc4.abimethod
def emit_swapped(self, a: arc4.String, b: arc4.UInt64) -> None:
arc4.emit(MyEvent(a, b))
```
### TealScript
```typescript
MyEvent = new EventLogger<{
stringField: string
intField: uint64
}>();
// ...
this.MyEvent.log({
stringField: "a"
intField: 2
})
```
### PyTEAL
```python
class MyEvent(pt.abi.NamedTuple):
stringField: pt.abi.Field[pt.abi.String]
intField: pt.abi.Field[pt.abi.Uint64]
# ...
@app.external()
def myMethod(a: pt.abi.String, b: pt.abi.Uint64) -> pt.Expr:
# ...
return pt.Seq(
# ...
(event := MyEvent()).set(a, b),
pt.Log(pt.Concat(pt.MethodSignature("MyEvent(byte[],uint64)"), event._stored_value.load())),
pt.Approve(),
)
```
Note: if your event doesn’t have any dynamic ARC-4 types in it then you can simplify that to something like this:
```python
pt.Log(pt.Concat(pt.MethodSignature("MyEvent(byte[],uint64)"), a.get(), pt.Itob(b.get()))),
```
### TEAL
```teal
method "MyEvent(byte[],uint64)"
frame_dig 0 // or any other command to put the ARC-4 encoded bytes for the event on the stack
concat
log
```
# AlgorandSubscriber
`AlgorandSubscriber` is a class that allows you to easily subscribe to the Algorand Blockchain, define a series of events that you are interested in, and react to those events. It has a similar programming model to [EventEmitter](https://nodejs.org/docs/latest/api/events.html), but also supports async/await.
## Creating a subscriber
To create an `AlgorandSubscriber` you can use the constructor:
```typescript
/**
* Create a new `AlgorandSubscriber`.
* @param config The subscriber configuration
* @param algod An algod client
* @param indexer An (optional) indexer client; only needed if `subscription.syncBehaviour` is `catchup-with-indexer`
*/
constructor(config: AlgorandSubscriberConfig, algod: Algodv2, indexer?: Indexer)
```
The key configuration is the `AlgorandSubscriberConfig` interface:
````typescript
/** Configuration for an `AlgorandSubscriber`. */
export interface AlgorandSubscriberConfig extends CoreTransactionSubscriptionParams {
/** The set of filters to subscribe to / emit events for, along with optional data mappers. */
filters: SubscriberConfigFilter[];
/** The frequency to poll for new blocks in seconds; defaults to 1s */
frequencyInSeconds?: number;
/** Whether to wait via algod `/status/wait-for-block-after` endpoint when at the tip of the chain; reduces latency of subscription */
waitForBlockWhenAtTip?: boolean;
/** Methods to retrieve and persist the current watermark so syncing is resilient and maintains
* its position in the chain */
watermarkPersistence: {
/** Returns the current watermark that syncing has previously been processed to */
get: () => Promise;
/** Persist the new watermark that has been processed */
set: (newWatermark: bigint) => Promise;
};
}
/** Common parameters to control a single subscription pull/poll for both `AlgorandSubscriber` and `getSubscribedTransactions`. */
export interface CoreTransactionSubscriptionParams {
/** The filter(s) to apply to find transactions of interest.
* A list of filters with corresponding names.
*
* @example
* ```typescript
* filter: [{
* name: 'asset-transfers',
* filter: {
* type: TransactionType.axfer,
* //...
* }
* }, {
* name: 'payments',
* filter: {
* type: TransactionType.pay,
* //...
* }
* }]
* ```
*
*/
filters: NamedTransactionFilter[];
/** Any ARC-28 event definitions to process from app call logs */
arc28Events?: Arc28EventGroup[];
/** The maximum number of rounds to sync from algod for each subscription pull/poll.
*
* Defaults to 500.
*
* This gives you control over how many rounds you wait for at a time,
* your staleness tolerance when using `skip-sync-newest` or `fail`, and
* your catchup speed when using `sync-oldest`.
**/
maxRoundsToSync?: number;
/**
* The maximum number of rounds to sync from indexer when using `syncBehaviour: 'catchup-with-indexer'.
*
* By default there is no limit and it will paginate through all of the rounds.
* Sometimes this can result in an incredibly long catchup time that may break the service
* due to execution and memory constraints, particularly for filters that result in a large number of transactions.
*
* Instead, this allows indexer catchup to be split into multiple polls, each with a transactionally consistent
* boundary based on the number of rounds specified here.
*/
maxIndexerRoundsToSync?: number;
/** If the current tip of the configured Algorand blockchain is more than `maxRoundsToSync`
* past `watermark` then how should that be handled:
* * `skip-sync-newest`: Discard old blocks/transactions and sync the newest; useful
* for real-time notification scenarios where you don't care about history and
* are happy to lose old transactions.
* * `sync-oldest`: Sync from the oldest rounds forward `maxRoundsToSync` rounds
* using algod; note: this will be slow if you are starting from 0 and requires
* an archival node.
* * `sync-oldest-start-now`: Same as `sync-oldest`, but if the `watermark` is `0`
* then start at the current round i.e. don't sync historical records, but once
* subscribing starts sync everything; note: if it falls behind it requires an
* archival node.
* * `catchup-with-indexer`: Sync to round `currentRound - maxRoundsToSync + 1`
* using indexer (much faster than using algod for long time periods) and then
* use algod from there.
* * `fail`: Throw an error.
**/
syncBehaviour:
| 'skip-sync-newest'
| 'sync-oldest'
| 'sync-oldest-start-now'
| 'catchup-with-indexer'
| 'fail';
}
````
`watermarkPersistence` allows you to ensure reliability against your code having outages since you can persist the last block your code processed up to and then provide it again the next time your code runs.
`maxRoundsToSync` and `syncBehaviour` allow you to control the subscription semantics as your code falls behind the tip of the chain (either on first run or after an outage).
`frequencyInSeconds` allows you to control the polling frequency and by association your latency tolerance for new events once you’ve caught up to the tip of the chain. Alternatively, you can set `waitForBlockWhenAtTip` to get the subscriber to ask algod to tell it when there is a new block ready to reduce latency when it’s caught up to the tip of the chain.
`arc28Events` are any [ARC-28 event definitions](subscriptions#arc-28-events).
Filters defines the different subscription(s) you want to make, and is defined by the following interface:
```typescript
/** A single event to subscribe to / emit. */
export interface SubscriberConfigFilter extends NamedTransactionFilter {
/** An optional data mapper if you want the event data to take a certain shape when subscribing to events with this filter name.
*
* If not specified, then the event will simply receive a `SubscribedTransaction`.
*
* Note: if you provide multiple filters with the same name then only the mapper of the first matching filter will be used
*/
mapper?: (transaction: SubscribedTransaction[]) => Promise;
}
/** Specify a named filter to apply to find transactions of interest. */
export interface NamedTransactionFilter {
/** The name to give the filter. */
name: string;
/** The filter itself. */
filter: TransactionFilter;
}
```
The event name is a unique name that describes the event you are subscribing to. The [filter](subscriptions#transactionfilter) defines how to interpret transactions on the chain as being “collected” by that event and the mapper is an optional ability to map from the raw transaction to a more targeted type for your event subscribers to consume.
## Subscribing to events
Once you have created the `AlgorandSubscriber`, you can register handlers/listeners for the filters you have defined, or each poll as a whole batch.
You can do this via the `on`, `onBatch` and `onPoll` methods:
````typescript
/**
* Register an event handler to run on every subscribed transaction matching the given filter name.
*
* The listener can be async and it will be awaited if so.
* @example **Non-mapped**
* ```typescript
* subscriber.on('my-filter', async (transaction) => { console.log(transaction.id) })
* ```
* @example **Mapped**
* ```typescript
* new AlgorandSubscriber({filters: [{name: 'my-filter', filter: {...}, mapper: (t) => t.id}], ...}, algod)
* .on('my-filter', async (transactionId) => { console.log(transactionId) })
* ```
* @param filterName The name of the filter to subscribe to
* @param listener The listener function to invoke with the subscribed event
* @returns The subscriber so `on*` calls can be chained
*/
on(filterName: string, listener: TypedAsyncEventListener) {}
/**
* Register an event handler to run on all subscribed transactions matching the given filter name
* for each subscription poll.
*
* This is useful when you want to efficiently process / persist events
* in bulk rather than one-by-one.
*
* The listener can be async and it will be awaited if so.
* @example **Non-mapped**
* ```typescript
* subscriber.onBatch('my-filter', async (transactions) => { console.log(transactions.length) })
* ```
* @example **Mapped**
* ```typescript
* new AlgorandSubscriber({filters: [{name: 'my-filter', filter: {...}, mapper: (t) => t.id}], ...}, algod)
* .onBatch('my-filter', async (transactionIds) => { console.log(transactionIds) })
* ```
* @param filterName The name of the filter to subscribe to
* @param listener The listener function to invoke with the subscribed events
* @returns The subscriber so `on*` calls can be chained
*/
onBatch(filterName: string, listener: TypedAsyncEventListener) {}
/**
* Register an event handler to run before every subscription poll.
*
* This is useful when you want to do pre-poll logging or start a transaction etc.
*
* The listener can be async and it will be awaited if so.
* @example
* ```typescript
* subscriber.onBeforePoll(async (metadata) => { console.log(metadata.watermark) })
* ```
* @param listener The listener function to invoke with the pre-poll metadata
* @returns The subscriber so `on*` calls can be chained
*/
onBeforePoll(listener: TypedAsyncEventListener) {}
/**
* Register an event handler to run after every subscription poll.
*
* This is useful when you want to process all subscribed transactions
* in a transactionally consistent manner rather than piecemeal for each
* filter, or to have a hook that occurs at the end of each poll to commit
* transactions etc.
*
* The listener can be async and it will be awaited if so.
* @example
* ```typescript
* subscriber.onPoll(async (pollResult) => { console.log(pollResult.subscribedTransactions.length, pollResult.syncedRoundRange) })
* ```
* @param listener The listener function to invoke with the poll result
* @returns The subscriber so `on*` calls can be chained
*/
onPoll(listener: TypedAsyncEventListener) {}
````
The `TypedAsyncEventListener` type is defined as:
```typescript
type TypedAsyncEventListener = (event: T, eventName: string | symbol) => Promise | void;
```
This allows you to use async or sync event listeners.
When you define an event listener it will be called, one-by-one (and awaited) in the order the registrations occur.
If you call `onBatch` it will be called first, with the full set of transactions that were found in the current poll (0 or more). Following that, each transaction in turn will then be passed to the listener(s) that subscribed with `on` for that event.
The default type that will be received is a `SubscribedTransaction`, which can be imported like so:
```typescript
import type { SubscribedTransaction } from '@algorandfoundation/algokit-subscriber/types';
```
See the [detail about this type](subscriptions#subscribedtransaction).
Alternatively, if you defined a mapper against the filter then it will be applied before passing the objects through.
If you call `onPoll` it will be called last (after all `on` and `onBatch` listeners) for each poll, with the full set of transactions for that poll and [metadata about the poll result](./subscriptions#transactionsubscriptionresult). This allows you to process the entire poll batch in one transaction or have a hook to call after processing individual listeners (e.g. to commit a transaction).
If you want to run code before a poll starts (e.g. to log or start a transaction) you can do so with `onBeforePoll`.
## Poll the chain
There are two methods to poll the chain for events: `pollOnce` and `start`:
```typescript
/**
* Execute a single subscription poll.
*
* This is useful when executing in the context of a process
* triggered by a recurring schedule / cron.
* @returns The poll result
*/
async pollOnce(): Promise {}
/**
* Start the subscriber in a loop until `stop` is called.
*
* This is useful when running in the context of a long-running process / container.
* @param inspect A function that is called for each poll so the inner workings can be inspected / logged / etc.
* @returns An object that contains a promise you can wait for after calling stop
*/
start(inspect?: (pollResult: TransactionSubscriptionResult) => void, suppressLog?: boolean): void {}
```
`pollOnce` is useful when you want to take control of scheduling the different polls, such as when running a Lambda on a schedule or a process via cron, etc. - it will do a single poll of the chain and return the result of that poll.
`start` is useful when you have a long-running process or container and you want it to loop infinitely at the specified polling frequency from the constructor config. If you want to inspect or log what happens under the covers you can pass in an `inspect` lambda that will be called for each poll.
If you use `start` then you can stop the polling by calling `stop`, which can be awaited to wait until everything is cleaned up. You may want to subscribe to Node.JS kill signals to exit cleanly:
```typescript
['SIGINT', 'SIGTERM', 'SIGQUIT'].forEach(signal =>
process.on(signal, () => {
// eslint-disable-next-line no-console
console.log(`Received ${signal}; stopping subscriber...`);
subscriber.stop(signal).then(() => console.log('Subscriber stopped'));
}),
);
```
## Handling errors
Because `start` isn’t a blocking method, you can’t simply wrap it in a try/catch. To handle errors, you can register error handlers/listeners using the `onError` method. This works in a similar way to the other `on*` methods.
````typescript
/**
* Register an error handler to run if an error is thrown during processing or event handling.
*
* This is useful to handle any errors that occur and can be used to perform retries, logging or cleanup activities.
*
* The listener can be async and it will be awaited if so.
* @example
* ```typescript
* subscriber.onError((error) => { console.error(error) })
* ```
* @example
* ```typescript
* const maxRetries = 3
* let retryCount = 0
* subscriber.onError(async (error) => {
* retryCount++
* if (retryCount > maxRetries) {
* console.error(error)
* return
* }
* console.log(`Error occurred, retrying in 2 seconds (${retryCount}/${maxRetries})`)
* await new Promise((r) => setTimeout(r, 2_000))
* subscriber.start()
*})
* ```
* @param listener The listener function to invoke with the error that was thrown
* @returns The subscriber so `on*` calls can be chained
*/
onError(listener: ErrorListener) {}
````
The `ErrorListener` type is defined as:
```typescript
type ErrorListener = (error: unknown) => Promise | void;
```
This allows you to use async or sync error listeners.
Multiple error listeners can be added, and each will be called one-by-one (and awaited) in the order the registrations occur.
When no error listeners have been registered, a default listener is used to re-throw any exception, so they can be caught by global uncaught exception handlers. Once an error listener has been registered, the default listener is removed and it’s the responsibility of the registered error listener to perform any error handling.
## Examples
See the [main README](../README#examples).
# getSubscribedTransactions
`getSubscribedTransactions` is the core building block at the centre of this library. It’s a simple, but flexible mechanism that allows you to enact a single subscription “poll” of the Algorand blockchain.
This is a lower level building block, you likely don’t want to use it directly, but instead use the [`AlgorandSubscriber` class](./subscriber#creating-a-subscriber).
You can use this method to orchestrate everything from an index of all relevant data from the start of the chain through to simply subscribing to relevant transactions as they emerge at the tip of the chain. It allows you to have reliable at least once delivery even if your code has outages through the use of watermarking.
```typescript
/**
* Executes a single pull/poll to subscribe to transactions on the configured Algorand
* blockchain for the given subscription context.
* @param subscription The subscription context.
* @param algod An Algod client.
* @param indexer An optional indexer client, only needed when `onMaxRounds` is `catchup-with-indexer`.
* @returns The result of this subscription pull/poll.
*/
export async function getSubscribedTransactions(
subscription: TransactionSubscriptionParams,
algod: Algodv2,
indexer?: Indexer,
): Promise;
```
## TransactionSubscriptionParams
Specifying a subscription requires passing in a `TransactionSubscriptionParams` object, which configures the behaviour:
````typescript
/** Parameters to control a single subscription pull/poll. */
export interface TransactionSubscriptionParams {
/** The filter(s) to apply to find transactions of interest.
* A list of filters with corresponding names.
*
* @example
* ```typescript
* filter: [{
* name: 'asset-transfers',
* filter: {
* type: TransactionType.axfer,
* //...
* }
* }, {
* name: 'payments',
* filter: {
* type: TransactionType.pay,
* //...
* }
* }]
* ```
*
*/
filters: NamedTransactionFilter[];
/** Any ARC-28 event definitions to process from app call logs */
arc28Events?: Arc28EventGroup[];
/** The current round watermark that transactions have previously been synced to.
*
* Persist this value as you process transactions processed from this method
* to allow for resilient and incremental syncing.
*
* Syncing will start from `watermark + 1`.
*
* Start from 0 if you want to start from the beginning of time, noting that
* will be slow if `onMaxRounds` is `sync-oldest`.
**/
watermark: bigint;
/** The maximum number of rounds to sync for each subscription pull/poll.
*
* Defaults to 500.
*
* This gives you control over how many rounds you wait for at a time,
* your staleness tolerance when using `skip-sync-newest` or `fail`, and
* your catchup speed when using `sync-oldest`.
**/
maxRoundsToSync?: number;
/**
* The maximum number of rounds to sync from indexer when using `syncBehaviour: 'catchup-with-indexer'.
*
* By default there is no limit and it will paginate through all of the rounds.
* Sometimes this can result in an incredibly long catchup time that may break the service
* due to execution and memory constraints, particularly for filters that result in a large number of transactions.
*
* Instead, this allows indexer catchup to be split into multiple polls, each with a transactionally consistent
* boundary based on the number of rounds specified here.
*/
maxIndexerRoundsToSync?: number;
/** If the current tip of the configured Algorand blockchain is more than `maxRoundsToSync`
* past `watermark` then how should that be handled:
* * `skip-sync-newest`: Discard old blocks/transactions and sync the newest; useful
* for real-time notification scenarios where you don't care about history and
* are happy to lose old transactions.
* * `sync-oldest`: Sync from the oldest rounds forward `maxRoundsToSync` rounds
* using algod; note: this will be slow if you are starting from 0 and requires
* an archival node.
* * `sync-oldest-start-now`: Same as `sync-oldest`, but if the `watermark` is `0`
* then start at the current round i.e. don't sync historical records, but once
* subscribing starts sync everything; note: if it falls behind it requires an
* archival node.
* * `catchup-with-indexer`: Sync to round `currentRound - maxRoundsToSync + 1`
* using indexer (much faster than using algod for long time periods) and then
* use algod from there.
* * `fail`: Throw an error.
**/
syncBehaviour:
| 'skip-sync-newest'
| 'sync-oldest'
| 'sync-oldest-start-now'
| 'catchup-with-indexer'
| 'fail';
}
````
## TransactionFilter
The [`filters` parameter](#transactionsubscriptionparams) allows you to specify a set of filters to return a subset of transactions you are interested in. Each filter contains a `filter` property of type `TransactionFilter`, which matches the following type:
````typescript
/** Common parameters to control a single subscription pull/poll for both `AlgorandSubscriber` and `getSubscribedTransactions`. */
export interface CoreTransactionSubscriptionParams {
/** The filter(s) to apply to find transactions of interest.
* A list of filters with corresponding names.
*
* @example
* ```typescript
* filter: [{
* name: 'asset-transfers',
* filter: {
* type: TransactionType.axfer,
* //...
* }
* }, {
* name: 'payments',
* filter: {
* type: TransactionType.pay,
* //...
* }
* }]
* ```
*
*/
filters: NamedTransactionFilter[];
/** Any ARC-28 event definitions to process from app call logs */
arc28Events?: Arc28EventGroup[];
/** The maximum number of rounds to sync from algod for each subscription pull/poll.
*
* Defaults to 500.
*
* This gives you control over how many rounds you wait for at a time,
* your staleness tolerance when using `skip-sync-newest` or `fail`, and
* your catchup speed when using `sync-oldest`.
**/
maxRoundsToSync?: number;
/**
* The maximum number of rounds to sync from indexer when using `syncBehaviour: 'catchup-with-indexer'.
*
* By default there is no limit and it will paginate through all of the rounds.
* Sometimes this can result in an incredibly long catchup time that may break the service
* due to execution and memory constraints, particularly for filters that result in a large number of transactions.
*
* Instead, this allows indexer catchup to be split into multiple polls, each with a transactionally consistent
* boundary based on the number of rounds specified here.
*/
maxIndexerRoundsToSync?: number;
/** If the current tip of the configured Algorand blockchain is more than `maxRoundsToSync`
* past `watermark` then how should that be handled:
* * `skip-sync-newest`: Discard old blocks/transactions and sync the newest; useful
* for real-time notification scenarios where you don't care about history and
* are happy to lose old transactions.
* * `sync-oldest`: Sync from the oldest rounds forward `maxRoundsToSync` rounds
* using algod; note: this will be slow if you are starting from 0 and requires
* an archival node.
* * `sync-oldest-start-now`: Same as `sync-oldest`, but if the `watermark` is `0`
* then start at the current round i.e. don't sync historical records, but once
* subscribing starts sync everything; note: if it falls behind it requires an
* archival node.
* * `catchup-with-indexer`: Sync to round `currentRound - maxRoundsToSync + 1`
* using indexer (much faster than using algod for long time periods) and then
* use algod from there.
* * `fail`: Throw an error.
**/
syncBehaviour:
| 'skip-sync-newest'
| 'sync-oldest'
| 'sync-oldest-start-now'
| 'catchup-with-indexer'
| 'fail';
}
````
Each filter you provide within this type will apply an AND logic between the specified filters, e.g.
```typescript
filter: {
type: TransactionType.axfer,
sender: "ABC..."
}
```
Will return transactions that are `axfer` type AND have a sender of `"ABC..."`.
### NamedTransactionFilter
You can specify multiple filters in an array, where each filter is a `NamedTransactionFilter`, which consists of:
```typescript
/** Specify a named filter to apply to find transactions of interest. */
export interface NamedTransactionFilter {
/** The name to give the filter. */
name: string;
/** The filter itself. */
filter: TransactionFilter;
}
```
This gives you the ability to detect which filter got matched when a transaction is returned, noting that you can use the same name multiple times if there are multiple filters (aka OR logic) that comprise the same logical filter.
## Arc28EventGroup
The [`arc28Events` parameter](#transactionsubscriptionparams) allows you to define any ARC-28 events that may appear in subscribed transactions so they can either be subscribed to, or be processed and added to the resulting [subscribed transaction object](#subscribedtransaction).
## TransactionSubscriptionResult
The result of calling `getSubscribedTransactions` is a `TransactionSubscriptionResult`:
```typescript
/** The result of a single subscription pull/poll. */
export interface TransactionSubscriptionResult {
/** The round range that was synced from/to */
syncedRoundRange: [startRound: bigint, endRound: bigint];
/** The current detected tip of the configured Algorand blockchain. */
currentRound: bigint;
/** The watermark value that was retrieved at the start of the subscription poll. */
startingWatermark: bigint;
/** The new watermark value to persist for the next call to
* `getSubscribedTransactions` to continue the sync.
* Will be equal to `syncedRoundRange[1]`. Only persist this
* after processing (or in the same atomic transaction as)
* subscribed transactions to keep it reliable. */
newWatermark: bigint;
/** Any transactions that matched the given filter within
* the synced round range. This substantively uses the [indexer transaction
* format](hhttps://dev.algorand.co/reference/rest-apis/indexer#transaction)
* to represent the data with some additional fields.
*/
subscribedTransactions: SubscribedTransaction[];
/** The metadata about any blocks that were retrieved from algod as part
* of the subscription poll.
*/
blockMetadata?: BlockMetadata[];
}
/** Metadata about a block that was retrieved from algod. */
export interface BlockMetadata {
/** The base64 block hash. */
hash?: string;
/** The round of the block. */
round: bigint;
/** Block creation timestamp in seconds since epoch */
timestamp: number;
/** The genesis ID of the chain. */
genesisId: string;
/** The base64 genesis hash of the chain. */
genesisHash: string;
/** The base64 previous block hash. */
previousBlockHash?: string;
/** The base64 seed of the block. */
seed: string;
/** Fields relating to rewards */
rewards?: BlockRewards;
/** Count of parent transactions in this block */
parentTransactionCount: number;
/** Full count of transactions and inner transactions (recursively) in this block. */
fullTransactionCount: number;
/** Number of the next transaction that will be committed after this block. It is 0 when no transactions have ever been committed (since TxnCounter started being supported). */
txnCounter: bigint;
/** TransactionsRoot authenticates the set of transactions appearing in the block. More specifically, it's the root of a merkle tree whose leaves are the block's Txids, in lexicographic order. For the empty block, it's 0. Note that the TxnRoot does not authenticate the signatures on the transactions, only the transactions themselves. Two blocks with the same transactions but in a different order and with different signatures will have the same TxnRoot.
Pattern : "^(?:[A-Za-z0-9+/]{4})*(?:[A-Za-z0-9+/]{2}==\|[A-Za-z0-9+/]{3}=)?$" */
transactionsRoot: string;
/** TransactionsRootSHA256 is an auxiliary TransactionRoot, built using a vector commitment instead of a merkle tree, and SHA256 hash function instead of the default SHA512_256. This commitment can be used on environments where only the SHA256 function exists. */
transactionsRootSha256: string;
/** Fields relating to a protocol upgrade. */
upgradeState?: BlockUpgradeState;
/** Tracks the status of state proofs. */
stateProofTracking?: BlockStateProofTracking[];
/** Fields relating to voting for a protocol upgrade. */
upgradeVote?: BlockUpgradeVote;
/** Participation account data that needs to be checked/acted on by the network. */
participationUpdates?: ParticipationUpdates;
/** Address of the proposer of this block */
proposer?: string;
}
```
## SubscribedTransaction
The common model used to expose a transaction that is returned from a subscription is a `SubscribedTransaction`, which can be imported like so:
```typescript
import type { SubscribedTransaction } from '@algorandfoundation/algokit-subscriber/types';
```
This type is substantively, based on the `algosdk.indexerModels.Transaction`. While the indexer type is used, the subscriber itself doesn’t have to use indexer - any transactions it retrieves from algod are transformed to this common model type. Beyond the indexer type it has some modifications to:
* Make `id` required
* Add the `parentTransactionId` field so inner transactions have a reference to their parent
* Override the type of `innerTxns` to be `SubscribedTransaction[]` so inner transactions (recursively) get these extra fields too
* Add emitted ARC-28 events via `arc28Events`
* The list of filter(s) that caused the transaction to be matched
* The list of balanceChange(s) that occurred in the transaction
The definition of the type is:
```typescript
export class SubscribedTransaction extends algosdk.indexerModels.Transaction {
id: string;
/** The intra-round offset of the parent of this transaction (if it's an inner transaction). */
parentIntraRoundOffset?: number;
/** The transaction ID of the parent of this transaction (if it's an inner transaction). */
parentTransactionId?: string;
/** Inner transactions produced by application execution. */
innerTxns?: SubscribedTransaction[];
/** Any ARC-28 events emitted from an app call. */
arc28Events?: EmittedArc28Event[];
/** The names of any filters that matched the given transaction to result in it being 'subscribed'. */
filtersMatched?: string[];
/** The balance changes in the transaction. */
balanceChanges?: BalanceChange[];
constructor({
id,
parentIntraRoundOffset,
parentTransactionId,
innerTxns,
arc28Events,
filtersMatched,
balanceChanges,
...rest
}: Omit) {
super(rest);
this.id = id;
this.parentIntraRoundOffset = parentIntraRoundOffset;
this.parentTransactionId = parentTransactionId;
this.innerTxns = innerTxns;
this.arc28Events = arc28Events;
this.filtersMatched = filtersMatched;
this.balanceChanges = balanceChanges;
}
}
/** An emitted ARC-28 event extracted from an app call log. */
export interface EmittedArc28Event extends Arc28EventToProcess {
/** The ordered arguments extracted from the event that was emitted */
args: ABIValue[];
/** The named arguments extracted from the event that was emitted (where the arguments had a name defined) */
argsByName: Record;
}
/** An ARC-28 event to be processed */
export interface Arc28EventToProcess {
/** The name of the ARC-28 event group the event belongs to */
groupName: string;
/** The name of the ARC-28 event that was triggered */
eventName: string;
/** The signature of the event e.g. `EventName(type1,type2)` */
eventSignature: string;
/** The 4-byte hex prefix for the event */
eventPrefix: string;
/** The ARC-28 definition of the event */
eventDefinition: Arc28Event;
}
/** Represents a balance change effect for a transaction. */
export interface BalanceChange {
/** The address that the balance change is for. */
address: string;
/** The asset ID of the balance change, or 0 for Algos. */
assetId: bigint;
/** The amount of the balance change in smallest divisible unit or microAlgos. */
amount: bigint;
/** The roles the account was playing that led to the balance change */
roles: BalanceChangeRole[];
}
/** The role that an account was playing for a given balance change. */
export enum BalanceChangeRole {
/** Account was sending a transaction (sending asset and/or spending fee if asset `0`) */
Sender,
/** Account was receiving a transaction */
Receiver,
/** Account was having an asset amount closed to it */
CloseTo,
}
```
## Examples
Here are some examples of how to use this method:
### Real-time notification of transactions of interest at the tip of the chain discarding stale records
If you ran the following code on a cron schedule of (say) every 5 seconds it would notify you every time the account (in this case the Data History Museum TestNet account `ER7AMZRPD5KDVFWTUUVOADSOWM4RQKEEV2EDYRVSA757UHXOIEKGMBQIVU`) sent a transaction. If the service stopped working for a period of time and fell behind then it would drop old records and restart notifications from the new tip.
```typescript
const algorand = AlgorandClient.defaultLocalNet();
// You would need to implement getLastWatermark() to retrieve from a persistence store
const watermark = await getLastWatermark();
const subscription = await getSubscribedTransactions(
{
filters: [
{
name: 'filter1',
filter: {
sender: 'ER7AMZRPD5KDVFWTUUVOADSOWM4RQKEEV2EDYRVSA757UHXOIEKGMBQIVU',
},
},
],
watermark,
maxRoundsToSync: 100,
onMaxRounds: 'skip-sync-newest',
},
algorand.client.algod,
);
if (subscription.subscribedTransactions.length > 0) {
// You would need to implement notifyTransactions to action the transactions
await notifyTransactions(subscription.subscribedTransactions);
}
// You would need to implement saveWatermark to persist the watermark to the persistence store
await saveWatermark(subscription.newWatermark);
```
### Real-time notification of transactions of interest at the tip of the chain with at least once delivery
If you ran the following code on a cron schedule of (say) every 5 seconds it would notify you every time the account (in this case the Data History Museum TestNet account `ER7AMZRPD5KDVFWTUUVOADSOWM4RQKEEV2EDYRVSA757UHXOIEKGMBQIVU`) sent a transaction. If the service stopped working for a period of time and fell behind then it would pick up where it left off and catch up using algod (note: you need to connect it to a archival node).
```typescript
const algorand = AlgorandClient.defaultLocalNet();
// You would need to implement getLastWatermark() to retrieve from a persistence store
const watermark = await getLastWatermark();
const subscription = await getSubscribedTransactions(
{
filters: [
{
name: 'filter1',
filter: {
sender: 'ER7AMZRPD5KDVFWTUUVOADSOWM4RQKEEV2EDYRVSA757UHXOIEKGMBQIVU',
},
},
],
watermark,
maxRoundsToSync: 100,
onMaxRounds: 'sync-oldest-start-now',
},
algorand.client.algod,
);
if (subscription.subscribedTransactions.length > 0) {
// You would need to implement notifyTransactions to action the transactions
await notifyTransactions(subscription.subscribedTransactions);
}
// You would need to implement saveWatermark to persist the watermark to the persistence store
await saveWatermark(subscription.newWatermark);
```
### Quickly building a reliable, up-to-date cache index of all transactions of interest from the beginning of the chain
If you ran the following code on a cron schedule of (say) every 30 - 60 seconds it would create a cached index of all assets created by the account (in this case the Data History Museum TestNet account `ER7AMZRPD5KDVFWTUUVOADSOWM4RQKEEV2EDYRVSA757UHXOIEKGMBQIVU`). Given it uses indexer to catch up you can deploy this into a fresh environment with an empty database and it will catch up in seconds rather than days.
```typescript
const algorand = AlgorandClient.defaultLocalNet();
// You would need to implement getLastWatermark() to retrieve from a persistence store
const watermark = await getLastWatermark();
const subscription = await getSubscribedTransactions(
{
filters: [
{
name: 'filter1',
filter: {
type: TransactionType.acfg,
sender: 'ER7AMZRPD5KDVFWTUUVOADSOWM4RQKEEV2EDYRVSA757UHXOIEKGMBQIVU',
assetCreate: true,
},
},
],
watermark,
maxRoundsToSync: 1000,
onMaxRounds: 'catchup-with-indexer',
},
algorand.client.algod,
algorand.client.indexer,
);
if (subscription.subscribedTransactions.length > 0) {
// You would need to implement saveTransactions to persist the transactions
await saveTransactions(subscription.subscribedTransactions);
}
// You would need to implement saveWatermark to persist the watermark to the persistence store
await saveWatermark(subscription.newWatermark);
```
# ARC4 Types
These types are available under the `algopy.arc4` namespace. Refer to the [ARC4 specification](https://arc.algorand.foundation/ARCs/arc-0004) for more details on the spec.
```{hint}
Test context manager provides _value generators_ for ARC4 types. To access their _value generators_, use `{context_instance}.any.arc4` property. See more examples below.
```
```{note}
For all `algopy.arc4` types with and without respective _value generator_, instantiation can be performed directly. If you have a suggestion for a new _value generator_ implementation, please open an issue in the [`algorand-python-testing`](https://github.com/algorandfoundation/algorand-python-testing) repository or contribute by following the [contribution guide](https://github.com/algorandfoundation/algorand-python-testing/blob/main/CONTRIBUTING).
```
```{testsetup}
import algopy
from algopy_testing import algopy_testing_context
# Create the context manager for snippets below
ctx_manager = algopy_testing_context()
# Enter the context
context = ctx_manager.__enter__()
```
## Unsigned Integers
```{testcode}
from algopy import arc4
# Integer types
uint8_value = arc4.UInt8(255)
uint16_value = arc4.UInt16(65535)
uint32_value = arc4.UInt32(4294967295)
uint64_value = arc4.UInt64(18446744073709551615)
... # instantiate test context
# Generate a random unsigned arc4 integer with default range
uint8 = context.any.arc4.uint8()
uint16 = context.any.arc4.uint16()
uint32 = context.any.arc4.uint32()
uint64 = context.any.arc4.uint64()
biguint128 = context.any.arc4.biguint128()
biguint256 = context.any.arc4.biguint256()
biguint512 = context.any.arc4.biguint512()
# Generate a random unsigned arc4 integer with specified range
uint8_custom = context.any.arc4.uint8(min_value=10, max_value=100)
uint16_custom = context.any.arc4.uint16(min_value=1000, max_value=5000)
uint32_custom = context.any.arc4.uint32(min_value=100000, max_value=1000000)
uint64_custom = context.any.arc4.uint64(min_value=1000000000, max_value=10000000000)
biguint128_custom = context.any.arc4.biguint128(min_value=1000000000000000, max_value=10000000000000000)
biguint256_custom = context.any.arc4.biguint256(min_value=1000000000000000000000000, max_value=10000000000000000000000000)
biguint512_custom = context.any.arc4.biguint512(min_value=10000000000000000000000000000000000, max_value=10000000000000000000000000000000000)
```
## Address
```{testcode}
from algopy import arc4
# Address type
address_value = arc4.Address("AAAAAAAAAAAAAAAAAAAAAAAAAAAAAAAAAAAAAAAAAAAAAAAAAAAAY5HFKQ")
# Generate a random address
random_address = context.any.arc4.address()
# Access native underlaying type
native = random_address.native
```
## Dynamic Bytes
```{testcode}
from algopy import arc4
# Dynamic byte string
bytes_value = arc4.DynamicBytes(b"Hello, Algorand!")
# Generate random dynamic bytes
random_dynamic_bytes = context.any.arc4.dynamic_bytes(n=123) # n is the number of bits in the arc4 dynamic bytes
```
## String
```{testcode}
from algopy import arc4
# UTF-8 encoded string
string_value = arc4.String("Hello, Algorand!")
# Generate random string
random_string = context.any.arc4.string(n=12) # n is the number of bits in the arc4 string
```
```{testcleanup}
ctx_manager.__exit__(None, None, None)
```
# AVM Types
These types are available directly under the `algopy` namespace. They represent the basic AVM primitive types and can be instantiated directly or via *value generators*:
```{note}
For 'primitive `algopy` types such as `Account`, `Application`, `Asset`, `UInt64`, `BigUint`, `Bytes`, `Sting` with and without respective _value generator_, instantiation can be performed directly. If you have a suggestion for a new _value generator_ implementation, please open an issue in the [`algorand-python-testing`](https://github.com/algorandfoundation/algorand-python-testing) repository or contribute by following the [contribution guide](https://github.com/algorandfoundation/algorand-python-testing/blob/main/CONTRIBUTING).
```
```{testsetup}
import algopy
from algopy_testing import algopy_testing_context
# Create the context manager for snippets below
ctx_manager = algopy_testing_context()
# Enter the context
context = ctx_manager.__enter__()
```
## UInt64
```{testcode}
# Direct instantiation
uint64_value = algopy.UInt64(100)
# Instantiate test context
...
# Generate a random UInt64 value
random_uint64 = context.any.uint64()
# Specify a range
random_uint64 = context.any.uint64(min_value=1000, max_value=9999)
```
## Bytes
```{testcode}
# Direct instantiation
bytes_value = algopy.Bytes(b"Hello, Algorand!")
# Instantiate test context
...
# Generate random byte sequences
random_bytes = context.any.bytes()
# Specify the length
random_bytes = context.any.bytes(length=32)
```
## String
```{testcode}
# Direct instantiation
string_value = algopy.String("Hello, Algorand!")
# Generate random strings
random_string = context.any.string()
# Specify the length
random_string = context.any.string(length=16)
```
## BigUInt
```{testcode}
# Direct instantiation
biguint_value = algopy.BigUInt(100)
# Generate a random BigUInt value
random_biguint = context.any.biguint()
```
## Asset
```{testcode}
# Direct instantiation
asset = algopy.Asset(asset_id=1001)
# Instantiate test context
...
# Generate a random asset
random_asset = context.any.asset(
creator=..., # Optional: Creator account
name=..., # Optional: Asset name
unit_name=..., # Optional: Unit name
total=..., # Optional: Total supply
decimals=..., # Optional: Number of decimals
default_frozen=..., # Optional: Default frozen state
url=..., # Optional: Asset URL
metadata_hash=..., # Optional: Metadata hash
manager=..., # Optional: Manager address
reserve=..., # Optional: Reserve address
freeze=..., # Optional: Freeze address
clawback=... # Optional: Clawback address
)
# Get an asset by ID
asset = context.ledger.get_asset(asset_id=random_asset.id)
# Update an asset
context.ledger.update_asset(
random_asset,
name=..., # Optional: New asset name
total=..., # Optional: New total supply
decimals=..., # Optional: Number of decimals
default_frozen=..., # Optional: Default frozen state
url=..., # Optional: New asset URL
metadata_hash=..., # Optional: New metadata hash
manager=..., # Optional: New manager address
reserve=..., # Optional: New reserve address
freeze=..., # Optional: New freeze address
clawback=... # Optional: New clawback address
)
```
## Account
```{testcode}
# Direct instantiation
raw_address = 'PUYAGEGVCOEBP57LUKPNOCSMRWHZJSU4S62RGC2AONDUEIHC6P7FOPJQ4I'
account = algopy.Account(raw_address) # zero address by default
# Instantiate test context
...
# Generate a random account
random_account = context.any.account(
address=str(raw_address), # Optional: Specify a custom address, defaults to a random address
opted_asset_balances={}, # Optional: Specify opted asset balances as dict of assets to balance
opted_apps=[], # Optional: Specify opted apps as sequence of algopy.Application objects
balance=..., # Optional: Specify an initial balance
min_balance=..., # Optional: Specify a minimum balance
auth_address=..., # Optional: Specify an auth address
total_assets=..., # Optional: Specify the total number of assets
total_assets_created=..., # Optional: Specify the total number of created assets
total_apps_created=..., # Optional: Specify the total number of created applications
total_apps_opted_in=..., # Optional: Specify the total number of applications opted into
total_extra_app_pages=..., # Optional: Specify the total number of extra
)
# Generate a random account that is opted into a specific asset
mock_asset = context.any.asset()
mock_account = context.any.account(
opted_asset_balances={mock_asset: 123}
)
# Get an account by address
account = context.ledger.get_account(str(mock_account))
# Update an account
context.ledger.update_account(
mock_account,
balance=..., # Optional: New balance
min_balance=..., # Optional: New minimum balance
auth_address=context.any.account(), # Optional: New auth address
total_assets=..., # Optional: New total number of assets
total_created_assets=..., # Optional: New total number of created assets
total_apps_created=..., # Optional: New total number of created applications
total_apps_opted_in=..., # Optional: New total number of applications opted into
total_extra_app_pages=..., # Optional: New total number of extra application pages
rewards=..., # Optional: New rewards
status=... # Optional: New account status
)
# Check if an account is opted into a specific asset
opted_in = account.is_opted_in(mock_asset)
```
## Application
```{testcode}
# Direct instantiation
application = algopy.Application()
# Instantiate test context
...
# Generate a random application
random_app = context.any.application(
approval_program=algopy.Bytes(b''), # Optional: Specify a custom approval program
clear_state_program=algopy.Bytes(b''), # Optional: Specify a custom clear state program
global_num_uint=algopy.UInt64(1), # Optional: Number of global uint values
global_num_bytes=algopy.UInt64(1), # Optional: Number of global byte values
local_num_uint=algopy.UInt64(1), # Optional: Number of local uint values
local_num_bytes=algopy.UInt64(1), # Optional: Number of local byte values
extra_program_pages=algopy.UInt64(1), # Optional: Number of extra program pages
creator=context.default_sender # Optional: Specify the creator account
)
# Get an application by ID
app = context.ledger.get_app(app_id=random_app.id)
# Update an application
context.ledger.update_app(
random_app,
approval_program=..., # Optional: New approval program
clear_state_program=..., # Optional: New clear state program
global_num_uint=..., # Optional: New number of global uint values
global_num_bytes=..., # Optional: New number of global byte values
local_num_uint=..., # Optional: New number of local uint values
local_num_bytes=..., # Optional: New number of local byte values
extra_program_pages=..., # Optional: New number of extra program pages
creator=... # Optional: New creator account
)
# Patch logs for an application. When accessing via transactions or inner transaction related opcodes, will return the patched logs unless new logs where added into the transaction during execution.
test_app = context.any.application(logs=b"log entry" or [b"log entry 1", b"log entry 2"])
# Get app associated with the active contract
class MyContract(algopy.ARC4Contract):
...
contract = MyContract()
active_app = context.ledger.get_app(contract)
```
```{testcleanup}
ctx_manager.__exit__(None, None, None)
```
# Concepts
The following sections provide an overview of key concepts and features in the Algorand Python Testing framework.
## Test Context
The main abstraction for interacting with the testing framework is the [`AlgopyTestContext`](../api-context#algopy_testing.AlgopyTestContext). It creates an emulated Algorand environment that closely mimics AVM behavior relevant to unit testing the contracts and provides a Pythonic interface for interacting with the emulated environment.
```python
from algopy_testing import algopy_testing_context
def test_my_contract():
# Recommended way to instantiate the test context
with algopy_testing_context() as ctx:
# Your test code here
pass
# ctx is automatically reset after the test code is executed
```
The context manager interface exposes three main properties:
1. `ledger`: An instance of `LedgerContext` for interacting with and querying the emulated Algorand ledger state.
2. `txn`: An instance of `TransactionContext` for creating and managing transaction groups, submitting transactions, and accessing transaction results.
3. `any`: An instance of `AlgopyValueGenerator` for generating randomized test data.
For detailed method signatures, parameters, and return types, refer to the following API sections:
* [`algopy_testing.LedgerContext`](../api)
* [`algopy_testing.TransactionContext`](../api)
* [`algopy_testing.AVMValueGenerator`, `algopy_testing.TxnValueGenerator`, `algopy_testing.ARC4ValueGenerator`](../api)
The `any` property provides access to different value generators:
* `AVMValueGenerator`: Base abstractions for AVM types. All methods are available directly on the instance returned from `any`.
* `TxnValueGenerator`: Accessible via `any.txn`, for transaction-related data.
* `ARC4ValueGenerator`: Accessible via `any.arc4`, for ARC4 type data.
These generators allow creation of constrained random values for various AVM entities (accounts, assets, applications, etc.) when specific values are not required.
```{hint}
Value generators are powerful tools for generating test data for specified AVM types. They allow further constraints on random value generation via arguments, making it easier to generate test data when exact values are not necessary.
When used with the 'Arrange, Act, Assert' pattern, value generators can be especially useful in setting up clear and concise test data in arrange steps.
They can also serve as a base building block that can be integrated/reused with popular Python property-based testing frameworks like [`hypothesis`](https://hypothesis.readthedocs.io/en/latest/).
```
## Types of `algopy` stub implementations
As explained in the [introduction](index), `algorand-python-testing` *injects* test implementations for stubs available in the `algorand-python` package. However, not all of the stubs are implemented in the same manner:
1. **Native**: Fully matches AVM computation in Python. For example, `algopy.op.sha256` and other cryptographic operations behave identically in AVM and unit tests. This implies that the majority of opcodes that are ‘pure’ functions in AVM also have a native Python implementation provided by this package. These abstractions and opcodes can be used within and outside of the testing context.
2. **Emulated**: Uses `AlgopyTestContext` to mimic AVM behavior. For example, `Box.put` on an `algopy.Box` within a test context stores data in the test manager, not the real Algorand network, but provides the same interface.
3. **Mockable**: Not implemented, but can be mocked or patched. For example, `algopy.abi_call` can be mocked to return specific values or behaviors; otherwise, it raises a `NotImplementedError`. This category covers cases where native or emulated implementation in a unit test context is impractical or overly complex.
For a full list of all public `algopy` types and their corresponding implementation category, refer to the [Coverage](coverage) section.
```plaintext
```
# Smart Contract Testing
This guide provides an overview of how to test smart contracts using the Algorand Python SDK (`algopy`). We will cover the basics of testing `ARC4Contract` and `Contract` classes, focusing on `abimethod` and `baremethod` decorators.
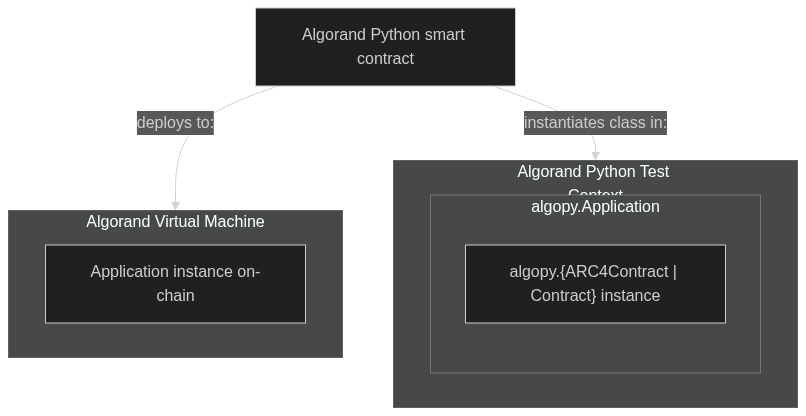
```{note}
The code snippets showcasing the contract testing capabilities are using [pytest](https://docs.pytest.org/en/latest/) as the test framework. However, note that the `algorand-python-testing` package can be used with any other test framework that supports Python. `pytest` is used for demonstration purposes in this documentation.
```
```{testsetup}
import algopy
import algopy_testing
from algopy_testing import algopy_testing_context
# Create the context manager for snippets below
ctx_manager = algopy_testing_context()
# Enter the context
context = ctx_manager.__enter__()
```
## `algopy.ARC4Contract`
Subclasses of `algopy.ARC4Contract` are **required** to be instantiated with an active test context. As part of instantiation, the test context will automatically create a matching `algopy.Application` object instance.
Within the class implementation, methods decorated with `algopy.arc4.abimethod` and `algopy.arc4.baremethod` will automatically assemble an `algopy.gtxn.ApplicationCallTransaction` transaction to emulate the AVM application call. This behavior can be overriden by setting the transaction group manually as part of test setup, this is done via implicit invocation of `algopy_testing.context.any_application()` *value generator* (refer to [APIs](../apis) for more details).
```{testcode}
class SimpleVotingContract(algopy.ARC4Contract):
def __init__(self) -> None:
self.topic = algopy.GlobalState(algopy.Bytes(b"default_topic"), key="topic", description="Voting topic")
self.votes = algopy.GlobalState(
algopy.UInt64(0),
key="votes",
description="Votes for the option",
)
self.voted = algopy.LocalState(algopy.UInt64, key="voted", description="Tracks if an account has voted")
@algopy.arc4.abimethod(create="require")
def create(self, initial_topic: algopy.Bytes) -> None:
self.topic.value = initial_topic
self.votes.value = algopy.UInt64(0)
@algopy.arc4.abimethod
def vote(self) -> algopy.UInt64:
assert self.voted[algopy.Txn.sender] == algopy.UInt64(0), "Account has already voted"
self.votes.value += algopy.UInt64(1)
self.voted[algopy.Txn.sender] = algopy.UInt64(1)
return self.votes.value
@algopy.arc4.abimethod(readonly=True)
def get_votes(self) -> algopy.UInt64:
return self.votes.value
@algopy.arc4.abimethod
def change_topic(self, new_topic: algopy.Bytes) -> None:
assert algopy.Txn.sender == algopy.Txn.application_id.creator, "Only creator can change topic"
self.topic.value = new_topic
self.votes.value = algopy.UInt64(0)
# Reset user's vote (this is simplified per single user for the sake of example)
self.voted[algopy.Txn.sender] = algopy.UInt64(0)
# Arrange
initial_topic = algopy.Bytes(b"initial_topic")
contract = SimpleVotingContract()
contract.voted[context.default_sender] = algopy.UInt64(0)
# Act - Create the contract
contract.create(initial_topic)
# Assert - Check initial state
assert contract.topic.value == initial_topic
assert contract.votes.value == algopy.UInt64(0)
# Act - Vote
# The method `.vote()` is decorated with `algopy.arc4.abimethod`, which means it will assemble a transaction to emulate the AVM application call
result = contract.vote()
# Assert - you can access the corresponding auto generated application call transaction via test context
assert len(context.txn.last_group.txns) == 1
# Assert - Note how local and global state are accessed via regular python instance attributes
assert result == algopy.UInt64(1)
assert contract.votes.value == algopy.UInt64(1)
assert contract.voted[context.default_sender] == algopy.UInt64(1)
# Act - Change topic
new_topic = algopy.Bytes(b"new_topic")
contract.change_topic(new_topic)
# Assert - Check topic changed and votes reset
assert contract.topic.value == new_topic
assert contract.votes.value == algopy.UInt64(0)
assert contract.voted[context.default_sender] == algopy.UInt64(0)
# Act - Get votes (should be 0 after reset)
votes = contract.get_votes()
# Assert - Check votes
assert votes == algopy.UInt64(0)
```
For more examples of tests using `algopy.ARC4Contract`, see the [examples](../examples) section.
## \`algopy.Contract“
Subclasses of `algopy.Contract` are **required** to be instantiated with an active test context. As part of instantiation, the test context will automatically create a matching `algopy.Application` object instance. This behavior is identical to `algopy.ARC4Contract` class instances.
Unlike `algopy.ARC4Contract`, `algopy.Contract` requires manual setup of the transaction context and explicit method calls. Alternatively, you can use `active_txn_overrides` to specify application arguments and foreign arrays without needing to create a full transaction group if your aim is to patch a specific active transaction related metadata.
Here’s an updated example demonstrating how to test a `Contract` class:
```{testcode}
import algopy
import pytest
from algopy_testing import AlgopyTestContext, algopy_testing_context
class CounterContract(algopy.Contract):
def __init__(self):
self.counter = algopy.UInt64(0)
@algopy.subroutine
def increment(self):
self.counter += algopy.UInt64(1)
return algopy.UInt64(1)
@algopy.arc4.baremethod
def approval_program(self):
return self.increment()
@algopy.arc4.baremethod
def clear_state_program(self):
return algopy.UInt64(1)
@pytest.fixture()
def context():
with algopy_testing_context() as ctx:
yield ctx
def test_counter_contract(context: AlgopyTestContext):
# Instantiate contract
contract = CounterContract()
# Set up the transaction context using active_txn_overrides
with context.txn.create_group(
active_txn_overrides={
"sender": context.default_sender,
"app_args": [algopy.Bytes(b"increment")],
}
):
# Invoke approval program
result = contract.approval_program()
# Assert approval program result
assert result == algopy.UInt64(1)
# Assert counter value
assert contract.counter == algopy.UInt64(1)
# Test clear state program
assert contract.clear_state_program() == algopy.UInt64(1)
def test_counter_contract_multiple_txns(context: AlgopyTestContext):
contract = CounterContract()
# For scenarios with multiple transactions, you can still use gtxns
extra_payment = context.any.txn.payment()
with context.txn.create_group(
gtxns=[
extra_payment,
context.any.txn.application_call(
sender=context.default_sender,
app_id=contract.app_id,
app_args=[algopy.Bytes(b"increment")],
),
],
active_txn_index=1 # Set the application call as the active transaction
):
result = contract.approval_program()
assert result == algopy.UInt64(1)
assert contract.counter == algopy.UInt64(1)
assert len(context.txn.last_group.txns) == 2
```
In this updated example:
1. We use `context.txn.create_group()` with `active_txn_overrides` to set up the transaction context for a single application call. This simplifies the process when you don’t need to specify a full transaction group.
2. The `active_txn_overrides` parameter allows you to specify `app_args` and other transaction fields directly, without creating a full `ApplicationCallTransaction` object.
3. For scenarios involving multiple transactions, you can still use the `gtxns` parameter to create a transaction group, as shown in the `test_counter_contract_multiple_txns` function.
4. The `app_id` is automatically set to the contract’s application ID, so you don’t need to specify it explicitly when using `active_txn_overrides`.
This approach provides more flexibility in setting up the transaction context for testing `Contract` classes, allowing for both simple single-transaction scenarios and more complex multi-transaction tests.
## Defer contract method invocation
You can create deferred application calls for more complex testing scenarios where order of transactions needs to be controlled:
```python
def test_deferred_call(context):
contract = MyARC4Contract()
extra_payment = context.any.txn.payment()
extra_asset_transfer = context.any.txn.asset_transfer()
implicit_payment = context.any.txn.payment()
deferred_call = context.txn.defer_app_call(contract.some_method, implicit_payment)
with context.txn.create_group([extra_payment, deferred_call, extra_asset_transfer]):
result = deferred_call.submit()
print(context.txn.last_group) # [extra_payment, implicit_payment, app call, extra_asset_transfer]
```
A deferred application call prepares the application call transaction without immediately executing it. The call can be executed later by invoking the `.submit()` method on the deferred application call instance. As demonstrated in the example, you can also include the deferred call in a transaction group creation context manager to execute it as part of a larger transaction group. When `.submit()` is called, only the specific method passed to `defer_app_call()` will be executed.
```{testcleanup}
ctx_manager.__exit__(None, None, None)
```
# Testing Guide
The Algorand Python Testing framework provides powerful tools for testing Algorand Python smart contracts within a Python interpreter. This guide covers the main features and concepts of the framework, helping you write effective tests for your Algorand applications.
```{note}
For all code examples in the _Testing Guide_ section, assume `context` is an instance of `AlgopyTestContext` obtained using the `algopy_testing_context()` context manager. All subsequent code is executed within this context.
```
```{mermaid}
graph TD
subgraph GA["Your Development Environment"]
A["algopy (type stubs)"]
B["algopy_testing (testing framework)
(You are here 📍)"]
C["puya (compiler)"]
end
subgraph GB["Your Algorand Project"]
D[Your Algorand Python contract]
end
D -->|type hints inferred from| A
D -->|compiled using| C
D -->|tested via| B
```
> *High-level overview of the relationship between your smart contracts project, Algorand Python Testing framework, Algorand Python type stubs, and the compiler*
The Algorand Python Testing framework streamlines unit testing of your Algorand Python smart contracts by offering functionality to:
1. Simulate the Algorand Virtual Machine (AVM) environment
2. Create and manipulate test accounts, assets, applications, transactions, and ARC4 types
3. Test smart contract classes, including their states, variables, and methods
4. Verify logic signatures and subroutines
5. Manage global state, local state, scratch slots, and boxes in test contexts
6. Simulate transactions and transaction groups, including inner transactions
7. Verify opcode behavior
By using this framework, you can ensure your Algorand Python smart contracts function correctly before deploying them to a live network.
Key features of the framework include:
* `AlgopyTestContext`: The main entry point for testing, providing access to various testing utilities and simulated blockchain state
* AVM Type Simulation: Accurate representations of AVM types like `UInt64` and `Bytes`
* ARC4 Support: Tools for testing ARC4 contracts and methods, including struct definitions and ABI encoding/decoding
* Transaction Simulation: Ability to create and execute various transaction types
* State Management: Tools for managing and verifying global and local state changes
* Opcode Simulation: Implementations of AVM opcodes for accurate smart contract behavior testing
The framework is designed to work seamlessly with Algorand Python smart contracts, allowing developers to write comprehensive unit tests that closely mimic the behavior of contracts on the Algorand blockchain.
## Table of Contents
```{toctree}
---
maxdepth: 3
---
concepts
avm-types
arc4-types
transactions
contract-testing
signature-testing
state-management
subroutines
opcodes
```
# AVM Opcodes
The [coverage](coverage) file provides a comprehensive list of all opcodes and their respective types, categorized as *Mockable*, *Emulated*, or *Native* within the `algorand-python-testing` package. This section highlights a **subset** of opcodes and types that typically require interaction with the test context manager.
`Native` opcodes are assumed to function as they do in the Algorand Virtual Machine, given their stateless nature. If you encounter issues with any `Native` opcodes, please raise an issue in the [`algorand-python-testing` repo](https://github.com/algorandfoundation/algorand-python-testing/issues/new/choose) or contribute a PR following the [Contributing](https://github.com/algorandfoundation/algorand-python-testing/blob/main/CONTRIBUTING) guide.
```{testsetup}
import algopy
from algopy_testing import algopy_testing_context
# Create the context manager for snippets below
ctx_manager = algopy_testing_context()
# Enter the context
context = ctx_manager.__enter__()
```
## Implemented Types
These types are fully implemented in Python and behave identically to their AVM counterparts:
### 1. Cryptographic Operations
The following opcodes are demonstrated:
* `op.sha256`
* `op.keccak256`
* `op.ecdsa_verify`
```{testcode}
from algopy import op
# SHA256 hash
data = algopy.Bytes(b"Hello, World!")
hashed = op.sha256(data)
# Keccak256 hash
keccak_hashed = op.keccak256(data)
# ECDSA verification
message_hash = bytes.fromhex("f809fd0aa0bb0f20b354c6b2f86ea751957a4e262a546bd716f34f69b9516ae1")
sig_r = bytes.fromhex("18d96c7cda4bc14d06277534681ded8a94828eb731d8b842e0da8105408c83cf")
sig_s = bytes.fromhex("7d33c61acf39cbb7a1d51c7126f1718116179adebd31618c4604a1f03b5c274a")
pubkey_x = bytes.fromhex("f8140e3b2b92f7cbdc8196bc6baa9ce86cf15c18e8ad0145d50824e6fa890264")
pubkey_y = bytes.fromhex("bd437b75d6f1db67155a95a0da4b41f2b6b3dc5d42f7db56238449e404a6c0a3")
result = op.ecdsa_verify(op.ECDSA.Secp256r1, message_hash, sig_r, sig_s, pubkey_x, pubkey_y)
assert result
```
### 2. Arithmetic and Bitwise Operations
The following opcodes are demonstrated:
* `op.addw`
* `op.bitlen`
* `op.getbit`
* `op.setbit_uint64`
```{testcode}
from algopy import op
# Addition with carry
result, carry = op.addw(algopy.UInt64(2**63), algopy.UInt64(2**63))
# Bitwise operations
value = algopy.UInt64(42)
bit_length = op.bitlen(value)
is_bit_set = op.getbit(value, 3)
new_value = op.setbit_uint64(value, 2, 1)
```
For a comprehensive list of all opcodes and types, refer to the [coverage](../coverage) page.
## Emulated Types Requiring Transaction Context
These types necessitate interaction with the transaction context:
### algopy.op.Global
```{testcode}
from algopy import op
class MyContract(algopy.ARC4Contract):
@algopy.arc4.abimethod
def check_globals(self) -> algopy.UInt64:
return op.Global.min_txn_fee + op.Global.min_balance
... # setup context (below assumes available under 'ctx' variable)
context.ledger.patch_global_fields(
min_txn_fee=algopy.UInt64(1000),
min_balance=algopy.UInt64(100000)
)
contract = MyContract()
result = contract.check_globals()
assert result == algopy.UInt64(101000)
```
### algopy.op.Txn
```{testcode}
from algopy import op
class MyContract(algopy.ARC4Contract):
@algopy.arc4.abimethod
def check_txn_fields(self) -> algopy.arc4.Address:
return algopy.arc4.Address(op.Txn.sender)
... # setup context (below assumes available under 'ctx' variable)
contract = MyContract()
custom_sender = context.any.account()
with context.txn.create_group(active_txn_overrides={"sender": custom_sender}):
result = contract.check_txn_fields()
assert result == custom_sender
```
### algopy.op.AssetHoldingGet
```{testcode}
from algopy import op
class AssetContract(algopy.ARC4Contract):
@algopy.arc4.abimethod
def check_asset_holding(self, account: algopy.Account, asset: algopy.Asset) -> algopy.UInt64:
balance, _ = op.AssetHoldingGet.asset_balance(account, asset)
return balance
... # setup context (below assumes available under 'ctx' variable)
asset = context.any.asset(total=algopy.UInt64(1000000))
account = context.any.account(opted_asset_balances={asset.id: algopy.UInt64(5000)})
contract = AssetContract()
result = contract.check_asset_holding(account, asset)
assert result == algopy.UInt64(5000)
```
### algopy.op.AppGlobal
```{testcode}
from algopy import op
class StateContract(algopy.ARC4Contract):
@algopy.arc4.abimethod
def set_and_get_state(self, key: algopy.Bytes, value: algopy.UInt64) -> algopy.UInt64:
op.AppGlobal.put(key, value)
return op.AppGlobal.get_uint64(key)
... # setup context (below assumes available under 'ctx' variable)
contract = StateContract()
key, value = algopy.Bytes(b"test_key"), algopy.UInt64(42)
result = contract.set_and_get_state(key, value)
assert result == value
stored_value = context.ledger.get_global_state(contract, key)
assert stored_value == 42
```
### algopy.op.Block
```{testcode}
from algopy import op
class BlockInfoContract(algopy.ARC4Contract):
@algopy.arc4.abimethod
def get_block_seed(self) -> algopy.Bytes:
return op.Block.blk_seed(1000)
... # setup context (below assumes available under 'ctx' variable)
context.ledger.set_block(1000, seed=123456, timestamp=1625097600)
contract = BlockInfoContract()
seed = contract.get_block_seed()
assert seed == algopy.op.itob(123456)
```
### algopy.op.AcctParamsGet
```{testcode}
from algopy import op
class AccountParamsContract(algopy.ARC4Contract):
@algopy.arc4.abimethod
def get_account_balance(self, account: algopy.Account) -> algopy.UInt64:
balance, exists = op.AcctParamsGet.acct_balance(account)
assert exists
return balance
... # setup context (below assumes available under 'ctx' variable)
account = context.any.account(balance=algopy.UInt64(1000000))
contract = AccountParamsContract()
balance = contract.get_account_balance(account)
assert balance == algopy.UInt64(1000000)
```
### algopy.op.AppParamsGet
```{testcode}
class AppParamsContract(algopy.ARC4Contract):
@algopy.arc4.abimethod
def get_app_creator(self, app_id: algopy.Application) -> algopy.arc4.Address:
creator, exists = algopy.op.AppParamsGet.app_creator(app_id)
assert exists
return algopy.arc4.Address(creator)
... # setup context (below assumes available under 'ctx' variable)
contract = AppParamsContract()
app = context.any.application()
creator = contract.get_app_creator(app)
assert creator == context.default_sender
```
### algopy.op.AssetParamsGet
```{testcode}
from algopy import op
class AssetParamsContract(algopy.ARC4Contract):
@algopy.arc4.abimethod
def get_asset_total(self, asset_id: algopy.UInt64) -> algopy.UInt64:
total, exists = op.AssetParamsGet.asset_total(asset_id)
assert exists
return total
... # setup context (below assumes available under 'ctx' variable)
asset = context.any.asset(total=algopy.UInt64(1000000), decimals=algopy.UInt64(6))
contract = AssetParamsContract()
total = contract.get_asset_total(asset.id)
assert total == algopy.UInt64(1000000)
```
### algopy.op.Box
```{testcode}
from algopy import op
class BoxStorageContract(algopy.ARC4Contract):
@algopy.arc4.abimethod
def store_and_retrieve(self, key: algopy.Bytes, value: algopy.Bytes) -> algopy.Bytes:
op.Box.put(key, value)
retrieved_value, exists = op.Box.get(key)
assert exists
return retrieved_value
... # setup context (below assumes available under 'ctx' variable)
contract = BoxStorageContract()
key, value = algopy.Bytes(b"test_key"), algopy.Bytes(b"test_value")
result = contract.store_and_retrieve(key, value)
assert result == value
stored_value = context.ledger.get_box(contract, key)
assert stored_value == value.value
```
## Mockable Opcodes
These opcodes are mockable in `algorand-python-testing`, allowing for controlled testing of complex operations:
### algopy.compile\_contract
```{testcode}
from unittest.mock import patch, MagicMock
import algopy
mocked_response = MagicMock()
mocked_response.local_bytes = algopy.UInt64(4)
class MockContract(algopy.Contract):
...
class ContractFactory(algopy.ARC4Contract):
...
@algopy.arc4.abimethod
def compile_and_get_bytes(self) -> algopy.UInt64:
contract_response = algopy.compile_contract(MockContract)
return contract_response.local_bytes
... # setup context (below assumes available under 'ctx' variable)
contract = ContractFactory()
with patch('algopy.compile_contract', return_value=mocked_response):
assert contract.compile_and_get_bytes() == 4
```
### algopy.arc4.abi\_call
```{testcode}
import unittest
from unittest.mock import patch, MagicMock
import algopy
import typing
class MockAbiCall:
def __call__(
self, *args: typing.Any, **_kwargs: typing.Any
) -> tuple[typing.Any, typing.Any]:
return (
algopy.arc4.UInt64(11),
MagicMock(),
)
def __getitem__(self, _item: object) -> typing.Self:
return self
class MyContract(algopy.ARC4Contract):
@algopy.arc4.abimethod
def my_method(self, arg1: algopy.UInt64, arg2: algopy.UInt64) -> algopy.UInt64:
return algopy.arc4.abi_call[algopy.arc4.UInt64]("my_other_method", arg1, arg2)[0].native
... # setup context (below assumes available under 'ctx' variable)
contract = MyContract()
with patch('algopy.arc4.abi_call', MockAbiCall()):
result = contract.my_method(algopy.UInt64(10), algopy.UInt64(1))
assert result == 11
```
### algopy.op.vrf\_verify
```{testcode}
from unittest.mock import patch, MagicMock
import algopy
def test_mock_vrf_verify():
mock_result = (algopy.Bytes(b'mock_output'), True)
with patch('algopy.op.vrf_verify', return_value=mock_result) as mock_vrf_verify:
result = algopy.op.vrf_verify(
algopy.op.VrfVerify.VrfAlgorand,
algopy.Bytes(b'proof'),
algopy.Bytes(b'message'),
algopy.Bytes(b'public_key')
)
assert result == mock_result
mock_vrf_verify.assert_called_once_with(
algopy.op.VrfVerify.VrfAlgorand,
algopy.Bytes(b'proof'),
algopy.Bytes(b'message'),
algopy.Bytes(b'public_key')
)
test_mock_vrf_verify()
```
### algopy.op.EllipticCurve
```{testcode}
from unittest.mock import patch, MagicMock
import algopy
def test_mock_elliptic_curve_add():
mock_result = algopy.Bytes(b'result')
with patch('algopy.op.EllipticCurve.add', return_value=mock_result) as mock_add:
result = algopy.op.EllipticCurve.add(
algopy.op.EC.BN254g1,
algopy.Bytes(b'a'),
algopy.Bytes(b'b')
)
assert result == mock_result
mock_add.assert_called_once_with(
algopy.op.EC.BN254g1,
algopy.Bytes(b'a'),
algopy.Bytes(b'b'),
)
test_mock_elliptic_curve_add()
```
These examples demonstrate how to mock key mockable opcodes in `algorand-python-testing`. Use similar techniques (in your preferred testing framework) for other mockable opcodes like `algopy.compile_logicsig`, `algopy.arc4.arc4_create`, and `algopy.arc4.arc4_update`.
Mocking these opcodes allows you to:
1. Control complex operations’ behavior not covered by *implemented* and *emulated* types.
2. Test edge cases and error conditions.
3. Isolate contract logic from external dependencies.
```{testcleanup}
ctx_manager.__exit__(None, None, None)
```
# Testing Guide
The Algorand Python Testing framework provides powerful tools for testing Algorand Python smart contracts within a Python interpreter. This guide covers the main features and concepts of the framework, helping you write effective tests for your Algorand applications.
```{note}
For all code examples in the _Testing Guide_ section, assume `context` is an instance of `AlgopyTestContext` obtained using the `algopy_testing_context()` context manager. All subsequent code is executed within this context.
```
```{mermaid}
graph TD
subgraph GA["Your Development Environment"]
A["algopy (type stubs)"]
B["algopy_testing (testing framework)
(You are here 📍)"]
C["puya (compiler)"]
end
subgraph GB["Your Algorand Project"]
D[Your Algorand Python contract]
end
D -->|type hints inferred from| A
D -->|compiled using| C
D -->|tested via| B
```
> *High-level overview of the relationship between your smart contracts project, Algorand Python Testing framework, Algorand Python type stubs, and the compiler*
The Algorand Python Testing framework streamlines unit testing of your Algorand Python smart contracts by offering functionality to:
1. Simulate the Algorand Virtual Machine (AVM) environment
2. Create and manipulate test accounts, assets, applications, transactions, and ARC4 types
3. Test smart contract classes, including their states, variables, and methods
4. Verify logic signatures and subroutines
5. Manage global state, local state, scratch slots, and boxes in test contexts
6. Simulate transactions and transaction groups, including inner transactions
7. Verify opcode behavior
By using this framework, you can ensure your Algorand Python smart contracts function correctly before deploying them to a live network.
Key features of the framework include:
* `AlgopyTestContext`: The main entry point for testing, providing access to various testing utilities and simulated blockchain state
* AVM Type Simulation: Accurate representations of AVM types like `UInt64` and `Bytes`
* ARC4 Support: Tools for testing ARC4 contracts and methods, including struct definitions and ABI encoding/decoding
* Transaction Simulation: Ability to create and execute various transaction types
* State Management: Tools for managing and verifying global and local state changes
* Opcode Simulation: Implementations of AVM opcodes for accurate smart contract behavior testing
The framework is designed to work seamlessly with Algorand Python smart contracts, allowing developers to write comprehensive unit tests that closely mimic the behavior of contracts on the Algorand blockchain.
## Table of Contents
```{toctree}
---
maxdepth: 3
---
concepts
avm-types
arc4-types
transactions
contract-testing
signature-testing
state-management
subroutines
opcodes
```
# Smart Signature Testing
Test Algorand smart signatures (LogicSigs) with ease using the Algorand Python Testing framework.
```{testsetup}
import algopy
from algopy_testing import algopy_testing_context
# Create the context manager for snippets below
ctx_manager = algopy_testing_context()
# Enter the context
context = ctx_manager.__enter__()
```
## Define a LogicSig
Use the `@logicsig` decorator to create a LogicSig:
```{testcode}
from algopy import logicsig, Account, Txn, Global, UInt64, Bytes
@logicsig
def hashed_time_locked_lsig() -> bool:
# LogicSig code here
return True # Approve transaction
```
## Execute and Test
Use `AlgopyTestContext.execute_logicsig()` to run and verify LogicSigs:
```{testcode}
with context.txn.create_group([
context.any.txn.payment(),
]):
result = context.execute_logicsig(hashed_time_locked_lsig, algopy.Bytes(b"secret"))
assert result is True
```
`execute_logicsig()` returns a boolean:
* `True`: Transaction approved
* `False`: Transaction rejected
## Pass Arguments
Provide arguments to LogicSigs using `execute_logicsig()`:
```{testcode}
result = context.execute_logicsig(hashed_time_locked_lsig, algopy.Bytes(b"secret"))
```
Access arguments in the LogicSig with `algopy.op.arg()` opcode:
```{testcode}
@logicsig
def hashed_time_locked_lsig() -> bool:
secret = algopy.op.arg(0)
expected_hash = algopy.op.sha256(algopy.Bytes(b"secret"))
return algopy.op.sha256(secret) == expected_hash
# Example usage
secret = algopy.Bytes(b"secret")
assert context.execute_logicsig(hashed_time_locked_lsig, secret)
```
For more details on available operations, see the [coverage](../coverage).
```{testcleanup}
ctx_manager.__exit__(None, None, None)
```
# State Management
`algorand-python-testing` provides tools to test state-related abstractions in Algorand smart contracts. This guide covers global state, local state, boxes, and scratch space management.
```{testsetup}
import algopy
from algopy_testing import algopy_testing_context
# Create the context manager for snippets below
ctx_manager = algopy_testing_context()
# Enter the context
context = ctx_manager.__enter__()
```
## Global State
Global state is represented as instance attributes on `algopy.Contract` and `algopy.ARC4Contract` classes.
```{testcode}
class MyContract(algopy.ARC4Contract):
def __init__(self):
self.state_a = algopy.GlobalState(algopy.UInt64, key="global_uint64")
self.state_b = algopy.UInt64(1)
# In your test
contract = MyContract()
contract.state_a.value = algopy.UInt64(10)
contract.state_b.value = algopy.UInt64(20)
```
## Local State
Local state is defined similarly to global state, but accessed using account addresses as keys.
```{testcode}
class MyContract(algopy.ARC4Contract):
def __init__(self):
self.local_state_a = algopy.LocalState(algopy.UInt64, key="state_a")
# In your test
contract = MyContract()
account = context.any.account()
contract.local_state_a[account] = algopy.UInt64(10)
```
## Boxes
The framework supports various Box abstractions available in `algorand-python`.
```{testcode}
class MyContract(algopy.ARC4Contract):
def __init__(self):
self.box_map = algopy.BoxMap(algopy.Bytes, algopy.UInt64)
@algopy.arc4.abimethod()
def some_method(self, key_a: algopy.Bytes, key_b: algopy.Bytes, key_c: algopy.Bytes) -> None:
self.box = algopy.Box(algopy.UInt64, key=key_a)
self.box.value = algopy.UInt64(1)
self.box_map[key_b] = algopy.UInt64(1)
self.box_map[key_c] = algopy.UInt64(2)
# In your test
contract = MyContract()
key_a = b"key_a"
key_b = b"key_b"
key_c = b"key_c"
contract.some_method(algopy.Bytes(key_a), algopy.Bytes(key_b), algopy.Bytes(key_c))
# Access boxes
box_content = context.ledger.get_box(contract, key_a)
assert context.ledger.box_exists(contract, key_a)
# Set box content manually
with context.txn.create_group():
context.ledger.set_box(contract, key_a, algopy.op.itob(algopy.UInt64(1)))
```
## Scratch Space
Scratch space is represented as a list of 256 slots for each transaction.
```{testcode}
class MyContract(algopy.Contract, scratch_slots=(1, 2, algopy.urange(3, 20))):
def approval_program(self):
algopy.op.Scratch.store(1, algopy.UInt64(5))
assert algopy.op.Scratch.load_uint64(1) == algopy.UInt64(5)
return True
# In your test
contract = MyContract()
result = contract.approval_program()
assert result
scratch_space = context.txn.last_group.get_scratch_space()
assert scratch_space[1] == algopy.UInt64(5)
```
For more detailed information, explore the example contracts in the `examples/` directory, the [coverage](../coverage) page, and the [API documentation](../api).
```{testcleanup}
ctx_manager.__exit__(None, None, None)
```
# Subroutines
Subroutines allow direct testing of internal contract logic without full application calls.
```{testsetup}
import algopy
import algopy_testing
from algopy_testing import algopy_testing_context
# Create the context manager for snippets below
ctx_manager = algopy_testing_context()
# Enter the context
context = ctx_manager.__enter__()
```
## Overview
The `@algopy.subroutine` decorator exposes contract methods for isolated testing within the Algorand Python Testing framework. This enables focused validation of core business logic without the overhead of full application deployment and execution.
## Usage
1. Decorate internal methods with `@algopy.subroutine`:
```{testcode}
from algopy import subroutine, UInt64
class MyContract:
@subroutine
def calculate_value(self, input: UInt64) -> UInt64:
return input * UInt64(2)
```
2. Test the subroutine directly:
```{testcode}
def test_calculate_value(context: algopy_testing.AlgopyTestContext):
contract = MyContract()
result = contract.calculate_value(UInt64(5))
assert result == UInt64(10)
```
## Benefits
* Faster test execution
* Simplified debugging
* Focused unit testing of core logic
## Best Practices
* Use subroutines for complex internal calculations
* Prefer writing `pure` subroutines in ARC4Contract classes
* Combine with full application tests for comprehensive coverage
* Maintain realistic input and output types (e.g., `UInt64`, `Bytes`)
## Example
For a complete example, see the `simple_voting` contract in the [examples](../examples) section.
```{testcleanup}
ctx_manager.__exit__(None, None, None)
```
# Transactions
The testing framework follows the Transaction definitions described in [`algorand-python` docs](https://algorand-python.readthedocs.io/en/latest/algorand_sdk/transactions.html). This section focuses on *value generators* and interactions with inner transactions, it also explains how the framework identifies *active* transaction group during contract method/subroutine/logicsig invocation.
```{testsetup}
import algopy
import algopy_testing
from algopy_testing import algopy_testing_context
# Create the context manager for snippets below
ctx_manager = algopy_testing_context()
# Enter the context
context = ctx_manager.__enter__()
```
## Group Transactions
Refers to test implementation of transaction stubs available under `algopy.gtxn.*` namespace. Available under [`algopy.TxnValueGenerator`](../api) instance accessible via `context.any.txn` property:
```{mermaid}
graph TD
A[TxnValueGenerator] --> B[payment]
A --> C[asset_transfer]
A --> D[application_call]
A --> E[asset_config]
A --> F[key_registration]
A --> G[asset_freeze]
A --> H[transaction]
```
```{testcode}
... # instantiate test context
# Generate a random payment transaction
pay_txn = context.any.txn.payment(
sender=context.any.account(), # Optional: Defaults to context's default sender if not provided
receiver=context.any.account(), # Required
amount=algopy.UInt64(1000000) # Required
)
# Generate a random asset transfer transaction
asset_transfer_txn = context.any.txn.asset_transfer(
sender=context.any.account(), # Optional: Defaults to context's default sender if not provided
receiver=context.any.account(), # Required
asset_id=algopy.UInt64(1), # Required
amount=algopy.UInt64(1000) # Required
)
# Generate a random application call transaction
app_call_txn = context.any.txn.application_call(
app_id=context.any.application(), # Required
app_args=[algopy.Bytes(b"arg1"), algopy.Bytes(b"arg2")], # Optional: Defaults to empty list if not provided
accounts=[context.any.account()], # Optional: Defaults to empty list if not provided
assets=[context.any.asset()], # Optional: Defaults to empty list if not provided
apps=[context.any.application()], # Optional: Defaults to empty list if not provided
approval_program_pages=[algopy.Bytes(b"approval_code")], # Optional: Defaults to empty list if not provided
clear_state_program_pages=[algopy.Bytes(b"clear_code")], # Optional: Defaults to empty list if not provided
scratch_space={0: algopy.Bytes(b"scratch")} # Optional: Defaults to empty dict if not provided
)
# Generate a random asset config transaction
asset_config_txn = context.any.txn.asset_config(
sender=context.any.account(), # Optional: Defaults to context's default sender if not provided
asset_id=algopy.UInt64(1), # Optional: If not provided, creates a new asset
total=1000000, # Required for new assets
decimals=0, # Required for new assets
default_frozen=False, # Optional: Defaults to False if not provided
unit_name="UNIT", # Optional: Defaults to empty string if not provided
asset_name="Asset", # Optional: Defaults to empty string if not provided
url="http://asset-url", # Optional: Defaults to empty string if not provided
metadata_hash=b"metadata_hash", # Optional: Defaults to empty bytes if not provided
manager=context.any.account(), # Optional: Defaults to sender if not provided
reserve=context.any.account(), # Optional: Defaults to zero address if not provided
freeze=context.any.account(), # Optional: Defaults to zero address if not provided
clawback=context.any.account() # Optional: Defaults to zero address if not provided
)
# Generate a random key registration transaction
key_reg_txn = context.any.txn.key_registration(
sender=context.any.account(), # Optional: Defaults to context's default sender if not provided
vote_pk=algopy.Bytes(b"vote_pk"), # Optional: Defaults to empty bytes if not provided
selection_pk=algopy.Bytes(b"selection_pk"), # Optional: Defaults to empty bytes if not provided
vote_first=algopy.UInt64(1), # Optional: Defaults to 0 if not provided
vote_last=algopy.UInt64(1000), # Optional: Defaults to 0 if not provided
vote_key_dilution=algopy.UInt64(10000) # Optional: Defaults to 0 if not provided
)
# Generate a random asset freeze transaction
asset_freeze_txn = context.any.txn.asset_freeze(
sender=context.any.account(), # Optional: Defaults to context's default sender if not provided
asset_id=algopy.UInt64(1), # Required
freeze_target=context.any.account(), # Required
freeze_state=True # Required
)
# Generate a random transaction of a specified type
generic_txn = context.any.txn.transaction(
type=algopy.TransactionType.Payment, # Required
sender=context.any.account(), # Optional: Defaults to context's default sender if not provided
receiver=context.any.account(), # Required for Payment
amount=algopy.UInt64(1000000) # Required for Payment
)
```
## Preparing for execution
When a smart contract instance (application) is interacted with on the Algorand network, it must be performed in relation to a specific transaction or transaction group where one or many transactions are application calls to target smart contract instances.
To emulate this behaviour, the `create_group` context manager is available on [`algopy.TransactionContext`](../api) instance that allows setting temporary transaction fields within a specific scope, passing in emulated transaction objects and identifying the active transaction index within the transaction group
```{testcode}
import algopy
from algopy_testing import AlgopyTestContext, algopy_testing_context
class SimpleContract(algopy.ARC4Contract):
@algopy.arc4.abimethod
def check_sender(self) -> algopy.arc4.Address:
return algopy.arc4.Address(algopy.Txn.sender)
...
# Create a contract instance
contract = SimpleContract()
# Use active_txn_overrides to change the sender
test_sender = context.any.account()
with context.txn.create_group(active_txn_overrides={"sender": test_sender}):
# Call the contract method
result = contract.check_sender()
assert result == test_sender
# Assert that the sender is the test_sender after exiting the
# transaction group context
assert context.txn.last_active.sender == test_sender
# Assert the size of last transaction group
assert len(context.txn.last_group.txns) == 1
```
## Inner Transaction
Inner transactions are AVM transactions that are signed and executed by AVM applications (instances of deployed smart contracts or signatures).
When testing smart contracts, to stay consistent with AVM, the framework \_does not allow you to submit inner transactions outside of contract/subroutine invocation, but you can interact with and manage inner transactions using the test context manager as follows:
```{testcode}
class MyContract(algopy.ARC4Contract):
@algopy.arc4.abimethod
def pay_via_itxn(self, asset: algopy.Asset) -> None:
algopy.itxn.Payment(
receiver=algopy.Txn.sender,
amount=algopy.UInt64(1)
).submit()
... # setup context (below assumes available under 'context' variable)
# Create a contract instance
contract = MyContract()
# Generate a random asset
asset = context.any.asset()
# Execute the contract method
contract.pay_via_itxn(asset=asset)
# Access the last submitted inner transaction
payment_txn = context.txn.last_group.last_itxn.payment
# Assert properties of the inner transaction
assert payment_txn.receiver == context.txn.last_active.sender
assert payment_txn.amount == algopy.UInt64(1)
# Access all inner transactions in the last group
for itxn in context.txn.last_group.itxn_groups[-1]:
# Perform assertions on each inner transaction
...
# Access a specific inner transaction group
first_itxn_group = context.txn.last_group.get_itxn_group(0)
first_payment_txn = first_itxn_group.payment(0)
```
In this example, we define a contract method `pay_via_itxn` that creates and submits an inner payment transaction. The test context automatically captures and stores the inner transactions submitted by the contract method.
Note that we don’t need to wrap the execution in a `create_group` context manager because the method is decorated with `@algopy.arc4.abimethod`, which automatically creates a transaction group for the method. The `create_group` context manager is only needed when you want to create more complex transaction groups or patch transaction fields for various transaction-related opcodes in AVM.
To access the submitted inner transactions:
1. Use `context.txn.last_group.last_itxn` to access the last submitted inner transaction of a specific type.
2. Iterate over all inner transactions in the last group using `context.txn.last_group.itxn_groups[-1]`.
3. Access a specific inner transaction group using `context.txn.last_group.get_itxn_group(index)`.
These methods provide type validation and will raise an error if the requested transaction type doesn’t match the actual type of the inner transaction.
## References
* [API](../api) for more details on the test context manager and inner transactions related methods that perform implicit inner transaction type validation.
* [Examples](../examples) for more examples of smart contracts and associated tests that interact with inner transactions.
```{testcleanup}
ctx_manager.__exit__(None, None, None)
```
# ARC4 Types
These types are available under the `arc4` namespace. Refer to the [ARC4 specification](https://arc.algorand.foundation/ARCs/arc-0004) for more details on the spec.
```{hint}
Test execution context provides _value generators_ for ARC4 types. To access their _value generators_, use `{context_instance}.any.arc4` property. See more examples below.
```
```{note}
For all `arc4` types with and without respective _value generator_, instantiation can be performed directly. If you have a suggestion for a new _value generator_ implementation, please open an issue in the [`algorand-typescript-testing`](https://github.com/algorandfoundation/algorand-typescript-testing) repository or contribute by following the [contribution guide](https://github.com/algorandfoundation/algorand-typescript-testing/blob/main/CONTRIBUTING).
```
```ts
import { arc4 } from '@algorandfoundation/algorand-typescript';
import { TestExecutionContext } from '@algorandfoundation/algorand-typescript-testing';
// Create the context manager for snippets below
const ctx = new TestExecutionContext();
```
## Unsigned Integers
```ts
// Integer types
const uint8Value = new arc4.UintN8(255);
const uint16Value = new arc4.UintN16(65535);
const uint32Value = new arc4.UintN32(4294967295);
const uint64Value = new arc4.UintN64(18446744073709551615n);
// Generate a random unsigned arc4 integer with default range
const uint8 = ctx.any.arc4.uintN8();
const uint16 = ctx.any.arc4.uintN16();
const uint32 = ctx.any.arc4.uintN32();
const uint64 = ctx.any.arc4.uintN64();
const biguint128 = ctx.any.arc4.uintN128();
const biguint256 = ctx.any.arc4.uintN256();
const biguint512 = ctx.any.arc4.uintN512();
// Generate a random unsigned arc4 integer with specified range
const uint8Custom = ctx.any.arc4.uintN8(10, 100);
const uint16Custom = ctx.any.arc4.uintN16(1000, 5000);
const uint32Custom = ctx.any.arc4.uintN32(100000, 1000000);
const uint64Custom = ctx.any.arc4.uintN64(1000000000, 10000000000);
const biguint128Custom = ctx.any.arc4.uintN128(1000000000000000, 10000000000000000n);
const biguint256Custom = ctx.any.arc4.uintN256(
1000000000000000000000000n,
10000000000000000000000000n,
);
const biguint512Custom = ctx.any.arc4.uintN512(
10000000000000000000000000000000000n,
10000000000000000000000000000000000n,
);
```
## Address
```ts
// Address type
const addressValue = new arc4.Address('AAAAAAAAAAAAAAAAAAAAAAAAAAAAAAAAAAAAAAAAAAAAAAAAAAAAY5HFKQ');
// Generate a random address
const randomAddress = ctx.any.arc4.address();
// Access native underlaying type
const native = randomAddress.native;
```
## Dynamic Bytes
```ts
// Dynamic byte string
const bytesValue = new arc4.DynamicBytes('Hello, Algorand!');
// Generate random dynamic bytes
const randomDynamicBytes = ctx.any.arc4.dynamicBytes(123); // n is the number of bits in the arc4 dynamic bytes
```
## String
```ts
// UTF-8 encoded string
const stringValue = new arc4.Str('Hello, Algorand!');
// Generate random string
const randomString = ctx.any.arc4.str(12); // n is the number of bits in the arc4 string
```
```ts
// test cleanup
ctx.reset();
```
# AVM Types
These types are available directly under the `algorand-typescript` namespace. They represent the basic AVM primitive types and can be instantiated directly or via *value generators*:
```{note}
For 'primitive `algorand-typescript` types such as `Account`, `Application`, `Asset`, `uint64`, `biguint`, `bytes`, `string` with and without respective _value generator_, instantiation can be performed directly. If you have a suggestion for a new _value generator_ implementation, please open an issue in the [`algorand-typescript-testing`](https://github.com/algorandfoundation/algorand-typescript-testing) repository or contribute by following the [contribution guide](https://github.com/algorandfoundation/algorand-typescript-testing/blob/main/CONTRIBUTING).
```
```ts
import * as algots from '@algorandfoundation/algorand-typescript';
import { TestExecutionContext } from '@algorandfoundation/algorand-typescript-testing';
// Create the context manager for snippets below
const ctx = new TestExecutionContext();
```
## uint64
```ts
// Direct instantiation
const uint64Value = algots.Uint64(100);
// Generate a random UInt64 value
const randomUint64 = ctx.any.uint64();
// Specify a range
const randomUint64InRange = ctx.any.uint64(1000, 9999);
```
## bytes
```ts
// Direct instantiation
const bytesValue = algots.Bytes('Hello, Algorand!');
// Generate random byte sequences
const randomBytes = ctx.any.bytes();
// Specify the length
const randomBytesOfLength = ctx.any.bytes(32);
```
## string
```ts
// Direct instantiation
const stringValue = 'Hello, Algorand!';
// Generate random strings
const randomString = ctx.any.string();
// Specify the length
const randomStringOfLength = ctx.any.string(16);
```
## biguint
```ts
// Direct instantiation
const biguintValue = algots.BigUint(100);
// Generate a random BigUInt value
const randomBiguint = ctx.any.biguint();
// Specify the min value
const randomBiguintOver = ctx.any.biguint(100n);
```
## Asset
```ts
// Direct instantiation
const asset = algots.Asset(1001);
// Generate a random asset
const randomAsset = ctx.any.asset({
clawback: ctx.any.account(), // Optional: Clawback address
creator: ctx.any.account(), // Optional: Creator account
decimals: 6, // Optional: Number of decimals
defaultFrozen: false, // Optional: Default frozen state
freeze: ctx.any.account(), // Optional: Freeze address
manager: ctx.any.account(), // Optional: Manager address
metadataHash: ctx.any.bytes(32), // Optional: Metadata hash
name: algots.Bytes(ctx.any.string()), // Optional: Asset name
reserve: ctx.any.account(), // Optional: Reserve address
total: 1000000, // Optional: Total supply
unitName: algots.Bytes(ctx.any.string()), // Optional: Unit name
url: algots.Bytes(ctx.any.string()), // Optional: Asset URL
});
// Get an asset by ID
const asset = ctx.ledger.getAsset(randomAsset.id);
// Update an asset
ctx.ledger.patchAssetData(randomAsset, {
clawback: ctx.any.account(), // Optional: New clawback address
creator: ctx.any.account(), // Optional: Creator account
decimals: 6, // Optional: New number of decimals
defaultFrozen: false, // Optional: Default frozen state
freeze: ctx.any.account(), // Optional: New freeze address
manager: ctx.any.account(), // Optional: New manager address
metadataHash: ctx.any.bytes(32), // Optional: New metadata hash
name: algots.Bytes(ctx.any.string()), // Optional: New asset name
reserve: ctx.any.account(), // Optional: New reserve address
total: 1000000, // Optional: New total supply
unitName: algots.Bytes(ctx.any.string()), // Optional: Unit name
url: algots.Bytes(ctx.any.string()), // Optional: New asset URL
});
```
## Account
```ts
// Direct instantiation
const rawAddress = algots.Bytes.fromBase32(
'PUYAGEGVCOEBP57LUKPNOCSMRWHZJSU4S62RGC2AONDUEIHC6P7FOPJQ4I',
);
const account = algots.Account(rawAddress); // zero address by default
// Generate a random account
const randomAccount = ctx.any.account({
address: rawAddress, // Optional: Specify a custom address, defaults to a random address
optedAssetBalances: new Map([]), // Optional: Specify opted asset balances as dict of assets to balance
optedApplications: [], // Optional: Specify opted apps as sequence of algopy.Application objects
totalAppsCreated: 0, // Optional: Specify the total number of created applications
totalAppsOptedIn: 0, // Optional: Specify the total number of applications opted into
totalAssets: 0, // Optional: Specify the total number of assets
totalAssetsCreated: 0, // Optional: Specify the total number of created assets
totalBoxBytes: 0, // Optional: Specify the total number of box bytes
totalBoxes: 0, // Optional: Specify the total number of boxes
totalExtraAppPages: 0, // Optional: Specify the total number of extra
totalNumByteSlice: 0, // Optional: Specify the total number of byte slices
totalNumUint: 0, // Optional: Specify the total number of uints
minBalance: 0, // Optional: Specify a minimum balance
balance: 0, // Optional: Specify an initial balance
authAddress: algots.Account(), // Optional: Specify an auth address,
});
// Generate a random account that is opted into a specific asset
const mockAsset = ctx.any.asset();
const mockAccount = ctx.any.account({
optedAssetBalances: new Map([[mockAsset.id, 123]]),
});
// Get an account by address
const account = ctx.ledger.getAccount(mockAccount);
// Update an account
ctx.ledger.patchAccountData(mockAccount, {
account: {
balance: 0, // Optional: New balance
minBalance: 0, // Optional: New minimum balance
authAddress: ctx.any.account(), // Optional: New auth address
totalAssets: 0, // Optional: New total number of assets
totalAssetsCreated: 0, // Optional: New total number of created assets
totalAppsCreated: 0, // Optional: New total number of created applications
totalAppsOptedIn: 0, // Optional: New total number of applications opted into
totalExtraAppPages: 0, // Optional: New total number of extra application pages
},
});
// Check if an account is opted into a specific asset
const optedIn = account.isOptedIn(mockAsset);
```
## Application
```ts
// Direct instantiation
const application = algots.Application();
// Generate a random application
const randomApp = ctx.any.application({
approvalProgram: algots.Bytes(''), // Optional: Specify a custom approval program
clearStateProgram: algots.Bytes(''), // Optional: Specify a custom clear state program
globalNumUint: 1, // Optional: Number of global uint values
globalNumBytes: 1, // Optional: Number of global byte values
localNumUint: 1, // Optional: Number of local uint values
localNumBytes: 1, // Optional: Number of local byte values
extraProgramPages: 1, // Optional: Number of extra program pages
creator: ctx.defaultSender, // Optional: Specify the creator account
});
// Get an application by ID
const app = ctx.ledger.getApplication(randomApp.id);
// Update an application
ctx.ledger.patchApplicationData(randomApp, {
application: {
approvalProgram: algots.Bytes(''), // Optional: New approval program
clearStateProgram: algots.Bytes(''), // Optional: New clear state program
globalNumUint: 1, // Optional: New number of global uint values
globalNumBytes: 1, // Optional: New number of global byte values
localNumUint: 1, // Optional: New number of local uint values
localNumBytes: 1, // Optional: New number of local byte values
extraProgramPages: 1, // Optional: New number of extra program pages
creator: ctx.defaultSender, // Optional: New creator account
},
});
// Patch logs for an application. When accessing via transactions or inner transaction related opcodes, will return the patched logs unless new logs where added into the transaction during execution.
const testApp = ctx.any.application({
appLogs: [algots.Bytes('log entry 1'), algots.Bytes('log entry 2')],
});
// Get app associated with the active contract
class MyContract extends algots.arc4.Contract {}
const contract = ctx.contract.create(MyContract);
const activeApp = ctx.ledger.getApplicationForContract(contract);
```
```ts
// test context clean up
ctx.reset();
```
# Concepts
The following sections provide an overview of key concepts and features in the Algorand TypeScript Testing framework.
## Test Context
The main abstraction for interacting with the testing framework is the [`TestExecutionContext`](../api#contexts). It creates an emulated Algorand environment that closely mimics AVM behavior relevant to unit testing the contracts and provides a TypeScript interface for interacting with the emulated environment.
```typescript
import { TestExecutionContext } from '@algorandfoundation/algorand-typescript-testing';
import { afterEach, describe, it } from 'vitest';
describe('MyContract', () => {
// Recommended way to instantiate the test context
const ctx = new TestExecutionContext();
afterEach(() => {
// ctx should be reset after each test is executed
ctx.reset();
});
it('test my contract', () => {
// Your test code here
});
});
```
The context manager interface exposes four main properties:
1. `contract`: An instance of `ContractContext` for creating instances of Contract under test and register them with the test execution context.
2. `ledger`: An instance of `LedgerContext` for interacting with and querying the emulated Algorand ledger state.
3. `txn`: An instance of `TransactionContext` for creating and managing transaction groups, submitting transactions, and accessing transaction results.
4. `any`: An instance of `AlgopyValueGenerator` for generating randomized test data.
The `any` property provides access to different value generators:
* `AvmValueGenerator`: Base abstractions for AVM types. All methods are available directly on the instance returned from `any`.
* `TxnValueGenerator`: Accessible via `any.txn`, for transaction-related data.
* `Arc4ValueGenerator`: Accessible via `any.arc4`, for ARC4 type data.
These generators allow creation of constrained random values for various AVM entities (accounts, assets, applications, etc.) when specific values are not required.
```{hint}
Value generators are powerful tools for generating test data for specified AVM types. They allow further constraints on random value generation via arguments, making it easier to generate test data when exact values are not necessary.
When used with the 'Arrange, Act, Assert' pattern, value generators can be especially useful in setting up clear and concise test data in arrange steps.
```
## Types of `algorand-typescript` stub implementations
As explained in the [introduction](index), `algorand-typescript-testing` *injects* test implementations for stubs available in the `algorand-typescript` package. However, not all of the stubs are implemented in the same manner:
1. **Native**: Fully matches AVM computation in Python. For example, `op.sha256` and other cryptographic operations behave identically in AVM and unit tests. This implies that the majority of opcodes that are ‘pure’ functions in AVM also have a native TypeScript implementation provided by this package. These abstractions and opcodes can be used within and outside of the testing context.
2. **Emulated**: Uses `TestExecutionContext` to mimic AVM behavior. For example, `Box.put` on an `Box` within a test context stores data in the test manager, not the real Algorand network, but provides the same interface.
3. **Mockable**: Not implemented, but can be mocked or patched. For example, `op.onlineStake` can be mocked to return specific values or behaviors; otherwise, it raises a `NotImplementedError`. This category covers cases where native or emulated implementation in a unit test context is impractical or overly complex.
# Smart Contract Testing
This guide provides an overview of how to test smart contracts using the [Algorand Typescript Testing package](https://www.npmjs.com/package/@algorandfoundation/algorand-typescript-testing). We will cover the basics of testing `arc4.Contract` and `BaseContract` classes, focusing on `abimethod` and `baremethod` decorators.
```{note}
The code snippets showcasing the contract testing capabilities are using [vitest](https://vitest.dev/) as the test framework. However, note that the `algorand-typescript-testing` package can be used with any other test framework that supports TypeScript. `vitest` is used for demonstration purposes in this documentation.
```
```ts
import { arc4 } from '@algorandfoundation/algorand-typescript';
import { TestExecutionContext } from '@algorandfoundation/algorand-typescript-testing';
// Create the context manager for snippets below
const ctx = new TestExecutionContext();
```
## `arc4.Contract`
Subclasses of `arc4.Contract` are **required** to be instantiated with an active test context. As part of instantiation, the test context will automatically create a matching `Application` object instance.
Within the class implementation, methods decorated with `arc4.abimethod` and `arc4.baremethod` will automatically assemble an `gtxn.ApplicationTxn` transaction to emulate the AVM application call. This behavior can be overriden by setting the transaction group manually as part of test setup, this is done via implicit invocation of `ctx.any.txn.applicationCall` *value generator* (refer to [APIs](../apis) for more details).
```ts
class SimpleVotingContract extends arc4.Contract {
topic = GlobalState({ initialValue: Bytes('default_topic'), key: 'topic' });
votes = GlobalState({
initialValue: Uint64(0),
key: 'votes',
});
voted = LocalState({ key: 'voted' });
@arc4.abimethod({ onCreate: 'require' })
create(initialTopic: bytes) {
this.topic.value = initialTopic;
this.votes.value = Uint64(0);
}
@arc4.abimethod()
vote(): uint64 {
assert(this.voted(Txn.sender).value === 0, 'Account has already voted');
this.votes.value = this.votes.value + 1;
this.voted(Txn.sender).value = Uint64(1);
return this.votes.value;
}
@arc4.abimethod({ readonly: true })
getVotes(): uint64 {
return this.votes.value;
}
@arc4.abimethod()
changeTopic(newTopic: bytes) {
assert(Txn.sender === Txn.applicationId.creator, 'Only creator can change topic');
this.topic.value = newTopic;
this.votes.value = Uint64(0);
// Reset user's vote (this is simplified per single user for the sake of example)
this.voted(Txn.sender).value = Uint64(0);
}
}
// Arrange
const initialTopic = Bytes('initial_topic');
const contract = ctx.contract.create(SimpleVotingContract);
contract.voted(ctx.defaultSender).value = Uint64(0);
// Act - Create the topic
contract.create(initialTopic);
// Assert - Check initial state
expect(contract.topic.value).toEqual(initialTopic);
expect(contract.votes.value).toEqual(Uint64(0));
// Act - Vote
// The method `.vote()` is decorated with `algopy.arc4.abimethod`, which means it will assemble a transaction to emulate the AVM application call
const result = contract.vote();
// Assert - you can access the corresponding auto generated application call transaction via test context
expect(ctx.txn.lastGroup.transactions.length).toEqual(1);
// Assert - Note how local and global state are accessed via regular python instance attributes
expect(result).toEqual(1);
expect(contract.votes.value).toEqual(1);
expect(contract.voted(ctx.defaultSender).value).toEqual(1);
// Act - Change topic
const newTopic = Bytes('new_topic');
contract.changeTopic(newTopic);
// Assert - Check topic changed and votes reset
expect(contract.topic.value).toEqual(newTopic);
expect(contract.votes.value).toEqual(0);
expect(contract.voted(ctx.defaultSender).value).toEqual(0);
// Act - Get votes (should be 0 after reset)
const votes = contract.getVotes();
// Assert - Check votes
expect(votes).toEqual(0);
```
For more examples of tests using `arc4.Contract`, see the [examples](../examples) section.
## \`BaseContract“
Subclasses of `BaseContract` are **required** to be instantiated with an active test context. As part of instantiation, the test context will automatically create a matching `Application` object instance. This behavior is identical to `arc4.Contract` class instances.
Unlike `arc4.Contract`, `BaseContract` requires manual setup of the transaction context and explicit method calls.
Here’s an updated example demonstrating how to test a `BaseContract` class:
```ts
import { BaseContract, Bytes, GlobalState, Uint64 } from '@algorandfoundation/algorand-typescript';
import { TestExecutionContext } from '@algorandfoundation/algorand-typescript-testing';
import { afterEach, expect, test } from 'vitest';
class CounterContract extends BaseContract {
counter = GlobalState({ initialValue: Uint64(0) });
increment() {
this.counter.value = this.counter.value + 1;
return Uint64(1);
}
approvalProgram() {
return this.increment();
}
clearStateProgram() {
return Uint64(1);
}
}
const ctx = new TestExecutionContext();
afterEach(() => {
ctx.reset();
});
test('increment', () => {
// Instantiate contract
const contract = ctx.contract.create(CounterContract);
// Set up the transaction context using active_txn_overrides
ctx.txn
.createScope([
ctx.any.txn.applicationCall({
appId: contract,
sender: ctx.defaultSender,
appArgs: [Bytes('increment')],
}),
])
.execute(() => {
// Invoke approval program
const result = contract.approvalProgram();
// Assert approval program result
expect(result).toEqual(1);
// Assert counter value
expect(contract.counter.value).toEqual(1);
});
// Test clear state program
expect(contract.clearStateProgram()).toEqual(1);
});
test('increment with multiple txns', () => {
const contract = ctx.contract.create(CounterContract);
// For scenarios with multiple transactions, you can still use gtxns
const extraPayment = ctx.any.txn.payment();
ctx.txn
.createScope(
[
extraPayment,
ctx.any.txn.applicationCall({
sender: ctx.defaultSender,
appId: contract,
appArgs: [Bytes('increment')],
}),
],
1, // Set the application call as the active transaction
)
.execute(() => {
const result = contract.approvalProgram();
expect(result).toEqual(1);
expect(contract.counter.value).toEqual(1);
});
expect(ctx.txn.lastGroup.transactions.length).toEqual(2);
});
```
In this updated example:
1. We use `ctx.txn.createScope()` with `ctx.any.txn.applicationCall` to set up the transaction context for a single application call.
2. For scenarios involving multiple transactions, you can still use the `group` parameter to create a transaction group, as shown in the `test('increment with multiple txns', () => {})` function.
This approach provides more flexibility in setting up the transaction context for testing `Contract` classes, allowing for both simple single-transaction scenarios and more complex multi-transaction tests.
## Defer contract method invocation
You can create deferred application calls for more complex testing scenarios where order of transactions needs to be controlled:
```ts
class MyARC4Contract extends arc4.Contract {
someMethod(payment: gtxn.PaymentTxn) {
return Uint64(1);
}
}
const ctx = new TestExecutionContext();
test('deferred call', () => {
const contract = ctx.contract.create(MyARC4Contract);
const extraPayment = ctx.any.txn.payment();
const extraAssetTransfer = ctx.any.txn.assetTransfer();
const implicitPayment = ctx.any.txn.payment();
const deferredCall = ctx.txn.deferAppCall(
contract,
contract.someMethod,
'someMethod',
implicitPayment,
);
ctx.txn.createScope([extraPayment, deferredCall, extraAssetTransfer]).execute(() => {
const result = deferredCall.submit();
});
console.log(ctx.txn.lastGroup); // [extra_payment, implicit_payment, app call, extra_asset_transfer]
});
```
A deferred application call prepares the application call transaction without immediately executing it. The call can be executed later by invoking the `.submit()` method on the deferred application call instance. As demonstrated in the example, you can also include the deferred call in a transaction group creation context manager to execute it as part of a larger transaction group. When `.submit()` is called, only the specific method passed to `defer_app_call()` will be executed.
```ts
// test cleanup
ctx.reset();
```
# Testing Guide
The Algorand TypeScript Testing framework provides powerful tools for testing Algorand TypeScript smart contracts within a Node.js environment. This guide covers the main features and concepts of the framework, helping you write effective tests for your Algorand applications.
```{note}
For all code examples in the _Testing Guide_ section, assume `context` is an instance of `TestExecutionContext` obtained using the initialising an instance of `TestExecutionContext` class. All subsequent code is executed within this context.
```
The Algorand TypeScript Testing framework streamlines unit testing of your Algorand TypeScript smart contracts by offering functionality to:
1. Simulate the Algorand Virtual Machine (AVM) environment
2. Create and manipulate test accounts, assets, applications, transactions, and ARC4 types
3. Test smart contract classes, including their states, variables, and methods
4. Verify logic signatures and subroutines
5. Manage global state, local state, scratch slots, and boxes in test contexts
6. Simulate transactions and transaction groups, including inner transactions
7. Verify opcode behavior
By using this framework, you can ensure your Algorand TypeScript smart contracts function correctly before deploying them to a live network.
Key features of the framework include:
* `TestExecutionContext`: The main entry point for testing, providing access to various testing utilities and simulated blockchain state
* AVM Type Simulation: Accurate representations of AVM types like `uint64` and `bytes`
* ARC4 Support: Tools for testing ARC4 contracts and methods, including struct definitions and ABI encoding/decoding
* Transaction Simulation: Ability to create and execute various transaction types
* State Management: Tools for managing and verifying global and local state changes
* Opcode Simulation: Implementations of AVM opcodes for accurate smart contract behavior testing
The framework is designed to work seamlessly with Algorand TypeScript smart contracts, allowing developers to write comprehensive unit tests that closely mimic the behavior of contracts on the Algorand blockchain.
## Table of Contents
* [Concepts](./concepts)
* [AVM Types](./avm-types)
* [ARC4 Types](./arc4-types)
* [Transactions](./transactions)
* [Smart Contract Testing](./contract-testing)
* [Smart Signature Testing](./signature-testing)
* [State Management](./state-management)
* [AVM Opcodes](./opcodes)
# AVM Opcodes
The [coverage](coverage) file provides a comprehensive list of all opcodes and their respective types, categorized as *Mockable*, *Emulated*, or *Native* within the `algorand-typescript-testing` package. This section highlights a **subset** of opcodes and types that typically require interaction with the test execution context.
`Native` opcodes are assumed to function as they do in the Algorand Virtual Machine, given their stateless nature. If you encounter issues with any `Native` opcodes, please raise an issue in the [`algorand-typescript-testing` repo](https://github.com/algorandfoundation/algorand-typescript-testing/issues/new/choose) or contribute a PR following the [Contributing](https://github.com/algorandfoundation/algorand-typescript-testing/blob/main/CONTRIBUTING) guide.
```ts
import { TestExecutionContext } from '@algorandfoundation/algorand-typescript-testing';
// Create the context manager for snippets below
const ctx = new TestExecutionContext();
```
## Implemented Types
These types are fully implemented in TypeScript and behave identically to their AVM counterparts:
### 1. Cryptographic Operations
The following opcodes are demonstrated:
* `op.sha256`
* `op.keccak256`
* `op.ecdsaVerify`
```ts
import { op } from '@algorandfoundation/algorand-typescript';
// SHA256 hash
const data = Bytes('Hello, World!');
const hashed = op.sha256(data);
// Keccak256 hash
const keccakHashed = op.keccak256(data);
// ECDSA verification
const messageHash = Bytes.fromHex(
'f809fd0aa0bb0f20b354c6b2f86ea751957a4e262a546bd716f34f69b9516ae1',
);
const sigR = Bytes.fromHex('18d96c7cda4bc14d06277534681ded8a94828eb731d8b842e0da8105408c83cf');
const sigS = Bytes.fromHex('7d33c61acf39cbb7a1d51c7126f1718116179adebd31618c4604a1f03b5c274a');
const pubkeyX = Bytes.fromHex('f8140e3b2b92f7cbdc8196bc6baa9ce86cf15c18e8ad0145d50824e6fa890264');
const pubkeyY = Bytes.fromHex('bd437b75d6f1db67155a95a0da4b41f2b6b3dc5d42f7db56238449e404a6c0a3');
const result = op.ecdsaVerify(op.Ecdsa.Secp256r1, messageHash, sigR, sigS, pubkeyX, pubkeyY);
expect(result).toBe(true);
```
### 2. Arithmetic and Bitwise Operations
The following opcodes are demonstrated:
* `op.addw`
* `op.bitLength`
* `op.getBit`
* `op.setBit`
```ts
import { op, Uint64 } from '@algorandfoundation/algorand-typescript';
// Addition with carry
const [result, carry] = op.addw(Uint64(2n ** 63n), Uint64(2n ** 63n));
// Bitwise operations
const value = Uint64(42);
const bitLength = op.bitLength(value);
const isBitSet = op.getBit(value, 3);
const newValue = op.setBit(value, 2, 1);
```
For a comprehensive list of all opcodes and types, refer to the [coverage](../coverage) page.
## Emulated Types Requiring Transaction Context
These types necessitate interaction with the transaction context:
### algopy.op.Global
```ts
import { TestExecutionContext } from '@algorandfoundation/algorand-typescript-testing';
import { op, arc4, uint64, Uint64 } from '@algorandfoundation/algorand-typescript';
import { TestExecutionContext } from '@algorandfoundation/algorand-typescript-testing';
class MyContract extends arc4.Contract {
@arc4.abimethod()
checkGlobals(): uint64 {
return op.Global.minTxnFee + op.Global.minBalance;
}
}
// Create the context manager for snippets below
const ctx = new TestExecutionContext();
ctx.ledger.patchGlobalData({
minTxnFee: 1000,
minBalance: 100000,
});
const contract = ctx.contract.create(MyContract);
const result = contract.checkGlobals();
expect(result).toEqual(101000);
```
### algopy.op.Txn
```ts
import { op, arc4 } from '@algorandfoundation/algorand-typescript';
import { TestExecutionContext } from '@algorandfoundation/algorand-typescript-testing';
class MyContract extends arc4.Contract {
@arc4.abimethod()
checkTxnFields(): arc4.Address {
return new arc4.Address(op.Txn.sender);
}
}
// Create the context manager for snippets below
const ctx = new TestExecutionContext();
const contract = ctx.contract.create(MyContract);
const customSender = ctx.any.account();
ctx.txn.createScope([ctx.any.txn.applicationCall({ sender: customSender })]).execute(() => {
const result = contract.checkTxnFields();
expect(result).toEqual(customSender);
});
```
### algopy.op.AssetHoldingGet
```ts
import { Account, arc4, Asset, op, uint64, Uint64 } from '@algorandfoundation/algorand-typescript';
import { TestExecutionContext } from '@algorandfoundation/algorand-typescript-testing';
class AssetContract extends arc4.Contract {
@arc4.abimethod()
checkAssetHolding(account: Account, asset: Asset): uint64 {
const [balance, _] = op.AssetHolding.assetBalance(account, asset);
return balance;
}
}
// Create the context manager for snippets below
const ctx = new TestExecutionContext();
const contract = ctx.contract.create(AssetContract);
const asset = ctx.any.asset({ total: 1000000 });
const account = ctx.any.account({ optedAssetBalances: new Map([[asset.id, Uint64(5000)]]) });
const result = contract.checkAssetHolding(account, asset);
expect(result).toEqual(5000);
```
### algopy.op.AppGlobal
```ts
import { arc4, bytes, Bytes, op, uint64, Uint64 } from '@algorandfoundation/algorand-typescript';
import { TestExecutionContext } from '@algorandfoundation/algorand-typescript-testing';
class StateContract extends arc4.Contract {
@arc4.abimethod()
setAndGetState(key: bytes, value: uint64): uint64 {
op.AppGlobal.put(key, value);
return op.AppGlobal.getUint64(key);
}
}
// Create the context manager for snippets below
const ctx = new TestExecutionContext();
const contract = ctx.contract.create(StateContract);
const key = Bytes('test_key');
const value = Uint64(42);
const result = contract.setAndGetState(key, value);
expect(result).toEqual(value);
const [storedValue, _] = ctx.ledger.getGlobalState(contract, key);
expect(storedValue?.value).toEqual(42);
```
### algopy.op.Block
```ts
import { arc4, bytes, op } from '@algorandfoundation/algorand-typescript';
import { TestExecutionContext } from '@algorandfoundation/algorand-typescript-testing';
class BlockInfoContract extends arc4.Contract {
@arc4.abimethod()
getBlockSeed(): bytes {
return op.Block.blkSeed(1000);
}
}
// Create the context manager for snippets below
const ctx = new TestExecutionContext();
const contract = ctx.contract.create(BlockInfoContract);
ctx.ledger.patchBlockData(1000, { seed: op.itob(123456), timestamp: 1625097600 });
const seed = contract.getBlockSeed();
expect(seed).toEqual(op.itob(123456));
```
### algopy.op.AcctParamsGet
```ts
import type { Account, uint64 } from '@algorandfoundation/algorand-typescript';
import { arc4, assert, op, Uint64 } from '@algorandfoundation/algorand-typescript';
import { TestExecutionContext } from '@algorandfoundation/algorand-typescript-testing';
class AccountParamsContract extends arc4.Contract {
@arc4.abimethod()
getAccountBalance(account: Account): uint64 {
const [balance, exists] = op.AcctParams.acctBalance(account);
assert(exists);
return balance;
}
}
// Create the context manager for snippets below
const ctx = new TestExecutionContext();
const contract = ctx.contract.create(AccountParamsContract);
const account = ctx.any.account({ balance: 1000000 });
const balance = contract.getAccountBalance(account);
expect(balance).toEqual(Uint64(1000000));
```
### algopy.op.AppParamsGet
```ts
import type { Application } from '@algorandfoundation/algorand-typescript';
import { arc4, assert, op } from '@algorandfoundation/algorand-typescript';
import { TestExecutionContext } from '@algorandfoundation/algorand-typescript-testing';
class AppParamsContract extends arc4.Contract {
@arc4.abimethod()
getAppCreator(appId: Application): arc4.Address {
const [creator, exists] = op.AppParams.appCreator(appId);
assert(exists);
return new arc4.Address(creator);
}
}
// Create the context manager for snippets below
const ctx = new TestExecutionContext();
const contract = ctx.contract.create(AppParamsContract);
const app = ctx.any.application();
const creator = contract.getAppCreator(app);
expect(creator).toEqual(ctx.defaultSender);
```
### algopy.op.AssetParamsGet
```ts
import type { uint64 } from '@algorandfoundation/algorand-typescript';
import { arc4, assert, op } from '@algorandfoundation/algorand-typescript';
import { TestExecutionContext } from '@algorandfoundation/algorand-typescript-testing';
class AssetParamsContract extends arc4.Contract {
@arc4.abimethod()
getAssetTotal(assetId: uint64): uint64 {
const [total, exists] = op.AssetParams.assetTotal(assetId);
assert(exists);
return total;
}
}
// Create the context manager for snippets below
const ctx = new TestExecutionContext();
const contract = ctx.contract.create(AssetParamsContract);
const asset = ctx.any.asset({ total: 1000000, decimals: 6 });
const total = contract.getAssetTotal(asset.id);
expect(total).toEqual(1000000);
```
### algopy.op.Box
```ts
import type { bytes } from '@algorandfoundation/algorand-typescript';
import { arc4, assert, Bytes, op } from '@algorandfoundation/algorand-typescript';
import { TestExecutionContext } from '@algorandfoundation/algorand-typescript-testing';
class BoxStorageContract extends arc4.Contract {
@arc4.abimethod()
storeAndRetrieve(key: bytes, value: bytes): bytes {
op.Box.put(key, value);
const [retrievedValue, exists] = op.Box.get(key);
assert(exists);
return retrievedValue;
}
}
// Create the context manager for snippets below
const ctx = new TestExecutionContext();
const contract = ctx.contract.create(BoxStorageContract);
const key = Bytes('test_key');
const value = Bytes('test_value');
const result = contract.storeAndRetrieve(key, value);
expect(result).toEqual(value);
const storedValue = ctx.ledger.getBox(contract, key);
expect(storedValue).toEqual(value);
```
### algopy.compile\_contract
```ts
import { arc4, compile, uint64 } from '@algorandfoundation/algorand-typescript';
import { TestExecutionContext } from '@algorandfoundation/algorand-typescript-testing';
class MockContract extends arc4.Contract {}
class ContractFactory extends arc4.Contract {
@arc4.abimethod()
compileAndGetBytes(): uint64 {
const contractResponse = compile(MockContract);
return compiled.localBytes;
}
}
// Create the context manager for snippets below
const ctx = new TestExecutionContext();
const contract = ctx.contract.create(ContractFactory);
const mockApp = ctx.any.application({ localNumBytes: 4 });
ctx.setCompiledApp(MockContract, mockApp.id);
const result = contract.compileAndGetBytes();
expect(result).toBe(4);
```
## Mockable Opcodes
These opcodes are mockable in `algorand-typescript-testing`, allowing for controlled testing of complex operations. Note that the module being mocked is `@algorandfoundation/algorand-typescript-testing/internal` which holds the stub implementations of `algorand-typescript` functions to be executed in Node.js environment.
### algopy.op.vrf\_verify
```ts
import { expect, Mock, test, vi } from 'vitest';
import { bytes, Bytes, op, VrfVerify } from '@algorandfoundation/algorand-typescript';
vi.mock(
import('@algorandfoundation/algorand-typescript-testing/internal'),
async importOriginal => {
const mod = await importOriginal();
return {
...mod,
op: {
...mod.op,
vrfVerify: vi.fn(),
},
};
},
);
test('mock vrfVerify', () => {
const mockedVrfVerify = op.vrfVerify as Mock;
const mockResult = [Bytes('mock_output'), true] as readonly [bytes, boolean];
mockedVrfVerify.mockReturnValue(mockResult);
const result = op.vrfVerify(
VrfVerify.VrfAlgorand,
Bytes('proof'),
Bytes('message'),
Bytes('public_key'),
);
expect(result).toEqual(mockResult);
});
```
### algopy.op.EllipticCurve
```ts
import { expect, Mock, test, vi } from 'vitest';
import { Bytes, op } from '@algorandfoundation/algorand-typescript';
vi.mock(
import('@algorandfoundation/algorand-typescript-testing/internal'),
async importOriginal => {
const mod = await importOriginal();
return {
...mod,
op: {
...mod.op,
EllipticCurve: {
...mod.op.EllipticCurve,
add: vi.fn(),
},
},
};
},
);
test('mock EllipticCurve', () => {
const mockedEllipticCurveAdd = op.EllipticCurve.add as Mock;
const mockResult = Bytes('mock_output');
mockedEllipticCurveAdd.mockReturnValue(mockResult);
const result = op.EllipticCurve.add(op.Ec.BN254g1, Bytes('A'), Bytes('B'));
expect(result).toEqual(mockResult);
});
```
These examples demonstrate how to mock key mockable opcodes in `algorand-typescript-testing`. Use similar techniques (in your preferred testing framework) for other mockable opcodes like `mimc`, and `JsonRef`.
Mocking these opcodes allows you to:
1. Control complex operations’ behavior not covered by *implemented* and *emulated* types.
2. Test edge cases and error conditions.
3. Isolate contract logic from external dependencies.
```ts
// test cleanup
ctx.reset();
```
# Testing Guide
The Algorand TypeScript Testing framework provides powerful tools for testing Algorand TypeScript smart contracts within a Node.js environment. This guide covers the main features and concepts of the framework, helping you write effective tests for your Algorand applications.
```{note}
For all code examples in the _Testing Guide_ section, assume `context` is an instance of `TestExecutionContext` obtained using the initialising an instance of `TestExecutionContext` class. All subsequent code is executed within this context.
```
The Algorand TypeScript Testing framework streamlines unit testing of your Algorand TypeScript smart contracts by offering functionality to:
1. Simulate the Algorand Virtual Machine (AVM) environment
2. Create and manipulate test accounts, assets, applications, transactions, and ARC4 types
3. Test smart contract classes, including their states, variables, and methods
4. Verify logic signatures and subroutines
5. Manage global state, local state, scratch slots, and boxes in test contexts
6. Simulate transactions and transaction groups, including inner transactions
7. Verify opcode behavior
By using this framework, you can ensure your Algorand TypeScript smart contracts function correctly before deploying them to a live network.
Key features of the framework include:
* `TestExecutionContext`: The main entry point for testing, providing access to various testing utilities and simulated blockchain state
* AVM Type Simulation: Accurate representations of AVM types like `uint64` and `bytes`
* ARC4 Support: Tools for testing ARC4 contracts and methods, including struct definitions and ABI encoding/decoding
* Transaction Simulation: Ability to create and execute various transaction types
* State Management: Tools for managing and verifying global and local state changes
* Opcode Simulation: Implementations of AVM opcodes for accurate smart contract behavior testing
The framework is designed to work seamlessly with Algorand TypeScript smart contracts, allowing developers to write comprehensive unit tests that closely mimic the behavior of contracts on the Algorand blockchain.
## Table of Contents
* [Concepts](./concepts)
* [AVM Types](./avm-types)
* [ARC4 Types](./arc4-types)
* [Transactions](./transactions)
* [Smart Contract Testing](./contract-testing)
* [Smart Signature Testing](./signature-testing)
* [State Management](./state-management)
* [AVM Opcodes](./opcodes)
# Smart Signature Testing
Test Algorand smart signatures (LogicSigs) with ease using the Algorand TypeScript Testing framework.
```ts
import * as algots from '@algorandfoundation/algorand-typescript';
import { TestExecutionContext } from '@algorandfoundation/algorand-typescript-testing';
// Create the context manager for snippets below
const ctx = new TestExecutionContext();
```
## Define a LogicSig
Extend `algots.LogicSig` class to create a LogicSig:
```ts
import * as algots from '@algorandfoundation/algorand-typescript';
class HashedTimeLockedLogicSig extends LogicSig {
program(): boolean {
// LogicSig code here
return true; // Approve transaction
}
}
```
## Execute and Test
Use `ctx.executeLogicSig()` to run and verify LogicSigs:
```ts
ctx.txn.createScope([ctx.any.txn.payment()]).execute(() => {
const result = ctx.executeLogicSig(new HashedTimeLockedLogicSig(), Bytes('secret'));
expect(result).toBe(true);
});
```
`executeLogicSig()` returns a boolean:
* `true`: Transaction approved
* `false`: Transaction rejected
## Pass Arguments
Provide arguments to LogicSigs using `executeLogicSig()`:
```ts
const result = ctx.executeLogicSig(new HashedTimeLockedLogicSig(), Bytes('secret'));
```
Access arguments in the LogicSig with `algots.op.arg()` opcode:
```ts
import * as algots from '@algorandfoundation/algorand-typescript';
class HashedTimeLockedLogicSig extends LogicSig {
program(): boolean {
// LogicSig code here
const secret = algots.op.arg(0);
const expectedHash = algots.op.sha256(algots.Bytes('secret'));
return algots.op.sha256(secret) === expectedHash;
}
}
// Example usage
const secret = algots.Bytes('secret');
expect(ctx.executeLogicSig(new HashedTimeLockedLogicSig(), secret));
```
For more details on available operations, see the [coverage](../coverage).
```ts
// test cleanup
ctx.reset();
```
# State Management
`algorand-typescript-testing` provides tools to test state-related abstractions in Algorand smart contracts. This guide covers global state, local state, boxes, and scratch space management.
```ts
import * as algots from '@algorandfoundation/algorand-typescript';
import { TestExecutionContext } from '@algorandfoundation/algorand-typescript-testing';
// Create the context manager for snippets below
const ctx = new TestExecutionContext();
```
## Global State
Global state is represented as instance attributes on `algots.Contract` and `algots.arc4.Contract` classes.
```ts
class MyContract extends algots.arc4.Contract {
stateA = algots.GlobalState({ key: 'globalStateA' });
stateB = algots.GlobalState({ initialValue: algots.Uint64(1), key: 'globalStateB' });
}
// In your test
const contract = ctx.contract.create(MyContract);
contract.stateA.value = algots.Uint64(10);
contract.stateB.value = algots.Uint64(20);
```
## Local State
Local state is defined similarly to global state, but accessed using account addresses as keys.
```ts
class MyContract extends algots.arc4.Contract {
localStateA = algots.LocalState({ key: 'localStateA' });
}
// In your test
const contract = ctx.contract.create(MyContract);
const account = ctx.any.account();
contract.localStateA(account).value = algots.Uint64(10);
```
## Boxes
The framework supports various Box abstractions available in `algorand-typescript`.
```ts
class MyContract extends algots.arc4.Contract {
box: algots.Box | undefined;
boxMap = algots.BoxMap({ keyPrefix: 'boxMap' });
@algots.arc4.abimethod()
someMethod(keyA: algots.bytes, keyB: algots.bytes, keyC: algots.bytes) {
this.box = algots.Box({ key: keyA });
this.box.value = algots.Uint64(1);
this.boxMap.set(keyB, algots.Uint64(1));
this.boxMap.set(keyC, algots.Uint64(2));
}
}
// In your test
const contract = ctx.contract.create(MyContract);
const keyA = algots.Bytes('keyA');
const keyB = algots.Bytes('keyB');
const keyC = algots.Bytes('keyC');
contract.someMethod(keyA, keyB, keyC);
// Access boxes
const boxContent = ctx.ledger.getBox(contract, keyA);
expect(ctx.ledger.boxExists(contract, keyA)).toBe(true);
// Set box content manually
ctx.ledger.setBox(contract, keyA, algots.op.itob(algots.Uint64(1)));
```
## Scratch Space
Scratch space is represented as a list of 256 slots for each transaction.
```ts
@algots.contract({ scratchSlots: [1, 2, { from: 3, to: 20 }] })
class MyContract extends algots.Contract {
approvalProgram(): boolean {
algots.op.Scratch.store(1, algots.Uint64(5));
algots.assert(algots.op.Scratch.loadUint64(1) === algots.Uint64(5));
return true;
}
}
// In your test
const contract = ctx.contract.create(MyContract);
const result = contract.approvalProgram();
expect(result).toBe(true);
const scratchSpace = ctx.txn.lastGroup.getScratchSpace();
expect(scratchSpace[1]).toEqual(5);
```
For more detailed information, explore the example contracts in the `examples/` directory, the [coverage](../coverage) page, and the [API documentation](../api).
```ts
// test cleanup
ctx.reset();
```
# Transactions
The testing framework follows the Transaction definitions described in [`algorand-typescript` docs](https://github.com/algorandfoundation/puya-ts/blob/main/docs/lg-transactions). This section focuses on *value generators* and interactions with inner transactions, it also explains how the framework identifies *active* transaction group during contract method/subroutine/logicsig invocation.
```ts
import * as algots from '@algorandfoundation/algorand-typescript';
import { TestExecutionContext } from '@algorandfoundation/algorand-typescript-testing';
// Create the context manager for snippets below
const ctx = new TestExecutionContext();
```
## Group Transactions
Refers to test implementation of transaction stubs available under `algots.gtxn.*` namespace. Available under [`TxnValueGenerator`](../code/value-generators/txn/classes/TxnValueGenerator) instance accessible via `ctx.any.txn` property:
```ts
// Generate a random payment transaction
const payTxn = ctx.any.txn.payment({
sender: ctx.any.account(), // Optional: Defaults to context's default sender if not provided
receiver: ctx.any.account(), // Required
amount: 1000000, // Required
});
// Generate a random asset transfer transaction
const assetTransferTxn = ctx.any.txn.assetTransfer({
sender: ctx.any.account(), // Optional: Defaults to context's default sender if not provided
assetReceiver: ctx.any.account(), // Required
xferAsset: ctx.any.asset({ assetId: 1 }), // Required
assetAmount: 1000, // Required
});
// Generate a random application call transaction
const appCallTxn = ctx.any.txn.applicationCall({
appId: ctx.any.application(), // Required
appArgs: [algots.Bytes('arg1'), algots.Bytes('arg2')], // Optional: Defaults to empty list if not provided
accounts: [ctx.any.account()], // Optional: Defaults to empty list if not provided
assets: [ctx.any.asset()], // Optional: Defaults to empty list if not provided
apps: [ctx.any.application()], // Optional: Defaults to empty list if not provided
approvalProgramPages: [algots.Bytes('approval_code')], // Optional: Defaults to empty list if not provided
clearStateProgramPages: [algots.Bytes('clear_code')], // Optional: Defaults to empty list if not provided
scratchSpace: { 0: algots.Bytes('scratch') }, // Optional: Defaults to empty dict if not provided
});
// Generate a random asset config transaction
const assetConfigTxn = ctx.any.txn.assetConfig({
sender: ctx.any.account(), // Optional: Defaults to context's default sender if not provided
configAsset: undefined, // Optional: If not provided, creates a new asset
total: 1000000, // Required for new assets
decimals: 0, // Required for new assets
defaultFrozen: false, // Optional: Defaults to False if not provided
unitName: algots.Bytes('UNIT'), // Optional: Defaults to empty string if not provided
assetName: algots.Bytes('Asset'), // Optional: Defaults to empty string if not provided
url: algots.Bytes('http://asset-url'), // Optional: Defaults to empty string if not provided
metadataHash: algots.Bytes('metadata_hash'), // Optional: Defaults to empty bytes if not provided
manager: ctx.any.account(), // Optional: Defaults to sender if not provided
reserve: ctx.any.account(), // Optional: Defaults to zero address if not provided
freeze: ctx.any.account(), // Optional: Defaults to zero address if not provided
clawback: ctx.any.account(), // Optional: Defaults to zero address if not provided
});
// Generate a random key registration transaction
const keyRegTxn = ctx.any.txn.keyRegistration({
sender: ctx.any.account(), // Optional: Defaults to context's default sender if not provided
voteKey: algots.Bytes('vote_pk'), // Optional: Defaults to empty bytes if not provided
selectionKey: algots.Bytes('selection_pk'), // Optional: Defaults to empty bytes if not provided
voteFirst: 1, // Optional: Defaults to 0 if not provided
voteLast: 1000, // Optional: Defaults to 0 if not provided
voteKeyDilution: 10000, // Optional: Defaults to 0 if not provided
});
// Generate a random asset freeze transaction
const assetFreezeTxn = ctx.any.txn.assetFreeze({
sender: ctx.any.account(), // Optional: Defaults to context's default sender if not provided
freezeAsset: ctx.ledger.getAsset(algots.Uint64(1)), // Required
freezeAccount: ctx.any.account(), // Required
frozen: true, // Required
});
```
## Preparing for execution
When a smart contract instance (application) is interacted with on the Algorand network, it must be performed in relation to a specific transaction or transaction group where one or many transactions are application calls to target smart contract instances.
To emulate this behaviour, the `createScope` context manager is available on [`TransactionContext`](../code/subcontexts/transaction-context/classes/TransactionContext) instance that allows setting temporary transaction fields within a specific scope, passing in emulated transaction objects and identifying the active transaction index within the transaction group
```ts
import { arc4, Txn } from '@algorandfoundation/algorand-typescript';
import { TestExecutionContext } from '@algorandfoundation/algorand-typescript-testing';
class SimpleContract extends arc4.Contract {
@arc4.abimethod()
checkSender(): arc4.Address {
return new arc4.Address(Txn.sender);
}
}
const ctx = new TestExecutionContext();
// Create a contract instance
const contract = ctx.contract.create(SimpleContract);
// Use active_txn_overrides to change the sender
const testSender = ctx.any.account();
ctx.txn
.createScope([ctx.any.txn.applicationCall({ appId: contract, sender: testSender })])
.execute(() => {
// Call the contract method
const result = contract.checkSender();
expect(result).toEqual(testSender);
});
// Assert that the sender is the test_sender after exiting the
// transaction group context
expect(ctx.txn.lastActive.sender).toEqual(testSender);
// Assert the size of last transaction group
expect(ctx.txn.lastGroup.transactions.length).toEqual(1);
```
## Inner Transaction
Inner transactions are AVM transactions that are signed and executed by AVM applications (instances of deployed smart contracts or signatures).
When testing smart contracts, to stay consistent with AVM, the framework \_does not allow you to submit inner transactions outside of contract/subroutine invocation, but you can interact with and manage inner transactions using the test execution context as follows:
```ts
import { arc4, Asset, itxn, Txn, Uint64 } from '@algorandfoundation/algorand-typescript';
import { TestExecutionContext } from '@algorandfoundation/algorand-typescript-testing';
class MyContract extends arc4.Contract {
@arc4.abimethod()
payViaItxn(asset: Asset) {
itxn
.payment({
receiver: Txn.sender,
amount: 1,
})
.submit();
}
}
// setup context
const ctx = new TestExecutionContext();
// Create a contract instance
const contract = ctx.contract.create(MyContract);
// Generate a random asset
const asset = ctx.any.asset();
// Execute the contract method
contract.payViaItxn(asset);
// Access the last submitted inner transaction
const paymentTxn = ctx.txn.lastGroup.lastItxnGroup().getPaymentInnerTxn();
// Assert properties of the inner transaction
expect(paymentTxn.receiver).toEqual(ctx.txn.lastActive.sender);
expect(paymentTxn.amount).toEqual(1);
// Access all inner transactions in the last group
ctx.txn.lastGroup.itxnGroups.at(-1)?.itxns.forEach(itxn => {
// Perform assertions on each inner transaction
expect(itxn.type).toEqual(TransactionType.Payment);
});
// Access a specific inner transaction group
const firstItxnGroup = ctx.txn.lastGroup.getItxnGroup(0);
const firstPaymentTxn = firstItxnGroup.getPaymentInnerTxn(0);
expect(firstPaymentTxn.type).toEqual(TransactionType.Payment);
```
In this example, we define a contract method `payViaItxn` that creates and submits an inner payment transaction. The test execution context automatically captures and stores the inner transactions submitted by the contract method.
Note that we don’t need to wrap the execution in a `createScope` context manager because the method is decorated with `@arc4.abimethod`, which automatically creates a transaction group for the method. The `createScope` context manager is only needed when you want to create more complex transaction groups or patch transaction fields for various transaction-related opcodes in AVM.
To access the submitted inner transactions:
1. Use `ctx.txn.lastGroup.lastItxnGroup().getPaymentInnerTxn()` to access the last submitted inner transaction of a specific type, in this case payment transaction.
2. Iterate over all inner transactions in the last group using `ctx.txn.lastGroup.itxnGroups.at(-1)?.itxns`.
3. Access a specific inner transaction group using `ctx.txn.lastGroup.getItxnGroup(index)`.
These methods provide type validation and will raise an error if the requested transaction type doesn’t match the actual type of the inner transaction.
## References
* [API](../api) for more details on the test context manager and inner transactions related methods that perform implicit inner transaction type validation.
* [Examples](../examples) for more examples of smart contracts and associated tests that interact with inner transactions.
```ts
// test cleanup
ctx.reset();
```
# AlgoKit Clients
When building on Algorand, you need reliable ways to communicate with the blockchain—sending transactions, interacting with smart contracts, and accessing blockchain data. AlgoKit Utils clients provide straightforward, developer-friendly interfaces for these interactions, reducing the complexity typically associated with blockchain development. This guide explains how to use these clients to simplify common Algorand development tasks, whether you’re sending a basic transaction or deploying complex smart contracts.
AlgoKit offers two main types of clients to interact with the Algorand blockchain:
1. **Algorand Client** - A general-purpose client for all Algorand interactions, including:
* Crafting, grouping, and sending transactions through a fluent interface of chained methods
* Accessing network services through REST API clients for algod, indexer, and kmd
* Configuring connection and transaction parameters with sensible defaults and optional overrides
2. **Typed Application Client** - A specialized, auto-generated client for interacting with specific smart contracts:
* Provides type-safe interfaces generated from [ARC-56](/arc-standards/arc-0056) or [ARC-32](/arc-standards/arc-0032) contract specification files
* Enables IntelliSense-driven development experience that includes the smart contract methods
* Reduces errors through real-time type checking of arguments provided to smart contract methods
Let’s explore each client type in detail.
## Algorand Client: Gateway to the Blockchain
The `AlgorandClient` serves as your primary entry point for all Algorand operations. Think of it as your Swiss Army knife for blockchain interactions.
### Getting Started with AlgorandClient
You can create an AlgorandClient instance in several ways, depending on your needs:
* TypeScript
[ Source](https://github.com/algorandfoundation/devportal-code-examples/blob/refs/heads/main/projects/typescript-examples/algokit-utils-ts/algorand-client.ts#L33)
```ts
// Point to the network configured through environment variables or
// if no environment variables it will point to the default LocalNet
// configuration
const client1 = AlgorandClient.fromEnvironment()
// Point to default LocalNet configuration
const client2 = AlgorandClient.defaultLocalNet()
// Point to TestNet using AlgoNode free tier
const client3 = AlgorandClient.testNet()
// Point to MainNet using AlgoNode free tier
const client4 = AlgorandClient.mainNet()
// Point to a pre-created algod client
const client5 = AlgorandClient.fromClients({ algod })
// Point to pre-created algod, indexer and kmd clients
const client6 = AlgorandClient.fromClients({ algod, indexer, kmd })
// Point to custom configuration for algod
const client7 = AlgorandClient.fromConfig({
algodConfig: {
server: 'http://localhost',
port: '4001',
token: 'aaaaaaaaaaaaaaaaaaaaaaaaaaaaaaaaaaaaaaaaaaaaaaaaaaaaaaaaaaaaaaaa',
},
})
// Point to custom configuration for algod, indexer and kmd
const client8 = AlgorandClient.fromConfig({
algodConfig: algodConfig,
indexerConfig: indexerConfig,
kmdConfig: kmdConfig,
})
```
* Python
[ Source](https://github.com/algorandfoundation/devportal-code-examples/blob/refs/heads/main/projects/python-examples/algokit_utils_py_examples/algorand_client.py#L28)
```py
# Point to the network configured through environment variables or
# if no environment variables it will point to the default LocalNet
# configuration
algorand_client = AlgorandClient.from_environment()
# Point to default LocalNet configuration
algorand_client = AlgorandClient.default_localnet()
# Point to TestNet using AlgoNode free tier
algorand_client = AlgorandClient.testnet()
# Point to MainNet using AlgoNode free tier
algorand_client = AlgorandClient.mainnet()
# Point to a pre-created algod client
algorand_client = AlgorandClient.from_clients(algod)
# Point to pre-created algod, indexer and kmd clients
algorand_client = AlgorandClient.from_clients(algod, indexer, kmd)
# Point to custom configuration for algod
algorand_client = AlgorandClient.from_config(
AlgoClientNetworkConfig(
server="http://localhost",
token="4001",
)
)
# Point to custom configuration for algod, indexer and kmd
algorand_client = AlgorandClient.from_config(
algod_config, indexer_config, kmd_config
)
```
These factory methods make it easy to connect to different Algorand networks without manually configuring connection details.
Once you have an `AlgorandClient` instance, you can access the REST API clients for the various Algorand APIs via the `AlgorandClient.client` property:
* TypeScript
[ Source](https://github.com/algorandfoundation/devportal-code-examples/blob/refs/heads/main/projects/typescript-examples/algokit-utils-ts/algorand-client.ts#L64)
```ts
const algorandClient = AlgorandClient.fromEnvironment()
const algodClient = algorandClient.client.algod
const indexerClient = algorandClient.client.indexer
const kmdClient = algorandClient.client.kmd
```
* Python
[ Source](https://github.com/algorandfoundation/devportal-code-examples/blob/refs/heads/main/projects/python-examples/algokit_utils_py_examples/algorand_client.py#L56)
```py
algod = algorand_client.client.algod
indexer = algorand_client.client.indexer
kmd = algorand_client.client.kmd
```
For more information about the functionalities of the REST API clients, refer to the following pages:
[algod API Reference ](/reference/rest-api/algod)Interact with Algorand nodes, submit transactions, and get blockchain status
[Indexer API Reference ](/reference/rest-api/indexer)Query historical transactions, account information, and blockchain data
[kmd API Reference ](/reference/rest-api/kmd)Manage wallets and keys (primarily for development environments)
### Understanding AlgorandClient’s Stateful Design
The `AlgorandClient` is “stateful”, meaning that it caches various information that are reused multiple times. This allows the `AlgorandClient` to avoid redundant requests to the blockchain and to provide a more efficient interface for interacting with the blockchain. This is an important concept to understand before using the `AlgorandClient`.
#### Account Signer Caching
When sending transactions, you need to sign them with a private key. `AlgorandClient` can cache these signing capabilities, eliminating the need to provide signing information for every transaction, as you can see in the following example:
* TypeScript
[ Source](https://github.com/algorandfoundation/devportal-code-examples/blob/refs/heads/main/projects/typescript-examples/algokit-utils-ts/algorand-client.ts#L72)
```ts
/*
* If you don't want the Algorand client to cache the signer,
* you can manually provide the signer.
*/
await algorand.send.payment({
sender: randomAccountA,
receiver: randomAccountB,
amount: AlgoAmount.Algo(1),
signer: randomAccountA.signer, // The signer must be manually provided
})
```
* Python
[ Source](https://github.com/algorandfoundation/devportal-code-examples/blob/refs/heads/main/projects/python-examples/algokit_utils_py_examples/algorand_client.py#L64)
```py
"""
If you don't want the Algorand client to cache the signer,
you can manually provide the signer.
"""
algorand_client.send.payment(
PaymentParams(
sender=account_a.address,
receiver=account_b.address,
amount=AlgoAmount(algo=1),
signer=account_a.signer, # The signer must be manually provided
)
)
```
The same example, but with different approaches to signer caching demonstrated:
* TypeScript
[ Source](https://github.com/algorandfoundation/devportal-code-examples/blob/refs/heads/main/projects/typescript-examples/algokit-utils-ts/algorand-client.ts#L85)
```ts
/*
* By setting signers of accounts to the algorand client, the client will cache the signers
* and use them to sign transactions when the sender is one of the accounts.
*/
// If no signer is provided, the client will use the default signer
algorand.setDefaultSigner(randomAccountA.signer)
// If you have an address and a signer, use this method to set the signer
algorand.setSigner(randomAccountA.addr, randomAccountA.signer)
// If you have a `SigningAccount` object, use this method to set the signer
algorand.setSignerFromAccount(randomAccountA)
/*
* The Algorand client can directly send this payment transaction without
* needing a signer because it is tracking the signer for account_a.
*/
await algorand.send.payment({
sender: randomAccountA,
receiver: randomAccountB,
amount: AlgoAmount.Algo(1),
})
```
* Python
[ Source](https://github.com/algorandfoundation/devportal-code-examples/blob/refs/heads/main/projects/python-examples/algokit_utils_py_examples/algorand_client.py#L80)
```py
"""
By setting signers of accounts to the algorand client, the client will cache the signers
and use them to sign transactions when the sender is one of the accounts.
"""
# If no signer is provided, the client will use the default signer
algorand_client.set_default_signer(account_a.signer)
# If you have an address and a signer, use this method to set the signer
algorand_client.set_signer(account_a.address, account_a.signer)
# If you have a `SigningAccount` object, use this method to set the signer
algorand_client.set_signer_from_account(account_a)
"""
The Algorand client can directly send this payment transaction without
needing a signer because it is tracking the signer for account_a.
"""
algorand_client.send.payment(
PaymentParams(
sender=account_a.address,
receiver=account_b.address,
amount=AlgoAmount(algo=1),
)
)
```
This caching mechanism simplifies your code, especially when sending multiple transactions from the same account.
#### Suggested Parameter Caching
`AlgorandClient` caches network provided transaction values ([suggested parameters](/reference/rest-api/algod#transactionparams)) for you automatically to reduce network traffic. It has a set of default configurations that control this behavior, but you have the ability to override and change the configuration of this behavior.
##### What Are Suggested Parameters?
In Algorand, every transaction requires a set of network-specific parameters that define how the transaction should be processed. These “suggested parameters” include:
* **Fee:** The transaction fee (in microAlgos)
* **First Valid Round:** The first blockchain round where the transaction can be processed
* **Last Valid Round:** The last blockchain round where the transaction can be processed (after this, the transaction expires)
* **Genesis ID:** The identifier for the Algorand network (e.g., “mainnet-v1.0”)
* **Genesis Hash:** The hash of the genesis block for the network
* **Min Fee:** The minimum fee required by the network
These parameters are called “suggested” because the network provides recommended values, but developers can modify them (for example, to increase the fee during network congestion).
##### Why Cache These Parameters?
Without caching, your application would need to request these parameters from the network before every transaction, which:
* **Increases latency:** Each transaction would require an additional network request
* **Increases network load:** Both for your application and the Algorand node
* **Slows down user experience:** Especially when creating multi-transaction groups
Since these parameters only change every few seconds (when new blocks are created), repeatedly requesting them wastes resources.
##### How Parameter Caching Works
The `AlgorandClient` automatically:
1. Requests suggested parameters when needed
2. Caches them for a configurable time period (default: 3 seconds)
3. Reuses the cached values for subsequent transactions
4. Refreshes the cache when it expires
##### Customized Parameter Caching
`AlgorandClient` has a set of default configurations that control this behavior, but you have the ability to override and change the configuration of this behavior:
* `algorand.setDefaultValidityWindow(validityWindow)` - Set the default validity window (number of rounds from the current known round that the transaction will be valid to be accepted for), having a smallish value for this is usually ideal to avoid transactions that are valid for a long future period and may be submitted even after you think it failed to submit if waiting for a particular number of rounds for the transaction to be successfully submitted. The validity window defaults to 10, except in automated testing where it’s set to 1000 when targeting LocalNet.
* `algorand.setSuggestedParams(suggestedParams, until?)` - Set the suggested network parameters to use (optionally until the given time)
* `algorand.setSuggestedParamsTimeout(timeout)` - Set the timeout that is used to cache the suggested network parameters (by default 3 seconds)
* `algorand.getSuggestedParams()` - Get the current suggested network parameters object, either the cached value, or if the cache has expired a fresh value
- TypeScript
[ Source](https://github.com/algorandfoundation/devportal-code-examples/blob/refs/heads/main/projects/typescript-examples/algokit-utils-ts/algorand-client.ts#L111)
```ts
/*
* Sets the default validity window for transactions.
* @param validityWindow The number of rounds between the first and last valid rounds
* @returns The `algorand` so method calls can be chained
*/
algorand.setDefaultValidityWindow(1000)
/*
* Get suggested params for a transaction (either cached or from algod if the cache is stale or empty)
*/
const sp = await algorand.getSuggestedParams()
// The suggested params can be modified like below
sp.flatFee = true
sp.fee = 2000
/*
* Sets a cache value to use for suggested params. Use this method to use modified suggested params for
* the next transaction.
* @param suggestedParams The suggested params to use
* @param until A timestamp until which to cache, or if not specified then the timeout is used
* @returns The `algorand` so method calls can be chained
*/
algorand.setSuggestedParamsCache(sp)
/*
* Sets the timeout for caching suggested params. If set to 0, the Algorand client
* will request suggested params from the algod client every time.
* @param timeout The timeout in milliseconds
* @returns The `algorand` so method calls can be chained
*/
algorand.setSuggestedParamsCacheTimeout(0)
```
- Python
[ Source](https://github.com/algorandfoundation/devportal-code-examples/blob/refs/heads/main/projects/python-examples/algokit_utils_py_examples/algorand_client.py#L109)
```py
"""
Sets the default validity window for transactions.
:param validity_window: The number of rounds between the first and last valid rounds
:return: The `AlgorandClient` so method calls can be chained
"""
algorand_client.set_default_validity_window(1000)
"""
Get suggested params for a transaction (either cached or from algod if the cache is stale or empty)
"""
sp = algorand_client.get_suggested_params()
# The suggested params can be modified like below
sp.flat_fee = True
sp.fee = 2000
"""
Sets a cache value to use for suggested params. Use this method to use modified suggested params for
the next transaction.
:param suggested_params: The suggested params to use
:param until: A timestamp until which to cache, or if not specified then the timeout is used
:return: The `AlgorandClient` so method calls can be chained
"""
algorand_client.set_suggested_params_cache(sp)
"""
Sets the timeout for caching suggested params. If set to 0, the Algorand client
will request suggested params from the algod client every time.
:param timeout: The timeout in milliseconds
:return: The `AlgorandClient` so method calls can be chained
"""
algorand_client.set_suggested_params_cache_timeout(0)
```
When to Adjust Parameter Caching
* **Building time-sensitive applications:** Reduce the validity window for transactions that shouldn’t remain pending for long
* **Developing high-throughput services:** Increase the cache timeout to reduce network requests
* **Testing transaction behavior:** Disable caching to ensure fresh parameters for each test
By understanding and properly configuring suggested parameter caching, you can optimize your application’s performance while ensuring transactions are processed correctly by the Algorand network.
## Typed App Clients: Smart Contract Interaction Simplified
While the `AlgorandClient` handles general blockchain interactions, typed app clients provide specialized interfaces for deployed applications. These clients are generated from contract specifications ([ARC-56](/arc-standards/arc-0056)/[ARC-32](/arc-standards/arc-0032)) and offer:
* Type-safe method calls
* Automatic parameter validation
* IntelliSense code completion support
Note
Typed app clients are the recommended way to interact with smart contracts. However, you have alternatives based on your situation. If you have an *ARC-56* or *ARC-32* app specification but prefer not to use typed clients, you can still use non-typed application clients. For smart contracts without any app specification, you’ll need to use the underlying app management and deployment functionality to manually construct your transactions.
### Generating App Clients
The relevant smart contract’s app client is generated using the *ARC56/ARC32* ABI file. There are two different ways to generate an application client for a smart contract:
#### 1. Using the AlgoKit Build CLI Command
When you are using the AlgoKit smart contract template for your project, compiling your *ARC4* smart contract written in either TypeScript or Python will automatically generate the TypeScript or Python application client for you depending on what language you chose for contract interaction. Simply run the following command to generate the artifacts including the typed application client:
```shell
algokit project run build
```
After running the command, you should see the following artifacts generated in the `artifacts` directory under the `smart_contracts` directory:
* hello\_world
* hello\_world\_client.py
* HelloWorld.approval.puya.map
* HelloWorld.approval.teal
* HelloWorld.arc56.json
* HelloWorld.clear.puya.map
* HelloWorld.clear.puya.teal
#### 2. Using the AlgoKit Generate CLI Command
There is also an AlgoKit CLI command to generate the app client for a smart contract. You can also use it to define custom commands inside of the `.algokit.toml` file in your project directory. Note that you can specify what language you want for the application clients with the file extensions `.ts` for TypeScript and `.py` for Python.
```shell
# To output a single arc32.json to a TypeScript typed app client:
algokit generate client path/to/arc32.json --output client.ts
# To process multiple arc32.json in a directory structure and output to a TypeScript app client for each in the current directory:
algokit generate client smart_contracts/artifacts --output {contract_name}.ts
# To process multiple arc32.json in a directory structure and output to a Python client alongside each arc32.json:
algokit generate client smart_contracts/artifacts --output {app_spec_path}/client.py
```
When compiled, all *ARC-4* smart contracts generate an `arc56.json` or `arc32.json` file depending on what app spec was used. This file contains the smart contract’s extended ABI, which follows the *ARC-32* standard.
### Working with a Typed App Client Object
To get an instance of a typed client you can use an `AlgorandClient` instance or a typed app `Factory` instance.
The approach to obtaining a client instance depends on how many app clients you require for a given app spec and if the app has already been deployed, which is summarised below:
#### App is Already Deployed
* TypeScript
[ Source](https://github.com/algorandfoundation/devportal-code-examples/blob/refs/heads/main/projects/typescript-examples/algokit-utils-ts/algorand-client.ts#L150)
```ts
/*
Get typed app client by id
*/
//For single app client instance
let appClient = await algorand.client.getTypedAppClientById(HelloWorldClient, {
appId: 1234n,
})
// or
appClient = new HelloWorldClient({
algorand,
appId: 1234n,
})
// For multiple app client instances use the factory
const factory = algorand.client.getTypedAppFactory(HelloWorldFactory)
// or
const factory2 = new HelloWorldFactory({ algorand })
const appClient1 = await factory.getAppClientById({ appId: 1234n })
const appClient2 = await factory.getAppClientById({ appId: 4321n })
/*
Get typed app client by creator and name
*/
// For single app client instance
let appClientByCreator = await algorand.client.getTypedAppClientByCreatorAndName(HelloWorldClient, {
creatorAddress: randomAccountA.addr,
appName: 'contract-name',
// ...
})
// or
appClientByCreator = await HelloWorldClient.fromCreatorAndName({
algorand,
creatorAddress: randomAccountA.addr,
appName: 'contract-name',
// ...
})
// For multiple app client instances use the factory
let appClientFactory = algorand.client.getTypedAppFactory(HelloWorldFactory)
// or
appClientFactory = new HelloWorldFactory({ algorand })
const appClientByCreator1 = await appClientFactory.getAppClientByCreatorAndName({
creatorAddress: randomAccountA.addr,
appName: 'contract-name',
// ...
})
const appClientByCreator2 = await appClientFactory.getAppClientByCreatorAndName({
creatorAddress: randomAccountA.addr,
appName: 'contract-name-2',
// ...
})
```
* Python
[ Source](https://github.com/algorandfoundation/devportal-code-examples/blob/refs/heads/main/projects/python-examples/algokit_utils_py_examples/algorand_client.py#L155)
```py
from smart_contracts.artifacts.hello_world.hello_world_client import (
HelloArgs,
HelloWorldClient,
HelloWorldFactory,
)
"""
Get a single typed app client by id
"""
app_client = algorand_client.client.get_typed_app_client_by_id(
HelloWorldClient,
app_id=1234,
)
# or
app_client = HelloWorldClient(
algorand=algorand_client,
app_id=1234,
)
"""
For multiple app client instances use the factory
"""
factory = algorand_client.client.get_typed_app_factory(HelloWorldFactory)
# or
factory = HelloWorldFactory(algorand_client)
app_client1 = factory.get_app_client_by_id(
app_id=1234,
)
app_client2 = factory.get_app_client_by_id(
app_id=4321,
)
"""
Get typed app client by creator and name
"""
app_client = algorand_client.client.get_typed_app_client_by_creator_and_name(
HelloWorldClient,
creator_address=account_a.address,
app_name="contract-name",
# ...
)
# or
app_client = HelloWorldClient.from_creator_and_name(
algorand=algorand_client,
creator_address=account_a.address,
app_name="contract-name",
# ...
)
"""
For multiple app client instances use the factory
"""
factory = algorand_client.client.get_typed_app_factory(HelloWorldFactory)
# or
factory = HelloWorldFactory(algorand_client)
app_client1 = factory.get_app_client_by_creator_and_name(
creator_address="CREATORADDRESS",
app_name="contract-name",
# ...
)
app_client2 = factory.get_app_client_by_creator_and_name(
creator_address="CREATORADDRESS",
app_name="contract-name-2",
# ...
)
```
#### App is not Deployed
For applications that need to work with multiple instances of the same smart contract spec, factories provide a convenient way to manage multiple clients:
* TypeScript
[ Source](https://github.com/algorandfoundation/devportal-code-examples/blob/refs/heads/main/projects/typescript-examples/algokit-utils-ts/algorand-client.ts#L209)
```ts
/*
* Deploy a New App
*/
let createFactory = algorand.client.getTypedAppFactory(HelloWorldFactory)
// or
createFactory = new HelloWorldFactory({ algorand })
const { result, appClient: newAppClient } = await createFactory.send.create.bare()
// or if the contract has a custom create method:
const customFactory = algorand.client.getTypedAppFactory(CustomCreateFactory)
const { result: customCreateResult, appClient: customCreateAppClient } = await customFactory.send.create.customCreate(
{ args: { age: 28 } },
)
// Deploy or Resolve App Idempotently by Creator and Name
const { result: deployResult, appClient: deployedClient } = await createFactory.deploy({
appName: 'contract-name',
})
```
* Python
[ Source](https://github.com/algorandfoundation/devportal-code-examples/blob/refs/heads/main/projects/python-examples/algokit_utils_py_examples/algorand_client.py#L226)
```py
from smart_contracts.artifacts.custom_create.custom_create_client import (
CustomCreateArgs,
CustomCreateFactory,
)
"""
Deploy a New App
"""
factory = algorand_client.client.get_typed_app_factory(HelloWorldFactory)
# or
factory = HelloWorldFactory(algorand_client)
app_client, create_response = factory.send.create.bare()
# or if the contract has a custom create method:
factory2 = algorand_client.client.get_typed_app_factory(CustomCreateFactory)
custom_create_app_client, factory_create_response = (
factory2.send.create.custom_create(CustomCreateArgs(age=28))
)
"""
Deploy or Resolve App Idempotently by Creator and Name
"""
app_client, deploy_response = factory.deploy(
app_name="contract-name",
)
```
### Calling a Smart Contract Method
To call a smart contract method using the application client instance, follow these steps:
* TypeScript
[ Source](https://github.com/algorandfoundation/devportal-code-examples/blob/refs/heads/main/projects/typescript-examples/algokit-utils-ts/algorand-client.ts#L232)
```ts
const methodResponse = await appClient.send.sayHello({ args: { firstName: 'there', lastName: 'world' } })
console.log(methodResponse.return)
```
* Python
[ Source](https://github.com/algorandfoundation/devportal-code-examples/blob/refs/heads/main/projects/python-examples/algokit_utils_py_examples/algorand_client.py#L256)
```py
response = app_client.send.hello(args=HelloArgs(name="world"))
print(response.abi_return)
```
The typed app client ensures you provide the correct parameters and handles all the underlying transaction construction and submission.
### Example: Deploying and Interacting with a Smart Contract
For a simple example that deploys a contract and calls a `hello` method, see below:
* TypeScript
[ Source](https://github.com/algorandfoundation/devportal-code-examples/blob/refs/heads/main/projects/typescript-examples/algokit-utils-ts/algorand-client.ts#L239)
```ts
// A similar working example can be seen in the AlgoKit init production smart contract templates
// In this case the generated factory is called `HelloWorldAppFactory` and is accessible via AppClients
// These require environment variables to be present, or it will retrieve from default LocalNet
const algorand = AlgorandClient.fromEnvironment()
const deployer = await algorand.account.fromEnvironment('DEPLOYER', (1).algo())
// Create the typed app factory
const factory = algorand.client.getTypedAppFactory(HelloWorldFactory, {
defaultSender: deployer.addr,
})
// Create the app and get a typed app client for the created app (note: this creates a new instance of the app every time,
// you can use .deploy() to deploy idempotently if the app wasn't previously
// deployed or needs to be updated if that's allowed)
const { appClient } = await factory.send.create.bare()
// Make a call to an ABI method and print the result
const response = await appClient.send.sayHello({ args: { firstName: 'there', lastName: 'world' } })
console.log(response.return)
```
* Python
[ Source](https://github.com/algorandfoundation/devportal-code-examples/blob/refs/heads/main/projects/python-examples/algokit_utils_py_examples/algorand_client.py#L262)
```py
# A similar working example can be seen in the AlgoKit init production smart contract templates, when using Python deployment
# In this case the generated factory is called `HelloWorldAppFactory` and is in `./artifacts/HelloWorldApp/client.py`
from algokit_utils import AlgorandClient
from smart_contracts.artifacts.hello_world.hello_world_client import (
HelloArgs,
HelloWorldClient,
HelloWorldFactory,
)
# These require environment variables to be present, or it will retrieve from default LocalNet
algorand = AlgorandClient.from_environment()
deployer = algorand.account.from_environment("DEPLOYER", AlgoAmount.from_algo(1))
# Create the typed app factory
factory = algorand.client.get_typed_app_factory(
HelloWorldFactory,
default_sender=deployer.address,
)
# Create the app and get a typed app client for the created app (note: this creates a new instance of the app every time,
# you can use .deploy() to deploy idempotently if the app wasn't previously
# deployed or needs to be updated if that's allowed)
app_client, create_response = factory.send.create.bare()
# Make a call to an ABI method and print the result
response = app_client.send.hello(args=HelloArgs(name="world"))
print(response.abi_return)
```
## When to Use Each Client Type
* Use the `AlgorandClient` when you need to:
* Send basic transactions (payments, asset transfers)
* Work with blockchain data in a general way
* Interact with contracts you don’t have specifications for
* Use Typed App Clients when you need to:
* Deploy and interact with specific smart contracts
* Benefit from type safety and IntelliSense
* Build applications that leverage contract-specific functionality
For most Algorand applications, you’ll likely use both: `AlgorandClient` for general blockchain operations and Typed App Clients for smart contract interactions.
## Next Steps
Now that you understand AlgoKit Utils Clients, you’re ready to start building on Algorand with confidence. Remember:
* Start with the AlgorandClient for general blockchain interactions
* Generate Typed Application Clients for your smart contracts
* Leverage the stateful design of these clients to simplify your code
# Account management
Account management is one of the core capabilities provided by AlgoKit Utils. It allows you to create mnemonic, rekeyed, multisig, transaction signer, idempotent KMD and environment variable injected accounts that can be used to sign transactions as well as representing a sender address at the same time. This significantly simplifies management of transaction signing.
## `AccountManager`
The [`AccountManager`](../autoapi/algokit_utils/accounts/account_manager/index#algokit_utils.accounts.account_manager.AccountManager) is a class that is used to get, create, and fund accounts and perform account-related actions such as funding. The `AccountManager` also keeps track of signers for each address so when using the [`TransactionComposer`](transaction-composer) to send transactions, a signer function does not need to manually be specified for each transaction - instead it can be inferred from the sender address automatically!
To get an instance of `AccountManager`, you can use either [`AlgorandClient`](algorand-client) via `algorand.account` or instantiate it directly:
```python
from algokit_utils import AccountManager
account_manager = AccountManager(client_manager)
```
## `TransactionSignerAccountProtocol`
The core internal type that holds information about a signer/sender pair for a transaction is [`TransactionSignerAccountProtocol`](../autoapi/algokit_utils/protocols/account/index#algokit_utils.protocols.account.TransactionSignerAccountProtocol), which represents an `algosdk.transaction.TransactionSigner` (`signer`) along with a sender address (`address`) as the encoded string address.
The following conform to `TransactionSignerAccountProtocol`:
* [`TransactionSignerAccount`](../autoapi/algokit_utils/models/account/index#algokit_utils.models.account.TransactionSignerAccount) - a basic transaction signer account that holds an address and a signer conforming to `TransactionSignerAccountProtocol`
* [`SigningAccount`](../autoapi/algokit_utils/models/account/index#algokit_utils.models.account.SigningAccount) - an abstraction that used to be available under `Account` in previous versions of AlgoKit Utils. Renamed for consistency with equivalent `ts` version. Holds private key and conforms to `TransactionSignerAccountProtocol`
* [`LogicSigAccount`](../autoapi/algokit_utils/models/account/index#algokit_utils.models.account.LogicSigAccount) - a wrapper class around `algosdk` logicsig abstractions conforming to `TransactionSignerAccountProtocol`
* `MultisigAccount` - a wrapper class around `algosdk` multisig abstractions conforming to `TransactionSignerAccountProtocol`
## Registering a signer
The `AccountManager` keeps track of which signer is associated with a given sender address. This is used by [`AlgorandClient`](algorand-client) to automatically sign transactions by that sender. Any of the [methods]() within `AccountManager` that return an account will automatically register the signer with the sender.
There are two methods that can be used for this, `set_signer_from_account`, which takes any number of [account based objects]() that combine signer and sender (`TransactionSignerAccount` | `SigningAccount` | `LogicSigAccount` | `MultisigAccount`), or `set_signer` which takes the sender address and the `TransactionSigner`:
```python
algorand.account
.set_signer_from_account(TransactionSignerAccount(your_address, your_signer))
.set_signer_from_account(SigningAccount.new_account())
.set_signer_from_account(
LogicSigAccount(algosdk.transaction.LogicSigAccount(program, args))
)
.set_signer_from_account(
MultisigAccount(
MultisigMetadata(
version = 1,
threshold = 1,
addresses = ["ADDRESS1...", "ADDRESS2..."]
),
[account1, account2]
)
)
.set_signer("SENDERADDRESS", transaction_signer)
```
## Default signer
If you want to have a default signer that is used to sign transactions without a registered signer (rather than throwing an exception) then you can [`set_default_signer`](../autoapi/algokit_utils/accounts/account_manager/index#algokit_utils.accounts.account_manager.AccountManager.set_default_signer):
```python
algorand.account.set_default_signer(my_default_signer)
```
## Get a signer
[`AlgorandClient`](algorand-client) will automatically retrieve a signer when signing a transaction, but if you need to get a `TransactionSigner` externally to do something more custom then you can [`get_signer`](../autoapi/algokit_utils/accounts/account_manager/index#algokit_utils.accounts.account_manager.AccountManager.get_signer) for a given sender address:
```python
signer = algorand.account.get_signer("SENDER_ADDRESS")
```
If there is no signer registered for that sender address it will either return the default signer ([if registered]()) or throw an exception.
## Accounts
In order to get/register accounts for signing operations you can use the following methods on [`AccountManager`]() (expressed here as `algorand.account` to denote the syntax via an [`AlgorandClient`](algorand-client)):
* [`from_environment`](../autoapi/algokit_utils/accounts/account_manager/index#algokit_utils.accounts.account_manager.AccountManager.from_environment) - Registers and returns an account with private key loaded by convention based on the given name identifier - either by idempotently creating the account in KMD or from environment variable via `process.env['{NAME}_MNEMONIC']` and (optionally) `process.env['{NAME}_SENDER']` (if account is rekeyed)
* This allows you to have powerful code that will automatically create and fund an account by name locally and when deployed against TestNet/MainNet will automatically resolve from environment variables, without having to have different code
* Note: `fund_with` allows you to control how many Algo are seeded into an account created in KMD
* [`from_mnemonic`](../autoapi/algokit_utils/accounts/account_manager/index#algokit_utils.accounts.account_manager.AccountManager.from_mnemonic) - Registers and returns an account with secret key loaded by taking the mnemonic secret
* [`multisig`](../autoapi/algokit_utils/accounts/account_manager/index#algokit_utils.accounts.account_manager.AccountManager.multisig) - Registers and returns a multisig account with one or more signing keys loaded
* [`rekeyed`](../autoapi/algokit_utils/accounts/account_manager/index#algokit_utils.accounts.account_manager.AccountManager.rekeyed) - Registers and returns an account representing the given rekeyed sender/signer combination
* [`random`](../autoapi/algokit_utils/accounts/account_manager/index#algokit_utils.accounts.account_manager.AccountManager.random) - Returns a new, cryptographically randomly generated account with private key loaded
* [`from_kmd`](../autoapi/algokit_utils/accounts/account_manager/index#algokit_utils.accounts.account_manager.AccountManager.from_kmd) - Returns an account with private key loaded from the given KMD wallet (identified by name)
* [`logicsig`](../autoapi/algokit_utils/accounts/account_manager/index#algokit_utils.accounts.account_manager.AccountManager.logicsig) - Returns an account that represents a logic signature
### Underlying account classes
While `TransactionSignerAccount` is the main class used to represent an account that can sign, there are underlying account classes that can underpin the signer within the transaction signer account.
* [`TransactionSignerAccount`](../autoapi/algokit_utils/models/account/index#algokit_utils.models.account.TransactionSignerAccount) - A default class conforming to `TransactionSignerAccountProtocol` that holds an address and a signer
* [`SigningAccount`](../autoapi/algokit_utils/models/account/index#algokit_utils.models.account.SigningAccount) - An abstraction around `algosdk.Account` that supports rekeyed accounts
* [`LogicSigAccount`](../autoapi/algokit_utils/models/account/index#algokit_utils.models.account.LogicSigAccount) - An abstraction around `algosdk.LogicSigAccount` and `algosdk.LogicSig` that supports logic sig signing. Exposes access to the underlying algosdk `algosdk.transaction.LogicSigAccount` object instance via `lsig` property.
* `MultisigAccount` - An abstraction around `algosdk.MultisigMetadata`, `algosdk.makeMultiSigAccountTransactionSigner`, `algosdk.multisigAddress`, `algosdk.signMultisigTransaction` and `algosdk.appendSignMultisigTransaction` that supports multisig accounts with one or more signers present. Exposes access to the underlying algosdk `algosdk.transaction.Multisig` object instance via `multisig` property.
### Dispenser
* [`dispenser_from_environment`](../autoapi/algokit_utils/accounts/account_manager/index#algokit_utils.accounts.account_manager.AccountManager.dispenser_from_environment) - Returns an account (with private key loaded) that can act as a dispenser from environment variables, or against default LocalNet if no environment variables present
* [`localnet_dispenser`](../autoapi/algokit_utils/accounts/account_manager/index#algokit_utils.accounts.account_manager.AccountManager.localnet_dispenser) - Returns an account with private key loaded that can act as a dispenser for the default LocalNet dispenser account
## Rekey account
One of the unique features of Algorand is the ability to change the private key that can authorise transactions for an account. This is called [rekeying](https://dev.algorand.co/concepts/accounts/rekeying).
> \[!WARNING] Rekeying should be done with caution as a rekey transaction can result in permanent loss of control of an account.
You can issue a transaction to rekey an account by using the [`rekey_account`](../autoapi/algokit_utils/accounts/account_manager/index#algokit_utils.accounts.account_manager.AccountManager.rekey_account) function:
* `account: string | TransactionSignerAccount` - The account address or signing account of the account that will be rekeyed
* `rekeyTo: string | TransactionSignerAccount` - The account address or signing account of the account that will be used to authorise transactions for the rekeyed account going forward. If a signing account is provided that will now be tracked as the signer for `account` in the `AccountManager` instance.
* An `options` object, which has:
* [Common transaction parameters](algorand-client#transaction-parameters)
* [Execution parameters](algorand-client#sending-a-single-transaction)
You can also pass in `rekeyTo` as a [common transaction parameter](algorand-client#transaction-parameters) to any transaction.
### Examples
```python
# Basic example (with string addresses)
algorand.account.rekey_account({
account: "ACCOUNTADDRESS",
rekey_to: "NEWADDRESS",
})
# Basic example (with signer accounts)
algorand.account.rekey_account({
account: account1,
rekey_to: new_signer_account,
})
# Advanced example
algorand.account.rekey_account({
account: "ACCOUNTADDRESS",
rekey_to: "NEWADDRESS",
lease: "lease",
note: "note",
first_valid_round: 1000,
validity_window: 10,
extra_fee: AlgoAmount.from_micro_algos(1000),
static_fee: AlgoAmount.from_micro_algos(1000),
# Max fee doesn't make sense with extra_fee AND static_fee
# already specified, but here for completeness
max_fee: AlgoAmount.from_micro_algos(3000),
max_rounds_to_wait_for_confirmation: 5,
suppress_log: True,
})
# Using a rekeyed account
Note: if a signing account is passed into `algorand.account.rekey_account` then you don't need to call `rekeyed_account` to register the new signer
rekeyed_account = algorand.account.rekey_account(account, new_account)
# rekeyed_account can be used to sign transactions on behalf of account...
```
## KMD account management
When running LocalNet, you have an instance of the [Key Management Daemon](https://github.com/algorand/go-algorand/blob/master/daemon/kmd/README), which is useful for:
* Accessing the private key of the default accounts that are pre-seeded with Algo so that other accounts can be funded and it’s possible to use LocalNet
* Idempotently creating new accounts against a name that will stay intact while the LocalNet instance is running without you needing to store private keys anywhere (i.e. completely automated)
The KMD SDK is fairly low level so to make use of it there is a fair bit of boilerplate code that’s needed. This code has been abstracted away into the `KmdAccountManager` class.
To get an instance of the `KmdAccountManager` class you can access it from [`AlgorandClient`](algorand-client) via `algorand.account.kmd` or instantiate it directly (passing in a [`ClientManager`](client)):
```python
from algokit_utils import KmdAccountManager
kmd_account_manager = KmdAccountManager(client_manager)
```
The methods that are available are:
* [`get_wallet_account`](../autoapi/algokit_utils/accounts/kmd_account_manager/index#algokit_utils.accounts.kmd_account_manager.KmdAccountManager.get_wallet_account) - Returns an Algorand signing account with private key loaded from the given KMD wallet (identified by name).
* [`get_or_create_wallet_account`](../autoapi/algokit_utils/accounts/kmd_account_manager/index#algokit_utils.accounts.kmd_account_manager.KmdAccountManager.get_or_create_wallet_account) - Gets an account with private key loaded from a KMD wallet of the given name, or alternatively creates one with funds in it via a KMD wallet of the given name.
* [`get_localnet_dispenser_account`](../autoapi/algokit_utils/accounts/kmd_account_manager/index#algokit_utils.accounts.kmd_account_manager.KmdAccountManager.get_localnet_dispenser_account) - Returns an Algorand account with private key loaded for the default LocalNet dispenser account (that can be used to fund other accounts)
```python
# Get a wallet account that seeded the LocalNet network
default_dispenser_account = kmd_account_manager.get_wallet_account(
"unencrypted-default-wallet",
lambda a: a["status"] != "Offline" and a["amount"] > 1_000_000_000
)
# Same as above, but dedicated method call for convenience
localnet_dispenser_account = kmd_account_manager.get_localnet_dispenser_account()
# Idempotently get (if exists) or create (if it doesn't exist yet) an account by name using KMD
# if creating it then fund it with 2 ALGO from the default dispenser account
new_account = kmd_account_manager.get_or_create_wallet_account(
"account1",
AlgoAmount.from_algos(2)
)
# This will return the same account as above since the name matches
existing_account = kmd_account_manager.get_or_create_wallet_account(
"account1"
)
```
Some of this functionality is directly exposed from [`AccountManager`](), which has the added benefit of registering the account as a signer so they can be automatically used to sign transactions when using via [`AlgorandClient`](algorand-client):
```python
# Get and register LocalNet dispenser
localnet_dispenser = algorand.account.localnet_dispenser()
# Get and register a dispenser by environment variable, or if not set then LocalNet dispenser via KMD
dispenser = algorand.account.dispenser_from_environment()
# Get an account from KMD idempotently by name. In this case we'll get the default dispenser account
dispenser_via_kmd = algorand.account.from_kmd('unencrypted-default-wallet', lambda a: a.status != 'Offline' and a.amount > 1_000_000_000)
# Get / create and register account from KMD idempotently by name
fresh_account_via_kmd = algorand.account.kmd.get_or_create_wallet_account('account1', AlgoAmount.from_algos(2))
```
# Algorand client
`AlgorandClient` is a client class that brokers easy access to Algorand functionality. It’s the [default entrypoint](../index#id3) into AlgoKit Utils functionality.
The main entrypoint to the bulk of the functionality in AlgoKit Utils is the `AlgorandClient` class, most of the time you can get started by typing `AlgorandClient.` and choosing one of the static initialisation methods to create an [`algokit_utils.algorand.AlgorandClient`](../autoapi/algokit_utils/algorand/index#algokit_utils.algorand.AlgorandClient), e.g.:
```python
# Point to the network configured through environment variables or
# if no environment variables it will point to the default LocalNet
# configuration
algorand = AlgorandClient.from_environment()
# Point to default LocalNet configuration
algorand = AlgorandClient.default_localnet()
# Point to TestNet using AlgoNode free tier
algorand = AlgorandClient.testnet()
# Point to MainNet using AlgoNode free tier
algorand = AlgorandClient.mainnet()
# Point to a pre-created algod client
algorand = AlgorandClient.from_clients(algod=algod)
# Point to pre-created algod, indexer and kmd clients
algorand = AlgorandClient.from_clients(algod=algod, indexer=indexer, kmd=kmd)
# Point to custom configuration for algod
algorand = AlgorandClient.from_config(algod_config=algod_config)
# Point to custom configuration for algod, indexer and kmd
algorand = AlgorandClient.from_config(
algod_config=algod_config,
indexer_config=indexer_config,
kmd_config=kmd_config
)
```
## Accessing SDK clients
Once you have an `AlgorandClient` instance, you can access the SDK clients for the various Algorand APIs via the `algorand.client` property.
```py
algorand = AlgorandClient.default_localnet()
algod_client = algorand.client.algod
indexer_client = algorand.client.indexer
kmd_client = algorand.client.kmd
```
## Accessing manager class instances
The `AlgorandClient` has a number of manager class instances that help you quickly use intellisense to get access to advanced functionality.
* [`AccountManager`](account) via `algorand.account`, there are also some chainable convenience methods which wrap specific methods in `AccountManager`:
* `algorand.setDefaultSigner(signer)` -
* `algorand.setSignerFromAccount(account)` -
* `algorand.setSigner(sender, signer)`
* [`AssetManager`](asset) via `algorand.asset`
* [`ClientManager`](client) via `algorand.client`
## Creating and issuing transactions
`AlgorandClient` exposes a series of methods that allow you to create, execute, and compose groups of transactions (all via the [`TransactionComposer`](transaction-composer)).
### Creating transactions
You can compose a transaction via `algorand.create_transaction.`, which gives you an instance of the `algokit_utils.transactions.AlgorandClientTransactionCreator` class. Intellisense will guide you on the different options.
The signature for the calls to send a single transaction usually look like:
```python
algorand.create_transaction.{method}(params=TxnParams(...), send_params=SendParams(...)) -> Transaction:
```
* `TxnParams` is a union type that can be any of the Algorand transaction types, exact dataclasses can be imported from `algokit_utils` and consist of:
* `AppCallParams`,
* `AppCreateParams`,
* `AppDeleteParams`,
* `AppUpdateParams`,
* `AssetConfigParams`,
* `AssetCreateParams`,
* `AssetDestroyParams`,
* `AssetFreezeParams`,
* `AssetOptInParams`,
* `AssetOptOutParams`,
* `AssetTransferParams`,
* `OfflineKeyRegistrationParams`,
* `OnlineKeyRegistrationParams`,
* `PaymentParams`,
* `SendParams` is a typed dictionary exposing setting to apply during send operation:
* `max_rounds_to_wait_for_confirmation: int | None` - The number of rounds to wait for confirmation. By default until the latest lastValid has past.
* `suppress_log: bool | None` - Whether to suppress log messages from transaction send, default: do not suppress.
* `populate_app_call_resources: bool | None` - Whether to use simulate to automatically populate app call resources in the txn objects. Defaults to `Config.populateAppCallResources`.
* `cover_app_call_inner_transaction_fees: bool | None` - Whether to use simulate to automatically calculate required app call inner transaction fees and cover them in the parent app call transaction fee
The return type for the ABI method call methods are slightly different:
```python
algorand.createTransaction.app{call_type}_method_call(params=MethodCallParams(...), send_params=SendParams(...)) -> BuiltTransactions
```
MethodCallParams is a union type that can be any of the Algorand method call types, exact dataclasses can be imported from `algokit_utils` and consist of:
* `AppCreateMethodCallParams`,
* `AppCallMethodCallParams`,
* `AppDeleteMethodCallParams`,
* `AppUpdateMethodCallParams`,
Where `BuiltTransactions` looks like this:
```python
@dataclass(frozen=True)
class BuiltTransactions:
transactions: list[algosdk.transaction.Transaction]
method_calls: dict[int, Method]
signers: dict[int, TransactionSigner]
```
This signifies the fact that an ABI method call can actually result in multiple transactions (which in turn may have different signers), that you need ABI metadata to be able to extract the return value from the transaction result.
### Sending a single transaction
You can compose a single transaction via `algorand.send...`, which gives you an instance of the `algokit_utils.transactions.AlgorandClientTransactionSender` class. Intellisense will guide you on the different options.
Further documentation is present in the related capabilities:
* [App management](app)
* [Asset management](asset)
* [Algo transfers](transfer)
The signature for the calls to send a single transaction usually look like:
`algorand.send.{method}(params=TxnParams, send_params=SendParams) -> SingleSendTransactionResult`
* To get intellisense on the params, use your IDE’s intellisense keyboard shortcut (e.g. ctrl+space).
* `TxnParams` is a union type that can be any of the Algorand transaction types, exact dataclasses can be imported from `algokit_utils`.
* `algokit_utils.transactions.SendParams` a typed dictionary exposing setting to apply during send operation.
* `algokit_utils.transactions.SendSingleTransactionResult` is all of the information that is relevant when [sending a single transaction to the network](transaction#transaction-results)
Generally, the functions to immediately send a single transaction will emit log messages before and/or after sending the transaction. You can opt-out of this by sending `suppressLog: true`.
### Composing a group of transactions
You can compose a group of transactions for execution by using the `new_group()` method on `AlgorandClient` and then use the various `.add_{Type}()` methods on [`TransactionComposer`](transaction-composer) to add a series of transactions.
```python
result = (algorand
.new_group()
.add_payment(
PaymentParams(
sender="SENDERADDRESS",
receiver="RECEIVERADDRESS",
amount=1_000_000 # 1 Algo in microAlgos
)
)
.add_asset_opt_in(
AssetOptInParams(
sender="SENDERADDRESS",
asset_id=12345
)
)
.send())
```
`new_group()` returns a new [`TransactionComposer`](transaction-composer) instance, which can also return the group of transactions, simulate them and other things.
### Transaction parameters
To create a transaction you instantiate a relevant Transaction parameters dataclass from `algokit_utils.transactions import *` or `from algokit_utils import PaymentParams, AssetOptInParams, etc`.
All transaction parameters share the following common base parameters:
* `sender: str` - The address of the account sending the transaction.
* `signer: algosdk.TransactionSigner | TransactionSignerAccount | None` - The function used to sign transaction(s); if not specified then an attempt will be made to find a registered signer for the given `sender` or use a default signer (if configured).
* `rekey_to: string | None` - Change the signing key of the sender to the given address. **Warning:** Please be careful with this parameter and be sure to read the [official rekey guidance](https://dev.algorand.co/concepts/accounts/rekeying).
* `note: bytes | str | None` - Note to attach to the transaction. Max of 1000 bytes.
* `lease: bytes | str | None` - Prevent multiple transactions with the same lease being included within the validity window. A [lease](https://dev.algorand.co/concepts/transactions/leases) enforces a mutually exclusive transaction (useful to prevent double-posting and other scenarios).
* Fee management
* `static_fee: AlgoAmount | None` - The static transaction fee. In most cases you want to use `extra_fee` unless setting the fee to 0 to be covered by another transaction.
* `extra_fee: AlgoAmount | None` - The fee to pay IN ADDITION to the suggested fee. Useful for covering inner transaction fees.
* `max_fee: AlgoAmount | None` - Throw an error if the fee for the transaction is more than this amount; prevents overspending on fees during high congestion periods.
* Round validity management
* `validity_window: int | None` - How many rounds the transaction should be valid for, if not specified then the registered default validity window will be used.
* `first_valid_round: int | None` - Set the first round this transaction is valid. If left undefined, the value from algod will be used. We recommend you only set this when you intentionally want this to be some time in the future.
* `last_valid_round: int | None` - The last round this transaction is valid. It is recommended to use `validity_window` instead.
Then on top of that the base type gets extended for the specific type of transaction you are issuing. These are all defined as part of [`TransactionComposer`](transaction-composer) and we recommend reading these docs, especially when leveraging either `populate_app_call_resources` or `cover_app_call_inner_transaction_fees`.
### Transaction configuration
AlgorandClient caches network provided transaction values for you automatically to reduce network traffic. It has a set of default configurations that control this behaviour, but you have the ability to override and change the configuration of this behaviour:
* `algorand.set_default_validity_window(validity_window)` - Set the default validity window (number of rounds from the current known round that the transaction will be valid to be accepted for), having a smallish value for this is usually ideal to avoid transactions that are valid for a long future period and may be submitted even after you think it failed to submit if waiting for a particular number of rounds for the transaction to be successfully submitted. The validity window defaults to `10`, except localnet environments where it’s set to `1000`.
* `algorand.set_suggested_params(suggested_params, until?)` - Set the suggested network parameters to use (optionally until the given time)
* `algorand.set_suggested_params_timeout(timeout)` - Set the timeout that is used to cache the suggested network parameters (by default 3 seconds)
* `algorand.get_suggested_params()` - Get the current suggested network parameters object, either the cached value, or if the cache has expired a fresh value
# Algo amount handling
Algo amount handling is one of the core capabilities provided by AlgoKit Utils. It allows you to reliably and tersely specify amounts of microAlgo and Algo and safely convert between them.
Any AlgoKit Utils function that needs an Algo amount will take an `AlgoAmount` object, which ensures that there is never any confusion about what value is being passed around. Whenever an AlgoKit Utils function calls into an underlying algosdk function, or if you need to take an `AlgoAmount` and pass it into an underlying algosdk function (per the [modularity principle](../index#core-principles)) you can safely and explicitly convert to microAlgo or Algo.
To see some usage examples check out the automated tests. Alternatively, you can see the reference documentation for `AlgoAmount`.
## `AlgoAmount`
The `AlgoAmount` class provides a safe wrapper around an underlying amount of microAlgo where any value entering or existing the `AlgoAmount` class must be explicitly stated to be in microAlgo or Algo. This makes it much safer to handle Algo amounts rather than passing them around as raw numbers where it’s easy to make a (potentially costly!) mistake and not perform a conversion when one is needed (or perform one when it shouldn’t be!).
To import the AlgoAmount class you can access it via:
```python
from algokit_utils import AlgoAmount
```
### Creating an `AlgoAmount`
There are a few ways to create an `AlgoAmount`:
* Algo
* Constructor: `AlgoAmount(algo=10)`
* Static helper: `AlgoAmount.from_algo(10)`
* microAlgo
* Constructor: `AlgoAmount(micro_algo=10_000)`
* Static helper: `AlgoAmount.from_micro_algo(10_000)`
### Extracting a value from `AlgoAmount`
The `AlgoAmount` class has properties to return Algo and microAlgo:
* `amount.algo` - Returns the value in Algo as a python `Decimal` object
* `amount.micro_algo` - Returns the value in microAlgo as an integer
`AlgoAmount` will coerce to an integer automatically (in microAlgo) when using `int(amount)`, which allows you to use `AlgoAmount` objects in comparison operations such as `<` and `>=` etc.
You can also call `str(amount)` or use an `AlgoAmount` directly in string interpolation to convert it to a nice user-facing formatted amount expressed in microAlgo.
### Additional Features
The `AlgoAmount` class supports arithmetic operations:
* Addition: `amount1 + amount2`
* Subtraction: `amount1 - amount2`
* Comparison operations: `<`, `<=`, `>`, `>=`, `==`, `!=`
Example:
```python
amount1 = AlgoAmount(algo=1)
amount2 = AlgoAmount(micro_algo=500_000)
total = amount1 + amount2 # Results in 1.5 Algo
```
# App client and App factory
> \[!NOTE] This page covers the untyped app client, but we recommend using typed clients (coming soon), which will give you a better developer experience with strong typing specific to the app itself.
App client and App factory are higher-order use case capabilities provided by AlgoKit Utils that builds on top of the core capabilities, particularly [App deployment](app-deploy) and [App management](app). They allow you to access high productivity application clients that work with [ARC-56](https://github.com/algorandfoundation/ARCs/pull/258) and [ARC-32](https://github.com/algorandfoundation/ARCs/blob/main/ARCs/arc-0032) application spec defined smart contracts, which you can use to create, update, delete, deploy and call a smart contract and access state data for it.
> \[!NOTE] If you are confused about when to use the factory vs client the mental model is: use the client if you know the app ID, use the factory if you don’t know the app ID (deferred knowledge or the instance doesn’t exist yet on the blockchain) or you have multiple app IDs
## `AppFactory`
The `AppFactory` is a class that, for a given app spec, allows you to create and deploy one or more app instances and to create one or more app clients to interact with those (or other) app instances.
To get an instance of `AppFactory` you can use `AlgorandClient` via `algorand.get_app_factory`:
```python
# Minimal example
factory = algorand.get_app_factory(
app_spec="{/* ARC-56 or ARC-32 compatible JSON */}",
)
# Advanced example
factory = algorand.get_app_factory(
app_spec=parsed_arc32_or_arc56_app_spec,
default_sender="SENDERADDRESS",
app_name="OverriddenAppName",
version="2.0.0",
compilation_params={
"updatable": True,
"deletable": False,
"deploy_time_params": { "ONE": 1, "TWO": "value" },
}
)
```
## `AppClient`
The `AppClient` is a class that, for a given app spec, allows you to manage calls and state for a specific deployed instance of an app (with a known app ID).
To get an instance of `AppClient` you can use either `AlgorandClient` or instantiate it directly:
```python
# Minimal examples
app_client = AppClient.from_creator_and_name(
app_spec="{/* ARC-56 or ARC-32 compatible JSON */}",
creator_address="CREATORADDRESS",
algorand=algorand,
)
app_client = AppClient(
AppClientParams(
app_spec="{/* ARC-56 or ARC-32 compatible JSON */}",
app_id=12345,
algorand=algorand,
)
)
app_client = AppClient.from_network(
app_spec="{/* ARC-56 or ARC-32 compatible JSON */}",
algorand=algorand,
)
# Advanced example
app_client = AppClient(
AppClientParams(
app_spec=parsed_app_spec,
app_id=12345,
algorand=algorand,
app_name="OverriddenAppName",
default_sender="SENDERADDRESS",
approval_source_map=approval_teal_source_map,
clear_source_map=clear_teal_source_map,
)
)
```
You can access `app_id`, `app_address`, `app_name` and `app_spec` as properties on the `AppClient`.
## Dynamically creating clients for a given app spec
The `AppFactory` allows you to conveniently create multiple `AppClient` instances on-the-fly with information pre-populated.
This is possible via two methods on the app factory:
* `factory.get_app_client_by_id(app_id, ...)` - Returns a new `AppClient` for an app instance of the given ID. Automatically populates app\_name, default\_sender and source maps from the factory if not specified.
* `factory.get_app_client_by_creator_and_name(creator_address, app_name, ...)` - Returns a new `AppClient`, resolving the app by creator address and name using AlgoKit app deployment semantics. Automatically populates app\_name, default\_sender and source maps from the factory if not specified.
```python
app_client1 = factory.get_app_client_by_id(app_id=12345)
app_client2 = factory.get_app_client_by_id(app_id=12346)
app_client3 = factory.get_app_client_by_id(
app_id=12345,
default_sender="SENDER2ADDRESS"
)
app_client4 = factory.get_app_client_by_creator_and_name(
creator_address="CREATORADDRESS"
)
app_client5 = factory.get_app_client_by_creator_and_name(
creator_address="CREATORADDRESS",
app_name="NonDefaultAppName"
)
app_client6 = factory.get_app_client_by_creator_and_name(
creator_address="CREATORADDRESS",
app_name="NonDefaultAppName",
ignore_cache=True, # Perform fresh indexer lookups
default_sender="SENDER2ADDRESS"
)
```
## Creating and deploying an app
Once you have an app factory you can perform the following actions:
* `factory.send.bare.create(...)` - Signs and sends a transaction to create an app and returns the result of that call and an `AppClient` instance for the created app
* `factory.deploy(...)` - Uses the creator address and app name pattern to find if the app has already been deployed or not and either creates, updates or replaces that app based on the deployment rules (i.e. it’s an idempotent deployment) and returns the result of the deployment and an `AppClient` instance for the created/updated/existing app.
> See `API docs` for details on parameter signatures.
### Create
The create method is a wrapper over the `app_create` (bare calls) and `app_create_method_call` (ABI method calls) methods, with the following differences:
* You don’t need to specify the `approval_program`, `clear_state_program`, or `schema` because these are all specified or calculated from the app spec
* `sender` is optional and if not specified then the `default_sender` from the `AppFactory` constructor is used
* `deploy_time_params`, `updatable` and `deletable` can be passed in to control deploy-time parameter replacements and deploy-time immutability and permanence control. Note these are consolidated under the `compilation_params` `TypedDict`, see `API docs` for details.
```python
# Use no-argument bare-call
result, app_client = factory.send.bare.create()
# Specify parameters for bare-call and override other parameters
result, app_client = factory.send.bare.create(
params=AppClientBareCallParams(
args=[bytes([1, 2, 3, 4])],
static_fee=AlgoAmount.from_microalgos(3000),
on_complete=OnComplete.OptIn,
),
compilation_params={
"deploy_time_params": {
"ONE": 1,
"TWO": "two",
},
"updatable": True,
"deletable": False,
}
)
# Specify parameters for ABI method call
result, app_client = factory.send.create(
AppClientMethodCallParams(
method="create_application",
args=[1, "something"]
)
)
```
## Updating and deleting an app
Deploy method aside, the ability to make update and delete calls happens after there is an instance of an app created via `AppClient`. The semantics of this are no different than other calls, with the caveat that the update call is a bit different since the code will be compiled when constructing the update params and the update calls thus optionally takes compilation parameters (`compilation_params`) for deploy-time parameter replacements and deploy-time immutability and permanence control.
## Calling the app
You can construct a params object, transaction(s) and sign and send a transaction to call the app that a given `AppClient` instance is pointing to.
This is done via the following properties:
* `app_client.params.{method}(params)` - Params for an ABI method call
* `app_client.params.bare.{method}(params)` - Params for a bare call
* `app_client.create_transaction.{method}(params)` - Transaction(s) for an ABI method call
* `app_client.create_transaction.bare.{method}(params)` - Transaction for a bare call
* `app_client.send.{method}(params)` - Sign and send an ABI method call
* `app_client.send.bare.{method}(params)` - Sign and send a bare call
Where `{method}` is one of:
* `update` - An update call
* `opt_in` - An opt-in call
* `delete` - A delete application call
* `clear_state` - A clear state call (note: calls the clear program and only applies to bare calls)
* `close_out` - A close-out call
* `call` - A no-op call (or other call if `on_complete` is specified to anything other than update)
```python
call1 = app_client.send.update(
AppClientMethodCallParams(
method="update_abi",
args=["string_io"],
),
compilation_params={"deploy_time_params": deploy_time_params}
)
call2 = app_client.send.delete(
AppClientMethodCallParams(
method="delete_abi",
args=["string_io"]
)
)
call3 = app_client.send.opt_in(
AppClientMethodCallParams(method="opt_in")
)
call4 = app_client.send.bare.clear_state()
transaction = app_client.create_transaction.bare.close_out(
AppClientBareCallParams(
args=[bytes([1, 2, 3])]
)
)
params = app_client.params.opt_in(
AppClientMethodCallParams(method="optin")
)
```
## Funding the app account
Often there is a need to fund an app account to cover minimum balance requirements for boxes and other scenarios. There is an app client method that will do this for you via `fund_app_account(params)`.
The input parameters are:
* A `FundAppAccountParams` object, which has the same properties as a payment transaction except `receiver` is not required and `sender` is optional (if not specified then it will be set to the app client’s default sender if configured).
Note: If you are passing the funding payment in as an ABI argument so it can be validated by the ABI method then you’ll want to get the funding call as a transaction, e.g.:
```python
result = app_client.send.call(
AppClientMethodCallParams(
method="bootstrap",
args=[
app_client.create_transaction.fund_app_account(
FundAppAccountParams(
amount=AlgoAmount.from_microalgos(200_000)
)
)
],
box_references=["Box1"]
)
)
```
You can also get the funding call as a params object via `app_client.params.fund_app_account(params)`.
## Reading state
`AppClient` has a number of mechanisms to read state (global, local and box storage) from the app instance.
### App spec methods
The ARC-56 app spec can specify detailed information about the encoding format of state values and as such allows for a more advanced ability to automatically read state values and decode them as their high-level language types rather than the limited `int` / `bytes` / `str` ability that the generic methods give you.
You can access this functionality via:
* `app_client.state.global_state.{method}()` - Global state
* `app_client.state.local_state(address).{method}()` - Local state
* `app_client.state.box.{method}()` - Box storage
Where `{method}` is one of:
* `get_all()` - Returns all single-key state values in a dict keyed by the key name and the value a decoded ABI value.
* `get_value(name)` - Returns a single state value for the current app with the value a decoded ABI value.
* `get_map_value(map_name, key)` - Returns a single value from the given map for the current app with the value a decoded ABI value. Key can either be bytes with the binary value of the key value on-chain (without the map prefix) or the high level (decoded) value that will be encoded to bytes for the app spec specified `key_type`
* `get_map(map_name)` - Returns all map values for the given map in a key=>value dict. It’s recommended that this is only done when you have a unique `prefix` for the map otherwise there’s a high risk that incorrect values will be included in the map.
```python
values = app_client.state.global_state.get_all()
value = app_client.state.local_state("ADDRESS").get_value("value1")
map_value = app_client.state.box.get_map_value("map1", "mapKey")
map_dict = app_client.state.global_state.get_map("myMap")
```
### Generic methods
There are various methods defined that let you read state from the smart contract app:
* `get_global_state()` - Gets the current global state using `algorand.app.get_global_state`.
* `get_local_state(address: str)` - Gets the current local state for the given account address using `algorand.app.get_local_state`.
* `get_box_names()` - Gets the current box names using `algorand.app.get_box_names`.
* `get_box_value(name)` - Gets the current value of the given box using `algorand.app.get_box_value`.
* `get_box_value_from_abi_type(name)` - Gets the current value of the given box from an ABI type using `algorand.app.get_box_value_from_abi_type`.
* `get_box_values(filter)` - Gets the current values of the boxes using `algorand.app.get_box_values`.
* `get_box_values_from_abi_type(type, filter)` - Gets the current values of the boxes from an ABI type using `algorand.app.get_box_values_from_abi_type`.
```python
global_state = app_client.get_global_state()
local_state = app_client.get_local_state("ACCOUNTADDRESS")
box_name: BoxReference = BoxReference(app_id=app_client.app_id, name="my-box")
box_name2: BoxReference = BoxReference(app_id=app_client.app_id, name="my-box2")
box_names = app_client.get_box_names()
box_value = app_client.get_box_value(box_name)
box_values = app_client.get_box_values([box_name, box_name2])
box_abi_value = app_client.get_box_value_from_abi_type(
box_name,
algosdk.ABIStringType
)
box_abi_values = app_client.get_box_values_from_abi_type(
[box_name, box_name2],
algosdk.ABIStringType
)
```
## Handling logic errors and diagnosing errors
Often when calling a smart contract during development you will get logic errors that cause an exception to throw. This may be because of a failing assertion, a lack of fees, exhaustion of opcode budget, or any number of other reasons.
When this occurs, you will generally get an error that looks something like: `TransactionPool.Remember: transaction {TRANSACTION_ID}: logic eval error: {ERROR_MESSAGE}. Details: pc={PROGRAM_COUNTER_VALUE}, opcodes={LIST_OF_OP_CODES}`.
The information in that error message can be parsed and when combined with the [source map from compilation](app-deploy#compilation-and-template-substitution) you can expose debugging information that makes it much easier to understand what’s happening. The ARC-56 app spec, if provided, can also specify human-readable error messages against certain program counter values and further augment the error message.
The app client and app factory automatically provide this functionality for all smart contract calls. They also expose a function that can be used for any custom calls you manually construct and need to add into your own try/catch `expose_logic_error(e: Error, is_clear: bool = False)`.
When an error is thrown then the resulting error that is re-thrown will be a [`LogicError`](../autoapi/algokit_utils/errors/logic_error/index#algokit_utils.errors.logic_error.LogicError), which has the following fields:
* `logic_error: Exception` - The original logic error exception
* `logic_error_str: str` - The string representation of the logic error
* `program: str` - The TEAL program source code
* `source_map: AlgoSourceMap | None` - The source map if available
* `transaction_id: str` - The transaction ID that triggered the error
* `message: str` - Combined error message with debugging information
* `pc: int` - The program counter value where error occurred
* `traces: list[SimulationTrace] | None` - Simulation traces if debug enabled
* `line_no: int | None` - The line number in the TEAL source code
* `lines: list[str]` - The TEAL program split into individual lines
Note: This information will only show if the app client / app factory has a source map. This will occur if:
* You have called `create`, `update` or `deploy`
* You have called `import_source_maps(source_maps)` and provided the source maps (which you can get by calling `export_source_maps()` after variously calling `create`, `update`, or `deploy` and it returns a serialisable value)
* You had source maps present in an app factory and then used it to [create an app client]() (they are automatically passed through)
If you want to go a step further and automatically issue a [simulated transaction](https://algorand.github.io/js-algorand-sdk/classes/modelsv2.SimulateTransactionResult.html) and get trace information when there is an error when an ABI method is called you can turn on debug mode:
```python
config.configure(debug=True)
```
If you do that then the exception will have the `traces` property within the underlying exception will have key information from the simulation within it and this will get populated into the `led.traces` property of the thrown error.
When this debug flag is set, it will also emit debugging symbols to allow break-point debugging of the calls if the [project root is also configured](debugging).
## Default arguments
If an ABI method call specifies default argument values for any of its arguments you can pass in `None` for the value of that argument for the default value to be automatically populated.
# App deployment
AlgoKit contains advanced smart contract deployment capabilities that allow you to have idempotent (safely retryable) deployment of a named app, including deploy-time immutability and permanence control and TEAL template substitution. This allows you to control the smart contract development lifecycle of a single-instance app across multiple environments (e.g. LocalNet, TestNet, MainNet).
It’s optional to use this functionality, since you can construct your own deployment logic using create / update / delete calls and your own mechanism to maintaining app metadata (like app IDs etc.), but this capability is an opinionated out-of-the-box solution that takes care of the heavy lifting for you.
App deployment is a higher-order use case capability provided by AlgoKit Utils that builds on top of the core capabilities, particularly [App management](app).
To see some usage examples check out the [automated tests](https://github.com/algorandfoundation/algokit-utils-py/blob/main/tests/test_deploy_scenarios.py).
## Smart contract development lifecycle
The design behind the deployment capability is unique. The architecture design behind app deployment is articulated in an [architecture decision record](https://github.com/algorandfoundation/algokit-cli/blob/main/docs/architecture-decisions/2023-01-12_smart-contract-deployment). While the implementation will naturally evolve over time and diverge from this record, the principles and design goals behind the design are comprehensively explained.
Namely, it described the concept of a smart contract development lifecycle:
1. Development
1. **Write** smart contracts
2. **Transpile** smart contracts with development-time parameters (code configuration) to TEAL Templates
3. **Verify** the TEAL Templates maintain [output stability](https://github.com/algorandfoundation/algokit-cli/blob/main/docs/articles/output_stability) and any other static code quality checks
2. Deployment
1. **Substitute** deploy-time parameters into TEAL Templates to create final TEAL code
2. **Compile** the TEAL to create byte code using algod
3. **Deploy** the byte code to one or more Algorand networks (e.g. LocalNet, TestNet, MainNet) to create Deployed Application(s)
3. Runtime
1. **Validate** the deployed app via automated testing of the smart contracts to provide confidence in their correctness
2. **Call** deployed smart contract with runtime parameters to utilise it
The App deployment capability provided by AlgoKit Utils helps implement **#2 Deployment**.
Furthermore, the implementation contains the following implementation characteristics per the original architecture design:
* Deploy-time parameters can be provided and substituted into a TEAL Template by convention (by replacing `TMPL_{KEY}`)
* Contracts can be built by any smart contract framework that supports [ARC-56](https://github.com/algorandfoundation/ARCs/blob/main/ARCs/arc-0056) and [ARC-32](https://github.com/algorandfoundation/ARCs/pull/150), which also means the deployment language can be different to the development language e.g. you can deploy a Python smart contract with TypeScript for instance
* There is explicit control of the immutability (updatability / upgradeability) and permanence (deletability) of the smart contract, which can be varied per environment to allow for easier development and testing in non-MainNet environments (by replacing `TMPL_UPDATABLE` and `TMPL_DELETABLE` at deploy-time by convention, if present)
* Contracts are resolvable by a string “name” for a given creator to allow automated determination of whether that contract had been deployed previously or not, but can also be resolved by ID instead
This design allows you to have the same deployment code across environments without having to specify an ID for each environment. This makes it really easy to apply [continuous delivery](https://continuousdelivery.com/) practices to your smart contract deployment and make the deployment process completely automated.
## `AppDeployer`
The `AppDeployer` is a class that is used to manage app deployments and deployment metadata.
To get an instance of `AppDeployer` you can use either [`AlgorandClient`](algorand-client) via `algorand.appDeployer` or instantiate it directly (passing in an [`AppManager`](app#appmanager), [`AlgorandClientTransactionSender`](algorand-client#sending-a-single-transaction) and optionally an indexer client instance):
```python
from algokit_utils.app_deployer import AppDeployer
app_deployer = AppDeployer(app_manager, transaction_sender, indexer)
```
## Deployment metadata
When AlgoKit performs a deployment of an app it creates metadata to describe that deployment and includes this metadata in an [ARC-2](https://github.com/algorandfoundation/ARCs/blob/main/ARCs/arc-0002) transaction note on any creation and update transactions.
The deployment metadata is defined in `AppDeployMetadata`, which is an object with:
* `name: str` - The unique name identifier of the app within the creator account
* `version: str` - The version of app that is / will be deployed; can be an arbitrary string, but we recommend using [semver](https://semver.org/)
* `deletable: bool | None` - Whether or not the app is deletable (`true`) / permanent (`false`) / unspecified (`None`)
* `updatable: bool | None` - Whether or not the app is updatable (`true`) / immutable (`false`) / unspecified (`None`)
An example of the ARC-2 transaction note that is attached as an app creation / update transaction note to specify this metadata is:
```default
ALGOKIT_DEPLOYER:j{name:"MyApp",version:"1.0",updatable:true,deletable:false}
```
> NOTE: Starting from v3.0.0, AlgoKit Utils no longer automatically increments the contract version by default. It is the user’s responsibility to explicitly manage versioning of their smart contracts (if desired).
## Lookup deployed apps by name
In order to resolve what apps have been previously deployed and their metadata, AlgoKit provides a method that does a series of indexer lookups and returns a map of name to app metadata via `get_creator_apps_by_name(creator_address)`.
```python
app_lookup = algorand.app_deployer.get_creator_apps_by_name("CREATORADDRESS")
app1_metadata = app_lookup.apps["app1"]
```
This method caches the result of the lookup, since it’s a reasonably heavyweight call (N+1 indexer calls for N deployed apps by the creator). If you want to skip the cache to get a fresh version then you can pass in a second parameter `ignore_cache=True`. This should only be needed if you are performing parallel deployments outside of the current `AppDeployer` instance, since it will keep its cache updated based on its own deployments.
The return type of `get_creator_apps_by_name` is `ApplicationLookup`, which is an object with:
```python
@dataclasses.dataclass
class ApplicationLookup:
creator: str
apps: dict[str, ApplicationMetaData] = dataclasses.field(default_factory=dict)
```
The `apps` property contains a lookup by app name that resolves to the current `ApplicationMetaData`.
> Refer to the `ApplicationLookup` for latest information on exact types.
## Performing a deployment
In order to perform a deployment, AlgoKit provides the `deploy` method.
For example:
```python
deployment_result = algorand.app_deployer.deploy(
AppDeployParams(
metadata=AppDeploymentMetaData(
name="MyApp",
version="1.0.0",
deletable=False,
updatable=False,
),
create_params=AppCreateParams(
sender="CREATORADDRESS",
approval_program=approval_teal_template_or_byte_code,
clear_state_program=clear_state_teal_template_or_byte_code,
schema=StateSchema(
global_ints=1,
global_byte_slices=2,
local_ints=3,
local_byte_slices=4,
),
# Other parameters if a create call is made...
),
update_params=AppUpdateParams(
sender="SENDERADDRESS",
# Other parameters if an update call is made...
),
delete_params=AppDeleteParams(
sender="SENDERADDRESS",
# Other parameters if a delete call is made...
),
deploy_time_params={
"VALUE": 1, # TEAL template variables to replace
},
on_schema_break=OnSchemaBreak.Append,
on_update=OnUpdate.Update,
send_params=SendParams(
populate_app_call_resources=True,
# Other execution control parameters
),
)
)
```
This method performs an idempotent (safely retryable) deployment. It will detect if the app already exists and if it doesn’t it will create it. If the app does already exist then it will:
* Detect if the app has been updated (i.e. the program logic has changed) and either fail, perform an update, deploy a new version or perform a replacement (delete old app and create new app) based on the deployment configuration.
* Detect if the app has a breaking schema change (i.e. more global or local storage is needed than were originally requested) and either fail, deploy a new version or perform a replacement (delete old app and create new app) based on the deployment configuration.
It will automatically [add metadata to the transaction note of the create or update transactions]() that indicates the name, version, updatability and deletability of the contract. This metadata works in concert with [`appDeployer.get_creator_apps_by_name`]() to allow the app to be reliably retrieved against that creator in it’s currently deployed state. It will automatically update it’s lookup cache so subsequent calls to `get_creator_apps_by_name` or `deploy` will use the latest metadata without needing to call indexer again.
`deploy` also automatically executes [template substitution]() including deploy-time control of permanence and immutability if the requisite template parameters are specified in the provided TEAL template.
### Input parameters
The first parameter `deployment` is an `AppDeployParams`, which is an object with:
* `metadata: AppDeployMetadata` - determines the [deployment metadata]() of the deployment
* `create_params: AppCreateParams | CreateCallABI` - the parameters for an [app creation call](app) (raw parameters or ABI method call)
* `update_params: AppUpdateParams | UpdateCallABI` - the parameters for an [app update call](app) (raw parameters or ABI method call) without the `app_id`, `approval_program`, or `clear_state_program` as these are handled by the deploy logic
* `delete_params: AppDeleteParams | DeleteCallABI` - the parameters for an [app delete call](app) (raw parameters or ABI method call) without the `app_id` parameter
* `deploy_time_params: TealTemplateParams | None` - optional parameters for [TEAL template substitution]()
* `TealTemplateParams` is a dict that replaces `TMPL_{key}` with `value` (strings/Uint8Arrays are properly encoded)
* `on_schema_break: OnSchemaBreak | str | None` - determines `OnSchemaBreak` if schema requirements increase (values: ‘replace’, ‘fail’, ‘append’)
* `on_update: OnUpdate | str | None` - determines `OnUpdate` if contract logic changes (values: ‘update’, ‘replace’, ‘fail’, ‘append’)
* `existing_deployments: ApplicationLookup | None` - optional pre-fetched app lookup data to skip indexer queries
* `ignore_cache: bool | None` - if True, bypasses cached deployment metadata
* Additional fields from `SendParams` - transaction execution parameters
### Idempotency
`deploy` is idempotent which means you can safely call it again multiple times and it will only apply any changes it detects. If you call it again straight after calling it then it will do nothing.
### Compilation and template substitution
When compiling TEAL template code, the capabilities described in the [above design]() are present, namely the ability to supply deploy-time parameters and the ability to control immutability and permanence of the smart contract at deploy-time.
In order for a smart contract to opt-in to use this functionality, it must have a TEAL Template that contains the following:
* `TMPL_{key}` - Which can be replaced with a number or a string / byte array which will be automatically hexadecimal encoded (for any number of `{key}` => `{value}` pairs)
* `TMPL_UPDATABLE` - Which will be replaced with a `1` if an app should be updatable and `0` if it shouldn’t (immutable)
* `TMPL_DELETABLE` - Which will be replaced with a `1` if an app should be deletable and `0` if it shouldn’t (permanent)
If you passed in a TEAL template for the `approval_program` or `clear_state_program` (i.e. a `str` rather than a `bytes`) then `deploy` will return the `CompiledTeal` of substituting then compiling the TEAL template(s) in the following properties of the return value:
* `compiled_approval: CompiledTeal | None`
* `compiled_clear: CompiledTeal | None`
Template substitution is done by executing `algorand.app.compile_teal_template(teal_template_code, template_params, deployment_metadata)`, which in turn calls the following in order and returns the compilation result per above (all of which can also be invoked directly):
* `AppManager.strip_teal_comments(teal_code)` - Strips out any TEAL comments to reduce the payload that is sent to algod and reduce the likelihood of hitting the max payload limit
* `AppManager.replace_template_variables(teal_template_code, template_values)` - Replaces the template variables by looking for `TMPL_{key}`
* `AppManager.replace_teal_template_deploy_time_control_params(teal_template_code, params)` - If `params` is provided, it allows for deploy-time immutability and permanence control by replacing `TMPL_UPDATABLE` with `params.get("updatable")` if not `None` and replacing `TMPL_DELETABLE` with `params.get("deletable")` if not `None`
* `algorand.app.compile_teal(teal_code)` - Sends the final TEAL to algod for compilation and returns the result including the source map and caches the compilation result within the `AppManager` instance
#### Making updatable/deletable apps
Below is a sample in [Algorand Python SDK](https://github.com/algorandfoundation/puya) that demonstrates how to make an app updatable/deletable smart contract with the use of `TMPL_UPDATABLE` and `TMPL_DELETABLE` template parameters.
```python
# ... your contract code ...
@arc4.baremethod(allow_actions=["UpdateApplication"])
def update(self) -> None:
assert TemplateVar[bool]("UPDATABLE")
@arc4.baremethod(allow_actions=["DeleteApplication"])
def delete(self) -> None:
assert TemplateVar[bool]("DELETABLE")
# ... your contract code ...
```
Alternative example in [Algorand TypeScript SDK](https://github.com/algorandfoundation/puya-ts):
```typescript
// ... your contract code ...
@baremethod({ allowActions: 'UpdateApplication' })
public onUpdate() {
assert(TemplateVar('UPDATABLE'))
}
@baremethod({ allowActions: 'DeleteApplication' })
public onDelete() {
assert(TemplateVar('DELETABLE'))
}
// ... your contract code ...
```
With the above code, when deploying your application, you can pass in the following deploy-time parameters:
```python
my_factory.deploy(
... # other deployment parameters ...
compilation_params={
"updatable": True, # resulting app will be updatable, and this metadata will be set in the ARC-2 transaction note
"deletable": False, # resulting app will not be deletable, and this metadata will be set in the ARC-2 transaction note
}
)
```
### Return value
When `deploy` executes it will return a `AppDeployResult` object that describes exactly what it did and has comprehensive metadata to describe the end result of the deployed app.
The `deploy` call itself may do one of the following (which you can determine by looking at the `operation_performed` field on the return value from the function):
* `OperationPerformed.CREATE` - The smart contract app was created
* `OperationPerformed.UPDATE` - The smart contract app was updated
* `OperationPerformed.REPLACE` - The smart contract app was deleted and created again (in an atomic transaction)
* `OperationPerformed.NOTHING` - Nothing was done since it was detected the existing smart contract app deployment was up to date
As well as the `operation_performed` parameter and the [optional compilation result](), the return value will have the [`ApplicationMetaData`](../autoapi/algokit_utils/applications/app_deployer/index#algokit_utils.applications.app_deployer.ApplicationMetaData) [fields]() present.
Based on the value of `operation_performed`, there will be other data available in the return value:
* If `CREATE`, `UPDATE` or `REPLACE` then it will have the relevant [`SendAppTransactionResult`](../autoapi/algokit_utils/transactions/transaction_sender/index#algokit_utils.transactions.transaction_sender.SendAppTransactionResult) values:
* `create_result` for create operations
* `update_result` for update operations
* If `REPLACE` then it will also have `delete_result` to capture the result of deleting the existing app
# App management
App management is a higher-order use case capability provided by AlgoKit Utils that builds on top of the core capabilities. It allows you to create, update, delete, call (ABI and otherwise) smart contract apps and the metadata associated with them (including state and boxes).
## `AppManager`
The `AppManager` is a class that is used to manage app information. To get an instance of `AppManager` you can use either [`AlgorandClient`](algorand-client) via `algorand.app` or instantiate it directly (passing in an algod client instance):
```python
from algokit_utils import AppManager
app_manager = AppManager(algod_client)
```
## Calling apps
### App Clients
The recommended way of interacting with apps is via [App clients](app-client) and [App factory](app-client#appfactory). The methods shown on this page are the underlying mechanisms that app clients use and are for advanced use cases when you want more control.
### Compilation
The `AppManager` class allows you to compile TEAL code with caching semantics that allows you to avoid duplicate compilation and keep track of source maps from compiled code.
```python
# Basic compilation
teal_code = "return 1"
compilation_result = app_manager.compile_teal(teal_code)
# Get cached compilation result
cached_result = app_manager.get_compilation_result(teal_code)
# Compile with template substitution
template_code = "int TMPL_VALUE"
template_params = {"VALUE": 1}
compilation_result = app_manager.compile_teal_template(
template_code,
template_params=template_params
)
# Compile with deployment control (updatable/deletable)
control_template = f"""#pragma version 8
int {UPDATABLE_TEMPLATE_NAME}
int {DELETABLE_TEMPLATE_NAME}"""
deployment_metadata = {"updatable": True, "deletable": True}
compilation_result = app_manager.compile_teal_template(
control_template,
deployment_metadata=deployment_metadata
)
```
The compilation result contains:
* `teal` - Original TEAL code
* `compiled` - Base64 encoded compiled bytecode
* `compiled_hash` - Hash of compiled bytecode
* `compiled_base64_to_bytes` - Raw bytes of compiled bytecode
* `source_map` - Source map for debugging
## Accessing state
### Global state
To access global state you can use:
```python
# Get global state for app
global_state = app_manager.get_global_state(app_id)
# Parse raw state from algod
decoded_state = AppManager.decode_app_state(raw_state)
# Access state values
key_raw = decoded_state["value1"].key_raw # Raw bytes
key_base64 = decoded_state["value1"].key_base64 # Base64 encoded
value = decoded_state["value1"].value # Parsed value (str or int)
value_raw = decoded_state["value1"].value_raw # Raw bytes if bytes value
value_base64 = decoded_state["value1"].value_base64 # Base64 if bytes value
```
### Local state
To access local state you can use:
```python
local_state = app_manager.get_local_state(app_id, "ACCOUNT_ADDRESS")
```
### Boxes
To access box storage:
```python
# Get box names
box_names = app_manager.get_box_names(app_id)
# Get box values
box_value = app_manager.get_box_value(app_id, box_name)
box_values = app_manager.get_box_values(app_id, [box_name1, box_name2])
# Get decoded ABI values
abi_value = app_manager.get_box_value_from_abi_type(
app_id, box_name, algosdk.abi.StringType()
)
abi_values = app_manager.get_box_values_from_abi_type(
app_id, [box_name1, box_name2], algosdk.abi.StringType()
)
# Get box reference for transaction
box_ref = AppManager.get_box_reference(box_id)
```
## Getting app information
To get app information:
```python
# Get app info by ID
app_info = app_manager.get_by_id(app_id)
# Get ABI return value from transaction
abi_return = AppManager.get_abi_return(confirmation, abi_method)
```
## Box references
Box references can be specified in several ways:
```python
# String name (encoded to bytes)
box_ref = "my_box"
# Raw bytes
box_ref = b"my_box"
# Account signer (uses address as name)
box_ref = account_signer
# Box reference with app ID
box_ref = BoxReference(app_id=123, name=b"my_box")
```
## Common app parameters
When interacting with apps (creating, updating, deleting, calling), there are common parameters that can be passed:
* `app_id` - ID of the application
* `sender` - Address of transaction sender
* `signer` - Transaction signer (optional)
* `args` - Arguments to pass to the smart contract
* `account_references` - Account addresses to reference
* `app_references` - App IDs to reference
* `asset_references` - Asset IDs to reference
* `box_references` - Box references to load
* `on_complete` - On complete action
* Other common transaction parameters like `note`, `lease`, etc.
For ABI method calls, additional parameters:
* `method` - The ABI method to call
* `args` - ABI typed arguments to pass
See [App client](app-client) for more details on constructing app calls.
# Assets
The Algorand Standard Asset (ASA) management functions include creating, opting in and transferring assets, which are fundamental to asset interaction in a blockchain environment.
## `AssetManager`
The `AssetManager` class provides functionality for managing Algorand Standard Assets (ASAs). It can be accessed through the `AlgorandClient` via `algorand.asset` or instantiated directly:
```python
from algokit_utils import AssetManager, TransactionComposer
from algosdk.v2client import algod
asset_manager = AssetManager(
algod_client=algod_client,
new_group=lambda: TransactionComposer()
)
```
## Asset Information
The `AssetManager` provides two key data classes for asset information:
### `AssetInformation`
Contains details about an Algorand Standard Asset (ASA):
```python
@dataclass
class AssetInformation:
asset_id: int # The ID of the asset
creator: str # Address of the creator account
total: int # Total units created
decimals: int # Number of decimal places
default_frozen: bool | None = None # Whether asset is frozen by default
manager: str | None = None # Optional manager address
reserve: str | None = None # Optional reserve address
freeze: str | None = None # Optional freeze address
clawback: str | None = None # Optional clawback address
unit_name: str | None = None # Optional unit name (e.g. ticker)
asset_name: str | None = None # Optional asset name
url: str | None = None # Optional URL for more info
metadata_hash: bytes | None = None # Optional 32-byte metadata hash
```
### `AccountAssetInformation`
Contains information about an account’s holding of a particular asset:
```python
@dataclass
class AccountAssetInformation:
asset_id: int # The ID of the asset
balance: int # Amount held by the account
frozen: bool # Whether frozen for this account
round: int # Round this info was retrieved at
```
## Bulk Operations
The `AssetManager` provides methods for bulk opt-in/opt-out operations:
### Bulk Opt-In
```python
# Basic example
result = asset_manager.bulk_opt_in(
account="ACCOUNT_ADDRESS",
asset_ids=[12345, 67890]
)
# Advanced example with optional parameters
result = asset_manager.bulk_opt_in(
account="ACCOUNT_ADDRESS",
asset_ids=[12345, 67890],
signer=transaction_signer,
note=b"opt-in note",
lease=b"lease",
static_fee=AlgoAmount(1000),
extra_fee=AlgoAmount(500),
max_fee=AlgoAmount(2000),
validity_window=10,
send_params=SendParams(...)
)
```
### Bulk Opt-Out
```python
# Basic example
result = asset_manager.bulk_opt_out(
account="ACCOUNT_ADDRESS",
asset_ids=[12345, 67890]
)
# Advanced example with optional parameters
result = asset_manager.bulk_opt_out(
account="ACCOUNT_ADDRESS",
asset_ids=[12345, 67890],
ensure_zero_balance=True,
signer=transaction_signer,
note=b"opt-out note",
lease=b"lease",
static_fee=AlgoAmount(1000),
extra_fee=AlgoAmount(500),
max_fee=AlgoAmount(2000),
validity_window=10,
send_params=SendParams(...)
)
```
The bulk operations return a list of `BulkAssetOptInOutResult` objects containing:
* `asset_id`: The ID of the asset opted into/out of
* `transaction_id`: The transaction ID of the opt-in/out
## Get Asset Information
### Getting Asset Parameters
You can get the current parameters of an asset from algod using `get_by_id()`:
```python
asset_info = asset_manager.get_by_id(12345)
```
### Getting Account Holdings
You can get an account’s current holdings of an asset using `get_account_information()`:
```python
address = "XBYLS2E6YI6XXL5BWCAMOA4GTWHXWENZMX5UHXMRNWWUQ7BXCY5WC5TEPA"
asset_id = 12345
account_info = asset_manager.get_account_information(address, asset_id)
```
# Client management
Client management is one of the core capabilities provided by AlgoKit Utils. It allows you to create (auto-retry) [algod](https://dev.algorand.co/reference/rest-apis/algod), [indexer](https://dev.algorand.co/reference/rest-apis/indexer) and [kmd](https://dev.algorand.co/reference/rest-apis/kmd) clients against various networks resolved from environment or specified configuration.
Any AlgoKit Utils function that needs one of these clients will take the underlying algosdk classes (`algosdk.v2client.algod.AlgodClient`, `algosdk.v2client.indexer.IndexerClient`, `algosdk.kmd.KMDClient`) so inline with the [Modularity](../index#id1) principle you can use existing logic to get instances of these clients without needing to use the Client management capability if you prefer.
To see some usage examples check out the [automated tests](https://github.com/algorandfoundation/algokit-utils-py/blob/main/tests/test_network_clients.py).
## `ClientManager`
The `ClientManager` is a class that is used to manage client instances.
To get an instance of `ClientManager` you can instantiate it directly:
```python
from algokit_utils import ClientManager, AlgoSdkClients, AlgoClientConfigs
from algosdk.v2client.algod import AlgodClient
# Using AlgoSdkClients
algod_client = AlgodClient(...)
algorand_client = ... # Get AlgorandClient instance from somewhere
clients = AlgoSdkClients(algod=algod_client, indexer=indexer_client, kmd=kmd_client)
client_manager = ClientManager(clients, algorand_client)
# Using AlgoClientConfigs
algod_config = AlgoClientNetworkConfig(server="https://...", token="")
configs = AlgoClientConfigs(algod_config=algod_config)
client_manager = ClientManager(configs, algorand_client)
```
## Network configuration
The network configuration is specified using the `AlgoClientConfig` type. This same type is used to specify the config for `algod`, `indexer`, and `kmd` [SDK clients](https://github.com/algorand/py-algorand-sdk).
There are a number of ways to produce one of these configuration objects:
* Manually specifying a dataclass, e.g.
```python
from algokit_utils import AlgoClientNetworkConfig
config = AlgoClientNetworkConfig(
server="https://myalgodnode.com",
token="SECRET_TOKEN" # optional
)
```
* `ClientManager.get_config_from_environment_or_localnet()` - Loads the Algod client config, the Indexer client config and the Kmd config from well-known environment variables or if not found then default LocalNet; this is useful to have code that can work across multiple blockchain environments (including LocalNet), without having to change
* `ClientManager.get_algod_config_from_environment()` - Loads an Algod client config from well-known environment variables
* `ClientManager.get_indexer_config_from_environment()` - Loads an Indexer client config from well-known environment variables; useful to have code that can work across multiple blockchain environments (including LocalNet), without having to change
* `ClientManager.get_algonode_config(network)` - Loads an Algod or indexer config against [AlgoNode free tier](https://nodely.io/docs/free/start) to either MainNet or TestNet
* `ClientManager.get_default_localnet_config()` - Loads an Algod, Indexer or Kmd config against [LocalNet](https://github.com/algorandfoundation/algokit-cli/blob/main/docs/features/localnet) using the default configuration
## Clients
### Creating an SDK client instance
Once you have the configuration for a client, to get a new client you can use the following functions:
* `ClientManager.get_algod_client(config)` - Returns an Algod client for the given configuration; the client automatically retries on transient HTTP errors
* `ClientManager.get_indexer_client(config)` - Returns an Indexer client for given configuration
* `ClientManager.get_kmd_client(config)` - Returns a Kmd client for the given configuration
You can also shortcut needing to write the likes of `ClientManager.get_algod_client(ClientManager.get_algod_config_from_environment())` with environment shortcut methods:
* `ClientManager.get_algod_client_from_environment()` - Returns an Algod client by loading the config from environment variables
* `ClientManager.get_indexer_client_from_environment()` - Returns an indexer client by loading the config from environment variables
* `ClientManager.get_kmd_client_from_environment()` - Returns a kmd client by loading the config from environment variables
### Accessing SDK clients via ClientManager instance
Once you have a `ClientManager` instance, you can access the SDK clients:
```python
client_manager = ClientManager(algod=algod_client, indexer=indexer_client, kmd=kmd_client)
algod_client = client_manager.algod
indexer_client = client_manager.indexer
kmd_client = client_manager.kmd
```
If the method to create the `ClientManager` doesn’t configure indexer or kmd (both of which are optional), then accessing those clients will trigger an error.
### Creating a TestNet dispenser API client instance
You can also create a [TestNet dispenser API client instance](dispenser-client) from `ClientManager` too.
## Automatic retry
When receiving an Algod or Indexer client from AlgoKit Utils, it will be a special wrapper client that handles retrying transient failures.
## Network information
You can get information about the current network you are connected to:
```python
# Get network information
network = client_manager.network()
print(f"Is mainnet: {network.is_mainnet}")
print(f"Is testnet: {network.is_testnet}")
print(f"Is localnet: {network.is_localnet}")
print(f"Genesis ID: {network.genesis_id}")
print(f"Genesis hash: {network.genesis_hash}")
# Convenience methods
is_mainnet = client_manager.is_mainnet()
is_testnet = client_manager.is_testnet()
is_localnet = client_manager.is_localnet()
```
The first time `network()` is called it will make a HTTP call to algod to get the network parameters, but from then on it will be cached within that `ClientManager` instance for subsequent calls.
# Debugger
The AlgoKit Python Utilities package provides a set of debugging tools that can be used to simulate and trace transactions on the Algorand blockchain. These tools and methods are optimized for developers who are building applications on Algorand and need to test and debug their smart contracts via [AlgoKit AVM Debugger extension](https://marketplace.visualstudio.com/items?itemName=algorandfoundation.algokit-avm-vscode-debugger).
## Configuration
The `config.py` file contains the `UpdatableConfig` class which manages and updates configuration settings for the AlgoKit project. The class has the following attributes:
* `debug`: Indicates whether debug mode is enabled.
* `project_root`: The path to the project root directory. Can be ignored if you are using `algokit_utils` inside an `algokit` compliant project (containing `.algokit.toml` file). For non algokit compliant projects, simply provide the path to the folder where you want to store sourcemaps and traces to be used with [`AlgoKit AVM Debugger`](https://github.com/algorandfoundation/algokit-avm-vscode-debugger). Alternatively you can also set the value via the `ALGOKIT_PROJECT_ROOT` environment variable.
* `trace_all`: Indicates whether to trace all operations. Defaults to false, this means that when debug mode is enabled, any (or all) application client calls performed via `algokit_utils` will store responses from `simulate` endpoint. These files are called traces, and can be used with `AlgoKit AVM Debugger` to debug TEAL source codes, transactions in the atomic group and etc.
* `trace_buffer_size_mb`: The size of the trace buffer in megabytes. By default uses 256 megabytes. When output folder containing debug trace files exceedes the size, oldest files are removed to optimize for storage consumption.
* `max_search_depth`: The maximum depth to search for a an `algokit` config file. By default it will traverse at most 10 folders searching for `.algokit.toml` file which will be used to assume algokit compliant project root path.
The `configure` method can be used to set these attributes.
To enable debug mode in your project you can configure it as follows:
```py
from algokit_utils.config import config
config.configure(debug=True)
```
## Debugging Utilities
Debugging utilities can be used to simplify gathering artifacts to be used with [AlgoKit AVM Debugger](https://github.com/algorandfoundation/algokit-avm-vscode-debugger) in non algokit compliant projects. The following methods are provided:
* `simulate_and_persist_response`: This method simulates the atomic transactions using the provided `AtomicTransactionComposer` object and `AlgodClient` object, and persists the simulation response to an AVM Debugger compliant JSON file. It takes an `AtomicTransactionComposer` object representing the atomic transactions to be simulated and persisted, a `Path` object representing the root directory of the project, an `AlgodClient` object representing the Algorand client, and a float representing the size of the trace buffer in megabytes.
### Trace filename format
The trace files are named in a specific format to provide useful information about the transactions they contain. The format is as follows:
```ts
`${timestamp}_lr${last_round}_${transaction_types}.trace.avm.json`;
```
Where:
* `timestamp`: The time when the trace file was created, in ISO 8601 format, with colons and periods removed.
* `last_round`: The last round when the simulation was performed.
* `transaction_types`: A string representing the types and counts of transactions in the atomic group. Each transaction type is represented as `${count}${type}`, and different transaction types are separated by underscores.
For example, a trace file might be named `20220301T123456Z_lr1000_2pay_1axfer.trace.avm.json`, indicating that the trace file was created at `2022-03-01T12:34:56Z`, the last round was `1000`, and the atomic group contained 2 payment transactions and 1 asset transfer transaction.
# Debugger
The AlgoKit Python Utilities package provides a set of debugging tools that can be used to simulate and trace transactions on the Algorand blockchain. These tools and methods are optimized for developers who are building applications on Algorand and need to test and debug their smart contracts via [AlgoKit AVM Debugger extension](https://marketplace.visualstudio.com/items?itemName=algorandfoundation.algokit-avm-vscode-debugger).
## Configuration
The `config.py` file contains the `UpdatableConfig` class which manages and updates configuration settings for the AlgoKit project.
* `debug`: Indicates whether debug mode is enabled.
* `project_root`: The path to the project root directory. Can be ignored if you are using `algokit_utils` inside an `algokit` compliant project (containing `.algokit.toml` file). For non algokit compliant projects, simply provide the path to the folder where you want to store sourcemaps and traces to be used with [`AlgoKit AVM Debugger`](https://github.com/algorandfoundation/algokit-avm-vscode-debugger). Alternatively you can also set the value via the `ALGOKIT_PROJECT_ROOT` environment variable.
* `trace_all`: Indicates whether to trace all operations. Defaults to false, this means that when debug mode is enabled, any (or all) application client calls performed via `algokit_utils` will store responses from `simulate` endpoint. These files are called traces, and can be used with `AlgoKit AVM Debugger` to debug TEAL source codes, transactions in the atomic group and etc.
* `trace_buffer_size_mb`: The size of the trace buffer in megabytes. By default uses 256 megabytes. When output folder containing debug trace files exceedes the size, oldest files are removed to optimize for storage consumption.
* `max_search_depth`: The maximum depth to search for a an `algokit` config file. By default it will traverse at most 10 folders searching for `.algokit.toml` file which will be used to assume algokit compliant project root path.
* `populate_app_call_resources`: Indicates whether to populate app call resources. Defaults to false, which means that when debug mode is enabled, any (or all) application client calls performed via `algokit_utils` will not populate app call resources.
* `logger`: A custom logger to use. Defaults to [`algokit_utils.config.AlgoKitLogger`](../autoapi/algokit_utils/config/index#algokit_utils.config.AlgoKitLogger) instance.
The `configure` method can be used to set these attributes.
To enable debug mode in your project you can configure it as follows:
```python
from algokit_utils.config import config
config.configure(
debug=True,
project_root=Path("./my-project"),
trace_all=True,
trace_buffer_size_mb=512,
max_search_depth=15,
populate_app_call_resources=True,
)
```
## `AlgoKitLogger`
The `AlgoKitLogger` is a custom logger that is used to log messages in the AlgoKit project. It is a subclass of the `logging.Logger` class and extends it to provide additional functionality.
### Suppressing log messages per log call
To supress log messages for individual log calls you can pass `'suppress_log':True` to the log call’s `extra` argument.
### Suppressing log messages globally
To supress log messages globally you can configure the config object to use a custom logger that does not log anything.
```python
config.configure(logger=AlgoKitLogger.get_null_logger())
```
## Debugging Utilities
When debug mode is enabled, AlgoKit Utils will automatically:
* Generate transaction traces compatible with the AVM Debugger
* Manage trace file storage with automatic cleanup
* Provide source map generation for TEAL contracts
The following methods are provided for manual debugging operations:
* `persist_sourcemaps`: Persists sourcemaps for given TEAL contracts as AVM Debugger-compliant artifacts. Parameters:
* `sources`: List of TEAL sources to generate sourcemaps for
* `project_root`: Project root directory for storage
* `client`: AlgodClient instance
* `with_sources`: Whether to include TEAL source files (default: True)
* `simulate_and_persist_response`: Simulates transactions and persists debug traces. Parameters:
* `atc`: AtomicTransactionComposer containing transactions
* `project_root`: Project root directory for storage
* `algod_client`: AlgodClient instance
* `buffer_size_mb`: Maximum trace storage in MB (default: 256)
* `allow_empty_signatures`: Allow unsigned transactions (default: True)
* `allow_unnamed_resources`: Allow unnamed resources (default: True)
* `extra_opcode_budget`: Additional opcode budget
* `exec_trace_config`: Custom trace configuration
* `simulation_round`: Specific round to simulate
### Trace filename format
The trace files are named in a specific format to provide useful information about the transactions they contain. The format is as follows:
```default
${timestamp}_lr${last_round}_${transaction_types}.trace.avm.json
```
Where:
* `timestamp`: The time when the trace file was created, in ISO 8601 format, with colons and periods removed.
* `last_round`: The last round when the simulation was performed.
* `transaction_types`: A string representing the types and counts of transactions in the atomic group. Each transaction type is represented as `${count}${type}`, and different transaction types are separated by underscores.
For example, a trace file might be named `20220301T123456Z_lr1000_2pay_1axfer.trace.avm.json`, indicating that the trace file was created at `2022-03-01T12:34:56Z`, the last round was `1000`, and the atomic group contained 2 payment transactions and 1 asset transfer transaction.
# TestNet Dispenser Client
The TestNet Dispenser Client is a utility for interacting with the AlgoKit TestNet Dispenser API. It provides methods to fund an account, register a refund for a transaction, and get the current limit for an account.
## Creating a Dispenser Client
To create a Dispenser Client, you need to provide an authorization token. This can be done in two ways:
1. Pass the token directly to the client constructor as `auth_token`.
2. Set the token as an environment variable `ALGOKIT_DISPENSER_ACCESS_TOKEN` (see [docs](https://github.com/algorandfoundation/algokit-cli/blob/main/docs/features/dispenser#login) on how to obtain the token).
If both methods are used, the constructor argument takes precedence.
```python
import algokit_utils
# With auth token
dispenser = algorand.client.get_testnet_dispenser(
auth_token="your_auth_token",
)
# With auth token and timeout
dispenser = algorand.client.get_testnet_dispenser(
auth_token="your_auth_token",
request_timeout=2, # seconds
)
# From environment variables
# i.e. os.environ['ALGOKIT_DISPENSER_ACCESS_TOKEN'] = 'your_auth_token'
dispenser = algorand.client.get_testnet_dispenser_from_environment()
# Alternatively, you can construct it directly
from algokit_utils import TestNetDispenserApiClient
# Using constructor argument
client = TestNetDispenserApiClient(auth_token="your_auth_token")
# Using environment variable
import os
os.environ['ALGOKIT_DISPENSER_ACCESS_TOKEN'] = 'your_auth_token'
client = TestNetDispenserApiClient()
```
## Funding an Account
To fund an account with Algo from the dispenser API, use the `fund` method. This method requires the receiver’s address and the amount to be funded.
```python
response = dispenser.fund(
receiver="RECEIVER_ADDRESS",
amount=1000, # Amount in microAlgos
)
```
The `fund` method returns a `DispenserFundResponse` object, which contains the transaction ID (`tx_id`) and the amount funded.
## Registering a Refund
To register a refund for a transaction with the dispenser API, use the `refund` method. This method requires the transaction ID of the refund transaction.
```python
dispenser.refund("transaction_id")
```
> Keep in mind, to perform a refund you need to perform a payment transaction yourself first by sending funds back to TestNet Dispenser, then you can invoke this refund endpoint and pass the txn\_id of your refund txn. You can obtain dispenser address by inspecting the sender field of any issued fund transaction initiated via [fund]().
## Getting Current Limit
To get the current limit for an account with Algo from the dispenser API, use the `get_limit` method.
```python
response = dispenser.get_limit()
```
The `get_limit` method returns a `DispenserLimitResponse` object, which contains the current limit amount.
## Error Handling
If an error occurs while making a request to the dispenser API, an exception will be raised with a message indicating the type of error. Refer to [Error Handling docs](https://github.com/algorandfoundation/algokit/blob/main/docs/testnet_api#error-handling) for details on how you can handle each individual error `code`.
Here’s an example of handling errors:
```python
try:
response = dispenser.fund(
receiver="RECEIVER_ADDRESS",
amount=1000,
)
except Exception as e:
print(f"Error occurred: {str(e)}")
```
# AlgoKit Python Utilities
A set of core Algorand utilities written in Python and released via PyPi that make it easier to build solutions on Algorand. This project is part of [AlgoKit](https://github.com/algorandfoundation/algokit-cli).
The goal of this library is to provide intuitive, productive utility functions that make it easier, quicker and safer to build applications on Algorand. Largely these functions wrap the underlying Algorand SDK, but provide a higher level interface with sensible defaults and capabilities for common tasks.
#### NOTE
If you prefer TypeScript there’s an equivalent [TypeScript utility library](https://github.com/algorandfoundation/algokit-utils-ts).
[Core principles](#core-principles) | [Installation](#installation) | [Usage](#usage) | [Config and logging](#config-logging) | [Capabilities](#capabilities) | [Reference docs](#reference-documentation)
# Contents
* [Account management](/algokit/utils/python/account)
* [`AccountManager`](/algokit/utils/python/account#accountmanager)
* [`TransactionSignerAccountProtocol`](/algokit/utils/python/account#transactionsigneraccountprotocol)
* [Registering a signer](/algokit/utils/python/account#registering-a-signer)
* [Default signer](/algokit/utils/python/account#default-signer)
* [Get a signer](/algokit/utils/python/account#get-a-signer)
* [Accounts](/algokit/utils/python/account#accounts)
* [Rekey account](/algokit/utils/python/account#rekey-account)
* [KMD account management](/algokit/utils/python/account#kmd-account-management)
* [Algorand client](/algokit/utils/python/algorand-client)
* [Accessing SDK clients](/algokit/utils/python/algorand-client#accessing-sdk-clients)
* [Accessing manager class instances](/algokit/utils/python/algorand-client#accessing-manager-class-instances)
* [Creating and issuing transactions](/algokit/utils/python/algorand-client#creating-and-issuing-transactions)
* [Algo amount handling](/algokit/utils/python/amount)
* [`AlgoAmount`](/algokit/utils/python/amount#algoamount)
* [App client and App factory](/algokit/utils/python/app-client)
* [`AppFactory`](/algokit/utils/python/app-client#appfactory)
* [`AppClient`](/algokit/utils/python/app-client#appclient)
* [Dynamically creating clients for a given app spec](/algokit/utils/python/app-client#dynamically-creating-clients-for-a-given-app-spec)
* [Creating and deploying an app](/algokit/utils/python/app-client#creating-and-deploying-an-app)
* [Updating and deleting an app](/algokit/utils/python/app-client#updating-and-deleting-an-app)
* [Calling the app](/algokit/utils/python/app-client#calling-the-app)
* [Funding the app account](/algokit/utils/python/app-client#funding-the-app-account)
* [Reading state](/algokit/utils/python/app-client#reading-state)
* [Handling logic errors and diagnosing errors](/algokit/utils/python/app-client#handling-logic-errors-and-diagnosing-errors)
* [Default arguments](/algokit/utils/python/app-client#default-arguments)
* [App deployment](/algokit/utils/python/app-deploy)
* [Smart contract development lifecycle](/algokit/utils/python/app-deploy#smart-contract-development-lifecycle)
* [`AppDeployer`](/algokit/utils/python/app-deploy#appdeployer)
* [Deployment metadata](/algokit/utils/python/app-deploy#deployment-metadata)
* [Lookup deployed apps by name](/algokit/utils/python/app-deploy#lookup-deployed-apps-by-name)
* [Performing a deployment](/algokit/utils/python/app-deploy#performing-a-deployment)
* [App management](/algokit/utils/python/app)
* [`AppManager`](/algokit/utils/python/app#appmanager)
* [Calling apps](/algokit/utils/python/app#calling-apps)
* [Accessing state](/algokit/utils/python/app#accessing-state)
* [Getting app information](/algokit/utils/python/app#getting-app-information)
* [Box references](/algokit/utils/python/app#box-references)
* [Common app parameters](/algokit/utils/python/app#common-app-parameters)
* [Assets](/algokit/utils/python/asset)
* [`AssetManager`](/algokit/utils/python/asset#assetmanager)
* [Asset Information](/algokit/utils/python/asset#asset-information)
* [Bulk Operations](/algokit/utils/python/asset#bulk-operations)
* [Get Asset Information](/algokit/utils/python/asset#get-asset-information)
* [Client management](/algokit/utils/python/client)
* [`ClientManager`](/algokit/utils/python/client#clientmanager)
* [Network configuration](/algokit/utils/python/client#network-configuration)
* [Clients](/algokit/utils/python/client#clients)
* [Automatic retry](/algokit/utils/python/client#automatic-retry)
* [Network information](/algokit/utils/python/client#network-information)
* [Debugger](/algokit/utils/python/debugging)
* [Configuration](/algokit/utils/python/debugging#configuration)
* [`AlgoKitLogger`](/algokit/utils/python/debugging#algokitlogger)
* [Debugging Utilities](/algokit/utils/python/debugging#debugging-utilities)
* [TestNet Dispenser Client](/algokit/utils/python/dispenser-client)
* [Creating a Dispenser Client](/algokit/utils/python/dispenser-client#creating-a-dispenser-client)
* [Funding an Account](/algokit/utils/python/dispenser-client#funding-an-account)
* [Registering a Refund](/algokit/utils/python/dispenser-client#registering-a-refund)
* [Getting Current Limit](/algokit/utils/python/dispenser-client#getting-current-limit)
* [Error Handling](/algokit/utils/python/dispenser-client#error-handling)
* [Testing](/algokit/utils/python/testing)
* [Basic Test Setup](/algokit/utils/python/testing#basic-test-setup)
* [Creating Test Assets](/algokit/utils/python/testing#creating-test-assets)
* [Testing Application Deployments](/algokit/utils/python/testing#testing-application-deployments)
* [Testing Asset Transfers](/algokit/utils/python/testing#testing-asset-transfers)
* [Testing Application Calls](/algokit/utils/python/testing#testing-application-calls)
* [Testing Box Storage](/algokit/utils/python/testing#testing-box-storage)
* [Transaction composer](/algokit/utils/python/transaction-composer)
* [Constructing a transaction](/algokit/utils/python/transaction-composer#constructing-a-transaction)
* [Simulating a transaction](/algokit/utils/python/transaction-composer#simulating-a-transaction)
* [Transaction management](/algokit/utils/python/transaction)
* [Transaction Results](/algokit/utils/python/transaction#transaction-results)
* [Further reading](/algokit/utils/python/transaction#further-reading)
* [Algo transfers (payments)](/algokit/utils/python/transfer)
* [`payment`](/algokit/utils/python/transfer#payment)
* [`ensure_funded`](/algokit/utils/python/transfer#ensure_funded)
* [Dispenser](/algokit/utils/python/transfer#dispenser)
* [Typed application clients](/algokit/utils/python/typed-app-clients)
* [Generating an app spec](/algokit/utils/python/typed-app-clients#generating-an-app-spec)
* [Generating a typed client](/algokit/utils/python/typed-app-clients#generating-a-typed-client)
* [Getting a typed client instance](/algokit/utils/python/typed-app-clients#getting-a-typed-client-instance)
* [Client usage](/algokit/utils/python/typed-app-clients#client-usage)
* [Migration Guide - v3](v3-migration-guide)
* [Migration Steps](v3-migration-guide#migration-steps)
* [Breaking Changes](v3-migration-guide#breaking-changes)
* [Best Practices](v3-migration-guide#best-practices)
* [Troubleshooting](v3-migration-guide#troubleshooting)
* [API Reference](autoapi/index)
* [algokit\_utils](autoapi/algokit_utils/index)
[]()
# Core principles
This library follows the [Guiding Principles of AlgoKit](https://github.com/algorandfoundation/algokit-cli/blob/main/docs/algokit#guiding-principles) and is designed with the following principles:
* **Modularity** - This library is a thin wrapper of modular building blocks over the Algorand SDK; the primitives from the underlying Algorand SDK are exposed and used wherever possible so you can opt-in to which parts of this library you want to use without having to use an all or nothing approach.
* **Type-safety** - This library provides strong type hints with effort put into creating types that provide good type safety and intellisense when used with tools like MyPy.
* **Productivity** - This library is built to make solution developers highly productive; it has a number of mechanisms to make common code easier and terser to write.
[]()
# Installation
This library can be installed from PyPi using pip or poetry:
```bash
pip install algokit-utils
# or
poetry add algokit-utils
```
[]()
# Usage
The main entrypoint to the bulk of the functionality in AlgoKit Utils is the `AlgorandClient` class. You can get started by using one of the static initialization methods to create an Algorand client:
```python
# Point to the network configured through environment variables or
# if no environment variables it will point to the default LocalNet configuration
algorand = AlgorandClient.from_environment()
# Point to default LocalNet configuration
algorand = AlgorandClient.default_localnet()
# Point to TestNet using AlgoNode free tier
algorand = AlgorandClient.testnet()
# Point to MainNet using AlgoNode free tier
algorand = AlgorandClient.mainnet()
# Point to a pre-created algod client
algorand = AlgorandClient.from_clients(algod=...)
# Point to a pre-created algod and indexer client
algorand = AlgorandClient.from_clients(algod=..., indexer=..., kmd=...)
# Point to custom configuration for algod
algod_config = AlgoClientNetworkConfig(server=..., token=..., port=...)
algorand = AlgorandClient.from_config(algod_config=algod_config)
# Point to custom configuration for algod and indexer and kmd
algod_config = AlgoClientNetworkConfig(server=..., token=..., port=...)
indexer_config = AlgoClientNetworkConfig(server=..., token=..., port=...)
kmd_config = AlgoClientNetworkConfig(server=..., token=..., port=...)
algorand = AlgorandClient.from_config(algod_config=algod_config, indexer_config=indexer_config, kmd_config=kmd_config)
```
# Testing
AlgoKit Utils provides a dedicated documentation page on various useful snippets that can be reused for testing with tools like [Pytest](https://docs.pytest.org/en/latest/):
* [Testing](/algokit/utils/python/testing)
# Types
The library leverages Python’s native type hints and is fully compatible with [MyPy](https://mypy-lang.org/) for static type checking.
All public abstractions and methods are organized in logical modules matching their domain functionality. You can import types either directly from the root module or from their source submodules. Refer to [API documentation](autoapi/index) for more details.
[]()
# Config and logging
To configure the AlgoKit Utils library you can make use of the [`Config`](autoapi/algokit_utils/config/index) object, which has a configure method that lets you configure some or all of the configuration options.
## Config singleton
The AlgoKit Utils configuration singleton can be updated using `config.configure()`. Refer to the [Config API documentation](autoapi/algokit_utils/config/index) for more details.
## Logging
AlgoKit has an in-built logging abstraction through the [`algokit_utils.config.AlgoKitLogger`](autoapi/algokit_utils/config/index#algokit_utils.config.AlgoKitLogger) class that provides standardized logging capabilities. The logger is accessible through the `config.logger` property and provides various logging levels.
Each method supports optional suppression of output using the `suppress_log` parameter.
## Debug mode
To turn on debug mode you can use the following:
```python
from algokit_utils.config import config
config.configure(debug=True)
```
To retrieve the current debug state you can use `debug` property.
This will turn on things like automatic tracing, more verbose logging and [advanced debugging](/algokit/utils/python/debugging). It’s likely this option will result in extra HTTP calls to algod and it’s worth being careful when it’s turned on.
[]()
# Capabilities
The library helps you interact with and develop against the Algorand blockchain with a series of end-to-end capabilities as described below:
* [**AlgorandClient**](/algokit/utils/python/algorand-client) - The key entrypoint to the AlgoKit Utils functionality
* **Core capabilities**
* [**Client management**](/algokit/utils/python/client) - Creation of (auto-retry) algod, indexer and kmd clients against various networks resolved from environment or specified configuration, and creation of other API clients (e.g. TestNet Dispenser API and app clients)
* [**Account management**](/algokit/utils/python/account) - Creation, use, and management of accounts including mnemonic, rekeyed, multisig, transaction signer, idempotent KMD accounts and environment variable injected
* [**Algo amount handling**](/algokit/utils/python/amount) - Reliable, explicit, and terse specification of microAlgo and Algo amounts and safe conversion between them
* [**Transaction management**](/algokit/utils/python/transaction) - Ability to construct, simulate and send transactions with consistent and highly configurable semantics, including configurable control of transaction notes, logging, fees, validity, signing, and sending behaviour
* **Higher-order use cases**
* [**Asset management**](/algokit/utils/python/asset) - Creation, transfer, destroying, opting in and out and managing Algorand Standard Assets
* [**Typed application clients**](/algokit/utils/python/typed-app-clients) - Type-safe application clients that are [generated](https://github.com/algorandfoundation/algokit-cli/blob/main/docs/features/generate#1-typed-clients) from ARC-56 or ARC-32 application spec files and allow you to intuitively and productively interact with a deployed app, which is the recommended way of interacting with apps and builds on top of the following capabilities:
* [**ARC-56 / ARC-32 App client and App factory**](/algokit/utils/python/app-client) - Builds on top of the App management and App deployment capabilities (below) to provide a high productivity application client that works with ARC-56 and ARC-32 application spec defined smart contracts
* [**App management**](/algokit/utils/python/app) - Creation, updating, deleting, calling (ABI and otherwise) smart contract apps and the metadata associated with them (including state and boxes)
* [**App deployment**](/algokit/utils/python/app-deploy) - Idempotent (safely retryable) deployment of an app, including deploy-time immutability and permanence control and TEAL template substitution
* [**Algo transfers (payments)**](/algokit/utils/python/transfer) - Ability to easily initiate Algo transfers between accounts, including dispenser management and idempotent account funding
* [**Automated testing**](/algokit/utils/python/testing) - Reusable snippets to leverage AlgoKit Utils abstractions in a manner that are useful for when writing tests in tools like [Pytest](https://docs.pytest.org/en/latest/).
[]()
# Reference documentation
For detailed API documentation, see the [`algokit_utils`](autoapi/algokit_utils/index#module-algokit_utils)
# Testing
The following is a collection of useful snippets that can help you get started with testing your Algorand applications using AlgoKit utils. For the sake of simplicity, we’ll use [pytest](https://docs.pytest.org/en/latest/) in the examples below.
## Basic Test Setup
Here’s a basic test setup using pytest fixtures that provides common testing utilities:
```python
import pytest
from algokit_utils import Account, SigningAccount
from algokit_utils.algorand import AlgorandClient
from algokit_utils.models.amount import AlgoAmount
@pytest.fixture
def algorand() -> AlgorandClient:
"""Get an AlgorandClient instance configured for LocalNet"""
return AlgorandClient.default_localnet()
@pytest.fixture
def funded_account(algorand: AlgorandClient) -> SigningAccount:
"""Create and fund a test account with ALGOs"""
new_account = algorand.account.random()
dispenser = algorand.account.localnet_dispenser()
algorand.account.ensure_funded(
new_account,
dispenser,
min_spending_balance=AlgoAmount.from_algos(100),
min_funding_increment=AlgoAmount.from_algos(1)
)
algorand.set_signer(sender=new_account.address, signer=new_account.signer)
return new_account
```
Refer to [pytest fixture scopes](https://docs.pytest.org/en/latest/how-to/fixtures.html#fixture-scopes) for more information on how to control lifecycle of fixtures.
## Creating Test Assets
Here’s a helper function to create test ASAs (Algorand Standard Assets):
```python
def generate_test_asset(algorand: AlgorandClient, sender: Account, total: int | None = None) -> int:
"""Create a test asset and return its ID"""
if total is None:
total = random.randint(20, 120)
create_result = algorand.send.asset_create(
AssetCreateParams(
sender=sender.address,
total=total,
decimals=0,
default_frozen=False,
unit_name="TST",
asset_name=f"Test Asset {random.randint(1,100)}",
url="https://example.com",
manager=sender.address,
reserve=sender.address,
freeze=sender.address,
clawback=sender.address,
)
)
return int(create_result.confirmation["asset-index"])
```
## Testing Application Deployments
Here’s how one can test smart contract application deployments:
```python
def test_app_deployment(algorand: AlgorandClient, funded_account: SigningAccount):
"""Test deploying a smart contract application"""
# Load the application spec
app_spec = Path("artifacts/application.json").read_text()
# Create app factory
factory = algorand.client.get_app_factory(
app_spec=app_spec,
default_sender=funded_account.address
)
# Deploy the app
app_client, deploy_response = factory.deploy(
compilation_params={
"deletable": True,
"updatable": True,
"deploy_time_params": {"VERSION": 1},
},
)
# Verify deployment
assert deploy_response.app.app_id > 0
assert deploy_response.app.app_address
```
## Testing Asset Transfers
Here’s how one can test ASA transfers between accounts:
```python
def test_asset_transfer(algorand: AlgorandClient, funded_account: SigningAccount):
"""Test ASA transfers between accounts"""
# Create receiver account
receiver = algorand.account.random()
algorand.account.ensure_funded(
account_to_fund=receiver,
dispenser_account=funded_account,
min_spending_balance=AlgoAmount.from_algos(1)
)
# Create test asset
asset_id = generate_test_asset(algorand, funded_account, 100)
# Opt receiver into asset
algorand.send.asset_opt_in(
AssetOptInParams(
sender=receiver.address,
asset_id=asset_id,
signer=receiver.signer
)
)
# Transfer asset
transfer_amount = 5
result = algorand.send.asset_transfer(
AssetTransferParams(
sender=funded_account.address,
receiver=receiver.address,
asset_id=asset_id,
amount=transfer_amount
)
)
# Verify transfer
receiver_balance = algorand.asset.get_account_information(receiver, asset_id)
assert receiver_balance.balance == transfer_amount
```
## Testing Application Calls
Here’s how to test application method calls:
```python
def test_app_method_call(algorand: AlgorandClient, funded_account: SigningAccount):
"""Test calling ABI methods on an application"""
# Deploy application first
app_spec = Path("artifacts/application.json").read_text()
factory = algorand.client.get_app_factory(
app_spec=app_spec,
default_sender=funded_account.address
)
app_client, _ = factory.deploy()
# Call application method
result = app_client.send.call(
AppClientMethodCallParams(
method="hello",
args=["world"]
)
)
# Verify result
assert result.abi_return == "Hello, world"
```
## Testing Box Storage
Here’s how to test application box storage:
```python
def test_box_storage(algorand: AlgorandClient, funded_account: SigningAccount):
"""Test application box storage"""
# Deploy application
app_spec = Path("artifacts/application.json").read_text()
factory = algorand.client.get_app_factory(
app_spec=app_spec,
default_sender=funded_account.address
)
app_client, _ = factory.deploy()
# Fund app account for box storage MBR
app_client.fund_app_account(
FundAppAccountParams(amount=AlgoAmount.from_algos(1))
)
# Store value in box
box_name = b"test_box"
box_value = "test_value"
app_client.send.call(
AppClientMethodCallParams(
method="set_box",
args=[box_name, box_value],
box_references=[box_name]
)
)
# Verify box value
stored_value = app_client.get_box_value(box_name)
assert stored_value == box_value.encode()
```
# Transaction composer
The `TransactionComposer` class allows you to easily compose one or more compliant Algorand transactions and execute and/or simulate them.
It’s the core of how the `AlgorandClient` class composes and sends transactions.
```python
from algokit_utils import TransactionComposer, AppManager
from algokit_utils.transactions import (
PaymentParams,
AppCallMethodCallParams,
AssetCreateParams,
AppCreateParams,
# ... other transaction parameter types
)
```
To get an instance of `TransactionComposer` you can either get it from an app client, from an `AlgorandClient`, or by instantiating via the constructor.
```python
# From AlgorandClient
composer_from_algorand = algorand.new_group()
# From AppClient
composer_from_app_client = app_client.algorand.new_group()
# From constructor
composer_from_constructor = TransactionComposer(
algod=algod,
# Return the TransactionSigner for this address
get_signer=lambda address: signer
)
# From constructor with optional params
composer_from_constructor = TransactionComposer(
algod=algod,
# Return the TransactionSigner for this address
get_signer=lambda address: signer,
# Custom function to get suggested params
get_suggested_params=lambda: algod.suggested_params(),
# Number of rounds the transaction should be valid for
default_validity_window=1000,
# Optional AppManager instance for TEAL compilation
app_manager=AppManager(algod)
)
```
## Constructing a transaction
To construct a transaction you need to add it to the composer, passing in the relevant params object for that transaction. Params are Python dataclasses aavailable for import from `algokit_utils.transactions`.
Parameter types include:
* `PaymentParams` - For ALGO transfers
* `AssetCreateParams` - For creating ASAs
* `AssetConfigParams` - For reconfiguring ASAs
* `AssetTransferParams` - For ASA transfers
* `AssetOptInParams` - For opting in to ASAs
* `AssetOptOutParams` - For opting out of ASAs
* `AssetDestroyParams` - For destroying ASAs
* `AssetFreezeParams` - For freezing ASA balances
* `AppCreateParams` - For creating applications
* `AppCreateMethodCallParams` - For creating applications with ABI method calls
* `AppCallParams` - For calling applications
* `AppCallMethodCallParams` - For calling ABI methods on applications
* `AppUpdateParams` - For updating applications
* `AppUpdateMethodCallParams` - For updating applications with ABI method calls
* `AppDeleteParams` - For deleting applications
* `AppDeleteMethodCallParams` - For deleting applications with ABI method calls
* `OnlineKeyRegistrationParams` - For online key registration transactions
* `OfflineKeyRegistrationParams` - For offline key registration transactions
The methods to construct a transaction are all named `add_{transaction_type}` and return an instance of the composer so they can be chained together fluently to construct a transaction group.
For example:
```python
from algokit_utils import AlgoAmount
from algokit_utils.transactions import AppCallMethodCallParams, PaymentParams
result = (
algorand.new_group()
.add_payment(PaymentParams(
sender="SENDER",
receiver="RECEIVER",
amount=AlgoAmount.from_micro_algos(100),
note=b"Payment note"
))
.add_app_call_method_call(AppCallMethodCallParams(
sender="SENDER",
app_id=123,
method=abi_method,
args=[1, 2, 3],
boxes=[box_reference] # Optional box references
))
)
```
## Simulating a transaction
Transactions can be simulated using the simulate endpoint in algod, which enables evaluating the transaction on the network without it actually being committed to a block. This is a powerful feature, which has a number of options which are detailed in the [simulate API docs](https://dev.algorand.co/reference/rest-apis/output/#simulatetransaction).
The `simulate()` method accepts several optional parameters that are passed through to the algod simulate endpoint:
* `allow_more_logs: bool | None` - Allow more logs than standard
* `allow_empty_signatures: bool | None` - Allow transactions without signatures
* `allow_unnamed_resources: bool | None` - Allow unnamed resources in app calls
* `extra_opcode_budget: int | None` - Additional opcode budget
* `exec_trace_config: SimulateTraceConfig | None` - Execution trace configuration
* `simulation_round: int | None` - Round to simulate at
* `skip_signatures: int | None` - Skip signature verification
For example:
```python
result = (
algorand.new_group()
.add_payment(PaymentParams(
sender="SENDER",
receiver="RECEIVER",
amount=AlgoAmount.from_micro_algos(100)
))
.add_app_call_method_call(AppCallMethodCallParams(
sender="SENDER",
app_id=123,
method=abi_method,
args=[1, 2, 3]
))
.simulate()
)
# Access simulation results
simulate_response = result.simulate_response
confirmations = result.confirmations
transactions = result.transactions
returns = result.returns # ABI returns if any
```
### Simulate without signing
There are situations where you may not be able to (or want to) sign the transactions when executing simulate. In these instances you should set `skip_signatures=True` which automatically builds empty transaction signers and sets both `fix-signers` and `allow-empty-signatures` to `True` when sending the algod API call.
For example:
```python
result = (
algorand.new_group()
.add_payment(PaymentParams(
sender="SENDER",
receiver="RECEIVER",
amount=AlgoAmount.from_micro_algos(100)
))
.add_app_call_method_call(AppCallMethodCallParams(
sender="SENDER",
app_id=123,
method=abi_method,
args=[1, 2, 3]
))
.simulate(
skip_signatures=True,
allow_more_logs=True, # Optional: allow more logs
extra_opcode_budget=700 # Optional: increase opcode budget
)
)
```
### Resource Population
The `TransactionComposer` includes automatic resource population capabilities for application calls. When sending or simulating transactions, it can automatically detect and populate required references for:
* Account references
* Application references
* Asset references
* Box references
This happens automatically when either:
1. The global `algokit_utils.config` instance is set to `populate_app_call_resources=True` (default is `False`)
2. The `populate_app_call_resources` parameter is explicitly passed as `True` when sending transactions
```python
# Automatic resource population
result = (
algorand.new_group()
.add_app_call_method_call(AppCallMethodCallParams(
sender="SENDER",
app_id=123,
method=abi_method,
args=[1, 2, 3]
# Resources will be automatically populated!
))
.send(params=SendParams(populate_app_call_resources=True))
)
# Or disable automatic population
result = (
algorand.new_group()
.add_app_call_method_call(AppCallMethodCallParams(
sender="SENDER",
app_id=123,
method=abi_method,
args=[1, 2, 3],
# Explicitly specify required resources
account_references=["ACCOUNT"],
app_references=[456],
asset_references=[789],
box_references=[box_reference]
))
.send(params=SendParams(populate_app_call_resources=False))
)
```
The resource population:
* Respects the maximum limits (4 for accounts, 8 for foreign references)
* Handles cross-reference resources efficiently (e.g., asset holdings and local state)
* Automatically distributes resources across multiple transactions in a group when needed
* Raises descriptive errors if resource limits are exceeded
This feature is particularly useful when:
* Working with complex smart contracts that access various resources
* Building transaction groups where resources need to be coordinated
* Developing applications where resource requirements may change dynamically
Note: Resource population uses simulation under the hood to detect required resources, so it may add a small overhead to transaction preparation time.
### Covering App Call Inner Transaction Fees
`cover_app_call_inner_transaction_fees` automatically calculate the required fee for a parent app call transaction that sends inner transactions. It leverages the simulate endpoint to discover the inner transactions sent and calculates a fee delta to resolve the optimal fee. This feature also takes care of accounting for any surplus transaction fee at the various levels, so as to effectively minimise the fees needed to successfully handle complex scenarios. This setting only applies when you have constucted at least one app call transaction.
For example:
```python
myMethod = algosdk.ABIMethod.fromSignature('my_method()void')
result = algorand
.new_group()
.add_app_call_method_call(AppCallMethodCallParams(
sender: 'SENDER',
app_id=123,
method=myMethod,
args=[1, 2, 3],
max_fee=AlgoAmount.from_micro_algo(5000), # NOTE: a maxFee value is required when enabling coverAppCallInnerTransactionFees
))
.send(send_params={"cover_app_call_inner_transaction_fees": True})
```
Assuming the app account is not covering any of the inner transaction fees, if `my_method` in the above example sends 2 inner transactions, then the fee calculated for the parent transaction will be 3000 µALGO when the transaction is sent to the network.
The above example also has a `max_fee` of 5000 µALGO specified. An exception will be thrown if the transaction fee execeeds that value, which allows you to set fee limits. The `max_fee` field is required when enabling `cover_app_call_inner_transaction_fees`.
Because `max_fee` is required and an `algosdk.Transaction` does not hold any max fee information, you cannot use the generic `add_transaction()` method on the composer with `cover_app_call_inner_transaction_fees` enabled. Instead use the below, which provides a better overall experience:
```python
my_method = algosdk.abi.Method.from_signature('my_method()void')
# Does not work
result = algorand
.new_group()
.add_transaction(localnet.algorand.create_transaction.app_call_method_call(
AppCallMethodCallParams(
sender='SENDER',
app_id=123,
method=my_method,
args=[1, 2, 3],
max_fee=AlgoAmount.from_micro_algos(5000), # This is only used to create the algosdk.Transaction object and isn't made available to the composer.
)
).transactions[0]
)
.send(send_params={"cover_app_call_inner_transaction_fees": True})
# Works as expected
result = algorand
.new_group()
.add_app_call_method_call(AppCallMethodCallParams(
sender='SENDER',
app_id=123,
method=my_method,
args=[1, 2, 3],
max_fee=AlgoAmount.from_micro_algos(5000),
))
.send(send_params={"cover_app_call_inner_transaction_fees": True})
```
A more complex valid scenario which leverages an app client to send an ABI method call with ABI method call transactions argument is below:
```python
app_factory = algorand.client.get_app_factory(
app_spec='APP_SPEC',
default_sender=sender.addr,
)
app_client_1, _ = app_factory.send.bare.create()
app_client_2, _ = app_factory.send.bare.create()
payment_arg = algorand.create_transaction.payment(
PaymentParams(
sender=sender.addr,
receiver=receiver.addr,
amount=AlgoAmount.from_micro_algos(1),
)
)
# Note the use of .params. here, this ensure that maxFee is still available to the composer
app_call_arg = app_client_2.params.call(
AppCallMethodCallParams(
method='my_other_method',
args=[],
max_fee=AlgoAmount.from_micro_algos(2000),
)
)
result = app_client_1.algorand
.new_group()
.add_app_call_method_call(
app_client_1.params.call(
AppClientMethodCallParams(
method='my_method',
args=[payment_arg, app_call_arg],
max_fee=AlgoAmount.from_micro_algos(5000),
)
),
)
.send({"cover_app_call_inner_transaction_fees": True})
```
This feature should efficiently calculate the minimum fee needed to execute an app call transaction with inners, however we always recommend testing your specific scenario behaves as expected before releasing.
#### Read-only calls
When invoking a readonly method, the transaction is simulated rather than being fully processed by the network. This allows users to call these methods without paying a fee.
Even though no actual fee is paid, the simulation still evaluates the transaction as if a fee was being paid, therefore op budget and fee coverage checks are still performed.
Because no fee is actually paid, calculating the minimum fee required to successfully execute the transaction is not required, and therefore we don’t need to send an additional simulate call to calculate the minimum fee, like we do with a non readonly method call.
The behaviour of enabling `cover_app_call_inner_transaction_fees` for readonly method calls is very similar to non readonly method calls, however is subtly different as we use `max_fee` as the transaction fee when executing the readonly method call.
### Covering App Call Op Budget
The high level Algorand contract authoring languages all have support for ensuring appropriate app op budget is available via `ensure_budget` in Algorand Python, `ensureBudget` in Algorand TypeScript and `increaseOpcodeBudget` in TEALScript. This is great, as it allows contract authors to ensure appropriate budget is available by automatically sending op-up inner transactions to increase the budget available. These op-up inner transactions require the fees to be covered by an account, which is generally the responsibility of the application consumer.
Application consumers may not be immediately aware of the number of op-up inner transactions sent, so it can be difficult for them to determine the exact fees required to successfully execute an application call. Fortunately the `cover_app_call_inner_transaction_fees` setting above can be leveraged to automatically cover the fees for any op-up inner transaction that an application sends. Additionally if a contract author decides to cover the fee for an op-up inner transaction, then the application consumer will not be charged a fee for that transaction.
# Transaction management
Transaction management is one of the core capabilities provided by AlgoKit Utils. It allows you to construct, simulate and send single or grouped transactions with consistent and highly configurable semantics, including configurable control of transaction notes, logging, fees, multiple sender account types, and sending behavior.
## Transaction Results
All AlgoKit Utils functions that send transactions return either a `SendSingleTransactionResult` or `SendAtomicTransactionComposerResults`, providing consistent mechanisms to interpret transaction outcomes.
### SendSingleTransactionResult
The base `SendSingleTransactionResult` class is used for single transactions:
```python
@dataclass(frozen=True, kw_only=True)
class SendSingleTransactionResult:
transaction: TransactionWrapper # Last transaction
confirmation: AlgodResponseType # Last confirmation
group_id: str
tx_id: str | None = None # Transaction ID of the last transaction
tx_ids: list[str] # All transaction IDs in the group
transactions: list[TransactionWrapper]
confirmations: list[AlgodResponseType]
returns: list[ABIReturn] | None = None # ABI returns if applicable
```
Common variations include:
* `SendSingleAssetCreateTransactionResult` - Adds `asset_id`
* `SendAppTransactionResult` - Adds `abi_return`
* `SendAppUpdateTransactionResult` - Adds compilation results
* `SendAppCreateTransactionResult` - Adds `app_id` and `app_address`
### SendAtomicTransactionComposerResults
When using the atomic transaction composer directly via `TransactionComposer.send()` or `TransactionComposer.simulate()`, you’ll receive a `SendAtomicTransactionComposerResults`:
```python
@dataclass
class SendAtomicTransactionComposerResults:
group_id: str # The group ID if this was a transaction group
confirmations: list[AlgodResponseType] # The confirmation info for each transaction
tx_ids: list[str] # The transaction IDs that were sent
transactions: list[TransactionWrapper] # The transactions that were sent
returns: list[ABIReturn] # The ABI return values from any ABI method calls
simulate_response: dict[str, Any] | None = None # Simulation response if simulated
```
### Application-specific Result Types
When working with applications via `AppClient` or `AppFactory`, you’ll get enhanced result types that provide direct access to parsed ABI values:
* `SendAppFactoryTransactionResult`
* `SendAppUpdateFactoryTransactionResult`
* `SendAppCreateFactoryTransactionResult`
These types extend the base transaction results to add an `abi_value` field that contains the parsed ABI return value according to the ARC-56 specification. The `Arc56ReturnValueType` can be:
* A primitive ABI value (bool, int, str, bytes)
* An ABI struct (as a Python dict)
* None (for void returns)
### Where You’ll Encounter Each Result Type
Different interfaces return different result types:
1. **Direct Transaction Composer**
* `TransactionComposer.send()` → `SendAtomicTransactionComposerResults`
* `TransactionComposer.simulate()` → `SendAtomicTransactionComposerResults`
2. **AlgorandClient Methods**
* `.send.payment()` → `SendSingleTransactionResult`
* `.send.asset_create()` → `SendSingleAssetCreateTransactionResult`
* `.send.app_call()` → `SendAppTransactionResult` (contains raw ABI return)
* `.send.app_create()` → `SendAppCreateTransactionResult` (with app ID/address)
* `.send.app_update()` → `SendAppUpdateTransactionResult` (with compilation info)
3. **AppClient Methods**
* `.call()` → `SendAppTransactionResult`
* `.create()` → `SendAppCreateTransactionResult`
* `.update()` → `SendAppUpdateTransactionResult`
4. **AppFactory Methods**
* `.create()` → `SendAppCreateFactoryTransactionResult`
* `.call()` → `SendAppFactoryTransactionResult`
* `.update()` → `SendAppUpdateFactoryTransactionResult`
Example usage with AppFactory for easy access to ABI returns:
```python
# Using AppFactory
result = app_factory.send.call(AppCallMethodCallParams(
method="my_method",
args=[1, 2, 3],
sender=sender
))
# Access the parsed ABI return value directly
parsed_value = result.abi_value # Already decoded per ARC-56 spec
# Compared to base AppClient where you need to parse manually
base_result = app_client.send.call(AppCallMethodCallParams(
method="my_method",
args=[1, 2, 3],
sender=sender
))
# Need to manually handle ABI return parsing
if base_result.abi_return:
parsed_value = base_result.abi_return.value
```
Key differences between result types:
1. **Base Transaction Results** (`SendSingleTransactionResult`)
* Focus on transaction confirmation details
* Include group support but optimized for single transactions
* No direct ABI value parsing
2. **Atomic Transaction Results** (`SendAtomicTransactionComposerResults`)
* Built for transaction groups
* Include simulation support
* Raw ABI returns via `.returns`
* No single transaction convenience fields
3. **Application Results** (`SendAppTransactionResult` family)
* Add application-specific fields (`app_id`, compilation results)
* Include raw ABI returns via `.abi_return`
* Base application transaction support
4. **Factory Results** (`SendAppFactoryTransactionResult` family)
* Highest level of abstraction
* Direct access to parsed ABI values via `.abi_value`
* Automatic ARC-56 compliant value parsing
* Combines app-specific fields with parsed ABI returns
## Further reading
To understand how to create, simulate and send transactions consult:
* The [`TransactionComposer`](transaction-composer) documentation for composing transaction groups
* The [`AlgorandClient`](algorand-client) documentation for a high-level interface to send transactions
The transaction composer documentation covers the details of constructing transactions and transaction groups, while the Algorand client documentation covers the high-level interface for sending transactions.
# Algo transfers (payments)
Algo transfers, or [payments](https://dev.algorand.co/concepts/transactions/types#payment-transaction), is a higher-order use case capability provided by AlgoKit Utils that builds on top of the core capabilities, particularly [Algo amount handling](amount) and [Transaction management](transaction). It allows you to easily initiate Algo transfers between accounts, including dispenser management and idempotent account funding.
To see some usage examples check out the automated tests in the repository.
## `payment`
The key function to facilitate Algo transfers is `algorand.send.payment(params)` (immediately send a single payment transaction), `algorand.create_transaction.payment(params)` (construct a payment transaction), or `algorand.new_group().add_payment(params)` (add payment to a group of transactions) per [`AlgorandClient`](algorand-client) [transaction semantics](algorand-client#creating-and-issuing-transactions).
The base type for specifying a payment transaction is `PaymentParams`, which has the following parameters in addition to the [common transaction parameters](algorand-client#transaction-parameters):
* `receiver: str` - The address of the account that will receive the Algo
* `amount: AlgoAmount` - The amount of Algo to send
* `close_remainder_to: Optional[str]` - If given, close the sender account and send the remaining balance to this address (**warning:** use this carefully as it can result in loss of funds if used incorrectly)
```python
# Minimal example
result = algorand_client.send.payment(
PaymentParams(
sender="SENDERADDRESS",
receiver="RECEIVERADDRESS",
amount=AlgoAmount(4, "algo")
)
)
# Advanced example
result2 = algorand_client.send.payment(
PaymentParams(
sender="SENDERADDRESS",
receiver="RECEIVERADDRESS",
amount=AlgoAmount(4, "algo"),
close_remainder_to="CLOSEREMAINDERTOADDRESS",
lease="lease",
note=b"note",
# Use this with caution, it's generally better to use algorand_client.account.rekey_account
rekey_to="REKEYTOADDRESS",
# You wouldn't normally set this field
first_valid_round=1000,
validity_window=10,
extra_fee=AlgoAmount(1000, "microalgo"),
static_fee=AlgoAmount(1000, "microalgo"),
# Max fee doesn't make sense with extra_fee AND static_fee
# already specified, but here for completeness
max_fee=AlgoAmount(3000, "microalgo"),
# Signer only needed if you want to provide one,
# generally you'd register it with AlgorandClient
# against the sender and not need to pass it in
signer=transaction_signer,
),
send_params=SendParams(
max_rounds_to_wait=5,
suppress_log=True,
)
)
```
## `ensure_funded`
The `ensure_funded` function automatically funds an account to maintain a minimum amount of [disposable Algo](https://dev.algorand.co/concepts/smart-contracts/costs-constraints#mbr). This is particularly useful for automation and deployment scripts that get run multiple times and consume Algo when run.
There are 3 variants of this function:
* `algorand_client.account.ensure_funded(account_to_fund, dispenser_account, min_spending_balance, options)` - Funds a given account using a dispenser account as a funding source such that the given account has a certain amount of Algo free to spend (accounting for Algo locked in minimum balance requirement).
* `algorand_client.account.ensure_funded_from_environment(account_to_fund, min_spending_balance, options)` - Funds a given account using a dispenser account retrieved from the environment, per the `dispenser_from_environment` method, as a funding source such that the given account has a certain amount of Algo free to spend (accounting for Algo locked in minimum balance requirement).
* **Note:** requires environment variables to be set.
* The dispenser account is retrieved from the account mnemonic stored in `DISPENSER_MNEMONIC` and optionally `DISPENSER_SENDER` if it’s a rekeyed account, or against default LocalNet if no environment variables present.
* `algorand_client.account.ensure_funded_from_testnet_dispenser_api(account_to_fund, dispenser_client, min_spending_balance, options)` - Funds a given account using the [TestNet Dispenser API](https://github.com/algorandfoundation/algokit/blob/main/docs/testnet_api) as a funding source such that the account has a certain amount of Algo free to spend (accounting for Algo locked in minimum balance requirement).
The general structure of these calls is similar, they all take:
* `account_to_fund: str | Account` - Address or signing account of the account to fund
* The source (dispenser):
* In `ensure_funded`: `dispenser_account: str | Account` - the address or signing account of the account to use as a dispenser
* In `ensure_funded_from_environment`: Not specified, loaded automatically from the ephemeral environment
* In `ensure_funded_from_testnet_dispenser_api`: `dispenser_client: TestNetDispenserApiClient` - a client instance of the TestNet dispenser API
* `min_spending_balance: AlgoAmount` - The minimum balance of Algo that the account should have available to spend (i.e., on top of the minimum balance requirement)
* An `options` object, which has:
* [Common transaction parameters](algorand-client#transaction-parameters) (not for TestNet Dispenser API)
* [Execution parameters](algorand-client#sending-a-single-transaction) (not for TestNet Dispenser API)
* `min_funding_increment: Optional[AlgoAmount]` - When issuing a funding amount, the minimum amount to transfer; this avoids many small transfers if this function gets called often on an active account
### Examples
```python
# From account
# Basic example
algorand_client.account.ensure_funded("ACCOUNTADDRESS", "DISPENSERADDRESS", AlgoAmount(1, "algo"))
# With configuration
algorand_client.account.ensure_funded(
"ACCOUNTADDRESS",
"DISPENSERADDRESS",
AlgoAmount(1, "algo"),
min_funding_increment=AlgoAmount(2, "algo"),
fee=AlgoAmount(1000, "microalgo"),
send_params=SendParams(
suppress_log=True,
),
)
# From environment
# Basic example
algorand_client.account.ensure_funded_from_environment("ACCOUNTADDRESS", AlgoAmount(1, "algo"))
# With configuration
algorand_client.account.ensure_funded_from_environment(
"ACCOUNTADDRESS",
AlgoAmount(1, "algo"),
min_funding_increment=AlgoAmount(2, "algo"),
fee=AlgoAmount(1000, "microalgo"),
send_params=SendParams(
suppress_log=True,
),
)
# TestNet Dispenser API
# Basic example
algorand_client.account.ensure_funded_from_testnet_dispenser_api(
"ACCOUNTADDRESS",
algorand_client.client.get_testnet_dispenser_from_environment(),
AlgoAmount(1, "algo")
)
# With configuration
algorand_client.account.ensure_funded_from_testnet_dispenser_api(
"ACCOUNTADDRESS",
algorand_client.client.get_testnet_dispenser_from_environment(),
AlgoAmount(1, "algo"),
min_funding_increment=AlgoAmount(2, "algo"),
)
```
All 3 variants return an `EnsureFundedResponse` (and the first two also return a [single transaction result](algorand-client#sending-a-single-transaction)) if a funding transaction was needed, or `None` if no transaction was required:
* `amount_funded: AlgoAmount` - The number of Algo that was paid
* `transaction_id: str` - The ID of the transaction that funded the account
If you are using the TestNet Dispenser API then the `transaction_id` is useful if you want to use the [refund functionality](dispenser-client#registering-a-refund).
## Dispenser
If you want to programmatically send funds to an account so it can transact then you will often need a “dispenser” account that has a store of Algo that can be sent and a private key available for that dispenser account.
There’s a number of ways to get a dispensing account in AlgoKit Utils:
* Get a dispenser via [account manager](account#dispenser) - either automatically from [LocalNet](https://github.com/algorandfoundation/algokit-cli/blob/main/docs/features/localnet) or from the environment
* By programmatically creating one of the many account types via [account manager](account#accounts)
* By programmatically interacting with [KMD](account#kmd-account-management) if running against LocalNet
* By using the [AlgoKit TestNet Dispenser API client](dispenser-client) which can be used to fund accounts on TestNet via a dedicated API service
# Typed application clients
Typed application clients are automatically generated, typed Python deployment and invocation clients for smart contracts that have a defined [ARC-56](https://github.com/algorandfoundation/ARCs/pull/258) or [ARC-32](https://github.com/algorandfoundation/ARCs/blob/main/ARCs/arc-0032) application specification so that the development experience is easier with less upskill ramp-up and less deployment errors. These clients give you a type-safe, intellisense-driven experience for invoking the smart contract.
Typed application clients are the recommended way of interacting with smart contracts. If you don’t have/want a typed client, but have an ARC-56/ARC-32 app spec then you can use the [non-typed application clients](app-client) and if you want to call a smart contract you don’t have an app spec file for you can use the underlying [app management](app) and [app deployment](app-deploy) functionality to manually construct transactions.
## Generating an app spec
You can generate an app spec file:
* Using [Algorand Python](https://algorandfoundation.github.io/puya/#quick-start)
* Using [TEALScript](https://tealscript.netlify.app/tutorials/hello-world/0004-artifacts/)
* By hand by following the specification [ARC-56](https://github.com/algorandfoundation/ARCs/pull/258)/[ARC-32](https://github.com/algorandfoundation/ARCs/blob/main/ARCs/arc-0032)
* Using [Beaker](https://algorand-devrel.github.io/beaker/html/usage.html) (PyTEAL) *(DEPRECATED)*
## Generating a typed client
To generate a typed client from an app spec file you can use [AlgoKit CLI](https://github.com/algorandfoundation/algokit-cli/blob/main/docs/features/generate#1-typed-clients):
```default
> algokit generate client application.json --output /absolute/path/to/client.py
```
Note: AlgoKit Utils >= 3.0.0 is compatible with the older 1.x.x generated typed clients, however if you want to utilise the new features or leverage ARC-56 support, you will need to generate using >= 2.x.x. See [AlgoKit CLI generator version pinning](https://github.com/algorandfoundation/algokit-cli/blob/main/docs/features/generate#version-pinning) for more information on how to lock to a specific version.
## Getting a typed client instance
To get an instance of a typed client you can use an [`AlgorandClient`](algorand-client) instance or a typed app [`Factory`]() instance.
The approach to obtaining a client instance depends on how many app clients you require for a given app spec and if the app has already been deployed:
### App is deployed
#### Resolve App by ID
**Single Typed App Client Instance:**
```python
# Typed: Using the AlgorandClient extension method
typed_client = algorand.client.get_typed_app_client_by_id(
MyContractClient, # Generated typed client class
app_id=1234,
# ...
)
# or Typed: Using the generated client class directly
typed_client = MyContractClient(
algorand,
app_id=1234,
# ...
)
```
**Multiple Typed App Client Instances:**
```python
# Typed: Using a typed factory to get multiple client instances
typed_client1 = typed_factory.get_app_client_by_id(
app_id=1234,
# ...
)
typed_client2 = typed_factory.get_app_client_by_id(
app_id=4321,
# ...
)
```
#### Resolve App by Creator and Name
**Single Typed App Client Instance:**
```python
# Typed: Using the AlgorandClient extension method
typed_client = algorand.client.get_typed_app_client_by_creator_and_name(
MyContractClient, # Generated typed client class
creator_address="CREATORADDRESS",
app_name="contract-name",
# ...
)
# or Typed: Using the static method on the generated client class
typed_client = MyContractClient.from_creator_and_name(
algorand,
creator_address="CREATORADDRESS",
app_name="contract-name",
# ...
)
```
**Multiple Typed App Client Instances:**
```python
# Typed: Using a typed factory to get multiple client instances by name
typed_client1 = typed_factory.get_app_client_by_creator_and_name(
creator_address="CREATORADDRESS",
app_name="contract-name",
# ...
)
typed_client2 = typed_factory.get_app_client_by_creator_and_name(
creator_address="CREATORADDRESS",
app_name="contract-name-2",
# ...
)
```
### App is not deployed
#### Deploy a New App
```python
# Typed: For typed clients, you call a specific creation method rather than generic 'create'
typed_client, response = typed_factory.send.create.{METHODNAME}(
# ...
)
```
#### Deploy or Resolve App Idempotently by Creator and Name
```python
# Typed: Using the deploy method on a typed factory
typed_client, response = typed_factory.deploy(
on_update=OnUpdate.UpdateApp,
on_schema_break=OnSchemaBreak.ReplaceApp,
# The parameters for create/update/delete would be specific to your generated client
app_name="contract-name",
# ...
)
```
### Creating a typed factory instance
If your scenario calls for an app factory, you can create one using the below:
```python
# Typed: Using the AlgorandClient extension method
typed_factory = algorand.client.get_typed_app_factory(MyContractFactory) # Generated factory class
# or Typed: Using the factory class constructor directly
typed_factory = MyContractFactory(algorand)
```
## Client usage
See the [official usage docs](https://github.com/algorandfoundation/algokit-client-generator-py/blob/main/docs/usage) for full details about typed clients.
Below is a realistic example that deploys a contract, funds it if newly created, and calls a `"hello"` method:
```python
# Typed: Complete example using a typed application client
import algokit_utils
from artifacts.hello_world.hello_world_client import (
HelloArgs, # Generated args class
HelloWorldFactory, # Generated factory class
)
# Get Algorand client from environment variables
algorand = algokit_utils.AlgorandClient.from_environment()
deployer = algorand.account.from_environment("DEPLOYER")
# Create the typed app factory
typed_factory = algorand.client.get_typed_app_factory(
HelloWorldFactory, default_sender=deployer.address
)
# Deploy idempotently - creates if it doesn't exist or updates if changed
typed_client, result = typed_factory.deploy(
on_update=algokit_utils.OnUpdate.AppendApp,
on_schema_break=algokit_utils.OnSchemaBreak.AppendApp,
)
# Fund the app with 1 ALGO if it's newly created
if result.operation_performed in [
algokit_utils.OperationPerformed.Create,
algokit_utils.OperationPerformed.Replace,
]:
algorand.send.payment(
algokit_utils.PaymentParams(
amount=algokit_utils.AlgoAmount(algo=1),
sender=deployer.address,
receiver=typed_client.app_address,
)
)
# Call the hello method on the smart contract
name = "world"
response = typed_client.send.hello(args=HelloArgs(name=name)) # Using generated args class
```
# Account management
Account management is one of the core capabilities provided by AlgoKit Utils. It allows you to create mnemonic, rekeyed, multisig, transaction signer, idempotent KMD and environment variable injected accounts that can be used to sign transactions as well as representing a sender address at the same time. This significantly simplifies management of transaction signing.
## `AccountManager`
The `AccountManager` is a class that is used to get, create, and fund accounts and perform account-related actions such as funding. The `AccountManager` also keeps track of signers for each address so when using the [`TransactionComposer`](./transaction-composer) to send transactions, a signer function does not need to manually be specified for each transaction - instead it can be inferred from the sender address automatically!
To get an instance of `AccountManager`, you can use either [`AlgorandClient`](./algorand-client) via `algorand.account` or instantiate it directly:
```typescript
import { AccountManager } from '@algorandfoundation/algokit-utils/types/account-manager';
const accountManager = new AccountManager(clientManager);
```
## `TransactionSignerAccount`
The core internal type that holds information about a signer/sender pair for a transaction is `TransactionSignerAccount`, which represents an `algosdk.TransactionSigner` (`signer`) along with a sender address (`addr`) as the encoded string address.
Many methods in `AccountManager` expose a `TransactionSignerAccount`. `TransactionSignerAccount` can be used with `AtomicTransactionComposer`, [`TransactionComposer`](./transaction-composer) and [useWallet](https://github.com/TxnLab/use-wallet).
## Registering a signer
The `AccountManager` keeps track of which signer is associated with a given sender address. This is used by [`AlgorandClient`](./algorand-client) to automatically sign transactions by that sender. Any of the [methods](#accounts) within `AccountManager` that return an account will automatically register the signer with the sender. If however, you are creating a signer external to the `AccountManager`, for instance when using the use-wallet library in a dApp, then you need to register the signer with the `AccountManager` if you want it to be able to automatically sign transactions from that sender.
There are two methods that can be used for this, `setSignerFromAccount`, which takes any number of [account based objects](#underlying-account-classes) that combine signer and sender (`TransactionSignerAccount` | `algosdk.Account` | `algosdk.LogicSigAccount` | `SigningAccount` | `MultisigAccount`), or `setSigner` which takes the sender address and the `TransactionSigner`:
```typescript
algorand.account
.setSignerFromAccount(algosdk.generateAccount())
.setSignerFromAccount(new algosdk.LogicSigAccount(program, args))
.setSignerFromAccount(new SigningAccount(mnemonic, sender))
.setSignerFromAccount(
new MultisigAccount({ version: 1, threshold: 1, addrs: ['ADDRESS1...', 'ADDRESS2...'] }, [
account1,
account2,
]),
)
.setSignerFromAccount({ addr: 'SENDERADDRESS', signer: transactionSigner })
.setSigner('SENDERADDRESS', transactionSigner);
```
## Default signer
If you want to have a default signer that is used to sign transactions without a registered signer (rather than throwing an exception) then you can register a default signer:
```typescript
algorand.account.setDefaultSigner(myDefaultSigner);
```
## Get a signer
`AlgorandClient`]\(./algorand-client) will automatically retrieve a signer when signing a transaction, but if you need to get a `TransactionSigner` externally to do something more custom then you can \[retrieve the signer for a given sender address:
```typescript
const signer = algorand.account.getSigner('SENDER_ADDRESS');
```
If there is no signer registered for that sender address it will either return the default signer ([if registered](#default-signer)) or throw an exception.
## Accounts
In order to get/register accounts for signing operations you can use the following methods on [`AccountManager`](#accountmanager) (expressed here as `algorand.account` to denote the syntax via an [`AlgorandClient`](./algorand-client)):
* `algorand.account.fromEnvironment(name, fundWith)` - Registers and returns an account with private key loaded by convention based on the given name identifier - either by idempotently creating the account in KMD or from environment variable via `process.env['{NAME}_MNEMONIC']` and (optionally) `process.env['{NAME}_SENDER']` (if account is rekeyed)
* This allows you to have powerful code that will automatically create and fund an account by name locally and when deployed against TestNet/MainNet will automatically resolve from environment variables, without having to have different code
* Note: `fundWith` allows you to control how many Algo are seeded into an account created in KMD
* `algorand.account.fromMnemonic(mnemonicSecret, sender?)` - Registers and returns an account with secret key loaded by taking the mnemonic secret
* `algorand.account.multisig(multisigParams, signingAccounts)` - Registers and returns a multisig account with one or more signing keys loaded
* `algorand.account.rekeyed(sender, signer)` - Registers and returns an account representing the given rekeyed sender/signer combination
* `algorand.account.random()` - Returns a new, cryptographically randomly generated account with private key loaded
* `algorand.account.fromKmd()` - Returns an account with private key loaded from the given KMD wallet (identified by name)
* `algorand.account.logicsig(program, args?)` - Returns an account that represents a logic signature
### Underlying account classes
While `TransactionSignerAccount` is the main class used to represent an account that can sign, there are underlying account classes that can underpin the signer within the transaction signer account.
* `Account` - An in-built `algosdk.Account` object that has an address and private signing key, this can be created
* `SigningAccount` - An abstraction around `algosdk.Account` that supports rekeyed accounts
* `LogicSigAccount` - An in-built algosdk `algosdk.LogicSigAccount` object
* `MultisigAccount` - An abstraction around `algosdk.MultisigMetadata`, `algosdk.makeMultiSigAccountTransactionSigner`, `algosdk.multisigAddress`, `algosdk.signMultisigTransaction` and `algosdk.appendSignMultisigTransaction` that supports multisig accounts with one or more signers present
### Dispenser
* `algorand.account.dispenserFromEnvironment()` - Returns an account (with private key loaded) that can act as a dispenser from environment variables, or against default LocalNet if no environment variables present
* `algorand.account.localNetDispenser()` - Returns an account with private key loaded that can act as a dispenser for the default LocalNet dispenser account
## Rekey account
One of the unique features of Algorand is the ability to change the private key that can authorise transactions for an account. This is called [rekeying](https://dev.algorand.co/concepts/accounts/rekeying).
> \[!WARNING] Rekeying should be done with caution as a rekey transaction can result in permanent loss of control of an account.
You can issue a transaction to rekey an account by using the `algorand.account.rekeyAccount(account, rekeyTo, options)` function:
* `account: string | TransactionSignerAccount` - The account address or signing account of the account that will be rekeyed
* `rekeyTo: string | TransactionSignerAccount` - The account address or signing account of the account that will be used to authorise transactions for the rekeyed account going forward. If a signing account is provided that will now be tracked as the signer for `account` in the `AccountManager` instance.
* An `options` object, which has:
* [Common transaction parameters](./algorand-client#transaction-parameters)
* [Execution parameters](./algorand-client#sending-a-single-transaction)
You can also pass in `rekeyTo` as a [common transaction parameter](./algorand-client#transaction-parameters) to any transaction.
### Examples
```typescript
// Basic example (with string addresses)
await algorand.account.rekeyAccount({ account: 'ACCOUNTADDRESS', rekeyTo: 'NEWADDRESS' });
// Basic example (with signer accounts)
await algorand.account.rekeyAccount({ account: account1, rekeyTo: newSignerAccount });
// Advanced example
await algorand.account.rekeyAccount({
account: 'ACCOUNTADDRESS',
rekeyTo: 'NEWADDRESS',
lease: 'lease',
note: 'note',
firstValidRound: 1000n,
validityWindow: 10,
extraFee: (1000).microAlgo(),
staticFee: (1000).microAlgo(),
// Max fee doesn't make sense with extraFee AND staticFee
// already specified, but here for completeness
maxFee: (3000).microAlgo(),
maxRoundsToWaitForConfirmation: 5,
suppressLog: true,
});
// Using a rekeyed account
// Note: if a signing account is passed into `algorand.account.rekeyAccount` then you don't need to call `rekeyedAccount` to register the new signer
const rekeyedAccount = algorand.account.rekeyed(account, newAccount);
// rekeyedAccount can be used to sign transactions on behalf of account...
```
# KMD account management
When running LocalNet, you have an instance of the [Key Management Daemon](https://github.com/algorand/go-algorand/blob/master/daemon/kmd/README), which is useful for:
* Accessing the private key of the default accounts that are pre-seeded with Algo so that other accounts can be funded and it’s possible to use LocalNet
* Idempotently creating new accounts against a name that will stay intact while the LocalNet instance is running without you needing to store private keys anywhere (i.e. completely automated)
The KMD SDK is fairly low level so to make use of it there is a fair bit of boilerplate code that’s needed. This code has been abstracted away into the `KmdAccountManager` class.
To get an instance of the `KmdAccountManager` class you can access it from [`AlgorandClient`](./algorand-client) via `algorand.account.kmd` or instantiate it directly (passing in a [`ClientManager`](./client)):
```typescript
import { KmdAccountManager } from '@algorandfoundation/algokit-utils/types/kmd-account-manager';
// Algod client only
const kmdAccountManager = new KmdAccountManager(clientManager);
```
The methods that are available are:
* `getWalletAccount(walletName, predicate?, sender?)` - Returns an Algorand signing account with private key loaded from the given KMD wallet (identified by name).
* `getOrCreateWalletAccount(name, fundWith?)` - Gets an account with private key loaded from a KMD wallet of the given name, or alternatively creates one with funds in it via a KMD wallet of the given name.
* `getLocalNetDispenserAccount()` - Returns an Algorand account with private key loaded for the default LocalNet dispenser account (that can be used to fund other accounts)
```typescript
// Get a wallet account that seeded the LocalNet network
const defaultDispenserAccount = await kmdAccountManager.getWalletAccount(
'unencrypted-default-wallet',
a => a.status !== 'Offline' && a.amount > 1_000_000_000,
);
// Same as above, but dedicated method call for convenience
const localNetDispenserAccount = await kmdAccountManager.getLocalNetDispenserAccount();
// Idempotently get (if exists) or create (if it doesn't exist yet) an account by name using KMD
// if creating it then fund it with 2 ALGO from the default dispenser account
const newAccount = await kmdAccountManager.getOrCreateWalletAccount('account1', (2).algo());
// This will return the same account as above since the name matches
const existingAccount = await kmdAccountManager.getOrCreateWalletAccount('account1');
```
Some of this functionality is directly exposed from [`AccountManager`](#accountmanager), which has the added benefit of registering the account as a signer so they can be automatically used to sign transactions when using via [`AlgorandClient`](./algorand-client):
```typescript
// Get and register LocalNet dispenser
const localNetDispenser = await algorand.account.localNetDispenser();
// Get and register a dispenser by environment variable, or if not set then LocalNet dispenser via KMD
const dispenser = await algorand.account.dispenserFromEnvironment();
// Get an account from KMD idempotently by name. In this case we'll get the default dispenser account
const account1 = await algorand.account.fromKmd(
'unencrypted-default-wallet',
a => a.status !== 'Offline' && a.amount > 1_000_000_000,
);
// Get / create and register account from KMD idempotently by name
const account1 = await algorand.account.kmd.getOrCreateWalletAccount('account1', (2).algo());
```
# Algorand client
`AlgorandClient` is a client class that brokers easy access to Algorand functionality. It’s the [default entrypoint](../README#usage) into AlgoKit Utils functionality.
The main entrypoint to the bulk of the functionality in AlgoKit Utils is the `AlgorandClient` class, most of the time you can get started by typing `AlgorandClient.` and choosing one of the static initialisation methods to create an [Algorand client](./capabilities/algorand-client), e.g.:
```typescript
// Point to the network configured through environment variables or
// if no environment variables it will point to the default LocalNet
// configuration
const algorand = AlgorandClient.fromEnvironment();
// Point to default LocalNet configuration
const algorand = AlgorandClient.defaultLocalNet();
// Point to TestNet using AlgoNode free tier
const algorand = AlgorandClient.testNet();
// Point to MainNet using AlgoNode free tier
const algorand = AlgorandClient.mainNet();
// Point to a pre-created algod client
const algorand = AlgorandClient.fromClients({ algod });
// Point to pre-created algod, indexer and kmd clients
const algorand = AlgorandClient.fromClients({ algod, indexer, kmd });
// Point to custom configuration for algod
const algorand = AlgorandClient.fromConfig({ algodConfig });
// Point to custom configuration for algod, indexer and kmd
const algorand = AlgorandClient.fromConfig({ algodConfig, indexerConfig, kmdConfig });
```
## Accessing SDK clients
Once you have an `AlgorandClient` instance, you can access the SDK clients for the various Algorand APIs via the `algorand.client` property.
```ts
const algorand = AlgorandClient.defaultLocalNet();
const algodClient = algorand.client.algod;
const indexerClient = algorand.client.indexer;
const kmdClient = algorand.client.kmd;
```
## Accessing manager class instances
The `AlgorandClient` has a number of manager class instances that help you quickly use intellisense to get access to advanced functionality.
* [`AccountManager`](./account) via `algorand.account`, there are also some chainable convenience methods which wrap specific methods in `AccountManager`:
* `algorand.setDefaultSigner(signer)` -
* `algorand.setSignerFromAccount(account)` -
* `algorand.setSigner(sender, signer)`
* [`AssetManager`](./asset) via `algorand.asset`
* [`ClientManager`](./client) via `algorand.client`
## Creating and issuing transactions
`AlgorandClient` exposes a series of methods that allow you to create, execute, and compose groups of transactions (all via the [`TransactionComposer`](./transaction-composer)).
### Creating transactions
You can compose a transaction via `algorand.createTransaction.`, which gives you an instance of the `AlgorandClientTransactionCreator` class. Intellisense will guide you on the different options.
The signature for the calls to send a single transaction usually look like:
```plaintext
algorand.createTransaction.{method}(params: {ComposerTransactionTypeParams} & CommonTransactionParams): Promise
```
* To get intellisense on the params, open an object parenthesis (`{`) and use your IDE’s intellisense keyboard shortcut (e.g. ctrl+space).
* `{ComposerTransactionTypeParams}` will be the parameters that are specific to that transaction type e.g. `PaymentParams`, see the full list
* `CommonTransactionParams` are the [common transaction parameters](#transaction-parameters) that can be specified for every single transaction
* `Transaction` is an unsigned `algosdk.Transaction` object, ready to be signed and sent
The return type for the ABI method call methods are slightly different:
```plaintext
algorand.createTransaction.app{callType}MethodCall(params: {ComposerTransactionTypeParams} & CommonTransactionParams): Promise
```
Where `BuiltTransactions` looks like this:
```typescript
export interface BuiltTransactions {
/** The built transactions */
transactions: algosdk.Transaction[];
/** Any `ABIMethod` objects associated with any of the transactions in a map keyed by transaction index. */
methodCalls: Map;
/** Any `TransactionSigner` objects associated with any of the transactions in a map keyed by transaction index. */
signers: Map;
}
```
This signifies the fact that an ABI method call can actually result in multiple transactions (which in turn may have different signers), that you need ABI metadata to be able to extract the return value from the transaction result.
### Sending a single transaction
You can compose a single transaction via `algorand.send...`, which gives you an instance of the `AlgorandClientTransactionSender` class. Intellisense will guide you on the different options.
Further documentation is present in the related capabilities:
* [App management](./app)
* [Asset management](./asset)
* [Algo transfers](./transfer)
The signature for the calls to send a single transaction usually look like:
`algorand.send.{method}(params: {ComposerTransactionTypeParams} & CommonAppCallParams & SendParams): SingleSendTransactionResult`
* To get intellisense on the params, open an object parenthesis (`{`) and use your IDE’s intellisense keyboard shortcut (e.g. ctrl+space).
* `{ComposerTransactionTypeParams}` will be the parameters that are specific to that transaction type e.g. `PaymentParams`, see the full list
* `CommonAppCallParams` are the [common app call transaction parameters](./app#common-app-parameters) that can be specified for every single app transaction
* `SendParams` are the [parameters](#transaction-parameters) that control execution semantics when sending transactions to the network
* `SendSingleTransactionResult` is all of the information that is relevant when [sending a single transaction to the network](./transaction#sending-a-transaction)
Generally, the functions to immediately send a single transaction will emit log messages before and/or after sending the transaction. You can opt-out of this by sending `suppressLog: true`.
### Composing a group of transactions
You can compose a group of transactions for execution by using the `newGroup()` method on `AlgorandClient` and then use the various `.add{Type}()` methods on [`TransactionComposer`](./transaction-composer) to add a series of transactions.
```typescript
const result = algorand
.newGroup()
.addPayment({ sender: 'SENDERADDRESS', receiver: 'RECEIVERADDRESS', amount: (1).microAlgo() })
.addAssetOptIn({ sender: 'SENDERADDRESS', assetId: 12345n })
.send();
```
`newGroup()` returns a new [`TransactionComposer`](./transaction-composer) instance, which can also return the group of transactions, simulate them and other things.
### Transaction parameters
To create a transaction you define a set of parameters as a plain TypeScript object.
There are two common base interfaces that get reused:
* `CommonTransactionParams`
* `sender: string` - The address of the account sending the transaction.
* `signer?: algosdk.TransactionSigner | TransactionSignerAccount` - The function used to sign transaction(s); if not specified then an attempt will be made to find a registered signer for the given `sender` or use a default signer (if configured).
* `rekeyTo?: string` - Change the signing key of the sender to the given address. **Warning:** Please be careful with this parameter and be sure to read the [official rekey guidance](https://dev.algorand.co/concepts/accounts/rekeying).
* `note?: Uint8Array | string` - Note to attach to the transaction. Max of 1000 bytes.
* `lease?: Uint8Array | string` - Prevent multiple transactions with the same lease being included within the validity window. A [lease](https://dev.algorand.co/concepts/transactions/leases) enforces a mutually exclusive transaction (useful to prevent double-posting and other scenarios).
* Fee management
* `staticFee?: AlgoAmount` - The static transaction fee. In most cases you want to use `extraFee` unless setting the fee to 0 to be covered by another transaction.
* `extraFee?: AlgoAmount` - The fee to pay IN ADDITION to the suggested fee. Useful for covering inner transaction fees.
* `maxFee?: AlgoAmount` - Throw an error if the fee for the transaction is more than this amount; prevents overspending on fees during high congestion periods.
* Round validity management
* `validityWindow?: number` - How many rounds the transaction should be valid for, if not specified then the registered default validity window will be used.
* `firstValidRound?: bigint` - Set the first round this transaction is valid. If left undefined, the value from algod will be used. We recommend you only set this when you intentionally want this to be some time in the future.
* `lastValidRound?: bigint` - The last round this transaction is valid. It is recommended to use `validityWindow` instead.
* `SendParams`
* `maxRoundsToWaitForConfirmation?: number` - The number of rounds to wait for confirmation. By default until the latest lastValid has past.
* `suppressLog?: boolean` - Whether to suppress log messages from transaction send, default: do not suppress.
* `populateAppCallResources?: boolean` - Whether to use simulate to automatically populate app call resources in the txn objects. Defaults to `Config.populateAppCallResources`.
* `coverAppCallInnerTransactionFees?: boolean` - Whether to use simulate to automatically calculate required app call inner transaction fees and cover them in the parent app call transaction fee
Then on top of that the base type gets extended for the specific type of transaction you are issuing. These are all defined as part of [`TransactionComposer`](./transaction-composer) and we recommend reading these docs, especially when leveraging either `populateAppCallResources` or `coverAppCallInnerTransactionFees`.
### Transaction configuration
AlgorandClient caches network provided transaction values for you automatically to reduce network traffic. It has a set of default configurations that control this behaviour, but you have the ability to override and change the configuration of this behaviour:
* `algorand.setDefaultValidityWindow(validityWindow)` - Set the default validity window (number of rounds from the current known round that the transaction will be valid to be accepted for), having a smallish value for this is usually ideal to avoid transactions that are valid for a long future period and may be submitted even after you think it failed to submit if waiting for a particular number of rounds for the transaction to be successfully submitted. The validity window defaults to 10, except in [automated testing](./testing) where it’s set to 1000 when targeting LocalNet.
* `algorand.setSuggestedParams(suggestedParams, until?)` - Set the suggested network parameters to use (optionally until the given time)
* `algorand.setSuggestedParamsTimeout(timeout)` - Set the timeout that is used to cache the suggested network parameters (by default 3 seconds)
* `algorand.getSuggestedParams()` - Get the current suggested network parameters object, either the cached value, or if the cache has expired a fresh value
# Algo amount handling
Algo amount handling is one of the core capabilities provided by AlgoKit Utils. It allows you to reliably and tersely specify amounts of microAlgo and Algo and safely convert between them.
Any AlgoKit Utils function that needs an Algo amount will take an `AlgoAmount` object, which ensures that there is never any confusion about what value is being passed around. Whenever an AlgoKit Utils function calls into an underlying algosdk function, or if you need to take an `AlgoAmount` and pass it into an underlying algosdk function (per the [modularity principle](../README#core-principles)) you can safely and explicitly convert to microAlgo or Algo.
To see some usage examples check out the automated tests]\(../../src/types/amount.spec.ts). Alternatively, you see the \[reference documentation for `AlgoAmount`.
## `AlgoAmount`
The `AlgoAmount` class provides a safe wrapper around an underlying `number` amount of microAlgo where any value entering or existing the `AlgoAmount` class must be explicitly stated to be in microAlgo or Algo. This makes it much safer to handle Algo amounts rather than passing them around as raw `number`’s where it’s easy to make a (potentially costly!) mistake and not perform a conversion when one is needed (or perform one when it shouldn’t be!).
To import the AlgoAmount class you can access it via:
```typescript
import { AlgoAmount } from '@algorandfoundation/algokit-utils/types/amount';
```
You may not need to import this type to use it though since there are also special methods that are exposed from the root AlgoKit Utils export and also others that extend the `number` protoype per below.
### Creating an `AlgoAmount`
There are a few ways to create an `AlgoAmount`:
* Algo
* Constructor: `new AlgoAmount({algo: 10})`
* Static helper: `AlgoAmount.algo(10)`
* AlgoKit Helper: `algo(10)`
* Number coersion: `(10).algo()` (note: you have to wrap the number in brackets or have it in a variable or function return, a raw number value can’t have a method called on it)
* microAlgo
* Constructor: `new AlgoAmount({microAlgos: 10_000})`
* Static helper: `AlgoAmount.algo(10)`
* AlgoKit Helper: `microAlgo(10_000)`
* Number coersion: `(10_000).microAlgo()` (note: you have to wrap the number in brackets or have it in a variable or function return, a raw number value can’t have a method called on it)
Note: per above, to use any of the versions that reference `AlgoAmount` type itself you need to import it:
```typescript
import { AlgoAmount } from '@algorandfoundation/algokit-utils/types/amount';
```
### Extracting a value from `AlgoAmount`
The `AlgoAmount` class has properties to return Algo and microAlgo:
* `amount.algo` - Returns the value in Algo
* `amount.microAlgo` - Returns the value in microAlgo
`AlgoAmount` will coerce to a `number` automatically (in microAlgo), which is not recommended to be used outside of allowing you to use `AlgoAmount` objects in comparison operations such as `<` and `>=` etc.
You can also call `.toString()` or use an `AlgoAmount` directly in string interpolation to convert it to a nice user-facing formatted amount expressed in microAlgo.
# App client and App factory
> \[!NOTE] This page covers the untyped app client, but we recommend using [typed clients](./typed-app-clients), which will give you a better developer experience with strong typing and intellisense specific to the app itself.
App client and App factory are higher-order use case capabilities provided by AlgoKit Utils that builds on top of the core capabilities, particularly [App deployment](./app-deploy) and [App management](./app). They allow you to access high productivity application clients that work with [ARC-56](https://github.com/algorandfoundation/ARCs/pull/258) and [ARC-32](https://github.com/algorandfoundation/ARCs/blob/main/ARCs/arc-0032) application spec defined smart contracts, which you can use to create, update, delete, deploy and call a smart contract and access state data for it.
> !\[NOTE]
>
> If you are confused about when to use the factory vs client the mental model is: use the client if you know the app ID, use the factory if you don’t know the app ID (deferred knowledge or the instance doesn’t exist yet on the blockchain) or you have multiple app IDs
## `AppFactory`
The `AppFactory` is a class that, for a given app spec, allows you to create and deploy one or more app instances and to create one or more app clients to interact with those (or other) app instances.
To get an instance of `AppFactory` you can use either [`AlgorandClient`](./algorand-client) via `algorand.client.getAppFactory` or instantiate it directly (passing in an app spec, an `AlgorandClient` instance and other optional parameters):
```typescript
// Minimal example
const factory = algorand.client.getAppFactory({
appSpec: '{/* ARC-56 or ARC-32 compatible JSON */}',
});
// Advanced example
const factory = algorand.client.getAppFactory({
appSpec: parsedArc32OrArc56AppSpec,
defaultSender: 'SENDERADDRESS',
appName: 'OverriddenAppName',
version: '2.0.0',
updatable: true,
deletable: false,
deployTimeParams: { ONE: 1, TWO: 'value' },
});
```
## `AppClient`
The `AppClient` is a class that, for a given app spec, allows you to manage calls and state for a specific deployed instance of an app (with a known app ID).
To get an instance of `AppClient` you can use either [`AlgorandClient`](./algorand-client) via `algorand.client.getAppClient*` or instantiate it directly (passing in an app ID, app spec, `AlgorandClient` instance and other optional parameters):
```typescript
// Minimal examples
const appClient = algorand.client.getAppClientByCreatorAndName({
appSpec: '{/* ARC-56 or ARC-32 compatible JSON */}',
// appId resolved by looking for app ID of named app by this creator
creatorAddress: 'CREATORADDRESS',
});
const appClient = algorand.client.getAppClientById({
appSpec: '{/* ARC-56 or ARC-32 compatible JSON */}',
appId: 12345n,
});
const appClient = algorand.client.getAppClientByNetwork({
appSpec: '{/* ARC-56 or ARC-32 compatible JSON */}',
// appId resolved by using ARC-56 spec to find app ID for current network
});
// Advanced example
const appClient = algorand.client.getAppClientById({
appSpec: parsedAppSpec_AppSpec_or_Arc56Contract,
appId: 12345n,
appName: 'OverriddenAppName',
defaultSender: 'SENDERADDRESS',
approvalSourceMap: approvalTealSourceMap,
clearSourceMap: clearTealSourceMap,
});
```
You can get the `appId` and `appAddress` at any time as properties on the `AppClient` along with `appName` and `appSpec`.
## Dynamically creating clients for a given app spec
As well as allowing you to control creation and deployment of apps, the `AppFactory` allows you to conveniently create multiple `AppClient` instances on-the-fly with information pre-populated.
This is possible via two methods on the app factory:
* `factory.getAppClientById(params)` - Returns a new `AppClient` client for an app instance of the given ID. Automatically populates appName, defaultSender and source maps from the factory if not specified in the params.
* `factory.getAppClientByCreatorAndName(params)` - Returns a new `AppClient` client, resolving the app by creator address and name using AlgoKit app deployment semantics (i.e. looking for the app creation transaction note). Automatically populates appName, defaultSender and source maps from the factory if not specified in the params.
```typescript
const appClient1 = factory.getAppClientById({ appId: 12345n });
const appClient2 = factory.getAppClientById({ appId: 12346n });
const appClient3 = factory.getAppClientById({ appId: 12345n, defaultSender: 'SENDER2ADDRESS' });
const appClient4 = factory.getAppClientByCreatorAndName({
creatorAddress: 'CREATORADDRESS',
});
const appClient5 = factory.getAppClientByCreatorAndName({
creatorAddress: 'CREATORADDRESS',
appName: 'NonDefaultAppName',
});
const appClient6 = factory.getAppClientByCreatorAndName({
creatorAddress: 'CREATORADDRESS',
appName: 'NonDefaultAppName',
ignoreCache: true, // Perform fresh indexer lookups
defaultSender: 'SENDER2ADDRESS',
});
```
## Creating and deploying an app
Once you have an [app factory](#appfactory) you can perform the following actions:
* `factory.create(params?)` - Signs and sends a transaction to create an app and returns the [result of that call](./app#creation) and an [`AppClient`](#appclient) instance for the created app
* `factory.deploy(params)` - Uses the [creator address and app name pattern](./app-deploy#lookup-deployed-apps-by-name) to find if the app has already been deployed or not and either creates, updates or replaces that app based on the [deployment rules](./app-deploy#performing-a-deployment) (i.e. it’s an idempotent deployment) and returns the [result of the deployment](./app-deploy#return-value) and an [`AppClient`](#appclient) instance for the created/updated/existing app
### Create
The create method is a wrapper over the `appCreate` (bare calls) and `appCreateMethodCall` (ABI method calls) [methods](./app#creation), with the following differences:
* You don’t need to specify the `approvalProgram`, `clearStateProgram`, or `schema` because these are all specified or calculated from the app spec (noting you can override the `schema`)
* `sender` is optional and if not specified then the `defaultSender` from the `AppFactory` constructor is used (if it was specified, otherwise an error is thrown)
* `deployTimeParams`, `updatable` and `deletable` can be passed in to control [deploy-time parameter replacements and deploy-time immutability and permanence control](./app-deploy#compilation-and-template-substitution); these values can also be passed into the `AppFactory` constructor instead and if so will be used if not defined in the params to the create call
```typescript
// Use no-argument bare-call
const { result, appClient } = factory.send.bare.create();
// Specify parameters for bare-call and override other parameters
const { result, appClient } = factory.send.bare.create({
args: [new Uint8Array(1, 2, 3, 4)],
staticFee: (3000).microAlgo(),
onComplete: algosdk.OnApplicationComplete.OptIn,
deployTimeParams: {
ONE: 1,
TWO: 'two',
},
updatable: true,
deletable: false,
populateAppCallResources: true,
});
// Specify parameters for ABI method call
const { result, appClient } = factory.send.create({
method: 'create_application',
args: [1, 'something'],
});
```
If you want to construct a custom create call, use the underlying [`algorand.send.appCreate` / `algorand.createTransaction.appCreate` / `algorand.send.appCreateMethodCall` / `algorand.createTransaction.appCreateMethodCall` methods](./app#creation) then you can get params objects:
* `factory.params.create(params)` - ABI method create call for deploy method or an underlying [`appCreateMethodCall` call](./app#creation)
* `factory.params.bare.create(params)` - Bare create call for deploy method or an underlying [`appCreate` call](./app#creation)
### Deploy
The deploy method is a wrapper over the [`AppDeployer`’s `deploy` method](./app-deploy#performing-a-deployment), with the following differences:
* You don’t need to specify the `approvalProgram`, `clearStateProgram`, or `schema` in the `createParams` because these are all specified or calculated from the app spec (noting you can override the `schema`)
* `sender` is optional for `createParams`, `updateParams` and `deleteParams` and if not specified then the `defaultSender` from the `AppFactory` constructor is used (if it was specified, otherwise an error is thrown)
* You don’t need to pass in `metadata` to the deploy params - it’s calculated from:
* `updatable` and `deletable`, which you can optionally pass in directly to the method params
* `version` and `name`, which are optionally passed into the `AppFactory` constructor
* `deployTimeParams`, `updatable` and `deletable` can all be passed into the `AppFactory` and if so will be used if not defined in the params to the deploy call for the [deploy-time parameter replacements and deploy-time immutability and permanence control](./app-deploy#compilation-and-template-substitution)
* `createParams`, `updateParams` and `deleteParams` are optional, if they aren’t specified then default values are used for everything and a no-argument bare call will be made for any create/update/delete calls
* If you want to call an ABI method for create/update/delete calls then you can pass in a string for `method` (as opposed to an `ABIMethod` object), which can either be the method name, or if you need to disambiguate between multiple methods of the same name it can be the ABI signature (see example below)
```typescript
// Use no-argument bare-calls to deploy with default behaviour
// for when update or schema break detected (fail the deployment)
const { result, appClient } = factory.deploy({})
// Specify parameters for bare-calls and override the schema break behaviour
const { result, appClient } = factory.deploy({
createParams: {
args: [new Uint8Array(1, 2, 3, 4)],
staticFee: (3000).microAlgo(),
onComplete: algosdk.OnApplicationComplete.OptIn:
},
updateParams: {
args: [new Uint8Array(1, 2, 3)],
},
deleteParams: {
args: [new Uint8Array(1, 2)],
},
deployTimeParams: {
ONE: 1,
TWO: 'two',
},
onUpdate: 'update',
onSchemaBreak: 'replace',
updatable: true,
deletable: true,
})
// Specify parameters for ABI method calls
const { result, appClient } = factory.deploy({
createParams: {
method: "create_application",
args: [1, "something"],
},
updateParams: {
method: "update",
},
deleteParams: {
method: "delete_app(uint64,uint64,uint64)uint64",
args: [1, 2, 3]
}
})
```
If you want to construct a custom deploy call, use the underlying [`algorand.appDeployer.deploy` method](./app-deploy#performing-a-deployment) then you can get params objects for the `createParams`, `updateParams` and `deleteParams`:
* `factory.params.create(params)` - ABI method create call for deploy method or an underlying [`appCreateMethodCall` call](./app#creation)
* `factory.params.deployUpdate(params)` - ABI method update call for deploy method
* `factory.params.deployDelete(params)` - ABI method delete call for deploy method
* `factory.params.bare.create(params)` - Bare create call for deploy method or an underlying [`appCreate` call](./app#creation)
* `factory.params.bare.deployUpdate(params)` - Bare update call for deploy method
* `factory.params.bare.deployDelete(params)` - Bare delete call for deploy method
## Updating and deleting an app
Deploy method aside, the ability to make update and delete calls happens after there is an instance of an app so are done via `AppClient`. The semantics of this are no different than [other calls](#calling-the-app), with the caveat that the update call is a bit different to the others since the code will be compiled when constructing the update params (making it an async method) and the update calls thus optionally takes compilation parameters (`deployTimeParams`, `updatable` and `deletable`) for [deploy-time parameter replacements and deploy-time immutability and permanence control](./app-deploy#compilation-and-template-substitution).
## Calling the app
You can construct a params object, transaction(s) and sign and send a transaction to call the app that a given `AppClient` instance is pointing to.
This is done via the following properties:
* `appClient.params.{onComplete}(params)` - Params for an ABI method call
* `appClient.params.bare.{onComplete}(params)` - Params for a bare call
* `appClient.createTransaction.{onComplete}(params)` - Transaction(s) for an ABI method call
* `appClient.createTransaction.bare.{onComplete}(params)` - Transaction for a bare call
* `appClient.send.{onComplete}(params)` - Sign and send an ABI method call
* `appClient.send.bare.{onComplete}(params)` - Sign and send a bare call
To make one of these calls `{onComplete}` needs to be swapped with the [on complete action](https://dev.algorand.co/concepts/smart-contracts/overview#smart-contract-lifecycle) that should be made:
* `update` - An update call
* `optIn` - An opt-in call
* `delete` - A delete application call
* `clearState` - A clear state call (note: calls the clear program and only applies to bare calls)
* `closeOut` - A close-out call
* `call` - A no-op call (or other call if `onComplete` is specified to anything other than update)
The input payload for all of these calls is the same as the [underlying app methods](./app#calling-apps) with the caveat that the `appId` is not passed in (since the `AppClient` already knows the app ID), `sender` is optional (it uses `defaultSender` from the `AppClient` constructor if it was specified) and `method` (for ABI method calls) is a string rather than an `ABIMethod` object (which can either be the method name, or if you need to disambiguate between multiple methods of the same name it can be the ABI signature).
The return payload for all of these is the same as the [underlying methods](./app#calling-apps).
```typescript
const call1 = await appClient.send.update({
method: 'update_abi',
args: ['string_io'],
deployTimeParams,
});
const call2 = await appClient.send.delete({
method: 'delete_abi',
args: ['string_io'],
});
const call3 = await appClient.send.optIn({ method: 'opt_in' });
const call4 = await appClient.send.bare.clearState();
const transaction = await appClient.createTransaction.bare.closeOut({
args: [new Uint8Array(1, 2, 3)],
});
const params = appClient.params.optIn({ method: 'optin' });
```
### Nested ABI Method Call Transactions
The ARC4 ABI specification supports ABI method calls as arguments to other ABI method calls, enabling some interesting use cases. While this conceptually resembles a function call hierarchy, in practice, the transactions are organized as a flat, ordered transaction group. Unfortunately, this logically hierarchical structure cannot always be correctly represented as a flat transaction group, making some scenarios impossible.
To illustrate this, let’s consider an example of two ABI methods with the following signatures:
* `myMethod(pay,appl)void`
* `myOtherMethod(pay)void`
These signatures are compatible, so `myOtherMethod` can be passed as an ABI method call argument to `myMethod`, which would look like:
Hierarchical method call
```plaintext
myMethod(pay, myOtherMethod(pay))
```
Flat transaction group
```plaintext
pay (pay)
appl (myOtherMethod)
appl (myMethod)
```
An important limitation to note is that the flat transaction group representation does not allow having two different pay transactions. This invariant is represented in the hierarchical call interface of the app client by passing an `undefined` value. This acts as a placeholder and tells the app client that another ABI method call argument will supply the value for this argument. For example:
```typescript
const payment = algorand.createTransaction.payment({
sender: alice.addr,
receiver: alice.addr,
amount: microAlgo(1),
});
const myOtherMethodCall = await appClient.params.call({
method: 'myOtherMethod',
args: [payment],
});
const myMethodCall = await appClient.send.call({
method: 'myMethod',
args: [undefined, myOtherMethodCall],
});
```
`myOtherMethodCall` supplies the pay transaction to the transaction group and, by association, `myOtherMethodCall` has access to it as defined in its signature. To ensure the app client builds the correct transaction group, you must supply a value for every argument in a method call signature.
## Funding the app account
Often there is a need to fund an app account to cover minimum balance requirements for boxes and other scenarios. There is an app client method that will do this for you `fundAppAccount(params)`.
The input parameters are:
* A `FundAppParams`, which has the same properties as a [payment transaction](./transfer#payment) except `receiver` is not required and `sender` is optional (if not specified then it will be set to the app client’s default sender if configured).
Note: If you are passing the funding payment in as an ABI argument so it can be validated by the ABI method then you’ll want to get the funding call as a transaction, e.g.:
```typescript
const result = await appClient.send.call({
method: 'bootstrap',
args: [
appClient.createTransaction.fundAppAccount({
amount: microAlgo(200_000),
}),
],
boxReferences: ['Box1'],
});
```
You can also get the funding call as a params object via `appClient.params.fundAppAccount(params)`.
## Reading state
`AppClient` has a number of mechanisms to read state (global, local and box storage) from the app instance.
### App spec methods
The ARC-56 app spec can specify detailed information about the encoding format of state values and as such allows for a more advanced ability to automatically read state values and decode them as their high-level language types rather than the limited `bigint` / `bytes` / `string` ability that the [generic methods](#generic-methods) give you.
You can access this functionality via:
* `appClient.state.global.{method}()` - Global state
* `appClient.state.local(address).{method}()` - Local state
* `appClient.state.box.{method}()` - Box storage
Where `{method}` is one of:
* `getAll()` - Returns all single-key state values in a record keyed by the key name and the value a decoded ABI value.
* `getValue(name)` - Returns a single state value for the current app with the value a decoded ABI value.
* `getMapValue(mapName, key)` - Returns a single value from the given map for the current app with the value a decoded ABI value. Key can either be a `Uint8Array` with the binary value of the key value on-chain (without the map prefix) or the high level (decoded) value that will be encoded to bytes for the app spec specified `keyType`
* `getMap(mapName)` - Returns all map values for the given map in a key=>value record. It’s recommended that this is only done when you have a unique `prefix` for the map otherwise there’s a high risk that incorrect values will be included in the map.
```typescript
const values = appClient.state.global.getAll();
const value = appClient.state.local('ADDRESS').getValue('value1');
const mapValue = appClient.state.box.getMapValue('map1', 'mapKey');
const map = appClient.state.global.getMap('myMap');
```
### Generic methods
There are various methods defined that let you read state from the smart contract app:
* `getGlobalState()` - Gets the current global state using [`algorand.app.getGlobalState`](./app#global-state)
* `getLocalState(address: string)` - Gets the current local state for the given account address using [`algorand.app.getLocalState`](./app#local-state).
* `getBoxNames()` - Gets the current box names using [`algorand.app.getBoxNames`](./app#boxes)
* `getBoxValue(name)` - Gets the current value of the given box using [`algorand.app.getBoxValue`](./app#boxes)
* `getBoxValueFromABIType(name)` - Gets the current value of the given box from an ABI type using [`algorand.app.getBoxValueFromABIType`](./app#boxes)
* `getBoxValues(filter)` - Gets the current values of the boxes using [`algorand.app.getBoxValues`](./app#boxes)
* `getBoxValuesFromABIType(type, filter)` - Gets the current values of the boxes from an ABI type using [`algorand.app.getBoxValuesFromABIType`](./app#boxes)
```typescript
const globalState = await appClient.getGlobalState();
const localState = await appClient.getLocalState('ACCOUNTADDRESS');
const boxName: BoxReference = 'my-box';
const boxName2: BoxReference = 'my-box2';
const boxNames = appClient.getBoxNames();
const boxValue = appClient.getBoxValue(boxName);
const boxValues = appClient.getBoxValues([boxName, boxName2]);
const boxABIValue = appClient.getBoxValueFromABIType(boxName, algosdk.ABIStringType);
const boxABIValues = appClient.getBoxValuesFromABIType([boxName, boxName2], algosdk.ABIStringType);
```
## Handling logic errors and diagnosing errors
Often when calling a smart contract during development you will get logic errors that cause an exception to throw. This may be because of a failing assertion, a lack of fees, exhaustion of opcode budget, or any number of other reasons.
When this occurs, you will generally get an error that looks something like: `TransactionPool.Remember: transaction {TRANSACTION_ID}: logic eval error: {ERROR_MESSAGE}. Details: pc={PROGRAM_COUNTER_VALUE}, opcodes={LIST_OF_OP_CODES}`.
The information in that error message can be parsed and when combined with the [source map from compilation](./app-deploy#compilation-and-template-substitution) you can expose debugging information that makes it much easier to understand what’s happening. The ARC-56 app spec, if provided, can also specify human-readable error messages against certain program counter values and further augment the error message.
The app client and app factory automatically provide this functionality for all smart contract calls. They also expose a function that can be used for any custom calls you manually construct and need to add into your own try/catch `exposeLogicError(e: Error, isClear?: boolean)`.
When an error is thrown then the resulting error that is re-thrown will be a `LogicError` object, which has the following fields:
* `message: string` - The formatted error message `{ERROR_MESSAGE}. at:{TEAL_LINE}. {ERROR_DESCRIPTION}`
* `stack: string` - A stack trace of the TEAL code showing where the error was with the 5 lines either side of it
* `led: LogicErrorDetails` - The parsed logic error details from the error message, with the following properties:
* `txId: string` - The transaction ID that triggered the error
* `pc: number` - The program counter
* `msg: string` - The raw error message
* `desc: string` - The full error description
* `traces: Record[]` - Any traces that were included in the error
* `program: string[]` - The TEAL program split by line
* `teal_line: number` - The line number in the TEAL program that triggered the error
Note: This information will only show if the app client / app factory has a source map. This will occur if:
* You have called `create`, `update` or `deploy`
* You have called `importSourceMaps(sourceMaps)` and provided the source maps (which you can get by calling `exportSourceMaps()` after variously calling `create`, `update`, or `deploy` and it returns a serialisable value)
* You had source maps present in an app factory and then used it to [create an app client](#dynamically-creating-clients-for-a-given-app-spec) (they are automatically passed through)
If you want to go a step further and automatically issue a [simulated transaction](https://algorand.github.io/js-algorand-sdk/classes/modelsv2.SimulateTransactionResult.html) and get trace information when there is an error when an ABI method is called you can turn on debug mode:
```typescript
Config.configure({ debug: true });
```
If you do that then the exception will have the `traces` property within the underlying exception will have key information from the simulation within it and this will get populated into the `led.traces` property of the thrown error.
When this debug flag is set, it will also emit debugging symbols to allow break-point debugging of the calls if the [project root is also configured](./debugging).
## Default arguments
If an ABI method call specifies default argument values for any of its arguments you can pass in `undefined` for the value of that argument for the default value to be automatically populated.
# App deployment
AlgoKit contains advanced smart contract deployment capabilities that allow you to have idempotent (safely retryable) deployment of a named app, including deploy-time immutability and permanence control and TEAL template substitution. This allows you to control the smart contract development lifecycle of a single-instance app across multiple environments (e.g. LocalNet, TestNet, MainNet).
It’s optional to use this functionality, since you can construct your own deployment logic using create / update / delete calls and your own mechanism to maintaining app metadata (like app IDs etc.), but this capability is an opinionated out-of-the-box solution that takes care of the heavy lifting for you.
App deployment is a higher-order use case capability provided by AlgoKit Utils that builds on top of the core capabilities, particularly [App management](./app).
To see some usage examples check out the [automated tests](../../src/app-deploy.spec.ts).
## Smart contract development lifecycle
The design behind the deployment capability is unique. The architecture design behind app deployment is articulated in an [architecture decision record](https://github.com/algorandfoundation/algokit-cli/blob/main/docs/architecture-decisions/2023-01-12_smart-contract-deployment). While the implementation will naturally evolve over time and diverge from this record, the principles and design goals behind the design are comprehensively explained.
Namely, it described the concept of a smart contract development lifecycle:
1. Development
1. **Write** smart contracts
2. **Transpile** smart contracts with development-time parameters (code configuration) to TEAL Templates
3. **Verify** the TEAL Templates maintain [output stability](https://github.com/algorandfoundation/algokit-cli/blob/main/docs/articles/output_stability) and any other static code quality checks
2. Deployment
1. **Substitute** deploy-time parameters into TEAL Templates to create final TEAL code
2. **Compile** the TEAL to create byte code using algod
3. **Deploy** the byte code to one or more Algorand networks (e.g. LocalNet, TestNet, MainNet) to create Deployed Application(s)
3. Runtime
1. **Validate** the deployed app via automated testing of the smart contracts to provide confidence in their correctness
2. **Call** deployed smart contract with runtime parameters to utilise it
The App deployment capability provided by AlgoKit Utils helps implement **#2 Deployment**.
Furthermore, the implementation contains the following implementation characteristics per the original architecture design:
* Deploy-time parameters can be provided and substituted into a TEAL Template by convention (by replacing `TMPL_{KEY}`)
* Contracts can be built by any smart contract framework that supports [ARC-0032](https://github.com/algorandfoundation/ARCs/pull/150) and [ARC-0004](https://github.com/algorandfoundation/ARCs/blob/main/ARCs/arc-0004) ([Beaker](https://beaker.algo.xyz/) or otherwise), which also means the deployment language can be different to the development language e.g. you can deploy a Python smart contract with TypeScript for instance
* There is explicit control of the immutability (updatability / upgradeability) and permanence (deletability) of the smart contract, which can be varied per environment to allow for easier development and testing in non-MainNet environments (by replacing `TMPL_UPDATABLE` and `TMPL_DELETABLE` at deploy-time by convention, if present)
* Contracts are resolvable by a string “name” for a given creator to allow automated determination of whether that contract had been deployed previously or not, but can also be resolved by ID instead
This design allows you to have the same deployment code across environments without having to specify an ID for each environment. This makes it really easy to apply [continuous delivery](https://continuousdelivery.com/) practices to your smart contract deployment and make the deployment process completely automated.
## `AppDeployer`
The `AppDeployer` is a class that is used to manage app deployments and deployment metadata.
To get an instance of `AppDeployer` you can use either [`AlgorandClient`](./algorand-client) via `algorand.appDeployer` or instantiate it directly (passing in an [`AppManager`](./app#appmanager), [`AlgorandClientTransactionSender`](./algorand-client#sending-a-single-transaction) and optionally an indexer client instance):
```typescript
import { AppDeployer } from '@algorandfoundation/algokit-utils/types/app-deployer';
const appDeployer = new AppDeployer(appManager, transactionSender, indexer);
```
## Deployment metadata
When AlgoKit performs a deployment of an app it creates metadata to describe that deployment and includes this metadata in an [ARC-2](https://github.com/algorandfoundation/ARCs/blob/main/ARCs/arc-0002) transaction note on any creation and update transactions.
The deployment metadata is defined in `AppDeployMetadata`, which is an object with:
* `name: string` - The unique name identifier of the app within the creator account
* `version: string` - The version of app that is / will be deployed; can be an arbitrary string, but we recommend using [semver](https://semver.org/)
* `deletable?: boolean` - Whether or not the app is deletable (`true`) / permanent (`false`) / unspecified (`undefined`)
* `updatable?: boolean` - Whether or not the app is updatable (`true`) / immutable (`false`) / unspecified (`undefined`)
An example of the ARC-2 transaction note that is attached as an app creation / update transaction note to specify this metadata is:
```plaintext
ALGOKIT_DEPLOYER:j{name:"MyApp",version:"1.0",updatable:true,deletable:false}
```
## Lookup deployed apps by name
In order to resolve what apps have been previously deployed and their metadata, AlgoKit provides a method that does a series of indexer lookups and returns a map of name to app metadata via `algorand.appDeployer.getCreatorAppsByName(creatorAddress)`.
```typescript
const appLookup = algorand.appDeployer.getCreatorAppsByName('CREATORADDRESS');
const app1Metadata = appLookup['app1'];
```
This method caches the result of the lookup, since it’s a reasonably heavyweight call (N+1 indexer calls for N deployed apps by the creator). If you want to skip the cache to get a fresh version then you can pass in a second parameter `ignoreCache?: boolean`. This should only be needed if you are performing parallel deployments outside of the current `AppDeployer` instance, since it will keep its cache updated based on its own deployments.
The return type of `getCreatorAppsByName` is `AppLookup`:
```typescript
export interface AppLookup {
creator: Readonly;
apps: {
[name: string]: AppMetadata;
};
}
```
The `apps` property contains a lookup by app name that resolves to the current `AppMetadata` value:
```typescript
interface AppMetadata {
/** The id of the app */
appId: bigint;
/** The Algorand address of the account associated with the app */
appAddress: string;
/** The unique name identifier of the app within the creator account */
name: string;
/** The version of app that is / will be deployed */
version: string;
/** Whether or not the app is deletable / permanent / unspecified */
deletable?: boolean;
/** Whether or not the app is updatable / immutable / unspecified */
updatable?: boolean;
/** The round the app was created */
createdRound: bigint;
/** The last round that the app was updated */
updatedRound: bigint;
/** The metadata when the app was created */
createdMetadata: AppDeployMetadata;
/** Whether or not the app is deleted */
deleted: boolean;
}
```
An example `AppLookup` might look like this:
```json
{
"creator": "",
"apps": {
"": {
/** The id of the app */
"appId": 1,
/** The Algorand address of the account associated with the app */
"appAddress": "",
/** The unique name identifier of the app within the creator account */
"name": "",
/** The version of app that is / will be deployed */
"version": "2.0.0",
/** Whether or not the app is deletable / permanent / unspecified */
"deletable": false,
/** Whether or not the app is updatable / immutable / unspecified */
"updatable": false,
/** The round the app was created */
"createdRound": 1,
/** The last round that the app was updated */
"updatedRound": 2,
/** Whether or not the app is deleted */
"deleted": false,
/** The metadata when the app was created */
"createdMetadata": {
/** The unique name identifier of the app within the creator account */
"name": "",
/** The version of app that is / will be deployed */
"version": "1.0.0",
/** Whether or not the app is deletable / permanent / unspecified */
"deletable": true,
/** Whether or not the app is updatable / immutable / unspecified */
"updatable": true
}
}
//...
}
}
```
## Performing a deployment
In order to perform a deployment, AlgoKit provides the `algorand.appDeployer.deploy(deployment)` method.
For example:
```typescript
const deploymentResult = algorand.appDeployer.deploy({
metadata: {
name: 'MyApp',
version: '1.0.0',
deletable: false,
updatable: false,
},
createParams: {
sender: 'CREATORADDRESS',
approvalProgram: approvalTealTemplateOrByteCode,
clearStateProgram: clearStateTealTemplateOrByteCode,
schema: {
globalInts: 1,
globalByteSlices: 2,
localInts: 3,
localByteSlices: 4,
},
// Other parameters if a create call is made...
},
updateParams: {
sender: 'SENDERADDRESS',
// Other parameters if an update call is made...
},
deleteParams: {
sender: 'SENDERADDRESS',
// Other parameters if a delete call is made...
},
deployTimeParams: {
// Key => value of any TEAL template variables to replace before compilation
VALUE: 1,
},
// How to handle a schema break
onSchemaBreak: OnSchemaBreak.Append,
// How to handle a contract code update
onUpdate: OnUpdate.Update,
// Optional execution control parameters
populateAppCallResources: true,
});
```
This method performs an idempotent (safely retryable) deployment. It will detect if the app already exists and if it doesn’t it will create it. If the app does already exist then it will:
* Detect if the app has been updated (i.e. the program logic has changed) and either fail, perform an update, deploy a new version or perform a replacement (delete old app and create new app) based on the deployment configuration.
* Detect if the app has a breaking schema change (i.e. more global or local storage is needed than were originally requested) and either fail, deploy a new version or perform a replacement (delete old app and create new app) based on the deployment configuration.
It will automatically [add metadata to the transaction note of the create or update transactions](#deployment-metadata) that indicates the name, version, updatability and deletability of the contract. This metadata works in concert with [`appDeployer.getCreatorAppsByName`](#lookup-deployed-apps-by-name) to allow the app to be reliably retrieved against that creator in it’s currently deployed state. It will automatically update it’s lookup cache so subsequent calls to `getCreatorAppsByName` or `deploy` will use the latest metadata without needing to call indexer again.
`deploy` also automatically executes [template substitution](#compilation-and-template-substitution) including deploy-time control of permanence and immutability if the requisite template parameters are specified in the provided TEAL template.
### Input parameters
The first parameter `deployment` is an `AppDeployParams`, which is an object with:
* `metadata: AppDeployMetadata` - determines the [deployment metadata](#deployment-metadata) of the deployment
* `createParams: AppCreateParams | AppCreateMethodCall` - the parameters for an [app creation call](./app#creation) (raw or ABI method call)
* `updateParams: Omit` - the parameters for an [app update call](./app#updating) (raw or ABI method call) without the `appId`, `approvalProgram` or `clearStateProgram`, since these are calculated by the `deploy` method
* `deleteParams: Omit` - the parameters for an [app delete call](./app#deleting) (raw or ABI method call) without the `appId`, since this is calculated by the `deploy` method
* `deployTimeParams?: TealTemplateParams` - allows automatic substitution of [deploy-time TEAL template variables](#compilation-and-template-substitution)
* `TealTemplateParams` is a `key => value` object that will result in `TMPL_{key}` being replaced with `value` (where a string or `Uint8Array` will be appropriately encoded as bytes within the TEAL code)
* `onSchemaBreak?: 'replace' | 'fail' | 'append' | OnSchemaBreak` - determines what should happen if a breaking change to the schema is detected (e.g. if you need more global or local state that was previously requested when the contract was originally created)
* `onUpdate?: 'update' | 'replace' | 'fail' | 'append' | OnUpdate` - determines what should happen if an update to the smart contract is detected (e.g. the TEAL code has changed since last deployment)
* `existingDeployments?: AppLookup` - optionally allows the [app lookup retrieval](#lookup-deployed-apps-by-name) to be skipped if it’s already been retrieved outside of this `AppDeployer` instance
* `ignoreCache?: boolean` - optionally allows the [lookup cache](#lookup-deployed-apps-by-name) to be ignored and force retrieval of fresh deployment metadata from indexer
* Everything from `SendParams` - [transaction execution control parameters](./algorand-client#transaction-parameters)
### Idempotency
`deploy` is idempotent which means you can safely call it again multiple times and it will only apply any changes it detects. If you call it again straight after calling it then it will do nothing.
### Compilation and template substitution
When compiling TEAL template code, the capabilities described in the above design are present, namely the ability to supply deploy-time parameters and the ability to control immutability and permanence of the smart contract at deploy-time.
In order for a smart contract to opt-in to use this functionality, it must have a TEAL Template that contains the following:
* `TMPL_{key}` - Which can be replaced with a number or a string / byte array which wil be automatically hexadecimal encoded (for any number of `{key}` => `{value}` pairs)
* `TMPL_UPDATABLE` - Which will be replaced with a `1` if an app should be updatable and `0` if it shouldn’t (immutable)
* `TMPL_DELETABLE` - Which will be replaced with a `1` if an app should be deletable and `0` if it shouldn’t (permanent)
If you passed in a TEAL template for the approvalProgram or clearStateProgram (i.e. a `string` rather than a `Uint8Array`) then `deploy` will return the compilation result of substituting then compiling the TEAL template(s) in the following properties of the return value:
* `compiledApproval?: CompiledTeal`
* `compiledClear?: CompiledTeal`
Template substitution is done by executing `algorand.app.compileTealTemplate(tealTemplateCode, templateParams?, deploymentMetadata?)`, which in turn calls the following in order and returns the compilation result per above (all of which can also be invoked directly):
* `AppManager.stripTealComments(tealCode)` - Strips out any TEAL comments to reduce the payload that is sent to algod and reduce the likelihood of hitting the max payload limit
* `AppManager.replaceTealTemplateParams(tealTemplateCode, templateParams)` - Replaces the `templateParams` by looking for `TMPL_{key}`
* `AppManager.replaceTealTemplateDeployTimeControlParams(tealTemplateCode, deploymentMetadata)` - If `deploymentMetadata` is provided, it allows for deploy-time immutability and permanence control by replacing `TMPL_UPDATABLE` with `deploymentMetadata.updatable` if it’s not `undefined` and replacing `TMPL_DELETABLE` with `deploymentMetadata.deletable` if it’s not `undefined`
* `algorand.app.compileTeal(tealCode)` - Sends the final TEAL to algod for compilation and returns the result including the source map and caches the compilation result within the `AppManager` instance
#### Making updatable/deletable apps
Below is a sample in [Algorand Python SDK](https://github.com/algorandfoundation/puya) that demonstrates how to make an app updatable/deletable smart contract with the use of `TMPL_UPDATABLE` and `TMPL_DELETABLE` template parameters.
```python
# ... your contract code ...
@arc4.baremethod(allow_actions=["UpdateApplication"])
def update(self) -> None:
assert TemplateVar[bool]("UPDATABLE")
@arc4.baremethod(allow_actions=["DeleteApplication"])
def delete(self) -> None:
assert TemplateVar[bool]("DELETABLE")
# ... your contract code ...
```
Alternative example in [Algorand TypeScript SDK](https://github.com/algorandfoundation/puya-ts):
```typescript
// ... your contract code ...
@baremethod({ allowActions: 'UpdateApplication' })
public onUpdate() {
assert(TemplateVar('UPDATABLE'))
}
@baremethod({ allowActions: 'DeleteApplication' })
public onDelete() {
assert(TemplateVar('DELETABLE'))
}
// ... your contract code ...
```
With the above code, when deploying your application, you can pass in the following deploy-time parameters:
```typescript
myFactory.deploy({
... // other deployment parameters
updatable: true, // resulting app will be updatable, and this metadata will be set in the ARC-2 transaction note
deletable: false, // resulting app will not be deletable, and this metadata will be set in the ARC-2 transaction note
})
```
### Return value
When `deploy` executes it will return a comprehensive result object that describes exactly what it did and has comprehensive metadata to describe the end result of the deployed app.
The `deploy` call itself may do one of the following (which you can determine by looking at the `operationPerformed` field on the return value from the function):
* `create` - The smart contract app was created
* `update` - The smart contract app was updated
* `replace` - The smart contract app was deleted and created again (in an atomic transaction)
* `nothing` - Nothing was done since it was detected the existing smart contract app deployment was up to date
As well as the `operationPerformed` parameter and the optional compilation result]\(#compilation-and-template-substitution), the return value will have the \[`AppMetadata` [fields](#deployment-metadata) present.
Based on the value of `operationPerformed` there will be other data available in the return value:
* If `create`, `update` or `replace` then it will have the relevant [`SendAppTransactionResult`](./app#calling-an-app) values
* If `replace` then it will also have `{deleteReturn?: ABIReturn, deleteResult: ConfirmedTransactionResult}` to capture the [result](./algorand-client#sending-a-single-transaction) of the deletion of the existing app
# App management
App management is a higher-order use case capability provided by AlgoKit Utils that builds on top of the core capabilities. It allows you to create, update, delete, call (ABI and otherwise) smart contract apps and the metadata associated with them (including state and boxes).
## `AppManager`
The `AppManager` is a class that is used to manage app information.
To get an instance of `AppManager` you can use either [`AlgorandClient`](./algorand-client) via `algorand.app` or instantiate it directly (passing in an algod client instance):
```typescript
import { AppManager } from '@algorandfoundation/algokit-utils/types/app-manager';
const appManager = new AppManager(algod);
```
## Calling apps
### App Clients
The recommended way of interacting with apps is via [Typed app clients](./typed-app-clients) or if you can’t use a typed app client then an [untyped app client](./app-client). The methods shown on this page are the underlying mechanisms that app clients use and are for advanced use cases when you want more control.
### Calling an app
When calling an app there are two types of transactions:
* Raw app transactions - Constructing a raw Algorand transaction to call the method; you have full control and are dealing with binary values directly
* ABI method calls - Constructing a call to an [ABI method](https://dev.algorand.co/concepts/smart-contracts/abi)
Calling an app involves providing some [common parameters](#common-app-parameters) and some parameters that will depend on the type of app call (create vs update vs other) per below sections.
When [sending transactions directly via AlgorandClient](./algorand-client#sending-a-single-transaction) the `SingleSendTransactionResult` return value is expanded with extra fields depending on the type of app call:
* All app calls extend `SendAppTransactionResult`, which has:
* `return?: ABIReturn` - Which will contain an ABI return value if a non-void ABI method was called:
* `rawReturnValue: Uint8Array` - The raw binary of the return value
* `returnValue: ABIValue` - The decoded value in the appropriate JavaScript object
* `decodeError: Error` - If there was a decoding error the above 2 values will be `undefined` and this will have the error
* Update and create calls extend `SendAppUpdateTransactionResult`, which has:
* `compiledApproval: CompiledTeal | undefined` - The compilation result of approval, if approval program was supplied as a string and thus compiled by algod
* `compiledClear: CompiledTeal | undefined` - The compilation result of clear state, if clear state program was supplied as a string and thus compiled by algod
* Create calls extend `SendAppCreateTransactionResult`, which has:
* `appId: bigint` - The id of the created app
* `appAddress: string` - The Algorand address of the account associated with the app
There is a static method on [`AppManager`](#appmanager) that allows you to parse an ABI return value from an algod transaction confirmation:
```typescript
const confirmation = modelsv2.PendingTransactionResponse.from_obj_for_encoding(
await algod.pendingTransactionInformation(transactionId).do(),
);
const abiReturn = AppManager.getABIReturn(confirmation, abiMethod);
```
### Creation
To create an app via a raw app transaction you can use `algorand.send.appCreate(params)` (immediately send a single app creation transaction), `algorand.createTransaction.appCreate(params)` (construct an app creation transaction), or `algorand.newGroup().addAppCreate(params)` (add app creation to a group of transactions) per [`AlgorandClient`](./algorand-client) [transaction semantics](./algorand-client#creating-and-issuing-transactions).
To create an app via an ABI method call you can use `algorand.send.appCreateMethodCall(params)` (immediately send a single app creation transaction), `algorand.createTransaction.appCreateMethodCall(params)` (construct an app creation transaction), or `algorand.newGroup().addAppCreateMethodCall(params)` (add app creation to a group of transactions).
The base type for specifying an app creation transaction is `AppCreateParams` (extended as `AppCreateMethodCall` for ABI method call version), which has the following parameters in addition to the [common parameters](#common-app-parameters):
* `onComplete?: Exclude` - The on-completion action to specify for the call; defaults to NoOp and allows any on-completion apart from clear state.
* `approvalProgram: Uint8Array | string` - The program to execute for all OnCompletes other than ClearState as raw teal that will be compiled (string) or compiled teal (encoded as a byte array (Uint8Array)).
* `clearStateProgram: Uint8Array | string` - The program to execute for ClearState OnComplete as raw teal that will be compiled (string) or compiled teal (encoded as a byte array (Uint8Array)).
* `schema?` - The storage schema to request for the created app. This is immutable once the app is created. It is an object with:
* `globalInts: number` - The number of integers saved in global state.
* `globalByteSlices: number` - The number of byte slices saved in global state.
* `localInts: number` - The number of integers saved in local state.
* `localByteSlices: number` - The number of byte slices saved in local state.
* `extraProgramPages?: number` - Number of extra pages required for the programs. This is immutable once the app is created.
If you pass in `approvalProgram` or `clearStateProgram` as a string then it will automatically be compiled using Algod and the compilation result will be available via `algorand.app.getCompilationResult` (including the source map). To skip this behaviour you can pass in the compiled TEAL as `Uint8Array`.
```typescript
// Basic raw example
const result = await algorand.send.appCreate({ sender: 'CREATORADDRESS', approvalProgram: 'TEALCODE', clearStateProgram: 'TEALCODE' })
const createdAppId = result.appId
// Advanced raw example
await algorand.send.appCreate({
sender: 'CREATORADDRESS',
approvalProgram: "TEALCODE",
clearStateProgram: "TEALCODE",
schema: {
globalInts: 1,
globalByteSlices: 2,
localInts: 3,
localByteSlices: 4
},
extraProgramPages: 1,
onComplete: algosdk.OnApplicationComplete.OptInOC,
args: [new Uint8Array(1, 2, 3, 4)]
accountReferences: ["ACCOUNT_1"]
appReferences: [123n, 1234n]
assetReferences: [12345n]
boxReferences: ["box1", {appId: 1234n, name: "box2"}]
lease: 'lease',
note: 'note',
// You wouldn't normally set this field
firstValidRound: 1000n,
validityWindow: 10,
extraFee: (1000).microAlgo(),
staticFee: (1000).microAlgo(),
// Max fee doesn't make sense with extraFee AND staticFee
// already specified, but here for completeness
maxFee: (3000).microAlgo(),
// Signer only needed if you want to provide one,
// generally you'd register it with AlgorandClient
// against the sender and not need to pass it in
signer: transactionSigner,
maxRoundsToWaitForConfirmation: 5,
suppressLog: true,
})
// Basic ABI call example
const method = new ABIMethod({
name: 'method',
args: [{ name: 'arg1', type: 'string' }],
returns: { type: 'string' },
})
const result = await algorand.send.appCreateMethodCall({
sender: 'CREATORADDRESS',
approvalProgram: 'TEALCODE',
clearStateProgram: 'TEALCODE',
method: method,
args: ["arg1_value"]
})
const createdAppId = result.appId
```
### Updating
To update an app via a raw app transaction you can use `algorand.send.appUpdate(params)` (immediately send a single app update transaction), `algorand.createTransaction.appUpdate(params)` (construct an app update transaction), or `algorand.newGroup().addAppUpdate(params)` (add app update to a group of transactions) per [`AlgorandClient`](./algorand-client) [transaction semantics](./algorand-client#creating-and-issuing-transactions).
To create an app via an ABI method call you can use `algorand.send.appUpdateMethodCall(params)` (immediately send a single app update transaction), `algorand.createTransaction.appUpdateMethodCall(params)` (construct an app update transaction), or `algorand.newGroup().addAppUpdateMethodCall(params)` (add app update to a group of transactions).
The base type for specifying an app update transaction is `AppUpdateParams` (extended as `AppUpdateMethodCall` for ABI method call version), which has the following parameters in addition to the [common parameters](#common-app-parameters):
* `onComplete?: algosdk.OnApplicationComplete.UpdateApplicationOC` - On Complete can either be omitted or set to update
* `approvalProgram: Uint8Array | string` - The program to execute for all OnCompletes other than ClearState as raw teal that will be compiled (string) or compiled teal (encoded as a byte array (Uint8Array)).
* `clearStateProgram: Uint8Array | string` - The program to execute for ClearState OnComplete as raw teal that will be compiled (string) or compiled teal (encoded as a byte array (Uint8Array)).
If you pass in `approvalProgram` or `clearStateProgram` as a string then it will automatically be compiled using Algod and the compilation result will be available via `algorand.app.getCompilationResult` (including the source map). To skip this behaviour you can pass in the compiled TEAL as `Uint8Array`.
```typescript
// Basic raw example
await algorand.send.appUpdate({ sender: 'SENDERADDRESS', approvalProgram: 'TEALCODE', clearStateProgram: 'TEALCODE' })
// Advanced raw example
await algorand.send.appUpdate({
sender: 'SENDERADDRESS',
approvalProgram: "TEALCODE",
clearStateProgram: "TEALCODE",
onComplete: algosdk.OnApplicationComplete.UpdateApplicationOC,
args: [new Uint8Array(1, 2, 3, 4)]
accountReferences: ["ACCOUNT_1"]
appReferences: [123n, 1234n]
assetReferences: [12345n]
boxReferences: ["box1", {appId: 1234n, name: "box2"}]
lease: 'lease',
note: 'note',
// You wouldn't normally set this field
firstValidRound: 1000n,
validityWindow: 10,
extraFee: (1000).microAlgo(),
staticFee: (1000).microAlgo(),
// Max fee doesn't make sense with extraFee AND staticFee
// already specified, but here for completeness
maxFee: (3000).microAlgo(),
// Signer only needed if you want to provide one,
// generally you'd register it with AlgorandClient
// against the sender and not need to pass it in
signer: transactionSigner,
maxRoundsToWaitForConfirmation: 5,
suppressLog: true,
})
// Basic ABI call example
const method = new ABIMethod({
name: 'method',
args: [{ name: 'arg1', type: 'string' }],
returns: { type: 'string' },
})
await algorand.send.appUpdateMethodCall({
sender: 'SENDERADDRESS',
approvalProgram: 'TEALCODE',
clearStateProgram: 'TEALCODE',
method: method,
args: ["arg1_value"]
})
```
### Deleting
To delete an app via a raw app transaction you can use `algorand.send.appDelete(params)` (immediately send a single app deletion transaction), `algorand.createTransaction.appDelete(params)` (construct an app deletion transaction), or `algorand.newGroup().addAppDelete(params)` (add app deletion to a group of transactions) per [`AlgorandClient`](./algorand-client) [transaction semantics](./algorand-client#creating-and-issuing-transactions).
To delete an app via an ABI method call you can use `algorand.send.appDeleteMethodCall(params)` (immediately send a single app deletion transaction), `algorand.createTransaction.appDeleteMethodCall(params)` (construct an app deletion transaction), or `algorand.newGroup().addAppDeleteMethodCall(params)` (add app deletion to a group of transactions).
The base type for specifying an app deletion transaction is `AppDeleteParams` (extended as `AppDeleteMethodCall` for ABI method call version), which has the following parameters in addition to the [common parameters](#common-app-parameters):
* `onComplete?: algosdk.OnApplicationComplete.DeleteApplicationOC` - On Complete can either be omitted or set to delete
```typescript
// Basic raw example
await algorand.send.appDelete({ sender: 'SENDERADDRESS' })
// Advanced raw example
await algorand.send.appDelete({
sender: 'SENDERADDRESS',
onComplete: algosdk.OnApplicationComplete.DeleteApplicationOC,
args: [new Uint8Array(1, 2, 3, 4)]
accountReferences: ["ACCOUNT_1"]
appReferences: [123n, 1234n]
assetReferences: [12345n]
boxReferences: ["box1", {appId: 1234n, name: "box2"}]
lease: 'lease',
note: 'note',
// You wouldn't normally set this field
firstValidRound: 1000n,
validityWindow: 10,
extraFee: (1000).microAlgo(),
staticFee: (1000).microAlgo(),
// Max fee doesn't make sense with extraFee AND staticFee
// already specified, but here for completeness
maxFee: (3000).microAlgo(),
// Signer only needed if you want to provide one,
// generally you'd register it with AlgorandClient
// against the sender and not need to pass it in
signer: transactionSigner,
maxRoundsToWaitForConfirmation: 5,
suppressLog: true,
})
// Basic ABI call example
const method = new ABIMethod({
name: 'method',
args: [{ name: 'arg1', type: 'string' }],
returns: { type: 'string' },
})
await algorand.send.appDeleteMethodCall({
sender: 'SENDERADDRESS',
method: method,
args: ["arg1_value"]
})
```
## Calling
To call an app via a raw app transaction you can use `algorand.send.appCall(params)` (immediately send a single app call transaction), `algorand.createTransaction.appCall(params)` (construct an app call transaction), or `algorand.newGroup().addAppCall(params)` (add app deletion to a group of transactions) per [`AlgorandClient`](./algorand-client) [transaction semantics](./algorand-client#creating-and-issuing-transactions).
To call an app via an ABI method call you can use `algorand.send.appCallMethodCall(params)` (immediately send a single app call transaction), `algorand.createTransaction.appCallMethodCall(params)` (construct an app call transaction), or `algorand.newGroup().addAppCallMethodCall(params)` (add app call to a group of transactions).
The base type for specifying an app call transaction is `AppCallParams` (extended as `AppCallMethodCall` for ABI method call version), which has the following parameters in addition to the [common parameters](#common-app-parameters):
* `onComplete?: Exclude` - On Complete can either be omitted (which will result in no-op) or set to any on-complete apart from update
```typescript
// Basic raw example
await algorand.send.appCall({ sender: 'SENDERADDRESS' })
// Advanced raw example
await algorand.send.appCall({
sender: 'SENDERADDRESS',
onComplete: algosdk.OnApplicationComplete.OptInOC,
args: [new Uint8Array(1, 2, 3, 4)]
accountReferences: ["ACCOUNT_1"]
appReferences: [123n, 1234n]
assetReferences: [12345n]
boxReferences: ["box1", {appId: 1234n, name: "box2"}]
lease: 'lease',
note: 'note',
// You wouldn't normally set this field
firstValidRound: 1000n,
validityWindow: 10,
extraFee: (1000).microAlgo(),
staticFee: (1000).microAlgo(),
// Max fee doesn't make sense with extraFee AND staticFee
// already specified, but here for completeness
maxFee: (3000).microAlgo(),
// Signer only needed if you want to provide one,
// generally you'd register it with AlgorandClient
// against the sender and not need to pass it in
signer: transactionSigner,
maxRoundsToWaitForConfirmation: 5,
suppressLog: true,
})
// Basic ABI call example
const method = new ABIMethod({
name: 'method',
args: [{ name: 'arg1', type: 'string' }],
returns: { type: 'string' },
})
await algorand.send.appCallMethodCall({
sender: 'SENDERADDRESS',
method: method,
args: ["arg1_value"]
})
```
## Accessing state
### Global state
To access local state you can use the following method from an [`AppManager`](#appmanager) instance:
* `algorand.app.getLocalState(appId, address)` - Returns the current local state for the given app ID and account address decoded into an object keyed by the UTF-8 representation of the state key with various parsed versions of the value (base64, UTF-8 and raw binary)
```typescript
const globalState = await algorand.app.getGlobalState(12345n);
```
Global state is parsed from the underlying algod response via the following static method from [`AppManager`](#appmanager):
* `AppManager.decodeAppState(state)` - Takes the raw response from the algod API for global state and returns a friendly generic object keyed by the UTF-8 value of the key
```typescript
const globalAppState = /* value from algod */
const appState = AppManager.decodeAppState(globalAppState)
const keyAsBinary = appState['value1'].keyRaw
const keyAsBase64 = appState['value1'].keyBase64
if (typeof appState['value1'].value === 'string') {
const valueAsString = appState['value1'].value
const valueAsBinary = appState['value1'].valueRaw
const valueAsBase64 = appState['value1'].valueBase64
} else {
const valueAsNumberOrBigInt = appState['value1'].value
}
```
### Local state
To access local state you can use the following method from an [`AppManager`](#appmanager) instance:
* `algorand.app.getLocalState(appId, address)` - Returns the current local state for the given app ID and account address decoded into an object keyed by the UTF-8 representation of the state key with various parsed versions of the value (base64, UTF-8 and raw binary)
```typescript
const localState = await algorand.app.getLocalState(12345n, 'ACCOUNTADDRESS');
```
### Boxes
To access and parse box values and names for an app you can use the following methods from an [`AppManager`](#appmanager) instance:
* `algorand.app.getBoxNames(appId: bigint)` - Returns the current box names for the given app ID
* `algorand.app.getBoxValue(appId: bigint, boxName: BoxIdentifier)` - Returns the binary value of the given box name for the given app ID
* `algorand.app.getBoxValues(appId: bigint, boxNames: BoxIdentifier[])` - Returns the binary values of the given box names for the given app ID
* `algorand.app.getBoxValueFromABIType(request: {appId: bigint, boxName: BoxIdentifier, type: algosdk.ABIType}})` - Returns the parsed ABI value of the given box name for the given app ID for the provided ABI type
* `algorand.app.getBoxValuesFromABIType(request: {appId: bigint, boxNames: BoxIdentifier[], type: algosdk.ABIType})` - Returns the parsed ABI values of the given box names for the given app ID for the provided ABI type
* `AppManager.getBoxReference(boxId)` - Returns a `algosdk.BoxReference` representation of the given [box identifier / reference](#box-references), which is useful when constructing a raw `algosdk.Transaction`
```typescript
const appId = 12345n;
const boxName: BoxReference = 'my-box';
const boxName2: BoxReference = 'my-box2';
const boxNames = algorand.app.getBoxNames(appId);
const boxValue = algorand.app.getBoxValue(appId, boxName);
const boxValues = algorand.app.getBoxValues(appId, [boxName, boxName2]);
const boxABIValue = algorand.app.getBoxValueFromABIType(appId, boxName, algosdk.ABIStringType);
const boxABIValues = algorand.app.getBoxValuesFromABIType(
appId,
[boxName, boxName2],
algosdk.ABIStringType,
);
```
## Getting app information
To get reference information and metadata about an existing app you can use the following methods:
* `algorand.app.getById(appId)` - Returns current app information by app ID from an [`AppManager`](#appmanager) instance
* `indexer.lookupAccountCreatedApplicationByAddress(indexer, address, getAll?, paginationLimit?)` - Returns all apps created by a given account from [indexer](./indexer)
## Common app parameters
When interacting with apps (creating, updating, deleting, calling), there are some `CommonAppCallParams` that you will be able to pass in to all calls in addition to the [common transaction parameters](./algorand-client#transaction-parameters):
* `appId: bigint` - ID of the application; only specified if the application is not being created.
* `onComplete?: algosdk.OnApplicationComplete` - The [on-complete](https://dev.algorand.co/concepts/smart-contracts/avm#oncomplete) action of the call (noting each call type will have restrictions that affect this value).
* `args?: Uint8Array[]` - Any [arguments to pass to the smart contract call](https://dev.algorand.co/concepts/smart-contracts/languages/teal/#argument-passing).
* `accountReferences?: string[]` - Any account addresses to add to the [accounts array](https://dev.algorand.co/concepts/smart-contracts/resource-usage#what-are-reference-arrays).
* `appReferences?: bigint[]` - The ID of any apps to load to the [foreign apps array](https://dev.algorand.co/concepts/smart-contracts/resource-usage#what-are-reference-arrays).
* `assetReferences?: bigint[]` - The ID of any assets to load to the [foreign assets array](https://dev.algorand.co/concepts/smart-contracts/resource-usage#what-are-reference-arrays).
* `boxReferences?: (BoxReference | BoxIdentifier)[]` - Any [boxes](#box-references) to load to the [boxes array](https://dev.algorand.co/concepts/smart-contracts/resource-usage#what-are-reference-arrays)
When making an ABI call, the `args` parameter is replaced with a different type and there is also a `method` parameter per the `AppMethodCall` type:
* `method: algosdk.ABIMethod`
* `args: ABIArgument[]` The arguments to pass to the ABI call, which can be one of:
* `algosdk.ABIValue` - Which can be one of:
* `boolean`
* `number`
* `bigint`
* `string`
* `Uint8Array`
* An array of one of the above types
* `algosdk.TransactionWithSigner`
* `algosdk.Transaction`
* `Promise` - which allows you to use an AlgorandClient call that [returns a transaction](./algorand-client#creating-single-transactions) without needing to await the call
* `AppMethodCall` - parameters that define another (nested) ABI method call, which will in turn get resolved to one or more transactions
## Box references
Referencing boxes can by done by either `BoxIdentifier` (which identifies the name of the box and app ID `0` will be used (i.e. the current app)) or `BoxReference`:
```typescript
/**
* Something that identifies an app box name - either a:
* * `Uint8Array` (the actual binary of the box name)
* * `string` (that will be encoded to a `Uint8Array`)
* * `TransactionSignerAccount` (that will be encoded into the
* public key address of the corresponding account)
*/
export type BoxIdentifier = string | Uint8Array | TransactionSignerAccount;
/**
* A grouping of the app ID and name identifier to reference an app box.
*/
export interface BoxReference {
/**
* A unique application id
*/
appId: bigint;
/**
* Identifier for a box name
*/
name: BoxIdentifier;
}
```
## Compilation
The [`AppManager`](#appmanager) class allows you to compile TEAL code with caching semantics that allows you to avoid duplicate compilation and keep track of source maps from compiled code.
If you call `algorand.app.compileTeal(tealCode)` then the compilation result will be stored and retrievable from `algorand.app.getCompilationResult(tealCode)`.
```typescript
const tealCode = 'return 1';
const compilationResult = await algorand.app.compileTeal(tealCode);
// ...
const previousCompilationResult = algorand.app.getCompilationResult(tealCode);
```
# Assets
The Algorand Standard Asset (asset) management functions include creating, opting in and transferring assets, which are fundamental to asset interaction in a blockchain environment.
To see some usage examples check out the [automated tests](../../src/types/algorand-client.asset.spec.ts).
## `AssetManager`
The `AssetManager` is a class that is used to manage asset information.
To get an instance of `AssetManager`, you can use either [`AlgorandClient`](./algorand-client) via `algorand.asset` or instantiate it directly:
```typescript
import { AssetManager } from '@algorandfoundation/algokit-utils/types/asset-manager'
import {TransactionComposer } from '@algorandfoundation/algokit-utils/types/composer'
const assetManager = new AssetManager(algod, () => new TransactionComposer({algod, () => signer, () => suggestedParams}))
```
## Creation
To create an asset you can use `algorand.send.assetCreate(params)` (immediately send a single asset creation transaction), `algorand.createTransaction.assetCreate(params)` (construct an asset creation transaction), or `algorand.newGroup().addAssetCreate(params)` (add asset creation to a group of transactions) per [`AlgorandClient`](./algorand-client) [transaction semantics](./algorand-client#creating-and-issuing-transactions).
The base type for specifying an asset creation transaction is `AssetCreateParams`, which has the following parameters in addition to the [common transaction parameters](./algorand-client#transaction-parameters):
* `total: bigint` - The total amount of the smallest divisible (decimal) unit to create. For example, if `decimals` is, say, 2, then for every 100 `total` there would be 1 whole unit. This field can only be specified upon asset creation.
* `decimals: number` - The amount of decimal places the asset should have. If unspecified then the asset will be in whole units (i.e. `0`). If 0, the asset is not divisible. If 1, the base unit of the asset is in tenths, and so on up to 19 decimal places. This field can only be specified upon asset creation.
* `assetName?: string` - The optional name of the asset. Max size is 32 bytes. This field can only be specified upon asset creation.
* `unitName?: string` - The optional name of the unit of this asset (e.g. ticker name). Max size is 8 bytes. This field can only be specified upon asset creation.
* `url?: string` - Specifies an optional URL where more information about the asset can be retrieved. Max size is 96 bytes. This field can only be specified upon asset creation.
* `metadataHash?: string | Uint8Array` - 32-byte hash of some metadata that is relevant to your asset and/or asset holders. The format of this metadata is up to the application. This field can only be specified upon asset creation.
* `defaultFrozen?: boolean` - Whether to freeze holdings for this asset by default. Defaults to `false`. If `true` then for anyone apart from the creator to hold the asset it needs to be unfrozen using an asset freeze transaction from the `freeze` account, which must be set on creation. This field can only be specified upon asset creation.
* `manager?: string` - The address of the optional account that can manage the configuration of the asset and destroy it. The configuration fields it can change are `manager`, `reserve`, `clawback`, and `freeze`. If not set (`undefined` or `""`) at asset creation or subsequently set to empty by the `manager` the asset becomes permanently immutable.
* `reserveAccount?: string` - The address of the optional account that holds the reserve (uncirculated supply) units of the asset. This address has no specific authority in the protocol itself and is informational only. Some standards like [ARC-19](https://github.com/algorandfoundation/ARCs/blob/main/ARCs/arc-0019) rely on this field to hold meaningful data. It can be used in the case where you want to signal to holders of your asset that the uncirculated units of the asset reside in an account that is different from the default creator account. If not set (`undefined` or `""`) at asset creation or subsequently set to empty by the manager the field is permanently empty.
* `freezeAccount?: string` - The address of the optional account that can be used to freeze or unfreeze holdings of this asset for any account. If empty, freezing is not permitted. If not set (`undefined` or `""`) at asset creation or subsequently set to empty by the manager the field is permanently empty.
* `clawbackAccount?: string` - The address of the optional account that can clawback holdings of this asset from any account. **This field should be used with caution** as the clawback account has the ability to **unconditionally take assets from any account**. If empty, clawback is not permitted. If not set (`undefined` or `""`) at asset creation or subsequently set to empty by the manager the field is permanently empty.
### Examples
```typescript
// Basic example
const result = await algorand.send.assetCreate({ sender: 'CREATORADDRESS', total: 100n });
const createdAssetId = result.assetId;
// Advanced example
await algorand.send.assetCreate({
sender: 'CREATORADDRESS',
total: 100n,
decimals: 2,
assetName: 'asset',
unitName: 'unit',
url: 'url',
metadataHash: 'metadataHash',
defaultFrozen: false,
manager: 'MANAGERADDRESS',
reserve: 'RESERVEADDRESS',
freeze: 'FREEZEADDRESS',
clawback: 'CLAWBACKADDRESS',
lease: 'lease',
note: 'note',
// You wouldn't normally set this field
firstValidRound: 1000n,
validityWindow: 10,
extraFee: (1000).microAlgo(),
staticFee: (1000).microAlgo(),
// Max fee doesn't make sense with extraFee AND staticFee
// already specified, but here for completeness
maxFee: (3000).microAlgo(),
// Signer only needed if you want to provide one,
// generally you'd register it with AlgorandClient
// against the sender and not need to pass it in
signer: transactionSigner,
maxRoundsToWaitForConfirmation: 5,
suppressLog: true,
});
```
## Reconfigure
If you have a `manager` address set on an asset, that address can send a reconfiguration transaction to change the `manager`, `reserve`, `freeze` and `clawback` fields of the asset if they haven’t been set to empty.
> \[!WARNING] If you issue a reconfigure transaction and don’t set the *existing* values for any of the below fields then that field will be permanently set to empty.
To reconfigure an asset you can use `algorand.send.assetConfig(params)` (immediately send a single asset config transaction), `algorand.createTransaction.assetConfig(params)` (construct an asset config transaction), or `algorand.newGroup().addAssetConfig(params)` (add asset config to a group of transactions) per [`AlgorandClient`](./algorand-client) [transaction semantics](./algorand-client#creating-and-issuing-transactions).
The base type for specifying an asset creation transaction is `AssetConfigParams`, which has the following parameters in addition to the [common transaction parameters](./algorand-client#transaction-parameters):
* `assetId: bigint` - ID of the asset to reconfigure
* `manager: string | undefined` - The address of the optional account that can manage the configuration of the asset and destroy it. The configuration fields it can change are `manager`, `reserve`, `clawback`, and `freeze`. If not set (`undefined` or `""`) the asset will become permanently immutable.
* `reserve?: string` - The address of the optional account that holds the reserve (uncirculated supply) units of the asset. This address has no specific authority in the protocol itself and is informational only. Some standards like [ARC-19](https://github.com/algorandfoundation/ARCs/blob/main/ARCs/arc-0019) rely on this field to hold meaningful data. It can be used in the case where you want to signal to holders of your asset that the uncirculated units of the asset reside in an account that is different from the default creator account. If not set (`undefined` or `""`) the field will become permanently empty.
* `freeze?: string` - The address of the optional account that can be used to freeze or unfreeze holdings of this asset for any account. If empty, freezing is not permitted. If not set (`undefined` or `""`) the field will become permanently empty.
* `clawback?: string` - The address of the optional account that can clawback holdings of this asset from any account. **This field should be used with caution** as the clawback account has the ability to **unconditionally take assets from any account**. If empty, clawback is not permitted. If not set (`undefined` or `""`) the field will become permanently empty.
### Examples
```typescript
// Basic example
await algorand.send.assetConfig({
sender: 'MANAGERADDRESS',
assetId: 123456n,
manager: 'MANAGERADDRESS',
});
// Advanced example
await algorand.send.assetConfig({
sender: 'MANAGERADDRESS',
assetId: 123456n,
manager: 'MANAGERADDRESS',
reserve: 'RESERVEADDRESS',
freeze: 'FREEZEADDRESS',
clawback: 'CLAWBACKADDRESS',
lease: 'lease',
note: 'note',
// You wouldn't normally set this field
firstValidRound: 1000n,
validityWindow: 10,
extraFee: (1000).microAlgo(),
staticFee: (1000).microAlgo(),
// Max fee doesn't make sense with extraFee AND staticFee
// already specified, but here for completeness
maxFee: (3000).microAlgo(),
// Signer only needed if you want to provide one,
// generally you'd register it with AlgorandClient
// against the sender and not need to pass it in
signer: transactionSigner,
maxRoundsToWaitForConfirmation: 5,
suppressLog: true,
});
```
## Transfer
To transfer unit(s) of an asset between accounts you can use `algorand.send.assetTransfer(params)` (immediately send a single asset transfer transaction), `algorand.createTransaction.assetTransfer(params)` (construct an asset transfer transaction), or `algorand.newGroup().addAssetTransfer(params)` (add asset transfer to a group of transactions) per [`AlgorandClient`](./algorand-client) [transaction semantics](./algorand-client#creating-and-issuing-transactions).
**Note:** For an account to receive an asset it needs to have [opted-in](#opt-inout).
The base type for specifying an asset transfer transaction is `AssetTransferParams`, which has the following parameters in addition to the [common transaction parameters](./algorand-client#transaction-parameters):
* `assetId: bigint` - ID of the asset to transfer.
* `amount: bigint` - Amount of the asset to transfer (in smallest divisible (decimal) units).
* `receiver: string` - The address of the account that will receive the asset unit(s).
* `clawbackTarget?: string` - Optional address of an account to clawback the asset from. Requires the sender to be the clawback account. **Warning:** Be careful with this parameter as it can lead to unexpected loss of funds if not used correctly.
* `closeAssetTo?: string` - Optional address of an account to close the asset position to. **Warning:** Be careful with this parameter as it can lead to loss of funds if not used correctly.
### Examples
```typescript
// Basic example
await algorand.send.assetTransfer({sender: 'HOLDERADDRESS', assetId: 123456n, amount: 1n, receiver: 'RECEIVERADDRESS' })
// Advanced example (with clawback and close asset to)
await algorand.send.assetTransfer({
sender: 'CLAWBACKADDRESS',
assetId: 123456n,
amount: 1n,
receiver: 'RECEIVERADDRESS',
clawbackTarget: 'HOLDERADDRESS',
// This field needs to be used with caution
closeAssetTo: 'ADDRESSTOCLOSETO'
lease: 'lease',
note: 'note',
// You wouldn't normally set this field
firstValidRound: 1000n,
validityWindow: 10,
extraFee: (1000).microAlgo(),
staticFee: (1000).microAlgo(),
// Max fee doesn't make sense with extraFee AND staticFee
// already specified, but here for completeness
maxFee: (3000).microAlgo(),
// Signer only needed if you want to provide one,
// generally you'd register it with AlgorandClient
// against the sender and not need to pass it in
signer: transactionSigner,
maxRoundsToWaitForConfirmation: 5,
suppressLog: true,
})
```
## Opt-in/out
Before an account can receive a specific asset, it must [`opt-in`](https://dev.algorand.co/concepts/assets/opt-in-out#receiving-an-asset) to receive it. An opt-in transaction places an asset holding of 0 into the account and increases the [minimum balance](https://dev.algorand.co/concepts/smart-contracts/costs-constraints#mbr) of that account by [100,000 microAlgos](https://dev.algorand.co/concepts/assets/overview/).
An account can opt out of an asset at any time by closing out it’s asset position to another account (usually to the asset creator). This means that the account will no longer hold the asset, and the account will no longer be able to receive the asset. The account also recovers the Minimum Balance Requirement for the asset (100,000 microAlgos).
When opting-out you generally want to be careful to ensure you have a zero-balance otherwise you will forfeit the balance you do have. AlgoKit Utils can protect you from making this mistake by checking you have a zero-balance before issuing the opt-out transaction. You can turn this check off if you want to avoid the extra calls to Algorand and are confident in what you are doing.
AlgoKit Utils gives you functions that allow you to do opt-ins and opt-outs in bulk or as a single operation. The bulk operations give you less control over the sending semantics as they automatically send the transactions to Algorand in the most optimal way using transaction groups of 16 at a time.
### `assetOptIn`
To opt-in to an asset you can use `algorand.send.assetOptIn(params)` (immediately send a single asset opt-in transaction), `algorand.createTransaction.assetOptIn(params)` (construct an asset opt-in transaction), or `algorand.newGroup().addAssetOptIn(params)` (add asset opt-in to a group of transactions) per [`AlgorandClient`](./algorand-client) [transaction semantics](./algorand-client#creating-and-issuing-transactions).
The base type for specifying an asset opt-in transaction is `AssetOptInParams`, which has the following parameters in addition to the [common transaction parameters](./algorand-client#transaction-parameters):
* `assetId: bigint` - The ID of the asset that will be opted-in to
```typescript
// Basic example
await algorand.send.assetOptIn({ sender: 'SENDERADDRESS', assetId: 123456n });
// Advanced example
await algorand.send.assetOptIn({
sender: 'SENDERADDRESS',
assetId: 123456n,
lease: 'lease',
note: 'note',
// You wouldn't normally set this field
firstValidRound: 1000n,
validityWindow: 10,
extraFee: (1000).microAlgo(),
staticFee: (1000).microAlgo(),
// Max fee doesn't make sense with extraFee AND staticFee
// already specified, but here for completeness
maxFee: (3000).microAlgo(),
// Signer only needed if you want to provide one,
// generally you'd register it with AlgorandClient
// against the sender and not need to pass it in
signer: transactionSigner,
maxRoundsToWaitForConfirmation: 5,
suppressLog: true,
});
```
### `assetOptOut`
To opt-out to an asset you can use `algorand.send.assetOptOut(params)` (immediately send a single asset opt-out transaction), `algorand.createTransaction.assetOptOut(params)` (construct an asset opt-out transaction), or `algorand.newGroup().addAssetOptOut(params)` (add asset opt-out to a group of transactions) per [`AlgorandClient`](./algorand-client) [transaction semantics](./algorand-client#creating-and-issuing-transactions).
The base type for specifying an asset opt-out transaction is `AssetOptOutParams`, which has the following parameters in addition to the [common transaction parameters](./algorand-client#transaction-parameters):
* `assetId: bigint` - The ID of the asset that will be opted-out of
* `creator: string` - The address of the asset creator account to close the asset position to (any remaining asset units will be sent to this account).
If you are using the `send` variant then there is an additional parameter:
* `ensureZeroBalance: boolean` - Whether or not to check if the account has a zero balance first or not. If this is set to `true` and the account has an asset balance it will throw an error. If this is set to `false` and the account has an asset balance it will lose those assets to the asset creator.
> \[!WARNING] If you are using the `transaction` or `addAssetOptOut` variants then you need to take responsibility to ensure the asset holding balance is `0` to avoid losing assets.
```typescript
// Basic example (without creator)
await algorand.send.assetOptOut({
sender: 'SENDERADDRESS',
assetId: 123456n,
ensureZeroBalance: true,
});
// Basic example (with creator)
await algorand.send.assetOptOut({
sender: 'SENDERADDRESS',
creator: 'CREATORADDRESS',
assetId: 123456n,
ensureZeroBalance: true,
});
// Advanced example
await algorand.send.assetOptOut({
sender: 'SENDERADDRESS',
assetId: 123456n,
creator: 'CREATORADDRESS',
ensureZeroBalance: true,
lease: 'lease',
note: 'note',
// You wouldn't normally set this field
firstValidRound: 1000n,
validityWindow: 10,
extraFee: (1000).microAlgo(),
staticFee: (1000).microAlgo(),
// Max fee doesn't make sense with extraFee AND staticFee
// already specified, but here for completeness
maxFee: (3000).microAlgo(),
// Signer only needed if you want to provide one,
// generally you'd register it with AlgorandClient
// against the sender and not need to pass it in
signer: transactionSigner,
maxRoundsToWaitForConfirmation: 5,
suppressLog: true,
});
```
### `asset.bulkOptIn`
The `asset.bulkOptIn` function facilitates the opt-in process for an account to multiple assets, allowing the account to receive and hold those assets.
```typescript
// Basic example
algorand.asset.bulkOptIn('ACCOUNTADDRESS', [12345n, 67890n]);
// Advanced example
algorand.asset.bulkOptIn('ACCOUNTADDRESS', [12345n, 67890n], {
maxFee: (1000).microAlgo(),
suppressLog: true,
});
```
### `asset.bulkOptOut`
The `asset.bulkOptOut` function facilitates the opt-out process for an account from multiple assets, permitting the account to discontinue holding a group of assets.
```typescript
// Basic example
algorand.asset.bulkOptOut('ACCOUNTADDRESS', [12345n, 67890n]);
// Advanced example
algorand.asset.bulkOptOut('ACCOUNTADDRESS', [12345n, 67890n], {
ensureZeroBalance: true,
maxFee: (1000).microAlgo(),
suppressLog: true,
});
```
## Get information
### Getting current parameters for an asset
You can get the current parameters of an asset from algod by using `algorand.asset.getById(assetId)`.
```typescript
const assetInfo = await assetManager.getById(12353n);
```
### Getting current holdings of an asset for an account
You can get the current holdings of an asset for a given account from algod by using `algorand.asset.getAccountInformation(accountAddress, assetId)`.
```typescript
const address = 'XBYLS2E6YI6XXL5BWCAMOA4GTWHXWENZMX5UHXMRNWWUQ7BXCY5WC5TEPA';
const assetId = 123345n;
const accountInfo = await algorand.asset.getAccountInformation(address, assetId);
```
# Client management
Client management is one of the core capabilities provided by AlgoKit Utils. It allows you to create (auto-retry) [algod](https://dev.algorand.co/reference/rest-apis/algod), [indexer](https://dev.algorand.co/reference/rest-apis/indexer) and [kmd](https://dev.algorand.co/reference/rest-apis/kmd) clients against various networks resolved from environment or specified configuration.
Any AlgoKit Utils function that needs one of these clients will take the underlying algosdk classes (`algosdk.Algodv2`, `algosdk.Indexer`, `algosdk.Kmd`) so inline with the [Modularity](../README#core-principles) principle you can use existing logic to get instances of these clients without needing to use the Client management capability if you prefer, including use of libraries like [useWallet](https://github.com/TxnLab/use-wallet) that have their own configuration mechanism.
To see some usage examples check out the [automated tests](../../src/types/client-manager.spec.ts).
## `ClientManager`
The `ClientManager` is a class that is used to manage client instances.
To get an instance of `ClientManager` you can get it from either [`AlgorandClient`](./algorand-client) via `algorand.client` or instantiate it directly:
```typescript
import { ClientManager } from '@algorandfoundation/algokit-utils/types/client-manager';
// Algod client only
const clientManager = new ClientManager({ algod: algodClient });
// All clients
const clientManager = new ClientManager({
algod: algodClient,
indexer: indexerClient,
kmd: kmdClient,
});
// Algod config only
const clientManager = new ClientManager({ algodConfig });
// All client configs
const clientManager = new ClientManager({ algodConfig, indexerConfig, kmdConfig });
```
## Network configuration
The network configuration is specified using the `AlgoClientConfig` interface. This same interface is used to specify the config for [algod](https://algorand.github.io/js-algorand-sdk/classes/Algodv2.html), [indexer](https://algorand.github.io/js-algorand-sdk/classes/Indexer.html) and [kmd](https://algorand.github.io/js-algorand-sdk/classes/Kmd.html) SDK clients.
There are a number of ways to produce one of these configuration objects:
* Manually specifying an object that conforms with the interface, e.g.
```typescript
{
server: 'https://myalgodnode.com'
}
// Or with the optional values:
{
server: 'https://myalgodnode.com',
port: 443,
token: 'SECRET_TOKEN'
}
```
* `ClientManager.getConfigFromEnvironmentOrLocalNet()` - Loads the Algod client config, the Indexer client config and the Kmd config from well-known environment variables or if not found then default LocalNet; this is useful to have code that can work across multiple blockchain environments (including LocalNet), without having to change
* `ClientManager.getAlgodConfigFromEnvironment()` - Loads an Algod client config from well-known environment variables
* `ClientManager.getIndexerConfigFromEnvironment()` - Loads an Indexer client config from well-known environment variables; useful to have code that can work across multiple blockchain environments (including LocalNet), without having to change
* `ClientManager.getAlgoNodeConfig(network, config)` - Loads an Algod or indexer config against [AlgoNode free tier](https://nodely.io/docs/free/start) to either MainNet or TestNet
* `ClientManager.getDefaultLocalNetConfig(configOrPort)` - Loads an Algod, Indexer or Kmd config against [LocalNet](https://github.com/algorandfoundation/algokit-cli/blob/main/docs/features/localnet) using the default configuration
## Clients
### Creating an SDK client instance
Once you have the configuration for a client, to get a new client you can use the following functions:
* `ClientManager.getAlgoClient(config)` - Returns an Algod client for the given configuration; the client automatically retries on transient HTTP errors
* `ClientManager.getIndexerClient(config, overrideIntDecoding)` - Returns an Indexer client for given configuration
* `ClientManager.getKmdClient(config)` - Returns a Kmd client for the given configuration
You can also shortcut needing to write the likes of `ClientManager.getAlgoClient(ClientManager.getAlgodConfigFromEnvironment())` with environment shortcut methods:
* `ClientManager.getAlgodClientFromEnvironment(config)` - Returns an Algod client by loading the config from environment variables
* `ClientManager.getIndexerClientFromEnvironment(config)` - Returns an indexer client by loading the config from environment variables
* `ClientManager.getKmdClientFromEnvironment(config)` - Returns a kmd client by loading the config from environment variables
### Accessing SDK clients via ClientManager instance
Once you have a `ClientManager` instance, you can access the SDK clients for the various Algorand APIs from it (expressed here as `algorand.client` to denote the syntax via an [`AlgorandClient`](./algorand-client)):
```typescript
const algorand = AlgorandClient.defaultLocalNet();
const algodClient = algorand.client.algod;
const indexerClient = algorand.client.indexer;
const kmdClient = algorand.client.kmd;
```
If the method to create the `ClientManager` doesn’t configure indexer or kmd, then accessing those clients will trigger an error to be thrown:
```typescript
const algorand = AlgorandClient.fromClients({ algod });
const algodClient = algorand.client.algod; // OK
algorand.client.indexer; // Throws error
algorand.client.kmd; // Throws error
```
### Creating an app client instance
See [how to create app clients via ClientManager via AlgorandClient](./app-client#via-algorandclient).
### Creating a TestNet dispenser API client instance
You can also create a [TestNet dispenser API client instance](./dispenser-client#creating-a-dispenser-client) from `ClientManager` too.
## Automatic retry
When receiving an Algod or Indexer client from AlgoKit Utils, it will be a special wrapper client that handles retrying transient failures. This is done via the `AlgoHttpClientWithRetry` class.
## Network information
To get information about the current network you are connected to, you can use the `network()` method on `ClientManager` or the `is{Network}()` methods (which in turn call `network()`) as shown below (expressed here as `algorand.client` to denote the syntax via an [`AlgorandClient`](./algorand-client)):
```typescript
const algorand = AlgorandClient.defaultLocalNet();
const { isTestNet, isMainNet, isLocalNet, genesisId, genesisHash } =
await algorand.client.network();
const testNet = await algorand.client.isTestNet();
const mainNet = await algorand.client.isMainNet();
const localNet = await algorand.client.isLocalNet();
```
The first time `network()` is called it will make a HTTP call to algod to get the network parameters, but from then on it will be cached within that `ClientManager` instance for subsequent calls.
# Debugger
The AlgoKit TypeScript Utilities package provides a set of debugging tools that can be used to simulate and trace transactions on the Algorand blockchain. These tools and methods are optimized for developers who are building applications on Algorand and need to test and debug their smart contracts via [AlgoKit AVM Debugger extension](https://github.com/algorandfoundation/algokit-avm-vscode-debugger).
## Configuration
The `config.ts` file contains the `UpdatableConfig` class which manages and updates configuration settings for the AlgoKit project.
To enable debug mode in your project you can configure it as follows:
```ts
import { Config } from '@algorandfoundation/algokit-utils';
Config.configure({
debug: true,
});
```
## Debugging in `node` environment (recommended)
Refer to the [algokit-utils-ts-debug](https://github.com/algorandfoundation/algokit-utils-ts-debug) for more details on how to activate the addon package with `algokit-utils` in your project.
> Note: Config also contains a set of flags that affect behaviour of [algokit-utils-ts-debug](https://github.com/algorandfoundation/algokit-utils-ts-debug). Those include `projectRoot`, `traceAll`, `traceBufferSizeMb`, and `maxSearchDepth`. Refer to addon package documentation for details.
### Why are the debug utilities in a separate package?
To keep the `algokit-utils-ts` package lean and isomporphic, the debugging utilities are located in a separate package. This eliminates various error cases with bundlers (e.g. `webpack`, `esbuild`) when building for the browser.
## Debugging in `browser` environment
Note: `algokit-utils-ts-debug` cannot be used in browser environments. However, you can still obtain and persist simulation traces from the browser’s `Console` tab when submitting transactions using the algokit-utils-ts package. To enable this functionality, activate debug mode in the algokit-utils-ts config as described in the [getting started](./docs/code/getting-started) guide.
### Subscribe to the `simulate` response event
After setting the `debug` flag to true in the [configuration](#configuration) section, subscribe to the `TxnGroupSimulated` event as follows:
```ts
import { AVMTracesEventData, Config, EventType } from '@algorandfoundation/algokit-utils';
Config.events.on(EventType.TxnGroupSimulated, (eventData: AVMTracesEventData) => {
Config.logger.info(JSON.stringify(eventData.simulateResponse.get_obj_for_encoding(), null, 2));
});
```
This will output any simulation traces that have been emitted whilst calling your app. Place this code immediately after the `Config.configure` call to ensure it executes before any transactions are submitted for simulation.
### Save simulation trace responses from the browser
With the event handler configured, follow these steps to save simulation trace responses:
1. Open your browser’s `Console` tab
2. Submit the transaction
3. Copy the simulation request `JSON` and save it to a file with the extension `.trace.avm.json`
4. Place the file in the `debug_traces` folder of your AlgoKit contract project
* Note: If you’re not using an AlgoKit project structure, the extension will present a file picker as long as the trace file is within your VSCode workspace
# TestNet Dispenser Client
The TestNet Dispenser Client is a utility for interacting with the AlgoKit TestNet Dispenser API. It provides methods to fund an account, register a refund for a transaction, and get the current limit for an account.
## Creating a Dispenser Client
To create a Dispenser Client, you need to provide an authorization token. This can be done in two ways:
1. Pass the token directly to the client constructor as `authToken`.
2. Set the token as an environment variable `ALGOKIT_DISPENSER_ACCESS_TOKEN` (see [docs](https://github.com/algorandfoundation/algokit/blob/main/docs/testnet_api#error-handling) on how to obtain the token).
If both methods are used, the constructor argument takes precedence.
The recommended way to get a TestNet dispenser API client is [via `ClientManager`](./client):
```typescript
// With auth token
const dispenserClient = algorand.client.getTestNetDispenser({
authToken: 'your_auth_token',
});
// With auth token and timeout
const dispenserClient = algorand.client.getTestNetDispenser({
authToken: 'your_auth_token',
requestTimeout: 2 /* seconds */,
});
// From environment variables
// i.e. process.env['ALGOKIT_DISPENSER_ACCESS_TOKEN'] = 'your_auth_token'
const dispenserClient = algorand.client.getTestNetDispenserFromEnvironment();
// From environment variables with request timeout
const dispenserClient = algorand.client.getTestNetDispenserFromEnvironment({
requestTimeout: 2 /* seconds */,
});
```
Alternatively, you can construct it directly.
```ts
import { TestNetDispenserApiClient } from '@algorandfoundation/algokit-utils/types/dispenser-client';
// Using constructor argument
const client = new TestNetDispenserApiClient({ authToken: 'your_auth_token' });
const clientFromAlgorandClient = algorand.client.getTestNetDispenser({
authToken: 'your_auth_token',
});
// Using environment variable
process.env['ALGOKIT_DISPENSER_ACCESS_TOKEN'] = 'your_auth_token';
const client = new TestNetDispenserApiClient();
const clientFromAlgorandClient = algorand.client.getTestNetDispenserFromEnvironment();
```
## Funding an Account
To fund an account with Algo from the dispenser API, use the `fund` method. This method requires the receiver’s address, the amount to be funded, and the asset ID.
```ts
const response = await client.fund('receiver_address', 1000);
```
The `fund` method returns a `DispenserFundResponse` object, which contains the transaction ID (`txId`) and the amount funded.
## Registering a Refund
To register a refund for a transaction with the dispenser API, use the `refund` method. This method requires the transaction ID of the refund transaction.
```ts
await client.refund('transaction_id');
```
> Keep in mind, to perform a refund you need to perform a payment transaction yourself first by sending funds back to TestNet Dispenser, then you can invoke this refund endpoint and pass the txn\_id of your refund txn. You can obtain dispenser address by inspecting the sender field of any issued fund transaction initiated via [fund](#funding-an-account).
## Getting Current Limit
To get the current limit for an account with Algo from the dispenser API, use the `getLimit` method. This method requires the account address.
```ts
const response = await client.getLimit();
```
The `limit` method returns a `DispenserLimitResponse` object, which contains the current limit amount.
## Error Handling
If an error occurs while making a request to the dispenser API, an exception will be raised with a message indicating the type of error. Refer to [Error Handling docs](https://github.com/algorandfoundation/algokit/blob/main/docs/testnet_api#error-handling) for details on how you can handle each individual error `code`.
# Event Emitter
The Event Emitter is a capability provided by AlgoKit Utils that allows for asynchronous event handling of lifecycle events. It provides a flexible mechanism for emitting and listening to custom events, which can be particularly useful for debugging and extending functionality not available in the `algokit-utils-ts` package.
## `AsyncEventEmitter`
The `AsyncEventEmitter` is a class that manages asynchronous event emission and subscription.
To use the `AsyncEventEmitter`, you can import it directly:
```typescript
import { AsyncEventEmitter } from '@algorandfoundation/algokit-utils/types/async-event-emitter';
const emitter = new AsyncEventEmitter();
```
## Event Types
The `EventType` enum defines the built-in event types:
```typescript
enum EventType {
TxnGroupSimulated = 'TxnGroupSimulated',
AppCompiled = 'AppCompiled',
}
```
## Emitting Events
To emit an event, use the `emitAsync` method:
```typescript
await emitter.emitAsync(EventType.AppCompiled, compilationData);
```
## Listening to Events
There are two ways to listen to events:
### Using `on`
The `on` method adds a listener that will be called every time the specified event is emitted:
```typescript
emitter.on(EventType.AppCompiled, async data => {
console.log('App compiled:', data);
});
```
### Using `once`
The `once` method adds a listener that will be called only once for the specified event:
```typescript
emitter.once(EventType.TxnGroupSimulated, async data => {
console.log('Transaction group simulated:', data);
});
```
## Removing Listeners
To remove a listener, use the `removeListener` or `off` method:
```typescript
const listener = async data => {
console.log('Event received:', data);
};
emitter.on(EventType.AppCompiled, listener);
// Later, when you want to remove the listener:
emitter.removeListener(EventType.AppCompiled, listener);
// or
emitter.off(EventType.AppCompiled, listener);
```
## Custom Events
While the current implementation primarily focuses on debugging events, the `AsyncEventEmitter` is designed to be extensible. You can emit and listen to custom events by using string keys:
```typescript
emitter.on('customEvent', async data => {
console.log('Custom event received:', data);
});
await emitter.emitAsync('customEvent', { foo: 'bar' });
```
## Integration with `algokit-utils-ts-debug`
The events emitted by `AsyncEventEmitter` are particularly useful when used in conjunction with the `algokit-utils-ts-debug` package. This package listens for these events and persists relevant debugging information to the user’s AlgoKit project filesystem, facilitating integration with the AVM debugger extension.
## Extending Functionality
The `AsyncEventEmitter` can serve as a foundation for building custom AlgoKit Utils extensions. By listening to the activity events emitted by the utils-ts package, you can create additional functionality tailored to your specific needs.
If you have suggestions for new event types or additional functionality, please open a PR or submit an issue on the AlgoKit Utils GitHub repository.
# Indexer lookups / searching
Indexer lookups / searching is a higher-order use case capability provided by AlgoKit Utils that builds on top of the core capabilities. It provides type-safe indexer API wrappers (no more `Record` pain), including automatic pagination control.
To see some usage examples check out the [automated tests](../../src/indexer-lookup.spec.ts).
To import the indexer functions you can:
```typescript
import { indexer } from '@algorandfoundation/algokit-utils';
```
All of the indexer functions require you to pass in an indexer SDK client, which you can get from [`AlgorandClient`](./algorand-client) via `algorand.client.indexer`. These calls are not made more easy to call by exposing via `AlgorandClient` and thus not requiring the indexer SDK client to be passed in. This is because we want to add a tiny bit of friction to using indexer, given it’s an expensive API to run for node providers, the data from it can sometimes be slow and stale, and there are alternatives [that](https://github.com/algorandfoundation/algokit-subscriber-ts) [allow](https://github.com/algorand/conduit) individual projects to index subsets of chain data specific to them as a preferred option. In saying that, it’s a very useful API for doing ad hoc data retrieval, writing automated tests, and many other uses.
## Indexer wrapper functions
There is a subset of [indexer API calls](https://dev.algorand.co/reference/rest-apis/indexer) that are exposed as easy to use methods with correct typing exposed and automatic pagination for multi item returns.
* `indexer.lookupTransactionById(transactionId, algorand.client.indexer)` - Finds a transaction by ID
* `indexer.lookupAccountByAddress(accountAddress, algorand.client.indexer)` - Finds an account by address
* `indexer.lookupAccountCreatedApplicationByAddress(algorand.client.indexer, address, getAll?, paginationLimit?)` - Finds all applications created for an account
* `indexer.lookupAssetHoldings(algorand.client.indexer, assetId, options?, paginationLimit?)` - Finds all asset holdings for the given asset
* `indexer.searchTransactions(algorand.client.indexer, searchCriteria, paginationLimit?)` - Search for transactions with a given set of criteria
* `indexer.executePaginatedRequest(extractItems, buildRequest)` - Execute the given indexer request with automatic pagination
### Search transactions example
To use the `indexer.searchTransaction` method, you can follow this example as a starting point:
```typescript
const transactions = await indexer.searchTransactions(algorand.client.indexer, s =>
s.txType('pay').addressRole('sender').address(myAddress),
);
```
### Automatic pagination example
To use the `indexer.executePaginatedRequest` method, you can follow this example as a starting point:
```typescript
const transactions = await executePaginatedRequest(
(response: TransactionSearchResults) => {
return response.transactions;
},
nextToken => {
let s = algorand.client.indexer
.searchForTransactions()
.txType('pay')
.address(myAddress)
.limit(1000);
if (nextToken) {
s = s.nextToken(nextToken);
}
return s;
},
);
```
It takes the first lambda to translate the raw response into the array that should keep getting appended as the pagination is followed and the second lambda constructs the request (without the `.do()` call), including populating the pagination token.
## Indexer API response types
The response model type definitions for the majority of [indexer API](https://dev.algorand.co/reference/rest-apis/indexer) are exposed from the `types/indexer` namespace in AlgoKit Utils. This is so that you can have a much better experience than the default response type of `Record` from the indexer client in `algosdk`. If there is a type you want to use that is missing feel free to [submit a pull request](https://github.com/algorandfoundation/algokit-utils-ts/pulls) to [add the type(s)](https://github.com/algorandfoundation/algokit-utils-ts/blob/main/src/types/indexer.ts).
To access these types you can import them:
```typescript
import { /* ... */ } '@algorandfoundation/algokit-utils/types/indexer'
```
As a general convention, the response types are named `{TypeName}Result` for a single item result and `{TypeName}Results` for a multiple item result where `{TypeName}` is:
* `{Entity}Lookup` for an API call response that returns a lookup for a single entity e.g. `AssetLookupResult`
* `{Entity}Search` for an API call response that searches for a type of entity e.g. `TransactionSearchResults`
* The `UpperCamelCase` name of a given model type as specified in the [official documentation](https://dev.algorand.co/reference/rest-apis/indexer) for any sub-types within a response e.g. `ApplicationResult`
The reason `Result/Results` is suffixed to the type is to avoid type name clashes for commonly used types from `algosdk` like `Transaction`.
To use these types with an indexer call you simply need to find the right result type and cast the response from `.do()` for the call in question, e.g.:
```typescript
import { TransactionLookupResult } from '@algorandfoundation/algokit-utils/types/indexer'
...
const transaction = (await algorand.client.indexer.lookupTransactionByID(transactionId).do()) as TransactionLookupResult
```
# AlgoKit TypeScript Utilities
A set of core Algorand utilities written in TypeScript and released via npm that make it easier to build, test and deploy solutions on the Algorand Blockchain, including APIs, console apps and dApps. This project is part of [AlgoKit](https://github.com/algorandfoundation/algokit-cli).
The goal of this library is to provide intuitive, productive utility functions that make it easier, quicker and safer to build applications on Algorand. Largely these functions provide a thin wrapper over the underlying Algorand SDK, but provide a higher level interface with sensible defaults and capabilities for common tasks that make development faster and easier.
Note: If you prefer Python there’s an equivalent [Python utility library](https://github.com/algorandfoundation/algokit-utils-py).
[Core principles](#core-principles) | [Installation](#installation) | [Usage](#usage) | [Config and logging](#config-and-logging) | [Capabilities](#capabilities) | [Reference docs](#reference-documentation)
# Core principles
This library is designed with the following principles:
* **Modularity** - This library is a thin wrapper of modular building blocks over the Algorand SDK; the primitives from the underlying Algorand SDK are exposed and used wherever possible so you can opt-in to which parts of this library you want to use without having to use an all or nothing approach.
* **Type-safety** - This library provides strong TypeScript support with effort put into creating types that provide good type safety and intellisense.
* **Productivity** - This library is built to make solution developers highly productive; it has a number of mechanisms to make common code easier and terser to write
# Installation
Before installing, you’ll need to decide on the version you want to target. Version 7 and 8 have the same feature set, however v7 leverages algosdk@>=2.9.0<3.0, whereas v8 leverages algosdk@>=3.0.0. Your project and it’s dependencies will help you decide which version to target.
Once you’ve decided on the target version, this library can be installed from NPM using your favourite npm client, e.g.:
To target algosdk\@2 and use version 7 of AlgoKit Utils, run the below:
```plaintext
npm install algosdk@^2.9.0 @algorandfoundation/algokit-utils@^7.0.0
```
To target algosdk\@3 and use the latest version of AlgoKit Utils, run the below:
```plaintext
npm install algosdk@^3.0.0 @algorandfoundation/algokit-utils
```
## Peer Dependencies
This library uses `algosdk` as a peer dependency. Please see above to ensure you have the correct version installed in your project.
# Usage
To use this library simply include the following at the top of your file:
```typescript
import { AlgorandClient, Config } from '@algorandfoundation/algokit-utils';
```
As well as `AlgorandClient` and `Config`, you can use intellisense to auto-complete the various types that you can import within the `{}` in your favourite Integrated Development Environment (IDE), or you can refer to the [reference documentation](./code/modules/index).
> \[!WARNING] Previous versions of AlgoKit Utils encouraged you to include an import that looks like this (note the subtle difference of the extra `* as algokit`):
>
> ```typescript
> import * as algokit from '@algorandfoundation/algokit-utils';
> ```
>
> This version will still work until at least v9, but it exposes an older, function-based interface to the functionality that is deprecated. The new way to use AlgoKit Utils is via the `AlgorandClient` class, which is easier, simpler and more convenient to use and has powerful new features.
>
> If you are migrating from the old functions to the new ones then you can follow the [migration guide](v7-migration).
The main entrypoint to the bulk of the functionality is the `AlgorandClient` class, most of the time you can get started by typing `AlgorandClient.` and choosing one of the static initialisation methods to create an [Algorand client](/algokit/utils/typescript/algorand-client), e.g.:
```typescript
// Point to the network configured through environment variables or
// if no environment variables it will point to the default LocalNet
// configuration
const algorand = AlgorandClient.fromEnvironment();
// Point to default LocalNet configuration
const algorand = AlgorandClient.defaultLocalNet();
// Point to TestNet using AlgoNode free tier
const algorand = AlgorandClient.testNet();
// Point to MainNet using AlgoNode free tier
const algorand = AlgorandClient.mainNet();
// Point to a pre-created algod client
const algorand = AlgorandClient.fromClients({ algod });
// Point to pre-created algod, indexer and kmd clients
const algorand = AlgorandClient.fromClients({ algod, indexer, kmd });
// Point to custom configuration for algod
const algorand = AlgorandClient.fromConfig({ algodConfig });
// Point to custom configuration for algod, indexer and kmd
const algorand = AlgorandClient.fromConfig({ algodConfig, indexerConfig, kmdConfig });
```
## Testing
AlgoKit Utils contains a module that helps you write automated tests against an Algorand network (usually LocalNet). These tests can run locally on a developer’s machine, or on a Continuous Integration server.
To use the automated testing functionality, you can import the testing module:
```typescript
import * as algotesting from '@algorandfoundation/algokit-utils/testing';
```
Or, you can generally get away with just importing the `algorandFixture` since it exposes the rest of the functionality in a manner that is easy to integrate with an underlying test framework like Jest or vitest:
```typescript
import { algorandFixture } from '@algorandfoundation/algokit-utils/testing';
```
To see how to use it consult the [testing capability page](/algokit/utils/typescript/testing) or to see what’s available look at the [reference documentation](./code/modules/testing).
## Types
If you want to extend or pass around any of the types the various functions take then they are all defined in isolated modules under the `types` namespace. This is to provide a better intellisense experience without overwhelming you with hundreds of types. If you determine a type to import then you can import it like so:
```typescript
import {} from '@algorandfoundation/types/'
```
Where `` would be replaced with the type and `` would be replaced with the module. You can use intellisense to discover the modules and types in your favourite IDE, or you can explore the [types modules in the reference documentation](./code/README#modules).
# Config and logging
To configure the AlgoKit Utils library you can make use of the `Config` object, which has a `configure` method that lets you configure some or all of the configuration options.
## Logging
AlgoKit has an in-built logging abstraction that allows the library to issue log messages without coupling the library to a particular logging library. This means you can access the AlgoKit Utils logs within your existing logging library if you have one.
To do this you need to create a logging translator that exposes the following interface ([`Logger`](./code/modules/types_logging#logger)):
```typescript
export type Logger = {
error(message: string, ...optionalParams: unknown[]): void;
warn(message: string, ...optionalParams: unknown[]): void;
info(message: string, ...optionalParams: unknown[]): void;
verbose(message: string, ...optionalParams: unknown[]): void;
debug(message: string, ...optionalParams: unknown[]): void;
};
```
Note: this interface type is directly compatible with [Winston](https://github.com/winstonjs/winston) so you should be able to pass AlgoKit a Winston logger.
By default, the [`consoleLogger`](./code/modules/types_logging#consolelogger) is set as the logger, which will send log messages to the various `console.*` methods for all logs apart from verbose logs. There is also a [`nullLogger`](./code/modules/types_logging#nulllogger) if you want to disable logging, or various leveled console loggers: [`verboseConsoleLogger`](./code/modules/types_logging#verboseconsolelogger) (also outputs verbose logs), [`infoConsoleLogger`](./code/modules/types_logging#infoconsolelogger) (only outputs info, warning and error logs), [`warningConsoleLogger`](./code/modules/types_logging#warningconsolelogger) (only outputs warning and error logs).
If you want to override the logger you can use the following:
```typescript
Config.configure({ logger: myLogger });
```
To retrieve the current debug state you can use [`Config.logger`](./code/interfaces/types_config.Config). To get a logger that is optionally set to the null logger based on a boolean flag you can use the [`Config.getLogger(useNullLogger)`](./code/classes/types_config.UpdatableConfig#getlogger) function.
## Debug mode
To turn on debug mode you can use the following:
```typescript
Config.configure({ debug: true });
```
To retrieve the current debug state you can use [`Config.debug`](./code/interfaces/types_config.Config).
This will turn on things like automatic tracing, more verbose logging and [advanced debugging](/algokit/utils/typescript/debugging). It’s likely this option will result in extra HTTP calls to algod so worth being careful when it’s turned on.
If you want to temporarily turn it on you can use the [`withDebug`](./code/classes/types_config.UpdatableConfig#withdebug) function:
```typescript
Config.withDebug(() => {
// Do stuff with Config.debug set to true
});
```
# Capabilities
The library helps you interact with and develop against the Algorand blockchain with a series of end-to-end capabilities as described below:
* [**AlgorandClient**](/algokit/utils/typescript/algorand-client) - The key entrypoint to the AlgoKit Utils functionality
* **Core capabilities**
* [**Client management**](/algokit/utils/typescript/client) - Creation of (auto-retry) algod, indexer and kmd clients against various networks resolved from environment or specified configuration, and creation of other API clients (e.g. TestNet Dispenser API and app clients)
* [**Account management**](/algokit/utils/typescript/account) - Creation, use, and management of accounts including mnemonic, rekeyed, multisig, transaction signer ([useWallet](https://github.com/TxnLab/use-wallet) for dApps and Atomic Transaction Composer compatible signers), idempotent KMD accounts and environment variable injected
* [**Algo amount handling**](/algokit/utils/typescript/amount) - Reliable, explicit, and terse specification of microAlgo and Algo amounts and safe conversion between them
* [**Transaction management**](/algokit/utils/typescript/transaction) - Ability to construct, simulate and send transactions with consistent and highly configurable semantics, including configurable control of transaction notes, logging, fees, validity, signing, and sending behaviour
* **Higher-order use cases**
* [**Asset management**](/algokit/utils/typescript/asset) - Creation, transfer, destroying, opting in and out and managing Algorand Standard Assets
* [**Typed application clients**](/algokit/utils/typescript/typed-app-clients) - Type-safe application clients that are [generated](https://github.com/algorandfoundation/algokit-cli/blob/main/docs/features/generate#1-typed-clients) from ARC-56 or ARC-32 application spec files and allow you to intuitively and productively interact with a deployed app, which is the recommended way of interacting with apps and builds on top of the following capabilities:
* [**ARC-56 / ARC-32 App client and App factory**](/algokit/utils/typescript/app-client) - Builds on top of the App management and App deployment capabilities (below) to provide a high productivity application client that works with ARC-56 and ARC-32 application spec defined smart contracts
* [**App management**](/algokit/utils/typescript/app) - Creation, updating, deleting, calling (ABI and otherwise) smart contract apps and the metadata associated with them (including state and boxes)
* [**App deployment**](/algokit/utils/typescript/app-deploy) - Idempotent (safely retryable) deployment of an app, including deploy-time immutability and permanence control and TEAL template substitution
* [**Algo transfers (payments)**](/algokit/utils/typescript/transfer) - Ability to easily initiate Algo transfers between accounts, including dispenser management and idempotent account funding
* [**Automated testing**](/algokit/utils/typescript/testing) - Terse, robust automated testing primitives that work across any testing framework (including jest and vitest) to facilitate fixture management, quickly generating isolated and funded test accounts, transaction logging, indexer wait management and log capture
* [**Indexer lookups / searching**](/algokit/utils/typescript/indexer) - Type-safe indexer API wrappers (no `Record` pain from the SDK client), including automatic pagination control
# Reference documentation
We have [auto-generated reference documentation for the code](./code/README).
# Automated testing
Automated testing is a higher-order use case capability provided by AlgoKit Utils that builds on top of the core capabilities. It allows you to use terse, robust automated testing primitives that work across any testing framework (including jest and vitest) to facilitate fixture management, quickly generating isolated and funded test accounts, transaction logging, indexer wait management and log capture.
To see some usage examples check out the all of the [automated tests](../../src/) and the various \*.spec.ts files (AlgoKit Utils [dogfoods](https://en.wikipedia.org/wiki/Eating_your_own_dog_food) it’s own testing library). Alternatively, you can see an example of using this library to test a smart contract with [the tests](https://github.com/algorandfoundation/nft_voting_tool/blob/main/src/algorand/smart_contracts/tests/voting.spec.ts) for the [on-chain voting tool](https://github.com/algorandfoundation/nft_voting_tool#readme).
## Module import
The testing capability is not exposed from the root algokit module so there is a clear separation between testing functionality and non-testing functionality.
To access all of the functionality in the testing capability individually, you can import the testing module:
```typescript
import * as algotesting from '@algorandfoundation/algokit-utils/testing';
```
## Algorand fixture
In general, the only entrypoint you will need to use the testing capability is just by importing the `algorandFixture` since it exposes the rest of the functionality in a manner that is easy to integrate with an underlying test framework like Jest or vitest:
```typescript
import { algorandFixture } from '@algorandfoundation/algokit-utils/testing';
```
### Using with Jest
To integrate with [Jest](https://jestjs.io/) you need to pass the `fixture.newScope` method into Jest’s `beforeEach` method (for per test isolation) or `beforeAll` method (for test suite isolation) and then within each test you can access `fixture.context` to access the isolated fixture values.
#### Per-test isolation
```typescript
import { describe, test, beforeEach } from '@jest/globals';
import { algorandFixture } from './testing';
describe('MY MODULE', () => {
const fixture = algorandFixture();
beforeEach(fixture.newScope, 10_000); // Add a 10s timeout to cater for occasionally slow LocalNet calls
test('MY TEST', async () => {
const { algorand, testAccount /* ... */ } = fixture.context;
// Test stuff!
});
});
```
Occasionally there may be a delay when first running the fixture setup so we add a 10s timeout to avoid intermittent test failures (`10_000`).
#### Test suite isolation
```typescript
import { describe, test, beforeAll } from '@jest/globals';
import { algorandFixture } from './testing';
describe('MY MODULE', () => {
const fixture = algorandFixture();
beforeAll(fixture.newScope, 10_000); // Add a 10s timeout to cater for occasionally slow LocalNet calls
test('MY TEST', async () => {
const { algorand, testAccount /* ... */ } = fixture.context;
// Test stuff!
});
});
```
Occasionally there may be a delay when first running the fixture setup so we add a 10s timeout to avoid intermittent test failures (`10_000`).
### Using with vitest
To integrate with [vitest](https://vitest.dev/) you need to pass the `fixture.beforeEach` method into vitest’s `beforeEach` method (for per test isolation) or `beforeAll` method (for test suite isolation) and then within each test you can access `fixture.context` to access the isolated fixture values.
#### Per-test isolation
```typescript
import { describe, test, beforeEach } from 'vitest';
import { algorandFixture } from './testing';
describe('MY MODULE', () => {
const fixture = algorandFixture();
beforeEach(fixture.newScope, 10_000); // Add a 10s timeout to cater for occasionally slow LocalNet calls
test('MY TEST', async () => {
const { algorand, testAccount /* ... */ } = fixture.context;
// Test stuff!
});
});
```
Occasionally there may be a delay when first running the fixture setup so we add a 10s timeout to avoid intermittent test failures (`10_000`).
#### Test suite isolation
```typescript
import { describe, test, beforeAll } from 'vitest';
import { algorandFixture } from './testing';
describe('MY MODULE', () => {
const fixture = algorandFixture();
beforeAll(fixture.newScope, 10_000); // Add a 10s timeout to cater for occasionally slow LocalNet calls
test('MY TEST', async () => {
const { algorand, testAccount /* ... */ } = fixture.context;
// Test stuff!
});
});
```
Occasionally there may be a delay when first running the fixture setup so we add a 10s timeout to avoid intermittent test failures (`10_000`).
### Fixture configuration
When calling `algorandFixture()` you can optionally pass in some fixture configuration, with any of these properties (all optional):
* `algod?: Algodv2` - An optional algod client, if not specified then it will create one against environment variables defined network (if present) or default LocalNet
* `indexer?: Indexer` - An optional indexer client, if not specified then it will create one against environment variables defined network (if present) or default LocalNet
* `kmd?: Kmd` - An optional kmd client, if not specified then it will create one against environment variables defined network (if present) or default LocalNet
* `testAccountFunding?: AlgoAmount` - The [amount](./amount) of funds to allocate to the default testing account, if not specified then it will get `10` ALGO
* `accountGetter?: (algod: Algodv2, kmd?: Kmd) => Promise` - Optional override for how to get an account; this allows you to retrieve test accounts from a known or cached list of accounts.
### Using the fixture context
The `fixture.context` property is of type `AlgorandTestAutomationContext` exposes the following properties from which you can pick which ones you want in a given test using an object [destructuring assignment](https://developer.mozilla.org/en-US/docs/Web/JavaScript/Reference/Operators/Destructuring_assignment):
* `algorand: AlgorandClient` - An [`AlgorandClient`](./algorand-client) instance
* `algod: Algodv2` - Proxy Algod client instance that will log sent transactions in `transactionLogger`
* `indexer: Indexer` - Indexer client instance
* `kmd: Kmd` - KMD client instance
* `transactionLogger: TransactionLogger` - Transaction logger that will log transaction IDs for all transactions issued by `algod`
* `testAccount: Account` - Funded test account that is ephemerally created for each test
* `generateAccount: (params: GetTestAccountParams) => Promise` - Generate and fund an additional ephemerally created account
* `waitForIndexer()` - Waits for indexer to catch up with the latest transaction that has been captured by the `transactionLogger` in the Algorand fixture
* `waitForIndexerTransaction: (transactionId: string) => Promise` - Wait for the indexer to catch up with the given transaction ID
## Log capture fixture
If you want to capture log messages from AlgoKit that are issued within your test so that you can assert on them or parse them for debugging information etc. then you can use the log capture fixture.
```typescript
import { algoKitLogCaptureFixture } from '@algorandfoundation/algokit-utils/testing';
```
The log capture fixture works by setting the logger within the AlgoKit configuration to be a `TestLogger` during the test run.
### Using with Jest
To integrate with [Jest](https://jestjs.io/) you need to pass the `fixture.beforeEach` method into Jest’s `beforeEach` method and then within each test you can access `fixture.context` to access per-test isolated fixture values.
```typescript
import { describe, test, beforeEach, afterEach } from '@jest/globals';
import { algoKitLogCaptureFixture } from './testing';
describe('MY MODULE', () => {
const logs = algoKitLogCaptureFixture();
beforeEach(logs.beforeEach);
afterEach(logs.afterEach);
test('MY TEST', async () => {
const { algorand, testAccount } = fixture.context;
// Test stuff!
const capturedLogs = logs.testLogger.capturedLogs;
// do stuff with the logs
});
});
```
### Using with vitest
To integrate with [vitest](https://vitest.dev/) you need to pass the `fixture.beforeEach` method into vitest’s `beforeEach` method and then within each test you can access `fixture.context` to access per-test isolated fixture values.
```typescript
import { describe, test, beforeEach, afterEach } from 'vitest';
import { algoKitLogCaptureFixture } from './testing';
describe('MY MODULE', () => {
const logs = algoKitLogCaptureFixture();
beforeEach(logs.beforeEach);
afterEach(logs.afterEach);
test('MY TEST', async () => {
const { algorand, testAccount } = fixture.context;
// Test stuff!
const capturedLogs = logs.testLogger.capturedLogs;
// do stuff with the logs
});
});
```
### Snapshot testing the logs
If you want to quickly pin some behaviour of what logic you have does in terms of invoking AlgoKit methods you can do a [snapshot test](https://jestjs.io/docs/snapshot-testing) / [approval test](https://approvaltests.com/) of the captured log output. The only problem is this output will contain identifiers that will change for every test run and thus will constantly break the snapshot. In order to work around this you can use the `getLogSnapshot` method on the `TestLogger`, which will replace those changing values with predictable strings to keep the snapshot integrity intact.
This might look something like this:
```typescript
const { algorand, testAccount } = fixture.context;
const result = await algorand.client
.getTypedClientById(HelloWorldContractClient, { id: 0 })
.deploy();
expect(
logging.testLogger.getLogSnapshot({
accounts: [testAccount],
transactions: [result.transaction],
apps: [result.appId],
}),
).toMatchSnapshot();
```
## Waiting for indexer
Often there will be things that you do in your test that you may want to assert in using data that is exclusively in indexer such as transaction notes. The problem is indexer asynchronously indexes the data in algod, even when devmode is turned on and algod instantly confirms transactions.
This means it’s easy to create tests that are flaky and have intermittent test failures (sometimes indexer is up to date and other times it hasn’t caught up yet).
The testing capability provides mechanisms for waiting for indexer to catch up, namely:
* `algotesting.runWhenIndexerCaughtUp(run: () => Promise)` - Executes the given action every 200ms up to 20 times until there is no longer an error with a `status` property with `404` and then returns the result of the action; this will work for any call that calls indexer APIs expecting to return a single record
* `algorandFixture.waitForIndexer()` - Waits for indexer to catch up with the latest transaction that has been captured by the `transactionLogger` in the Algorand fixture
* `algorandFixture.waitForIndexerTransaction(transactionId)` - Waits for indexer to catch up with the single transaction of the given ID
## Logging transactions
When testing, it can be useful to capture all of the transactions that have been issued with a given test run. They can then be asserted on, or used for [waiting for indexer](#waiting-for-indexer), etc.
The testing capability provides the ability to capture transactions via the `TransactionLogger` class.
The `TransactionLogger` has the following methods:
* `logRawTransaction(signedTransactions: Uint8Array | Uint8Array[])` - Logs the IDs of the given signed transaction(s)
* `capture(algod)` - Returns a proxy `algosdk.Algodv2` instance that wraps the given `algod` client that will call `logRawTransaction` for every call to `sendRawTransaction` on that algod instance
* `sentTransactionIds` - Returns the currently captured list of transaction IDs that have been logged
* `clear()` - Clears the current list of transaction IDs
* `waitForIndexer(indexer)` - [Waits for the given indexer instance to catch up](#waiting-for-indexer) with the currently logged transaction IDs
The easiest way to use this functionality is via the [Algorand fixture](#algorand-fixture), which automatically provides a `transactionLogger` and a proxy `algod` connected to that `transactionLogger`.
## Getting a test account
When testing, it’s often useful to ephemerally generate random accounts, fund them with some number of Algo and then use that account to perform transactions. By creating an ephemeral, random account you naturally get isolation between tests and test runs and don’t need to start from a specific blockchain network state. This makes test less flakey, and also means the same test can be run against LocalNet and (say) TestNet.
The key when generating a test account is getting hold of a [dispenser](./transfer#dispenser) and then [ensuring the test account is funded](./transfer#ensurefunded).
To make it easier to quickly get a test account the testing capability provides the following mechanisms:
* `algotesting.getTestAccount(testAccountParams, algod, kmd?)` - Generates a random new account, logs the mnemonic of the account (unless suppressed), funds it from the [dispenser](./transfer#dispenser)
* `algorandFixture.testAccount` - A test account that is always generated for every test (log output suppressed to reduce noise, but worth noting that means the mnemonic isn’t logged for this account), by default it is given 10 Algo unless overridden in the [fixture config](#fixture-configuration)
* `algorandFixture.generateAccount(testAccountParams)` - Allows you to quickly generate a test account with the `algod` and `kmd` instances that are part of the given fixture
The parameters object that controls test account generation, `GetTestAccountParams`, has the following properties:
* `initialFunds: AlgoAmount` - Initial funds to ensure the account has
* `suppressLog?: boolean` - Whether to suppress the log (which includes a mnemonic) or not (default: do not suppress the log)
# Transaction composer
The `TransactionComposer` class allows you to easily compose one or more compliant Algorand transactions and execute and/or simulate them.
It’s the core of how the [`AlgorandClient`](./algorand-client) class composes and sends transactions.
To get an instance of `TransactionComposer` you can either get it from an [app client](./app-client), from an [`AlgorandClient`](./algorand-client), or by new-ing up via the constructor.
```typescript
const composerFromAlgorand = algorand.newGroup();
const composerFromAppClient = appClient.algorand.newGroup();
const composerFromConstructor = new TransactionComposer({
algod,
/* Return the algosdk.TransactionSigner for this address*/
getSigner: (address: string) => signer,
});
const composerFromConstructorWithOptionalParams = new TransactionComposer({
algod,
/* Return the algosdk.TransactionSigner for this address*/
getSigner: (address: string) => signer,
getSuggestedParams: () => algod.getTransactionParams().do(),
defaultValidityWindow: 1000,
appManager: new AppManager(algod),
});
```
## Constructing a transaction
To construct a transaction you need to add it to the composer, passing in the relevant params object for that transaction. Params are normal JavaScript objects and all of them extend the [common call parameters](./algorand-client#transaction-parameters).
The methods to construct a transaction are all named `add{TransactionType}` and return an instance of the composer so they can be chained together fluently to construct a transaction group.
For example:
```typescript
const myMethod = algosdk.ABIMethod.fromSignature('my_method()void');
const result = algorand
.newGroup()
.addPayment({ sender: 'SENDER', receiver: 'RECEIVER', amount: (100).microAlgo() })
.addAppCallMethodCall({
sender: 'SENDER',
appId: 123n,
method: myMethod,
args: [1, 2, 3],
});
```
## Sending a transaction
Once you have constructed all the required transactions, they can be sent by calling `send()` on the `TransactionComposer`. Additionally `send()` takes a number of parameters which allow you to opt-in to some additional behaviours as part of sending the transaction or transaction group, mostly significantly `populateAppCallResources` and `coverAppCallInnerTransactionFees`.
### Populating App Call Resource
`populateAppCallResources` automatically updates the relevant app call transactions in the group to include the account, app, asset and box resources required for the transactions to execute successfully. It leverages the simulate endpoint to discover the accessed resources, which have not been explicitly specified. This setting only applies when you have constucted at least one app call transaction. You can read more about [resources and the reference arrays](https://dev.algorand.co/concepts/smart-contracts/resource-usage/#what-are-reference-arrays) in the docs.
For example:
```typescript
const myMethod = algosdk.ABIMethod.fromSignature('my_method()void');
const result = algorand
.newGroup()
.addAppCallMethodCall({
sender: 'SENDER',
appId: 123n,
method: myMethod,
args: [1, 2, 3],
})
.send({
populateAppCallResources: true,
});
```
If `my_method` in the above example accesses any resources, they will be automatically discovered and added before sending the transaction to the network.
### Covering App Call Inner Transaction Fees
`coverAppCallInnerTransactionFees` automatically calculate the required fee for a parent app call transaction that sends inner transactions. It leverages the simulate endpoint to discover the inner transactions sent and calculates a fee delta to resolve the optimal fee. This feature also takes care of accounting for any surplus transaction fee at the various levels, so as to effectively minimise the fees needed to successfully handle complex scenarios. This setting only applies when you have constucted at least one app call transaction.
For example:
```typescript
const myMethod = algosdk.ABIMethod.fromSignature('my_method()void');
const result = algorand
.newGroup()
.addAppCallMethodCall({
sender: 'SENDER',
appId: 123n,
method: myMethod,
args: [1, 2, 3],
maxFee: microAlgo(5000), // NOTE: a maxFee value is required when enabling coverAppCallInnerTransactionFees
})
.send({
coverAppCallInnerTransactionFees: true,
});
```
Assuming the app account is not covering any of the inner transaction fees, if `my_method` in the above example sends 2 inner transactions, then the fee calculated for the parent transaction will be 3000 µALGO when the transaction is sent to the network.
The above example also has a `maxFee` of 5000 µALGO specified. An exception will be thrown if the transaction fee execeeds that value, which allows you to set fee limits. The `maxFee` field is required when enabling `coverAppCallInnerTransactionFees`.
Because `maxFee` is required and an `algosdk.Transaction` does not hold any max fee information, you cannot use the generic `addTransaction()` method on the composer with `coverAppCallInnerTransactionFees` enabled. Instead use the below, which provides a better overall experience:
```typescript
const myMethod = algosdk.ABIMethod.fromSignature('my_method()void')
// Does not work
const result = algorand
.newGroup()
.addTransaction((await localnet.algorand.createTransaction.appCallMethodCall({
sender: 'SENDER',
appId: 123n,
method: myMethod,
args: [1, 2, 3],
maxFee: microAlgo(5000), // This is only used to create the algosdk.Transaction object and isn't made available to the composer.
})).transactions[0]),
.send({
coverAppCallInnerTransactionFees: true,
})
// Works as expected
const result = algorand
.newGroup()
.addAppCallMethodCall({
sender: 'SENDER',
appId: 123n,
method: myMethod,
args: [1, 2, 3],
maxFee: microAlgo(5000),
})
.send({
coverAppCallInnerTransactionFees: true,
})
```
A more complex valid scenario which leverages an app client to send an ABI method call with ABI method call transactions argument is below:
```typescript
const appFactory = algorand.client.getAppFactory({
appSpec: 'APP_SPEC',
defaultSender: sender.addr,
});
const { appClient: appClient1 } = await appFactory.send.bare.create();
const { appClient: appClient2 } = await appFactory.send.bare.create();
const paymentArg = algorand.createTransaction.payment({
sender: sender.addr,
receiver: receiver.addr,
amount: microAlgo(1),
});
// Note the use of .params. here, this ensure that maxFee is still available to the composer
const appCallArg = await appClient2.params.call({
method: 'my_other_method',
args: [],
maxFee: microAlgo(2000),
});
const result = await appClient1.algorand
.newGroup()
.addAppCallMethodCall(
await appClient1.params.call({
method: 'my_method',
args: [paymentArg, appCallArg],
maxFee: microAlgo(5000),
}),
)
.send({
coverAppCallInnerTransactionFees: true,
});
```
This feature should efficiently calculate the minimum fee needed to execute an app call transaction with inners, however we always recommend testing your specific scenario behaves as expected before releasing.
#### Read-only calls
When invoking a readonly method, the transaction is simulated rather than being fully processed by the network. This allows users to call these methods without paying a fee.
Even though no actual fee is paid, the simulation still evaluates the transaction as if a fee was being paid, therefore op budget and fee coverage checks are still performed.
Because no fee is actually paid, calculating the minimum fee required to successfully execute the transaction is not required, and therefore we don’t need to send an additional simulate call to calculate the minimum fee, like we do with a non readonly method call.
The behaviour of enabling `coverAppCallInnerTransactionFees` for readonly method calls is very similar to non readonly method calls, however is subtly different as we use `maxFee` as the transaction fee when executing the readonly method call.
### Covering App Call Op Budget
The high level Algorand contract authoring languages all have support for ensuring appropriate app op budget is available via `ensure_budget` in Algorand Python, `ensureBudget` in Algorand TypeScript and `increaseOpcodeBudget` in TEALScript. This is great, as it allows contract authors to ensure appropriate budget is available by automatically sending op-up inner transactions to increase the budget available. These op-up inner transactions require the fees to be covered by an account, which is generally the responsibility of the application consumer.
Application consumers may not be immediately aware of the number of op-up inner transactions sent, so it can be difficult for them to determine the exact fees required to successfully execute an application call. Fortunately the `coverAppCallInnerTransactionFees` setting above can be leveraged to automatically cover the fees for any op-up inner transaction that an application sends. Additionally if a contract author decides to cover the fee for an op-up inner transaction, then the application consumer will not be charged a fee for that transaction.
## Simulating a transaction
Transactions can be simulated using the simulate endpoint in algod, which enables evaluating the transaction on the network without it actually being commited to a block. This is a powerful feature, which has a number of options which are detailed in the [simulate API docs](https://dev.algorand.co/reference/rest-apis/output/#simulatetransaction).
For example you can simulate a transaction group like below:
```typescript
const result = await algorand
.newGroup()
.addPayment({ sender: 'SENDER', receiver: 'RECEIVER', amount: (100).microAlgo() })
.addAppCallMethodCall({
sender: 'SENDER',
appId: 123n,
method: abiMethod,
args: [1, 2, 3],
})
.simulate();
```
The above will execute a simulate request asserting that all transactions in the group are correctly signed.
### Simulate without signing
There are situations where you may not be able to (or want to) sign the transactions when executing simulate. In these instances you should set `skipSignatures: true` which automatically builds empty transaction signers and sets both `fix-signers` and `allow-empty-signatures` to `true` when sending the algod API call.
For example:
```typescript
const result = await algorand
.newGroup()
.addPayment({ sender: 'SENDER', receiver: 'RECEIVER', amount: (100).microAlgo() })
.addAppCallMethodCall({
sender: 'SENDER',
appId: 123n,
method: abiMethod,
args: [1, 2, 3],
})
.simulate({
skipSignatures: true,
});
```
# Transaction management
Transaction management is one of the core capabilities provided by AlgoKit Utils. It allows you to construct, simulate and send single, or grouped transactions with consistent and highly configurable semantics, including configurable control of transaction notes, logging, fees, multiple sender account types, and sending behaviour.
## `ConfirmedTransactionResult`
All AlgoKit Utils functions that send a transaction will generally return a variant of the `ConfirmedTransactionResult` interface or some superset of that. This provides a consistent mechanism to interpret the results of a transaction send.
It consists of two properties:
* `transaction`: An `algosdk.Transaction` object that is either ready to send or represents the transaction that was sent
* `confirmation`: An `algosdk.modelsv2.PendingTransactionResponse` object, which is a type-safe wrapper of the return from the algod pending transaction API noting that it will only be returned if the transaction was able to be confirmed (so won’t represent a “pending” transaction)
There are various variations of the `ConfirmedTransactionResult` that are exposed by various functions within AlgoKit Utils, including:
* `ConfirmedTransactionResults` - Where it’s both guaranteed that a confirmation will be returned, there is a primary driving transaction, but multiple transactions may be sent (e.g. when making an ABI app call which has dependant transactions)
* `SendTransactionResults` - Where multiple transactions are being sent (`transactions` and `confirmations` are arrays that replace the singular `transaction` and `confirmation`)
* `SendAtomicTransactionComposerResults` - The result from sending the transactions within an `AtomicTransactionComposer`, it extends `SendTransactionResults` and adds a few other useful properties
* `AppCallTransactionResult` - Result from calling a single app call (which potentially may result in multiple other transaction calls if it was an ABI method with dependant transactions)
## Further reading
To understand how to create, simulate and send transactions consult the [`AlgorandClient`](./algorand-client) and [`TransactionComposer`](./transaction-composer) documentation.
# Algo transfers (payments)
Algo transfers, or [payments](https://dev.algorand.co/concepts/transactions/types/#payment-transaction), is a higher-order use case capability provided by AlgoKit Utils that builds on top of the core capabilities, particularly [Algo amount handling](./amount) and [Transaction management](./transaction). It allows you to easily initiate Algo transfers between accounts, including dispenser management and idempotent account funding.
To see some usage examples check out the [automated tests](../../src/types/algorand-client.transfer.spec.ts).
## `payment`
The key function to facilitate Algo transfers is `algorand.send.payment(params)` (immediately send a single payment transaction), `algorand.createTransaction.payment(params)` (construct a payment transaction), or `algorand.newGroup().addPayment(params)` (add payment to a group of transactions) per [`AlgorandClient`](./algorand-client) [transaction semantics](./algorand-client#creating-and-issuing-transactions).
The base type for specifying a payment transaction is `PaymentParams`, which has the following parameters in addition to the [common transaction parameters](./algorand-client#transaction-parameters):
* `receiver: string` - The address of the account that will receive the Algo
* `amount: AlgoAmount` - The amount of Algo to send
* `closeRemainderTo?: string` - If given, close the sender account and send the remaining balance to this address (**warning:** use this carefully as it can result in loss of funds if used incorrectly)
```typescript
// Minimal example
const result = await algorand.send.payment({
sender: 'SENDERADDRESS',
receiver: 'RECEIVERADDRESS',
amount: (4).algo(),
});
// Advanced example
const result2 = await algorand.send.payment({
sender: 'SENDERADDRESS',
receiver: 'RECEIVERADDRESS',
amount: (4).algo(),
closeRemainderTo: 'CLOSEREMAINDERTOADDRESS',
lease: 'lease',
note: 'note',
// Use this with caution, it's generally better to use algorand.account.rekeyAccount
rekeyTo: 'REKEYTOADDRESS',
// You wouldn't normally set this field
firstValidRound: 1000n,
validityWindow: 10,
extraFee: (1000).microAlgo(),
staticFee: (1000).microAlgo(),
// Max fee doesn't make sense with extraFee AND staticFee
// already specified, but here for completeness
maxFee: (3000).microAlgo(),
// Signer only needed if you want to provide one,
// generally you'd register it with AlgorandClient
// against the sender and not need to pass it in
signer: transactionSigner,
maxRoundsToWaitForConfirmation: 5,
suppressLog: true,
});
```
## `ensureFunded`
The `ensureFunded` function automatically funds an account to maintain a minimum amount of [disposable Algo](https://dev.algorand.co/concepts/smart-contracts/costs-constraints#mbr). This is particularly useful for automation and deployment scripts that get run multiple times and consume Algo when run.
There are 3 variants of this function:
* `algorand.account.ensureFunded(accountToFund, dispenserAccount, minSpendingBalance, options?)` - Funds a given account using a dispenser account as a funding source such that the given account has a certain amount of Algo free to spend (accounting for Algo locked in minimum balance requirement).
* `algorand.account.ensureFundedFromEnvironment(accountToFund, minSpendingBalance, options?)` - Funds a given account using a dispenser account retrieved from the environment, per the [`dispenserFromEnvironment`](#dispenser) method, as a funding source such that the given account has a certain amount of Algo free to spend (accounting for Algo locked in minimum balance requirement).
* **Note:** requires a Node.js environment to execute.
* The dispenser account is retrieved from the account mnemonic stored in `process.env.DISPENSER_MNEMONIC` and optionally `process.env.DISPENSER_SENDER` if it’s a rekeyed account, or against default LocalNet if no environment variables present.
* `algorand.account.ensureFundedFromTestNetDispenserApi(accountToFund, dispenserClient, minSpendingBalance, options)` - Funds a given account using the [TestNet Dispenser API](https://github.com/algorandfoundation/algokit/blob/main/docs/testnet_api) as a funding source such that the account has a certain amount of Algo free to spend (accounting for Algo locked in minimum balance requirement).
The general structure of these calls is similar, they all take:
* `accountToFund: string | TransactionSignerAccount` - Address or signing account of the account to fund
* The source (dispenser):
* In `ensureFunded`: `dispenserAccount: string | TransactionSignerAccount` - the address or signing account of the account to use as a dispenser
* In `ensureFundedFromEnvironment`: Not specified, loaded automatically from the ephemeral environment
* In `ensureFundedFromTestNetDispenserApi`: `dispenserClient: TestNetDispenserApiClient` - a client instance of the [TestNet dispenser API](./dispenser-client)
* `minSpendingBalance: AlgoAmount` - The minimum balance of Algo that the account should have available to spend (i.e., on top of the minimum balance requirement)
* An `options` object, which has:
* [Common transaction parameters](./algorand-client#transaction-parameters) (not for TestNet Dispenser API)
* [Execution parameters](./algorand-client#sending-a-single-transaction) (not for TestNet Dispenser API)
* `minFundingIncrement?: AlgoAmount` - When issuing a funding amount, the minimum amount to transfer; this avoids many small transfers if this function gets called often on an active account
### Examples
```typescript
// From account
// Basic example
await algorand.account.ensureFunded('ACCOUNTADDRESS', 'DISPENSERADDRESS', (1).algo());
// With configuration
await algorand.account.ensureFunded('ACCOUNTADDRESS', 'DISPENSERADDRESS', (1).algo(), {
minFundingIncrement: (2).algo(),
fee: (1000).microAlgo(),
suppressLog: true,
});
// From environment
// Basic example
await algorand.account.ensureFundedFromEnvironment('ACCOUNTADDRESS', (1).algo());
// With configuration
await algorand.account.ensureFundedFromEnvironment('ACCOUNTADDRESS', (1).algo(), {
minFundingIncrement: (2).algo(),
fee: (1000).microAlgo(),
suppressLog: true,
});
// TestNet Dispenser API
// Basic example
await algorand.account.ensureFundedUsingDispenserAPI(
'ACCOUNTADDRESS',
algorand.client.getTestNetDispenserFromEnvironment(),
(1).algo(),
);
// With configuration
await algorand.account.ensureFundedUsingDispenserAPI(
'ACCOUNTADDRESS',
algorand.client.getTestNetDispenserFromEnvironment(),
(1).algo(),
{
minFundingIncrement: (2).algo(),
},
);
```
All 3 variants return an `EnsureFundedReturnType` (and the first two also return a [single transaction result](./algorand-client#sending-a-single-transaction)) if a funding transaction was needed, or `undefined` if no transaction was required:
* `amountFunded: AlgoAmount` - The number of Algo that was paid
* `transactionId: string` - The ID of the transaction that funded the account
If you are using the TestNet Dispenser API then the `transactionId` is useful if you want to use the [refund functionality](./dispenser-client#registering-a-refund).
## Dispenser
If you want to programmatically send funds to an account so it can transact then you will often need a “dispenser” account that has a store of Algo that can be sent and a private key available for that dispenser account.
There’s a number of ways to get a dispensing account in AlgoKit Utils:
* Get a dispenser via [account manager](./account#dispenser) - either automatically from [LocalNet](https://github.com/algorandfoundation/algokit-cli/blob/main/docs/features/localnet) or from the environment
* By programmatically creating one of the many account types via [account manager](./account#accounts)
* By programmatically interacting with [KMD](./account#kmd-account-management) if running against LocalNet
* By using the [AlgoKit TestNet Dispenser API client](./dispenser-client) which can be used to fund accounts on TestNet via a dedicated API service
# Typed application clients
Typed application clients are automatically generated, typed TypeScript deployment and invocation clients for smart contracts that have a defined [ARC-56](https://github.com/algorandfoundation/ARCs/pull/258) or [ARC-32](https://github.com/algorandfoundation/ARCs/blob/main/ARCs/arc-0032) application specification so that the development experience is easier with less upskill ramp-up and less deployment errors. These clients give you a type-safe, intellisense-driven experience for invoking the smart contract.
Typed application clients are the recommended way of interacting with smart contracts. If you don’t have/want a typed client, but have an ARC-56/ARC-32 app spec then you can use the [non-typed application clients](./app-client) and if you want to call a smart contract you don’t have an app spec file for you can use the underlying [app management](./app) and [app deployment](./app-deploy) functionality to manually construct transactions.
## Generating an app spec
You can generate an app spec file:
* Using [Algorand Python](https://algorandfoundation.github.io/puya/#quick-start)
* Using [TEALScript](https://tealscript.netlify.app/tutorials/hello-world/0004-artifacts/)
* By hand by following the specification [ARC-56](https://github.com/algorandfoundation/ARCs/pull/258)/[ARC-32](https://github.com/algorandfoundation/ARCs/blob/main/ARCs/arc-0032)
* Using [Beaker](https://algorand-devrel.github.io/beaker/html/usage.html) (PyTEAL) *(DEPRECATED)*
## Generating a typed client
To generate a typed client from an app spec file you can use [AlgoKit CLI](https://github.com/algorandfoundation/algokit-cli/blob/main/docs/features/generate#1-typed-clients):
```plaintext
> algokit generate client application.json --output /absolute/path/to/client.ts
```
Note: AlgoKit Utils >= 7.0.0 is compatible with the older 3.0.0 generated typed clients, however if you want to utilise the new features or leverage ARC-56 support, you will need to generate using >= 4.0.0. See [AlgoKit CLI generator version pinning](https://github.com/algorandfoundation/algokit-cli/blob/main/docs/features/generate#version-pinning) for more information on how to lock to a specific version.
## Getting a typed client instance
To get an instance of a typed client you can use an [`AlgorandClient`](./algorand-client) instance or a typed app [`Factory`](#creating-a-typed-factory-instance) instance.
The approach to obtaining a client instance depends on how many app clients you require for a given app spec and if the app has already been deployed, which is summarised below:
### App is deployed
| Resolve App by ID | | Resolve App by Creator and Name | |
| ----------------------------------------------------------------------------------------------------------------------------------------------------------------------------------------------------------------- | ----------------------------------------------------------------------------------------------------------------------------------------------------------------------- | -------------------------------------------------------------------------------------------------------------------------------------------------------------------------------------------------------------------------------------------------------------------------------------------------------------------------------------------------------- | ------------------------------------------------------------------------------------------------------------------------------------------------------------------------------------------------------------------------------------------------------------------------------------------------------------- |
| Single App Client Instance | Multiple App Client Instances | Single App Client Instance | Multiple App Client Instances |
| ```typescript
const appClient = algorand.client.getTypedAppClientById(MyContractClient, {
appId: 1234n,
// ...
});
//or
const appClient = new MyContractClient({
algorand,
appId: 1234n,
// ...
});
``` | ```typescript
const appClient1 = factory.getAppClientById({
appId: 1234n,
// ...
});
const appClient2 = factory.getAppClientById({
appId: 4321n,
// ...
});
``` | ```typescript
const appClient = await algorand.client.getTypedAppClientByCreatorAndName(MyContractClient, {
creatorAddress: 'CREATORADDRESS',
appName: 'contract-name',
// ...
});
//or
const appClient = await MyContractClient.fromCreatorAndName({
algorand,
creatorAddress: 'CREATORADDRESS',
appName: 'contract-name',
// ...
});
``` | ```typescript
const appClient1 = await factory.getAppClientByCreatorAndName({
creatorAddress: 'CREATORADDRESS',
appName: 'contract-name',
// ...
});
const appClient2 = await factory.getAppClientByCreatorAndName({
creatorAddress: 'CREATORADDRESS',
appName: 'contract-name-2',
// ...
});
``` |
To understand the difference between resolving by ID vs by creator and name see the underlying [app client documentation](./app-client#appclient).
### App is not deployed
| Deploy a New App | Deploy or Resolve App Idempotently by Creator and Name |
| --------------------------------------------------------------------------------------------------------------------------------------------------------------------------------------------- | ------------------------------------------------------------------------------------------------------- |
| ```typescript
const { appClient } = await factory.send.create.bare({
args: [],
// ...
});
// or
const { appClient } = await factory.send.create.METHODNAME({
args: [],
// ...
});
``` | ```typescript
const { appClient } = await factory.deploy({
appName: 'contract-name',
// ...
});
``` |
### Creating a typed factory instance
If your scenario calls for an app factory, you can create one using the below:
```typescript
const factory = algorand.client.getTypedAppFactory(MyContractFactory);
//or
const factory = new MyContractFactory({
algorand,
});
```
## Client usage
See the [official usage docs](https://github.com/algorandfoundation/algokit-client-generator-ts/blob/main/docs/usage) for full details.
For a simple example that deploys a contract and calls a `"hello"` method, see below:
```typescript
// A similar working example can be seen in the AlgoKit init production smart contract templates, when using TypeScript deployment
// In this case the generated factory is called `HelloWorldAppFactory` and is in `./artifacts/HelloWorldApp/client.ts`
import { HelloWorldAppClient } from './artifacts/HelloWorldApp/client';
import { AlgorandClient } from '@algorandfoundation/algokit-utils';
// These require environment variables to be present, or it will retrieve from default LocalNet
const algorand = AlgorandClient.fromEnvironment();
const deployer = algorand.account.fromEnvironment('DEPLOYER', (1).algo());
// Create the typed app factory
const factory = algorand.client.getTypedAppFactory(HelloWorldAppFactory, {
creatorAddress: deployer,
defaultSender: deployer,
});
// Create the app and get a typed app client for the created app (note: this creates a new instance of the app every time,
// you can use .deploy() to deploy idempotently if the app wasn't previously
// deployed or needs to be updated if that's allowed)
const { appClient } = await factory.send.create();
// Make a call to an ABI method and print the result
const response = await appClient.hello({ name: 'world' });
console.log(response);
```
# ARC Purpose and Guidelines
> Guide explaining how to write a new ARC
## Abstract
### What is an ARC?
ARC stands for Algorand Request for Comments. An ARC is a design document providing information to the Algorand community or describing a new feature for Algorand or its processes or environment. The ARC should provide a concise technical specification and a rationale for the feature. The ARC author is responsible for building consensus within the community and documenting dissenting opinions.
We intend ARCs to be the primary mechanisms for proposing new features and collecting community technical input on an issue. We maintain ARCs as text files in a versioned repository. Their revision history is the historical record of the feature proposal.
## Specification
### ARC Types
There are three types of ARC:
* A **Standards track ARC**: application-level standards and conventions, including contract standards such as NFT standards, Algorand ABI, URI schemes, library/package formats, and wallet formats.
* A **Meta ARC** describes a process surrounding Algorand or proposes a change to (or an event in) a process. Process ARCs are like Standards track ARCs but apply to areas other than the Algorand protocol. They may propose an implementation, but not to Algorand’s codebase; they often require community consensus; unlike Informational ARCs, they are more than recommendations, and users are typically not free to ignore them. Examples include procedures, guidelines, changes to the decision-making process, and changes to the tools or environment used in Algorand development. Any meta-ARC is also considered a Process ARC.
* An **Informational ARC** describes an Algorand design issue or provides general guidelines or information to the Algorand community but does not propose a new feature. Informational ARCs do not necessarily represent Algorand community consensus or a recommendation, so users and implementers are free to ignore Informational ARCs or follow their advice.
We recommend that a single ARC contains a single key proposal or new idea. The more focused the ARC, the more successful it tends to be. A change to one client does not require an ARC; a change that affects multiple clients, or defines a standard for multiple apps to use, does.
An ARC must meet specific minimum criteria. It must be a clear and complete description of the proposed enhancement. The enhancement must represent a net improvement. If applicable, the proposed implementation must be solid and not complicate the protocol unduly.
### Shepherding an ARC
Parties involved in the process are you, the champion or *ARC author*, the [*ARC editors*](#arc-editors), the [*Algorand Core Developers*](https://github.com/orgs/algorand/people), and the [*Algorand Foundation Team*](https://github.com/orgs/algorandfoundation/people).
Before writing a formal ARC, you should vet your idea. Ask the Algorand community first if an idea is original to avoid wasting time on something that will be rejected based on prior research. You **MUST** open an issue on the [Algorand ARC Github Repository](https://github.com/algorandfoundation/ARCs/issues) to do this. You **SHOULD** also share the idea on the [Algorand Discord #arcs chat room](https://discord.gg/algorand).
Once the idea has been vetted, your next responsibility will be to create a [pull request](https://github.com/algorandfoundation/ARCs/pulls) to present (through an ARC) the idea to the reviewers and all interested parties and invite editors, developers, and the community to give feedback on the aforementioned issue.
The pull request with the **DRAFT** status **MUST**:
* Have been vetted on the forum.
* Be editable by ARC Editors; it will be closed otherwise.
You should try and gauge whether the interest in your ARC is commensurate with both the work involved in implementing it and how many parties will have to conform to it. Negative community feedback will be considered and may prevent your ARC from moving past the Draft stage.
To facilitate the discussion between each party involved in an ARC, you **SHOULD** use the specific [channel in the Algorand Discord](https://discord.com/channels/491256308461207573/1011541977189326852).
The ARC author is in charge of creating the PR and changing the status to **REVIEW**.
The pull request with the **REVIEW** status **MUST**:
* Contain a reference implementation.
* Have garnered the interest of multiple projects; it will be set to **STAGNANT** otherwise.
To update the status of an ARC from **REVIEW** to **LAST CALL**, a discussion will occur with all parties involved in the process. Any stakeholder **SHOULD** implement the ARC to point out any flaws that might occur.
*In short, the role of a champion is to write the ARC using the style and format described below, shepherd the discussions in the appropriate forums, build community consensus around the idea, and gather projects with similar needs who will implement it.*
### ARC Process
The following is the standardization process for all ARCs in all tracks:
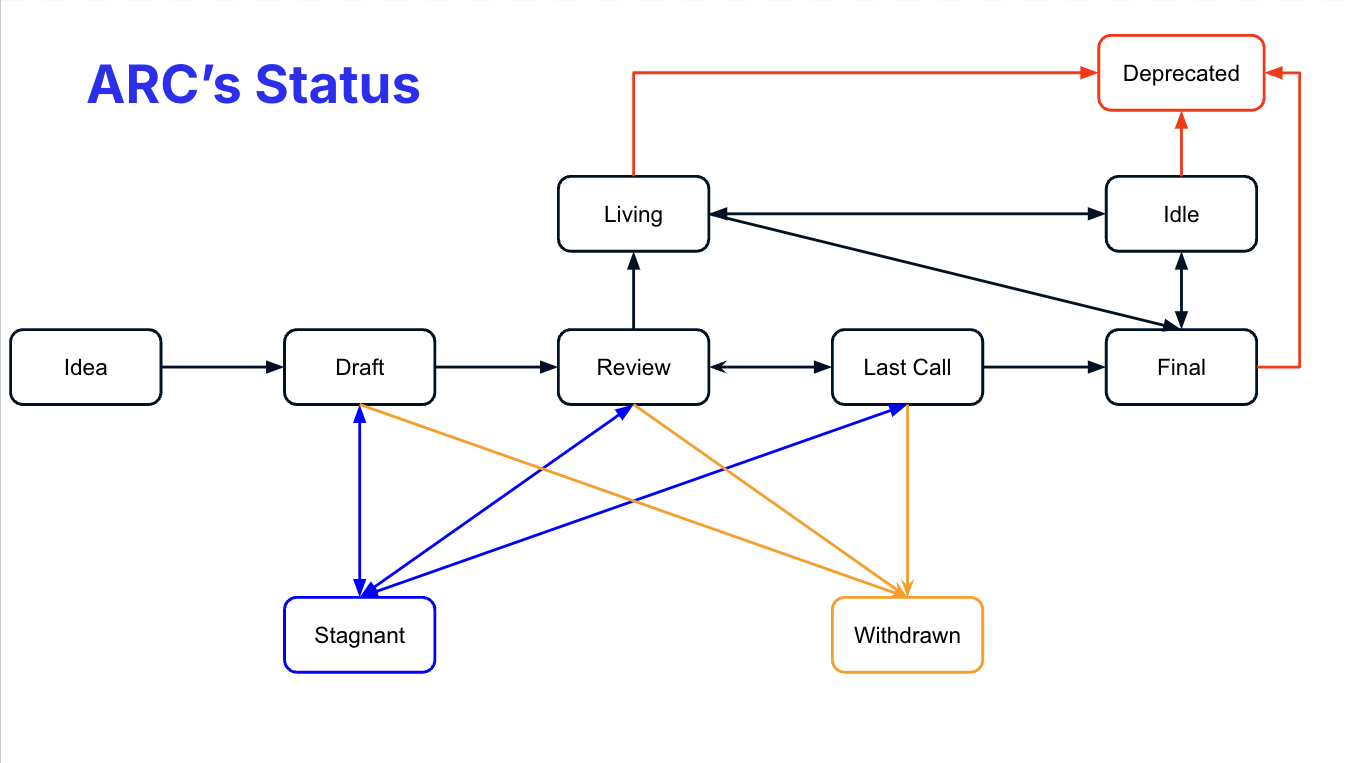
**Idea** - An idea that is pre-draft. This is not tracked within the ARC Repository.
**Draft** - The first formally tracked stage of an ARC in development. An ARC is merged by an ARC Editor into the ARC repository when adequately formatted.
**Review** - An ARC Author marks an ARC as ready for and requests Peer Review.
**Last Call** - The final review window for an ARC before moving to `FINAL`. An ARC editor will assign `Last Call` status and set a review end date (last-call-deadline), typically 1 month later.
If this period results in necessary normative change, it will revert the ARC to `REVIEW`.
**Final** - This ARC represents the final standard. A Final ARC exists in a state of finality and should only be updated to correct errata and add non-normative clarifications.
**Stagnant** - Any ARC in `DRAFT`,`REVIEW` or `LAST CALL`, if inactive for 6 months or greater, is moved to `STAGNANT`. An ARC may be resurrected from this state by Authors or ARC Editors by moving it back to `DRAFT`.
> An ARC with the status **STAGNANT** which does not have any activity for 1 month will be closed. *ARC Authors are notified of any algorithmic change to the status of their ARC*
**Withdrawn** - The ARC Author(s)/Editor(s) has withdrawn the proposed ARC. This state has finality and can no longer be resurrected using this ARC number. If the idea is pursued later, it is considered a new proposal.
**Idle** - Any ARC in `FINAL` or `LIVING`, if it has not been widely adopted by the ecosystem within 12 months. It will be moved to `DEPRECATED` after 6 months of `IDLE`. And can go back to `FINAL` or `LIVING` if the adoption starts.
**Living** - A special status for ARCs which, by design, will be continually updated and **MIGHT** not reach a state of finality.
**Deprecated** - A status for ARCs that are no longer aligned with our ecosystem or have been superseded by another ARC.
### What belongs in a successful ARC?
Each ARC should have the following parts:
* Preamble - [RFC 822](https://www.rfc-editor.org/rfc/rfc822) style headers containing metadata about the ARC, including the ARC number, a short descriptive title (limited to a maximum of 44 characters), a description (limited to a maximum of 140 characters), and the author details. Irrespective of the category, the title and description should not include ARC numbers. See [below](/arc-standards/arc-0000#arc-header-preamble) for details.
* Abstract - This is a multi-sentence (short paragraph) technical summary. It should be a very terse and human-readable version of the specification section. Someone should be able to read only the abstract to get the gist of what this specification does.
* Specification - The technical specification should describe the syntax and semantics of any new feature. The specification should be detailed enough to allow competing, interoperable implementations for any of the current Algorand clients.
* Rationale - The rationale fleshes out the specification by describing what motivated the design and why particular design decisions were made. It should describe alternate designs that were considered and related work, e.g., how the feature is supported in other languages. The rationale may also provide evidence of consensus within the community and should discuss significant objections or concerns raised during discussions.
* Backwards Compatibility - All ARCs that introduce backward incompatibilities must include a section describing these incompatibilities and their severity. The ARC must explain how the author proposes to deal with these incompatibilities. ARC submissions without a sufficient backward compatibility treatise may be rejected outright.
* Test Cases - Test cases for implementation are mandatory for ARCs that are affecting consensus changes. Tests should either be inlined in the ARC as data (such as input/expected output pairs, or included in `https://raw.githubusercontent.com/algorandfoundation/ARCs/main/assets/arc-###/`.
* Reference Implementation - An section that contains a reference/example implementation that people **MUST** use to assist in understanding or implementing this specification. If the reference implementation is too complex, the reference implementation **MUST** be included in `https://raw.githubusercontent.com/algorandfoundation/ARCs/main/assets/arc-###/`
* Security Considerations - All ARCs must contain a section that discusses the security implications/considerations relevant to the proposed change. Include information that might be important for security discussions, surfaces risks, and can be used throughout the life-cycle of the proposal. E.g., include security-relevant design decisions, concerns, essential discussions, implementation-specific guidance and pitfalls, an outline of threats and risks, and how they are being addressed. ARC submissions missing the “Security Considerations” section will be rejected. An ARC cannot proceed to status “Final” without a Security Considerations discussion deemed sufficient by the reviewers.
* Copyright Waiver - All ARCs must be in the public domain. See the bottom of this ARC for an example copyright waiver.
### ARC Formats and Templates
ARCs should be written in [markdown](https://github.com/adam-p/markdown-here/wiki/Markdown-Cheatsheet) format. There is a [template](https://github.com/algorandfoundation/ARCs/blob/main/ARC-template.md) to follow.
### ARC Header Preamble
Each ARC must begin with an [RFC 822](https://www.ietf.org/rfc/rfc822.txt) style header preamble, preceded and followed by three hyphens (`---`). This header is also termed “front matter” by [Jekyll](https://jekyllrb.com/docs/front-matter/)[. The headers must appear in the following order. Headers marked with ”\*” are optional and are described below. All other headers are required.]()
[`arc:` *ARC number* (It is determined by the ARC editor)]()
[`title:` *The ARC title is a few words, not a complete sentence*]()
[`description:` *Description is one full (short) sentence*]()
[`author:` *A list of the author’s or authors’ name(s) and/or username(s), or name(s) and email(s). Details are below.*]()
> []()
>
> [The `author` header lists the names, email addresses, or usernames of the authors/owners of the ARC. Those who prefer anonymity may use a username only or a first name and a username. The format of the `author` header value must be: Random J. User <]()> or Random J. User (@username) At least one author must use a GitHub username in order to get notified of change requests and can approve or reject them. `* discussions-to:` *A url pointing to the official discussion thread* While an ARC is in state `Idea`, a `discussions-to` header will indicate the URL where the ARC is being discussed. As mentioned above, an example of a place to discuss your ARC is the Algorand forum, but you can also use Algorand Discord #arcs chat room. When the ARC reach the state `Draft`, the `discussions-to` header will redirect to the discussion in [the Issues section of this repository](https://github.com/algorandfoundation/ARCs/issues).
`status:` *Draft, Review, Last Call, Final, Stagnant, Withdrawn, Living*
`* last-call-deadline:` *Date review period ends*
`type:` *Standards Track, Meta, or Informational*
`* category:` *Core, Networking, Interface, or ARC* (Only needed for Standards Track ARCs)
`created:` *Date created on*
> The `created` header records the date that the ARC was assigned a number. Both headers should be in yyyy-mm-dd format, e.g. 2001-08-14. `* updated:` *Comma separated list of dates* The `updated` header records the date(s) when the ARC was updated with “substantial” changes. This header is only valid for ARCs of Draft and Active status. `* requires:` *ARC number(s)* ARCs may have a `requires` header, indicating the ARC numbers that this ARC depends on. `* replaces:` *ARC number(s)* `* superseded-by:` *ARC number(s)* ARCs may also have a `superseded-by` header indicating that an ARC has been rendered obsolete by a later document; the value is the number of the ARC that replaces the current document. The newer ARC must have a `replaces` header containing the number of the ARC that it rendered obsolete.
> ARCs may also have an `extended-by` header indicating that functionalities have been added to the existing, still active ARC; the value is the number of the ARC that updates the current document. The newer ARC must have an `extends` header containing the number of the ARC that it extends.
`* resolution:` *A url pointing to the resolution of this ARC*
Headers that permit lists must separate elements with commas.
Headers requiring dates will always do so in the format of ISO 8601 (yyyy-mm-dd).
### Style Guide
When referring to an ARC by number, it should be written in the hyphenated form `ARC-X` where `X` is the ARC’s assigned number.
### Linking to other ARCs
References to other ARCs should follow the format `ARC-N`, where `N` is the ARC number you are referring to. Each ARC that is referenced in an ARC **MUST** be accompanied by a relative markdown link the first time it is referenced, and **MAY** be accompanied by a link on subsequent references. The link **MUST** always be done via relative paths so that the links work in this GitHub repository, forks of this repository, the main ARCs site, mirrors of the main ARC site, etc. For example, you would link to this ARC with `[ARC-0](./arc-0000.md)`.
### Auxiliary Files
Images, diagrams, and auxiliary files should be included in a subdirectory of the `assets` folder for that ARC as follows: `assets/arc-N` (where **N** is to be replaced with the ARC number). When linking to an image in the ARC, use relative links such as `https://raw.githubusercontent.com/algorandfoundation/ARCs/main/assets/arc-1/image.png`.
### Application’s Methods name
To provide information about which ARCs has been implemented on a particular application, namespace with the ARC number should be used before every method name: `arc_methodName`.
> Where represents the specific ARC number associated to the standard.
eg:
```json
{
"name": "Method naming convention",
"desc": "Example",
"methods": [
{
"name": "arc0_method1",
"desc": "Method 1",
"args": [
{ "type": "uint64", "name": "Number", "desc": "A number" },
],
"returns": { "type": "void[]" }
},
{
"name": "arc0_method2",
"desc": "Method 2",
"args": [
{ "type": "byte[]", "name": "user_data", "desc": "Some characters" }
],
"returns": { "type": "void[]" }
}
]
}
```
### Application’s Event name
To provide information about which ARCs has been implemented on a particular application, namespace with the ARC number should be used before every [ARC-73](/arc-standards/arc-0073) event name: `arc_EventName`.
> Where represents the specific ARC number associated to the standard.
eg:
```json
{
"name": "Event naming convention",
"desc": "Example",
"events": [
{
"name": "arc0_Event1",
"desc": "Method 1",
"args": [
{ "type": "uint64", "name": "Number", "desc": "A number" },
]
},
{
"name": "arc0_Event2",
"desc": "Method 2",
"args": [
{ "type": "byte[]", "name": "user_data", "desc": "Some characters" }
]
}
]
}
```
## Rationale
This document was derived heavily from [Ethereum’s EIP-1](https://github.com/ethereum/eips), which was written by Martin Becze and Hudson Jameson, which in turn was derived from [Bitcoin’s BIP-0001](https://github.com/bitcoin/bips) written by Amir Taaki, which in turn was derived from [Python’s PEP-0001](https://www.python.org/dev/peps/). In many places, text was copied and modified. Although the PEP-0001 text was written by Barry Warsaw, Jeremy Hylton, and David Goodger, they are not responsible for its use in the Algorand Request for Comments. They should not be bothered with technical questions specific to Algorand or the ARC. Please direct all comments to the ARC editors.
## Security Considerations
### Usage of related link
Every link **SHOULD** be relative.
| OK | `[ARC-0](./arc-0000.md)` |
| :-- | -------------------------------------------------------------------------------: |
| NOK | `[ARC-0](https://github.com/algorandfoundation/ARCs/blob/main/ARCs/arc-0000.md)` |
If you are using many links you **SHOULD** use this format:
### Usage of non-related link
If for some reason (CCO, RFC …), you need to refer on something outside of the repository, you *MUST* you the following syntax
| OK | `ARCS` |
| :-- | --------------------------------------------------------------: |
| NOK | `[ARCS](https://github.com/algorandfoundation/ARCs)` |
### Transferring ARC Ownership
It occasionally becomes necessary to transfer ownership of ARCs to a new champion. In general, we would like to retain the original author as a co-author of the transferred ARC, but that is really up to the original author. A good reason to transfer ownership is that the original author no longer has the time or interest in updating it or following through with the ARC process or has fallen off the face of the ‘net (i.e., is unreachable or is not responding to email). A wrong reason to transfer ownership is that you disagree with the direction of the ARC. We try to build consensus around an ARC, but if that is not possible, you can always submit a competing ARC.
If you are interested in assuming ownership of an ARC, send a message asking to take over, addressed to both the original author and the ARC editor. If the original author does not respond to the email on time, the ARC editor will make a unilateral decision (it’s not like such decisions can’t be reversed :)).
### ARC Editors
The current ARC editor is:
* Stéphane Barroso (@sudoweezy)
### ARC Editor Responsibilities
For each new ARC that comes in, an editor does the following:
* Read the ARC to check if it is ready: sound and complete. The ideas must make technical sense, even if they do not seem likely to get to final status.
* The title should accurately describe the content.
* Check the ARC for language (spelling, grammar, sentence structure, etc.), markup (GitHub flavored Markdown), code style
If the ARC is not ready, the editor will send it back to the author for revision with specific instructions.
Once the ARC is ready for the repository, the ARC editor will:
* Assign an ARC number
* Create a living discussion in the Issues section of this repository
> The issue will be closed when the ARC reaches the status *Final* or *Withdrawn*
* Merge the corresponding pull request
* Send a message back to the ARC author with the next step.
The editors do not pass judgment on ARCs. We merely do the administrative & editorial part.
## Copyright
Copyright and related rights waived via [CCO](https://creativecommons.org/publicdomain/zero/1.0/).
# Algorand Wallet Transaction Signing API
> An API for a function used to sign a list of transactions.
## Abstract
The goal of this API is to propose a standard way for a dApp to request the signature of a list of transactions to an Algorand wallet. This document also includes detailed security requirements to reduce the risks of users being tricked to sign dangerous transactions. As the Algorand blockchain adds new features, these requirements may change.
## Specification
The key words “**MUST**”, “**MUST NOT**”, “**REQUIRED**”, “**SHALL**”, “**SHALL NOT**”, “**SHOULD**”, “**SHOULD NOT**”, “**RECOMMENDED**”, “**MAY**”, and “**OPTIONAL**” in this document are to be interpreted as described in [RFC-2119](https://www.ietf.org/rfc/rfc2119.txt).
> Comments like this are non-normative.
### Overview
> This overview section is non-normative.
After this overview, the syntax of the interfaces are described followed by the semantics and the security requirements.
At a high-level the API allows to sign:
* A valid group of transaction (aka atomic transfers).
* (**OPTIONAL**) A list of groups of transactions.
Signatures are requested by calling a function `signTxns(txns)` on a list `txns` of transactions. The dApp may also provide an optional parameter `opts`.
Each transaction is represented by a `WalletTransaction` object. The only required field of a `WalletTransaction` is `txn`, a base64 encoding of the canonical msgpack encoding of the unsigned transaction. There are three main use cases:
1. The transaction needs to be signed and the sender of the transaction is an account known by the wallet. This is the most common case. Example:
```json
{
"txn": "iaNhbXT..."
}
```
The wallet is free to generate the resulting signed transaction in any way it wants. In particular, the signature may be a multisig, may involve rekeying, or for very advanced wallets may use logicsigs.
> Remark: If the wallet uses a large logicsig to sign the transaction and there is congestion, the fee estimated by the dApp may be too low. A future standard may provide a wallet API allowing the dApp to compute correctly the estimated fee. Before such a standard, the dApp may need to retry with a higher fee when this issue arises.
2. The transaction does not need to be signed. This happens when the transaction is part of a group of transaction and is signed by another party or by a logicsig. In that case, the field `signers` is set to an empty array. Example:
```json
{
"txn": "iaNhbXT...",
"signers": []
}
```
3. (**OPTIONAL**) The transaction needs to be signed but the sender of the transaction is *not* an account known by the wallet. This happens when the dApp uses a sender account derived from one or more accounts of the wallet. For example, the sender account may be a multisig account with public keys corresponding to some accounts of the wallet, or the sender account may be rekeyed to an account of the wallet. Example:
```json
{
"txn": "iaNhbXT...",
"authAddr": "HOLQV2G65F6PFM36MEUKZVHK3XM7UEIFLG35UJGND77YDXHKXHKX4UXUQU",
"msig": {
"version": 1,
"threshold": 2,
"addrs": [
"5MF575NQUDMRWOTS27KIBL2MFPJHKQEEF4LZEN6H3CZDAYVUKESMGZPK3Q",
"FS7G3AHTDVMQNQQBHZYMGNWAX7NV2XAQSACQH3QDBDOW66DYTAQQW76RYA",
"DRSHY5ONWKVMWWASTB7HOELVF5HRUTRQGK53ZK3YNMESZJR6BBLMNH4BBY"
]
},
"signers": ...
}
```
Note that in both the first and the third use cases, the wallet may sign the transaction using a multisig and may use a different authorized address (`authAddr`) than the sender address (i.e., rekeying). The main difference is that in the first case, the wallet knows how to sign the transaction (i.e., whether the sender address is a multisig and/or rekeyed), while in the third case, the wallet may not know it.
### Syntax and Interfaces
> Interfaces are defined in TypeScript. All the objects that are defined are valid JSON objects.
#### Interface `SignTxnsFunction`
A wallet transaction signing function `signTxns` is defined by the following interface:
```typescript
export type SignTxnsFunction = (
txns: WalletTransaction[],
opts?: SignTxnsOpts
)
=> Promise<(SignedTxnStr | null)[]>;
```
where:
* `txns` is a non-empty list of `WalletTransaction` objects (defined below).
* `opts` is an optional parameter object `SignTxnsOpts` (defined below).
In case of error, the wallet (i.e., the `signTxns` function in this document) **MUST** reject the promise with an error object `SignTxnsError` defined below. This ARC uses interchangeably the terms “throw an error” and “reject a promise with an error”.
#### Interface `AlgorandAddress`
An Algorand address is represented by a 58-character base32 string. It includes the checksum.
```typescript
export type AlgorandAddress = string;
```
An Algorand address is *valid* is it is a valid base32 string without padding and if the checksum is valid.
> Example: `"6BJ32SU3ABLWSBND7U5H2QICQ6GGXVD7AXSSMRYM2GO3RRNHCZIUT4ISAQ"` is a valid Algorand address.
#### Interface `SignedTxnStr`
`SignedTxnStr` is the base64 encoding of the canonical msgpack encoding of a `SignedTxn` object, as defined in the [Algorand specs](https://github.com/algorandfoundation/specs)[. For Algorand version 2.5.5, see the ]()[authorization and signatures Section](https://github.com/algorandfoundation/specs/blob/d050b3cade6d5c664df8bd729bf219f179812595/dev/ledger.md#authorization-and-signatures) of the specs or the [Go structure](https://github.com/algorand/go-algorand/blob/304815d00b9512cf9f91dbb987fead35894676f4/data/transactions/signedtxn.go#L31)
```typescript
export type SignedTxnStr = string;
```
#### Interface `MultisigMetadata`
A `MultisigMetadata` object specifies the parameters of an Algorand multisig address.
```typescript
export interface MultisigMetadata {
/**
* Multisig version.
*/
version: number;
/**
* Multisig threshold value. Authorization requires a subset of signatures,
* equal to or greater than the threshold value.
*/
threshold: number;
/**
* List of Algorand addresses of possible signers for this
* multisig. Order is important.
*/
addrs: AlgorandAddress[];
}
```
* `version` should always be 1.
* `threshold` should be between 1 and the length of `addrs`.
> Interface originally from github.com/algorand/js-algorand-sdk/blob/e07d99a2b6bd91c4c19704f107cfca398aeb9619/src/types/multisig.ts, where `string` has been replaced by `AlgorandAddress`.
#### Interface `WalletTransaction`
A `WalletTransaction` object represents a transaction to be signed by a wallet.
```typescript
export interface WalletTransaction {
/**
* Base64 encoding of the canonical msgpack encoding of a Transaction.
*/
txn: string;
/**
* Optional authorized address used to sign the transaction when the account
* is rekeyed. Also called the signor/sgnr.
*/
authAddr?: AlgorandAddress;
/**
* Multisig metadata used to sign the transaction
*/
msig?: MultisigMetadata;
/**
* Optional list of addresses that must sign the transactions
*/
signers?: AlgorandAddress[];
/**
* Optional base64 encoding of the canonical msgpack encoding of a
* SignedTxn corresponding to txn, when signers=[]
*/
stxn?: SignedTxnStr;
/**
* Optional message explaining the reason of the transaction
*/
message?: string;
/**
* Optional message explaining the reason of this group of transaction
* Field only allowed in the first transaction of a group
*/
groupMessage?: string;
}
```
#### Interface `SignTxnsOpts`
A `SignTxnsOps` specifies optional parameters of the `signTxns` function:
```typescript
export type SignTxnsOpts = {
/**
* Optional message explaining the reason of the group of transactions
*/
message?: string;
}
```
#### Error Interface `SignTxnsError`
In case of error, the `signTxns` function **MUST** return a `SignTxnsError` object
```typescript
interface SignTxnsError extends Error {
code: number;
data?: any;
}
```
where:
* `message`:
* **MUST** be a human-readable string
* **SHOULD** adhere to the specifications in the Error Standards section below
* `code`:
* **MUST** be an integer number
* **MUST** adhere to the specifications in the Error Standards section below
* `data`:
* **SHOULD** contain any other useful information about the error
> Inspired from github.com/ethereum/EIPs/blob/master/EIPS/eip-1193.md
### Error Standards
| Status Code | Name | Description |
| ----------- | --------------------- | --------------------------------------------------------------------------- |
| 4001 | User Rejected Request | The user rejected the request. |
| 4100 | Unauthorized | The requested operation and/or account has not been authorized by the user. |
| 4200 | Unsupported Operation | The wallet does not support the requested operation. |
| 4201 | Too Many Transactions | The wallet does not support signing that many transactions at a time. |
| 4202 | Uninitialized Wallet | The wallet was not initialized properly beforehand. |
| 4300 | Invalid Input | The input provided is invalid. |
### Wallet-specific extensions
Wallets **MAY** use specific extension fields in `WalletTransaction` and in `SignTxnsOpts`. These fields must start with: `_walletName`, where `walletName` is the name of the wallet. Wallet designers **SHOULD** ensure that their wallet name is not already used.
> Example of a wallet-specific fields in `opts` (for the wallet `theBestAlgorandWallet`): `_theBestAlgorandWalletIcon` for displaying an icon related to the transactions.
Wallet-specific extensions **MUST** be designed such that a wallet not understanding them would not provide a lower security level.
> Example of a forbidden wallet-specific field in `WalletTransaction`: `_theWorstAlgorandWalletDisable` requires this transaction not to be signed. This is dangerous for security as any signed transaction may leak and be committed by an attacker. Therefore, the dApp should never submit transactions that should not be signed, and that some wallets (not supporting this extension) may still sign.
### Semantic and Security Requirements
The call `signTxns(txns, opts)` **MUST** either throws an error or return an array `ret` of the same length of the `txns` array:
1. If `txns[i].signers` is an empty array, the wallet **MUST NOT** sign the transaction `txns[i]`, and:
* if `txns[i].stxn` is not present, `ret[i]` **MUST** be set to `null`.
* if `txns[i].stxn` is present and is a valid `SignedTxnStr` with the underlying transaction exactly matching `txns[i].txn`, `ret[i]` **MUST** be set to `txns[i].stxn`. (See section on the semantic of `WalletTransaction` for the exact requirements on `txns[i].stxn`.)
* otherwise, the wallet **MUST** throw a `4300` error.
2. Otherwise, the wallet **MUST** sign the transaction `txns[i].txn` and `ret[i]` **MUST** be set to the corresponding `SignedTxnStr`.
Note that if any transaction `txns[i]` that should be signed (i.e., where `txns[i].signers` is not an empty array) cannot be signed for any reason, the wallet **MUST** throw an error.
#### Terminology: Validation, Warnings, Fields
All the field names below are the ones in the [Go `SignedTxn` structure](https://github.com/algorand/go-algorand/blob/304815d00b9512cf9f91dbb987fead35894676f4/data/transactions/signedtxn.go#L31) and [](https://github.com/algorand/go-algorand/blob/304815d00b9512cf9f91dbb987fead35894676f4/data/transactions/transaction.go#L81). Field of the actual transaction are prefixed with `txn.` (as opposed to fields of the `WalletTransaction` such as `signers`). For example, the sender of a transaction is `txn.Sender`.
**Rejecting** means throwing a `4300` error.
Strong warning / warning / weak warning / informational messages are different level of alerts. Strong warnings **MUST** be displayed in such a way that the user cannot miss the importance of them.
#### Semantic of `WalletTransaction`
* `txn`:
* Must a base64 encoding of the canonical msgpack encoding of a `Transaction` object as defined in the [Algorand specs](https://github.com/algorandfoundation/specs). For Algorand version 2.5.5, see the [authorization and signatures Section](https://github.com/algorandfoundation/specs/blob/d050b3cade6d5c664df8bd729bf219f179812595/dev/ledger.md#authorization-and-signatures) of the specs or the [Go structure](https://github.com/algorand/go-algorand/blob/304815d00b9512cf9f91dbb987fead35894676f4/data/transactions/transaction.go#L81).
* If `txn` is not a base64 string or cannot be decoded into a `Transaction` object, the wallet **MUST** reject.
* `authAddr`:
* The wallet **MAY** not support this field. In that case, it **MUST** throw a `4200` error.
* If specified, it must be a valid Algorand address. If this is not the case, the wallet **MUST** reject.
* If specified and supported, the wallet **MUST** sign the transaction using this authorized address *even if it sees the sender address `txn.Sender` was not rekeyed to `authAddr`*. This is because the sender may be rekeyed before the transaction is committed. The wallet **SHOULD** display an informational message.
* `msig`:
* The wallet **MAY** not support this field. In that case, it **MUST** throw a `4200` error.
* If specified, it must be a valid `MultisigMetadata` object. If this is not the case, the wallet **MUST** reject.
* If specified and supported, the wallet **MUST** verify `msig` matches `authAddr` (if `authAddr` is specified and supported) or the sender address `txn.Sender` (otherwise). The wallet **MUST** reject if this is not the case.
* If specified and supported and if `signers` is not specified, the wallet **MUST** return a `SignedTxn` with all the subsigs that it can provide and that the wallet user agrees to provide. If the wallet can sign more subsigs than the requested threshold (`msig.threshold`), it **MAY** only provide `msig.threshold` subsigs. It is also possible that the wallet cannot provide at least `msig.threshold` subsigs (either because the user prevented signing with some keys or because the wallet does not know enough keys). In that case, the wallet just provide the subsigs it can provide. However, the wallet **MUST** provide at least one subsig or throw an error.
* `signers`:
* If specified and if not a list of valid Algorand addresses, the wallet **MUST** reject.
* If `signers` is an empty array, the transaction is for information purpose only and the wallet **SHALL NOT** sign it, even if it can (e.g., know the secret key of the sender address).
* If `signers` is an array with more than 1 Algorand addresses:
* The wallet **MUST** reject if `msig` is not specified.
* The wallet **MUST** reject if `signers` is not a subset of `msig.addrs`.
* The wallet **MUST** try to return a `SignedTxn` with all the subsigs corresponding to `signers` signed. If it cannot, it **SHOULD** throw a `4001` error. Note that this is different than when `signers` is not provided, where the signing is only “best effort”.
* If `signers` is an array with a single Algorand address:
* If `msig` is specified, the rules as when `signers` is an array with more than 1 Algorand addresses apply.
* If `authAddr` is specified but `msig` is not, the wallet **MUST** reject if `signers[0]` is not equal to `authAddr`.
* If neither `authAddr` nor `msig` are specified, the wallet **MUST** reject if `signers[0]` is not the sender address `txn.Sender`.
* In all cases, the wallet **MUST** only try to provide signatures for `signers[0]`. In particular, if the sender address `txn.Sender` was rekeyed or is a multisig and if `authAddr` and `msig` are not specified, then the wallet **MUST** reject.
* `stxn` if specified:
* If specified and if `signers` is not the empty array, the wallet **MUST** reject.
* If specified:
* It must be a valid `SignedTxnStr`. The wallet **MUST** reject if this is not the case.
* The wallet **MUST** reject if the field `txn` inside the `SignedTxn` object does not match exactly the `Transaction` object in `txn`.
* The wallet **MAY NOT** check whether the other fields of the `SignedTxn` are valid. In particular, it **MAY** accept `stxn` even in the following cases: it contains an invalid signature `sig`, it contains both a signature `sig` and a logicsig `lsig`, it contains a logicsig `lsig` that always reject.
* `message`:
* The wallet **MAY** decide to never print the message, to only print the first characters, or to make any changes to the messages that may be used to ensure a higher level of security. The wallet **MUST** be designed to ensure that the message cannot be easily used to trick the user to do an incorrect action. In particular, if displayed, the message must appear in an area that is easily and clearly identifiable as not trusted by the wallet.
* The wallet **MUST** prevent HTML/JS injection and must only display plaintext messages.
* `groupMessage` obeys the same rules as `message`, except it is a message common to all the transactions of the group containing the current transaction. In addition, the wallet **MUST** reject if `groupMessage` is provided for a transaction that is not the first transaction of the group. Note that `txns` may contain multiple groups of transactions, one after the other (see the Group Validation section for details).
##### Particular Case without `signers`, nor `msig`, nor `senders`
When neither `signers`, nor `msig`, nor `authAddr` are specified, the wallet **MAY** still sign the transaction using a multisig or a different authorized address than the sender address `txn.Sender`. It may also sign the transaction using a logicsig.
However, in all these cases, the resulting `SignedTxn` **MUST** be such that it can be committed to the blockchain (assuming the transaction itself can be executed and that the account is not rekeyed in the meantime).
In particular, if a multisig is used, the numbers of subsigs provided must be at least equal to the multisig threshold. This is different from the case where `msig` is provided, where the wallet **MAY** provide fewer subsigs than the threshold.
#### Semantic of `SignTxnsOpts`
* `message` obeys the rules as `WalletTransaction.message` except it is a message common to all transactions.
#### General Validation
The goal is to ensure the highest level of security for the end-user, even when the transaction is generated by a malicious dApp. Every input must be validated.
Validation:
* **SHALL NOT** rely on TypeScript typing as this can be bypassed. Types **MUST** be manually verified.
* **SHALL NOT** assume the Algorand SDK does any validation, as the Algorand SDK is not meant to receive maliciously generated inputs. Furthermore, the SDK allows for dangerous transactions (such as rekeying). The only exception for the above rule is for de-serialization of transactions. Once de-serialized, every field of the transaction must be manually validated.
> Note: We will be working with the algosdk team to provide helper functions for validation in some cases and to ensure the security of the de-serialization of potentially malicious transactions.
If there is any unexpected field at any level (both in the transaction itself or in the object WalletTransaction), the wallet **MUST** immediately reject. The only exception is for the “wallet-specific extension” fields (see above).
#### Group Validation
The wallet should support the following two use cases:
1. (**REQUIRED**) `txns` is a non-empty array of transactions that belong to the same group of transactions. In other words, either `txns` is an array of a single transaction with a zero group ID (`txn.Group`), or `txns` is an array of one or more transactions with the *same* non-zero group ID. The wallet **MUST** reject if the transactions do not match their group ID. (The dApp must provide the transactions in the order defined by the group ID.)
> An early draft of this ARC required that the size of a group of transactions must be greater than 1 but, since the Algorand protocol supports groups of size 1, this requirement had been changed so dApps don’t have to have special cases for single transactions and can always send a group to the wallet.
2. (**OPTIONAL**) `txns` is a concatenation of `txns` arrays of transactions of type 1:
* All transactions with the *same* non-zero group ID must be consecutive and must match their group ID. The wallet **MUST** reject if the above is not satisfied.
* The wallet UI **MUST** be designed so that it is clear to the user when transactions are grouped (aka form an atomic transfers) and when they are not. It **SHOULD** provide very clear explanations that are understandable by beginner users, so that they cannot easily be tricked to sign what they believe is an atomic exchange while it is in actuality a one-sided payment.
If `txns` does not match any of the formats above, the wallet **MUST** reject.
The wallet **MAY** choose to restrict the maximum size of the array `txns`. The maximum size allowed by a wallet **MUST** be at least the maximum size of a group of transactions in the current Algorand protocol on MainNet. (When this ARC was published, this maximum size was 16.) If the wallet rejects `txns` because of its size, it **MUST** throw a 4201 error.
An early draft of this API allowed to sign single transactions in a group without providing the other transactions in the group. For security reasons, this use case is now deprecated and **SHALL** not be allowed in new implementations. Existing implementations may continue allowing for single transactions to be signed if a very clear warning is displayed to the user. The warning **MUST** stress that signing the transaction may incur losses that are much higher than the amount of tokens indicated in the transaction. That is because potential future features of Algorand may later have such consequences (e.g., a signature of a transaction may actually authorize the full group under some circumstances).
#### Transaction Validation
##### Inputs that Must Be Systematically Rejected
* Transactions `WalletTransaction.txn` with fields that are not known by the wallet **MUST** be systematically rejected. In particular:
* Every field **MUST** be validated.
* Any extra field **MUST** systematically make the wallet reject.
* This is to prevent any security issue in case of the introduction of new dangerous fields (such as `txn.RekeyTo` or `txn.CloseRemainderTo`).
* Transactions of an unknown type (field `txn.Type`) **MUST** be rejected.
* Transactions containing fields of a different transaction type (e.g., `txn.Receiver` in an asset transfer transaction) **MUST** be rejected.
##### Inputs that Warrant Display of Warnings
The wallet **MUST**:
* Display a strong warning message when signing a transaction with one of the following fields: `txn.RekeyTo`, `txn.CloseRemainderTo`, `txn.AssetCloseTo`. The warning message **MUST** clearly explain the risks. No warning message is necessary for transactions that are provided for informational purposes in a group and are not signed (i.e., transactions with `signers=[]`).
* Display a strong warning message in case the transaction is signed in the future (first valid round is after current round plus some number, e.g. 500). This is to prevent surprises in the future where a user forgot that they signed a transaction and the dApp maliciously play it later.
* Display a warning message when the fee is too high. The threshold **MAY** depend on the load of the Algorand network.
* Display a weak warning message when signing a transaction that can increase the minimum balance in a way that may be hard or impossible to undo (asset creation or application creation)
* Display an informational message when signing a transaction that can increase the minimum balance in a way that can be undone (opt-in to asset or transaction)
The above is for version 2.5.6 of the Algorand software. Future consensus versions may require additional checks.
Before supporting any new transaction field or type (for a new version of the Algorand blockchain), the wallet authors **MUST** be perform a careful security analysis.
#### Genesis Validation
The wallet **MUST** check that the genesis hash (field `txn.GenesisHash`) and the genesis ID (field `txn.GenesisID`, if provided) match the network used by the wallet. If the wallet supports multiple networks, it **MUST** make clear to the user which network is used.
#### UI
In general, the UI **MUST** ensure that the user cannot be confused by the dApp to perform dangerous operations. In particular, the wallet **MUST** make clear to the user what is part of the wallet UI from what is part of what the dApp provided.
Special care **MUST** be taken of when:
* Displaying the `message` field of `WalletTransaction` and of `SignTxnsOpts`.
* Displaying any arbitrary field of transactions including note field (`txn.Note`), genesis ID (`txn.genesisID`), asset configuration fields (`txn.AssetName`, `txn.UnitName`, `txn.URL`, …)
* Displaying message hidden in fields that are expected to be base32/base64-strings or addresses. Using a different font for those fields **MAY** be an option to prevent such confusion.
Usual precautions **MUST** be taken regarding the fact that the inputs are provided by an untrusted dApp (e.g., preventing code injection and so on).
## Rationale
The API was designed to:
* Be easily implementable by all Algorand wallets
* Rely on the official [specs](https://github.com/algorandfoundation/specs/blob/master/dev/ledger.md) and the [official source code](https://github.com/algorand/go-algorand/blob/304815d00b9512cf9f91dbb987fead35894676f4/data/transactions/signedtxn.go#L31).
* Only use types supported by JSON to simplify interoperability (avoid Uint8Array for example) and to allow easy serialization / deserialization
* Be easy to extend to support future features of Algorand
* Be secure by design: making it hard for malicious dApps to cause the wallet to sign a transaction without the user understanding the implications of their signature.
The API was not designed to:
* Directly support of the SDK objects. SDK objects must first be serialized.
* Support any listing accounts, connecting to the wallet, sending transactions, …
* Support of signing logic signatures.
The last two items are expected to be defined in other documents.
### Rationale for Group Validation
The requirements around group validation have been designed to prevent the following attack.
The dApp pretends to buy 1 Algo for 10 USDC, but instead creates an atomic transfer with the user sending 1 Algo to the dApp and the dApp sending 0.01 USDC to the user. However, it sends to the wallet a 1 Algo and 10 USDC transactions. If the wallet does not verify that this is a valid group, it will make the user believe that they are signing for the correct atomic transfer.
## Reference Implementation
> This section is non-normative.
### Sign a Group of Two Transactions
Here is an example in node.js how to use the wallet interface to sign a group of two transactions and send them to the network. The function `signTxns` is assumed to be a method of `algorandWallet`.
> Note: We will be working with the algosdk development to add two helper functions to facilitate the use of the wallet. Current idea is to add: `Transaction.toBase64` that does the same as `Transaction.toByte` except it outputs a base64 string `Algodv2.sendBase64RawTransactions` that does the same as `Algodv2.sendRawTransactions` except it takes an array of base64 string instead of an array of Uint8array
```typescript
import algosdk from 'algosdk';
import * as algorandWallet from './wallet';
import {Buffer} from "buffer";
const firstRound = 13809129;
const suggestedParams = {
flatFee: false,
fee: 0,
firstRound: firstRound,
lastRound: firstRound + 1000,
genesisID: 'testnet-v1.0',
genesisHash: 'SGO1GKSzyE7IEPItTxCByw9x8FmnrCDexi9/cOUJOiI='
};
const txn1 = algosdk.makePaymentTxnWithSuggestedParamsFromObject({
from: "37MSZIPXHGNCKTDJTJDSYIOF4C57JAL2FTKESD2HBVELXYHEIXVZ4JVGFU",
to: "PKSE2TARC645D4O2IO6QNWVW6PLJDTR6IOKNKMGSHQL7JIJHNGNFVISUHI",
amount: 1000,
suggestedParams,
});
const txn2 = algosdk.makePaymentTxnWithSuggestedParamsFromObject({
from: "37MSZIPXHGNCKTDJTJDSYIOF4C57JAL2FTKESD2HBVELXYHEIXVZ4JVGFU",
to: "PKSE2TARC645D4O2IO6QNWVW6PLJDTR6IOKNKMGSHQL7JIJHNGNFVISUHI",
amount: 2000,
suggestedParams,
});
const txs = [txn1, txn2];
algosdk.assignGroupID(txs);
const txn1B64 = Buffer.from(txn1.toByte()).toString("base64");
const txn2B64 = Buffer.from(txn2.toByte()).toString("base64");
(async () => {
const signedTxs = await algorandWallet.signTxns([
{txn: txn1B64},
{txn: txn2B64, signers: []}
]);
const algodClient = new algosdk.Algodv2("", "...", "");
algodClient.sendRawTransaction(
signedTxs.map(stxB64 => Buffer.from(stxB64, "base64"))
)
})();
```
## Security Considerations
None.
## Copyright
Copyright and related rights waived via [CCO](https://creativecommons.org/publicdomain/zero/1.0/).
# Algorand Transaction Note Field Conventions
> Conventions for encoding data in the note field at application-level
## Abstract
The goal of these conventions is to make it simpler for block explorers and indexers to parse the data in the note fields and filter transactions of certain dApps.
## Specification
Note fields should be formatted as follows:
for dApps
```plaintext
:
```
for ARCs
```plaintext
arc:
```
where:
* `` is the name of the dApp:
* Regexp to satisfy: `[a-zA-Z0-9][a-zA-Z0-9_/@.-]{4-31}` In other words, a name should:
* only contain alphanumerical characters or `_`, `/`, `-`, `@`, `.`
* start with an alphanumerical character
* be at least 5 characters long
* be at most 32 characters long
* Names starting with `a/` and `af/` are reserved for the Algorand protocol and the Algorand Foundation uses.
* `` is the number of the ARC:
* Regexp to satisfy: `\b(0|[1-9]\d*)\b` In other words, an arc-number should:
* Only contain a digit number, without any padding
* `` is one of the following:
* `m`: [MsgPack](https://msgpack.org)
* `j`: [JSON](https://json.org)
* `b`: arbitrary bytes
* `u`: utf-8 string
* `` is the actual data in the format specified by ``
**WARNING**: Any user can create transactions with arbitrary data and may impersonate other dApps. In particular, the fact that a note field start with `` does not guarantee that it indeed comes from this dApp. The value `` cannot be relied upon to ensure provenance and validity of the ``.
**WARNING**: Any user can create transactions with arbitrary data, including ARC numbers, which may not correspond to the intended standard. An ARC number included in a note field does not ensure compliance with the corresponding standard. The value of the ARC number cannot be relied upon to ensure the provenance and validity of the .
### Versioning
This document suggests the following convention for the names of dApp with multiple versions: `mydapp/v1`, `mydapp/v2`, … However, dApps are free to use any other convention and may include the version inside the `` part instead of the `` part.
## Rationale
The goal of these conventions is to facilitate displaying notes by block explorers and filtering of transactions by notes. However, the note field **cannot be trusted**, as any user can create transactions with arbitrary note fields. An external mechanism needs to be used to ensure the validity and provenance of the data. For example:
* Some dApps may only send transactions from a small set of accounts controlled by the dApps. In that case, the sender of the transaction should be checked.
* Some dApps may fund escrow accounts created from some template TEAL script. In that case, the note field may contain the template parameters and the escrow account address should be checked to correspond to the resulting TEAL script.
* Some dApps may include a signature in the `` part of the note field. The `` may be an MsgPack encoding of a structure of the form:
```json
{
"d": ... // actual data
"sig": ... // signature of the actual data (encoded using MsgPack)
}
```
In that case, the signature should be checked.
The conventions were designed to support multiple use cases of the notes. Some dApps may just record data on the blockchain without using any smart contracts. Such dApps typically would use JSON or MsgPack encoding.
On the other hands, dApps that need reading note fields from smart contracts most likely would require easier-to-parse formats of data, which would most likely consist in application-specific byte strings.
Since `:` is a prefix of the note, transactions for a given dApp can easily be filtered by the [indexer](https://github.com/algorand/indexer) ().
The restrictions on dApp names were chosen to allow most usual names while avoiding any encoding or displaying issues. The maximum length (32) matches the maximum length of ASA on Algorand, while the minimum length (5) has been chosen to limit collisions.
## Reference Implementation
> This section is non-normative.
Consider [ARC-20](/arc-standards/arc-0020), that provides information about Smart ASA’s Application.
Here a potential note indicating that the Application ID is 123:
* JSON without version:
```plaintext
arc20:j{"application-id":123}
```
Consider a dApp named `algoCityTemp` that stores temperatures from cities on the blockchain.
Here are some potential notes indicating that Singapore’s temperature is 35 degree Celsius:
* JSON without version:
```plaintext
algoCityTemp:j{"city":"Singapore","temp":35}
```
* JSON with version in the name:
```plaintext
algoCityTemp/v1:j{"city":"Singapore","temp":35}
```
* JSON with version in the name with index lookup:
```plaintext
algoCityTemp/v1/35:j{"city":"Singapore","temp":35}
```
* JSON with version in the data:
```plaintext
algoCityTemp:j{"city":"Singapore","temp":35,"ver":1}
```
* UTF-8 string without version:
```plaintext
algoCityTemp:uSingapore|35
```
* Bytes where the temperature is encoded as a signed 1-byte integer in the first position:
```plaintext
algoCityTemp:b#Singapore
```
(`#` is the ASCII character for 35.)
* MsgPack corresponding to the JSON example with version in the name. The string is encoded in base64 as it contains characters that cannot be printed in this document. But the note should contain the actual bytes and not the base64 encoding of them:
```plaintext
YWxnb0NpdHlUZW1wL3YxOoKkY2l0ealTaW5nYXBvcmWkdGVtcBg=
```
## Security Considerations
> Not Applicable
## Copyright
Copyright and related rights waived via [CCO](https://creativecommons.org/publicdomain/zero/1.0/).
# Conventions Fungible/Non-Fungible Tokens
> Parameters Conventions for Algorand Standard Assets (ASAs) for fungible tokens and non-fungible tokens (NFTs).
## Abstract
The goal of these conventions is to make it simpler for block explorers, wallets, exchanges, marketplaces, and more generally, client software to display the properties of a given ASA.
## Specification
The key words “**MUST**”, “**MUST NOT**”, “**REQUIRED**”, “**SHALL**”, “**SHALL NOT**”, “**SHOULD**”, “**SHOULD NOT**”, “**RECOMMENDED**”, “**MAY**”, and “**OPTIONAL**” in this document are to be interpreted as described in [RFC-2119](https://www.ietf.org/rfc/rfc2119.txt).
> Comments like this are non-normative.
An [ARC-3](/arc-standards/arc-0003) ASA has an associated JSON Metadata file, formatted as specified below, that is stored off-chain.
### ASA Parameters Conventions
The ASA parameters should follow the following conventions:
* *Unit Name* (`un`): no restriction but **SHOULD** be related to the name in the JSON Metadata file
* *Asset Name* (`an`): **MUST** be:
* (**NOT RECOMMENDED**) either exactly `arc3` (without any space)
* (**NOT RECOMMENDED**) or `@arc3`, where `` **SHOULD** be closely related to the name in the JSON Metadata file:
* If the resulting asset name can fit the *Asset Name* field, then `` **SHOULD** be equal to the name in the JSON Metadata file.
* If the resulting asset name cannot fit the *Asset Name* field, then `` **SHOULD** be a reasonable shorten version of the name in the JSON Metadata file.
* (**RECOMMENDED**) or `` where `` is defined as above. In this case, the Asset URL **MUST** end with `#arc3`.
* *Asset URL* (`au`): a URI pointing to a JSON Metadata file.
* This URI as well as any URI in the JSON Metadata file:
* **SHOULD** be persistent and allow to download the JSON Metadata file forever.
* **MAY** contain the string `{id}`. If `{id}` exists in the URI, clients **MUST** replace this with the asset ID in decimal form. The rules below applies after such a replacement.
* **MUST** follow [RFC-3986](https://www.ietf.org/rfc/rfc3986.txt) and **MUST NOT** contain any whitespace character
* **SHOULD** use one of the following URI schemes (for compatibility and security): *https* and *ipfs*:
* When the file is stored on IPFS, the `ipfs://...` URI **SHOULD** be used. IPFS Gateway URI (such as `https://ipfs.io/ipfs/...`) **SHOULD NOT** be used.
* **SHOULD NOT** use the following URI scheme: *http* (due to security concerns).
* **MUST** be such that the returned resource includes the CORS header
```plaintext
Access-Control-Allow-Origin: *
```
if the URI scheme is *https*
> This requirement is to ensure that client JavaScript can load all resources pointed by *https* URIs inside an ARC-3 ASA.
* **MAY** be a relative URI when inside the JSON Metadata file. In that case, the relative URI is relative to the Asset URL. The Asset URL **SHALL NOT** be relative. Relative URI **MUST** not contain the character `:`. Clients **MUST** consider a URI as relative if and only if it does not contain the character `:`.
* If the Asset Name is neither `arc3` nor of the form `@arc3`, then the Asset URL **MUST** end with `#arc3`.
* If the Asset URL ends with `#arc3`, clients **MUST** remove `#arc3` when linking to the URL. When displaying the URL, they **MAY** display `#arc3` in a different style (e.g., a lighter color).
* If the Asset URL ends with `#arc3`, the full URL with `#arc3` **SHOULD** be valid and point to the same resource as the URL without `#arc3`.
> This recommendation is to ensure backward compatibility with wallets that do not support ARC-3.
* *Asset Metadata Hash* (`am`):
* If the JSON Metadata file specifies extra metadata `e` (property `extra_metadata`), then `am` is defined as:
```plain
am = SHA-512/256("arc0003/am" || SHA-512/256("arc0003/amj" || content of JSON Metadata file) || e)
```
where `||` denotes concatenation and SHA-512/256 is defined in [NIST FIPS 180-4](https://doi.org/10.6028/NIST.FIPS.180-4). The above definition of `am` **MUST** be used when the property `extra_metadata` is specified, even if its value `e` is the empty string. Python code to compute the hash and a full example are provided below (see “Sample with Extra Metadata”).
> Extra metadata can be used to store data about the asset that needs to be accessed from a smart contract. The smart contract would not be able to directly read the metadata. But, if provided with the hash of the JSON Metadata file and with the extra metadata `e`, the smart contract can check that `e` is indeed valid.
* If the JSON Metadata file does not specify the property `extra_metadata`, then `am` is defined as the SHA-256 digest of the JSON Metadata file as a 32-byte string (as defined in [NIST FIPS 180-4](https://doi.org/10.6028/NIST.FIPS.180-4))
There are no requirements regarding the manager account of the ASA, or its the reserve account, freeze account, or clawback account.
> Clients recognize ARC-3 ASAs by looking at the Asset Name and Asset URL. If the Asset Name is `arc3` or ends with `@arc3`, or if the Asset URL ends with `#arc3`, the ASA is to be considered an ARC-3 ASA.
#### Pure and Fractional NFTs
An ASA is said to be a *pure non-fungible token* (*pure NFT*) if and only if it has the following properties:
* *Total Number of Units* (`t`) **MUST** be 1.
* *Number of Digits after the Decimal Point* (`dc`) **MUST** be 0.
An ASA is said to be a *fractional non-fungible token* (*fractional NFT*) if and only if it has the following properties:
* *Total Number of Units* (`t`) **MUST** be a power of 10 larger than 1: 10, 100, 1000, …
* *Number of Digits after the Decimal Point* (`dc`) **MUST** be equal to the logarithm in base 10 of total number of units.
> In other words, the total supply of the ASA is exactly 1.
### JSON Metadata File Schema
> The JSON Medata File schema follow the Ethereum Improvement Proposal [ERC-1155 Metadata URI JSON Schema](https://eips.ethereum.org/EIPS/eip-1155) with the following main differences:
>
> * Support for integrity fields for any file pointed by any URI field as well as for localized JSON Metadata files.
> * Support for mimetype fields for any file pointed by any URI field.
> * Support for extra metadata that is hashed as part of the Asset Metadata Hash (`am`) of the ASA.
> * Adding the fields `external_url`, `background_color`, `animation_url` used by [OpenSea metadata format](https://docs.opensea.io/docs/metadata-standards).
Similarly to ERC-1155, the URI does support ID substitution. If the URI contains `{id}`, clients **MUST** substitute it by the asset ID in *decimal*.
> Contrary to ERC-1155, the ID is represented in decimal (instead of hexadecimal) to match what current APIs and block explorers use on the Algorand blockchain.
The JSON Metadata schema is as follows:
```json
{
"title": "Token Metadata",
"type": "object",
"properties": {
"name": {
"type": "string",
"description": "Identifies the asset to which this token represents"
},
"decimals": {
"type": "integer",
"description": "The number of decimal places that the token amount should display - e.g. 18, means to divide the token amount by 1000000000000000000 to get its user representation."
},
"description": {
"type": "string",
"description": "Describes the asset to which this token represents"
},
"image": {
"type": "string",
"description": "A URI pointing to a file with MIME type image/* representing the asset to which this token represents. Consider making any images at a width between 320 and 1080 pixels and aspect ratio between 1.91:1 and 4:5 inclusive."
},
"image_integrity": {
"type": "string",
"description": "The SHA-256 digest of the file pointed by the URI image. The field value is a single SHA-256 integrity metadata as defined in the W3C subresource integrity specification (https://w3c.github.io/webappsec-subresource-integrity)."
},
"image_mimetype": {
"type": "string",
"description": "The MIME type of the file pointed by the URI image. MUST be of the form 'image/*'."
},
"background_color": {
"type": "string",
"description": "Background color do display the asset. MUST be a six-character hexadecimal without a pre-pended #."
},
"external_url": {
"type": "string",
"description": "A URI pointing to an external website presenting the asset."
},
"external_url_integrity": {
"type": "string",
"description": "The SHA-256 digest of the file pointed by the URI external_url. The field value is a single SHA-256 integrity metadata as defined in the W3C subresource integrity specification (https://w3c.github.io/webappsec-subresource-integrity)."
},
"external_url_mimetype": {
"type": "string",
"description": "The MIME type of the file pointed by the URI external_url. It is expected to be 'text/html' in almost all cases."
},
"animation_url": {
"type": "string",
"description": "A URI pointing to a multi-media file representing the asset."
},
"animation_url_integrity": {
"type": "string",
"description": "The SHA-256 digest of the file pointed by the URI external_url. The field value is a single SHA-256 integrity metadata as defined in the W3C subresource integrity specification (https://w3c.github.io/webappsec-subresource-integrity)."
},
"animation_url_mimetype": {
"type": "string",
"description": "The MIME type of the file pointed by the URI animation_url. If the MIME type is not specified, clients MAY guess the MIME type from the file extension or MAY decide not to display the asset at all. It is STRONGLY RECOMMENDED to include the MIME type."
},
"properties": {
"type": "object",
"description": "Arbitrary properties (also called attributes). Values may be strings, numbers, object or arrays."
},
"extra_metadata": {
"type": "string",
"description": "Extra metadata in base64. If the field is specified (even if it is an empty string) the asset metadata (am) of the ASA is computed differently than if it is not specified."
},
"localization": {
"type": "object",
"required": ["uri", "default", "locales"],
"properties": {
"uri": {
"type": "string",
"description": "The URI pattern to fetch localized data from. This URI should contain the substring `{locale}` which will be replaced with the appropriate locale value before sending the request."
},
"default": {
"type": "string",
"description": "The locale of the default data within the base JSON"
},
"locales": {
"type": "array",
"description": "The list of locales for which data is available. These locales should conform to those defined in the Unicode Common Locale Data Repository (http://cldr.unicode.org/)."
},
"integrity": {
"type": "object",
"patternProperties": {
".*": { "type": "string" }
},
"description": "The SHA-256 digests of the localized JSON files (except the default one). The field name is the locale. The field value is a single SHA-256 integrity metadata as defined in the W3C subresource integrity specification (https://w3c.github.io/webappsec-subresource-integrity)."
}
}
}
}
}
```
All the fields are **OPTIONAL**. But if provided, they **MUST** match the description in the JSON schema.
The field `decimals` is **OPTIONAL**. If provided, it **MUST** match the ASA parameter `dt`.
URI fields (`image`, `external_url`, `animation_url`, and `localization.uri`) in the JSON Metadata file are defined similarly as the Asset URL parameter `au`. However, contrary to the Asset URL, they **MAY** be relative (to the Asset URL). See Asset URL above.
#### Integrity Fields
Compared to ERC-1155, the JSON Metadata schema allows to indicate digests of the files pointed by any URI field. This is to ensure the integrity of all the files referenced by the ASA. Concretly, every URI field `xxx` is allowed to have an optional associated field `xxx_integrity` that specifies the digest of the file pointed by the URI.
The digests are represented as a single SHA-256 integrity metadata as defined in the [W3C subresource integrity specification](https://w3c.github.io/webappsec-subresource-integrity). Details on how to generate those digests can be found on the [MDN Web Docs](https://developer.mozilla.org/en-US/docs/Web/Security/Subresource_Integrity) (where `sha384` or `384` are to be replaced by `sha256` and `256` respectively as only SHA-256 is supported by this ARC).
It is **RECOMMENDED** to specify all the `xxx_integrity` fields of all the `xxx` URI fields, except for `external_url_integrity` when it points to a potentially mutable website.
Any field with a name ending with `_integrity` **MUST** match a corresponding field containing a URI to a file with a matching digest. For example, if the field `hello_integrity` is specified, the field `hello` **MUST** exist and **MUST** be a URI pointing to a file with a digest equal to the digest specified by `hello_integrity`.
#### MIME Type Files
Compared to ERC-1155, the JSON Metadata schema allows to indicate the MIME type of the files pointed by any URI field. This is to allow clients to display appropriately the resource without having to first query it to find out the MIME type. Concretly, every URI field `xxx` is allowed to have an optional associated field `xxx_integrity` that specifies the digest of the file pointed by the URI.
It is **STRONGLY RECOMMENDED** to specify all the `xxx_mimetype` fields of all the `xxx` URI fields, except for `external_url_mimetype` when it points to a website. If the MIME type is not specified, clients **MAY** guess the MIME type from the file extension or **MAY** decide not to display the asset at all.
Clients **MUST NOT** rely on the `xxx_mimetype` fields from a security perspective and **MUST NOT** break or fail if the fields are incorrect (beyond not displaying the asset image or animation correctly). In particular, clients **MUST** take all necessary security measures to protect users against remote code execution or cross-site scripting attacks, even when the MIME type looks innocuous (like `image/png`).
> The above restriction is to protect clients and users against malformed or malicious ARC-3.
Any field with a name ending with `_mimetype` **MUST** match a corresponding field containing a URI to a file with a matching digest. For example, if the field `hello_mimetype` is specified, the field `hello` **MUST** exist and **MUST** be a URI pointing to a file with a digest equal to the digest specified by `hello_mimetype`.
#### Localization
If the JSON Metadata file contains a `localization` attribute, its content **MAY** be used to provide localized values for fields that need it. The `localization` attribute should be a sub-object with three **REQUIRED** attributes: `uri`, `default`, `locales`, and one **RECOMMENDED** attribute: `integrity`. If the string `{locale}` exists in any URI, it **MUST** be replaced with the chosen locale by all client software.
> Compared to ERC-1155, the `localization` attribute contains an additional optional `integrity` field that specify the digests of the localized JSON files.
It is **RECOMMENDED** that `integrity` contains the digests of all the locales but the default one.
#### Examples
##### Basic Example
An example of an ARC-3 JSON Metadata file for a song follows. The properties array proposes some **SUGGESTED** formatting for token-specific display properties and metadata.
```json
{
"name": "My Song",
"description": "My first and best song!",
"image": "https://s3.amazonaws.com/your-bucket/song/cover/mysong.png",
"image_integrity": "sha256-47DEQpj8HBSa+/TImW+5JCeuQeRkm5NMpJWZG3hSuFU=",
"image_mimetype": "image/png",
"external_url": "https://mysongs.com/song/mysong",
"animation_url": "https://s3.amazonaws.com/your-bucket/song/preview/mysong.ogg",
"animation_url_integrity": "sha256-LwArA6xMdnFF3bvQjwODpeTG/RVn61weQSuoRyynA1I=",
"animation_url_mimetype": "audio/ogg",
"properties": {
"simple_property": "example value",
"rich_property": {
"name": "Name",
"value": "123",
"display_value": "123 Example Value",
"class": "emphasis",
"css": {
"color": "#ffffff",
"font-weight": "bold",
"text-decoration": "underline"
}
},
"array_property": {
"name": "Name",
"value": [1,2,3,4],
"class": "emphasis"
}
}
}
```
In the example, the `image` field **MAY** be the album cover, while the `animation_url` **MAY** be the full song or may just be a small preview. In the latter case, the full song **MAY** be specified by three additional properties inside the `properties` field:
```json
{
...
"properties": {
...
"file_url": "https://s3.amazonaws.com/your-bucket/song/full/mysong.ogg",
"file_url_integrity": "sha256-7IGatqxLhUYkruDsEva52Ku43up6774yAmf0k98MXnU=",
"file_url_mimetype": "audio/ogg"
}
}
```
An example of possible ASA parameters would be:
* *Asset Unit*: `mysong` for example
* *Asset Name*: `My Song`
* *Asset URL*: `https://example.com/mypict#arc3` or `https://arweave.net/MAVgEMO3qlqe-qHNVs00qgwwbCb6FY2k15vJP3gBLW4#arc3`
* *Metadata Hash*: the 32 bytes of the SHA-256 digest of the above JSON file
* *Total Number of Units*: 100
* *Number of Digits after the Decimal Point*: 2
> IPFS urls of the form `ipfs://QmWS1VAdMD353A6SDk9wNyvkT14kyCiZrNDYAad4w1tKqT#arc3` may be used too but may cause issue with clients that do not support ARC-3 and that do not handle fragments in IPFS URLs.
Example of alternative versions for *Asset Name* and *Asset URL*:
* *Asset Name*: `My Song@arc3` or `arc3`
* *Asset URL*: `ipfs://QmWS1VAdMD353A6SDk9wNyvkT14kyCiZrNDYAad4w1tKqT` or `https://example.com/mypict` or `https://arweave.net/MAVgEMO3qlqe-qHNVs00qgwwbCb6FY2k15vJP3gBLW4`
> These alternative versions are less recommended as they make the asset name harder to read for clients that do not support ARC-3.
The above parameters define a fractional NFT with 100 shares. The JSON Metadata file **MAY** contain the field `decimals: 2`:
```json
{
...
"decimals": 2
}
```
##### Example with Relative URI and IPFS
> When using IPFS, it is convenient to bundle the JSON Metadata file with other files references by the JSON Metadata file. In this case, because of circularity, it is necessary to use relative URI
An example of an ARC-3 JSON Metadata file using IPFS and relative URI is provided below:
```json
{
"name": "My Song",
"description": "My first and best song!",
"image": "mysong.png",
"image_integrity": "sha256-47DEQpj8HBSa+/TImW+5JCeuQeRkm5NMpJWZG3hSuFU=",
"image_mimetype": "image/png",
"external_url": "https://mysongs.com/song/mysong",
"animation_url": "mysong.ogg",
"animation_url_integrity": "sha256-LwArA6xMdnFF3bvQjwODpeTG/RVn61weQSuoRyynA1I=",
"animation_url_mimetype": "audio/ogg"
}
```
If the Asset URL is `ipfs://QmWS1VAdMD353A6SDk9wNyvkT14kyCiZrNDYAad4w1tKqT/metadata.json`:
* the `image` URI is `ipfs://QmWS1VAdMD353A6SDk9wNyvkT14kyCiZrNDYAad4w1tKqT/mysong.png`.
* the `animation_url` URI is `ipfs://QmWS1VAdMD353A6SDk9wNyvkT14kyCiZrNDYAad4w1tKqT/mysong.ogg`.
##### Example with Extra Metadata and `{id}`
An example of an ARC-3 JSON Metadata file with extra metadata and `{id}` is provided below.
```json
{
"name": "My Picture",
"description": "Lorem ipsum...",
"image": "https://s3.amazonaws.com/your-bucket/images/{id}.png",
"image_integrity": "sha256-47DEQpj8HBSa+/TImW+5JCeuQeRkm5NMpJWZG3hSuFU=",
"image_mimetype": "image/png",
"external_url": "https://mysongs.com/song/{id}",
"extra_metadata": "iHcUslDaL/jEM/oTxqEX++4CS8o3+IZp7/V5Rgchqwc="
}
```
The possible ASA parameters are the same as with the basic example, except for the metadata hash that would be the 32-byte string corresponding to the base64 string `xsmZp6lGW9ktTWAt22KautPEqAmiXxow/iIuJlRlHIg=`.
> For completeness, we provide below a Python program that computes this metadata hash:
```python
import base64
import hashlib
extra_metadata_base64 = "iHcUslDaL/jEM/oTxqEX++4CS8o3+IZp7/V5Rgchqwc="
extra_metadata = base64.b64decode(extra_metadata_base64)
json_metadata = """{
"name": "My Picture",
"description": "Lorem ipsum...",
"image": "https://s3.amazonaws.com/your-bucket/images/{id}.png",
"image_integrity": "sha256-47DEQpj8HBSa+/TImW+5JCeuQeRkm5NMpJWZG3hSuFU=",
"image_mimetype": "image/png",
"external_url": "https://mysongs.com/song/{id}",
"extra_metadata": "iHcUslDaL/jEM/oTxqEX++4CS8o3+IZp7/V5Rgchqwc="
}"""
h = hashlib.new("sha512_256")
h.update(b"arc0003/amj")
h.update(json_metadata.encode("utf-8"))
json_metadata_hash = h.digest()
h = hashlib.new("sha512_256")
h.update(b"arc0003/am")
h.update(json_metadata_hash)
h.update(extra_metadata)
am = h.digest()
print("Asset metadata in base64: ")
print(base64.b64encode(am).decode("utf-8"))
```
#### Localized Example
An example of an ARC-3 JSON Metadata file with localized metadata is presented below.
Base metadata file:
```json
{
"name": "Advertising Space",
"description": "Each token represents a unique Ad space in the city.",
"localization": {
"uri": "ipfs://QmWS1VAdMD353A6SDk9wNyvkT14kyCiZrNDYAad4w1tKqT/{locale}.json",
"default": "en",
"locales": [
"en",
"es",
"fr"
],
"integrity": {
"es": "sha256-T0UofLOqdamWQDLok4vy/OcetEFzD8dRLig4229138Y=",
"fr": "sha256-UUM89QQlXRlerdzVfatUzvNrEI/gwsgsN/lGkR13CKw="
}
}
}
```
File `es.json`:
```json
{
"name": "Espacio Publicitario",
"description": "Cada token representa un espacio publicitario único en la ciudad."
}
```
File `fr.json`:
```json
{
"name": "Espace Publicitaire",
"description": "Chaque jeton représente un espace publicitaire unique dans la ville."
}
```
Note that if the base metadata file URI (i.e., the Asset URL) is `ipfs://QmWS1VAdMD353A6SDk9wNyvkT14kyCiZrNDYAad4w1tKqT/metadata.json`, then the `uri` field inside the `localization` field may be the relative URI `{locale}.json`.
## Rationale
These conventions are heavily based on Ethereum Improvement Proposal [ERC-1155 Metadata URI JSON Schema](https://eips.ethereum.org/EIPS/eip-1155) to facilitate interoperobility.
The main differences are highlighted below:
* Asset Name and Asset Unit can be optionally specified in the ASA parameters. This is to allow wallets that are not aware of ARC-3 or that are not able to retrieve the JSON file to still display meaningful information.
* A digest of the JSON Metadata file is included in the ASA parameters to ensure integrity of this file. This is redundant with the URI when IPFS is used. But this is important to ensure the integrity of the JSON file when IPFS is not used.
* Similarly, the JSON Metadata schema is changed to allow to specify the SHA-256 digests of the localized versions as well as the SHA-256 digests of any file pointed by a URI property.
* MIME type fields are added to help clients know how to display the files pointed by URI.
* When extra metadata are provided, the Asset Metadata Hash parameter is computed using SHA-512/256 with prefix for proper domain separation. SHA-512/256 is the hash function used in Algorand in general (see the list of prefixes in ). Domain separation is especially important in this case to avoid mixing hash of the JSON Metadata file with extra metadata. However, since SHA-512/256 is less common and since not every tool or library allows to compute SHA-512/256, when no extra metadata is specified, SHA-256 is used instead.
* Support for relative URI is added to allow storing both the JSON Metadata files and the files it refers to in the same IPFS directory.
Valid JSON Metadata files for ERC-1155 are valid JSON Metadata files for ARC-3. However, it is highly recommended that users always include the additional RECOMMENDED fields, such as the integrity fields.
The asset name is either `arc3` or suffixed by `@arc3` to allow client software to know when an asset follows the conventions.
## Security Considerations
> Not Applicable
## Copyright
Copyright and related rights waived via [CCO](https://creativecommons.org/publicdomain/zero/1.0/).
# Application Binary Interface (ABI)
> Conventions for encoding method calls in Algorand Application
## Abstract
This document introduces conventions for encoding method calls, including argument and return value encoding, in Algorand Application call transactions. The goal is to allow clients, such as wallets and dapp frontends, to properly encode call transactions based on a description of the interface. Further, explorers will be able to show details of these method invocations.
### Definitions
* **Application:** an Algorand Application, aka “smart contract”, “stateful contract”, “contract”, or “app”.
* **HLL:** a higher level language that compiles to TEAL bytecode.
* **dapp (frontend)**: a decentralized application frontend, interpreted here to mean an off-chain frontend (a webapp, native app, etc.) that interacts with Applications on the blockchain.
* **wallet**: an off-chain application that stores secret keys for on-chain accounts and can display and sign transactions for these accounts.
* **explorer**: an off-chain application that allows browsing the blockchain, showing details of transactions.
## Specification
The key words “**MUST**”, “**MUST NOT**”, “**REQUIRED**”, “**SHALL**”, “**SHALL NOT**”, “**SHOULD**”, “**SHOULD NOT**”, “**RECOMMENDED**”, “**MAY**”, and “**OPTIONAL**” in this document are to be interpreted as described in [RFC-2119](https://www.ietf.org/rfc/rfc2119.txt).
> Comments like this are non-normative.
Interfaces are defined in TypeScript. All the objects that are defined are valid JSON objects, and all JSON `string` types are UTF-8 encoded.
### Overview
This document makes recommendations for encoding method invocations as Application call transactions, and for describing methods for access by higher-level entities. Encoding recommendations are intended to be minimal, intended only to allow interoperability among Applications. Higher level recommendations are intended to enhance user-facing interfaces, such as high-level languages, dapps, and wallets. Applications that follow the recommendations described here are called *[ARC-4](/arc-standards/arc-0004) Applications*.
### Methods
A method is a section of code intended to be invoked externally with an Application call transaction. A method must have a name, it may take a list of arguments as input when it is invoked, and it may return a single value (which may be a tuple) when it finishes running. The possible types for arguments and return values are described later in the [Encoding](#encoding) section.
Invoking a method involves creating an Application call transaction to specifically call that method. Methods are different from internal subroutines that may exist in a contract, but are not externally callable. Methods may be invoked by a top-level Application call transaction from an off-chain caller, or by an Application call inner transaction created by another Application.
#### Method Signature
A method signature is a unique identifier for a method. The signature is a string that consists of the method’s name, an open parenthesis, a comma-separated list of the types of its arguments, a closing parenthesis, and the method’s return type, or `void` if it does not return a value. The names of the arguments **MUST NOT** be included in a method’s signature, and **MUST NOT** contain any whitespace.
For example, `add(uint64,uint64)uint128` is the method signature for a method named `add` which takes two uint64 parameters and returns a uint128. Signatures are encoded in ASCII.
For the benefit of universal interoperability (especially in HLLs), names **MUST** satisfy the regular expression `[_A-Za-z][A-Za-z0-9_]*`. Names starting with an underscore are reserved and **MUST** only be used as specified in this ARC or future ABI-related ARC.
#### Method Selector
Method signatures contain all the information needed to identify a method, however the length of a signature is unbounded. Rather than consume program space with such strings, a method selector is used to identify methods in calls. A method selector is the first four bytes of the SHA-512/256 hash of the method signature.
For example, the method selector for a method named `add` which takes two uint64 parameters and returns a uint128 can be computed as follows:
```plaintext
Method signature: add(uint64,uint64)uint128
SHA-512/256 hash (in hex): 8aa3b61f0f1965c3a1cbfa91d46b24e54c67270184ff89dc114e877b1753254a
Method selector (in hex): 8aa3b61f
```
#### Method Description
A method description provides further information about a method beyond its signature. This description is encoded in JSON and consists of a method’s name, description (optional), arguments (their types, and optional names and descriptions), and return type and optional description for the return type. From this structure, the method’s signature and selector can be calculated. The Algorand SDKs provide convenience functions to calculate signatures and selectors from such JSON files.
These details will enable high-level languages and dapps/wallets to properly encode arguments, call methods, and decode return values. This description can populate UIs in dapps, wallets, and explorers with description of parameters, as well as populate information about methods in IDEs for HLLs.
The JSON structure for such an object is:
```typescript
interface Method {
/** The name of the method */
name: string;
/** Optional, user-friendly description for the method */
desc?: string;
/** The arguments of the method, in order */
args: Array<{
/** The type of the argument */
type: string;
/** Optional, user-friendly name for the argument */
name?: string;
/** Optional, user-friendly description for the argument */
desc?: string;
}>;
/** Information about the method's return value */
returns: {
/** The type of the return value, or "void" to indicate no return value. */
type: string;
/** Optional, user-friendly description for the return value */
desc?: string;
};
}
```
For example:
```json
{
"name": "add",
"desc": "Calculate the sum of two 64-bit integers",
"args": [
{ "type": "uint64", "name": "a", "desc": "The first term to add" },
{ "type": "uint64", "name": "b", "desc": "The second term to add" }
],
"returns": { "type": "uint128", "desc": "The sum of a and b" }
}
```
### Interfaces
An Interface is a logically grouped set of methods. All method selectors in an Interface **MUST** be unique. Method names **MAY** not be unique, as long as the corresponding method selectors are different. Method names in Interfaces **MUST NOT** begin with an underscore.
An Algorand Application *implements* an Interface if it supports all of the methods from that Interface. An Application **MAY** implement zero, one, or multiple Interfaces.
Interface designers **SHOULD** try to prevent collisions of method selectors between Interfaces that are likely to be implemented together by the same Application.
> For example, an Interface `Calculator` providing addition and subtraction of integer methods and an Interface `NumberFormatting` providing formatting methods for numbers into strings are likely to be used together. Interface designers should ensure that all the methods in `Calculator` and `NumberFormatting` have distinct method selectors.
#### Interface Description
An Interface description is a JSON object containing the JSON descriptions for each of the methods in the Interface.
The JSON structure for such an object is:
```typescript
interface Interface {
/** A user-friendly name for the interface */
name: string;
/** Optional, user-friendly description for the interface */
desc?: string;
/** All of the methods that the interface contains */
methods: Method[];
}
```
Interface names **MUST** satisfy the regular expression `[_A-Za-z][A-Za-z0-9_]*`. Interface names starting with `ARC` are reserved to interfaces defined in ARC. Interfaces defined in `ARC-XXXX` (where `XXXX` is a 0-padded number) **SHOULD** start with `ARC_XXXX`.
For example:
```json
{
"name": "Calculator",
"desc": "Interface for a basic calculator supporting additions and multiplications",
"methods": [
{
"name": "add",
"desc": "Calculate the sum of two 64-bit integers",
"args": [
{ "type": "uint64", "name": "a", "desc": "The first term to add" },
{ "type": "uint64", "name": "b", "desc": "The second term to add" }
],
"returns": { "type": "uint128", "desc": "The sum of a and b" }
},
{
"name": "multiply",
"desc": "Calculate the product of two 64-bit integers",
"args": [
{ "type": "uint64", "name": "a", "desc": "The first factor to multiply" },
{ "type": "uint64", "name": "b", "desc": "The second factor to multiply" }
],
"returns": { "type": "uint128", "desc": "The product of a and b" }
}
]
}
```
### Contracts
A Contract is a declaration of what an Application implements. It includes the complete list of the methods implemented by the related Application. It is similar to an Interface, but it may include further details about the concrete implementation, as well as implementation-specific methods that do not belong to any Interface. All methods in a Contract **MUST** be unique; specifically, each method **MUST** have a unique method selector.
Method names in Contracts **MAY** begin with underscore, but these names are reserved for use by this ARC and future extensions of this ARC.
#### OnCompletion Actions and Creation
In addition to the set of methods from the Contract’s definition, a Contract **MAY** allow Application calls with zero arguments, also known as bare Application calls. Since method invocations with zero arguments still encode the method selector as the first Application call argument, bare Application calls are always distinguishable from method invocations.
The primary purpose of bare Application calls is to allow the execution of an OnCompletion (`apan`) action which requires no inputs and has no return value. A Contract **MAY** allow this for all of the OnCompletion actions listed below, for only a subset of them, or for none at all. Great care should be taken when allowing these operations.
Allowed OnCompletion actions:
* 0: NoOp
* 1: OptIn
* 2: CloseOut
* 4: UpdateApplication
* 5: DeleteApplication
Note that OnCompletion action 3, ClearState, is **NOT** allowed to be invoked as a bare Application call.
> While ClearState is a valid OnCompletion action, its behavior differs significantly from the other actions. Namely, an Application running during ClearState which wishes to have any effect on the state of the chain must never fail, since due to the unique behavior about ClearState failure, doing so would revert any effect made by that Application. Because of this, Applications running during ClearState are incentivized to never fail. Accepting any user input, whether that is an ABI method selector, method arguments, or even relying on the absence of Application arguments to indicate a bare Application call, is therefore a dangerous operation, since there is no way to enforce properties or even the existence of data that is supplied by the user.
If a Contract elects to allow bare Application calls for some OnCompletion actions, then that Contract **SHOULD** also allow any of its methods to be called with those OnCompletion actions, as long as this would not cause undesirable or nonsensical behavior.
> The reason for this is because if it’s acceptable to allow an OnCompletion action to take place in isolation inside of a bare Application call, then it’s most likely acceptable to allow the same action to take place at the same time as an ABI method call. And since the latter can be accomplished in just one transaction, it can be more efficient.
If a Contract requires an OnCompletion action to take inputs or to return a value, then the **RECOMMENDED** behavior of the Contract is to not allow bare Application calls for that OnCompletion action. Rather, the Contract should have one or more methods that are meant to be called with the appropriate OnCompletion action set in order to process that action.
A Contract **MUST NOT** allow any of its methods to be called with the ClearState OnCompletion action.
> To reinforce an earlier point, it is unsafe for a ClearState program to read any user input, whether that is a method argument or even relying on a certain method selector to be present. This behavior makes it unsafe to use ABI calling conventions during ClearState.
If an Application is called with greater than zero Application call arguments (i.e. **NOT** a bare Application call) and the OnCompletion action is **NOT** ClearState, the Application **MUST** always treat the first argument as a method selector and invoke the specified method. This behavior **MUST** be followed for all OnCompletion actions, except for ClearState. This applies to Application creation transactions as well, where the supplied Application ID is 0.
Similar to OnCompletion actions, if a Contract requires its creation transaction to take inputs or to return a value, then the **RECOMMENDED** behavior of the Contract should be to not allow bare Application calls for creation. Rather, the Contract should have one or more methods that are meant to be called in order to create the Contract.
#### Contract Description
A Contract description is a JSON object containing the JSON descriptions for each of the methods in the Contract.
The JSON structure for such an object is:
```typescript
interface Contract {
/** A user-friendly name for the contract */
name: string;
/** Optional, user-friendly description for the interface */
desc?: string;
/**
* Optional object listing the contract instances across different networks
*/
networks?: {
/**
* The key is the base64 genesis hash of the network, and the value contains
* information about the deployed contract in the network indicated by the
* key
*/
[network: string]: {
/** The app ID of the deployed contract in this network */
appID: number;
}
}
/** All of the methods that the contract implements */
methods: Method[];
}
```
Contract names **MUST** satisfy the regular expression `[_A-Za-z][A-Za-z0-9_]*`.
The `desc` fields of the Contract and the methods inside the Contract **SHOULD** contain information that is not explicitly encoded in the other fields, such as support of bare Application calls, requirement of specific OnCompletion action for specific methods, and methods to call for creation (if creation cannot be done via a bare Application call).
For example:
```json
{
"name": "Calculator",
"desc": "Contract of a basic calculator supporting additions and multiplications. Implements the Calculator interface.",
"networks": {
"wGHE2Pwdvd7S12BL5FaOP20EGYesN73ktiC1qzkkit8=": { "appID": 1234 },
"SGO1GKSzyE7IEPItTxCByw9x8FmnrCDexi9/cOUJOiI=": { "appID": 5678 },
},
"methods": [
{
"name": "add",
"desc": "Calculate the sum of two 64-bit integers",
"args": [
{ "type": "uint64", "name": "a", "desc": "The first term to add" },
{ "type": "uint64", "name": "b", "desc": "The second term to add" }
],
"returns": { "type": "uint128", "desc": "The sum of a and b" }
},
{
"name": "multiply",
"desc": "Calculate the product of two 64-bit integers",
"args": [
{ "type": "uint64", "name": "a", "desc": "The first factor to multiply" },
{ "type": "uint64", "name": "b", "desc": "The second factor to multiply" }
],
"returns": { "type": "uint128", "desc": "The product of a and b" }
}
]
}
```
### Method Invocation
In order for a caller to invoke a method, the caller and the method implementation (callee) must agree on how information will be passed to and from the method. This ABI defines a standard for where this information should be stored and for its format.
This standard does not apply to Application calls with the ClearState OnCompletion action, since it is unsafe for ClearState programs to rely on user input.
#### Standard Format
The method selector must be the first Application call argument (index 0), accessible as `txna ApplicationArgs 0` from TEAL (except for bare Application calls, which use zero application call arguments).
If a method has 15 or fewer arguments, each argument **MUST** be placed in order in the following Application call argument slots (indexes 1 through 15). The arguments **MUST** be encoded as defined in the [Encoding](#encoding) section.
Otherwise, if a method has 16 or more arguments, the first 14 **MUST** be placed in order in the following Application call argument slots (indexes 1 through 14), and the remaining arguments **MUST** be encoded as a tuple in the final Application call argument slot (index 15). The arguments must be encoded as defined in the [Encoding](#encoding) section.
If a method has a non-void return type, then the return value of the method **MUST** be located in the final logged value of the method’s execution, using the `log` opcode. The logged value **MUST** contain a specific 4 byte prefix, followed by the encoding of the return value as defined in the [Encoding](#encoding) section. The 4 byte prefix is defined as the first 4 bytes of the SHA-512/256 hash of the ASCII string `return`. In hex, this is `151f7c75`.
> For example, if the method `add(uint64,uint64)uint128` wanted to return the value 4160, it would log the byte array `151f7c7500000000000000000000000000001040` (shown in hex).
#### Implementing a Method
An ARC-4 Application implementing a method:
1. **MUST** check if `txn NumAppArgs` equals 0. If true, then this is a bare Application call. If the Contract supports bare Application calls for the current transaction parameters (it **SHOULD** check the OnCompletion action and whether the transaction is creating the application), it **MUST** handle the call appropriately and either approve or reject the transaction. The following steps **MUST** be ignored in this case. Otherwise, if the Contract does not support this bare application call, the Contract **MUST** reject the transaction.
2. **MUST** examine `txna ApplicationArgs 0` to identify the selector of the method being invoked. If the contract does not implement a method with that selector, the Contract **MUST** reject the transaction.
3. **MUST** execute the actions required to implement the method being invoked. In general, this works by branching to the body of the method indicated by the selector.
4. The code for that method **MAY** extract the arguments it needs, if any, from the application call arguments as described in the [Encoding](#encoding) section. If the method has more than 15 arguments and the contract needs to extract an argument beyond the 14th, it **MUST** decode `txna ApplicationArgs 15` as a tuple to access the arguments contained in it.
5. If the method is non-void, the Application **MUST** encode the return value as described in the [Encoding](#encoding) section and then `log` it with the prefix `151f7c75`. Other values **MAY** be logged before the return value, but other values **MUST NOT** be logged after the return value.
#### Calling a Method from Off-Chain
To invoke an ARC-4 Application, an off-chain system, such as a dapp or wallet, would first obtain the Interface or Contract description JSON object for the app. The client may now:
1. Create an Application call transaction with the following parameters:
1. Use the ID of the desired Application whose program code implements the method being invoked, or 0 if they wish to create the Application.
2. Use the selector of the method being invoked as the first Application call argument.
3. Encode all arguments for the method, if any, as described in the [Encoding](#encoding) section. If the method has more than 15 arguments, encode all arguments beyond (but not including) the 14th as a tuple into the final Application call argument.
2. Submit this transaction and wait until it successfully commits to the blockchain.
3. Decode the return value, if any, from the ApplyData’s log information.
Clients **MAY** ignore the return value.
An exception to the above instructions is if the app supports bare Application calls for some transaction parameters, and the client wishes to invoke this functionality. Then the client may simply create and submit to the network an Application call transaction with the ID of the Application (or 0 if they wish to create the application) and the desired OnCompletion value set. Application arguments **MUST NOT** be present.
### Encoding
This section describes how ABI types can be represented as byte strings.
Like the [EthereumABI](https://docs.soliditylang.org/en/v0.8.6/abi-spec.html), this encoding specification is designed to have the following two properties:
1. The number of non-sequential “reads” necessary to access a value is at most the depth of that value inside the encoded array structure. For example, at most 4 reads are needed to retrieve a value at `a[i][k][l][r]`.
2. The encoding of a value or array element is not interleaved with other data and it is relocatable, i.e. only relative “addresses” (indexes to other parts of the encoding) are used.
#### Types
The following types are supported in the Algorand ABI.
* `uint`: An `N`-bit unsigned integer, where `8 <= N <= 512` and `N % 8 = 0`. When this type is used as part of a method signature, `N` must be written as a base 10 number without any leading zeros.
* `byte`: An alias for `uint8`.
* `bool`: A boolean value that is restricted to either 0 or 1. When encoded, up to 8 consecutive `bool` values will be packed into a single byte.
* `ufixedx`: An `N`-bit unsigned fixed-point decimal number with precision `M`, where `8 <= N <= 512`, `N % 8 = 0`, and `0 < M <= 160`, which denotes a value `v` as `v / (10^M)`. When this type is used as part of a method signature, `N` and `M` must be written as base 10 numbers without any leading zeros.
* `[]`: A fixed-length array of length `N`, where `N >= 0`. `type` can be any other type. When this type is used as part of a method signature, `N` must be written as a base 10 number without any leading zeros, *unless* `N` is zero, in which case only a single 0 character should be used.
* `address`: Used to represent a 32-byte Algorand address. This is equivalent to `byte[32]`.
* `[]`: A variable-length array. `type` can be any other type.
* `string`: A variable-length byte array (`byte[]`) assumed to contain UTF-8 encoded content.
* `(T1,T2,…,TN)`: A tuple of the types `T1`, `T2`, …, `TN`, `N >= 0`.
* reference types `account`, `asset`, `application`: **MUST NOT** be used as the return type. For encoding purposes they are an alias for `uint8`. See section “Reference Types” below.
Additional special use types are defined in [Reference Types](#reference-types) and [Transaction Types](#transaction-types).
#### Static vs Dynamic Types
For encoding purposes, the types are divided into two categories: static and dynamic.
The dynamic types are:
* `[]` for any `type`
* This includes `string` since it is an alias for `byte[]`.
* `[]` for any dynamic `type`
* `(T1,T2,...,TN)` if `Ti` is dynamic for some `1 <= i <= N`
All other types are static. For a static type, all encoded values of that type have the same length, irrespective of their actual value.
#### Encoding Rules
Let `len(a)` be the number of bytes in the binary string `a`. The returned value shall be considered to have the ABI type `uint16`.
Let `enc` be a mapping from values of the ABI types to binary strings. This mapping defines the encoding of the ABI.
For any ABI value `x`, we recursively define `enc(x)` to be as follows:
* If `x` is a tuple of `N` types, `(T1,T2,...,TN)`, where `x[i]` is the value at index `i`, starting at 1:
* `enc(x) = head(x[1]) ... head(x[N]) tail(x[1]) ... tail(x[N])`
* Let `head` and `tail` be mappings from values in this tuple to binary strings. For each `i` such that `1 <= i <= N`, these mappings are defined as:
* If `Ti` (the type of `x[i]`) is static:
* If `Ti` is `bool`:
* Let `after` be the largest integer such that all `T(i+j)` are `bool`, for `0 <= j <= after`.
* Let `before` be the largest integer such that all `T(i-j)` are `bool`, for `0 <= j <= before`.
* If `before % 8 == 0`:
* `head(x[i]) = enc(x[i]) | (enc(x[i+1]) >> 1) | ... | (enc(x[i + min(after,7)]) >> min(after,7))`, where `>>` is bitwise right shift which pads with 0, `|` is bitwise or, and `min(x,y)` returns the minimum value of the integers `x` and `y`.
* `tail(x[i]) = ""` (the empty string)
* Otherwise:
* `head(x[i]) = ""` (the empty string)
* `tail(x[i]) = ""` (the empty string)
* Otherwise:
* `head(x[i]) = enc(x[i])`
* `tail(x[i]) = ""` (the empty string)
* Otherwise:
* `head(x[i]) = enc(len( head(x[1]) ... head(x[N]) tail(x[1]) ... tail(x[i-1]) ))`
* `tail(x[i]) = enc(x[i])`
* If `x` is a fixed-length array `T[N]`:
* `enc(x) = enc((x[0], ..., x[N-1]))`, i.e. it’s encoded as if it were an `N` element tuple where every element is type `T`.
* If `x` is a variable-length array `T[]` with `k` elements:
* `enc(x) = enc(k) enc([x[0], ..., x[k-1]])`, i.e. it’s encoded as if it were a fixed-length array of `k` elements, prefixed with its length, `k` encoded as a `uint16`.
* If `x` is an `N`-bit unsigned integer, `uint`:
* `enc(x)` is the `N`-bit big-endian encoding of `x`.
* If `x` is an `N`-bit unsigned fixed-point decimal number with precision `M`, `ufixedx`:
* `enc(x) = enc(x * 10^M)`, where `x * 10^M` is interpreted as a `uint`.
* If `x` is a boolean value `bool`:
* `enc(x)` is a single byte whose **most significant bit** is either 1 or 0, if `x` is true or false respectively. All other bits are 0. Note: this means that a value of true will be encoded as `0x80` (`10000000` in binary) and a value of false will be encoded as `0x00`. This is in contrast to most other encoding schemes, where a value of true is encoded as `0x01`.
Other aliased types’ encodings are already covered:
* `string` and `address` are aliases for `byte[]` and `byte[32]` respectively
* `byte` is an alias for `uint8`
* each of the reference types is an alias for `uint8`
#### Reference Types
Three special types are supported *only* as the type of an argument. They *can* be embedded in arrays and tuples.
* `account` represents an Algorand account, stored in the Accounts (`apat`) array
* `asset` represents an Algorand Standard Asset (ASA), stored in the Foreign Assets (`apas`) array
* `application` represents an Algorand Application, stored in the Foreign Apps (`apfa`) array
Some AVM opcodes require specific values to be placed in the “foreign arrays” of the Application call transaction. These three types allow methods to describe these requirements. To encode method calls that have these types as arguments, the value in question is placed in the Accounts (`apat`), Foreign Assets (`apas`), or Foreign Apps (`apfa`) arrays, respectively, and a `uint8` containing the index of the value in the appropriate array is encoded in the normal location for this argument.
Note that the Accounts and Foreign Apps arrays have an implicit value at index 0, the Sender of the transaction or the called Application, respectively. Therefore, indexes of any additional values begin at 1. Additionally, for efficiency, callers of a method that wish to pass the transaction Sender as an `account` value or the called Application as an `application` value **SHOULD** use 0 as the index of these values and not explicitly add them to Accounts or Foreign Apps arrays.
When passing addresses, ASAs, or apps that are *not* required to be accessed by such opcodes, ARC-4 Contracts **SHOULD** use the base types for passing these types: `address` for accounts and `uint64` for asset or Application IDs.
#### Transaction Types
Some apps require that they are invoked as part of a larger transaction group, containing specific additional transactions. Seven additional special types are supported (only) as argument types to describe such requirements.
* `txn` represents any Algorand transaction
* `pay` represents a PaymentTransaction (algo transfer)
* `keyreg` represents a KeyRegistration transaction (configure consensus participation)
* `acfg` represent a AssetConfig transaction (create, configure, or destroy ASAs)
* `axfer` represents an AssetTransfer transaction (ASA transfer)
* `afrz` represents an AssetFreezeTx transaction (freeze or unfreeze ASAs)
* `appl` represents an ApplicationCallTx transaction (create/invoke a Application)
Arguments of these types are encoded as consecutive transactions in the same transaction group as the Application call, placed in the position immediately preceding the Application call. Unlike “foreign” references, these special types are not encoded in ApplicationArgs as small integers “pointing” to the associated object. In fact, they occupy no space at all in the Application Call transaction itself. Allowing explicit references would create opportunities for multiple transaction “values” to point to the same transaction in the group, which is undesirable. Instead, the locations of the transactions are implied entirely by the placement of the transaction types in the argument list.
For example, to invoke the method `deposit(string,axfer,pay,uint32)void`, a client would create a transaction group containing, in this order:
1. an asset transfer
2. a payment
3. the actual Application call
When encoding the other (non-transaction) arguments, the client **MUST** act as if the transaction arguments were completely absent from the method signature. The Application call would contain the method selector in ApplicationArgs\[0], the first (string) argument in ApplicationArgs\[1], and the fourth (uint32) argument in ApplicationArgs\[2].
ARC-4 Applications **SHOULD** be constructed to allow their invocations to be combined with other contract invocations in a single atomic group if they can do so safely. For example, they **SHOULD** use `gtxns` to examine the previous index in the group for a required `pay` transaction, rather than hardcode an index with `gtxn`.
In general, an ARC-4 Application method with `n` transactions as arguments **SHOULD** only inspect the `n` previous transactions. In particular, it **SHOULD NOT** inspect transactions after and it **SHOULD NOT** check the size of a transaction group (if this can be done safely). In addition, a given method **SHOULD** always expect the same number of transactions before itself. For example, the method `deposit(string,axfer,pay,uint32)void` is always preceded by two transactions. It is never the case that it can be called only with one asset transfer but no payment transfer.
> The reason for the above recommendation is to provide minimal composability support while preventing obvious dangerous attacks. For example, if some apps expect payment transactions after them while other expect payment transaction before them, then the same payment may be counted twice.
## Rationale
## Security Considerations
None.
## Copyright
Copyright and related rights waived via [CCO](https://creativecommons.org/publicdomain/zero/1.0/).
# Wallet Transaction Signing API (Functional)
> An API for a function used to sign a list of transactions.
> This ARC is intended to be completely compatible with [ARC-1](/arc-standards/arc-0001).
## Abstract
ARC-1 defines a standard for signing transactions with security in mind. This proposal is a strict subset of ARC-1 that outlines only the minimum functionality required in order to be useable.
Wallets that conform to ARC-1 already conform to this API.
Wallets conforming to [ARC-5](/arc-standards/arc-0005) but not ARC-1 **MUST** only be used for testing purposes and **MUST NOT** used on MainNet. This is because this ARC-5 does not provide the same security guarantees as ARC-1 to protect properly wallet users.
## Specification
The key words “**MUST**”, “**MUST NOT**”, “**REQUIRED**”, “**SHALL**”, “**SHALL NOT**”, “**SHOULD**”, “**SHOULD NOT**”, “**RECOMMENDED**”, “**MAY**”, and “**OPTIONAL**” in this document are to be interpreted as described in [RFC-2119](https://www.ietf.org/rfc/rfc2119.txt).
> Comments like this are non-normative.
### Interface `SignTxnsFunction`
Signatures are requested by calling a function `signTxns(txns)` on a list `txns` of transactions. The dApp may also provide an optional parameter `opts`.
A wallet transaction signing function `signTxns` is defined by the following interface:
```ts
export type SignTxnsFunction = (
txns: WalletTransaction[],
opts?: SignTxnsOpts,
)
=> Promise<(SignedTxnStr | null)[]>;
```
* `SignTxnsOpts` is as specified by [ARC-1](/arc-standards/arc-0001#interface-signtxnsopts).
* `SignedTxnStr` is as specified by [ARC-1](/arc-standards/arc-0001#interface-signedtxnstr).
A `SignTxnsFunction`:
* expects `txns` to be in the correct format as specified by `WalletTransaction`.
### Interface `WalletTransaction`
```ts
export interface WalletTransaction {
/**
* Base64 encoding of the canonical msgpack encoding of a Transaction.
*/
txn: string;
}
```
### Semantic requirements
* The call `signTxns(txns, opts)` **MUST** either throw an error or return an array `ret` of the same length as the `txns` array.
* Each element of `ret` **MUST** be a valid `SignedTxnStr` with the underlying transaction exactly matching `txns[i].txn`.
This ARC uses interchangeably the terms “throw an error” and “reject a promise with an error”.
`signTxns` **SHOULD** follow the error standard specified in [ARC-0001](/arc-standards/arc-0001#error-standards).
### UI requirements
Wallets satisfying this ARC but not [ARC-0001](/arc-standards/arc-0001) **MUST** clearly display a warning to the user that they **MUST** not be used with real funds on MainNet.
## Rationale
This simplified version of ARC-0001 exists for two main reasons:
1. To outline the minimum amount of functionality needed in order to be useful.
2. To serve as a stepping stone towards full ARC-0001 compatibility.
While this ARC **MUST** not be used by users with real funds on MainNet for security reasons, this simplified API sets a lower bar and acts as a signpost for which wallets can even be used at all.
## Security Considerations
None.
## Copyright
Copyright and related rights waived via [CCO](https://creativecommons.org/publicdomain/zero/1.0/).
# Algorand Wallet Address Discovery API
> API function, enable, which allows the discovery of accounts
## Abstract
A function, `enable`, which allows the discovery of accounts. Optional functions, `enableNetwork` and `enableAccounts`, which handle the multiple capabilities of `enable` separately. This document requires nothing else, but further semantic meaning is prescribed to these functions in [ARC-0010](/arc-standards/arc-0010#semantic-requirements) which builds off of this one and a few others. The caller of this function is usually a dApp.
## Specification
The key words “**MUST**”, “**MUST NOT**”, “**REQUIRED**”, “**SHALL**”, “**SHALL NOT**”, “**SHOULD**”, “**SHOULD NOT**”, “**RECOMMENDED**”, “**MAY**”, and “**OPTIONAL**” in this document are to be interpreted as described in [RFC-2119](https://www.ietf.org/rfc/rfc2119.txt).
> Comments like this are non-normative.
### Interface `EnableFunction`
```ts
export type AlgorandAddress = string;
export type GenesisHash = string;
export type EnableNetworkFunction = (
opts?: EnableNetworkOpts
) => Promise;
export type EnableAccountsFunction = (
opts?: EnableAccountsOpts
) => Promise;
export type EnableFunction = (
opts?: EnableOpts
) => Promise;
export type EnableOpts = (
EnableNetworkOpts & EnableAccountsOpts
);
export interface EnableNetworkOpts {
genesisID?: string;
genesisHash?: GenesisHash;
};
export interface EnableAccountsOpts {
accounts?: AlgorandAddress[];
};
export type EnableResult = (
EnableNetworkResult & EnableAccountsResult
);
export interface EnableNetworkResult {
genesisID: string;
genesisHash: GenesisHash;
}
export interface EnableAccountsResult {
accounts: AlgorandAddress[];
}
export interface EnableError extends Error {
code: number;
data?: any;
}
```
An `EnableFunction` with optional input argument `opts:EnableOpts` **MUST** return a value `ret:EnableResult` or **MUST** throw an exception object of type `EnableError`.
#### String specification: `GenesisID` and `GenesisHash`
A `GenesisID` is an ascii string
A `GenesisHash` is base64 string representing a 32-byte genesis hash.
#### String specification: `AlgorandAddress`
Defined as in [ARC-0001](/arc-standards/arc-0001#interface-algorandaddress):
> An Algorand address is represented by a 58-character base32 string. It includes includes the checksum.
#### Error Standards
`EnableError` follows the same rules as `SignTxnsError` from [ARC-0001](/arc-standards/arc-0001#error-interface-signtxnserror) and uses the same status error codes.
### Interface `WalletAccountManager`
```ts
export interface WalletAccountManager {
switchAccount: (addr: AlgorandAddress) => Promise
switchNetwork: (genesisID: string) => Promise
onAccountSwitch: (hook: (addr: AlgorandAddress) => void)
onNetworkSwitch: (hook: (genesisID: string, genesisHash: GenesisHash) => void)
}
```
Wallets SHOULD expose `switchAccount` function to allow an app to switch an account to another one managed by the wallet. The `switchAccount` function should return a promise which will be fulfilled when the wallet will effectively switch an account. The function must thrown an `Error` exception when the wallet can’t execute the switch (for example, the provided address is not managed by the wallet or when the address is not a valid Algorand address).
Similarly, wallets SHOULD expose `switchNetwork` function to instrument a wallet to switch to another network. The function must thrown an `Error` exception when the wallet can’t execute the switch (for example, when the provided genesis ID is not recognized by the wallet).
Very often, webapp have their own state with information about the user (provided by the account address) and a network. For example, a webapp can list all compatible Smart Contracts for a given network. For descent integration with a wallet, we must be able to react in a webapp on the account and network switch from the wallet interface. For that we define 2 functions which MUST be exposed by wallets: `onAccountSwitch` and `onNetworkSwitch`. These function will register a hook and will call it whenever a user switches respectively an account or network from the wallet interface.
### Semantic requirements
This ARC uses interchangeably the terms “throw an error” and “reject a promise with an error”.
#### First call to `enable`
Regarding a first call by a caller to `enable(opts)` or `enable()` (where `opts` is `undefined`), with potential promised return value `ret`:
When `genesisID` and/or `genesisHash` is specified in `opts`:
* The call `enable(opts)` **MUST** either throw an error or return an object `ret` where `ret.genesisID` and `ret.genesisHash` match `opts.genesisID` and `opts.genesisHash` (i.e., `ret.genesisID` is identical to `opts.genesisID` if `opts.genesisID` is specified, and `ret.genesisHash` is identical to `opts.genesisHash` if `opts.genesisHash` is specified).
* The user **SHOULD** be prompted for permission to acknowledge control of accounts on that specific network (defined by `ret.genesisID` and `ret.genesisHash`).
* In the case only `opts.genesisID` is provided, several networks may match this ID and the user **SHOULD** be prompted to select the network they wish to use.
When neither `genesisID` nor `genesisHash` is specified in `opts`:
* The user **SHOULD** be prompted to select the network they wish to use.
* The call `enable(opts)` **MUST** either throw an error or return an object `ret` where `ret.genesisID` and `ret.genesisHash` **SHOULD** represent the user’s selection of network.
* The function **MAY** throw an error if it does not support user selection of network.
When `accounts` is specified in `opts`:
* The call `enable(opts)` **MUST** either throw an error or return an object `ret` where `ret.accounts` is an array that starts with all the same elements as `opts.accounts`, in the same order.
* The user **SHOULD** be prompted for permission to acknowledge their control of the specified accounts. The wallet **MAY** allow the user to provide more accounts than those listed. The wallet **MAY** allow the user to select fewer accounts than those listed, in which the wallet **MUST** return an error which **SHOULD** be a user rejected error and contain the rejected accounts in `data.accounts`.
When `accounts` is not specified in `opts`:
* The user **SHOULD** be prompted to select the accounts they wish to reveal on the selected network.
* The call `enable(opts)` **MUST** either throw an error or return an object `ret` where `ret.accounts` is a empty or non-empty array.
* If `ret.accounts` is not empty, the caller **MAY** assume that `ret.accounts[0]` is the user’s “currently-selected” or “default” account, for DApps that only require access to one account.
> Empty `ret.accounts` array are used to allow a DApp to get access to an Algorand node but not to signing capabilities.
#### Network
In addition to the above rules, in all cases, if `ret.genesisID` is one of the official network `mainnet-v1.0`, `testnet-v1.0`, or `betanet-v1.0`, `ret.genesisHash` **MUST** match the genesis hash of those networks
| Genesis ID | Genesis Hash |
| -------------- | ---------------------------------------------- |
| `mainnet-v1.0` | `wGHE2Pwdvd7S12BL5FaOP20EGYesN73ktiC1qzkkit8=` |
| `testnet-v1.0` | `SGO1GKSzyE7IEPItTxCByw9x8FmnrCDexi9/cOUJOiI=` |
| `betanet-v1.0` | `mFgazF+2uRS1tMiL9dsj01hJGySEmPN28B/TjjvpVW0=` |
When using a genesis ID that is not one of the above, the caller **SHOULD** always provide a `genesisHash`. This is because a `genesisID` does not uniquely define a network in that case. If a caller does not provide a `genesisHash`, multiple calls to `enable` may return a different network with the same `genesisID` but a different `genesisHash`.
#### Identification of the caller
The `enable` function **MAY** remember the choices of the user made by a specific caller and use them everytime the same caller calls the function. The function **MUST** ensure that the caller can be securely identified. In particular, by default, the function **MUST NOT** allow webapps on the http protocol to call it, as such webapps can easily be modified by a man-in-the-middle attacker. In the case of callers that are https websites, the caller **SHOULD** be identified by its fully qualified domain name.
The function **MAY** offer the user some “developer mode” or “advanced” options to allow calls from insecure dApps. In that case, the fact that the caller is insecure and/or the fact that the wallet in “developer mode” **MUST** be clearly displayed by the wallet.
#### Multiple calls to `enable`
The same caller **MAY** call multiple time the `enable` function. When the caller is a dApp, every time a dApp is refreshed, it actually **SHOULD** call the `enable()` function.
The `enable` function **MAY NOT** return the same value every time it is called, even when called with the exact same argument `opts`. The caller **MUST NOT** assume that the `enable` function will always return the same value, and **MUST** properly handle changes of available accounts and/or changes of network.
For example, a user may want to change network or accounts for a dApp. That is why, upon refresh, the dApp **SHOULD** automatically switch network and perform all required changes. Examples of required changes include but are not limited to change of the list of accounts, change of statuses of the account (e.g., opted in or not), change of the balances of the accounts.
### `enableNetwork` and `enableAccounts`
It may be desirable for a dapp to perform network queries prior to requesting that the user enable an account for use with the dapp. Wallets may provide the functionality of `enable` in two parts: `enableNetwork` for network discovery, and `enableAccounts` for account discovery, which together are the equivalent of calling `enable`.
## Rationale
This API puts power in the user’s hands to choose a preferred network and account to use when interacting with a dApp.
It also allows dApp developers to suggest a specific network, or specific accounts, as appropriate. The user still maintains the ability to reject the dApp’s suggestions, which corresponds to rejecting the promise returned by `enable()`.
## Security Considerations
None.
## Copyright
Copyright and related rights waived via [CCO](https://creativecommons.org/publicdomain/zero/1.0/).
# Algorand Wallet Post Transactions API
> API function to Post Signed Transactions to the network.
## Abstract
A function, `postTxns`, which accepts an array of `SignedTransaction`s, and posts them to the network.
## Specification
The key words “**MUST**”, “**MUST NOT**”, “**REQUIRED**”, “**SHALL**”, “**SHALL NOT**”, “**SHOULD**”, “**SHOULD NOT**”, “**RECOMMENDED**”, “**MAY**”, and “**OPTIONAL**” in this document are to be interpreted as described in [RFC-2119](https://www.ietf.org/rfc/rfc2119.txt).
> Comments like this are non-normative.
This ARC uses interchangeably the terms “throw an error” and “reject a promise with an error”.
### Interface `PostTxnsFunction`
```ts
export type TxnID = string;
export type SignedTxnStr = string;
export type PostTxnsFunction = (
stxns: SignedTxnStr[],
) => Promise;
export interface PostTxnsResult {
txnIDs: TxnID[];
}
export interface PostTxnsError extends Error {
code: number;
data?: any;
successTxnIDs: (TxnID | null)[];
}
```
A `PostTxnsFunction` with input argument `stxns:string[]` and promised return value `ret:PostTxnsResult`:
* expects `stxns` to be in the correct string format as specified by `SignedTxnStr` (defined below).
* **MUST**, if successful, return an object `ret` such that `ret.txID` is in the correct string format as specified by `TxID`.
> The use of `txID` instead of `txnID` is to follow the standard name for the transaction ID.
### String specification: `SignedTxnStr`
Defined as in [ARC-0001](/arc-standards/arc-0001#interface-signedtxnstr):
> \[`SignedTxnStr` is] the base64 encoding of the canonical msgpack encoding of the `SignedTxn` corresponding object, as defined in the [Algorand specs](https://github.com/algorandfoundation/specs).
### String specification: `TxnID`
A `TxnID` is a 52-character base32 string (without padding) corresponding to a 32-byte string. For example: `H2KKVITXKWL2VBZBWNHSYNU3DBLYBXQAVPFPXBCJ6ZZDVXQPSRTQ`.
### Error standard
`PostTxnsError` follows the same rules as `SignTxnsError` from [ARC-0001](/arc-standards/arc-0001#error-interface-signtxnserror) and uses the same status codes as well as the following status codes:
| Status Code | Name | Description |
| ----------- | --------------------------------- | ----------------------------------------- |
| 4400 | Failure Sending Some Transactions | Some transactions were not sent properly. |
### Semantic requirements
Regarding a call to `postTxns(stxns)` with promised return value `ret`:
* `postTxns` **MAY** assume that `stxns` is an array of valid `SignedTxnStr` strings that represent correctly signed transactions such that:
* Either all transaction belong to the same group of transactions and are in the correct order. In other words, either `stxns` is an array of a single transaction with a zero group ID (`txn.Group`), or `stxns` is an array of one or more transactions with the *same* non-zero group ID. The function **MUST** reject if the transactions do not match their group ID. (The caller must provide the transactions in the order defined by the group ID.)
> An early draft of this ARC required that the size of a group of transactions must be greater than 1 but, since the Algorand protocol supports groups of size 1, this requirement had been changed so dApps don’t have to have special cases for single transactions and can always send a group to the wallet.
* Or `stxns` is a concatenation of arrays satisfying the above.
* `postTxns` **MUST** attempt to post all transactions together. With the `algod` v2 API, this implies splitting the transactions into groups and making an API call per transaction group. `postTxns` **SHOULD NOT** wait after each transaction group but post all of them without pause in-between.
* `postTxns` **MAY** ask the user whether they approve posting those transactions.
> A dApp can always post transactions itself without the help of `postTxns` when a public network is used. However, when a private network is used, a dApp may need `postTxns`, and in this case, asking the user’s approval can make sense. Another such use case is when the user uses a specific trusted node that has some legal restrictions.
* `postTxns` **MUST** wait for confirmation that the transactions are finalized.
> TODO: Decide whether to add an optional flag to not wait for that.
* If successful, `postTxns` **MUST** resolve the returned promise with the list of transaction IDs `txnIDs` of the posted transactions `stxn`.
* If unsuccessful, `postTxns` **MUST** reject the promise with an error `err` of type `PostTxnsError` such that:
* `err.code=4400` if there was a failure sending the transactions or a code as specified in [ARC-0001](/arc-standards/arc-0001#error-standards) if the user or function disallowed posting the transactions.
* `err.message` **SHOULD** describe what went wrong in as much detail as possible.
* `err.successTxnIDs` **MUST** be an array such that `err.successTxnID[i]` is the transaction ID of `stxns[i]` if `stxns[i]` was successfully committed to the blockchain, and `null` otherwise.
### Security considerations
In case the wallet uses an API service that is secret or provided by the user, the wallet **MUST** ensure that the URL of the service and the potential tokens/headers are not leaked to the dApp.
> Leakage may happen by accidentally including too much information in responses or errors returned by the various methods. For example, if the Node.JS superagent library is used without filtering errors and responses, errors and responses may include the request object, which includes the potentially secret API service URL / secret token headers.
## Rationale
This API allows DApps to use a user’s preferred connection in order to submit transactions to the network.
The user may wish to use a specific trusted node, or a particular paid service with their own secret token. This API protects the user’s secrets by not exposing connection details to the DApp.
## Security Considerations
None.
## Copyright
Copyright and related rights waived via [CCO](https://creativecommons.org/publicdomain/zero/1.0/).
# Algorand Wallet Sign and Post API
> A function used to simultaneously sign and post transactions to the network.
## Abstract
A function `signAndPostTxns`, which accepts an array of `WalletTransaction`s, and posts them to the network.
Accepts the inputs to [ARC-0001](/arc-standards/arc-0001#interface-signtxnsfunction)’s / [ARC-0005](/arc-standards/arc-0005#interface-signtxnsfunction)’s `signTxns`, and produces the output of [ARC-0007](/arc-standards/arc-0007#interface-posttxnsfunction)’s `postTxns`.
## Specification
### Interface `SignAndPostTxnsFunction`
```ts
export type SignAndPostTxnsFunction = (
txns: WalletTransaction[],
opts?: any,
) => Promise;
```
* `WalletTransaction` is as specified by [ARC-0005](/arc-standards/arc-0005#interface-wallettransaction).
* `PostTxnsResult` is as specified by [ARC-0007](/arc-standards/arc-0007#interface-posttxnsfunction).
Errors are handled exactly as specified by [ARC-0001](/arc-standards/arc-0001#error-standards) and [ARC-0007](/arc-standards/arc-0007#error-standard)
## Rationale
Allows the user to be sure that what they are signing is in fact all that is being sent. Doesn’t necessarily grant the DApp direct access to the signed txns, though they are posted to the network, so they should not be considered private.
Exposing only this API instead of exposing `postTxns` directly is potentially safer for the wallet user, since it only allows the posting of transactions which the user has explicitly approved.
## Security Considerations
In case the wallet uses an API service that is secret or provided by the user, the wallet **MUST** ensure that the URL of the service and the potential tokens/headers are not leaked to the dApp.
> Leakage may happen by accidentally including too much information in responses or errors returned by the various methods. For example, if the nodeJS superagent library is used without filtering errors and responses, errors and responses may include the request object, which includes the potentially secret API service URL / secret token headers.
For dApps using the `signAndPostTxns` function, it is **RECOMMENDED** to display a Waiting/Loading Screen to wait until the transaction is confirmed to prevent potential issues.
> The reasoning is the following: the pop-up/window in which the wallet is showing the waiting/loading screen may disappear in some cases (e.g., if the user clicks away from it). If it disappears, the user may be tempted to perform again the action, causing significant damages.
## Copyright
Copyright and related rights waived via [CCO](https://creativecommons.org/publicdomain/zero/1.0/).
# Algorand Wallet Algodv2 and Indexer API
> An API for accessing Algod and Indexer through a user's preferred connection.
## Abstract
Functions `getAlgodv2Client` and `getIndexerClient` which return a `BaseHTTPClient` that can be used to construct an `Algodv2Client` and an `IndexerClient` respectively (from the [JS SDK](https://github.com/algorand/js-algorand-sdk/blob/develop/src/client/baseHTTPClient.ts));
## Specification
### Interface `GetAlgodv2ClientFunction`
```ts
type GetAlgodv2ClientFunction = () => Promise
```
Returns a promised `BaseHTTPClient` that can be used to then build an `Algodv2Client`, where `BaseHTTPClient` is an interface matching the interface `algosdk.BaseHTTPClient` from the [JS SDK](https://github.com/algorand/js-algorand-sdk/blob/develop/src/client/baseHTTPClient.ts)).
### Interface `GetIndexerClientFunction`
```ts
type GetIndexerClientFunction = () => Promise
```
Returns a promised `BaseHTTPClient` that can be used to then build an `Indexer`, where `BaseHTTPClient` is an interface matching the interface `algosdk.BaseHTTPClient` from the [JS SDK](https://github.com/algorand/js-algorand-sdk/blob/develop/src/client/baseHTTPClient.ts)).
### Security considerations
The returned `BaseHTTPClient` **SHOULD** filter the queries made to prevent potential attacks and reject (i.e., throw an exception) if this is not satisfied. A non-exhaustive list of checks is provided below:
* Check that the relative PATH does not contain `..`.
* Check that the only provided headers are the ones used by the SDK (when this ARC was written: `accept` and `content-type`) and their values are the ones provided by the SDK.
`BaseHTTPClient` **MAY** impose rate limits.
For higher security, `BaseHTTPClient` **MAY** also check the queries with regards to the OpenAPI specification of the node and the indexer.
In case the wallet uses an API service that is secret or provided by the user, the wallet **MUST** ensure that the URL of the service and the potential tokens/headers are not leaked to the dApp.
> Leakage may happen by accidentally including too much information in responses or errors returned by the various methods. For example, if the nodeJS superagent library is used without filtering errors and responses, errors and responses may include the request object, which includes the potentially secret API service URL / secret token headers.
## Rationale
Nontrivial dApps often require the ability to query the network for activity. Algorand dApps written without regard to wallets are likely written using `Algodv2` and `Indexer` from `algosdk`. This document allows dApps to instantiate `Algodv2` and `Indexer` for a wallet API service, making it easy for JavaScript dApp authors to port their code to work with wallets.
## Security Considerations
None.
## Copyright
Copyright and related rights waived via [CCO](https://creativecommons.org/publicdomain/zero/1.0/).
# Algorand Wallet Reach Minimum Requirements
> Minimum requirements for Reach to function with a given wallet.
## Abstract
An amalgamation of APIs which comprise the minimum requirements for Reach to be able to function correctly with a given wallet.
## Specification
A group of related functions:
* `enable` (**REQUIRED**)
* `enableNetwork` (**OPTIONAL**)
* `enableAccounts` (**OPTIONAL**)
* `signAndPostTxns` (**REQUIRED**)
* `getAlgodv2Client` (**REQUIRED**)
* `getIndexerClient` (**REQUIRED**)
* `signTxns` (**OPTIONAL**)
* `postTxns` (**OPTIONAL**)
* `enable`: as specified in [ARC-0006](/arc-standards/arc-0006#interface-enablefunction).
* `signAndPostTxns`: as specified in [ARC-0008](/arc-standards/arc-0008#interface-signandposttxnsfunction).
* `getAlgodv2Client` and `getIndexerClient`: as specified in [ARC-0009](/arc-standards/arc-0009#specification).
* `signTxns`: as specified in [ARC-0005](/arc-standards/arc-0005#interface-signtxnsfunction) / [ARC-0001](/arc-standards/arc-0001#interface-signtxnsfunction).
* `postTxns`: as specified in [ARC-0007](/arc-standards/arc-0007#interface-posttxnsfunction).
There are additional semantics for using these functions together.
### Semantic Requirements
* `enable` **SHOULD** be called before calling the other functions and upon refresh of the dApp.
* Calling `enableNetwork` and then `enableAccounts` **MUST** be equivalent to calling `enable`.
* If used instead of `enable`: `enableNetwork` **SHOULD** be called before `enableAccounts` and `getIndexerClient`. Both `enableNetwork` and `enableAccounts` **SHOULD** be called before the other functions.
* If `signAndPostTxns`, `getAlgodv2Client`, `getIndexerClient`, `signTxns`, or `postTxns` are called before `enable` (or `enableAccounts`), they **SHOULD** throw an error object with property `code=4202`. (See Error Standards in [ARC-0001](/arc-standards/arc-0001#error-standards)).
* `getAlgodv2Client` and `getIndexerClient` **MUST** return connections to the network indicated by the `network` result of `enable`.
* `signAndPostTxns` **MUST** post transactions to the network indicated by the `network` result of `enable`
* The result of `getAlgodv2Client` **SHOULD** only be used to query the network. `postTxns` (if available) and `signAndPostTxns` **SHOULD** be used to send transactions to the network. The `Algodv2Client` object **MAY** be modified to throw exceptions if the caller tries to use it to post transactions.
* `signTxns` and `postTxns` **MAY** or **MAY NOT** be provided. When one is provided, they both **MUST** be provided. In addition, `signTxns` **MAY** display a warning that the transactions are returned to the dApp rather than posted directly to the blockchain.
### Additional requirements regarding LogicSigs
`signAndPostTxns` must also be able to handle logic sigs, and more generally transactions signed by the DApp itself. In case of logic sigs, callers are expected to sign the logic sig by themselves, rather than expecting the wallet to do so on their behalf. To handle these cases, we adopt and extend the [ARC-0001](/arc-standards/arc-0001#interface-wallettransaction) format for `WalletTransaction`s that do not need to be signed:
```json
{
"txn": "...",
"signers": [],
"stxn": "..."
}
```
* `stxn` is a `SignedTxnStr`, as specified in [ARC-0007](/arc-standards/arc-0007#string-specification-signedtxnstr).
* For production wallets, `stxn` **MUST** be checked to match `txn`, as specified in [ARC-0001](/arc-standards/arc-0001#semantic-and-security-requirements).
`signAndPostTxns` **MAY** reject when none of the transactions need to be signed by the user.
## Rationale
In order for a wallet to be useable by a DApp, it must support features for account discovery, signing and posting transactions, and querying the network.
To whatever extent possible, the end users of a DApp should be empowered to select their own wallet, accounts, and network to be used with the DApp. Furthermore, said users should be able to use their preferred network node connection, without exposing their connection details and secrets (such as endpoint URLs and API tokens) to the DApp.
The APIs presented in this document and related documents are sufficient to cover the needed functionality, while protecting user choice and remaining compatible with best security practices. Most DApps indeed always need to post transactions immediately after signing. `signAndPostTxns` allows this goal without revealing the signed transactions to the DApp, which prevents surprises to the user: there is no risk the DApp keeps in memory the transactions and post it later without the user knowing it (either to achieve a malicious goal such as forcing double spending, or just because the DApp has a bug). However, there are cases where `signTxns` and `postTxns` need to be used: for example when multiple users need to coordinate to sign an atomic transfer.
## Reference Implementation
```js
async function main(wallet) {
// Account discovery
const enabled = await wallet.enable({genesisID: 'testnet-v1.0'});
const from = enabled.accounts[0];
// Querying
const algodv2 = new algosdk.Algodv2(await wallet.getAlgodv2Client());
const suggestedParams = await algodv2.getTransactionParams().do();
const txns = makeTxns(from, suggestedParams);
// Sign and post
const res = await wallet.signAndPost(txns);
console.log(res);
};
```
Where `makeTxns` is comparable to what is seen in [ARC-0001](/arc-standards/arc-0001#reference-implementation)’s sample code.
## Security Considerations
None.
## Copyright
Copyright and related rights waived via [CCO](https://creativecommons.org/publicdomain/zero/1.0/).
# Algorand Wallet Reach Browser Spec
> Convention for DApps to discover Algorand wallets in browser
## Abstract
A common convention for DApps to discover Algorand wallets in browser code: `window.algorand`. A property `algorand` attached to the `window` browser object, with all the features defined in [ARC-0010](/arc-standards/arc-0010#specification).
## Specification
```ts
interface WindowAlgorand {
enable: EnableFunction;
enableNetwork?: EnableNetworkFunction;
enableAccounts?: EnableAccountsFunction;
signAndPostTxns: SignAndPostTxnsFunction;
getAlgodv2Client: GetAlgodv2ClientFunction;
getIndexerClient: GetIndexerClientFunction;
signTxns?: SignTxnsFunction;
postTxns?: SignTxnsFunction;
}
```
With the specifications and semantics for each function as stated in [ARC-0010](/arc-standards/arc-0010#specification).
## Rationale
DApps should be unopinionated about which wallet they are used with. End users should be able to inject their wallet of choice into the DApp. Therefore, in browser contexts, we reserve `window.algorand` for this purpose.
## Security Considerations
None.
## Copyright
Copyright and related rights waived via [CCO](https://creativecommons.org/publicdomain/zero/1.0/).
# Claimable ASA from vault application
> A smart signature contract account that can receive & disburse claimable Algorand Smart Assets (ASA) to an intended recipient account.
## Abstract
The goal of this standard is to establish a standard in the Algorand ecosytem by which ASAs can be sent to an intended receiver even if their account is not opted in to the ASA.
A on-chain application, called a vault, will be used to custody assets on behalf of a given user, with only that user being able to withdraw assets. A master application will use box storage to keep track of the vault for any given Algorand account.
If integrated into ecosystem technologies including wallets, epxlorers, and dApps, this standard can provide enhanced capabilities around ASAs which are otherwise strictly bound at the protocol level to require opting in to be received. This also enables the ability to “burn” ASAs by sending them to the vault associated with the global Zero Address.
## Motivation
Algorand requires accounts to opt in to receive any ASA, a fact which simultaneously:
1. Grants account holders fine-grained control over their holdings by allowing them to select which assets to allow and preventing receipt of unwanted tokens.
2. Frustrates users and developers when accounting for this requirement especially since other blockchains do not have this requirement.
This ARC lays out a new way to navigate the ASA opt in requirement.
### Contemplated Use Cases
The following use cases help explain how this capability can enhance the possibilities within the Algorand ecosystem.
#### Airdrops
An ASA creator who wants to send their asset to a set of accounts faces the challenge of needing their intended receivers to opt in to the ASA ahead of time, which requires non-trivial communication efforts and precludes the possibility of completing the airdrop as a surprise. This claimable ASA standard creates the ability to send an airdrop out to individual addresses so that the receivers can opt in and claim the asset at their convenience—or not, if they so choose.
#### Reducing New User On-boarding Friction
An application operator who wants to on-board users to their game or business may want to reduce the friction of getting people started by decoupling their application on-boarding process from the process of funding a non-custodial Algorand wallet, if users are wholly new to the Algorand ecosystem. As long as the receiver’s address is known, an ASA can be sent to them ahead of them having ALGOs in their wallet to cover the minimum balance requirement and opt in to the asset.
#### Token Burning
Similarly to any regular account, the global Zero Address also has a corresponding vault to which one can send a quantity of any ASA to effectively “burn” it, rendering it lost forever. No one controls the Zero Address, so while it cannot opt into any ASA to receive it directly, it also cannot make any claims from its corresponding vault, which thus functions as an UN-claimable ASAs purgatory account. By utilizing this approach, anyone can verifiably and irreversibly take a quantity of any ASA out of circulation forever.
## Specification
The key words “**MUST**”, “**MUST NOT**”, “**REQUIRED**”, “**SHALL**”, “**SHALL NOT**”, “**SHOULD**”, “**SHOULD NOT**”, “**RECOMMENDED**”, “**MAY**”, and “**OPTIONAL**” in this document are to be interpreted as described in [RFC-2119](https://www.ietf.org/rfc/rfc2119.txt).
> Comments like this are non-normative.
### Definitions
* **Claimable ASA**: An Algorand Standard Asset (ASA) which has been transferred to a vault following the standard set forth in this proposal such that only the intended receiver account can claim it at their convenience.
* **Vaultt**: An Algorand application used to hold claimable ASAs for a given account.
* **Master**: An Algorand application used to keep track of all of the vaults created for Algorand accounts.
* **dApp**: A decentralized application frontend, interpreted here to mean an off-chain frontend (a webapp, native app, etc.) that interacts with applications on the blockchain.
* **Explorer**: An off-chain application that allows browsing the blockchain, showing details of transactions.
* **Wallet**: An off-chain application that stores secret keys for on-chain accounts and can display and sign transactions for these accounts.
* **Mainnet ID**: The ID for the application that should be called upon claiming an asset on mainnet
* **Testnet ID**: The ID for the application that should be called upoin claiming an asset on testnet
* **Minimum Balance Requirement (MBR)**: The minimum amount of Algos which must be held by an account on the ledger, which is currently 0.1A + 0.1A per ASA opted into.
### TEAL Smart Contracts
There are two smart contracts being utilized: The [vault](https://raw.githubusercontent.com/algorandfoundation/ARCs/main/assets/arc-0012/vault.teal) and the [master](https://raw.githubusercontent.com/algorandfoundation/ARCs/main/assets/arc-0012/master.teal).
#### Vault
##### Storage
| Type | Key | Value | Description |
| ------ | ---------- | -------------- | ----------------------------------------------------- |
| Global | “creator” | Account | The account that funded the creation of the vault |
| Global | “master” | Application ID | The application ID that created the vault |
| Global | “receiver” | Account | The account that can claim/reject ASAs from the vault |
| Box | Asset ID | Account | The account that funded the MBR for the given ASA |
##### Methods
###### Opt-In
* Opts vault into ASA
* Creates box: ASA -> “funder”
* “funder” being the account that initiates the opt-in
* “funder” is the one covering the ASA MBR
###### Claim
* Transfers ASA from vault to “receiver”
* Deletes box: ASA -> “funder”
* Returns ASA and box MBR to “funder”
###### Reject
* Sends ASA to ASA creator
* Refunds rejector all fees incurred (thus rejecting is free)
* Deletes box: ASA -> “funder”
* Remaining balance sent to fee sink
#### Master
##### Storage
| Type | Key | Value | Description |
| ---- | ------- | -------------- | ------------------------------- |
| Box | Account | Application ID | The vault for the given account |
##### Methods
###### Create Vault
* Creates a vault for a given account (“receiver”)
* Creates box: “receiver” -> vault ID
* App/box MBR funded by vault creator
###### Delete Vault
* Deletes vault app
* Deletes box: “receiver” -> vault ID
* App.box MBR returned to vault creator
###### Verify Axfer
* Verifies asset is going to correct vault for “receiver”
###### getVaultID
* Returns vault ID for “receiver”
* Fails if “receiver” does not have vault
###### getVaultAddr
* Returns vault address for “receiver”
* Fails if “receiver” does not have vault
###### hasVault
* Determines if “receiver” has a vault
## Rationale
This design was created to offer a standard mechanism by which wallets, explorers, and dapps could enable users to send, receive, and find claimable ASAs without requiring any changes to the core protocol.
## Backwards Compatibility
This ARC makes no changes to the consensus protocol and creates no backwards compatibility issues.
## Reference Implementation
### Source code
* [Contracts](https://github.com/algorandfoundation/ARCs/tree/main/assets/arc-0012/contracts)
* [TypeScript SDK](https://github.com/algorandfoundation/ARCs/tree/main/assets/arc-0012/arc12-sdk)
## Security Considerations
Both applications (The vault and the master have not been audited)
## Copyright
Copyright and related rights waived via [CCO](https://creativecommons.org/publicdomain/zero/1.0/).
# Encrypted Short Messages
> Scheme for encryption/decryption that allows for private messages.
## Abstract
The goal of this convention is to have a standard way for block explorers, wallets, exchanges, marketplaces, and more generally, client software to send, read & delete short encrypted messages.
## Specification
The key words “**MUST**”, “**MUST NOT**”, “**REQUIRED**”, “**SHALL**”, “**SHALL NOT**”, “**SHOULD**”, “**SHOULD NOT**”, “**RECOMMENDED**”, “**MAY**”, and “**OPTIONAL**” in this document are to be interpreted as described in [RFC-2119](https://www.ietf.org/rfc/rfc2119.txt).
> Comments like this are non-normative.
### Account’s message Application
To receive a message, an Account **MUST** create an application that follows this convention:
* A Local State named `public_key` **MUST** contain an *NACL Public Key (Curve 25519)* key
* A Local State named `arc` **MUST** contain the value `arc15-nacl-curve25519`
* A Box `inbox` where:
* Keys is an ABI encoded of the tuple `(address,uint64)` containing the address of the sender and the round when the message is sent
* Value is an encoded **text**
> With this design, for each round, the sender can only write one message per round. For the same round, an account can receive multiple messages if distinct sender sends them
### ABI Interface
The associated smart contract **MUST** implement the following ABI interface:
```json
{
"name": "ARC_0015",
"desc": "Interface for an encrypted messages application",
"methods": [
{
"name": "write",
"desc": "Write encrypted text to the box inbox",
"args": [
{ "type": "byte[]", "name": "text", "desc": "Encrypted text provided by the sender." }
],
"returns": { "type": "void" }
},
{
"name": "authorize",
"desc": "Authorize an addresses to send a message",
"args": [
{ "type": "byte[]", "name": "address_to_add", "desc": "Address of a sender" },
{ "type": "byte[]", "name": "info", "desc": "information about the sender" }
],
"returns": { "type": "void" }
},
{
"name": "remove",
"desc": "Delete the encrypted text sent by an account on a particular round. Send the MBR used for a box to the Application's owner.",
"args": [
{ "type": "byte[]", "name": "address", "desc": "Address of the sender"},
{ "type": "uint64", "name": "round", "desc": "Round when the message was sent"}
],
"returns": { "type": "void" }
},
{
"name": "set_public_key",
"desc": "Register a NACL Public Key (Curve 25519) to the global value public_key",
"args": [
{ "type": "byte[]", "name": "public_key", "desc": "NACL Public Key (Curve 25519)" }
],
"returns": { "type": "void" }
}
]
}
```
> Warning: The remove method only removes the box used for a message, but it is still possible to access it by looking at the indexer.
## Rationale
Algorand blockchain unlocks many new use cases - anonymous user login to dApps and classical WEB2.0 solutions being one of them. For many use-cases, anonymous users still require asynchronous event notifications, and email seems to be the only standard option at the time of the creation of this ARC. With wallet adoption of this standard, users will enjoy real-time encrypted A2P (application-to-person) notifications without having to provide their email addresses and without any vendor lock-in.
There is also a possibility to do a similar version of this ARC with one App which will store every message for every Account.
Another approach was to use the note field for messages, but with box storage available, it was a more practical and secure design.
## Reference Implementation
The following codes are not audited and are only here for information purposes. It **MUST** not be used in production.
Here is an example of how the code can be run in python : [main.py](https://raw.githubusercontent.com/algorandfoundation/ARCs/main/assets/arc-0015/main.py).
> The delete method is only for test purposes, it is not part of the ABI for an `ARC-15` Application.
An example the application created using Beaker can be found here : [application.py](https://raw.githubusercontent.com/algorandfoundation/ARCs/main/assets/arc-0015/application.py).
## Security Considerations
Even if the message is encrypted, it will stay on the blockchain. If the secret key used to decrypt is compromised at one point, every related message IS at risk.
## Copyright
Copyright and related rights waived via [CCO](https://creativecommons.org/publicdomain/zero/1.0/).
# Convention for declaring traits of an NFT's
> This is a convention for declaring traits in an NFT's metadata.
## Abstract
The goal is to establish a standard for how traits are declared inside a non-fungible NFT’s metadata, for example as specified in ([ARC-3](/arc-standards/arc-0003)), ([ARC-69](/arc-standards/arc-0069)) or ([ARC-72](/arc-standards/arc-0072)).
## Specification
The key words “**MUST**”, “**MUST NOT**”, “**REQUIRED**”, “**SHALL**”, “**SHALL NOT**”, “**SHOULD**”, “**SHOULD NOT**”, “**RECOMMENDED**”, “**MAY**”, and “**OPTIONAL**” in this document are to be interpreted as described in [RFC-2119](https://www.ietf.org/rfc/rfc2119.txt).
> Comments like this are non-normative.
If the property `traits` is provided anywhere in the metadata, it **MUST** adhere to the schema below. If the NFT is a part of a larger collection and that collection has traits, all the available traits for the collection **MUST** be listed as a property of the `traits` object. If the NFT does not have a particular trait, it’s value **MUST** be “none”.
The JSON schema for `traits` is as follows:
```json
{
"title": "Traits for Non-Fungible Token",
"type": "object",
"properties": {
"traits": {
"type": "object",
"description": "Traits (attributes) that can be used to calculate things like rarity. Values may be strings or numbers"
}
}
}
```
#### Examples
##### Example of an NFT that has traits
```json
{
"name": "NFT With Traits",
"description": "NFT with traits",
"image": "https://s3.amazonaws.com/your-bucket/images/two.png",
"image_integrity": "sha256-47DEQpj8HBSa+/TImW+5JCeuQeRkm5NMpJWZG3hSuFU=",
"properties": {
"creator": "Tim Smith",
"created_at": "January 2, 2022",
"traits": {
"background": "red",
"shirt_color": "blue",
"glasses": "none",
"tattoos": 4,
}
}
}
```
##### Example of an NFT that has no traits
```json
{
"name": "NFT Without Traits",
"description": "NFT without traits",
"image": "https://s3.amazonaws.com/your-bucket/images/one.png",
"image_integrity": "sha256-47DEQpj8HBSa+/TImW+5JCeuQeRkm5NMpJWZG3hSuFU=",
"properties": {
"creator": "John Smith",
"created_at": "January 1, 2022",
}
}
```
## Rationale
A standard for traits is needed so programs know what to expect in order to calculate things like rarity.
## Backwards Compatibility
If the metadata does not have the field `traits`, each value of `properties` should be considered a trait.
## Security Considerations
None.
## Copyright
Copyright and related rights waived via [CCO](https://creativecommons.org/publicdomain/zero/1.0/).
# Royalty Enforcement Specification
> An ARC to specify the methods and mechanisms to enforce Royalty payments as part of ASA transfers
## Abstract
A specification to describe a set of methods that offer an API to enforce Royalty Payments to a Royalty Receiver given a policy describing the royalty shares, both on primary and secondary sales.
This is an implementation of an [ARC-20](/arc-standards/arc-0020) specification and other methods may be implemented in the same contract according to that specification.
## Motivation
This ARC is defined to provide a consistent set of asset configurations and ABI methods that, together, enable a royalty payment to a Royalty Receiver. An example may include some music rights where the label, the artist, and any investors have some assigned royalty percentage that should be enforced on transfer. During the sale transaction, the appropriate royalty payments should be included or the transaction must be rejected.
## Specification
The key words “MUST”, “MUST NOT”, “REQUIRED”, “SHALL”, “SHALL NOT”, “SHOULD”, “SHOULD NOT”, “RECOMMENDED”, “MAY”, and “OPTIONAL” in this document are to be interpreted as described in [RFC 822](https://www.ietf.org/rfc/rfc822.txt).. [Royalty Policy](#royalty-policy) - The name for the settings that define how royalty payments are collected. [Royalty Enforcer](#royalty-enforcer) - The application that enforces the royalty payments given the Royalty Policy and performs transfers of the assets. [Royalty Enforcer Administrator](#royalty-enforcer-administrator) - The account that may call administrative level methods against the Royalty Enforcer. [Royalty Receiver](#royalty-receiver) - The account that receives the royalty payment. It can be any valid Algorand account. [Royalty Basis](#royalty-basis) - The share of a payment that is due to the Royalty Receiver [Royalty Asset](#royalty-asset) - The ASA that should have royalties enforced during a transfer. [Asset Offer](#asset-offer) - A data structure stored in local state for the current owner representing the number of units of the asset being offered and the authorizing account for any transfer requests. [Third Party Marketplace](#third-party-marketplace) - A third party marketplace may be any marketplace that implements the appropriate methods to initiate transfers.
### Royalty Policy
```ts
interface RoyaltyPolicy {
royalty_basis: number // The percentage of the payment due, specified in basis points (0-10,000)
royalty_recipient: string // The address that should collect the payment
}
```
A Royalty Share consists of a `royalty_receiver` that should receive a Royalty payment and a `royalty_basis` representing some share of the total payment amount.
### Royalty Enforcer
The Royalty Enforcer is an instance of the contract, an Application, that controls the transfer of ASAs subject to the Royalty Policy. This is accomplished by exposing an interface defined as a set of [ABI Methods](#abi-methods) allowing a grouped transaction call containing a payment and a [Transfer](#transfer) request.
### Royalty Enforcer Administrator
The Royalty Enforcer Administrator is the account that has privileges to call administrative actions against the Royalty Enforcer. If one is not set the account that created the application MUST be used. To update the Royalty Enforcer Administrator the [Set Administrator](#set-administrator) method is called by the current administrator and passed the address of the new administrator. An implementation of this spec may choose how they wish to enforce a that method is called by the administrator.
### Royalty Receiver
The Royalty Receiver is a generic account that could be set to a Single Signature, a Multi Signature, a Smart Signature or even to another Smart Contract. The Royalty Receiver is then responsible for any further royalty distribution logic, making the Royalty Enforcement Specification more general and composable.
### Royalty Basis
The Royalty Basis is value representing the percentage of the payment made during a transfer that is due to the Royalty Receiver. The Royalty Basis **MUST** be specified in terms of basis points of the payment amount.
### Royalty Asset
The Royalty Asset is an ASA subject to royalty payment collection and **MUST** be created with the [appropriate parameters](#royalty-asset-parameters).
> Because the protocol does not allow updating an address parameter after it’s been deleted, if the asset creator thinks they may want to modify them later, they must be set to some non-zero address.
#### Asset Offer
The Asset Offer is the a data structure stored in the owner’s local state. It is keyed in local storage by the byte string representing the ASA Id.
```ts
interface AssetOffer {
auth_address: string // The address of a marketplace or account that may issue a transfer request
offered_amount: number // The number of units being offered
}
```
This concept is important to this specification because we use the clawback feature to transfer the assets. Without some signal that the current owner is willing to have their assets transferred, it may be possible to transfer the asset without their permission. In order for a transfer to occur, this field **MUST** be set and the parameters of the transfer request **MUST** match the value set.
> A transfer matching the offer would require the transfer amount <= offered amount and that the transfer is sent by auth\_address. After the transfer is completed this value **MUST** be wiped from the local state of the owner’s account.
#### Royalty Asset Parameters
The Clawback parameter **MUST** be set to the Application Address of the Royalty Enforcer.
> Since the Royalty Enforcer relies on using the Clawback mechanism to perform the transfer the Clawback should NEVER be set to the zero address. The Freeze parameter **MUST** be set to the Application Address of the Royalty Enforcer if `FreezeAddr != ZeroAddress`, else set to `ZeroAddress`. If the asset creator wants to allow an ASA to be Royalty Free after some conditions are met, it should be set to the Application Address The Manager parameter **MUST** be set to the Application Address of the Royalty Enforcer if `ManagerAddr != ZeroAddress`, else set to `ZeroAddress`. If the asset creator wants to update the Freeze parameter, this should be set to the application address The Reserve parameter **MAY** be set to anything. The `DefaultFrozen` **MUST** be set to true.
### Third Party Marketplace
In order to support secondary sales on external markets this spec was designed such that the Royalty Asset may be listed without transferring it from the current owner’s account. A Marketplace may call the transfer request as long as the address initiating the transfer has been set as the `auth_address` through the [offer](#offer) method in some previous transaction by the current owner.
### ABI Methods
The following is a set of methods that conform to the [ABI](/arc-standards/arc-0004) specification meant to enable the configuration of a Royalty Policy and perform transfers. Any Inner Transactions that may be performed as part of the execution of the Royalty Enforcer application **SHOULD** set the fee to 0 and enforce fee payment through fee pooling by the caller.
#### Set Administrator:
*OPTIONAL*
```plaintext
set_administrator(
administrator: address,
)
```
Sets the administrator for the Royalty Enforcer contract. If this method is never called the creator of the application **MUST** be considered the administrator. This method **SHOULD** have checks to ensure it is being called by the current administrator. The `administrator` parameter is the address of the account that should be set as the new administrator for this Royalty Enforcer application.
#### Set Policy:
*REQUIRED*
```plaintext
set_policy(
royalty_basis: uint64,
royalty_recipient: account,
)
```
Sets the policy for any assets using this application as a Royalty Enforcer. The `royalty_basis` is the percentage for royalty payment collection, specified in basis points (e.g., 1% is 100). A Royalty Basis **SHOULD** be immutable, if an application call is made that would overwrite an existing value it **SHOULD** fail. See [Security Considerations](#security-considerations) for more details on how to handle this parameters mutability. The `royalty_receiver` is the address of the account that should receive a partial share of the payment for any [transfer](#transfer) of an asset subject to royalty collection.
#### Set Payment Asset:
*REQUIRED*
```plaintext
set_payment_asset(
payment_asset: asset,
allowed: boolean,
)
```
The `payment_asset` argument represents the ASA id that is acceptable for payment. The contract logic **MUST** opt into the asset specified in order to accept them as payment as part of a transfer. This method **SHOULD** have checks to ensure it is being called by the current administrator. The `allowed` argument is a boolean representing whether or not this asset is allowed. The Royalty Receiver **MUST** be opted into the full set of assets contained in this list of payment\_assets.
> In the case that an account is not opted into an asset, any transfers where payment is specified for that asset will fail until the account opts into the asset. or the policy is updated.
#### Transfer:
*REQUIRED*
```plaintext
transfer_algo_payment(
royalty_asset: asset,
royalty_asset_amount: uint64,
from: account,
to: account,
royalty_receiver: account,
payment: pay,
current_offer_amount: uint64,
)
```
And
```plaintext
transfer_asset_payment(
royalty_asset: asset,
royalty_asset_amount: uint64,
from: account,
to: account,
royalty_receiver: account,
payment: axfer,
payment_asset: asset,
current_offer_amount: uint64,
)
```
Transfers the Asset after checking that the royalty policy is adhered to. This call must be sent by the `auth_address` specified by the current offer. There **MUST** be a royalty policy defined prior to attempting a transfer. There are two different method signatures specified, one for simple Algo payments and one for Asset as payment. The appropriate method should be called depending on the circumstance. The `royalty_asset` is the ASA ID to be transferred. The `from` parameter is the account the ASA is transferred from. The `to` parameter is the account the ASA is transferred to. The `royalty_receiver` parameter is the account that collects the royalty payment. The `royalty_asset_amount` parameter is the number of units of this ASA ID to transfer. The amount **MUST** be less than or equal to the amount [offered](#offer) by the `from` account. The `payment` parameter is a reference to the transaction that is transferring some asset (ASA or Algos) from the buyer to the Application Address of the Royalty Enforcer. The `payment_asset` parameter is specified in the case that the payment is being made with some ASA rather than with Algos. It **MUST** match the Asset ID of the AssetTransfer payment transaction. The `current_offer_amount` parameter is the current amount of the Royalty Asset [offered](#offer) by the `from` account. The transfer call **SHOULD** be part of a group with a size of 2 (payment/asset transfer + app call)
> See [Security Considerations](#security-considerations) for details on how this check may be circumvented. Prior to each transfer the Royalty Enforcer **SHOULD** assert that the Seller (the `from` parameter) and the Buyer (the `to` parameter) have blank or unset `AuthAddr`. This reasoning for this check is described in [Security Considerations](#security-considerations). It is purposely left to the implementor to decide if it should be checked.
#### Offer:
*REQUIRED*
```plaintext
offer(
royalty_asset: asset,
royalty_asset_amount: uint64,
auth_address: account,
offered_amount: uint64,
offered_auth_addr: account,
)
```
Flags the asset as transferrable and sets the address that may initiate the transfer request. The `royalty_asset` is the ASA ID that is being offered. The `royalty_asset_amount` is the number of units of the ASA ID that are offered. The account making this call **MUST** have at least this amount. The `auth_address` is the address that may initiate a [transfer](#transfer).
> This address may be any valid address in the Algorand network including an Application Account’s address. The `offered_amount` is the number of units of the ASA ID that are currently offered. In the case that this is an update, it should be the amount being replaced. In the case that this is a new offer it should be 0. The `offered_auth_address` is the address that may currently initiate a [transfer](#transfer). In the case that this is an update, it should be the address being replaced. In the case that this is a new offer it should be the zero address. If any transfer is initiated by an address that is *not* listed as the `auth_address` for this asset ID from this account, the transfer **MUST** be rejected. If this method is called when there is an existing entry for the same `royalty_asset`, the call is treated as an update. In the case of an update case the contract **MUST** compare the `offered_amount` and `offered_auth_addr` with what is currently set. If the values differ, the call **MUST** be rejected. This requirement is meant to prevent a sort of race condition where the `auth_address` has a `transfer` accepted before the `offer`-ing account sees the update. In that case the offering account might try to offer more than they would otherwise want to. An example is offered in [security considerations](#security-considerations) To rescind an offer, this method is called with 0 as the new offered amount. If a [transfer](#transfer) or [royalty\_free\_move](#royalty-free-move) is called successfully, the `offer` **SHOULD** be updated or deleted from local state. Exactly how to update the offer is left to the implementer. In the case of a partially filled offer, the amount may be updated to reflect some new amount that represents `offered_amount - amount transferred` or the offer may be deleted completely.
#### Royalty Free Move:
*OPTIONAL*
```plaintext
royalty_free_move(
royalty_asset: asset,
royalty_asset_amount: uint64,
from: account,
to: account,
offered_amount: uint64,
)
```
Moves an asset to the new address without collecting any royalty payment. Prior to this method being called the current owner **MUST** offer their asset to be moved. The `auth_address` of the offer **SHOULD** be set to the address of the Royalty Enforcer Administrator and calling this method **SHOULD** have checks to ensure it is being called by the current administrator.
> This May be useful in the case of a marketplace where the NFT must be placed in some escrow account. Any logic may be used to validate this is an authorized transfer. The `royalty_asset` is the asset being transferred without applying the Royalty Enforcement logic. The `royalty_asset_amount` is the number of units of this ASA ID that should be moved. The `from` parameter is the current owner of the asset. The `to` parameter is the intended receiver of the asset. The `offered_amount` is the number of units of this asset currently offered. This value **MUST** be greater than or equal to the amount being transferred. The `offered_amount` value for is passed to prevent the race or attack described in [Security Considerations](#security-considerations).
### Read Only Methods
Three methods are specified here as `read-only` as defined in [ARC-22](/arc-standards/arc-0022).
#### Get Policy:
*REQUIRED*
```plaintext
get_policy()(address,uint64)
```
Gets the current [Royalty Policy](#royalty-policy) setting for this Royalty Enforcer. The return value is a tuple of type `(address,uint64)`, where the `address` is the [Royalty Receiver](#royalty-receiver) and the `uint64` is the [Royalty Basis](#royalty-basis).
#### Get Offer:
*REQUIRED*
```plaintext
get_offer(
royalty_asset: asset,
from: account,
)(address,uint64)
```
Gets the current [Asset Offer](#asset-offer) for a given asset as set by its owner. The `royalty_asset` parameter is the asset id of the [Royalty Asset](#royalty-asset) that has been offered The `from` parameter is the account that placed the offer The return value is a tuple of type `(address,uint64)`, where `address` is the authorizing address that may make a transfer request and the `uint64` it the amount offered.
#### Get Administrator:
*OPTIONAL* unless set\_administrator is implemented then *REQUIRED*
```plaintext
get_administrator()address
```
Gets the [Royalty Enforcer Administrator](#royalty-enforcer-administrator) set for this Royalty Enforcer. The return value is of type `address` and represents the address of the account that may call administrative methods for this Royalty Enforcer application
### Storage
While the details of storage are described here, `readonly` methods are specified to provide callers with a method to retrieve the information without having to write parsing logic. The exact location and encoding of these fields are left to the implementer.
#### Global Storage
The parameters that describe a policy are stored in Global State. The relevant keys are: `royalty_basis` - The percentage specified in basis points of the payment `royalty_receiver` - The account that should be paid the royalty Another key is used to store the current administrator account: `administrator` - The account that is allowed to make administrative calls to this Royalty Enforcer application
#### Local Storage
For an offered Asset, the authorizing address and amount offered should be stored in a Local State field for the account offering the Asset.
### Full ABI Spec
```json
{
"name": "ARC18",
"methods": [
{
"name": "set_policy",
"args": [
{
"type": "uint64",
"name": "royalty_basis"
},
{
"type": "address",
"name": "royalty_receiver"
}
],
"returns": {
"type": "void"
},
"desc": "Sets the royalty basis and royalty receiver for this royalty enforcer"
},
{
"name": "set_administrator",
"args": [
{
"type": "address",
"name": "new_admin"
}
],
"returns": {
"type": "void"
},
"desc": "Sets the administrator for this royalty enforcer"
},
{
"name": "set_payment_asset",
"args": [
{
"type": "asset",
"name": "payment_asset"
},
{
"type": "bool",
"name": "is_allowed"
}
],
"returns": {
"type": "void"
},
"desc": "Triggers the contract account to opt in or out of an asset that may be used for payment of royalties"
},
{
"name": "set_offer",
"args": [
{
"type": "asset",
"name": "royalty_asset"
},
{
"type": "uint64",
"name": "royalty_asset_amount"
},
{
"type": "address",
"name": "auth_address"
},
{
"type": "uint64",
"name": "prev_offer_amt"
},
{
"type": "address",
"name": "prev_offer_auth"
}
],
"returns": {
"type": "void"
},
"desc": "Flags that an asset is offered for sale and sets address authorized to submit the transfer"
},
{
"name": "transfer_asset_payment",
"args": [
{
"type": "asset",
"name": "royalty_asset"
},
{
"type": "uint64",
"name": "royalty_asset_amount"
},
{
"type": "account",
"name": "owner"
},
{
"type": "account",
"name": "buyer"
},
{
"type": "account",
"name": "royalty_receiver"
},
{
"type": "axfer",
"name": "payment_txn"
},
{
"type": "asset",
"name": "payment_asset"
},
{
"type": "uint64",
"name": "offered_amt"
}
],
"returns": {
"type": "void"
},
"desc": "Transfers an Asset from one account to another and enforces royalty payments. This instance of the `transfer` method requires an AssetTransfer transaction and an Asset to be passed corresponding to the Asset id of the transfer transaction."
},
{
"name": "transfer_algo_payment",
"args": [
{
"type": "asset",
"name": "royalty_asset"
},
{
"type": "uint64",
"name": "royalty_asset_amount"
},
{
"type": "account",
"name": "owner"
},
{
"type": "account",
"name": "buyer"
},
{
"type": "account",
"name": "royalty_receiver"
},
{
"type": "pay",
"name": "payment_txn"
},
{
"type": "uint64",
"name": "offered_amt"
}
],
"returns": {
"type": "void"
},
"desc": "Transfers an Asset from one account to another and enforces royalty payments. This instance of the `transfer` method requires a PaymentTransaction for payment in algos"
},
{
"name": "royalty_free_move",
"args": [
{
"type": "asset",
"name": "royalty_asset"
},
{
"type": "uint64",
"name": "royalty_asset_amount"
},
{
"type": "account",
"name": "owner"
},
{
"type": "account",
"name": "receiver"
},
{
"type": "uint64",
"name": "offered_amt"
}
],
"returns": {
"type": "void"
},
"desc": "Moves the asset passed from one account to another"
},
{
"name": "get_offer",
"args": [
{
"type": "uint64",
"name": "royalty_asset"
},
{
"type": "account",
"name": "owner"
}
],
"returns": {
"type": "(address,uint64)"
},
"read-only":true
},
{
"name": "get_policy",
"args": [],
"returns": {
"type": "(address,uint64)"
},
"read-only":true
},
{
"name": "get_administrator",
"args": [],
"returns": {
"type": "address"
},
"read-only":true
}
],
"desc": "ARC18 Contract providing an interface to create and enforce a royalty policy over a given ASA. See https://github.com/algorandfoundation/ARCs/blob/main/ARCs/arc-0018.md for details.",
"networks": {}
}
```
#### Example Flow for a Marketplace
```plaintext
Let Alice be the creator of the Royalty Enforcer and Royalty Asset
Let Alice also be the Royalty Receiver
Let Bob be the Royalty Asset holder
Let Carol be a buyer of a Royalty Asset
```
```mermaid
sequenceDiagram
Alice->>Royalty Enforcer: set_policy with Royalty Basis and Royalty Receiver
Alice->>Royalty Enforcer: set_payment_asset with any asset that should be accepted as payment
par List
Bob->>Royalty Enforcer: offer
Bob->>Marketplace: list
end
Par Buy
Carol->>Marketplace: buy
Marketplace->>Royalty Enforcer: transfer
Bob->>Carol: clawback issued by Royalty Enforcer
Royalty Enforcer->>Alice: royalty payment
end
par Delist
Bob->>Royalty Enforcer: offer 0
Bob->>Marketplace: delist
end
```
### Metadata
The metadata associated to an asset **SHOULD** conform to any ARC that supports an additional field in the `properties` section specifying the specific information relevant for off-chain applications like wallets or Marketplace dApps. The metadata **MUST** be immutable. The fields that should be specified are the `application-id` as described in [ARC-20](/arc-standards/arc-0020) and `rekey-checked` which describes whether or not this application implements the rekey checks during transfers. Example:
```js
//...
"properties":{
//...
"arc-20":{
"application-id":123
},
"arc-18":{
"rekey-checked":true // Defaults to false if not set, see *Rekey to swap* below for reasoning
}
}
//...
```
## Rationale
The motivation behind defining a Royalty Enforcement specification is the need to guarantee a portion of a payment is received by select royalty collector on sale of an asset. Current royalty implementations are either platform specific or are only adhered to when an honest seller complies with it, allowing for the exchange of an asset without necessarily paying the royalties. The use of a smart contract as a clawback address is a guaranteed way to know an asset transfer is only ever made when certain conditions are met, or made in conjunction with additional transactions. The Royalty Enforcer is responsible for the calculations required in dividing up and dispensing the payments to the respective parties. The present specification does not impose any restriction on the Royalty Receiver distribution logic (if any), which could be achieved through a Multi Signature account, a Smart Signature or even through another Smart Contract. On Ethereum the EIP-2981 standard allows for ERC-721 and ERC-1155 interfaces to signal a royalty amount to be paid, however this is not enforced and requires marketplaces to implement and adhere to it.
## Backwards Compatibility
Existing ASAs with unset clawback address or unset manager address (in case the clawback address is not the application account of a smart contract that is updatable - which is most likely the case) will be incompatible with this specification.
## Reference Implementation
## Security Considerations
There are a number of security considerations that implementers and users should be aware of. *Royalty policy mutability* The immutability of a royalty basis is important to consider since mutability introduces the possibility for a situation where, after an initial sale, the royalty policy is updated from 1% to 100% for example. This would make any further sales have the full payment amount sent to the royalty recipient and the seller would receive nothing. This specification is written with the recommendation that the royalty policy **SHOULD** be immutable. This is not a **MUST** so that an implementation may decrease the royalty basis may decrease over time. Caution should be taken by users and implementers when evaluating how to implement the exact logic. *Spoofed payment* While its possible to enforce the group size limit, it is possible to circumvent the royalty enforcement logic by simply making an Inner Transaction application call with the appropriate parameters and a small payment, then in the same outer group the “real” payment. The counter-party risk remains the same since the inner transaction is atomic with the outers. In addition, it is always possible to circumvent the royalty enforcement logic by using an escrow account in the middle:
* Alice wants to sell asset A to Bob for 1M USDC.
* Alice and Bob creates an escrow ESCROW (smart signature).
* Alice sends A for 1 μAlgo to the ESCROW
* Bob sends 1M USDC to ESCROW.
* Then ESCROW sends 1M USDC to Alice and sends A to Bob for 1 microAlgo. Some ways to prevent a small royalty payment and larger payment in a later transaction of the same group might be by using an `allow` list that is checked against the `auth_addr` of the offer call. The `allow` list would be comprised of known and trusted marketplaces that do not attempt to circumvent the royalty policy. The `allow` list may be implicit as well by transferring a specific asset to the `auth_addr` as frozen and on `offer` a the balance must be > 0 to allow the `auth_addr` to be persisted. The exact logic that should determine *if* a transfer should be allowed is left to the implementer. *Rekey to swap* Rekeying an account can also be seen as circumventing this logic since there is no counter-party risk given that a rekey can be grouped with a payment. We address this by suggesting the `auth_addr` on the buyer and seller accounts are both set to the zero address. *Offer for unintended clawback* Because we use the clawback mechanism to move the asset, we need to be sure that the current owner is actually interested in making the sale. We address this by requiring the [offer](#offer) method is called to set an authorized address OR that the AssetSender is the one making the application call. *Offer double spend* If the [offer](#offer) method did not require the current value be passed, a possible attack or race condition may be taken advantage of.
* There’s an open offer for N.
* The owner decides to lower it to N < M < 0
* I see that; decide to “frontrun” the second tx and first get N, \[here the ledger should apply the change of offer, which overwrites the previous value — now 0 — with M], then I can get another M of the asset. *Mutable asset parameters* If the ASA has it’s manager parameter set, it is possible to change the other address parameters. Namely the clawback and freeze roles could be changed to allow an address that is *not* the Royalty Enforcer’s application address. For that reason the manager **MUST** be set to the zero address or to the Royalty Enforcer’s address. *Compatibility of existing ASAs* In the case of [ARC-69](/arc-standards/arc-0069) and [ARC-19](/arc-standards/arc-0019) ASA’s the manager is the account that may issue `acfg` transactions to update metadata or to change the reserve address. For the purposes of this spec the manager **MUST** be the application address, so the logic to issue appropriate `acfg` transactions should be included in the application logic if there is a need to update them.
> When evaluating whether or not an existing ASA may be compatible with this spec, note that the `clawback` address needs to be set to the application address of the Royalty Enforcer. The `freeze` address and `manager` address may be empty or, if set, must be the application address. If these addresses aren’t set correctly, the royalty enforcer will not be able to issue the transactions required and there may be security considerations. The `reserve` address has no requirements in this spec so [ARC-19](/arc-standards/arc-0019) ASAs should have no issue assuming the rest of the addresses are set correctly.
## Copyright
Copyright and related rights waived via [CCO](https://creativecommons.org/publicdomain/zero/1.0/).
# Templating of NFT ASA URLs for mutability
> Templating mechanism of the URL so that changeable data in an asset can be substituted by a client, providing a mutable URL.
## Abstract
This ARC describes a template substitution for URLs in ASAs, initially for ipfs\:// scheme URLs allowing mutable CID replacement in rendered URLs.
The proposed template-XXX scheme has substitutions like:
```plaintext
template-ipfs://{ipfscid::::}[/...]
```
This will allow modifying the 32-byte ‘Reserve address’ in an ASA to represent a new IPFS content-id hash. Changing of the reserve address via an asset-config transaction will be all that is needed to point an ASA URL to new IPFS content. The client reading this URL, will compose a fully formed IPFS Content-ID based on the version, multicodec, and hash arguments provided in the ipfscid substitution.
## Motivation
While immutability for many NFTs is appropriate (see [ARC-3](/arc-standards/arc-0003) link), there are cases where some type of mutability is desired for NFT metadata and/or digital media. The data being referenced by the pointer should be immutable but the pointer may be updated to provide a kind of mutability. The data being referenced may be of any size.
Algorand ASAs support mutation of several parameters, namely the role address fields (Manager, Clawback, Freeze, and Reserve addresses), unless previously cleared. These are changed via an asset-config transaction from the Manager account. An asset-config transaction may include a note, but it is limited to 1KB and accessing this value requires clients to use an indexer to iterate/retrieve the values.
Of the parameters that are mutable, the Reserve address is somewhat distinct in that it is not used for anything directly as part of the protocol. It is used solely for determining what is in/out of circulation (by subtracting supply from that held by the reserve address). With a (pure) NFT, the Reserve address is irrelevant as it is a 1 of 1 unit. Thus, the Reserve address may be repurposed as a 32-byte ‘bitbucket’.
These 32-bytes can, for example, hold a SHA2-256 hash uniquely referencing the desired content for the ASA (ARC-3-like metadata for example)
Using the reserve address in this way means that what an ASA ‘points to’ for metadata can be changed with a single asset config transaction, changing only the 32-bytes of the reserve address. The new value is accessible via even non-archival nodes with a single call to the `/v2/assets/xxx` REST endpoint.
## Specification
The key words “**MUST**”, “**MUST NOT**”, “**REQUIRED**”, “**SHALL**”, “**SHALL NOT**”, “**SHOULD**”, “**SHOULD NOT**”, “**RECOMMENDED**”, “**MAY**”, and “**OPTIONAL**” in this document are to be interpreted as described in [RFC-2119](https://www.ietf.org/rfc/rfc2119.txt).
This proposal specifies a method to provide mutability for IPFS hosted content-ids. The intention is that FUTURE ARCs could define additional template substitutions, but this is not meant to be a kitchen sink of templates, only to establish a possible baseline of syntax.
An indication that this ARC is in use is defined by an ASA URL’s “scheme” having the prefix “**template-**”.
An Asset conforming this specification **MUST** have:
1. **URL Scheme of “template-ipfs”**
The URL of the asset must be of the form:
```plain
template-ipfs://(...)
```
> The ipfs\:// scheme is already somewhat of a meta scheme in that clients interpret the ipfs scheme as referencing an IPFS CID (version 0/base58 or 1/base32 currently) followed by optional path within certain types of IPFS DAG content (IPLD CAR content for example). The clients take the CID and use to fetch directly from the IPFS network directly via IPFS nodes, or via various IPFS gateways ([https://ipfs.io/ipfs/CID\[/](https://ipfs.io/ipfs/CID%5B/)…], pinata, etc.)).
2. **An “ipfscid” *template* argument in place of the normal CID.**
Where the format of templates are `{:])`
The ipfscid template definitions is based on properties within the IPFS CID spec:
```plaintext
ipfscid::::
```
> The intent is to recompose a complete CID based on the content-hash contained within the 32-byte reserve address, but using the correct multicodec content type, ipfs content-id version, and hash type to match how the asset creator will seed the IPFS content. If a single file is added using the ‘ipfs’ CLI via `ipfs add --cid-version=1 metadata.json` then the resulting content will be encoded using the ‘raw’ multicodec type. If a directory is added containing one or more files, then it will be encoded using the dag-pb multicodec. CAR content will also be dag-pb. Thus based on the method used to post content to IPFS, the ipfscid template should match.
The parameters to the template ipfscid are:
1. IPFS ``, **MUST** a valid IPFS CID version. Client implementation **MUST** support ‘0’ or ‘1’ and **SHOULD** support future version.
2. `` **MUST** be an IPFS multicodec name. Client implementations **MUST** support ‘raw’ or ‘dag-pb’. Other codecs **SHOULD** be supported but are beyond the scope of this proposal.
3. `` **MUST** be ‘reserve’.
> This is to represent the reserve address is used for the 32-byte hash. It is specified here so future iterations of the specification may allow other fields or syntaxes to reference other mutable field types.
4. `` **MUST** be the multihash hash function type (as defined in ). Client implementations **MUST** support ‘sha2-256’ and **SHOULD** support future hash types when introduced by IPFS.
> IPFS may add future versions of the cid spec, and add additional multicodec types or hash types.
Implementations **SHOULD** use IPFS libraries where possible that accept multicodec and hash types as named values and allow a CID to be composed generically.
### Examples
> This whole section is non-normative.
* ASA URL: `template-ipfs://{ipfscid:0:dag-pb:reserve:sha2-256}/arc3.json`
* ASA URL: `template-ipfs://{ipfscid:1:raw:reserve:sha2-256}`
* ASA URL: `template-ipfs://{ipfscid:1:dag-pb:reserve:sha2-256}/metadata.json`
#### Deployed Testnet Example
An example was pushed to TestNet, converting from an existing ARC-3 MainNet ASA (asset ID 560421434, )
With IPFS URL:
```plaintext
ipfs://QmQZyq4b89RfaUw8GESPd2re4hJqB8bnm4kVHNtyQrHnnK
```
The TestNet ASA was minted with the URL:
```plaintext
template-ipfs://{ipfscid:0:dag-pb:reserve:sha2-256}
```
as the original CID is a V0 / dag-pb CID.
A helpful link to ‘visualize’ CIDs and for this specific id, is
Using the example encoding implementation, results in virtual ‘reserve address’ of
```plaintext
EEQYWGGBHRDAMTEVDPVOSDVX3HJQIG6K6IVNR3RXHYOHV64ZWAEISS4CTI
```
which is the address (with checksum) corresponding to the 32-byte with hexadecimal value:
```plaintext
21218B18C13C46064C951BEAE90EB7D9D3041BCAF22AD8EE373E1C7AFB99B008
```
(Transformation from a 32-byte public key to an address can be found there on the developer website .)
The resulting ASA can be seen on
Using the forked [repo](https://github.com/TxnLab/arc3.xyz), with testnet selected, and the /nft/66753108 url - the browser will display the original content as-is, using only the Reserve address as the source of the content hash.
### Interactions with ARC-3
This ARC is compatible with [ARC-3](/arc-standards/arc-0003) with the following notable exception: the ASA Metadata Hash (`am`) is no more necessarily a valid hash of the JSON Metadata File pointed by the URL.
As such, clients cannot be strictly compatible to both ARC-3 and [ARC-19](/arc-standards/arc-0019). An ARC-3 and ARC-19 client **SHOULD** ignore validation of the ASA Metadata Hash when the Asset URL is following ARC-19.
ARC-3 clients **SHOULD** clearly indicate to the user when displaying an ARC-19 ASA, as contrary to a strict ARC-3 ASA, the asset may arbitrarily change over time (even after being bought).
ASA that follow both ARC-3 and ARC-19 **MUST NOT** use extra metadata hash (from ARC-3).
## Rationale
See the motivation section above for the general rationale.
### Backwards Compatibility
The ‘template-’ prefix of the scheme is intended to break clients reading these ASA URLs outright. Clients interpreting these URLs as-is would likely yield unusual errors. Code checking for an explicit ‘ipfs’ scheme for example will not see this as compatible with any of the default processing and should treat the URL as if it were simply unknown/empty.
## Reference Implementation
### Encoding
#### Go implementation
```go
import (
"github.com/algorand/go-algorand-sdk/types"
"github.com/ipfs/go-cid"
"github.com/multiformats/go-multihash"
)
// ...
func ReserveAddressFromCID(cidToEncode cid.Cid) (string, error) {
decodedMultiHash, err := multihash.Decode(cidToEncode.Hash())
if err != nil {
return "", fmt.Errorf("failed to decode ipfs cid: %w", err))
}
return types.EncodeAddress(decodedMultiHash.Digest)
}
// ....
```
### Decoding
#### Go implementation
```go
import (
"errors"
"fmt"
"regexp"
"strings"
"github.com/algorand/go-algorand-sdk/types"
"github.com/ipfs/go-cid"
"github.com/multiformats/go-multicodec"
"github.com/multiformats/go-multihash"
)
var (
ErrUnknownSpec = errors.New("unsupported template-ipfs spec")
ErrUnsupportedField = errors.New("unsupported ipfscid field, only reserve is currently supported")
ErrUnsupportedCodec = errors.New("unknown multicodec type in ipfscid spec")
ErrUnsupportedHash = errors.New("unknown hash type in ipfscid spec")
ErrInvalidV0 = errors.New("cid v0 must always be dag-pb and sha2-256 codec/hash type")
ErrHashEncoding = errors.New("error encoding new hash")
templateIPFSRegexp = regexp.MustCompile(`template-ipfs://{ipfscid:(?P[01]):(?P[a-z0-9\-]+):(?P[a-z0-9\-]+):(?P[a-z0-9\-]+)}`)
)
func ParseASAUrl(asaUrl string, reserveAddress types.Address) (string, error) {
matches := templateIPFSRegexp.FindStringSubmatch(asaUrl)
if matches == nil {
if strings.HasPrefix(asaUrl, "template-ipfs://") {
return "", ErrUnknownSpec
}
return asaUrl, nil
}
if matches[templateIPFSRegexp.SubexpIndex("field")] != "reserve" {
return "", ErrUnsupportedField
}
var (
codec multicodec.Code
multihashType uint64
hash []byte
err error
cidResult cid.Cid
)
if err = codec.Set(matches[templateIPFSRegexp.SubexpIndex("codec")]); err != nil {
return "", ErrUnsupportedCodec
}
multihashType = multihash.Names[matches[templateIPFSRegexp.SubexpIndex("hash")]]
if multihashType == 0 {
return "", ErrUnsupportedHash
}
hash, err = multihash.Encode(reserveAddress[:], multihashType)
if err != nil {
return "", ErrHashEncoding
}
if matches[templateIPFSRegexp.SubexpIndex("version")] == "0" {
if codec != multicodec.DagPb {
return "", ErrInvalidV0
}
if multihashType != multihash.SHA2_256 {
return "", ErrInvalidV0
}
cidResult = cid.NewCidV0(hash)
} else {
cidResult = cid.NewCidV1(uint64(codec), hash)
}
return fmt.Sprintf("ipfs://%s", strings.ReplaceAll(asaUrl, matches[0], cidResult.String())), nil
}
```
#### Typescript Implementation
A modified version of a simple ARC-3 viewer can be found [here](https://github.com/TxnLab/arc3.xyz) specifically the code segment at [nft.ts#L41](https://github.com/TxnLab/arc3.xyz/blob/main/src/lib/nft.ts#L41)
This is a fork of [ar3.xyz](https://github.com/barnjamin/arc3.xyz)
## Security Considerations
There should be no specific security issues beyond those of any client accessing any remote content and the risks linked to assets changing (even after the ASA is bought).
The later is handled in the section “Interactions with ARC-3” above.
Regarding the former, URLs within ASAs could point to malicious content, whether that is an http/https link or whether fetched through ipfs protocols or ipfs gateways. As the template changes nothing other than the resulting URL and also defines nothing more than the generation of an IPFS CID hash value, no security concerns derived from this specific proposal are known.
## Copyright
Copyright and related rights waived via [CCO](https://creativecommons.org/publicdomain/zero/1.0/).
# Smart ASA
> An ARC for an ASA controlled by an Algorand Smart Contract
## Abstract
A “Smart ASA” is an Algorand Standard Asset (ASA) controlled by a Smart Contract that exposes methods to create, configure, transfer, freeze, and destroy the asset.
This ARC defines the ABI interface of such a Smart Contract, the required metadata, and suggests a reference implementation.
## Motivation
The Algorand Standard Asset (ASA) is an excellent building block for on-chain applications. It is battle-tested and widely supported by SDKs, wallets, and dApps.
However, the ASA lacks in flexibility and configurability. For instance, once issued, it can’t be re-configured (its unit name, decimals, maximum supply). Also, it is freely transferable (unless frozen). This prevents developers from specifying additional business logic to be checked while transferring it (think of royalties or vesting ).
Enforcing transfer conditions requires freezing the asset and transferring it through a clawback operation — which results in a process that is opaque to users and wallets and a bad experience for the users.
The Smart ASA defined by this ARC extends the ASA to increase its expressiveness and its flexibility. By introducing this as a standard, both developers, users (marketplaces, wallets, dApps, etc.) and SDKs can confidently and consistently recognize Smart ASAs and adjust their flows and user experiences accordingly.
## Specification
The keywords “MUST”, “MUST NOT”, “REQUIRED”, “SHALL”, “SHALL NOT”, “SHOULD”, “SHOULD NOT”, “RECOMMENDED”, “MAY”, and “OPTIONAL” in this document are to be interpreted as described in [RFC 2119](https://datatracker.ietf.org/doc/html/rfc2119).
The following sections describe:
* The ABI interface for a controlling Smart Contract (the Smart Contract that controls a Smart ASA).
* The metadata required to denote a Smart ASA and define the association between an ASA and its controlling Smart Contract.
### ABI Interface
The ABI interface specified here draws inspiration from the transaction reference of an Algorand Standard Asset (ASA).
To provide a unified and familiar interface between the Algorand Standard Asset and the Smart ASA, method names and parameters have been adapted to the ABI types but left otherwise unchanged.
#### Asset Creation
```json
{
"name": "asset_create",
"args": [
{ "type": "uint64", "name": "total" },
{ "type": "uint32", "name": "decimals" },
{ "type": "bool", "name": "default_frozen" },
{ "type": "string", "name": "unit_name" },
{ "type": "string", "name": "name" },
{ "type": "string", "name": "url" },
{ "type": "byte[]", "name": "metadata_hash" },
{ "type": "address", "name": "manager_addr" },
{ "type": "address", "name": "reserve_addr" },
{ "type": "address", "name": "freeze_addr" },
{ "type": "address", "name": "clawback_addr" }
],
"returns": { "type": "uint64" }
}
```
Calling `asset_create` creates a new Smart ASA and returns the identifier of the ASA. The [metadata section](#metadata) describes its required properties.
> Upon a call to `asset_create`, a reference implementation SHOULD:
>
> * Mint an Algorand Standard Asset (ASA) that MUST specify the properties defined in the [metadata section](#metadata). In addition:
>
> * The `manager`, `reserve` and `freeze` addresses SHOULD be set to the account of the controlling Smart Contract.
> * The remaining fields are left to the implementation, which MAY set `total` to `2 ** 64 - 1` to enable dynamically increasing the max circulating supply of the Smart ASA.
> * `name` and `unit_name` MAY be set to `SMART-ASA` and `S-ASA`, to denote that this ASA is Smart and has a controlling application.
>
> * Persist the `total`, `decimals`, `default_frozen`, etc. fields for later use/retrieval.
>
> * Return the ID of the created ASA.
>
> It is RECOMMENDED for calls to this method to be permissioned, e.g. to only approve transactions issued by the controlling Smart Contract creator.
#### Asset Configuration
```json
[
{
"name": "asset_config",
"args": [
{ "type": "asset", "name": "config_asset" },
{ "type": "uint64", "name": "total" },
{ "type": "uint32", "name": "decimals" },
{ "type": "bool", "name": "default_frozen" },
{ "type": "string", "name": "unit_name" },
{ "type": "string", "name": "name" },
{ "type": "string", "name": "url" },
{ "type": "byte[]", "name": "metadata_hash" },
{ "type": "address", "name": "manager_addr" },
{ "type": "address", "name": "reserve_addr" },
{ "type": "address", "name": "freeze_addr" },
{ "type": "address", "name": "clawback_addr" }
],
"returns": { "type": "void" }
},
{
"name": "get_asset_config",
"readonly": true,
"args": [{ "type": "asset", "name": "asset" }],
"returns": {
"type": "(uint64,uint32,bool,string,string,string,byte[],address,address,address,address)",
"desc": "`total`, `decimals`, `default_frozen`, `unit_name`, `name`, `url`, `metadata_hash`, `manager_addr`, `reserve_addr`, `freeze_addr`, `clawback_addr`"
}
}
]
```
Calling `asset_config` configures an existing Smart ASA.
> Upon a call to `asset_config`, a reference implementation SHOULD:
>
> * Fail if `config_asset` does not correspond to an ASA controlled by this smart contract.
> * Succeed iff the `sender` of the transaction corresponds to the `manager_addr` that was previously persisted for `config_asset` by a previous call to this method or, if never caller, to `asset_create`.
> * Update the persisted `total`, `decimals`, `default_frozen`, etc. fields for later use/retrieval.
>
> The business logic associated with the update of the other parameters is left to the implementation. An implementation that maximizes similarities with ASAs SHOULD NOT allow modifying the `clawback_addr` or `freeze_addr` after they have been set to the special value `ZeroAddress`.
>
> The implementation MAY provide flexibility on the fields of an ASA that cannot be updated after initial configuration. For instance, it MAY update the `total` parameter to enable minting of new units or restricting the maximum supply; when doing so, the implementation SHOULD ensure that the updated `total` is not lower than the current circulating supply of the asset.
Calling `get_asset_config` reads and returns the `asset`’s configuration as specified in:
* The most recent invocation of `asset_config`; or
* if `asset_config` was never invoked for `asset`, the invocation of `asset_create` that originally created it.
> Upon a call to `get_asset_config`, a reference implementation SHOULD:
>
> * Fail if `asset` does not correspond to an ASA controlled by this smart contract (see `asset_config`).
> * Return `total`, `decimals`, `default_frozen`, `unit_name`, `name`, `url`, `metadata_hash`, `manager_addr`, `reserve_addr`, `freeze_addr`, `clawback` as persisted by `asset_create` or `asset_config`.
#### Asset Transfer
```json
{
"name": "asset_transfer",
"args": [
{ "type": "asset", "name": "xfer_asset" },
{ "type": "uint64", "name": "asset_amount" },
{ "type": "account", "name": "asset_sender" },
{ "type": "account", "name": "asset_receiver" }
],
"returns": { "type": "void" }
}
```
Calling `asset_transfer` transfers a Smart ASA.
> Upon a call to `asset_transfer`, a reference implementation SHOULD:
>
> * Fail if `xfer_asset` does not correspond to an ASA controlled by this smart contract.
>
> * Succeed if:
>
> * the `sender` of the transaction is the `asset_sender` and
> * `xfer_asset` is not in a frozen state (see [Asset Freeze below](#asset-freeze)) and
> * `asset_sender` and `asset_receiver` are not in a frozen state (see [Asset Freeze below](#asset-freeze))
>
> * Succeed if the `sender` of the transaction corresponds to the `clawback_addr`, as persisted by the controlling Smart Contract. This enables clawback operations on the Smart ASA.
>
> Internally, the controlling Smart Contract SHOULD issue a clawback inner transaction that transfers the `asset_amount` from `asset_sender` to `asset_receiver`. The inner transaction will fail on the usual conditions (e.g. not enough balance).
>
> Note that the method interface does not specify `asset_close_to`, because holders of a Smart ASA will need two transactions (RECOMMENDED in an Atomic Transfer) to close their position:
>
> * A call to this method to transfer their outstanding balance (possibly as a `CloseOut` operation if the controlling Smart Contract required opt in); and
> * an additional transaction to close out of the ASA.
#### Asset Freeze
```json
[
{
"name": "asset_freeze",
"args": [
{ "type": "asset", "name": "freeze_asset" },
{ "type": "bool", "name": "asset_frozen" }
],
"returns": { "type": "void" }
},
{
"name": "account_freeze",
"args": [
{ "type": "asset", "name": "freeze_asset" },
{ "type": "account", "name": "freeze_account" },
{ "type": "bool", "name": "asset_frozen" }
],
"returns": { "type": "void" }
}
]
```
Calling `asset_freeze` prevents any transfer of a Smart ASA. Calling `account_freeze` prevents a specific account from transferring or receiving a Smart ASA.
> Upon a call to `asset_freeze` or `account_freeze`, a reference implementation SHOULD:
>
> * Fail if `freeze_asset` does not correspond to an ASA controlled by this smart contract.
> * Succeed iff the `sender` of the transaction corresponds to the `freeze_addr`, as persisted by the controlling Smart Contract.
>
> In addition:
>
> * Upon a call to `asset_freeze`, the controlling Smart Contract SHOULD persist the tuple `(freeze_asset, asset_frozen)` (for instance, by setting a `frozen` flag in *global* storage).
> * Upon a call to `account_freeze` the controlling Smart Contract SHOULD persist the tuple `(freeze_asset, freeze_account, asset_frozen)` (for instance by setting a `frozen` flag in the *local* storage of the `freeze_account`). See the [security considerations section](#security-considerations) for how to ensure that Smart ASA holders cannot reset their `frozen` flag by clearing out their state at the controlling Smart Contract.
```json
[
{
"name": "get_asset_is_frozen",
"readonly": true,
"args": [{ "type": "asset", "name": "freeze_asset" }],
"returns": { "type": "bool" }
},
{
"name": "get_account_is_frozen",
"readonly": true,
"args": [
{ "type": "asset", "name": "freeze_asset" },
{ "type": "account", "name": "freeze_account" }
],
"returns": { "type": "bool" }
}
]
```
The value return by `get_asset_is_frozen` (respectively, `get_account_is_frozen`) tells whether any account (respectively `freeze_account`) can transfer or receive `freeze_asset`. A `false` value indicates that the transfer will be rejected.
> Upon a call to `get_asset_is_frozen`, a reference implementation SHOULD retrieve the tuple `(freeze_asset, asset_frozen)` as stored on `asset_freeze` and return the value corresponding to `asset_frozen`. Upon a call to `get_account_is_frozen`, a reference implementation SHOULD retrieve the tuple `(freeze_asset, freeze_account, asset_frozen)` as stored on `account_freeze` and return the value corresponding to `asset_frozen`.
#### Asset Destroy
```json
{
"name": "asset_destroy",
"args": [{ "type": "asset", "name": "destroy_asset" }],
"returns": { "type": "void" }
}
```
Calling `asset_destroy` destroys a Smart ASA.
> Upon a call to `asset_destroy`, a reference implementation SHOULD:
>
> * Fail if `destroy_asset` does not correspond to an ASA controlled by this smart contract.
>
> It is RECOMMENDED for calls to this method to be permissioned (see `asset_create`).
>
> The controlling Smart Contract SHOULD perform an asset destroy operation on the ASA with ID `destroy_asset`. The operation will fail if the asset is still in circulation.
#### Circulating Supply
```json
{
"name": "get_circulating_supply",
"readonly": true,
"args": [{ "type": "asset", "name": "asset" }],
"returns": { "type": "uint64" }
}
```
Calling `get_circulating_supply` returns the circulating supply of a Smart ASA.
> Upon a call to `get_circulating_supply`, a reference implementation SHOULD:
>
> * Fail if `asset` does not correspond to an ASA controlled by this smart contract.
> * Return the circulating supply of `asset`, defined by the difference between the ASA `total` and the balance held by its `reserve_addr` (see [Asset Creation](#asset-creation)).
#### Full ABI Spec
```json
{
"name": "arc-0020",
"methods": [
{
"name": "asset_create",
"args": [
{
"type": "uint64",
"name": "total"
},
{
"type": "uint32",
"name": "decimals"
},
{
"type": "bool",
"name": "default_frozen"
},
{
"type": "string",
"name": "unit_name"
},
{
"type": "string",
"name": "name"
},
{
"type": "string",
"name": "url"
},
{
"type": "byte[]",
"name": "metadata_hash"
},
{
"type": "address",
"name": "manager_addr"
},
{
"type": "address",
"name": "reserve_addr"
},
{
"type": "address",
"name": "freeze_addr"
},
{
"type": "address",
"name": "clawback_addr"
}
],
"returns": {
"type": "uint64"
}
},
{
"name": "asset_config",
"args": [
{
"type": "asset",
"name": "config_asset"
},
{
"type": "uint64",
"name": "total"
},
{
"type": "uint32",
"name": "decimals"
},
{
"type": "bool",
"name": "default_frozen"
},
{
"type": "string",
"name": "unit_name"
},
{
"type": "string",
"name": "name"
},
{
"type": "string",
"name": "url"
},
{
"type": "byte[]",
"name": "metadata_hash"
},
{
"type": "address",
"name": "manager_addr"
},
{
"type": "address",
"name": "reserve_addr"
},
{
"type": "address",
"name": "freeze_addr"
},
{
"type": "address",
"name": "clawback_addr"
}
],
"returns": {
"type": "void"
}
},
{
"name": "get_asset_config",
"readonly": true,
"args": [
{
"type": "asset",
"name": "asset"
}
],
"returns": {
"type": "(uint64,uint32,bool,string,string,string,byte[],address,address,address,address)",
"desc": "`total`, `decimals`, `default_frozen`, `unit_name`, `name`, `url`, `metadata_hash`, `manager_addr`, `reserve_addr`, `freeze_addr`, `clawback`"
}
},
{
"name": "asset_transfer",
"args": [
{
"type": "asset",
"name": "xfer_asset"
},
{
"type": "uint64",
"name": "asset_amount"
},
{
"type": "account",
"name": "asset_sender"
},
{
"type": "account",
"name": "asset_receiver"
}
],
"returns": {
"type": "void"
}
},
{
"name": "asset_freeze",
"args": [
{
"type": "asset",
"name": "freeze_asset"
},
{
"type": "bool",
"name": "asset_frozen"
}
],
"returns": {
"type": "void"
}
},
{
"name": "account_freeze",
"args": [
{
"type": "asset",
"name": "freeze_asset"
},
{
"type": "account",
"name": "freeze_account"
},
{
"type": "bool",
"name": "asset_frozen"
}
],
"returns": {
"type": "void"
}
},
{
"name": "get_asset_is_frozen",
"readonly": true,
"args": [
{
"type": "asset",
"name": "freeze_asset"
}
],
"returns": {
"type": "bool"
}
},
{
"name": "get_account_is_frozen",
"readonly": true,
"args": [
{
"type": "asset",
"name": "freeze_asset"
},
{
"type": "account",
"name": "freeze_account"
}
],
"returns": {
"type": "bool"
}
},
{
"name": "asset_destroy",
"args": [
{
"type": "asset",
"name": "destroy_asset"
}
],
"returns": {
"type": "void"
}
},
{
"name": "get_circulating_supply",
"readonly": true,
"args": [
{
"type": "asset",
"name": "asset"
}
],
"returns": {
"type": "uint64"
}
}
]
}
```
### Metadata
#### ASA Metadata
The ASA underlying a Smart ASA:
* MUST be `DefaultFrozen`.
* MUST specify the ID of the controlling Smart Contract (see below); and
* MUST set the `ClawbackAddr` to the account of such Smart Contract.
The metadata **MUST** be immutable.
#### Specifying the controlling Smart Contract
A Smart ASA MUST specify the ID of its controlling Smart Contract.
If the Smart ASA also conforms to any ARC that supports additional `properties` ([ARC-3](/arc-standards/arc-0003), [ARC-69](/arc-standards/arc-0069)), then it MUST include a `arc-20` key and set the corresponding value to a map, including the ID of the controlling Smart Contract as a value for the key `application-id`. For example:
```javascript
{
//...
"properties": {
//...
"arc-20": {
"application-id": 123
}
}
//...
}
```
> To avoid ecosystem fragmentation this ARC does NOT propose any new method to specify the metadata of an ASA. Instead, it only extends already existing standards.
### Handling opt in and close out
A Smart ASA MUST require users to opt to the ASA and MAY require them to opt in to the controlling Smart Contract. This MAY be performed at two separate times.
The reminder of this section is non-normative.
> Smart ASAs SHOULD NOT require users to opt in to the controlling Smart Contract, unless the implementation requires storing information into their local schema (for instance, to implement [freezing](#asset-freeze); also see [security considerations](#security-considerations)).
>
> Clients MAY inspect the local state schema of the controlling Smart Contract to infer whether opt in is required.
>
> If a Smart ASA requires opt in, then clients SHOULD prevent users from closing out the controlling Smart Contract unless they don’t hold a balance for any of the ASAs controlled by the Smart Contract.
## Rationale
This ARC builds on the strengths of the ASA to enable a Smart Contract to control its operations and flexibly re-configure its configuration.
The rationale is to have a “Smart ASA” that is as widely adopted as the ASA both by the community and by the surrounding ecosystem. Wallets, dApps, and marketplaces:
* Will display a user’s Smart ASA balance out-of-the-box (because of the underlying ASA).
* SHOULD recognize Smart ASAs and inform the users accordingly by displaying the name, unit name, URL, etc. from the controlling Smart Contract.
* SHOULD enable users to transfer the Smart ASA by constructing the appropriate transactions, which call the ABI methods of the controlling Smart Contract.
With this in mind, this standard optimizes for:
* Community adoption, by minimizing the [ASA metadata](#metadata) that need to be set and the requirements of a conforming implementation.
* Developer adoption, by re-using the familiar ASA transaction reference in the methods’ specification.
* Ecosystem integration, by minimizing the amount of work that a wallet, dApp or service should perform to support the Smart ASA.
## Backwards Compatibility
Existing ASAs MAY adopt this standard if issued or re-configured to match the requirements in the [metadata section](#metadata).
This requires:
* The ASA to be `DefaultFrozen`.
* Deploying a Smart Contract that will manage, control and operate on the asset(s).
* Re-configuring the ASA, by setting its `ClawbackAddr` to the account of the controlling Smart Contract.
* Associating the ID of the Smart Contract to the ASA (see [metadata](#metadata)).
### [ARC-18](/arc-standards/arc-0018)
Assets implementing [ARC-18](/arc-standards/arc-0018) MAY also be compatible with this ARC if the Smart Contract implementing royalties enforcement exposes the ABI methods specified here. The corresponding ASA and their metadata are compliant with this standard.
## Reference Implementation
A reference implementation is available [here](https://github.com/algorandfoundation/ARCs/tree/main/assets/arc-0020)
## Security Considerations
Keep in mind that the rules governing a Smart ASA are only in place as long as:
* The ASA remains frozen;
* the `ClawbackAddr` of the ASA is set to a controlling Smart Contract, as specified in the [metadata section](#metadata);
* the controlling Smart Contract is not updatable, nor deletable, nor re-keyable.
### Local State
If your controlling Smart Contract implementation writes information to a user’s local state, keep in mind that users can close out the application and (worse) clear their state at all times. This requires careful considerations.
For instance, if you determine a user’s [freeze](#asset-freeze) state by reading a flag from their local state, you should consider the flag *set* and the user *frozen* if the corresponding local state key is *missing*.
For a `default_frozen` Smart ASA this means:
* Set the `frozen` flag (to `1`) at opt in.
* Explicitly verify that a user’s `frozen` flag is not set (is `0`) before approving transfers.
* If the key `frozen` is missing from the user’s local state, then considered the flag to be set and reject all transfers.
This prevents users from resetting their `frozen` flag by clearing their state and then opting into the controlling Smart Contract again.
## Copyright
Copyright and related rights waived via [CCO](https://creativecommons.org/publicdomain/zero/1.0/).
# Round based datafeed oracles on Algorand
> Conventions for building round based datafeed oracles on Algorand
## Abstract
The following document introduces conventions for building round based datafeed oracles on Algorand using the ABI defined in [ARC-4](/arc-standards/arc-0004)
## Specification
The key words “**MUST**”, “**MUST NOT**”, “**REQUIRED**”, “**SHALL**”, “**SHALL NOT**”, “**SHOULD**”, “**SHOULD NOT**”, “**RECOMMENDED**”, “**MAY**”, and “**OPTIONAL**” in this document are to be interpreted as described in [RFC-2119](https://www.ietf.org/rfc/rfc2119.txt).
> Comments like this are non-normative.
An [ARC-21](/arc-standards/arc-0021) oracle **MUST** have an associated smart-contract implementaing the ABI interface described below.
### ABI Interface
Round based datafeed oracles allow smart-contracts to get data with relevancy to a specific block number, for example the ALGO price at a specific round.
The associated smart contract **MUST** implement the following ABI interface:
```json
{
"name": "ARC_0021",
"desc": "Interface for a round based datafeed oracle",
"methods": [
{
"name": "get",
"desc": "Get data from the oracle for a specific round",
"args": [
{ "type": "uint64", "name": "round", "desc": "The desired round" },
{ "type": "byte[]", "name": "user_data", "desc": "Optional: Extra data provided by the user. Pass an empty slice if not used." }
],
"returns": { "type": "byte[]", "desc": "The oracle's response. If the data doesn't exist, the response is an empty slice." }
},
{
"name": "must_get",
"desc": "Get data from the oracle for a specific round. Panics if the data doesn't exist.",
"args": [
{ "type": "uint64", "name": "round", "desc": "The desired round" },
{ "type": "byte[]", "name": "user_data", "desc": "Optional: Extra data provided by the user. Pass an empty slice if not used." }
],
"returns": { "type": "byte[]", "desc": "The oracle's response" }
},
/** Optional */
{
"name": "get_closest",
"desc": "Get data from the oracle closest to a specified round by searching over past rounds.",
"args": [
{ "type": "uint64", "name": "round", "desc": "The desired round" },
{ "type": "uint64", "name": "search_span", "desc": "Threshold for number of rounds in the past to search on." }
{ "type": "byte[]", "name": "user_data", "desc": "Optional: Extra data provided by the user. Pass an empty slice if not used." }
],
"returns": { "type": "(uint64,byte[])", "desc": "The closest round and the oracle's response for that round. If the data doesn't exist, the round is set to 0 and the response is an empty slice." }
},
/** Optional */
{
"name": "must_get_closest",
"desc": "Get data from the oracle closest to a specified round by searching over past rounds. Panics if no data is found within the specified range.",
"args": [
{ "type": "uint64", "name": "round", "desc": "The desired round" },
{ "type": "uint64", "name": "search_span", "desc": "Threshold for number of rounds in the past to search on." }
{ "type": "byte[]", "name": "user_data", "desc": "Optional: Extra data provided by the user. Pass an empty slice if not used." }
],
"returns": { "type": "(uint64,byte[])", "desc": "The closest round and the oracle's response for that round." }
}
]
}
```
### Method boundaries
* All of `get`, `must_get`, `get_closest` and `must_get_closest` functions **MUST NOT** use local state.
* Optional arguments of type `byte[]` that are not used are expected to be passed as an empty byte slice.
## Rationale
The goal of these conventions is to make it easier for smart-contracts to interact with off-chain data sources.
## Security Considerations
None.
## Copyright
Copyright and related rights waived via [CCO](https://creativecommons.org/publicdomain/zero/1.0/).
# Add `read-only` annotation to ABI methods
> Convention for creating methods which don't mutate state
The following document introduces a convention for creating methods (as described in [ARC-4](/arc-standards/arc-0004)) which don’t mutate state.
## Abstract
The goal of this convention is to allow smart contract developers to distinguish between methods which mutate state and methods which don’t by introducing a new property to the `Method` descriptor.
## Specification
The key words “**MUST**”, “**MUST NOT**”, “**REQUIRED**”, “**SHALL**”, “**SHALL NOT**”, “**SHOULD**”, “**SHOULD NOT**”, “**RECOMMENDED**”, “**MAY**”, and “**OPTIONAL**” in this document are to be interpreted as described in [RFC-2119](https://www.ietf.org/rfc/rfc2119.txt).
> Comments like this are non-normative.
### Read-only functions
A `read-only` function is a function with no side-effects. In particular, a `read-only` function **SHOULD NOT** include:
* local/global state modifications
* calls to non `read-only` functions
* inner-transactions
It is **RECOMMENDED** for a `read-only` function to not access transactions in a group or metadata of the group.
> The goal is to allow algod to easily execute `read-only` functions without broadcasting a transaction
In order to support this annotation, the following `Method` descriptor is suggested:
```typescript
interface Method {
/** The name of the method */
name: string;
/** Optional, user-friendly description for the method */
desc?: string;
/** Optional, is it a read-only method (according to ARC-22) */
readonly?: boolean
/** The arguments of the method, in order */
args: Array<{
/** The type of the argument */
type: string;
/** Optional, user-friendly name for the argument */
name?: string;
/** Optional, user-friendly description for the argument */
desc?: string;
}>;
/** Information about the method's return value */
returns: {
/** The type of the return value, or "void" to indicate no return value. */
type: string;
/** Optional, user-friendly description for the return value */
desc?: string;
};
}
```
## Rationale
## Security Considerations
None.
## Copyright
Copyright and related rights waived via [CCO](https://creativecommons.org/publicdomain/zero/1.0/).
# Sharing Application Information
> Append application information to compiled TEAL applications
## Abstract
The following document introduces a convention for appending information (stored in various files) to the compiled application’s bytes. The goal of this convention is to standardize the process of verifying and adding this information. The encoded information byte string is `arc23` followed by the IPFS CID v1 of a folder containing the files with the information.
The minimum required file is `contract.json` representing the contract metadata (as described in [ARC-4](/arc-standards/arc-0004)), and as extended by future potential ARCs).
## Specification
The key words “**MUST**”, “**MUST NOT**”, “**REQUIRED**”, “**SHALL**”, “**SHALL NOT**”, “**SHOULD**”, “**SHOULD NOT**”, “**RECOMMENDED**”, “**MAY**”, and “**OPTIONAL**” in this document are to be interpreted as described in [RFC-2119](https://www.ietf.org/rfc/rfc2119.txt).
> Comments like this are non-normative.
### Files containing Application Information
Application information are represented by various files in a folder that:
* **MUST** contain a file `contract.json` representing the contract metadata (as described in [ARC-4](/arc-standards/arc-0004)), and as extended by future potential ARCs).
* **MAY** contain a file with the basename `application` followed by the extension of the high-level language the application is written in (e.g., `application.py` for PyTeal).
> To allow the verification of your contract, be sure to write the version used to compile the file after the import eg: `from pyteal import * #pyteal==0.20.1`
* **MAY** contain the files `approval.teal` and `clear.teal`, that are the compiled versions of approval and clear program in TEAL.
* Note that `approval.teal` will not be able to contain the application information as this would create circularity. If `approval.teal` is provided, it is assumed that the *actual* `approval.teal` that is deployed corresponds to `approval.teal` with the proper `bytecblock` (defined below) appended at the end.
* **MAY** contain other files as defined by other ARCs.
### CID, Pinning, and CAR of the Application Information
The [CID](https://github.com/multiformats/cid) allows to access the corresponding application information files using [IPFS](https://docs.ipfs.tech/).
The CID **MUST**:
* Represent a folder of files, even if only `contract.json` is present.
> You may need to use the option `--wrap-with-directory` of `ipfs add`
* Be a version V1 CID
> E.g., use the option `--cid-version=1` of `ipfs add`
* Use SHA-256 hash algorithm
> E.g., use the option `--hash=sha2-256` of `ipfs add`
Since the exact CID depends on the options provided when creating it and of the IPFS software version (if default options are used), for any production application, the folder of files **SHOULD** be published and pinned on IPFS.
> All examples in this ARC assume the use of Kubo IPFS version 0.17.0 with default options apart those explicitly stated.
If the IPFS is not pinned, any production application **SHOULD** provide a [Content Address Archiver (CAR)](https://ipld.io/specs/transport/car/carv1)( file of the folder, obtained using `ipfs dag export`.
For public networks (e.g., MainNet, TestNet, BetaNet), block explorers and wallets (that support this ARC) **SHOULD** try to recover application information files from IPFS, and if not possible, **SHOULD** allow developers to upload a CAR file. If a CAR file is used, these tools **MUST** validate the CAR file matches the CID.
For development purposes, on private networks, the application information files **MAY** be instead provided as a .zip or .tar.gz containing at the root all the required files. Block explorers and wallets for *private* networks **MAY** allow uploading the application information as a .zip or .tar.gz. They still **SHOULD** validate the files.
> The validation of .zip or .tar.gz files will work if the same version of the IPFS software is used with the same option. Since for development purposes, the same machine is normally used to code the dApp and run the block explorer/wallet, this is most likely not an issue. However, for production purposes, we cannot assume the same IPFS software is used and a CAR file is the best solution to ensure that the application information files will always be available and possible to validate.
> Example: For the example stored in `/asset/arc-0023/application_information`, the CID is `bafybeiavazvdva6uyxqudfsh57jbithx7r7juzvxhrylnhg22aeqau6wte`, which can be obtained with the command:
>
> ```plaintext
> ipfs add --cid-version=1 --hash=sha2-256 --recursive --quiet --wrap-with-directory --only-hash application_information
> ```
### Associated Encoded Information Byte String
The (encoded) information byte string is `arc23` concatenated to the 36 bytes of the binary CID.
The information byte string is always 41-byte long and always start, in hexadecimal with `0x6172633233` (corresponding to `arc23`).
> Example: for the above CID `bafybeiavazvdva6uyxqudfsh57jbithx7r7juzvxhrylnhg22aeqau6wte`, the binary CID corresponds to the following hexadecimal value:
>
> ```plaintext
> 0x0170122015066a3a83d4c5e1419647efd2144cf7fc7e9a66b73c70b69cdad0090053d699
> ```
>
> and hence the encoded information byte string has the following hexadecimal value:
>
> ```plaintext
> 0x61726332330170122015066a3a83d4c5e1419647efd2144cf7fc7e9a66b73c70b69cdad0090053d699
> ```
### Inclusion of the Encoded Information Byte String in Programs
The encoded information byte string is included in the *approval program* of the application via a [`bytecblock`](https://developer.algorand.org/docs/get-details/dapps/avm/teal/opcodes/#bytecblock-bytes) with a unique byte string equal to the encoding information byte string.
> For the example above, the `bytecblock` is:
>
> ```plaintext
> bytecblock 0x61726332330170122015066a3a83d4c5e1419647efd2144cf7fc7e9a66b73c70b69cdad0090053d699
> ```
>
> and when compiled this gives the following byte string (at least with TEAL v8 and before):
>
> ```plaintext
> 0x26012961726332330170122015066a3a83d4c5e1419647efd2144cf7fc7e9a66b73c70b69cdad0090053d699
> ```
The size of the compiled application plus the bytecblock **MUST** be, at most, the maximum size of a compiled application according to the latest consensus parameters supported by the compiler.
> At least with TEAL v8 and before, appending the `bytecblock` to the end of the program should add exactly 44 bytes (1 byte for opcode `bytecblock`, 1 byte for 0x01 -the number of byte strings-, 1 byte for 0x29 the length of the encoded information byte string, 41 byte for the encodedin information byte string)
The `bytecblock` **MAY** be placed anywhere in the TEAL source code as long as it does not modify the semantic of the TEAL source code. However, if `approval.teal` is provided as an application information file, the `bytecblock` **SHOULD** be the last opcode of the deployed TEAL program.
Developers **MUST** check that, when adding the `bytecblock` to their program, semantic is not changed.
> At least with TEAL v8 and before, adding a `bytecblock` opcode at the end of the approval program does not change the semantics of the program, as long as opcodes are correctly aligned, there is no jump after the last position (that would make the program fail without `bytecblock`), and there is enough space left to add the opcode, at least with TEAL v8 and before. However, though very unlikely, future versions of TEAL may not satisfy this property.
The `bytecblock` **MUST NOT** contain any additional byte string beyond the encoded information byte string.
> For example, the following `bytecblock` is **INVALID**:
>
> ```plaintext
> bytecblock 0x61726332330170122015066a3a83d4c5e1419647efd2144cf7fc7e9a66b73c70b69cdad0090053d699 0x42
> ```
### Retrieval the Encoded Information Byte String and CID from Compiled TEAL Programs
For programs until TEAL v8, a way to find the encoded information byte string is to search for the prefix:
```plaintext
0x2601296172633233
```
which is then followed by the 36 bytes of the binary CID.
Indeed, this prefix is composed of:
* 0x26, the `bytecblock` opcode
* 0x01, the number of byte strings provided in the `bytecblock`
* 0x29, the length of the encoded information byte string
* 0x6172633233, the hexadecimal of `arc23`
Software retrieving the encoded information byte string **SHOULD** check the TEAL version and only perform retrieval for supported TEAL version. They also **SHOULD** gracefully handle false positives, that is when the above prefix is found multiple times. One solution is to allow multiple possible CID for a given compiled program.
Note that opcode encoding may change with the TEAL version (though this did not happen up to TEAL v8 at least). If the `bytecblock` opcode encoding changes, software that extract the encoded information byte string from compiled TEAL programs **MUST** be updated.
## Rationale
By appending the IPFS CID of the folder containing information about the Application, any user with access to the blockchain could easily verify the Application and the ABI of the Application and interact with it.
Using IPFS has several advantages:
* Allows automatic retrievel of the application information when pinned.
* Allows easy archival using CAR.
* Allows support of multiple files.
## Reference Implementation
The following codes are not audited and are only here for information purposes.
Here is an example of a python script that can generate the hash and append it to the compiled application, according this ARC: [main.py](https://raw.githubusercontent.com/algorandfoundation/ARCs/main/assets/arc-0023/main.py).
A Folder containing:
* example of the application [application.py](https://raw.githubusercontent.com/algorandfoundation/ARCs/main/assets/arc-0023/application_information/application.py).
* example of the contract metadata that follow [ARC-4](/arc-standards/arc-0004) [contract.json](https://raw.githubusercontent.com/algorandfoundation/ARCs/main/assets/arc-0023/application_information/contract.json).
Files are accessible through followings IPFS command:
```console
$ ipfs cat bafybeiavazvdva6uyxqudfsh57jbithx7r7juzvxhrylnhg22aeqau6wte/contract.json
$ ipfs cat bafybeiavazvdva6uyxqudfsh57jbithx7r7juzvxhrylnhg22aeqau6wte/application.py
```
> If they are not accessible be sure to removed \[—only-hash | -n] from your command or check you ipfs node.
## Security Considerations
CIDs are unique; however, related files **MUST** be checked to ensure that the application conforms. An `arc-23` CID added at the end of an application is here to share information, not proof of anything. In particular, nothing ensures that a provided `approval.teal` matches the actual program on chain.
## Copyright
Copyright and related rights waived via [CCO](https://creativecommons.org/publicdomain/zero/1.0/).
# Algorand WalletConnect v1 API
> API for communication between Dapps and wallets using WalletConnect
This document specifies a standard API for communication between Algorand decentralized applications and wallets using the WalletConnect v1 protocol.
## Abstract
WalletConnect is an open protocol to communicate securely between mobile wallets and decentralized applications (dApps) using QR code scanning (desktop) or deep linking (mobile). It’s main use case allows users to sign transactions on web apps using a mobile wallet.
This document aims to establish a standard API for using the WalletConnect v1 protocol on Algorand, leveraging the existing transaction signing APIs defined in [ARC-1](/arc-standards/arc-0001).
## Specification
The key words “**MUST**”, “**MUST NOT**”, “**REQUIRED**”, “**SHALL**”, “**SHALL NOT**”, “**SHOULD**”, “**SHOULD NOT**”, “**RECOMMENDED**”, “**MAY**”, and “**OPTIONAL**” in this document are to be interpreted as described in [RFC-2119](https://www.ietf.org/rfc/rfc2119.txt).
> Comments like this are non-normative.
It is strongly recommended to read and understand the entirety of [ARC-1](/arc-standards/arc-0001) before reading this ARC.
### Overview
This overview section is non-normative. It offers a brief overview of the WalletConnect v1 lifecycle. A more in-depth description can be found in the WalletConnect v1 documentation .
In order for a dApp and wallet to communicate using WalletConnect, a WalletConnect session must be established between them. The dApp is responsible for initiating this session and producing a session URI, which it will communicate to the wallet, typically in the form of a QR code or a deep link. This processed is described in the [Session Creation](#session-creation) section.
Once a session is established between a dApp and a wallet, the dApp is able to send requests to the wallet. The wallet is responsible for listening for requests, performing the appropriate actions to fulfill requests, and sending responses back to the dApp with the results of requests. This process is described in the [Message Schema](#message-schema) section.
### Session Creation
The dApp is responsible for initializing a WalletConnect session and producing a WalletConnect URI that communicates the necessary session information to the wallet. This process is as described in the WalletConnect documentation , with one addition. In order for wallets to be able to easily and immediately recognize an Algorand WalletConnect session, dApps **SHOULD** add an additional URI query parameter to the WalletConnect URI. If present, the name of this parameter **MUST** be `algorand` and its value **MUST** be `true`. This query parameter can appear in any order relative to the other query parameters in the URI.
> For example, here is a standard WalletConnect URI:
>
> ```plaintext
> wc:4015f93f-b88d-48fc-8bfe-8b063cc325b6@1?bridge=https%3A%2F%2F9.bridge.walletconnect.org&key=b0576e0880e17f8400bfff92d4caaf2158cccc0f493dcf455ba76d448c9b5655
> ```
>
> And here is that same URI with the Algorand-specific query parameter:
>
> ```plaintext
> wc:4015f93f-b88d-48fc-8bfe-8b063cc325b6@1?bridge=https%3A%2F%2F9.bridge.walletconnect.org&key=b0576e0880e17f8400bfff92d4caaf2158cccc0f493dcf455ba76d448c9b5655&algorand=true
> ```
It is **RECOMMENDED** that dApps include this query parameter, but it is not **REQUIRED**. Wallets **MAY** reject sessions if the session URI does not contain this query parameter.
#### Chain IDs
WalletConnect v1 sessions are associated with a numeric chain ID. Since Algorand chains do not have numeric identifiers (instead, the genesis hash or ID is used for this purpose), this document defines the following chain IDs for the Algorand ecosystem:
* MainNet (genesis hash `wGHE2Pwdvd7S12BL5FaOP20EGYesN73ktiC1qzkkit8=`): 416001
* TestNet (genesis hash `SGO1GKSzyE7IEPItTxCByw9x8FmnrCDexi9/cOUJOiI=`): 416002
* BetaNet (genesis hash `mFgazF+2uRS1tMiL9dsj01hJGySEmPN28B/TjjvpVW0=`): 416003
At the time of writing, these chain IDs do not conflict with any known chain that also uses WalletConnect. In the unfortunate event that this were to happen, the `algorand` query parameter discussed above would be used to differentiate Algorand chains from others.
Future Algorand chains, if introduced, **MUST** be assigned new chain IDs.
Wallets and dApps **MAY** support all of the above chain IDs or only a subset of them. If a chain ID is presented to a wallet or dApp that does not support that chain ID, they **MUST** terminate the session.
For compatibility with WalletConnect usage prior to this ARC, the following catch-all chain ID is also defined:
* All Algorand Chains (legacy value): 4160
Wallets and dApps **SHOULD** support this chain ID as well for backwards compatibility. Unfortunately this ID alone is not enough to identify which Algorand chain is being used, so extra fields in message requests (i.e. the genesis hash field in a transaction to sign) **SHOULD** be consulted as well to determine this.
### Message Schema
Note: interfaces are defined in TypeScript. These interfaces are designed to be serializable to and from valid JSON objects.
The WalletConnect message schema is a set of JSON-RPC 2.0 requests and responses. Decentralized applications will send requests to the wallets and will receive responses as JSON-RPC messages. All requests **MUST** adhere to the following structure:
```typescript
interface JsonRpcRequest {
/**
* An identifier established by the Client. Numbers SHOULD NOT contain fractional parts.
*/
id: number;
/**
* A String specifying the version of the JSON-RPC protocol. MUST be exactly "2.0".
*/
jsonrpc: "2.0";
/**
* A String containing the name of the RPC method to be invoked.
*/
method: string;
/**
* A Structured value that holds the parameter values to be used during the invocation of the method.
*/
params: any[];
}
```
The Algorand WalletConnect schema consists of a single RPC method, `algo_signTxn`, as described in the following section.
All responses, whether successful or unsuccessful, **MUST** adhere to the following structure:
```typescript
interface JsonRpcResponse {
/**
* This member is REQUIRED.
* It MUST be the same as the value of the id member in the Request Object.
* If there was an error in detecting the id in the Request object (e.g. Parse error/Invalid Request), it MUST be Null.
*/
id: number;
/**
* A String specifying the version of the JSON-RPC protocol. MUST be exactly "2.0".
*/
jsonrpc: "2.0";
/**
* This member is REQUIRED on success.
* This member MUST NOT exist if there was an error invoking the method.
* The value of this member is determined by the method invoked on the Server.
*/
result?: any;
/**
* This member is REQUIRED on error.
* This member MUST NOT exist if the requested method was invoked successfully.
*/
error?: JsonRpcError;
}
interface JsonRpcError {
/**
* A Number that indicates the error type that occurred.
* This MUST be an integer.
*/
code: number;
/**
* A String providing a short description of the error.
* The message SHOULD be limited to a concise single sentence.
*/
message: string;
/**
* A Primitive or Structured value that contains additional information about the error.
* This may be omitted.
* The value of this member is defined by the Server (e.g. detailed error information, nested errors etc.).
*/
data?: any;
}
```
#### `algo_signTxn`
This request is used to ask a wallet to sign one or more transactions in one or more atomic groups.
##### Request
This request **MUST** adhere to the following structure:
```typescript
interface AlgoSignTxnRequest {
/**
* As described in JsonRpcRequest.
*/
id: number;
/**
* As described in JsonRpcRequest.
*/
jsonrpc: "2.0";
/**
* The method to invoke, MUST be "algo_signTxn".
*/
method: "algo_signTxn";
/**
* Parameters for the transaction signing request.
*/
params: SignTxnParams;
}
/**
* The first element is an array of `WalletTransaction` objects which contain the transaction(s) to be signed.
* If transactions from an atomic transaction group are being signed, then all transactions in the group (even the ones not being signed by the wallet) MUST appear in this array.
*
* The second element, if present, contains addition options specified with the `SignTxnOpts` structure.
*/
type SignTxnParams = [WalletTransaction[], SignTxnOpts?];
```
> `SignTxnParams` is a tuple with an optional element , meaning its length can be 1 or 2.
The [`WalletTransaction`](/arc-standards/arc-0001#interface-wallettransaction) and [`SignTxnOpts`](/arc-standards/arc-0001#interface-signtxnsopts) types are defined in [ARC-1](/arc-standards/arc-0001).
All specifications, restrictions, and guidelines declared in ARC-1 for these types apply to their usage here as well. Additionally, all security requirements and restrictions for processing transaction signing requests from ARC-1 apply to this request as well.
> For more information, see [ARC-1 - Syntax and Interfaces](/arc-standards/arc-0001#syntax-and-interfaces) and [ARC-1 - Semantic and Security Requirements](/arc-standards/arc-0001#semantic-and-security-requirements).
##### Response
To respond to a request, the wallet **MUST** send back the following response object:
```typescript
interface AlgoSignTxnResponse {
/**
* As described in JsonRpcResponse.
*/
id: number;
/**
* As described in JsonRpcResponse.
*/
jsonrpc: "2.0";
/**
* An array containing signed transactions at specific indexes.
*/
result?: Array;
/**
* As described in JsonRpcResponse.
*/
error?: JsonRpcError;
}
```
[`SignedTxnStr`](/arc-standards/arc-0001#interface-signedtxnstr) type is defined in [ARC-1](/arc-standards/arc-0001).
In this response, `result` **MUST** be an array with the same length as the number of `WalletTransaction`s in the request (i.e. `.params[0].length`). For every integer `i` such that `0 <= i < result.length`:
* If the transaction at index `i` in the group should be signed by the wallet (i.e. `.params[0][i].signers` is not an empty array): `result[i]` **MUST** be a base64-encoded string containing the msgpack-encoded signed transaction `params[0][i].txn`.
* Otherwise: `result[i]` **MUST** be `null`, since the wallet was not requested to sign this transaction.
If the wallet does not approve signing every transaction whose signature is being requested, the request **MUST** fail.
All request failures **MUST** use the error codes defined in [ARC-1 - Error Standards](/arc-standards/arc-0001#error-standards).
## Rationale
## Security Considerations
None.
## Copyright
Copyright and related rights waived via [CCO](https://creativecommons.org/publicdomain/zero/1.0/).
# URI scheme
> A specification for encoding Transactions in a URI format.
## Abstract
This URI specification represents a standardized way for applications and websites to send requests and information through deeplinks, QR codes, etc. It is heavily based on Bitcoin’s [BIP-0021](https://github.com/bitcoin/bips/blob/master/bip-0021.mediawiki) and should be seen as derivative of it. The decision to base it on BIP-0021 was made to make it easy and compatible as possible for any other application.
## Specification
### General format
Algorand URIs follow the general format for URIs as set forth in [RFC 3986](https://www.rfc-editor.org/rfc/rfc3986). The path component consists of an Algorand address, and the query component provides additional payment options.
Elements of the query component may contain characters outside the valid range. These must first be encoded according to UTF-8, and then each octet of the corresponding UTF-8 sequence must be percent-encoded as described in RFC 3986.
### ABNF Grammar
```plaintext
algorandurn = "algorand://" algorandaddress [ "?" algorandparams ]
algorandaddress = *base32
algorandparams = algorandparam [ "&" algorandparams ]
algorandparam = [ amountparam / labelparam / noteparam / assetparam / otherparam ]
amountparam = "amount=" *digit
labelparam = "label=" *qchar
assetparam = "asset=" *digit
noteparam = (xnote | note)
xnote = "xnote=" *qchar
note = "note=" *qchar
otherparam = qchar *qchar [ "=" *qchar ]
```
Here, “qchar” corresponds to valid characters of an RFC 3986 URI query component, excluding the ”=” and ”&” characters, which this specification takes as separators.
The scheme component (“algorand:”) is case-insensitive, and implementations must accept any combination of uppercase and lowercase letters. The rest of the URI is case-sensitive, including the query parameter keys.
!!! Caveat When it comes to generation of an address’ QR, many exchanges and wallets encodes the address w/o the scheme component (“algorand:”). This is not a URI so it is OK.
### Query Keys
* label: Label for that address (e.g. name of receiver)
* address: Algorand address
* xnote: A URL-encoded notes field value that must not be modifiable by the user when displayed to users.
* note: A URL-encoded default notes field value that the the user interface may optionally make editable by the user.
* amount: microAlgos or smallest unit of asset
* asset: The asset id this request refers to (if Algos, simply omit this parameter)
* (others): optional, for future extensions
### Transfer amount/size
!!! Note This is DIFFERENT than Bitcoin’s BIP-0021
If an amount is provided, it MUST be specified in basic unit of the asset. For example, if it’s Algos (Algorand native unit), the amount should be specified in microAlgos. All amounts MUST NOT contain commas nor a period (.) Strictly non negative integers.
e.g. for 100 Algos, the amount needs to be 100000000, for 54.1354 Algos the amount needs to be 54135400.
Algorand Clients should display the amount in whole Algos. Where needed, microAlgos can be used as well. In any case, the units shall be clear for the user.
### Appendix
This section contains several examples
address -
```plaintext
algorand://TMTAD6N22HCS2LKH7677L2KFLT3PAQWY6M4JFQFXQS32ECBFC23F57RYX4
```
address with label -
```plaintext
algorand://TMTAD6N22HCS2LKH7677L2KFLT3PAQWY6M4JFQFXQS32ECBFC23F57RYX4?label=Silvio
```
Request 150.5 Algos from an address
```plaintext
algorand://TMTAD6N22HCS2LKH7677L2KFLT3PAQWY6M4JFQFXQS32ECBFC23F57RYX4?amount=150500000
```
Request 150 units of Asset ID 45 from an address
```plaintext
algorand://TMTAD6N22HCS2LKH7677L2KFLT3PAQWY6M4JFQFXQS32ECBFC23F57RYX4?amount=150&asset=45
```
## Rationale
## Security Considerations
None.
## Copyright
Copyright and related rights waived via [CCO](https://creativecommons.org/publicdomain/zero/1.0/).
# Provider Message Schema
> A comprehensive message schema for communication between clients and providers.
## Abstract
Building off of the work of the previous ARCs relating to; provider transaction signing ([ARC-0005](/arc-standards/arc-0005#specification)), provider address discovery ([ARC-0006](/arc-standards/arc-0006#specification)), provider transaction network posting ([ARC-0007](/arc-standards/arc-0007#specification)) and provider transaction signing & posting ([ARC-0008](/arc-standards/arc-0008#specification)), this proposal aims to comprehensively outline a common message schema between clients and providers.
Furthermore, this proposal extends the aforementioned methods to encompass new functionality such as:
* Extending the message structure to target specific networks, thereby supporting multiple AVM (Algorand Virtual Machine) chains.
* Adding a new method that disables clients on providers.
* Adding a new method to discover provider capabilities, such as what networks and methods are supported.
This proposal serves as a formalization of the message schema and leaves the implementation details to the prerogative of the clients and providers.
[Back to top ^](/arc-standards/arc-0027#abstract)
## Motivation
The previous ARCs relating to client/provider communication ([ARC-0005](/arc-standards/arc-0005), [ARC-0006](/arc-standards/arc-0006), [ARC-0007](/arc-standards/arc-0007) and [ARC-0008](/arc-standards/arc-0008) serve as the foundation of this proposal. However, this proposal attempts to bring these previous ARCs together and extend their functionality as some of the previous formats did not allow for very much robustness when it came to targeting a specific AVM chain.
More methods have been added in an attempt to “fill in the gaps” of the previous client/provider communication ARCS.
[Back to top ^](/arc-standards/arc-0027#abstract)
## Specification
The key words “**MUST**”, “**MUST NOT**”, “**REQUIRED**”, “**SHALL**”, “**SHALL NOT**”, “**SHOULD**”, “**SHOULD NOT**”, “**RECOMMENDED**”, “**MAY**”, and “**OPTIONAL**” in this document are to be interpreted as described in [RFC-2119](https://www.ietf.org/rfc/rfc2119.txt).
> Comments like this are non-normative.
### Definitions
This section is non-normative.
* Client
* An end-user application that interacts with a provider; e.g. a dApp.
* Provider
* An application that manages private keys and performs signing operations; e.g. a wallet.
[Back to top ^](/arc-standards/arc-0027#abstract)
### Message Reference Naming
In order for each message to be identifiable, each message **MUST** contain a `reference` property. Furthermore, this `reference` property **MUST** conform to the following naming convention:
```plaintext
[namespace]:[method]:[type]
```
where:
* `namespace`:
* **MUST** be `arc0027`
* `method`:
* **MUST** be in snake case
* **MUST** be one of `disable`, `discover`, `enable`, `post_transactions`, `sign_and_post_transactions`, `sign_message` or `sign_transactions`
* `type`:
* **MUST** be one of `request` or `response`
This convention ensures that each message can be identified and handled.
[Back to top ^](/arc-standards/arc-0027#abstract)
### Supported Methods
| Name | Summary | Example |
| ---------------------------- | ----------------------------------------------------------------------------------------------------------------------------------------------------------------------------------------------------------------------------------------------------------------------------------------------------------------------------------------------------------------------- | ------------------------------------------- |
| `disable` | Removes access for the clients on the provider. What this looks like is the prerogative of the provider. | [here](#disable-example) |
| `discover` | Sent by a client to discover the available provider(s). If the `params.providerId` property is supplied, only the provider with the matching ID **SHOULD** respond. This method is usually called before other methods as it allows the client to identify provider(s), the networks the provider(s) supports and the methods the provider(s) supports on each network. | [here](#discover-example) |
| `enable` | Requests that a provider allow a client access to the providers’ accounts. The response **MUST** return a user-curated list of available addresses. Providers **SHOULD** create a “session” for the requesting client, what this should look like is the prerogative of the provider(s) and is beyond the scope of this proposal. | [here](#enable-example) |
| `post_transactions` | Sends a list of signed transactions to be posted to the network by the provider. | [here](#post-transactions-example) |
| `sign_and_post_transactions` | Sends a list of signed transactions to be posted to the network by the provider. | [here](#sign-and-post-transactions-example) |
| `sign_message` | Sends a UTF-8 encoded message to be signed by the provider. | [here](#sign-message-example) |
| `sign_transactions` | Sends a list of transactions to be signed by the provider. | [here](#sign-transactions-example) |
[Back to top ^](/arc-standards/arc-0027#abstract)
### Request Message Schema
```json
{
"$schema": "https://json-schema.org/draft/2020-12/schema",
"$id": "/schemas/request-message",
"title": "Request Message",
"description": "Outlines the structure of a request message",
"type": "object",
"properties": {
"id": {
"type": "string",
"description": "A globally unique identifier for the message",
"format": "uuid"
},
"reference": {
"description": "Identifies the purpose of the message",
"enum": [
"arc0027:disable:request",
"arc0027:discover:request",
"arc0027:enable:request",
"arc0027:post_transactions:request",
"arc0027:sign_and_post_transactions:request",
"arc0027:sign_message:request",
"arc0027:sign_transactions:request"
]
}
},
"allOf": [
{
"if": {
"properties": {
"reference": {
"const": "arc0027:disable:request"
}
},
"required": ["id", "reference"]
},
"then": {
"properties": {
"params": {
"$ref": "/schemas/disable-params"
}
}
}
},
{
"if": {
"properties": {
"reference": {
"const": "arc0027:discover:request"
}
},
"required": ["id", "reference"]
},
"then": {
"properties": {
"params": {
"$ref": "/schemas/discover-params"
}
}
}
},
{
"if": {
"properties": {
"reference": {
"const": "arc0027:enable:request"
}
},
"required": ["id", "reference"]
},
"then": {
"properties": {
"params": {
"$ref": "/schemas/enable-params"
}
}
}
},
{
"if": {
"properties": {
"reference": {
"const": "arc0027:post_transactions:request"
}
},
"required": ["id", "params", "reference"]
},
"then": {
"properties": {
"params": {
"$ref": "/schemas/post-transactions-params"
}
}
}
},
{
"if": {
"properties": {
"reference": {
"const": "arc0027:sign_and_post_transactions:request"
}
},
"required": ["id", "params", "reference"]
},
"then": {
"properties": {
"params": {
"$ref": "/schemas/sign-and-post-transactions-params"
}
}
}
},
{
"if": {
"properties": {
"reference": {
"const": "arc0027:sign_message:request"
}
},
"required": ["id", "params", "reference"]
},
"then": {
"properties": {
"params": {
"$ref": "/schemas/sign-message-params"
}
}
}
},
{
"if": {
"properties": {
"reference": {
"const": "arc0027:sign_transactions:request"
}
},
"required": ["id", "params", "reference"]
},
"then": {
"properties": {
"params": {
"$ref": "/schemas/sign-transactions-params"
}
}
}
}
]
}
```
where:
* `id`:
* **MUST** be a [UUIDv4](https://www.rfc-editor.org/rfc/rfc4122) compliant string
* `reference`:
* **MUST** be a string that conforms to the [message reference naming](#message-reference-naming) convention
[Back to top ^](/arc-standards/arc-0027#abstract)
#### Param Definitions
##### Disable Params
```json
{
"$schema": "https://json-schema.org/draft/2020-12/schema",
"$id": "/schemas/disable-params",
"title": "Disable Params",
"description": "Disables a previously enabled client with any provider(s)",
"type": "object",
"properties": {
"genesisHash": {
"type": "string",
"description": "The unique identifier for the network that is the hash of the genesis block"
},
"providerId": {
"type": "string",
"description": "A unique identifier for the provider",
"format": "uuid"
},
"sessionIds": {
"type": "array",
"description": "A list of specific session IDs to remove",
"items": {
"type": "string"
}
}
},
"required": ["providerId"]
}
```
where:
* `genesisHash`:
* **OPTIONAL** if omitted, the provider **SHOULD** assume the “default” network
* **MUST** be a base64 encoded hash of the genesis block of the network
* `providerId`:
* **MUST** be a [UUIDv4](https://www.rfc-editor.org/rfc/rfc4122) compliant string
* `sessionIds`:
* **OPTIONAL** if omitted, all sessions must be removed
* **MUST** remove all sessions if the list is empty
[Back to top ^](/arc-standards/arc-0027#abstract)
##### Discover Params
```json
{
"$schema": "https://json-schema.org/draft/2020-12/schema",
"$id": "/schemas/discover-params",
"title": "Discover Params",
"description": "Gets a list of available providers",
"type": "object",
"properties": {
"providerId": {
"type": "string",
"description": "A unique identifier for the provider",
"format": "uuid"
}
}
}
```
where:
* `providerId`:
* **OPTIONAL** if omitted, all providers **MAY** respond
* **MUST** be a [UUIDv4](https://www.rfc-editor.org/rfc/rfc4122) compliant string
[Back to top ^](/arc-standards/arc-0027#abstract)
##### Enable Params
```json
{
"$schema": "https://json-schema.org/draft/2020-12/schema",
"$id": "/schemas/enable-params",
"title": "Enable Params",
"description": "Asks provider(s) to enable the requesting client",
"type": "object",
"properties": {
"genesisHash": {
"type": "string",
"description": "The unique identifier for the network that is the hash of the genesis block"
},
"providerId": {
"type": "string",
"description": "A unique identifier for the provider",
"format": "uuid"
}
},
"required": ["providerId"]
}
```
where:
* `genesisHash`:
* **OPTIONAL** if omitted, the provider **SHOULD** assume the “default” network
* **MUST** be a base64 encoded hash of the genesis block of the network
* `providerId`:
* **MUST** be a [UUIDv4](https://www.rfc-editor.org/rfc/rfc4122) compliant string
[Back to top ^](/arc-standards/arc-0027#abstract)
##### Post Transactions Params
```json
{
"$schema": "https://json-schema.org/draft/2020-12/schema",
"$id": "/schemas/post-transactions-params",
"title": "Post Transactions Params",
"description": "Sends a list of signed transactions to be posted to the network by the provider(s)",
"type": "object",
"properties": {
"providerId": {
"type": "string",
"description": "A unique identifier for the provider",
"format": "uuid"
},
"stxns": {
"type": "array",
"description": "A list of signed transactions to be posted to the network by the provider(s)",
"items": {
"type": "string"
}
}
},
"required": [
"providerId",
"stxns"
]
}
```
where:
* `providerId`:
* **MUST** be a [UUIDv4](https://www.rfc-editor.org/rfc/rfc4122) compliant string
* `stxns`:
* **MUST** be the base64 encoding of the canonical msgpack encoding of a signed transaction as defined in [ARC-1](/arc-standards/arc-0001#interface-signedtxnstr)
* **MAY** be empty
[Back to top ^](/arc-standards/arc-0027#abstract)
##### Sign And Post Transactions Params
```json
{
"$schema": "https://json-schema.org/draft/2020-12/schema",
"$id": "/schemas/sign-and-post-transactions-params",
"title": "Sign And Post Transactions Params",
"description": "Sends a list of transactions to be signed and posted to the network by the provider(s)",
"type": "object",
"properties": {
"providerId": {
"type": "string",
"description": "A unique identifier for the provider",
"format": "uuid"
},
"txns": {
"type": "array",
"description": "A list of transactions to be signed and posted to the network by the provider(s)",
"items": {
"type": "object",
"properties": {
"authAddr": {
"type": "string",
"description": "The auth address if the sender has rekeyed"
},
"msig": {
"type": "object",
"description": "Extra metadata needed when sending multisig transactions",
"properties": {
"addrs": {
"type": "array",
"description": "A list of Algorand addresses representing possible signers for the multisig",
"items": {
"type": "string"
}
},
"threshold": {
"type": "integer",
"description": "Multisig threshold value"
},
"version": {
"type": "integer",
"description": "Multisig version"
}
}
},
"signers": {
"type": "array",
"description": "A list of addresses to sign with",
"items": {
"type": "string"
}
},
"stxn": {
"type": "string",
"description": "The base64 encoded signed transaction"
},
"txn": {
"type": "string",
"description": "The base64 encoded unsigned transaction"
}
},
"required": ["txn"]
}
}
},
"required": [
"providerId",
"txns"
]
}
```
where:
* `providerId`:
* **MUST** be a [UUIDv4](https://www.rfc-editor.org/rfc/rfc4122) compliant string
* `txns`:
* **MUST** have each item conform to the semantic of a transaction in [ARC-1](/arc-standards/arc-0001#semantic-of-wallettransaction)
* **MAY** be empty
[Back to top ^](/arc-standards/arc-0027#abstract)
##### Sign Message Params
```json
{
"$schema": "https://json-schema.org/draft/2020-12/schema",
"$id": "/schemas/sign-message-params",
"title": "Sign Message Params",
"description": "Sends a UTF-8 encoded message to be signed by the provider(s)",
"type": "object",
"properties": {
"message": {
"type": "string",
"description": "The string to be signed by the provider"
},
"providerId": {
"type": "string",
"description": "A unique identifier for the provider",
"format": "uuid"
},
"signer": {
"type": "string",
"description": "The address to be used to sign the message"
}
},
"required": [
"message",
"providerId"
]
}
```
where:
* `message`:
* **MUST** be a string that is compatible with the UTF-8 character set as defined in [RFC-2279](https://www.rfc-editor.org/rfc/rfc2279)
* `providerId`:
* **MUST** be a [UUIDv4](https://www.rfc-editor.org/rfc/rfc4122) compliant string
* `signer`:
* **MUST** be a base32 encoded public key with a 4 byte checksum appended as defined in [keys and addresses](https://developer.algorand.org/docs/get-details/accounts/#keys-and-addresses)
[Back to top ^](/arc-standards/arc-0027#abstract)
##### Sign Transactions Params
```json
{
"$schema": "https://json-schema.org/draft/2020-12/schema",
"$id": "/schemas/sign-transactions-params",
"title": "Sign Transactions Params",
"description": "Sends a list of transactions to be signed by the provider(s)",
"type": "object",
"properties": {
"providerId": {
"type": "string",
"description": "A unique identifier for the provider",
"format": "uuid"
},
"txns": {
"type": "array",
"description": "A list of transactions to be signed by the provider(s)",
"items": {
"type": "object",
"properties": {
"authAddr": {
"type": "string",
"description": "The auth address if the sender has rekeyed"
},
"msig": {
"type": "object",
"description": "Extra metadata needed when sending multisig transactions",
"properties": {
"addrs": {
"type": "array",
"description": "A list of Algorand addresses representing possible signers for the multisig",
"items": {
"type": "string"
}
},
"threshold": {
"type": "integer",
"description": "Multisig threshold value"
},
"version": {
"type": "integer",
"description": "Multisig version"
}
}
},
"signers": {
"type": "array",
"description": "A list of addresses to sign with",
"items": {
"type": "string"
}
},
"stxn": {
"type": "string",
"description": "The base64 encoded signed transaction"
},
"txn": {
"type": "string",
"description": "The base64 encoded unsigned transaction"
}
},
"required": ["txn"]
}
}
},
"required": [
"providerId",
"txns"
]
}
```
where:
* `providerId`:
* **MUST** be a [UUIDv4](https://www.rfc-editor.org/rfc/rfc4122) compliant string
* `txns`:
* **MUST** have each item conform to the semantic of a transaction in [ARC-1](/arc-standards/arc-0001#semantic-of-wallettransaction)
* **MAY** be empty
[Back to top ^](/arc-standards/arc-0027#abstract)
### Response Message Schema
```json
{
"$schema": "https://json-schema.org/draft/2020-12/schema",
"$id": "/schemas/response-message",
"title": "Response Message",
"description": "Outlines the structure of a response message",
"type": "object",
"properties": {
"id": {
"type": "string",
"description": "A globally unique identifier for the message",
"format": "uuid"
},
"reference": {
"description": "Identifies the purpose of the message",
"enum": [
"arc0027:disable:response",
"arc0027:discover:response",
"arc0027:enable:response",
"arc0027:post_transactions:response",
"arc0027:sign_and_post_transactions:response",
"arc0027:sign_message:response",
"arc0027:sign_transactions:response"
]
},
"requestId": {
"type": "string",
"description": "The ID of the request message",
"format": "uuid"
}
},
"allOf": [
{
"if": {
"properties": {
"reference": {
"const": "arc0027:disable:response"
}
},
"required": ["id", "reference", "requestId"]
},
"then": {
"oneOf": [
{
"properties": {
"result": {
"$ref": "/schemas/disable-result"
}
}
},
{
"properties": {
"error": {
"$ref": "/schemas/error"
}
}
}
]
}
},
{
"if": {
"properties": {
"reference": {
"const": "arc0027:discover:response"
}
},
"required": ["id", "reference", "requestId"]
},
"then": {
"oneOf": [
{
"properties": {
"result": {
"$ref": "/schemas/discover-result"
}
}
},
{
"properties": {
"error": {
"$ref": "/schemas/error"
}
}
}
]
}
},
{
"if": {
"properties": {
"reference": {
"const": "arc0027:enable:response"
}
},
"required": ["id", "reference", "requestId"]
},
"then": {
"oneOf": [
{
"properties": {
"result": {
"$ref": "/schemas/enable-result"
}
}
},
{
"properties": {
"error": {
"$ref": "/schemas/error"
}
}
}
]
}
},
{
"if": {
"properties": {
"reference": {
"const": "arc0027:post_transactions:response"
}
},
"required": ["id", "reference", "requestId"]
},
"then": {
"oneOf": [
{
"properties": {
"result": {
"$ref": "/schemas/post-transactions-result"
}
}
},
{
"properties": {
"error": {
"$ref": "/schemas/error"
}
}
}
]
}
},
{
"if": {
"properties": {
"reference": {
"const": "arc0027:sign_and_post_transactions:response"
}
},
"required": ["id", "reference", "requestId"]
},
"then": {
"oneOf": [
{
"properties": {
"result": {
"$ref": "/schemas/sign-and-post-transactions-result"
}
}
},
{
"properties": {
"error": {
"$ref": "/schemas/error"
}
}
}
]
}
},
{
"if": {
"properties": {
"reference": {
"const": "arc0027:sign_message:response"
}
},
"required": ["id", "reference", "requestId"]
},
"then": {
"oneOf": [
{
"properties": {
"result": {
"$ref": "/schemas/sign-message-result"
}
}
},
{
"properties": {
"error": {
"$ref": "/schemas/error"
}
}
}
]
}
},
{
"if": {
"properties": {
"reference": {
"const": "arc0027:sign_transactions:response"
}
},
"required": ["id", "reference", "requestId"]
},
"then": {
"oneOf": [
{
"properties": {
"result": {
"$ref": "/schemas/sign-transactions-result"
}
}
},
{
"properties": {
"error": {
"$ref": "/schemas/error"
}
}
}
]
}
}
]
}
```
* `id`:
* **MUST** be a [UUIDv4](https://www.rfc-editor.org/rfc/rfc4122) compliant string
* `reference`:
* **MUST** be a string that conforms to the [message reference naming](#message-reference-naming) convention
* `requestId`:
* **MUST** be the ID of the origin request message
[Back to top ^](/arc-standards/arc-0027#abstract)
#### Result Definitions
##### Disable Result
```json
{
"$schema": "https://json-schema.org/draft/2020-12/schema",
"$id": "/schemas/disable-result",
"title": "Disable Result",
"description": "The response from a disable request",
"type": "object",
"properties": {
"genesisHash": {
"type": "string",
"description": "The unique identifier for the network that is the hash of the genesis block"
},
"genesisId": {
"type": "string",
"description": "A human-readable identifier for the network"
},
"providerId": {
"type": "number",
"description": "A unique identifier for the provider",
"format": "uuid"
},
"sessionIds": {
"type": "array",
"description": "A list of specific session IDs that have been removed",
"items": {
"type": "string"
}
}
},
"required": [
"genesisHash",
"genesisId",
"providerId"
]
}
```
where:
* `genesisHash`:
* **MUST** be a base64 encoded hash of the genesis block of the network
* `providerId`:
* **MUST** be a [UUIDv4](https://www.rfc-editor.org/rfc/rfc4122) compliant string
* **MUST** uniquely identify the provider
[Back to top ^](/arc-standards/arc-0027#abstract)
##### Discover Result
```json
{
"$schema": "https://json-schema.org/draft/2020-12/schema",
"$id": "/schemas/discover-result",
"title": "Discover Result",
"description": "The response from a discover request",
"type": "object",
"properties": {
"host": {
"type": "string",
"description": "A domain name of the provider"
},
"icon": {
"type": "string",
"description": "A URI pointing to an image"
},
"name": {
"type": "string",
"description": "A human-readable canonical name of the provider"
},
"networks": {
"type": "array",
"description": "A list of networks available for the provider",
"items": {
"type": "object",
"properties": {
"genesisHash": {
"type": "string",
"description": "The unique identifier for the network that is the hash of the genesis block"
},
"genesisId": {
"type": "string",
"description": "A human-readable identifier for the network"
},
"methods": {
"type": "array",
"description": "A list of methods available from the provider for the chain",
"items": {
"enum": [
"disable",
"enable",
"post_transactions",
"sign_and_post_transactions",
"sign_message",
"sign_transactions"
]
}
}
},
"required": [
"genesisHash",
"genesisId",
"methods"
]
}
},
"providerId": {
"type": "string",
"description": "A globally unique identifier for the provider",
"format": "uuid"
}
},
"required": [
"name",
"networks",
"providerId"
]
}
```
where:
* `host`:
* **RECOMMENDED** a URL that points to a live website
* `icon`:
* **RECOMMENDED** be a URI that conforms to [\[RFC-2397\]](https://www.rfc-editor.org/rfc/rfc2397)
* **SHOULD** be a URI that points to a square image with a 96x96px minimum resolution
* **RECOMMENDED** image format to be either lossless or vector based such as PNG, WebP or SVG
* `name`:
* **SHOULD** be human-readable to allow for display to a user
* `networks`:
* **MAY** be empty
* `networks.genesisHash`:
* **MUST** be a base64 encoded hash of the genesis block of the network
* `networks.methods`:
* **SHOULD** be one or all of `disable`, `enable`, `post_transactions`, `sign_and_post_transactions`, `sign_message` or `sign_transactions`
* **MAY** be empty
* `providerId`:
* **MUST** be a [UUIDv4](https://www.rfc-editor.org/rfc/rfc4122) compliant string
* **MUST** uniquely identify the provider
[Back to top ^](/arc-standards/arc-0027#abstract)
##### Enable Result
```json
{
"$schema": "https://json-schema.org/draft/2020-12/schema",
"$id": "/schemas/enable-result",
"title": "Enable Result",
"description": "The response from an enable request",
"type": "object",
"properties": {
"accounts": {
"type": "array",
"description": "A list of accounts available for the provider",
"items": {
"type": "object",
"properties": {
"address": {
"type": "string",
"description": "The address of the account"
},
"name": {
"type": "string",
"description": "A human-readable name for this account"
}
},
"required": ["address"]
}
},
"genesisHash": {
"type": "string",
"description": "The unique identifier for the network that is the hash of the genesis block"
},
"genesisId": {
"type": "string",
"description": "A human-readable identifier for the network"
},
"providerId": {
"type": "string",
"description": "A unique identifier for the provider",
"format": "uuid"
},
"sessionId": {
"type": "string",
"description": "A globally unique identifier for the session as defined by the provider"
}
},
"required": [
"accounts",
"genesisHash",
"genesisId",
"providerId"
]
}
```
where:
* `accounts`:
* **MAY** be empty
* `accounts.address`:
* **MUST** be a base32 encoded public key with a 4 byte checksum appended as defined in [keys and addresses](https://developer.algorand.org/docs/get-details/accounts/#keys-and-addresses)
* `genesisHash`:
* **MUST** be a base64 encoded hash of the genesis block of the network
* `providerId`:
* **MUST** be a [UUIDv4](https://www.rfc-editor.org/rfc/rfc4122) compliant string
* **MUST** uniquely identify the provider
* `sessionId`:
* **RECOMMENDED** to be a [UUIDv4](https://www.rfc-editor.org/rfc/rfc4122) compliant string
[Back to top ^](/arc-standards/arc-0027#abstract)
##### Post Transactions Result
```json
{
"$schema": "https://json-schema.org/draft/2020-12/schema",
"$id": "/schemas/post-transactions-result",
"title": "Post Transactions Result",
"description": "The response from a post transactions request",
"type": "object",
"properties": {
"providerId": {
"type": "string",
"description": "A unique identifier for the provider",
"format": "uuid"
},
"txnIDs": {
"type": "array",
"description": "A list of IDs for all of the transactions posted to the network",
"items": {
"type": "string"
}
}
},
"required": [
"providerId",
"txnIDs"
]
}
```
where:
* `providerId`:
* **MUST** be a [UUIDv4](https://www.rfc-editor.org/rfc/rfc4122) compliant string
* **MUST** uniquely identify the provider
* `txnIDs`:
* **MUST** contain items that are a 52-character base32 string (without padding) corresponding to a 32-byte string transaction ID
* **MAY** be empty
[Back to top ^](/arc-standards/arc-0027#abstract)
##### Sign And Post Transactions Result
```json
{
"$schema": "https://json-schema.org/draft/2020-12/schema",
"$id": "/schemas/sign-and-post-transactions-result",
"title": "Sign And Post Transactions Result",
"description": "The response from a sign and post transactions request",
"type": "object",
"properties": {
"providerId": {
"type": "string",
"description": "A unique identifier for the provider",
"format": "uuid"
},
"txnIDs": {
"type": "array",
"description": "A list of IDs for all of the transactions posted to the network",
"items": {
"type": "string"
}
}
},
"required": [
"providerId",
"txnIDs"
]
}
```
where:
* `providerId`:
* **MUST** be a [UUIDv4](https://www.rfc-editor.org/rfc/rfc4122) compliant string
* **MUST** uniquely identify the provider
* `txnIDs`:
* **MUST** contain items that are a 52-character base32 string (without padding) corresponding to a 32-byte string transaction ID
* **MAY** be empty
[Back to top ^](/arc-standards/arc-0027#abstract)
##### Sign Message Result
```json
{
"$schema": "https://json-schema.org/draft/2020-12/schema",
"$id": "/schemas/sign-message-result",
"title": "Sign Message Result",
"description": "The response from a sign message request",
"type": "object",
"properties": {
"providerId": {
"type": "string",
"description": "A unique identifier for the provider",
"format": "uuid"
},
"signature": {
"type": "string",
"description": "The signature of the signed message signed by the private key of the intended signer"
},
"signer": {
"type": "string",
"description": "The address of the signer used to sign the message"
}
},
"required": ["providerId", "signature", "signer"]
}
```
where:
* `providerId`:
* **MUST** be a [UUIDv4](https://www.rfc-editor.org/rfc/rfc4122) compliant string
* **MUST** uniquely identify the provider
* `signature`:
* **MUST** be a base64 encoded string
* `signer`:
* **MUST** be a base32 encoded public key with a 4 byte checksum appended as defined in [keys and addresses](https://developer.algorand.org/docs/get-details/accounts/#keys-and-addresses)
[Back to top ^](/arc-standards/arc-0027#abstract)
##### Sign Transactions Result
```json
{
"$schema": "https://json-schema.org/draft/2020-12/schema",
"$id": "/schemas/sign-transactions-result",
"title": "Sign Transactions Result",
"description": "The response from a sign transactions request",
"type": "object",
"properties": {
"providerId": {
"type": "string",
"description": "A unique identifier for the provider",
"format": "uuid"
},
"stxns": {
"type": "array",
"description": "A list of signed transactions that is ready to be posted to the network",
"items": {
"type": "string"
}
}
},
"required": ["providerId", "stxns"]
}
```
where:
* `providerId`:
* **MUST** be a [UUIDv4](https://www.rfc-editor.org/rfc/rfc4122) compliant string
* **MUST** uniquely identify the provider
* `stxns`:
* **MUST** be the base64 encoding of the canonical msgpack encoding of a signed transaction as defined in [ARC-1](/arc-standards/arc-0001#interface-signedtxnstr)
* **MAY** be empty
[Back to top ^](/arc-standards/arc-0027#abstract)
#### Error Definition
```json
{
"$schema": "https://json-schema.org/draft/2020-12/schema",
"$id": "/schemas/error",
"title": "Error",
"description": "Details the type of error and a human-readable message that can be displayed to the user",
"type": "object",
"properties": {
"code": {
"description": "An integer that defines the type of error",
"enum": [
4000,
4001,
4002,
4003,
4004,
4100,
4200,
4201,
4300
]
},
"data": {
"type": "object",
"description": "Additional information about the error"
},
"message": {
"type": "string",
"description": "A human-readable message about the error"
},
"providerId": {
"type": "number",
"description": "A unique identifier for the provider",
"format": "uuid"
}
},
"required": [
"code",
"message"
]
}
```
where:
* `code`:
* **MUST** be a code of one of the [errors](#errors)
* `message`:
* **SHOULD** be human-readable to allow for display to a user
* `providerId`:
* **MUST** be a [UUIDv4](https://www.rfc-editor.org/rfc/rfc4122) compliant string
* **MUST** be present if the error originates from the provider
[Back to top ^](/arc-standards/arc-0027#abstract)
### Errors
#### Summary
| Code | Name | Summary |
| ---- | ------------------------------------------------------------------------------ | ----------------------------------------------------------------------------------------- |
| 4000 | [`UnknownError`](#4000-unknownerror) | The default error response, usually indicates something is not quite right. |
| 4001 | [`MethodCanceledError`](#4001-methodcancelederror) | When a user has rejected the method. |
| 4002 | [`MethodTimedOutError`](#4002-methodtimedouterror) | The requested method has timed out. |
| 4003 | [`MethodNotSupportedError`](#4003-methodnotsupportederror) | The provider does not support this method. |
| 4004 | [`NetworkNotSupportedError`](#4004-networknotsupportederror) | Network is not supported. |
| 4100 | [`UnauthorizedSignerError`](#4100-unauthorizedsignererror) | The provider has not given permission to use a specified signer. |
| 4200 | [`InvalidInputError`](#4200-invalidinputerror) | The input for signing transactions is malformed. |
| 4201 | [`InvalidGroupIdError`](#4201-invalidgroupiderror) | The computed group ID of the atomic transactions is different from the assigned group ID. |
| 4300 | [`FailedToPostSomeTransactionsError`](#4300-failedtopostsometransactionserror) | When some transactions were not sent properly. |
[Back to top ^](/arc-standards/arc-0027#abstract)
#### 4000 `UnknownError`
This error is the default error and serves as the “catch all” error. This usually occurs when something has happened that is outside the bounds of graceful handling. You can check the `UnknownError.message` string for more information.
The code **MUST** be 4000.
[Back to top ^](/arc-standards/arc-0027#abstract)
#### 4001 `MethodCanceledError`
This error is thrown when a user has rejected or canceled the requested method on the provider. For example, the user decides to cancel the signing of a transaction.
**Additional Data**
| Name | Type | Value | Description |
| ------ | -------- | ----- | ----------------------------------------- |
| method | `string` | - | The name of the method that was canceled. |
The code **MUST** be 4001.
[Back to top ^](/arc-standards/arc-0027#abstract)
#### 4002 `MethodTimedOutError`
This can be thrown by most methods and indicates that the method has timed out.
**Additional Data**
| Name | Type | Value | Description |
| ------ | -------- | ----- | -------------------------------------- |
| method | `string` | - | The name of the method that timed out. |
The code **MUST** be 4002.
[Back to top ^](/arc-standards/arc-0027#abstract)
#### 4003 `MethodNotSupportedError`
This can be thrown by most methods and indicates that the provider does not support the method you are trying to perform.
The code **MUST** be 4003.
**Additional Data**
| Name | Type | Value | Description |
| ------ | -------- | ----- | --------------------------------------------- |
| method | `string` | - | The name of the method that is not supported. |
[Back to top ^](/arc-standards/arc-0027#abstract)
#### 4004 `NetworkNotSupportedError`
This error is thrown when the requested genesis hash is not supported by the provider.
The code **MUST** be 4004.
**Additional Data**
| Name | Type | Value | Description |
| ----------- | -------- | ----- | ------------------------------------------------------ |
| genesisHash | `string` | - | The genesis hash of the network that is not supported. |
[Back to top ^](/arc-standards/arc-0027#abstract)
#### 4100 `UnauthorizedSignerError`
This error is thrown when a provided account has been specified, but the provider has not given permission to use that account as a signer.
The code **MUST** be 4100.
**Additional Data**
| Name | Type | Value | Description |
| ------ | -------- | ----- | ------------------------------------------------- |
| signer | `string` | - | The address of the signer that is not authorized. |
[Back to top ^](/arc-standards/arc-0027#abstract)
#### 4200 `InvalidInputError`
This error is thrown when the provider attempts to sign transaction(s), but the input is malformed.
The code **MUST** be 4200.
[Back to top ^](/arc-standards/arc-0027#abstract)
#### 4201 `InvalidGroupIdError`
This error is thrown when the provider attempts to sign atomic transactions in which the computed group ID is different from the assigned group ID.
The code **MUST** be 4301.
**Additional Data**
| Name | Type | Value | Description |
| --------------- | -------- | ----- | ---------------------------------------------------- |
| computedGroupId | `string` | - | The computed ID of the supplied atomic transactions. |
[Back to top ^](/arc-standards/arc-0027#abstract)
#### 4300 `FailedToPostSomeTransactionsError`
This error is thrown when some transactions failed to be posted to the network.
The code **MUST** be 4300.
**Additional Data**
| Name | Type | Value | Description |
| ------------- | -------------------- | ----- | ----------------------------------------------------------------------------------------------------------------------------------------------------------------------------------------------------------------------------- |
| successTxnIDs | `(string \| null)[]` | - | This will correspond to the `stxns` list sent in `post_transactions` & `sign_and_post_transactions` and will contain the ID of those transactions that were successfully committed to the blockchain, or null if they failed. |
[Back to top ^](/arc-standards/arc-0027#abstract)
## Rationale
An original vision for Algorand was that multiple AVM chains could co-exist. Extending the base of each message schema with a targeted network (referenced by its genesis hash) ensures the schema can remain AVM chain-agnostic and adapted to work with any AVM-compatible chain.
The schema adds a few more methods that are not mentioned in previous ARCs and the inception of these methods are born out of the need that has been seen by providers, and clients alike.
The latest JSON schema (as of writing is the [2020-12](https://json-schema.org/draft/2020-12/draft-bhutton-json-schema-01) draft) was chosen as the format due to the widely supported use across multiple platforms & languages, and due to its popularity.
[Back to top ^](/arc-standards/arc-0027#abstract)
## Reference Implementation
### Disable Example
**Request**
```json
{
"id": "e44f5bde-37f4-44b0-94d5-1daff41bc984d",
"params": {
"genesisHash": "SGO1GKSzyE7IEPItTxCByw9x8FmnrCDexi9/cOUJOiI=",
"providerId": "85533948-4d0b-4727-904e-dd35305d49aa",
"sessionIds": ["ab476381-c1f4-4665-b89c-9f386fb6f15d", "7b02d412-6a27-4d97-b091-d5c26387e644"]
},
"reference": "arc0027:disable:request"
}
```
**Response**
```json
{
"id": "e6696507-6a6c-4df8-98c4-356d5351207c",
"reference": "arc0027:disable:response",
"requestId": "e44f5bde-37f4-44b0-94d5-1daff41bc984d",
"result": {
"genesisHash": "SGO1GKSzyE7IEPItTxCByw9x8FmnrCDexi9/cOUJOiI=",
"genesisId": "testnet-v1.0",
"providerId": "85533948-4d0b-4727-904e-dd35305d49aa",
"sessionIds": ["ab476381-c1f4-4665-b89c-9f386fb6f15d", "7b02d412-6a27-4d97-b091-d5c26387e644"]
}
}
```
[Back to top ^](/arc-standards/arc-0027#abstract)
### Discover Example
**Request**
```json
{
"id": "5d5186fc-2091-4e88-8ef9-05a5d4da24ed",
"params": {
"providerId": "85533948-4d0b-4727-904e-dd35305d49aa"
},
"reference": "arc0027:discover:request"
}
```
**Response**
```json
{
"id": "6695f990-e3d7-41c4-bb26-64ab8da0653b",
"reference": "arc0027:discover:response",
"requestId": "5d5186fc-2091-4e88-8ef9-05a5d4da24ed",
"result": {
"host": "https://awesome-wallet.com",
"icon": "data:image/png;base64,iVBORw0KGgoAAAANSUh...",
"name": "Awesome Wallet",
"networks": [
{
"genesisHash": "wGHE2Pwdvd7S12BL5FaOP20EGYesN73ktiC1qzkkit8=",
"genesisId": "mainnet-v1.0",
"methods": [
"disable",
"enable",
"post_transactions",
"sign_and_post_transactions",
"sign_message",
"sign_transactions"
]
},
{
"genesisHash": "SGO1GKSzyE7IEPItTxCByw9x8FmnrCDexi9/cOUJOiI=",
"genesisId": "testnet-v1.0",
"methods": [
"disable",
"enable",
"post_transactions",
"sign_message",
"sign_transactions"
]
}
],
"providerId": "85533948-4d0b-4727-904e-dd35305d49aa"
}
}
```
[Back to top ^](/arc-standards/arc-0027#abstract)
### Enable Example
**Request**
```json
{
"id": "4dd4ccdf-a918-4e33-a675-073330db4c99",
"params": {
"genesisHash": "SGO1GKSzyE7IEPItTxCByw9x8FmnrCDexi9/cOUJOiI=",
"providerId": "85533948-4d0b-4727-904e-dd35305d49aa"
},
"reference": "arc0027:enable:request"
}
```
**Response**
```json
{
"id": "cdf43d9e-1158-400b-b2fb-ba45e39548ff",
"reference": "arc0027:enable:response",
"requestId": "4dd4ccdf-a918-4e33-a675-073330db4c99",
"result": {
"accounts": [{
"address": "ARC27GVTJO27GGSWHZR2S3E7UY46KXFLBC6CLEMF7GY3UYF7YWGWC6NPTA",
"name": "Main Account"
}],
"genesisHash": "SGO1GKSzyE7IEPItTxCByw9x8FmnrCDexi9/cOUJOiI=",
"genesisId": "testnet-v1.0",
"providerId": "85533948-4d0b-4727-904e-dd35305d49aa",
"sessionId": "6eb74cf1-93e8-400c-94b5-4928807a3ab1"
}
}
```
[Back to top ^](/arc-standards/arc-0027#abstract)
### Post Transactions Example
**Request**
```json
{
"id": "e555ccb3-4730-474c-92e3-1e42868e0c0d",
"params": {
"providerId": "85533948-4d0b-4727-904e-dd35305d49aa",
"stxns": [
"iaNhbXT..."
]
},
"reference": "arc0027:post_transactions:request"
}
```
**Response**
```json
{
"id": "13b115fb-2966-4a21-b6f7-8aca118ac008",
"reference": "arc0027:post_transactions:response",
"requestId": "e555ccb3-4730-474c-92e3-1e42868e0c0d",
"result": {
"providerId": "85533948-4d0b-4727-904e-dd35305d49aa",
"txnIDs": [
"H2KKVI..."
]
}
}
```
[Back to top ^](/arc-standards/arc-0027#abstract)
### Sign And Post Transactions Example
**Request**
```json
{
"id": "43adafeb-d455-4264-a1c0-d86d9e1d75d9",
"params": {
"providerId": "85533948-4d0b-4727-904e-dd35305d49aa",
"txns": [
{
"txn": "iaNhbXT..."
},
{
"txn": "iaNhbXT...",
"signers": []
}
]
},
"reference": "arc0027:sign_and_post_transactions:request"
}
```
**Response**
```json
{
"id": "973df300-f149-4004-9718-b04b5f3991bd",
"reference": "arc0027:sign_and_post_transactions:response",
"requestId": "43adafeb-d455-4264-a1c0-d86d9e1d75d9",
"result": {
"providerId": "85533948-4d0b-4727-904e-dd35305d49aa",
"stxns": [
"iaNhbXT...",
null
]
}
}
```
[Back to top ^](/arc-standards/arc-0027#abstract)
### Sign Message Example
**Request**
```json
{
"id": "8f4aa9e5-d039-4272-95ac-6e972967e0cb",
"params": {
"message": "Hello humie!",
"providerId": "85533948-4d0b-4727-904e-dd35305d49aa",
"signer": "ARC27GVTJO27GGSWHZR2S3E7UY46KXFLBC6CLEMF7GY3UYF7YWGWC6NPTA"
},
"reference": "arc0027:sign_message:request"
}
```
**Response**
```json
{
"id": "9bdf72bf-218e-462a-8f64-3a40ef4a4963",
"reference": "arc0027:sign_message:response",
"requestId": "8f4aa9e5-d039-4272-95ac-6e972967e0cb",
"result": {
"providerId": "85533948-4d0b-4727-904e-dd35305d49aa",
"signature": "iaNhbXT...",
"signer": "ARC27GVTJO27GGSWHZR2S3E7UY46KXFLBC6CLEMF7GY3UYF7YWGWC6NPTA"
}
}
```
[Back to top ^](/arc-standards/arc-0027#abstract)
### Sign Transactions Example
**Request**
```json
{
"id": "464e6b88-8860-403c-891d-7de6d0425686",
"params": {
"providerId": "85533948-4d0b-4727-904e-dd35305d49aa",
"txns": [
{
"txn": "iaNhbXT..."
},
{
"txn": "iaNhbXT...",
"signers": []
}
]
},
"reference": "arc0027:sign_transactions:request"
}
```
**Response**
```json
{
"id": "f5a56135-5cd2-4f3f-8757-7b89d32d67e0",
"reference": "arc0027:sign_transactions:response",
"requestId": "464e6b88-8860-403c-891d-7de6d0425686",
"result": {
"providerId": "85533948-4d0b-4727-904e-dd35305d49aa",
"stxns": [
"iaNhbXT...",
null
]
}
}
```
[Back to top ^](/arc-standards/arc-0027#abstract)
## Security Considerations
As this ARC only serves as the formalization of the message schema, the end-to-end security of the actual messages is beyond the scope of this ARC. It is **RECOMMENDED** that another ARC be proposed to advise in this topic, with reference to this ARC.
[Back to top ^](/arc-standards/arc-0027#abstract)
## Copyright
Copyright and related rights waived via [CCO](https://creativecommons.org/publicdomain/zero/1.0/).
[Back to top ^](/arc-standards/arc-0027#abstract)
# Algorand Event Log Spec
> A methodology for structured logging by Algorand dapps.
## Abstract
Algorand dapps can use the [`log`](https://developer.algorand.org/docs/get-details/dapps/avm/teal/opcodes/#log) primitive to attach information about an application call. This ARC proposes the concept of Events, which are merely a way in which data contained in these logs may be categorized and structured.
In short: to emit an Event, a dapp calls `log` with ABI formatting of the log data, and a 4-byte prefix to indicate which Event it is.
## Specification
Each kind of Event emitted by a given dapp has a unique 4-byte identifier. This identifier is derived from its name and the structure of its contents, like so:
### Event Signature
An Event Signature is a utf8 string, comprised of: the name of the event, followed by an open paren, followed by the comma-separated names of the data types contained in the event (Types supported are the same as in [ARC-4](/arc-standards/arc-0004#types)), followed by a close paren. This follows naming conventions similar to ABI signatures, but does not include the return type.
### Deriving the 4-byte prefix from the Event Signature
To derive the 4-byte prefix from the Event Signature, perform the `sha512/256` hash algorithm on the signature, and select the first 4 bytes of the result.
This is the same process that is used by the [ABI Method Selector ](/arc-standards/arc-0004#method-selector)as specified in ARC-4.
### Argument Encoding
The arguments to a tuple **MUST** be encoded as if they were a single [ARC-4](/arc-standards/arc-0004) tuple (opposed to concatenating the encoded values together). For example, an event signature `foo(string,string)` would contain the 4-byte prefix and a `(string,string)` encoded byteslice.
### ARC-4 Extension
#### Event
An event is represented as follow:
```typescript
interface Event {
/** The name of the event */
name: string;
/** Optional, user-friendly description for the event */
desc?: string;
/** The arguments of the event, in order */
args: Array<{
/** The type of the argument */
type: string;
/** Optional, user-friendly name for the argument */
name?: string;
/** Optional, user-friendly description for the argument */
desc?: string;
}>;
}
```
#### Method
This ARC extends ARC-4 by adding an array events of type `Event[]` to the `Method` interface. Concretely, this give the following extended Method interface:
```typescript
interface Method {
/** The name of the method */
name: string;
/** Optional, user-friendly description for the method */
desc?: string;
/** The arguments of the method, in order */
args: Array<{
/** The type of the argument */
type: string;
/** Optional, user-friendly name for the argument */
name?: string;
/** Optional, user-friendly description for the argument */
desc?: string;
}>;
/** All of the events that the method use */
events: Event[];
/** Information about the method's return value */
returns: {
/** The type of the return value, or "void" to indicate no return value. */
type: string;
/** Optional, user-friendly description for the return value */
desc?: string;
};
}
```
#### Contract
> Even if events are already inside `Method`, the contract **MUST** provide an array of `Events` to improve readability.
```typescript
interface Contract {
/** A user-friendly name for the contract */
name: string;
/** Optional, user-friendly description for the interface */
desc?: string;
/**
* Optional object listing the contract instances across different networks
*/
networks?: {
/**
* The key is the base64 genesis hash of the network, and the value contains
* information about the deployed contract in the network indicated by the
* key
*/
[network: string]: {
/** The app ID of the deployed contract in this network */
appID: number;
}
}
/** All of the methods that the contract implements */
methods: Method[];
/** All of the events that the contract contains */
events: Event[];
}
```
## Rationale
Event logging allows a dapp to convey useful information about the things it is doing. Well-designed Event logs allow observers to more easily interpret the history of interactions with the dapp. A structured approach to Event logging could also allow for indexers to more efficiently store and serve queryable data exposed by the dapp about its history.
## Reference Implementation
### Sample interpretation of Event log data
An exchange dapp might emit a `Swapped` event with two `uint64` values representing quantities of currency swapped. The event signature would be: `Swapped(uint64,uint64)`.
Suppose that dapp emits the following log data (seen here as base64 encoded): `HMvZJQAAAAAAAAAqAAAAAAAAAGQ=`.
Suppose also that the dapp developers have declared that it follows this spec for Events, and have published the signature `Swapped(uint64,uint64)`.
We can attempt to parse this log data to see if it is one of these events, as follows. (This example is written in JavaScript.)
First, we can determine the expected 4-byte prefix by following the spec above:
```js
> { sha512_256 } = require('js-sha512')
> sig = 'Swapped(uint64,uint64)'
'Swapped(uint64,uint64)'
> hash = sha512_256(sig)
'1ccbd9254b9f2e1caf190c6530a8d435fc788b69954078ab937db9b5540d9567'
> prefix = hash.slice(0,8) // 8 nibbles = 4 bytes
'1ccbd925'
```
Next, we can inspect the data to see if it matches the expected format: 4 bytes for the prefix, 8 bytes for the first uint64, and 8 bytes for the next.
```js
> b = Buffer.from('HMvZJQAAAAAAAAAqAAAAAAAAAGQ=', 'base64')
> b.slice(0,4).toString('hex')
'1ccbd925'
> b.slice(4, 12)
> b.slice(12,20)
```
We see that the 4-byte prefix matches the signature for `Swapped(uint64,uint64)`, and that the rest of the data can be interpreted using the types declared for that signature. We interpret the above Event data to be: `Swapped(0x2a,0x64)`, meaning `Swapped(42,100)`.
## Security Considerations
As specify in ARC-4, methods which have a `return` value MUST NOT emit an event after they log their `return` value.
## Copyright
Copyright and related rights waived via [CCO](https://creativecommons.org/publicdomain/zero/1.0/).
# Application Specification
> A specification for fully describing an Application, useful for Application clients.
## Abstract
> \[!NOTE] This specification will be eventually deprecated by the [`ARC-56`](https://github.com/algorandfoundation/ARCs/pull/258) specification.
An Application is partially defined by it’s [methods](/arc-standards/arc-0004) but further information about the Application should be available. Other descriptive elements of an application may include it’s State Schema, the original TEAL source programs, default method arguments, and custom data types. This specification defines the descriptive elements of an Application that should be available to clients to provide useful information for an Application Client.
## Motivation
As more complex Applications are created and deployed, some consistent way to specify the details of the application and how to interact with it becomes more important. A specification to allow a consistent and complete definition of an application will help developers attempting to integrate an application they’ve never worked with before.
## Specification
The key words “MUST”, “MUST NOT”, “REQUIRED”, “SHALL”, “SHALL NOT”, “SHOULD”, “SHOULD NOT”, “RECOMMENDED”, “MAY”, and “OPTIONAL” in this document are to be interpreted as described in [RFC 822](https://www.ietf.org/rfc/rfc822.txt)..
### Definitions
* [Application Specification](#application-specification): The object containing the elements describing the Application.
* [Source Specification](#source-specification): The object containing a description of the TEAL source programs that are evaluated when this Application is called.
* [Schema Specification](#schema-specification): The object containing a description of the schema required by the Application.
* [Bare Call Specification](#bare-call-specification): The object containing a map of on completion actions to allowable calls for bare methods
* [Hints Specification](#hints-specification): The object containing a map of method signatures to meta data about each method
### Application Specification
The Application Specification is composed of a number of elements that serve to fully describe the Application.
```ts
type AppSpec = {
// embedded contract fields, see ARC-0004 for more
contract: ARC4Contract;
// the original teal source, containing annotations, base64 encoded
source?: SourceSpec;
// the schema this application requires/provides
schema?: SchemaSpec;
// supplemental information for calling bare methods
bare_call_config?: CallConfigSpec;
// supplemental information for calling ARC-0004 ABI methods
hints: HintsSpec;
// storage requirements
state?: StateSpec;
}
```
### Source Specification
Contains the source TEAL files including comments and other annotations.
```ts
// Object containing the original TEAL source files
type SourceSpec = {
// b64 encoded approval program
approval: string;
// b64 encoded clear state program
clear: string;
}
```
### Schema Specification
The schema of an application is critical to know prior to creation since it is immutable after create. It also helps clients of the application understand the data that is available to be queried from off chain. Individual fields can be referenced from the [default argument](#default-argument) to provide input data to a given ABI method.
While some fields are possible to know ahead of time, others may be keyed dynamically. In both cases the data type being stored MUST be known and declared ahead of time.
```ts
// The complete schema for this application
type SchemaSpec = {
local: Schema;
global: Schema;
}
// Schema fields may be declared explicitly or reserved
type Schema = {
declared: Record;
reserved: Record;
}
// Types supported for encoding/decoding
enum AVMType { uint64, bytes }
// string encoded datatype name defined in arc-4
type ABIType = string;
// Fields that have an explicit key
type DeclaredSchemaValueSpec = {
type: AVMType | ABIType;
key: string;
descr: string;
}
// Fields that have an undetermined key
type ReservedSchemaValueSpec = {
type: AVMType | ABIType;
descr: string;
max_keys: number;
}
```
### Bare call specification
Describes the supported OnComplete actions for bare calls on the contract.
```ts
// describes under what conditions an associated OnCompletion type can be used with a particular method
// NEVER: Never handle the specified on completion type
// CALL: Only handle the specified on completion type for application calls
// CREATE: Only handle the specified on completion type for application create calls
// ALL: Handle the specified on completion type for both create and normal application calls
type CallConfig = 'NEVER' | 'CALL' | 'CREATE' | 'ALL'
type CallConfigSpec = {
// lists the supported CallConfig for each on completion type, if not specified a CallConfig of NEVER is assumed
no_op?: CallConfig
opt_in?: CallConfig
close_out?: CallConfig
update_application?: CallConfig
delete_application?: CallConfig
}
```
### Hints specification
Contains supplemental information about [ARC-0004](/arc-standards/arc-0004) ABI methods, each record represents a single method in the [ARC-0004](/arc-standards/arc-0004) contract. The record key should be the corresponding ABI signature.
NOTE: Ideally this information would be part of the [ARC-0004](/arc-standards/arc-0004) ABI specification.
```ts
type HintSpec = {
// indicates the method has no side-effects and can be call via dry-run/simulate
read_only?: bool;
// describes the structure of arguments, key represents the argument name
structs?: Record;
// describes source of default values for arguments, key represents the argument name
default_arguments?: Record;
// describes which OnCompletion types are supported
call_config: CallConfigSpec;
}
// key represents the method signature for an ABI method defined in 'contracts'
type HintsSpec = Record
```
#### Readonly Specification
Indicates the method has no side-effects and can be called via dry-run/simulate
NOTE: This property is made obsolete by [ARC-0022](/arc-standards/arc-0022) but is included as it is currently used by existing reference implementations such as Beaker
#### Struct Specification
Each defined type is specified as an array of `StructElement`s.
The ABI encoding is exactly as if an ABI Tuple type defined the same element types in the same order. It is important to encode the struct elements as an array since it preserves the order of fields which is critical to encoding/decoding the data properly.
```ts
// Type aliases for readability
type FieldName = string
// string encoded datatype name defined in ARC-0004
type ABIType = string
// Each field in the struct contains a name and ABI type
type StructElement = [FieldName, ABIType]
// Type aliases for readability
type ContractDefinedType = StructElement[]
type ContractDefinedTypeName = string;
// represents a input/output structure
type StructSpec = {
name: ContractDefinedTypeName
elements: ContractDefinedType
}
```
For example a `ContractDefinedType` that should provide an array of `StructElement`s
Given the PyTeal:
```py
from pyteal import abi
class Thing(abi.NamedTuple):
addr: abi.Field[abi.address]
balance: abi.Field[abi.Uint64]
```
the equivalent ABI type is `(address,uint64)` and an element in the TypeSpec is:
```js
{
// ...
"Thing":[["addr", "address"]["balance","uint64"]],
// ...
}
```
#### Default Argument
Defines how default argument values can be obtained. The `source` field defines how a default value is obtained, the `data` field contains additional information based on the `source` value.
Valid values for `source` are:
* “constant” - `data` is the value to use
* “global-state” - `data` is the global state key.
* “local-state” - `data` is the local state key
* “abi-method” - `data` is a reference to the ABI method to call. Method should be read only and return a value of the appropriate type
Two scenarios where providing default arguments can be useful:
1. Providing a default value for optional arguments
2. Providing a value for required arguments such as foreign asset or application references without requiring the client to explicitly determine these values when calling the contract
```ts
// ARC-0004 ABI method definition
type ABIMethod = {};
type DefaultArgumentSpec = {
// Where to look for the default arg value
source: "constant" | "global-state" | "local-state" | "abi-method"
// extra data to include when looking up the value
data: string | bigint | number | ABIMethod
}
```
### State Specifications
Describes the total storage requirements for both global and local storage, this should include both declared and reserved described in SchemaSpec.
NOTE: If the Schema specification contained additional information such that the size could be calculated, then this specification would not be required.
```ts
type StateSchema = {
// how many byte slices are required
num_byte_slices: number
// how many uints are required
num_uints: number
}
type StateSpec = {
// schema specification for global storage
global: StateSchema
// schema specification for local storage
local: StateSchema
}
```
### Reference schema
A full JSON schema for application.json can be found in [here](https://raw.githubusercontent.com/algorandfoundation/ARCs/main/assets/arc-0032/application.schema.json).
## Rationale
The rationale fleshes out the specification by describing what motivated the design and why particular design decisions were made. It should describe alternate designs that were considered and related work, e.g. how the feature is supported in other languages.
## Backwards Compatibility
All ARCs that introduce backwards incompatibilities must include a section describing these incompatibilities and their severity. The ARC must explain how the author proposes to deal with these incompatibilities. ARC submissions without a sufficient backwards compatibility treatise may be rejected outright.
## Test Cases
Test cases for an implementation are mandatory for ARCs that are affecting consensus changes. If the test suite is too large to reasonably be included inline, then consider adding it as one or more files in `https://raw.githubusercontent.com/algorandfoundation/ARCs/main/assets/arc-####/`.
## Reference Implementation
`algokit-utils-py` and `algokit-utils-ts` both provide reference implementations for the specification structure and using the data in an `ApplicationClient` `Beaker` provides a reference implementation for creating an application.json from a smart contract.
## Security Considerations
All ARCs must contain a section that discusses the security implications/considerations relevant to the proposed change. Include information that might be important for security discussions, surfaces risks and can be used throughout the life cycle of the proposal. E.g. include security-relevant design decisions, concerns, important discussions, implementation-specific guidance and pitfalls, an outline of threats and risks and how they are being addressed. ARC submissions missing the “Security Considerations” section will be rejected. An ARC cannot proceed to status “Final” without a Security Considerations discussion deemed sufficient by the reviewers.
## Copyright
Copyright and related rights waived via [CCO](https://creativecommons.org/publicdomain/zero/1.0/).
# xGov Pilot - Becoming an xGov
> Explanation on how to become Expert Governors.
## Abstract
This ARC proposes a standard for achieving xGov status in the Algorand governance process. xGov status grants the right to vote on [ARC-34](/arc-standards/arc-0034) proposals raised by the community, specifically spending a previously specified amount of Algo in a given Term on particular initiatives.
## Specification
The key words “**MUST**”, “**MUST NOT**”, “**REQUIRED**”, “**SHALL**”, “**SHALL NOT**”, “**SHOULD**”, “**SHOULD NOT**”, “**RECOMMENDED**”, “**MAY**”, and “**OPTIONAL**” in this document are to be interpreted as described in [RFC-2119](https://www.ietf.org/rfc/rfc2119.txt).
| Algorand xGovernor Summary | | |
| -------------------------- | -------------------------------------------------------------------------------------------------------------------------------------------------------------------------------- | - |
| Enrolment | At the start of each governance period | |
| How to become eligible | Having completed participation in the previous governance period through official or approved decentralized finance governance. | |
| Requisite | Commit of governance reward for one year | |
| Duration | 1 Year | |
| Voting Power | 1 Algo committed = 1 Vote, as per REWARDS DEPOSIT | |
| Duty | Spend all available votes each time a voting period occurs. (In case there is no proposal that aligns with an xGov's preference, a mock proposal can be used as an alternative.) | |
| Disqualification | Forfeit rewards pledged | |
### What is an xGov?
xGovs, or Expert Governors, are a **self-selected** group of decentralized decision makers who demonstrate an enduring commitment to the Algorand community, possess a deep understanding of the blockchain’s inner workings and realities of the Algorand community, and whose interests are aligned with the good of the Algorand blockchain. These individuals have the ability to participate in the designation **and** approval of proposals, and play an instrumental role in shaping the future of the Algorand ecosystem.
### Requirement to become an xGov
To become an xGov, or Expert Governor, an account:
* **MUST** first be deemed eligible by having fully participated in the previous governance period, either through official or approved decentralized finance governance.
* At the start of each governance period, eligible participants will have the option to enrol in the xGov program
* To gain voting power as an xGov, the eligible **governor rewards for the period of the enrolment** **MUST** be committed to the xGov Term Pool and locked for a period of 12 months.
> Only the GP rewards are deposited to the xGov Term Pool. The principal algo committed remains in the gov wallet (or DeFi protocol) and can be used in subsequent Governance Periods.
Rewards deposited to the xGov Term Pool will be call **REWARDS DEPOSIT**.
### Voting Power
Voting power in the xGov process is determined by the amount of Algo an eligible participant commits. Voting power is 1 Algo = 1 Vote, as per REWARDS DEPOSIT, and it renews at the start of every quarter - provided the xGov remain eligible. This ensures that the weight of each vote is directly proportional to the level of investment and commitment to the Algorand ecosystem.
### Duty of an xGov
As an xGov, you **MUST** actively participate in the governance process by using all available votes amongst proposals each time a voting period occurs. If you don’t do it, you will be disqualified.
> eg. For 100 Algo as per REWARDS DEPOSIT, 100 votes available, they can be spent like this:
>
> * 50 on proposal A
> * 20 on proposal B
> * 30 on proposal C
> * 0 on every other proposal
> In case no proposal aligns with an xGov’s preference, a mock proposal can be used as an alternative.
### Disqualification
As an xGov, it is important to understand the importance of your role in the governance process and the responsibilities that come with it. Failure to do so will result in disqualification. The consequences of disqualification are significant, as the xGov will lose the rewards that were committed when they entered the xGov process. It is important to take your role as an xGov seriously and fulfill your responsibilities to ensure the success of the governance process.
> The rewards will remain in the xGov reward pools & will be distributed among remaining xGovs
## Rationale
This proposal provides a clear and simple method for participation in xGov process, while also providing incentives for long-term commitment to the network. Separate pools for xGov and Gov allow for a more diverse range of participation, with the xGov pool providing an additional incentive for longer-term commitment. The requirement to spend 100% of your vote on proposals will ensure that participants are actively engaged in the decision-making process.
After weeks of engagement with the community, it has been decided:
* That the xGov process will not utilize token or NFT.
* There will be no minimum or maximum amount of Algo required to participate in the xGov process
* In the future, the possibility of node operation being considered as a form of participation eligibility is being explored This approach aims to make the xGov process accessible and inclusive for all members of the community.
We encourage the community to continue to provide input on this topic through the submission of questions and ideas in this ARC document.
> **Important**: The xGov program is still a work in progress, and changes are expected to happen over the next few years with community input and design consultation. Criteria to ENTER the program will only be applied forward, which means Term Pools already in place will not be affected by new any NEW ENTRY criteria. However, other ELIGIBILITY criteria could be added and be applied to all pools. For example, if the majority of the community deems necessary to have more than 1 voting session per quarter, this type of change could be applied to all Term pools, given ample notice and time for preparation.
## Security Considerations
No funds need to leave the user’s wallet in order to become an xGov.
## Copyright
Copyright and related rights waived via [CCO](https://creativecommons.org/publicdomain/zero/1.0/).
# xGov Pilot - Proposal Process
> Criteria for the creation of proposals.
## Abstract
The Goal of this ARC is to clearly define the steps involved in submitting proposals for the xGov Program, to increase transparency and efficiency, ensuring all proposals are given proper consideration. The goal of this grants scheme is to fund proposals that will help us in our goal of increasing the adoption of the Algorand network, as the most advanced layer 1 blockchain to date. The program aims to fund proposals to develop open source software, including tooling, as well as educational resources to help inform and grow the Algorand community.
## Specification
The key words “**MUST**”, “**MUST NOT**”, “**REQUIRED**”, “**SHALL**”, “**SHALL NOT**”, “**SHOULD**”, “**SHOULD NOT**”, “**RECOMMENDED**”, “**MAY**”, and “**OPTIONAL**” in this document are to be interpreted as described in [RFC-2119](https://www.ietf.org/rfc/rfc2119.txt).
### What is a proposal
The xGov program aims to provide funding for individuals or teams to:
* Develop of open source applications and tools (eg. an open source AMM or contributing content to an Algorand software library).
* Develop Algorand education resources, preferably in languages where the resources are not yet available(eg. a video series teaching developers about Algorand in Portuguese or Indonesian).
The remainder of the xGov program pilot will not fund proposals for:
* Supplying liquidity.
* Reserving funds to pay for ad-hoc open-source development (devs can apply directly for an xGov grant).
* Buying ASAs, including NFTs.
Proposals **SHALL NOT** be divided in small chunks.
> Issues requiring resolution may have been discussed on various online platforms such as forums, discord, and social media networks. Proposals requesting a large amount of funds **MUST BE** split into a milestone-based plan. See [Submit a proposal](/arc-standards/arc-0034#submit-a-proposal)
### Duty of a proposer
Having the ability to propose measures for a vote is a significant privilege, which requires:
* A thorough understanding of the needs of the community.
* Alignment of personal interests with the advancement of the Algorand ecosystem.
* Promoting good behavior amongst proposers and discouraging “gaming the system”.
* Reporting flaws and discussing possible solutions with the AF team and community using either the Algorand Forum or the xGov Discord channels.
### Life of a proposal
The proposal process will follow the steps below:
* Anyone can submit a proposal at any time.
* Proposals will be evaluated and refined by the community and xGovs before they are available for voting.
* Up to one month is allocated for voting on proposals.
* The community will vote on proposals that have passed the refinement and temperature check stage.
> If too many proposals are received in a short period of time. xGovs can elect to close proposals, in order to be able to handle the volume appropriately.
### Submit a proposal
In order to submit a proposal, a proposer needs to create a pull request on the following repository: [xGov Proposals](https://github.com/algorandfoundation/xGov).
Proposals **MUST**:
* Be posted on the [Algorand Forum](https://forum.algorand.org/) (using tags: Governance and xGov Proposals) and discussed with the community during the review phased. Proposals without a discussion thread WILL NOT be included in the voting session.
* Follow the [template form provided](https://raw.githubusercontent.com/algorandfoundation/ARCs/main/assets/arc-0034/TemplateForm.md), filling all the template sections
* Follow the rules of the xGov Proposals Repository.
* The minimum requested Amount is 10000 Algo
* Have the status `Final` before the end of the temperature check.
* Be either Proactive (the content of the proposal is yet to be created) or Retroactive (the content of the proposal is already created)
* Milestone-based grants must submit a proposal for one milestone at a time.
* Milestones need to follow the governance periods cycle. With the current 3-months cycle, a milestone could be 3-months, 6 months, 9 months etc.
* The proposal must display all milestones with clear deliverables and the amount requested must match the 1st milestone. If a second milestone proposal is submitted, it must display the first completed milestone, linking all deliverables. If a third milestone proposal is submitted, it must display the first and second completed milestone, linking all deliverables. This repeats until all milestones are completed.
* Funding will only be disbursed upon the completion of deliverables.
* A proposal must specify how its delivery can be verified, so that it can be checked prior to payment.
* Proposals must include clear, non-technical descriptions of deliverables. We encourage the use of multimedia (blog/video) to help explain your proposal’s benefits to the community.
* Contain the maintenance period, availability, and sustainability plans. This includes information on potential costs and the duration for which services will be offered at no or reduced cost.
Proposals **MUST NOT**:
* Request funds for marketing campaigns or organizing future meetups.
> Each entity, individual, or project can submit at most two proposals (one proactive proposal and one retroactive proposal). Attempts to circumvent this rule may lead to disqualification or denial of funds.
### Disclaimer jurisdictions and exclusions
To be eligible to apply for a grant, projects must abide by the [Disclaimers](https://www.algorand.foundation/disclaimers) (in particular the “Excluded Jurisdictions” section) and be willing to enter into [a binding contract with the Algorand Foundation](https://drive.google.com/file/d/1dsKwQGhnS3h_PrSkoidhnvqlX7soLpZ-/view). Additionally, applications promoting gambling, adult content, drug use, and violence of any kind are not permitted.
> We are currently accepting grant applications from US-based individual/business. If the grant is approved, Algos will be converted to USDCa upon payment. This exception will be reviewed periodically.
### Voting Power
When an account participates in its first session, the voting power assigned to it will be equivalent to the total governance rewards it would have received. For all following sessions, the account’s voting power will adjust based on the rewards lost by members in their pool who did not meet their obligations.
The voting power for an upcoming session is computed as: `new_account_voting_power = (initial_pool_voting_power * initial_account_voting_power) / pool_voting_power_used`
Where:
* `new_account_voting_power`: Voting power allocated to an account for the next session.
* `initial_account_voting_power`: The voting power originally assigned to an account, based on the governance rewards.
* `initial_pool_voting_power`: The total voting power of the pool during its initial phase. This is the sum of governance rewards for all pool participants.
* `pool_voting_power_used`: The voting power from the pool that was actually used in the last session.
### Proposal Approval Threshold
In order for a proposal to be approved, it is necessary for the number of votes in favor of the proposal to be proportionate to the amount of funds requested. This ensures that the allocation of funds is in line with the community’s consensus and in accordance with democratic principles.
The formula to calculate the voting power needed to pass a proposal is as follows: `voting_power_needed = (amount_requested) / (amount_available) * (current_session_voting_power_used)`
Where:
* `voting_power_needed`: Voting power required for a proposal to be accepted.
* `amount_requested`: The requested amount a proposal is seeking.
* `amount_available`: The entire grant funds available for the current session.
* `current_session_voting_power_used`: The voting power used in the current session.
> eg. 2 000 000 Algo are available to be given away as grants, 300 000 000 Algo are committed to the xGov Process, 200 000 000 Algo are used during the vote:
>
> * Proposal A request 100 000 Algos (5 % of the Amount available)
> * Proposal A needs 5 % of the used votes (10 000 000 Votes) to go through
### Voting on proposal
At the start of the voting period xGovs [ARC-33](/arc-standards/arc-0033) will vote on proposals using the voting tool hosted at [](https://xgov.algorand.foundation/).
Vote will refer to the PR number and a cid hash of the proposal itself.
The CID MUST:
* Represent the file.
* Be a version V1 CID
* E.g., use the option —cid-version=1 of ipfs add
* Use SHA-256 hash algorithm
* E.g., use the option —hash=sha2-256 of ipfs add
### Grants calculation
The allocation of grants will consider the funding request amounts and the available amount of ALGO to be distributed.
### Grants contract & payment
* Once grants are approved, the Algorand Foundation team will handle the applicable contract and payment.
* **Before submitting your grant proposal**, review the contract template and ensure you’re comfortable with its terms: [Contract Template](https://drive.google.com/file/d/1dsKwQGhnS3h_PrSkoidhnvqlX7soLpZ-/view).
> For milestone-based grants, please also refer to the [Submit a proposal section](/arc-standards/arc-0034#submit-a-proposal)
## Rationale
The current status of the proposal process includes the following elements:
* Proposals will be submitted off-chain and linked to the on-chain voting through a hash.
* Projects that require multiple funding rounds will need to submit separate proposals.
* The allocation of funds will be subject to review and adjustment during each governance period.
* Voting on proposals will take place on-chain.
We encourage the community to continue to provide input on this topic through the submission of questions and ideas in this ARC document.
## Security Considerations
None
## Copyright
Copyright and related rights waived via [CCO](https://creativecommons.org/publicdomain/zero/1.0/).
# Algorand Offline Wallet Backup Protocol
> Wallet-agnostic backup protocol for multiple accounts
## Abstract
This document outlines the high-level requirements for a wallet-agnostic backup protocol that can be used across all wallets on the Algorand ecosystem.
## Specification
The key words “**MUST**”, “**MUST NOT**”, “**REQUIRED**”, “**SHALL**”, “**SHALL NOT**”, “**SHOULD**”, “**SHOULD NOT**”, “**RECOMMENDED**”, “**MAY**”, and “**OPTIONAL**” in this document are to be interpreted as described in [RFC-2119](https://www.ietf.org/rfc/rfc2119.txt).
### Requirements
At a high-level, offline wallet backup protocol has the following requirements:
* Wallet applications should allow backing up and storing multiple accounts at the same time. Account information should be encrypted with a user-defined secret key, utilizing NaCl SecretBox method (audited and endorsed by Algorand).
* Encrypted final string should be easily copyable to be stored digitally. When importing, wallet applications should be able to detect already imported accounts and gracefully ignore them.
### Format
Before encryption, account information should be converted to the following JSON format:
```plaintext
{
"device_id": "UNIQUE IDENTIFIER FOR DEVICE (OPTIONAL)",
"provider_name": "PROVIDER NAME (OPTIONAL, i.e. Pera Wallet)",
"accounts": [
{
"address": "ACCOUNT PUBLIC ADDRESS (REQUIRED)",
"name": "USER DEFINED ACCOUNT NAME (OPTIONAL)",
"account_type": "TYPE OF ACCOUNT: single, multisig, watch, contact, ledger (REQUIRED)",
"private_key": "PRIVATE KEY AS BASE64 ENCODING OF 64 BYTE ALGORAND PRIVATE KEY as encoded by algosdk (NOT PASSPHRASE, REQUIRED for user-owned accounts, can be omitted in case of watch, contact, multisig, ledger accounts)",
"metadata": "ANY ADDITIONAL CONTENT (OPTIONAL)",
"multisig": "Multisig information (only required if the account_type is multisig)",
"ledger": {
"device_id": "device id",
"index": ,
"connection_type": "bluetooth|usb"
},
},
...
]
}
```
*Clients must accept additional fields in the JSON document.*
Here is an example with a single account:
```plaintext
{
"device_id": "2498232091970170817",
"provider_name": "Pera Wallet",
"accounts": [
{
"address": "ELWRE6HZ7KIUT46EQ6PBISGD3ND6QSCBVWICYR2QR2Y7LOBRZRCAIKLWDE",
"name": "My NFT Account",
"account_type": "single",
"private_key": "w0HG2VH7tAYz9PD4SYX0flC4CKh1OONCB6U5bP7cXGci7RJ4+fqRSfPEh54USMPbR+hIQa2QLEdQjrH1uDHMRA=="
}
],
}
```
Here is an example with a single multi-sig account:
```plaintext
{
"device_id": "2498232091970170817",
"provider_name": "Pera Wallet",
"accounts": [
{
"address": "ELWRE6HZ7KIUT46EQ6PBISGD3ND6QSCBVWICYR2QR2Y7LOBRZRCAIKLWDE",
"name": "Our Multisig Account",
"account_type": "multisig",
"multisig": {
version: 1,
threshold: 2,
addrs: [
account1.addr,
account2.addr,
account3.addr,
],
},
}
],
}
```
### Encryption
Once the input JSON is ready, as specified above, it needs to be encrypted. Even if it is assumed that the user is going to store this information in a secure location, copy-pasting it without encryption is not secure since multiple applications can access the clipboard.
The information needs to be encrypted using a very long passphrase. 12 words mnemonic will be used as the key. 12-word mnemonic is secure and it will not create confusion with the 25-word mnemonics that are used to encrypt accounts.
The wallet applications should not allow users to copy the 12-word mnemonic nor allow taking screenshots. The users should note it visually.
The encryption should be made as follows:
1. The wallet generates a random 16-byte string S (using a cryptographically secure random number generator)
2. The wallet derives a 32-byte key: `key = HMAC-SHA256(key="Algorand export 1.0", input=S)` On libsodium, use , `crypto_auth_hmacsha256_init` / `crypto_auth_hmacsha256_update` / `crypto_auth_hmacsha256_final`
3. The wallet encrypts the input JSON using `crypto_secretbox_easy` from libsodium ()
4. The wallet outputs the following output JSON:
```plaintext
{
"version": "1.0",
"suite": "HMAC-SHA256:sodium_secretbox_easy",
"ciphertext":
}
```
This JSON document (will be referred as ciphertext envelope JSON) needs to be encoded with base64 again in order to make it easier to copy-paste & store.
5. S is encoded as a 12-word mnemonic (according to BIP-39) and displayed to the user.
The user will be responsible for keeping the 12-word mnemonic and the base64 output of the ciphertext envelope JSON in safe locations. Note that step 5 is the default approach, however, the wallets can support other methods other than mnemonics as well, as long as they are secure.
### Importing
When importing, wallet applications should ask the user for the base64 output of the envelope JSON and the 12-word mnemonic. After getting these values, it should attempt to decrypt the encrypted string using the 12-word mnemonic. On successful decryption, accounts that can be imported can be processed.
## Rationale
There are many benefits to having an openly documented format:
* Better interoperability across wallets, allowing users to use multiple wallets easily by importing all of their accounts using a single format.
* Easy and secure backup of all wallet data at a user-defined location, including secure storage in digital environments.
* Ability to transfer data from device to device securely, such as when moving data from one mobile device to another.
## Security Considerations
Tbd
## Copyright
Copyright and related rights waived via [CCO](https://creativecommons.org/publicdomain/zero/1.0/).
# Convention for declaring filters of an NFT
> This is a convention for declaring filters in an NFT metadata
## Abstract
The goal is to establish a standard for how filters are declared inside a non-fungible (NFT) metadata.
## Specification
The key words “**MUST**”, “**MUST NOT**”, “**REQUIRED**”, “**SHALL**”, “**SHALL NOT**”, “**SHOULD**”, “**SHOULD NOT**”, “**RECOMMENDED**”, “**MAY**”, and “**OPTIONAL**” in this document are to be interpreted as described in [RFC-2119](https://www.ietf.org/rfc/rfc2119.txt).
> Comments like this are non-normative.
If the property `filters` is provided anywhere in the metadata of an nft, it **MUST** adhere to the schema below. If the nft is a part of a larger collection and that collection has filters, all the available filters for the collection **MUST** be listed as a property of the `filters` object. If the nft does not have a particular filter, it’s value **MUST** be “none”.
The JSON schema for `filters` is as follows:
```json
{
"title": "Filters for Non-Fungible Token",
"type": "object",
"properties": {
"filters": {
"type": "object",
"description": "Filters can be used to filter nfts of a collection. Values must be an array of strings or numbers."
}
}
}
```
#### Examples
##### Example of an NFT that has traits & filters
```json
{
"name": "NFT With Traits & filters",
"description": "NFT with traits & filters",
"image": "https://s3.amazonaws.com/your-bucket/images/two.png",
"image_integrity": "sha256-47DEQpj8HBSa+/TImW+5JCeuQeRkm5NMpJWZG3hSuFU=",
"properties": {
"creator": "Tim Smith",
"created_at": "January 2, 2022",
"traits": {
"background": "yellow",
"head": "curly"
},
"filters": {
"xp": 120,
"state": "REM"
}
}
}
```
## Rationale
A standard for filters is needed so programs know what to expect in order to filter things without using rarity.
## Backwards Compatibility
If `filters` wants to be added on top of fields [ARC-16](/arc-standards/arc-0016) `traits` and `filters` should be inside the `properties` object. (eg: [Example above](/arc-standards/arc-0036#example-of-an-nft-that-has-traits--filters))
## Security Considerations
None.
## Copyright
Copyright and related rights waived via [CCO](https://creativecommons.org/publicdomain/zero/1.0/).
# xGov Pilot - Integration
> Integration of xGov Process
## Abstract
This ARC aims to explain how the xGov process can be integrated within dApps.
## Motivation
By leveraging the xGov decentralization, it can improve the overall efficiency of this initiative.
## Specification
The keywords “**MUST**”, “**MUST NOT**”, “**REQUIRED**”, “**SHALL**”, “**SHALL NOT**”, “**SHOULD**”, “**SHOULD NOT**”, “**RECOMMENDED**”, “**MAY**”, and “**OPTIONAL**” in this document are to be interpreted as described in [RFC-2119](https://www.ietf.org/rfc/rfc2119.txt).
### How to register
#### How to find the xGov Escrow address
The xGov Escrow address can be extracted using this endpoint: `https://governance.algorand.foundation/api/periods/active/`.
```json
{
...
"xgov_escrow_address": "string",
...
}
```
#### Registration
Governors should specify the xGov-related fields. Specifically, governors can sign up to be xGovs by designating as beneficiaries the xGov escrow address (that changes from one governance period to the next). They can also designate an xGov-controller address that would participate on their behalf in xGov votes via the optional parameter “xGv”:“aaa”. Namely, the Notes field has the form.
af/gov1:j{“com”:nnn,“mmm1”:nnn1,“mmm2”:nnn2,“bnf”:“XYZ”,“xGv”:“ABC”} Where:
“com”:nnn is the Algo commitment; “mmm”:nnn is a commitment for LP-token with asset-ID mmm; “bnf”:“XYZ” designates the address “XYZ” as the recipient of rewards (“XYZ” must equal the xGov escrow in order to sign up as an xGov); The optional “xGv”:“ABC” designates address “ABC” as the xGov-controller of this xGov account.
#### Goal example
goal clerk send -a 0 -f ALDJ4R2L2PNDGQFSP4LZY4HATIFKZVOKTBKHDGI2PKAFZJSWC4L3UY5HN4 -t RFKCBRTPO76KTY7KSJ3HVWCH5HLBPNBHQYDC52QH3VRS2KIM7N56AS44M4 -n
‘af/gov1:j{“com”:1000000,“12345”:2,“67890”:30,“bnf”:“DRWUX3L5EW7NAYCFL3NWGDXX4YC6Y6NR2XVYIC6UNOZUUU2ERQEAJHOH4M”,“xGv”:“ALDJ4R2L2PNDGQFSP4LZY4HATIFKZVOKTBKHDGI2PKAFZJSWC4L3UY5HN4”}’
### How to Interact with the Voting Application
#### How to get the Application ID
Every vote will be a different ID, but search for all apps created by the used account and look at the global state to see if is\_bootstrapped is 1.
#### ABI
The ABI is available [here ](https://github.com/algorandfoundation/nft_voting_tool/blob/main/src/algorand/smart_contracts/artifacts/VotingRoundApp/contract.json). A working test example of how to call application’s method is here:
## Rationale
This integration will improve the usage of the process.
## Backwards Compatibility
None
## Security Considerations
None
## Copyright
Copyright and related rights waived via [CCO](https://creativecommons.org/publicdomain/zero/1.0/).
# Logic Signature Templates
> Defining templated logic signatures so wallets can safely sign them.
## Abstract
This standard allows wallets to sign known logic signatures and clearly tell the user what they are signing.
## Motivation
Currently, most Algorand wallets do not enable the signing of logic signature programs for the purpose of delegation. The rationale is to prevent users from signing malicious programs, but this limitation also prevents non-malicious delegated logic signatures from being used in the Algorand ecosystem. As such, there needs to be a way to provide a safe way for wallets to sign logic signatures without putting users at risk.
## Specification
A logic signature **MUST** be described via the following JSON interface(s):
### Interface
```typescript
interface LogicSignatureDescription {
name: string,
description: string,
program: string,
variables: {
variable: string,
name: string,
type: string,
description: string
}[]
}
```
| Key | Description |
| ----------------------- | ------------------------------------------------------------------------- |
| `name` | The name of the logic signature. **SHOULD** be short and descriptive |
| `description` | A description of what the logic signature does |
| `program` | base64 encoding of the TEAL program source |
| `variables` | An array of variables in the program |
| `variables.variable` | The name of the variable in the templated program. |
| `variables.name` | Human-friendly name for the variable. **SHOULD** be short and descriptive |
| `variables.type` | **MUST** be a type defined below in the `type` section |
| `variables.description` | A description of how this variable is used in the program |
### Variables
A variable in the program **MUST** be start with `TMPL_`
#### Types
All non-reference ABI types **MUST** be supported by the client. ABI values **MUST** be encoded in base16 (with the leading `0x`) with the following exceptions:
| Type | Description |
| ------------- | ------------------------------------------------------------------------------------------------------------------------------------------------------------------------- |
| `address` | 58-character base32 Algorand public address. Typically to be used as an argument to the `addr` opcode. Front-ends **SHOULD** provide a link to the address on an explorer |
| `application` | Application ID. Alias for `uint64`. Front-ends **SHOULD** provide a link to the app on an explorer |
| `asset` | Asset ID. Alias for `uint64`. Front-ends **SHOULD** provide a link to the asset on an explorer |
| `string` | UTF-8 string. Typically used as an argument to `byte`, `method`, or a branching opcode. |
| `hex` | base16 encoding of binary data. Typically used as an argument to `byte`. **MUST** be prefixed with `0x` |
For all other value, front-ends **MUST** decode the ABI value to display the human-readable value to the user.
### Input Validation
All ABI values **MUST** be encoded as base16 and prefixed with `0x`, with the exception of `uint64` which should be provided as an integer.
String values **MUST NOT** include any unescaped `"` to ensure there is no TEAL injection.
All values **MUST** be validated to ensure they are encoded properly. This includes the following checks:
* An `address` value must be a valid Algorand address
* A `uint64`, `application`, or `asset` value must be a valid unsigned 64-bit integer
### Unique Identification
To enable unique identification of a description, clients **MUST** calculate the SHA256 hash of the JSON description canonicalized in accordance with [RFC 8785](https://www.rfc-editor.org/rfc/rfc8785).
### WalletConnect Method
For wallets to support this ARC, they need to support the a `algo_templatedLsig` method.
The method expects three parameters described by the interface below
```ts
interface TemplatedLsigParams {
/** The canoncalized ARC47 templated lsig JSON as described in this ARC */
arc47: string
/** The values of the templated variables, if there are any */
values?: {[variable: string]: string | number}
/** The hash of the expected program. Wallets should compile the lsig with the given values to verify the program hash matches */
hash: string
}
```
## Rationale
This provides a way for frontends to clearly display to the user what is being signed when signing a logic signature.
Template variables must be immediate arguments. Otherwise a string variable could specify the opcode in the program, which could have unintended and unclear consequences.
`TMPL_` prefix is used to align with existing template variable tooling.
Hashing canonicalized JSON is useful for ensuring clients, such as wallets, can create a allowlist of templated logic signatures.
## Backwards Compatibility
N/A
## Test Cases
N/A
## Reference Implementation
A reference implementation can be found in the`https://raw.githubusercontent.com/algorandfoundation/ARCs/main/assets/arc-0047` folder.
[lsig.teal](https://raw.githubusercontent.com/algorandfoundation/ARCs/main/assets/arc-0047/lsig.teal) contains the templated TEAL code for a logic signature that allows payments of a specific amount every 25,000 blocks.
[dapp.ts](https://raw.githubusercontent.com/algorandfoundation/ARCs/main/assets/arc-0047/dapp.ts) contains a TypeScript script showcasing how a dapp would form a wallet connect request for a templated logic signature.
[wallet.ts](https://raw.githubusercontent.com/algorandfoundation/ARCs/main/assets/arc-0047/wallet.ts) contains a TypeScript script showcasing how a wallet would handle a request for signing a templated logic signature.
[validate.ts](https://raw.githubusercontent.com/algorandfoundation/ARCs/main/assets/arc-0047/validate.ts) contains a TypeScript script showcasing how one could validate templated TEAL and variable values.
### String Variables
#### Invalid: Partial Argument
```plaintext
#pragma version 9
byte "Hello, TMPL_NAME"
```
This is not valid because `TMPL_NAME` is not the full immediate argument.
#### Invalid: Not An Argument
```plaintext
#pragma version 9
TMPL_PUSH_HELLO_NAME
```
This is not valid because `TMPL_PUSH_HELLO_NAME` is not an immediate argument to an opcode.
#### Valid
```plaintext
#pragma version 9
byte TMPL_HELLO_NAME
```
This is valid as `TMPL_HELLO_NAME` is the entire immediate argument of the `byte` opcode. A possible value could be `Hello, AlgoDev`
### Hex Variables
#### Valid
```plaintext
#pragma version 9
byte TMPL_DEAD_BEEF
```
This is valid as `TMPL_DEAD_BEEF` is the full immediate argument to the `byte` opcode. A possible value could be `0xdeadbeef`.
## Security Considerations
It should be made clear that this standard alone does not define how frontends, particularly wallets, should deem a logic signature to be safe. This is a decision made solely by the front-ends as to which logic signatures they allow to be signed. It is **RECOMMENDED** to only support the signing of audited or otherwise trusted logic signatures.
## Copyright
Copyright and related rights waived via [CCO](https://creativecommons.org/publicdomain/zero/1.0/).
# Targeted DeFi Rewards
> Targeted DeFi Rewards, Terms and Conditions
## Abstract
The Targeted DeFi Rewards is a temporary incentive program that distributes Algo to be deployed in targeted activities to attract new DeFi users from within and outside the ecosystem. The goal is to give DeFi projects more flexibility in how these rewards are structured and distributed among their user base, targeting rapid growth, deeper DEX liquidity, and incentives for users who come to Algorand in the middle of a governance period.
## Specification
The key words “**MUST**”, “**MUST NOT**”, “**REQUIRED**”, “**SHALL**”, “**SHALL NOT**”, “**SHOULD**”, “**SHOULD NOT**”, “**RECOMMENDED**”, “**MAY**”, and “**OPTIONAL**” in this document are to be interpreted as described in [RFC-2119](https://www.ietf.org/rfc/rfc2119.txt).
### Eligibility Criteria
To be eligible to apply to this program, projects must abide by the [Disclaimers](https://www.algorand.foundation/disclaimers) (in particular the “Excluded Jurisdictions” section) and be willing to enter into a binding contract in the form of the template provided by the Algorand Foundation.
> The Algorand Foundation is temporarily allowing US-based entities to apply for this program. Approved projects will have their rewards swapped to USDCa on the day of the payment. This exception will be reviewed periodically.
Projects must have at least 500K Algo equivalent in TVL of white-listed assets, at the time of the quarterly snapshot block, which happens on the 15th day of the last month of each calendar quarter. All related wallet addresses will be provided in advance for peer scrutiny.
The DeFi Advisory Committee will review applications to verify each TVL claim, thus ensuring that claims are valid prior to application approval.
For AMMs we will leverage the Eligible Liquidity Pool list that is currently adopted to allow the governors commitment of LP tokens in the DeFi Rewards program, with extension to the assets defined below.
For Lending/Borrowing protocols, each project will provide a list of their assets and their holding wallet address(es).
For Bridges, each project will provide a list of the bridged assets and their holding wallet address(es).
### Assets Selection
The metrics used to select eligible assets to be used for Eligibility TVL Calculation (as per Eligibility Criteria above) were chosen to ensure that the selected tokens have a strong reputation, are difficult to manipulate, and are valuable to the ecosystem. This reputation is built on a combination of factors, including Total Value Locked (TVL), Market Cap, and listings.
> Assets are expected to meet at least two of the three criteria below to be included in the white-list.
| Criteria | |
| :--------- | ------------------------------------------------------------------------------------------------------------------------------------------------------------------------------------------------------------------------------------------------------: |
| TVL | The total value locked in different Algorand protocols plays a key role. It’s a good indicator of the token’s popularity. Minimum TVL requirement: $100K across all the protocols. |
| Market Cap | Market cap is a measure of a crypto token’s total circulating supply multiplied by its current market price. This parameter can be used to consider the positioning of the tokens on the entire crypto market. Minimum Market Cap requirement: USD 1MM. |
| Listing | Tokens listed on multiple stable and respected exchanges are often seen as more established and trustworthy. This can also contribute to increased demand for the token and further the growth of its reputation within the ecosystem. |
The following assets are qualified and meet the above criteria:
* ALGO
* gALGO - ASA ID 793124631
* USDC - ASA ID 31566704
* USDT - ASA ID 312769
* goBTC - ASA ID 386192725
* goETH - ASA ID 386195940
* PLANETS - ASA ID 27165954
* OPUL - ASA ID 287867876
* VESTIGE - ASA ID 700965019
* CHIPS - ASA ID 388592191
* DEFLY - ASA ID 470842789
* goUSD - ASA 672913181
* WBTC - ASA 1058926737
* WETH - ASA 887406851
* GOLD$ - ASA 246516580
* SILVER$ - ASA 246519683
* PEPE - ASA 1096015467
* COOP - ASA 796425061
* GORA - ASA 1138500612
> Applications for the above list can be submitted at any time [using this form](https://forms.gle/kpEpZ8sih69M5xa39). Cut off for the applications review is the 7th day of the last month of each calendar quarter, or one week before the quarterly snapshot date.
### Rewards Distribution
Projects will receive 11250 Algo for each 500K Algo TVL as defined above, rounded down. In the event that the available Algo are not sufficient for all the projects, Algo rewards will be distributed to each protocol based on their weighted contribution of TVL to Algorand DeFi.
Rewards per project are capped at 25% of the total rewards distributed under this program for that period. In the event of partial distribution of the allocated 7.5MM, the remaining funds will be distributed as regular DeFi governance rewards. For Governance Period 8, the AMM TVL count has doubled, when compared to lending/borrow and bridge projects, in recognition of their strategic role in providing liquidity for the ecosystem. This modification was approved by the DeFi Committee.
Rewards under this program will be distributed to projects within 4 weeks of the scheduled start date of the new governance period and the project(s). The usage of these rewards will be made public, and they will be entirely dedicated to protocol provision, user rewards, and user engagement. The use of rewards and methodology for payment must be made public and approved by the Algorand DeFi advisory committee prior to distribution.
## Rationale
This document was versioned using google doc, it made more sense to move it on github.
## Security Considerations
Disclaimer: This document may be revised until the day before the voting session opens, as we are still collecting community feedback.
## Copyright
Copyright and related rights waived via [CCO](https://creativecommons.org/publicdomain/zero/1.0/).
# NFT Rewards
> NFT Rewards, Terms and Conditions
## Abstract
The NFT Rewards is a temporary incentive program that distributes ALGO to be deployed in targeted activities to attract new NFT users from within and outside the ecosystem.
## Specification
The key words “**MUST**”, “**MUST NOT**”, “**REQUIRED**”, “**SHALL**”, “**SHALL NOT**”, “**SHOULD**”, “**SHOULD NOT**”, “**RECOMMENDED**”, “**MAY**”, and “**OPTIONAL**” in this document are to be interpreted as described in [RFC-2119](https://www.ietf.org/rfc/rfc2119.txt).
### Pilot program qualification for NFT marketplaces
To be eligible to apply to this program, projects must abide by the [Disclaimers](https://www.algorand.foundation/disclaimers) (in particular the “Excluded Jurisdictions” section) and be willing to enter into a binding contract in the form of the template provided by the Algorand Foundation.
NFT marketplaces applying for this program:
* Must be an NFT marketplace on Algorand that coordinates the selling of NFTs. An NFT marketplace is defined as an online platform that facilitates third-party non-fungible token listings and transactions in ALGO on the Algorand blockchain.
* Must have transaction volume (over the previous 6 months leading up to the application for the program) that is equivalent to at least 10% of total rewards being distributed. For example, if the total rewards amount is 500K ALGO, then the minimum volume must be 50K ALGO.P
#### Important Note
*NFT Rewards Program for US entities:*
> For 2024 | Q2 we will be allowing US-based entities that fit the Program Criteria to apply for the NFT Rewards program. Their allocated ALGO will be converted to USDCa post prior to the payment transfer. This change will be reviewed on a periodic basis.
### Allocation of rewards
* Rewards will be allocated proportionally based on volume for each qualified NFT marketplace.
* For qualifying marketplaces with more than 50% of total NFT marketplace volume, rewards will be capped at 35%.
### Requirements for initiatives
1. The rewards (ALGO) must ultimately go to NFT collectors/end users and creators.
2. NFT marketplaces must share their campaign plans publicly in advance in order to qualify for the rewards.
3. The rewards (ALGO) should be held in a separate wallet from operating funds to track on-chain transactions of how funds are being spent.
4. The NFT marketplace must make public data that shows its trading volume in the last quarter.
5. Proposals that incentivize wash trading\* will not be approved to participate in the Program.
6. NFT marketplaces must reward creators whose NFTs are purchased with a 5% minimum royalty.
> * By definition, the term “wash trading” means a form of market manipulation where the same user simultaneously buys and sells the same asset with the intention of giving false or misleading signals about its demand or price
### Process for launching initiative
* To apply, a qualifying NFT marketplace must provide detailed information on the specifics of initiatives they are planning in that period, as well as any documentation proving the location of its headquarters.
* If approved by the Algorand Foundation team, rewards will be distributed proportionally based on the allocation defined above.
* The qualifying NFT marketplaces must provide a detailed 1-page report following the initiative to Algorand Foundation and on the Forum:
1. Summary of the initiatives implemented;
2. Amount of rewards paid out (including any unspent rewards, which must be returned), and wallet addresses;
3. Total volume of transactions directly as a result of the campaign;
4. New wallets interacting with the marketplace;
5. Total volume of transactions compared to the previous quarter;
6. Any other relevant information.
### Evaluation
From GP10 (Q1/2024) proposals will be added to the governance portal and approved or rejected directly by the community. A proposal passes when it reaches a majority of “Yes” votes. The proposals and results are available at [governance.algorand.foundation](https://governance.algorand.foundation).
NFT marketplaces that do not fulfill their campaign plan cannot apply for further incentives.
NFT team will review overall results and discuss whether this program is having the desired impact and, together with the community, will help evaluate whether it should be extended and expanded to the next period.
### Important to note
* Marketplaces that fit the above criteria will be required to sign a legal contract with the Algorand Foundation.
* Rewards are only paid out in ALGO or USDCa for US-based entities..
* Legal entities based in other jurisdictions where receiving ALGO is not allowed are not able to partake in this program.
* Participants and the Algorand Foundation will all agree on the source of data and metrics to be used for calculating the allocation and measuring the results.
## Rationale
This document was versioned using google doc, it made more sense to move it on github.
## Security Considerations
Disclaimer: This document may be revised until the day before the voting session opens, as we are still collecting community feedback.
## Copyright
Copyright and related rights waived via [CCO](https://creativecommons.org/publicdomain/zero/1.0/).
# Metadata Declarations
> A specification for a decentralized, Self-declared, & Verifiable Tokens, Collections, & Metadata
## Abstract
This ARC describes a standard for a self-sovereign on-chain project & info declaration. The declaration is an ipfs link to a JSON document attached to a smart contract with multi-wallet verification capabilities that contains information about a project, including project tokens, FAQ, NFT collections, team members, and more.
## Motivation
In our current ecosystem we have a number of centralized implementations for parts of these vital pieces of information to be communicated to other relevant parties. All NFT marketplaces implement their own collection listing systems & requirements. Block explorers all take different approaches to sourcing images for ASA’s; The most common being a github repository that the Tinyman team controls & maintains. This ARC aims to standardize the way that projects communicate this information to other parts of our ecosystem.
We can use a smart contract with multi-wallet verification to store this information in a decentralized, self-sovereign & verifiable way by using custom field metadata & IPFS. A chain parser can be used to read the information stored & verify the details against the verified wallets attached to the contract.
## Specification
The keywords “MUST”, “MUST NOT”, “REQUIRED”, “SHALL”, “SHALL NOT”, “SHOULD”, “SHOULD NOT”, “RECOMMENDED”, “MAY”, and “OPTIONAL” in this document are to be interpreted as described in [RFC 2119](https://datatracker.ietf.org/doc/html/rfc2119).
This proposal specifies an associated off-chain JSON metadata file, displayed below. This metadata file contains many separate sections and escape hatches to include unique metadata about various businesses & projects. For the purposes of requiring as few files & ipfs uploads as possible the sections are all included within the same file. The file is then added to IPFS and the link saved in a custom field on the smart contract under the key `project`.
| Field | Schema | Description | Required |
| ----------- | ------------------ | ---------------------------------------------------------------------------------- | -------- |
| version | string | The version of the standard that the metadata is following. | true |
| associates | array\ | An array of objects that represent the associates of the project. | false |
| collections | array\ | An array of objects that represent the collections of the project. | false |
| tokens | array\ | An array of objects that represent the tokens of the project. | false |
| faq | array\ | An array of objects that represent the FAQ of the project. | false |
| extras | object | An object that represents any extra information that the project wants to include. | false |
##### Top Level JSON Example
```json
{
"version": "0.0.2",
"associates": [...],
"collections": [...],
"tokens": [...],
"faq": [...],
"extras": {...}
}
```
### Version
We envision this is an evolving / living standard that allows the community to add new sections & metadata as needed. The version field will be used to determine which version of the standard the metadata is following. This will allow for backwards compatibility & future proofing as the standard changes & grows. At the top level, `version` is the only required field.
### Associates
Associates are a list of wallets & roles that are associated with the project. This can be used to display the team members of a project, or the owners of a collection.
The associates field is an array of objects that contain the following fields:
| Field | Schema | Description | Required |
| ------- | ------ | ------------------------------------------------------------------ | -------- |
| address | string | The algorand wallet address of the associated person | true |
| role | string | A short title for the role the associate plays within the project. | true |
eg:
```json
"associates": [
{
"address": "W5MD3VTDUN3H2FFYJR2NDXGAAV2SJ44XEEDGBWHIZKH6ZZXF44SE7KEPVP",
"role": "Project Founder"
},
...
]
```
### Collections
NFT Collections have no formal standard for how they should be declared. This section aims to standardize the way that collections are declared & categorized. The collections field is an array of objects that contain the following fields:
| Field | Schema | Description | Required |
| ------------------- | ---------------------------- | ---------------------------------------------------------------------------------------------------------------------------------------------- | -------- |
| name | string | The name of the collection | true |
| network | string | The blockchain network that the collection is minted on. *Default*: `algorand` *Special*: `multichain` | false |
| prefixes | array\ | An array of strings that represent the prefixes to match against the `unit_name` of the NFTs in the collection. | false |
| addresses | array\ | An array of strings that represent the addresses that minted the NFTs in the collection. | false |
| assets | array\ | An array of strings that represent the asset\_ids of the NFTs in the collection. | false |
| excluded\_assets | array\ | An array of strings that represent the asset\_ids of the NFTs in the collection that should be excluded. | false |
| artists | array\ | An array of strings that represent the addresses of the artists that created the NFTs in the collection. | false |
| banner\_image | string | An IPFS link to an image that represents the collection. *if set `banner_id` should be unset & vice-versa* | false |
| banner\_id | uint64 | An asset\_id that represents the collection. | false |
| avatar\_image | string | An IPFS link to an image that represents the collection. *if set `avatar_id` should be unset & vice-versa* | false |
| avatar\_id | uint64 | An asset\_id that represents the collection. | false |
| explicit | boolean | A boolean that represents whether or not the collection contains explicit content. | false |
| royalty\_percentage | uint64 | A uint64 with a value ranging from 0-10000 that represents the royalty percentage that the collection would prefer to take on secondary sales. | false |
| properties | array\ | An array of objects that represent traits from an entire collection. | false |
| extras | object | An object of key value pairs for any extra information that the project wants to include for the collection. | false |
eg:
```json
"collections": [
{
"name": "My Collection",
"networks": "algorand",
"prefixes": [
"AKC",
...
],
"addresses": [
"W5MD3VTDUN3H2FFYJR2NDXGAAV2SJ44XEEDGBWHIZKH6ZZXF44SE7KEPVP",
...
],
"assets": [
123456789,
...
],
"excluded_assets": [
123456789,
...
],
"artists": [
"W5MD3VTDUN3H2FFYJR2NDXGAAV2SJ44XEEDGBWHIZKH6ZZXF44SE7KEPVP",
...
],
"banner_image": "ipfs://...",
"avatar": 123456789,
"explicit": false,
"royalty_percentage": "750", // ie: 7.5%
"properties": [
{
"name": "Fur",
"values": [
{
"name": "Red",
"image": "ipfs://...",
"image_integrity": "sha256-...",
"image_mimetype": "image/png",
"animation_url": "ipfs://...",
"animation_url_integrity": "sha256-...",
"animation_url_mimetype": "image/gif",
"extras": {
"key": "value",
...
}
},
...
]
}
...
],
"extras": {
"key": "value",
...
}
},
...
]
```
#### Collection Scoping
Not all collections have been consistent with their naming conventions. Some collections are minted across multiple wallets due to prior asa minting limitations. The following fields used together offer great flexibility in creating a group of NFTs to include in a collection. `prefixes`, `addresses`, `assets`, `excluded_assets`. Combined, these fields allow for maximum flexibility for mints that may have mistakes or exist across wallets & dont all conform to a consistent standard.
`prefixes` allows for simple grouping of a set of NFTs based on the beginning part of the ASAs `unit_name`. This is useful for collections that have a consistent naming convention for their NFTs. Every other scoping field modifies this rule.
`addresses` scope down the collection to only include ASAs minted by the addresses listed in this field. This is useful for projects that mint different collections across multiple wallets that utilize the same prefix.
`assets` is a direct entry in the collection for NFTs that dont conform to any of the prefix rules.
`excluded_assets` is a direct exclusion on an NFT that may conform to a prefix but should be excluded from the collection.
`banner_image`, `banner_id`, `avatar_image`, `avatar_id` are all very self explanatory. They allow for a glancable preview of the collection to display on NFT marketplaces, analytics sites & others. Both `banner` & `avatar` field groups should be one or the other, not both. `banner_image` or `banner_id` (likely an ASA id from the creator). `avatar_image` or `avatar_id` (likely an ASA id from the collection).
`explicit` is a boolean that indicates whether or not the collection contains explicit content. This is useful for sites that want to filter out explicit content.
`properties` is an array of objects that represent traits from an entire collection. Many new NFT collections are choosing to use [ARC-19](/arc-standards/arc-0019) and mint their NFTs as blank slates. This can prevent sniping but also has the adverse affect of obscuring the trait information of a collection. This field allows for a collection to declare its traits, values, image previews of the trait it references and extra metadata.
#### Collection Properties
| Field | Schema | Description | Required |
| ------ | ------------------------------- | -------------------------------------------------------------- | -------- |
| name | string | The name of the property | true |
| values | array\ | An array of objects that represent the values of the property. | true |
#### Collection Property Values
| Field | Schema | Description | Required |
| ------------------------- | ------ | ---------------------------------------------------------------------------------------------------------------- | -------- |
| name | string | The name of the value | true |
| image | string | An IPFS link to an image that represents the value. | false |
| image\_integrity | string | A sha256 hash of the image that represents the value. | false |
| image\_mimetype | string | The mimetype of the image that represents the value. | false |
| animation\_url | string | An IPFS link to an animation that represents the value. | false |
| animation\_url\_integrity | string | A sha256 hash of the animation that represents the value. | false |
| animation\_url\_mimetype | string | The mimetype of the animation that represents the value. | false |
| extras | object | An object of key value pairs for any extra information that the project wants to include for the property value. | false |
### Tokens
Tokens are a list of assets that are associated with the project. This can be used to verify the tokens of a project and for others to easily source images to represent the token on their own platforms.
| Field | Schema | Description | Required |
| ---------------- | ------ | ----------------------------------------------------- | -------- |
| asset\_id | uint64 | The asset\_id of the token | true |
| image | string | An IPFS link to an image that represents the token. | false |
| image\_integrity | string | A sha256 hash of the image that represents the token. | false |
| image\_mimetype | string | The mimetype of the image that represents the token. | false |
eg:
```json
"tokens": [
{
"asset_id": 123456789,
"image": "ipfs://...",
"image_integrity": "sha256-...",
"image_mimetype": "image/png",
}
...
]
```
### FAQ
Frequently Asked Questions for the project to address the common questions people have about their project and help inform the community.
| Field | Schema | Description | Required |
| ----- | ------ | ------------ | -------- |
| q | string | The question | true |
| a | string | The answer | true |
eg:
```json
"faq": [
{
"q": "What is XYZ Collection?",
"a": "XYZ Collection is a premiere NFT project that..."
},
...
]
```
### Extras
Custom Metadata for extending & customizing the declaration for your own use cases. This object can be found at several levels throughout the specification, The top level, within collections & within collection property value objects.
| Field | Schema | Description | Required |
| ----- | ------ | ---------------------------------- | -------- |
| key | string | The key of the extra information | true |
| value | string | The value of the extra information | true |
eg:
```json
"extras": {
"key": "value",
...
}
```
### Contract Providers
Custom metadata needs to be verifiable and many projects use many wallets as a means of separating concerns. Providers are smart contracts that have the capability of verifying multiple wallets & thus provide evidence to parsers of the authenticity of such data. Providers that support this standard will be listed on the [ARC compatibility matrices](https://arc.algorand.foundation/) site.
## Rationale
See the motivation section above for the general rationale.
## Security Considerations
None
## Copyright
Copyright and related rights waived via [CCO](https://creativecommons.org/publicdomain/zero/1.0/).
# ASA Burning App
> Standardized Application for Burning ASAs
## Abstract
This ARC provides TEAL which would deploy a application that can be used for burning Algorand Standard Assets. The goal is to have the apps deployed on the public networks using this TEAL to provide a standardized burn address and app ID.
## Motivation
Currently there is no official way to burn ASAs. While one can currently deploy their own app or rekey an account holding the asset to some other address, having a standardized address for burned assets enables explorers and dapps to easily calculate and display burnt supply for any ASA burned here.
### Definitions Related to Token Supply & Burning
It is important to note that assets with clawback enabled are effectively impossible to “burn” and could at any point be clawed back from any account or contract. The definitions below attempt to clarify some terminology around tokens and what can be considered burned.
| Token Type | Clawback | No Clawback |
| ------------------ | ---------------------------------------------------- | ---------------------------------------------------- |
| Total Supply | Total | Total |
| Circulating Supply | Total - Qty in Reserve Address - Qty in burn address | Total - Qty in Reserve Address - Qty in burn address |
| Available Supply | Total | Total - Qty in burn address |
| Burned Supply | N/A (Impossible to burn) | Qty in burn address |
## Specification
### `ARC-4` JSON Description
```json
{
"name": "ARC54",
"desc": "Standardized application for burning ASAs",
"methods": [
{
"name": "arc54_optIntoASA",
"args": [
{
"name": "asa",
"type": "asset",
"desc": "The asset to which the contract will opt in"
}
],
"desc": "A method to opt the contract into an ASA",
"returns": {
"type": "void",
"desc": ""
}
},
{
"name": "createApplication",
"desc": "",
"returns": {
"type": "void",
"desc": ""
},
"args": []
}
]
}
```
## Rationale
This simple application is only able to opt in to ASAs but not send them. As such, once an ASA has been sent to the app address it is effectively burnt.
If the burned ASA does not have clawback enabled, it will remain permanently in this account and can be considered out of circulation.
The app will accept ASAs which have clawback enabled, but any such assets can never be considered permanently burned. Users may use the burning app as a convenient receptable to remove ASAs from their account rather than returning them to the creator account.
The app will, of course, only be able to opt into a new ASA if it has sufficient Algo balance to cover the increase minimum balance requirement (MBR). Callers should fund the contract account as needed to cover the opt-in requests. It is possible for the contract to be funded by donated Algo so that subsequent callers need not pay the MBR requirement to request new ASA opt-ins.
## Reference Implementation
### TEAL Approval Program
```plaintext
#pragma version 9
// This TEAL was generated by TEALScript v0.62.2
// https://github.com/algorandfoundation/TEALScript
// This contract is compliant with and/or implements the following ARCs: [ ARC4 ]
// The following ten lines of TEAL handle initial program flow
// This pattern is used to make it easy for anyone to parse the start of the program and determine if a specific action is allowed
// Here, action refers to the OnComplete in combination with whether the app is being created or called
// Every possible action for this contract is represented in the switch statement
// If the action is not implemented in the contract, its respective branch will be "NOT_IMPLEMENTED" which just contains "err"
txn ApplicationID
int 0
>
int 6
*
txn OnCompletion
+
switch create_NoOp NOT_IMPLEMENTED NOT_IMPLEMENTED NOT_IMPLEMENTED NOT_IMPLEMENTED NOT_IMPLEMENTED call_NoOp
NOT_IMPLEMENTED:
err
// arc54_optIntoASA(asset)void
//
// /*
// Sends an inner transaction to opt the contract account into an ASA.
// The fee for the inner transaction must be covered by the caller.
//
// @param asa The ASA to opt in to
abi_route_arc54_optIntoASA:
// asa: asset
txna ApplicationArgs 1
btoi
txnas Assets
// execute arc54_optIntoASA(asset)void
callsub arc54_optIntoASA
int 1
return
arc54_optIntoASA:
proto 1 0
// contracts/arc54.algo.ts:13
// sendAssetTransfer({
// assetReceiver: globals.currentApplicationAddress,
// xferAsset: asa,
// assetAmount: 0,
// fee: 0,
// })
itxn_begin
int axfer
itxn_field TypeEnum
// contracts/arc54.algo.ts:14
// assetReceiver: globals.currentApplicationAddress
global CurrentApplicationAddress
itxn_field AssetReceiver
// contracts/arc54.algo.ts:15
// xferAsset: asa
frame_dig -1 // asa: asset
itxn_field XferAsset
// contracts/arc54.algo.ts:16
// assetAmount: 0
int 0
itxn_field AssetAmount
// contracts/arc54.algo.ts:17
// fee: 0
int 0
itxn_field Fee
// Submit inner transaction
itxn_submit
retsub
abi_route_createApplication:
int 1
return
create_NoOp:
method "createApplication()void"
txna ApplicationArgs 0
match abi_route_createApplication
err
call_NoOp:
method "arc54_optIntoASA(asset)void"
txna ApplicationArgs 0
match abi_route_arc54_optIntoASA
err
```
### TealScript Source Code
```plaintext
import { Contract } from '@algorandfoundation/tealscript';
// eslint-disable-next-line no-unused-vars
class ARC54 extends Contract {
/*
* Sends an inner transaction to opt the contract account into an ASA.
* The fee for the inner transaction must be covered by the caller.
*
* @param asa The ASA to opt in to
*/
arc54_optIntoASA(asa: Asset): void {
sendAssetTransfer({
assetReceiver: globals.currentApplicationAddress,
xferAsset: asa,
assetAmount: 0,
fee: 0,
});
}
}
```
### Deployments
An application per the above reference implementation has been deployed to each of Algorand’s networks at these app IDs:
| Network | App ID | Address |
| ------- | ---------- | ---------------------------------------------------------- |
| MainNet | 1257620981 | BNFIREKGRXEHCFOEQLTX3PU5SUCMRKDU7WHNBGZA4SXPW42OAHZBP7BPHY |
| TestNet | 497806551 | 3TKF2GMZJ5VZ4BQVQGC72BJ63WFN4QBPU2EUD4NQYHFLC3NE5D7GXHXYOQ |
| BetaNet | 2019020358 | XRXCALSRDVUY2OQXWDYCRMHPCF346WKIV5JPAHXQ4MZADSROJGDIHZP7AI |
## Security Considerations
It should be noted that once an asset is sent to the contract there will be no way to recover the asset unless it has clawback enabled.
Due to the simplicity of a TEAL, an audit is not needed. The contract has no code paths which can send tokens, thus there is no concern of an exploit that undoes burning of ASAs without clawback.
## Copyright
Copyright and related rights waived via [CCO](https://creativecommons.org/publicdomain/zero/1.0/).
# On-Chain storage/transfer for Multisig
> A smart contract that stores transactions and signatures for simplified multisignature use on Algorand.
## Abstract
This ARC proposes the utilization of on-chain smart contracts to facilitate the storage and transfer of Algorand multisignature metadata, transactions, and corresponding signatures for the respective multisignature sub-accounts.
## Motivation
Multisignature (multisig) accounts play a crucial role in enhancing security and control within the Algorand ecosystem. However, the management of multisig accounts often involves intricate off-chain coordination and the distribution of transactions among authorized signers. There exists a pressing need for a more streamlined and simplified approach to multisig utilization, along with an efficient transaction signing workflow.
## Specification
The key words “**MUST**”, “**MUST NOT**”, “**REQUIRED**”, “**SHALL**”, “**SHALL NOT**”, “**SHOULD**”, “**SHOULD NOT**”, “**RECOMMENDED**”, “**MAY**”, and “**OPTIONAL**” in this document are to be interpreted as described in [RFC-2119](https://www.ietf.org/rfc/rfc2119.txt).
### ABI
A compliant smart contract, conforming to this ARC, **MUST** implement the following interface:
```json
{
"name": "ARC-55",
"desc": "On-Chain Msig App",
"methods": [
{
"name": "arc55_getThreshold",
"desc": "Retrieve the signature threshold required for the multisignature to be submitted",
"readonly": true,
"args": [],
"returns": {
"type": "uint64",
"desc": "Multisignature threshold"
}
},
{
"name": "arc55_getAdmin",
"desc": "Retrieves the admin address, responsible for calling arc55_setup",
"readonly": true,
"args": [],
"returns": {
"type": "address",
"desc": "Admin address"
}
},
{
"name": "arc55_nextTransactionGroup",
"readonly": true,
"args": [],
"returns": {
"type": "uint64",
"desc": "Next expected Transaction Group nonce"
}
},
{
"name": "arc55_getTransaction",
"desc": "Retrieve a transaction from a given transaction group",
"readonly": true,
"args": [
{
"name": "transactionGroup",
"type": "uint64",
"desc": "Transaction Group nonce"
},
{
"name": "transactionIndex",
"type": "uint8",
"desc": "Index of transaction within group"
}
],
"returns": {
"type": "byte[]",
"desc": "A single transaction at the specified index for the transaction group nonce"
}
},
{
"name": "arc55_getSignatures",
"desc": "Retrieve a list of signatures for a given transaction group nonce and address",
"readonly": true,
"args": [
{
"name": "transactionGroup",
"type": "uint64",
"desc": "Transaction Group nonce"
},
{
"name": "signer",
"type": "address",
"desc": "Address you want to retrieve signatures for"
}
],
"returns": {
"type": "byte[64][]",
"desc": "Array of signatures"
}
},
{
"name": "arc55_getSignerByIndex",
"desc": "Find out which address is at this index of the multisignature",
"readonly": true,
"args": [
{
"name": "index",
"type": "uint64",
"desc": "Address at this index of the multisignature"
}
],
"returns": {
"type": "address",
"desc": "Address at index"
}
},
{
"name": "arc55_isSigner",
"desc": "Check if an address is a member of the multisignature",
"readonly": true,
"args": [
{
"name": "address",
"type": "address",
"desc": "Address to check is a signer"
}
],
"returns": {
"type": "bool",
"desc": "True if address is a signer"
}
},
{
"name": "arc55_mbrSigIncrease",
"desc": "Calculate the minimum balance requirement for storing a signature",
"readonly": true,
"args": [
{
"name": "signaturesSize",
"type": "uint64",
"desc": "Size (in bytes) of the signatures to store"
}
],
"returns": {
"type": "uint64",
"desc": "Minimum balance requirement increase"
}
},
{
"name": "arc55_mbrTxnIncrease",
"desc": "Calculate the minimum balance requirement for storing a transaction",
"readonly": true,
"args": [
{
"name": "transactionSize",
"type": "uint64",
"desc": "Size (in bytes) of the transaction to store"
}
],
"returns": {
"type": "uint64",
"desc": "Minimum balance requirement increase"
}
},
{
"name": "arc55_setup",
"desc": "Setup On-Chain Msig App. This can only be called whilst no transaction groups have been created.",
"args": [
{
"name": "threshold",
"type": "uint8",
"desc": "Initial multisig threshold, must be greater than 0"
},
{
"name": "addresses",
"type": "address[]",
"desc": "Array of addresses that make up the multisig"
}
],
"returns": {
"type": "void"
}
},
{
"name": "arc55_newTransactionGroup",
"desc": "Generate a new transaction group nonce for holding pending transactions",
"args": [],
"returns": {
"type": "uint64",
"desc": "transactionGroup Transaction Group nonce"
}
},
{
"name": "arc55_addTransaction",
"desc": "Add a transaction to an existing group. Only one transaction should be included per call",
"args": [
{
"name": "costs",
"type": "pay",
"desc": "Minimum Balance Requirement for associated box storage costs: (2500) + (400 * (9 + transaction.length))"
},
{
"name": "transactionGroup",
"type": "uint64",
"desc": "Transaction Group nonce"
},
{
"name": "index",
"type": "uint8",
"desc": "Transaction position within atomic group to add"
},
{
"name": "transaction",
"type": "byte[]",
"desc": "Transaction to add"
}
],
"returns": {
"type": "void"
},
"events": [
{
"name": "TransactionAdded",
"args": [
{
"name": "transactionGroup",
"type": "uint64"
},
{
"name": "transactionIndex",
"type": "uint8"
}
],
"desc": "Emitted when a new transaction is added to a transaction group"
}
]
},
{
"name": "arc55_addTransactionContinued",
"args": [
{
"name": "transaction",
"type": "byte[]"
}
],
"returns": {
"type": "void"
}
},
{
"name": "arc55_removeTransaction",
"desc": "Remove transaction from the app. The MBR associated with the transaction will be returned to the transaction sender.",
"args": [
{
"name": "transactionGroup",
"type": "uint64",
"desc": "Transaction Group nonce"
},
{
"name": "index",
"type": "uint8",
"desc": "Transaction position within atomic group to remove"
}
],
"returns": {
"type": "void"
},
"events": [
{
"name": "TransactionRemoved",
"args": [
{
"name": "transactionGroup",
"type": "uint64"
},
{
"name": "transactionIndex",
"type": "uint8"
}
],
"desc": "Emitted when a transaction has been removed from a transaction group"
}
]
},
{
"name": "arc55_setSignatures",
"desc": "Set signatures for a particular transaction group. Signatures must be included as an array of byte-arrays",
"args": [
{
"name": "costs",
"type": "pay",
"desc": "Minimum Balance Requirement for associated box storage costs: (2500) + (400 * (40 + signatures.length))"
},
{
"name": "transactionGroup",
"type": "uint64",
"desc": "Transaction Group nonce"
},
{
"name": "signatures",
"type": "byte[64][]",
"desc": "Array of signatures"
}
],
"returns": {
"type": "void"
},
"events": [
{
"name": "SignatureSet",
"args": [
{
"name": "transactionGroup",
"type": "uint64"
},
{
"name": "signer",
"type": "address"
}
],
"desc": "Emitted when a new signature is added to a transaction group"
}
]
},
{
"name": "arc55_clearSignatures",
"desc": "Clear signatures for an address. Be aware this only removes it from the current state of the ledger, and indexers will still know and could use your signature",
"args": [
{
"name": "transactionGroup",
"type": "uint64",
"desc": "Transaction Group nonce"
},
{
"name": "address",
"type": "address",
"desc": "Address whose signatures to clear"
}
],
"returns": {
"type": "void"
},
"events": [
{
"name": "SignatureSet",
"args": [
{
"name": "transactionGroup",
"type": "uint64"
},
{
"name": "signer",
"type": "address"
}
],
"desc": "Emitted when a new signature is added to a transaction group"
}
]
},
{
"name": "createApplication",
"args": [],
"returns": {
"type": "void"
}
}
],
"events": [
{
"name": "TransactionAdded",
"args": [
{
"name": "transactionGroup",
"type": "uint64"
},
{
"name": "transactionIndex",
"type": "uint8"
}
],
"desc": "Emitted when a new transaction is added to a transaction group"
},
{
"name": "TransactionRemoved",
"args": [
{
"name": "transactionGroup",
"type": "uint64"
},
{
"name": "transactionIndex",
"type": "uint8"
}
],
"desc": "Emitted when a transaction has been removed from a transaction group"
},
{
"name": "SignatureSet",
"args": [
{
"name": "transactionGroup",
"type": "uint64"
},
{
"name": "signer",
"type": "address"
}
],
"desc": "Emitted when a new signature is added to a transaction group"
},
{
"name": "SignatureCleared",
"args": [
{
"name": "transactionGroup",
"type": "uint64"
},
{
"name": "signer",
"type": "address"
}
],
"desc": "Emitted when a signature has been removed from a transaction group"
}
]
}
```
### Usage
The deployment of an [ARC-55](/arc-standards/arc-0055)-compliant contract is not covered by the ARC and is instead left to the implementer for their own use-case. An internal function `arc55_setAdmin` **SHOULD** be used to initialize an address which will be administering the setup. If left unset, then the admin defaults to the creator address. Once the application exists on-chain it must be setup before it can be used. The ARC-55 admin is responsible for setting up the multisignature metadata using the `arc55_setup(uint8,address[])void` method, and passing in details about the signature threshold and signer accounts that will make up the multisignature address. After successful deployment and configuration, the application ID **SHOULD** be distributed among the involved parties (signers) as a one-time off-chain exchange. The setup process may be called multiple times to correct any changes to the multisignature metadata, as long as no one has created a new transaction group nonce. Once a transaction group nonce has been generated, the metadata is immutable.
Before any transactions or signatures can be stored, a new “transaction group nonce” must be generated using the `arc55_newTransactionGroup()uint64` method. This returns a unique value which **MUST** be used for all further [ARC-55](/arc-standards/arc-0055) interactions. This nonce value allows multiple pending transactions groups to be available simultaneously under the same contract deployment. Do note confuse this value with a transaction group hash. It’s entirely possible to add multiple non-grouped, or multiple different groups into a single transaction group nonce, up to a limit of 255 transactions. However it’s unlikely ARC-55 clients will facilitate this.
Using a transaction group nonce, the admin or any signer **MAY** add transactions one at a time to that transaction group by providing the transaction data and the index of that transaction within the group using `arc55_addTransaction(pay,uint64,uint8,byte[])void`. A mandatory payment transaction **MUST** be included before the application call and will contain any minimum balance requirements as a result of storing the transaction data. When adding transactions the index **MUST** start at 0. Once a transaction has successfully be used or is no longer needed, any signer **MAY** remove the transaction data from the group using the `arc55_removeTransaction(uint64,uint8)void` method. This will result in the minimum balance requirement being freed up and being sent to the transaction sender.
Signers **MAY** provide their signature for a particular transaction group by using the `arc55_setSignatures(pay,uint64,byte[64][])void` method. This requires paying the minimum balance requirement used to store their signature and will be returned to them once their signature is removed. Any signer **MAY** also remove their own or others signatures from the contract using the `arc55_clearSignatures(uint64)void` method, however this may not prevent someone from using that signature. Once a signature has been shared publicly, anyone can use it assuming they meet the signature threshold to submit the transaction.
Once a transaction receives enough signatures to meet the threshold and falls within the valid rounds of the transaction, anyone **MAY** construct the multisignature transaction, by including all the signatures and submitting it to the network. Subsequently, participants **SHOULD** now clear the signatures and transaction data from the contract.
Whilst it’s not part of the ARC, an [ARC-55](/arc-standards/arc-0055)-compliant contract **MAY** be destroyed once it is no longer needed. The process **SHOULD** be performed by the admin and/or application creator, by first reclaiming any outstanding Algo funds by removing transactions and clearing signatures, which avoids permanently locking Algo on the network. Then issuing the `DeleteApplication` call and closing out the application address. It’s important to note that destroying the application does not render the multisignature account inaccessible, as a new deployment with the same multisignature metadata can be configured and used.
Below is a typical expected lifecycle:
* Creator deploys an ARC-55 compliant smart contract.
* Admin performs setup: Setting threshold to 2, and including 2 signer addresses.
* Either signer can now generate a new transaction group.
* Either signer can add a new transaction to sign to the transaction group, providing the MBR.
* Signer 1 provides their signatures to the transaction group, providing their MBR.
* Signer 2 provides their signatures to the transaction group, providing their MBR.
* Anyone can now submit the transaction to the network.
* Either signer can now clear the signatures of each signer, refunding their MBR to each account.
* Either signer can remove the transaction since it’s now committed to the network, refunding the MBR to the transaction sender.
### Storage
```plaintext
n = Transaction group nonce (uint64)
i = Transaction index within group (uint8)
addr = signers address (byte[32])
```
| Type | Key | Value | Description |
| ------ | ----------------- | ------- | ------------------------------------------------------------ |
| Global | `arc55_threshold` | uint64 | The multisig signature threshold |
| Global | `arc55_nonce` | uint64 | The ARC-55 transaction group nonce |
| Global | `arc55_admin` | Address | The admin responsible for calling `arc55_setup` |
| Box | n+i | byte\[] | The ith transaction data for the nth transaction group nonce |
| Box | n+addr | byte\[] | The signatures for the nth transaction group |
| Global | uint8 | Address | The signer address index for the multisig |
| Global | Address | uint64 | The number of times this signer appears in the multisig |
Whilst the data can be read directly from the applications storage, there are also read-only method for use with Algod’s simulate to retrieve the data. Below is a summary of each piece of data, how and where it’s stored, and it’s associated method call.
#### Threshold
The threshold is stored in global state of the application as a uint64 value. It’s immutable after setup and the first transaction group nonce has been generated.
The associated read-only method is `arc55_getThreshold()uint64`, which will return the signature threshold for the multisignature account.
#### Multisig Signer Addresses
A multisignature address is made up of one or more addresses. The contract stores these addresses in global state twice. Once as the positional index, and a second time to identify how many times they’re being used. This allows for simpler on-chain processing within the smart contract to identify 1) if the account is used, and 2) where the account should be used when reconstructing the multisignature.
Their are two associated read-only methods for obtaining and checking multisignature signer addresses. To retrieve a list of index addresses, you **SHOULD** use `arc55_getSignerByIndex(uint64)address`, which will return the signer address at the given multisignature index. This can be done incrementally until you reach the end of the available indexes. To check if an address is a signer for the multisignature account, you **SHOULD** use `arc55_isSigner(address)boolean`, which will return a `true` or `false` value.
#### Transactions
All transactions are stored individually within boxes, where the name of the box are separately identified by their related transaction group nonce. The box names are a concatenation of a uint64 and a uint8, representing the transaction group nonce and transaction index. This allows off-chain services to list all boxes belonging to an application and can quickly group and identify how many transaction groups and transactions are available.
The associated read-only method is `arc55_getTransaction(uint64,uint8)byte[]`, which will return the transaction for a given transaction group nonce and transaction index. Note: To retrieve data larger than 1024 bytes, simulate must be called with `AllowMoreLogging` set to true.
Example Group Transaction Nonce: `1` (uint64) Transaction Index: `0` (uint8) Hex: `000000000000000100` Box name: `AAAAAAAAAAEA` (base64)
#### Signatures
Signers store their signatures in a single box per transaction group nonce. Where multiple signatures **MUST** be concatenated together in the same order as the transactions within the group. The box name is made up of the transaction group nonce and the signers public key. Which is later used when removing the signatures, to identify where to refund the minimum balance requirement to.
The associated read-only method is `arc55_getSignatures(uint64,address)byte[64][]`, which will return the signatures for a given transaction group nonce and signer address.
Example Group Transaction Nonce: `1` (uint64) Signer: `ALICE7Y2JOFGG2VGUC64VINB75PI56O6M2XW233KG2I3AIYJFUD4QMYTJM` (address) Hex: `000000000000000102d0227f1a4b8a636aa6a0bdcaa1a1ff5e8ef9de66af6d6f6a3691b023092d07` Box name: `AAAAAAAAAAEC0CJ/GkuKY2qmoL3KoaH/Xo753mavbW9qNpGwIwktBw==` (base64)
## Rationale
Establishing individual deployments for distinct user groups, as opposed to relying on a singular instance accessible to all, presents numerous advantages. Initially, this approach facilitates the implementation and expansion of functionalities well beyond the scope initially envisioned by the ARC. It enables the integration of entirely customized smart contracts that adhere to [ARC-55](/arc-standards/arc-0055) while avoiding being constrained by it.
Furthermore, in the context of third-party infrastructures, the management of numerous boxes for a singular monolithic application can become increasingly cumbersome over time. In contrast, empowering small groups to create their own multisig applications, they can subscribe exclusively to their unique application ID streamlining the monitoring of it for new transactions and signatures.
### Limitations and Design Decisions
The available transaction size is the most critical limitation within this implementation. For transactions larger than 2048 bytes (the maximum application argument size), additional transactions using the method `arc55_addTransactionContinued(byte[])void` can be used and sent within the same group as the `arc55_addTransaction(pay,uint64,uint8,byte[])void` call. This will allow the storing of up to 4096 bytes per transaction. Note: The minimum balance requirement must be paid in full by the preceding payment transaction of the `addTransaction` call.
This ARC inherently promotes transparency of transactions and signers. If an additional layer of anonymity is required, an extension to this ARC **SHOULD** be proposed, outlining how to store and share encrypted data.
The current design necessitates that all transactions within the group be exclusively signed by the constituents of the multisig account. If a group transaction requires a separate signature from another account or a logicsig, this design does not support it. An extension to this ARC **SHOULD** be considered to address such scenarios.
## Reference Implementation
A TEALScript reference implementation is available at [`github.com/nullun/arc55-msig-app`](https://github.com/nullun/arc55-msig-app). This version has been written as an inheritable class, so can be included on top of an existing project to give you an ARC-55-compliant interface. It is encouraged for others to implement this standard in their preferred smart contract language of choice and even extend the capabilities whilst adhering to the provided ABI specification.
## Security Considerations
This ARC’s design solely involves storing existing data structures and does not have the capability to create or use multisignature accounts. Therefore, the security implications are minimal. End users are expected to review each transaction before generating a signature for it. If a smart contract implementing this ARC lacks proper security checks, the worst-case scenario would involve incorrect transactions and invalid signatures being stored on-chain, along with the potential loss of the minimum balance requirement from the application account.
## Copyright
Copyright and related rights waived via [CCO](https://creativecommons.org/publicdomain/zero/1.0/).
# Extended App Description
> Adds information to the ABI JSON description
## Abstract
This ARC takes the existing JSON description of a contract as described in [ARC-4](/arc-standards/arc-0004) and adds more fields for the purpose of client interaction
## Motivation
The data provided by ARC-4 is missing a lot of critical information that clients should know when interacting with an app. This means ARC-4 is insufficient to generate type-safe clients that provide a superior developer experience.
On the other hand, [ARC-32](/arc-standards/arc-0032) provides the vast majority of useful information that can be used to [generate typed clients](https://github.com/algorandfoundation/algokit-cli/blob/main/docs/features/generate.md#1-typed-clients), but requires a separate JSON file on top of the ARC-4 json file, which adds extra complexity and cognitive overhead.
## Specification
### Contract Interface
Every application is described via the following interface which is an extension of the `Contract` interface described in [ARC-4](/arc-standards/arc-0004).
```ts
/** Describes the entire contract. This interface is an extension of the interface described in ARC-4 */
interface Contract {
/** The ARCs used and/or supported by this contract. All contracts implicitly support ARC4 and ARC56 */
arcs: number[];
/** A user-friendly name for the contract */
name: string;
/** Optional, user-friendly description for the interface */
desc?: string;
/**
* Optional object listing the contract instances across different networks.
* The key is the base64 genesis hash of the network, and the value contains
* information about the deployed contract in the network indicated by the
* key. A key containing the human-readable name of the network MAY be
* included, but the corresponding genesis hash key MUST also be defined
*/
networks?: {
[network: string]: {
/** The app ID of the deployed contract in this network */
appID: number;
};
};
/** Named structs used by the application. Each struct field appears in the same order as ABI encoding. */
structs: { [structName: StructName]: StructField[] };
/** All of the methods that the contract implements */
methods: Method[];
state: {
/** Defines the values that should be used for GlobalNumUint, GlobalNumByteSlice, LocalNumUint, and LocalNumByteSlice when creating the application */
schema: {
global: {
ints: number;
bytes: number;
};
local: {
ints: number;
bytes: number;
};
};
/** Mapping of human-readable names to StorageKey objects */
keys: {
global: { [name: string]: StorageKey };
local: { [name: string]: StorageKey };
box: { [name: string]: StorageKey };
};
/** Mapping of human-readable names to StorageMap objects */
maps: {
global: { [name: string]: StorageMap };
local: { [name: string]: StorageMap };
box: { [name: string]: StorageMap };
};
};
/** Supported bare actions for the contract. An action is a combination of call/create and an OnComplete */
bareActions: {
/** OnCompletes this method allows when appID === 0 */
create: ("NoOp" | "OptIn" | "DeleteApplication")[];
/** OnCompletes this method allows when appID !== 0 */
call: (
| "NoOp"
| "OptIn"
| "CloseOut"
| "UpdateApplication"
| "DeleteApplication"
)[];
};
/** Information about the TEAL programs */
sourceInfo?: {
/** Approval program information */
approval: ProgramSourceInfo;
/** Clear program information */
clear: ProgramSourceInfo;
};
/** The pre-compiled TEAL that may contain template variables. MUST be omitted if included as part of ARC23 */
source?: {
/** The approval program */
approval: string;
/** The clear program */
clear: string;
};
/** The compiled bytecode for the application. MUST be omitted if included as part of ARC23 */
byteCode?: {
/** The approval program */
approval: string;
/** The clear program */
clear: string;
};
/** Information used to get the given byteCode and/or PC values in sourceInfo. MUST be given if byteCode or PC values are present */
compilerInfo?: {
/** The name of the compiler */
compiler: "algod" | "puya";
/** Compiler version information */
compilerVersion: {
major: number;
minor: number;
patch: number;
commitHash?: string;
};
};
/** ARC-28 events that MAY be emitted by this contract */
events?: Array;
/** A mapping of template variable names as they appear in the TEAL (not including TMPL_ prefix) to their respective types and values (if applicable) */
templateVariables?: {
[name: string]: {
/** The type of the template variable */
type: ABIType | AVMType | StructName;
/** If given, the base64 encoded value used for the given app/program */
value?: string;
};
};
/** The scratch variables used during runtime */
scratchVariables?: {
[name: string]: {
slot: number;
type: ABIType | AVMType | StructName;
};
};
}
```
### Method Interface
Every method in the contract is described via a `Method` interface. This interface is an extension of the one defined in [ARC-4](/arc-standards/arc-0004).
```ts
/** Describes a method in the contract. This interface is an extension of the interface described in ARC-4 */
interface Method {
/** The name of the method */
name: string;
/** Optional, user-friendly description for the method */
desc?: string;
/** The arguments of the method, in order */
args: Array<{
/** The type of the argument. The `struct` field should also be checked to determine if this arg is a struct. */
type: ABIType;
/** If the type is a struct, the name of the struct */
struct?: StructName;
/** Optional, user-friendly name for the argument */
name?: string;
/** Optional, user-friendly description for the argument */
desc?: string;
/** The default value that clients should use. */
defaultValue?: {
/** Where the default value is coming from
* - box: The data key signifies the box key to read the value from
* - global: The data key signifies the global state key to read the value from
* - local: The data key signifies the local state key to read the value from (for the sender)
* - literal: the value is a literal and should be passed directly as the argument
* - method: The utf8 signature of the method in this contract to call to get the default value. If the method has arguments, they all must have default values. The method **MUST** be readonly so simulate can be used to get the default value.
*/
source: "box" | "global" | "local" | "literal" | "method";
/** Base64 encoded bytes, base64 ARC4 encoded uint64, or UTF-8 method selector */
data: string;
/** How the data is encoded. This is the encoding for the data provided here, not the arg type. Undefined if the data is method selector */
type?: ABIType | AVMType;
};
}>;
/** Information about the method's return value */
returns: {
/** The type of the return value, or "void" to indicate no return value. The `struct` field should also be checked to determine if this return value is a struct. */
type: ABIType;
/** If the type is a struct, the name of the struct */
struct?: StructName;
/** Optional, user-friendly description for the return value */
desc?: string;
};
/** an action is a combination of call/create and an OnComplete */
actions: {
/** OnCompletes this method allows when appID === 0 */
create: ("NoOp" | "OptIn" | "DeleteApplication")[];
/** OnCompletes this method allows when appID !== 0 */
call: (
| "NoOp"
| "OptIn"
| "CloseOut"
| "UpdateApplication"
| "DeleteApplication"
)[];
};
/** If this method does not write anything to the ledger (ARC-22) */
readonly?: boolean;
/** ARC-28 events that MAY be emitted by this method */
events?: Array;
/** Information that clients can use when calling the method */
recommendations?: {
/** The number of inner transactions the caller should cover the fees for */
innerTransactionCount?: number;
/** Recommended box references to include */
boxes?: {
/** The app ID for the box */
app?: number;
/** The base64 encoded box key */
key: string;
/** The number of bytes being read from the box */
readBytes: number;
/** The number of bytes being written to the box */
writeBytes: number;
};
/** Recommended foreign accounts */
accounts?: string[];
/** Recommended foreign apps */
apps?: number[];
/** Recommended foreign assets */
assets?: number[];
};
}
```
### Event Interface
[ARC-28](/arc-standards/arc-0028) events are described using an extension of the original interface described in the ARC, with the addition of an optional struct field for arguments
```ts
interface Event {
/** The name of the event */
name: string;
/** Optional, user-friendly description for the event */
desc?: string;
/** The arguments of the event, in order */
args: Array<{
/** The type of the argument. The `struct` field should also be checked to determine if this arg is a struct. */
type: ABIType;
/** Optional, user-friendly name for the argument */
name?: string;
/** Optional, user-friendly description for the argument */
desc?: string;
/** If the type is a struct, the name of the struct */
struct?: StructName;
}>;
}
```
### Type Interfaces
The types defined in [ARC-4](/arc-standards/arc-0004) may not fully described the best way to use the ABI values as intended by the contract developers. These type interfaces are intended to supplement ABI types so clients can interact with the contract as intended.
```ts
/** An ABI-encoded type */
type ABIType = string;
/** The name of a defined struct */
type StructName = string;
/** Raw byteslice without the length prefixed that is specified in ARC-4 */
type AVMBytes = "AVMBytes";
/** A utf-8 string without the length prefix that is specified in ARC-4 */
type AVMString = "AVMString";
/** A 64-bit unsigned integer */
type AVMUint64 = "AVMUint64";
/** A native AVM type */
type AVMType = AVMBytes | AVMString | AVMUint64;
/** Information about a single field in a struct */
interface StructField {
/** The name of the struct field */
name: string;
/** The type of the struct field's value */
type: ABIType | StructName | StructField[];
}
```
### Storage Interfaces
These interfaces properly describe how app storage is access within the contract
```ts
/** Describes a single key in app storage */
interface StorageKey {
/** Description of what this storage key holds */
desc?: string;
/** The type of the key */
keyType: ABIType | AVMType | StructName;
/** The type of the value */
valueType: ABIType | AVMType | StructName;
/** The bytes of the key encoded as base64 */
key: string;
}
/** Describes a mapping of key-value pairs in storage */
interface StorageMap {
/** Description of what the key-value pairs in this mapping hold */
desc?: string;
/** The type of the keys in the map */
keyType: ABIType | AVMType | StructName;
/** The type of the values in the map */
valueType: ABIType | AVMType | StructName;
/** The base64-encoded prefix of the map keys*/
prefix?: string;
}
```
### SourceInfo Interface
These interfaces give clients more information about the contract’s source code.
```ts
interface ProgramSourceInfo {
/** The source information for the program */
sourceInfo: SourceInfo[];
/** How the program counter offset is calculated
* - none: The pc values in sourceInfo are not offset
* - cblocks: The pc values in sourceInfo are offset by the PC of the first op following the last cblock at the top of the program
*/
pcOffsetMethod: "none" | "cblocks";
}
interface SourceInfo {
/** The program counter value(s). Could be offset if pcOffsetMethod is not "none" */
pc: Array;
/** A human-readable string that describes the error when the program fails at the given PC */
errorMessage?: string;
/** The TEAL line number that corresponds to the given PC. RECOMMENDED to be used for development purposes, but not required for clients */
teal?: number;
/** The original source file and line number that corresponds to the given PC. RECOMMENDED to be used for development purposes, but not required for clients */
source?: string;
}
```
### Template Variables
Template variables are variables in the TEAL that should be substitued prior to compilation. The usage of the variable **MUST** appear in the TEAL starting with `TMPL_`. Template variables **MUST** be an argument to either `bytecblock` or `intcblock`. If a program has template variables, `bytecblock` and `intcblock` **MUST** be the first two opcodes in the program (unless one is not used).
#### Example
```js
#pragma version 10
bytecblock 0xdeadbeef TMPL_FOO
intcblock 0x12345678 TMPL_BAR
```
### Dynamic Template Variables
When a program has a template variable with a dynamic length, the `pcOffsetMethod` in `ProgramSourceInfo` **MUST** be `cblocks`. The `pc` value in each `SourceInfo` **MUST** be the pc determined at compilation minus the last `pc` value of the last `cblock` at compilation.
When a client is leveraging a source map with `cblocks` as the `pcOffsetMethod`, it **MUST** determine the `pc` value by parsing the bytecode to get the PC value of the first op following the last `cblock` at the top of the program. See the reference implementation section for an example of how to do this.
## Rationale
ARC-32 essentially addresses the same problem, but it requires the generation of two separate JSON files and the ARC-32 JSON file contains the ARC-4 JSON file within it (redundant information). The goal of this ARC is to create one JSON schema that is backwards compatible with ARC-4 clients, but contains the relevant information needed to automatically generate comprehensive client experiences.
### State
Describes all of the state that MAY exist in the app and how one should decode values. The schema provides the required schema when creating the app.
### Named Structs
It is common for high-level languages to support named structs, which gives names to the indexes of elements in an ABI tuple. The same structs should be useable on the client-side just as they are used in the contract.
### Action
This is one of the biggest deviation from ARC-32, but provides a much simpler interface to describe and understand what any given method can do.
## Backwards Compatibility
The JSON schema defined in this ARC should be compatible with all ARC-4 clients, provided they don’t do any strict schema checking for extraneous fields.
## Test Cases
NA
## Reference Implementation
### Calculating cblock Offsets
Below is an example of how to determine the TEAL/source line for a PC from an algod error message when the `pcOffsetMethod` is `cblocks`.
```ts
/** An ARC56 JSON file */
import arc56Json from "./arc56.json";
/** The bytecblock opcode */
const BYTE_CBLOCK = 38;
/** The intcblock opcode */
const INT_CBLOCK = 32;
/**
* Get the offset of the last constant block at the beginning of the program
* This value is used to calculate the program counter for an ARC56 program that has a pcOffsetMethod of "cblocks"
*
* @param program The program to parse
* @returns The PC value of the opcode after the last constant block
*/
function getConstantBlockOffset(program: Uint8Array) {
const bytes = [...program];
const programSize = bytes.length;
bytes.shift(); // remove version
/** The PC of the opcode after the bytecblock */
let bytecblockOffset: number | undefined;
/** The PC of the opcode after the intcblock */
let intcblockOffset: number | undefined;
while (bytes.length > 0) {
/** The current byte from the beginning of the byte array */
const byte = bytes.shift()!;
// If the byte is a constant block...
if (byte === BYTE_CBLOCK || byte === INT_CBLOCK) {
const isBytecblock = byte === BYTE_CBLOCK;
/** The byte following the opcode is the number of values in the constant block */
const valuesRemaining = bytes.shift()!;
// Iterate over all the values in the constant block
for (let i = 0; i < valuesRemaining; i++) {
if (isBytecblock) {
/** The byte following the opcode is the length of the next element */
const length = bytes.shift()!;
bytes.splice(0, length);
} else {
// intcblock is a uvarint, so we need to keep reading until we find the end (MSB is not set)
while ((bytes.shift()! & 0x80) !== 0) {
// Do nothing...
}
}
}
if (isBytecblock) bytecblockOffset = programSize - bytes.length - 1;
else intcblockOffset = programSize - bytes.length - 1;
if (bytes[0] !== BYTE_CBLOCK && bytes[0] !== INT_CBLOCK) {
// if the next opcode isn't a constant block, we're done
break;
}
}
}
return Math.max(bytecblockOffset ?? 0, intcblockOffset ?? 0);
}
/** The error message from algod */
const algodError =
"Network request error. Received status 400 (Bad Request): TransactionPool.Remember: transaction ZR2LAFLRQYFZFV6WVKAPH6CANJMIBLLH5WRTSWT5CJHFVMF4UIFA: logic eval error: assert failed pc=162. Details: app=11927, pc=162, opcodes=log; intc_0 // 0; assert";
/** The PC of the error */
const pc = Number(algodError.match(/pc=(\d+)/)![1]);
// Parse the ARC56 JSON to determine if the PC values are offset by the constant blocks
if (arc56Json.sourceInfo.approval.pcOffsetMethod === "cblocks") {
/** The program can either be cached locally OR retrieved via the algod API */
const program = new Uint8Array([
10, 32, 3, 0, 1, 6, 38, 3, 64, 48, 48, 48, 48, 48, 48, 48, 48, 48, 48, 48,
48, 48, 48, 48, 48, 48, 48, 48, 48, 48, 48, 48, 48, 48, 48, 48, 48, 48, 48,
48, 48, 48, 48, 48, 48, 48, 48, 48, 48, 48, 48, 48, 48, 48, 48, 48, 48, 48,
48, 48, 48, 48, 48, 48, 48, 48, 48, 48, 48, 48, 48, 48, 48, 32, 48, 48, 48,
48, 48, 48, 48, 48, 48, 48, 48, 48, 48, 48, 48, 48, 48, 48, 48, 48, 48, 48,
48, 48, 48, 48, 48, 48, 48, 48, 48, 48, 3, 102, 111, 111, 40, 41, 34, 42,
49, 24, 20, 129, 6, 11, 49, 25, 8, 141, 12, 0, 85, 0, 0, 0, 0, 0, 0, 0, 0,
0, 0, 0, 71, 0, 0, 0, 0, 0, 0, 0, 0, 0, 0, 0, 136, 0, 3, 129, 1, 67, 138, 0,
0, 42, 176, 34, 68, 137, 136, 0, 3, 129, 1, 67, 138, 0, 0, 42, 40, 41, 132,
137, 136, 0, 3, 129, 1, 67, 138, 0, 0, 0, 137, 128, 4, 21, 31, 124, 117,
136, 0, 13, 73, 21, 22, 87, 6, 2, 76, 80, 80, 176, 129, 1, 67, 138, 0, 1,
34, 22, 137, 129, 1, 67, 128, 4, 184, 68, 123, 54, 54, 26, 0, 142, 1, 255,
240, 0, 128, 4, 154, 113, 210, 180, 128, 4, 223, 77, 92, 59, 128, 4, 61,
135, 13, 135, 128, 4, 188, 11, 23, 6, 54, 26, 0, 142, 4, 255, 135, 255, 149,
255, 163, 255, 174, 0,
]);
/** Get the offset of the last constant block */
const offset = getConstantBlockOffset(program);
/** Find the source info object that corresponds to the error's PC */
const sourceInfoObject = arc56Json.sourceInfo.approval.sourceInfo.find((s) =>
s.pc.includes(pc - offset)
)!;
/** Get the TEAL line and source line that corresponds to the error */
console.log(
`Error at PC ${pc} corresponds to TEAL line ${sourceInfoObject.teal} and source line ${sourceInfoObject.source}`
);
}
```
## Security Considerations
The type values used in methods **MUST** be correct, because if they were not then the method would not be callable. For state, however, it is possible to have an incorrect type encoding defined. Any significant security concern from this possibility is not immediately evident, but it is worth considering.
## Copyright
Copyright and related rights waived via [CCO](https://creativecommons.org/publicdomain/zero/1.0/).
```plaintext
```
# ASA Inbox Router
> An application that can route ASAs to users or hold them to later be claimed
## Abstract
The goal of this standard is to establish a standard in the Algorand ecosystem by which ASAs can be sent to an intended receiver even if their account is not opted in to the ASA.
A wallet custodied by an application will be used to custody assets on behalf of a given user, with only that user being able to withdraw assets. A master application will be used to map inbox addresses to user address. This master application can route ASAs to users performing whatever actions are necessary.
If integrated into ecosystem technologies including wallets, explorers, and dApps, this standard can provide enhanced capabilities around ASAs which are otherwise strictly bound at the protocol level to require opting in to be received.
## Motivation
Algorand requires accounts to opt in to receive any ASA, a fact which simultaneously:
1. Grants account holders fine-grained control over their holdings by allowing them to select which assets to allow and preventing receipt of unwanted tokens.
2. Frustrates users and developers when accounting for this requirement especially since other blockchains do not have this requirement.
This ARC lays out a new way to navigate the ASA opt in requirement.
### Contemplated Use Cases
The following use cases help explain how this capability can enhance the possibilities within the Algorand ecosystem.
#### Airdrops
An ASA creator who wants to send their asset to a set of accounts faces the challenge of needing their intended receivers to opt in to the ASA ahead of time, which requires non-trivial communication efforts and precludes the possibility of completing the airdrop as a surprise. This claimable ASA standard creates the ability to send an airdrop out to individual addresses so that the receivers can opt in and claim the asset at their convenience—or not, if they so choose.
#### Reducing New User On-boarding Friction
An application operator who wants to on-board users to their game or business may want to reduce the friction of getting people started by decoupling their application on-boarding process from the process of funding a non-custodial Algorand wallet, if users are wholly new to the Algorand ecosystem. As long as the receiver’s address is known, an ASA can be sent to them ahead of them having ALGOs in their wallet to cover the minimum balance requirement and opt in to the asset.
## Specification
The key words “**MUST**”, “**MUST NOT**”, “**REQUIRED**”, “**SHALL**”, “**SHALL NOT**”, “**SHOULD**”, “**SHOULD NOT**”, “**RECOMMENDED**”, “**MAY**”, and “**OPTIONAL**” in this document are to be interpreted as described in [RFC-2119](https://www.ietf.org/rfc/rfc2119.txt).
### Deployments
This ARC works best when there is a singleton deployment per network. Below are the app IDs for the canonical deployments:
| Network | App ID |
| ------- | ------------ |
| Mainnet | `2449590623` |
| Testnet | `643020148` |
### Router Contract [ARC-56](/arc-standards/arc-0056) JSON
```json
{
"name": "ARC59",
"desc": "",
"methods": [
{
"name": "createApplication",
"desc": "Deploy ARC59 contract",
"args": [],
"returns": {
"type": "void"
},
"actions": {
"create": ["NoOp"],
"call": []
}
},
{
"name": "arc59_optRouterIn",
"desc": "Opt the ARC59 router into the ASA. This is required before this app can be used to send the ASA to anyone.",
"args": [
{
"name": "asa",
"type": "uint64",
"desc": "The ASA to opt into"
}
],
"returns": {
"type": "void"
},
"actions": {
"create": [],
"call": ["NoOp"]
}
},
{
"name": "arc59_getOrCreateInbox",
"desc": "Gets the existing inbox for the receiver or creates a new one if it does not exist",
"args": [
{
"name": "receiver",
"type": "address",
"desc": "The address to get or create the inbox for"
}
],
"returns": {
"type": "address",
"desc": "The inbox address"
},
"actions": {
"create": [],
"call": ["NoOp"]
}
},
{
"name": "arc59_getSendAssetInfo",
"args": [
{
"name": "receiver",
"type": "address",
"desc": "The address to send the asset to"
},
{
"name": "asset",
"type": "uint64",
"desc": "The asset to send"
}
],
"returns": {
"type": "(uint64,uint64,bool,bool,uint64,uint64)",
"desc": "Returns the following information for sending an asset:\nThe number of itxns required, the MBR required, whether the router is opted in, whether the receiver is opted in,\nand how much ALGO the receiver would need to claim the asset",
"struct": "SendAssetInfo"
},
"actions": {
"create": [],
"call": ["NoOp"]
}
},
{
"name": "arc59_sendAsset",
"desc": "Send an asset to the receiver",
"args": [
{
"name": "axfer",
"type": "axfer",
"desc": "The asset transfer to this app"
},
{
"name": "receiver",
"type": "address",
"desc": "The address to send the asset to"
},
{
"name": "additionalReceiverFunds",
"type": "uint64",
"desc": "The amount of ALGO to send to the receiver/inbox in addition to the MBR"
}
],
"returns": {
"type": "address",
"desc": "The address that the asset was sent to (either the receiver or their inbox)"
},
"actions": {
"create": [],
"call": ["NoOp"]
}
},
{
"name": "arc59_claim",
"desc": "Claim an ASA from the inbox",
"args": [
{
"name": "asa",
"type": "uint64",
"desc": "The ASA to claim"
}
],
"returns": {
"type": "void"
},
"actions": {
"create": [],
"call": ["NoOp"]
}
},
{
"name": "arc59_reject",
"desc": "Reject the ASA by closing it out to the ASA creator. Always sends two inner transactions.\nAll non-MBR ALGO balance in the inbox will be sent to the caller.",
"args": [
{
"name": "asa",
"type": "uint64",
"desc": "The ASA to reject"
}
],
"returns": {
"type": "void"
},
"actions": {
"create": [],
"call": ["NoOp"]
}
},
{
"name": "arc59_getInbox",
"desc": "Get the inbox address for the given receiver",
"args": [
{
"name": "receiver",
"type": "address",
"desc": "The receiver to get the inbox for"
}
],
"returns": {
"type": "address",
"desc": "Zero address if the receiver does not yet have an inbox, otherwise the inbox address"
},
"actions": {
"create": [],
"call": ["NoOp"]
}
},
{
"name": "arc59_claimAlgo",
"desc": "Claim any extra algo from the inbox",
"args": [],
"returns": {
"type": "void"
},
"actions": {
"create": [],
"call": ["NoOp"]
}
}
],
"arcs": [4, 56],
"structs": {
"SendAssetInfo": [
{
"name": "itxns",
"type": "uint64"
},
{
"name": "mbr",
"type": "uint64"
},
{
"name": "routerOptedIn",
"type": "bool"
},
{
"name": "receiverOptedIn",
"type": "bool"
},
{
"name": "receiverAlgoNeededForClaim",
"type": "uint64"
},
{
"name": "receiverAlgoNeededForWorstCaseClaim",
"type": "uint64"
}
]
},
"state": {
"schema": {
"global": {
"bytes": 0,
"ints": 0
},
"local": {
"bytes": 0,
"ints": 0
}
},
"keys": {
"global": {},
"local": {},
"box": {}
},
"maps": {
"global": {},
"local": {},
"box": {
"inboxes": {
"keyType": "address",
"valueType": "address"
}
}
}
},
"bareActions": {
"create": [],
"call": []
}
}
```
**NOTE:** This ARC-56 spec does not include the source information, including error mapping, because the deployment used a version of TEALScript to compile the contract prior to ARC-56 support.
### Sending an Asset
When sending an asset, the sender **SHOULD** call `ARC59_getSendAssetInfo` to determine relevant information about the receiver and the router. This information is included as a tuple described below
| Index | Object Property | Description | Type |
| ----- | -------------------------- | -------------------------------------------------------------------------------- | ------ |
| 0 | itxns | The number of itxns required | uint64 |
| 1 | mbr | The amount of ALGO the sender **MUST** send the the router contract to cover MBR | uint64 |
| 2 | routerOptedIn | Whether the router is already opted in to the asset | bool |
| 3 | receiverOptedIn | Whether the receiver is already directly opted in to the asset | bool |
| 4 | receiverAlgoNeededForClaim | The amount of ALGO the receiver would currently need to claim the asset | uint64 |
This information can then be used to send the asset. An example of using this information to send an asset is shown in [the reference implementation section](#typescript-send-asset-function).
### Claiming an Asset
When claiming an asset, the claimer **MUST** call `arc59_claim` to claim the asset from their inbox. This will transfer the asset to the claimer and any extra ALGO in the inbox will be sent to the claimer.
Prior to sending the `arc59_claim` app call, a call to `arc59_claimAlgo` **SHOULD** be made to claim any extra ALGO in the inbox if the inbox balance is above its minimum balance.
An example of claiming an asset is shown in [the reference implementation section](#typescript-claim-function).
## Rationale
This design was created to offer a standard mechanism by which wallets, explorers, and dapps could enable users to send, receive, and find claimable ASAs without requiring any changes to the core protocol.
This ARC is intended to replace [ARC-12](/arc-standards/arc-0012). This ARC is simpler than [ARC-12](/arc-standards/arc-0012), with the main feature lost being senders not getting back MBR. Given the significant reduction in complexity it is considered to be worth the tradeoff. No way to get back MBR is also another way to disincentivize spam.
### Rejection
The initial proposal for this ARC included a method for burning that leveraged [ARC-54](/arc-standards/arc-0054). After further consideration though it was decided to remove the burn functionality with a reject method. The reject method does not burn the ASA. It simply closes out to the creator. This decision was made to reduce the additional complexity and potential user friction that [ARC-54](/arc-standards/arc-0054) opt-ins introduced.
### Router MBR
It should be noted that the MBR for the router contract itself is non-recoverable. This was an intentional decision that results in more predictable costs for assets that may freuqently be sent through the router, such as stablecoins.
## Test Cases
Test cases for the JavaScript client and the [ARC-59](/arc-standards/arc-0059) smart contract implementation can be found [here](https://github.com/algorandfoundation/ARCs/tree/main/assets/arc-0059/__test__/)
## Reference Implementation
A project with a the full reference implementation, including the smart contract and JavaScript library (used for testing), can be found [here](https://github.com/algorandfoundation/ARCs/tree/main/assets/arc-0059/).
### Router Contract
This contract is written using TEALScript v0.90.3
```ts
/* eslint-disable max-classes-per-file */
// eslint-disable-next-line import/no-unresolved, import/extensions
import { Contract } from "@algorandfoundation/tealscript";
type SendAssetInfo = {
/**
* The total number of inner transactions required to send the asset through the router.
* This should be used to add extra fees to the app call
*/
itxns: uint64;
/** The total MBR the router needs to send the asset through the router. */
mbr: uint64;
/** Whether the router is already opted in to the asset or not */
routerOptedIn: boolean;
/** Whether the receiver is already directly opted in to the asset or not */
receiverOptedIn: boolean;
/** The amount of ALGO the receiver would currently need to claim the asset */
receiverAlgoNeededForClaim: uint64;
};
class ControlledAddress extends Contract {
@allow.create("DeleteApplication")
new(): Address {
sendPayment({
rekeyTo: this.txn.sender,
});
return this.app.address;
}
}
export class ARC59 extends Contract {
inboxes = BoxMap();
/**
* Deploy ARC59 contract
*
*/
createApplication(): void {}
/**
* Opt the ARC59 router into the ASA. This is required before this app can be used to send the ASA to anyone.
*
* @param asa The ASA to opt into
*/
arc59_optRouterIn(asa: AssetID): void {
sendAssetTransfer({
assetReceiver: this.app.address,
assetAmount: 0,
xferAsset: asa,
});
}
/**
* Gets the existing inbox for the receiver or creates a new one if it does not exist
*
* @param receiver The address to get or create the inbox for
* @returns The inbox address
*/
arc59_getOrCreateInbox(receiver: Address): Address {
if (this.inboxes(receiver).exists) return this.inboxes(receiver).value;
const inbox = sendMethodCall({
onCompletion: OnCompletion.DeleteApplication,
approvalProgram: ControlledAddress.approvalProgram(),
clearStateProgram: ControlledAddress.clearProgram(),
});
this.inboxes(receiver).value = inbox;
return inbox;
}
/**
*
* @param receiver The address to send the asset to
* @param asset The asset to send
*
* @returns Returns the following information for sending an asset:
* The number of itxns required, the MBR required, whether the router is opted in, whether the receiver is opted in,
* and how much ALGO the receiver would need to claim the asset
*/
arc59_getSendAssetInfo(receiver: Address, asset: AssetID): SendAssetInfo {
const routerOptedIn = this.app.address.isOptedInToAsset(asset);
const receiverOptedIn = receiver.isOptedInToAsset(asset);
const info: SendAssetInfo = {
itxns: 1,
mbr: 0,
routerOptedIn: routerOptedIn,
receiverOptedIn: receiverOptedIn,
receiverAlgoNeededForClaim: 0,
};
if (receiverOptedIn) return info;
const algoNeededToClaim =
receiver.minBalance + globals.assetOptInMinBalance + globals.minTxnFee;
// Determine how much ALGO the receiver needs to claim the asset
if (receiver.balance < algoNeededToClaim) {
info.receiverAlgoNeededForClaim += algoNeededToClaim - receiver.balance;
}
// Add mbr and transaction for opting the router in
if (!routerOptedIn) {
info.mbr += globals.assetOptInMinBalance;
info.itxns += 1;
}
if (!this.inboxes(receiver).exists) {
// Two itxns to create inbox (create + rekey)
// One itxns to send MBR
// One itxn to opt in
info.itxns += 4;
// Calculate the MBR for the inbox box
const preMBR = globals.currentApplicationAddress.minBalance;
this.inboxes(receiver).value = globals.zeroAddress;
const boxMbrDelta = globals.currentApplicationAddress.minBalance - preMBR;
this.inboxes(receiver).delete();
// MBR = MBR for the box + min balance for the inbox + ASA MBR
info.mbr +=
boxMbrDelta + globals.minBalance + globals.assetOptInMinBalance;
return info;
}
const inbox = this.inboxes(receiver).value;
if (!inbox.isOptedInToAsset(asset)) {
// One itxn to opt in
info.itxns += 1;
if (!(inbox.balance >= inbox.minBalance + globals.assetOptInMinBalance)) {
// One itxn to send MBR
info.itxns += 1;
// MBR = ASA MBR
info.mbr += globals.assetOptInMinBalance;
}
}
return info;
}
/**
* Send an asset to the receiver
*
* @param receiver The address to send the asset to
* @param axfer The asset transfer to this app
* @param additionalReceiverFunds The amount of ALGO to send to the receiver/inbox in addition to the MBR
*
* @returns The address that the asset was sent to (either the receiver or their inbox)
*/
arc59_sendAsset(
axfer: AssetTransferTxn,
receiver: Address,
additionalReceiverFunds: uint64
): Address {
verifyAssetTransferTxn(axfer, {
assetReceiver: this.app.address,
});
// If the receiver is opted in, send directly to their account
if (receiver.isOptedInToAsset(axfer.xferAsset)) {
sendAssetTransfer({
assetReceiver: receiver,
assetAmount: axfer.assetAmount,
xferAsset: axfer.xferAsset,
});
if (additionalReceiverFunds !== 0) {
sendPayment({
receiver: receiver,
amount: additionalReceiverFunds,
});
}
return receiver;
}
const inboxExisted = this.inboxes(receiver).exists;
const inbox = this.arc59_getOrCreateInbox(receiver);
if (additionalReceiverFunds !== 0) {
sendPayment({
receiver: inbox,
amount: additionalReceiverFunds,
});
}
if (!inbox.isOptedInToAsset(axfer.xferAsset)) {
let inboxMbrDelta = globals.assetOptInMinBalance;
if (!inboxExisted) inboxMbrDelta += globals.minBalance;
// Ensure the inbox has enough balance to opt in
if (inbox.balance < inbox.minBalance + inboxMbrDelta) {
sendPayment({
receiver: inbox,
amount: inboxMbrDelta,
});
}
// Opt the inbox in
sendAssetTransfer({
sender: inbox,
assetReceiver: inbox,
assetAmount: 0,
xferAsset: axfer.xferAsset,
});
}
// Transfer the asset to the inbox
sendAssetTransfer({
assetReceiver: inbox,
assetAmount: axfer.assetAmount,
xferAsset: axfer.xferAsset,
});
return inbox;
}
/**
* Claim an ASA from the inbox
*
* @param asa The ASA to claim
*/
arc59_claim(asa: AssetID): void {
const inbox = this.inboxes(this.txn.sender).value;
sendAssetTransfer({
sender: inbox,
assetReceiver: this.txn.sender,
assetAmount: inbox.assetBalance(asa),
xferAsset: asa,
assetCloseTo: this.txn.sender,
});
sendPayment({
sender: inbox,
receiver: this.txn.sender,
amount: inbox.balance - inbox.minBalance,
});
}
/**
* Reject the ASA by closing it out to the ASA creator. Always sends two inner transactions.
* All non-MBR ALGO balance in the inbox will be sent to the caller.
*
* @param asa The ASA to reject
*/
arc59_reject(asa: AssetID) {
const inbox = this.inboxes(this.txn.sender).value;
sendAssetTransfer({
sender: inbox,
assetReceiver: asa.creator,
assetAmount: inbox.assetBalance(asa),
xferAsset: asa,
assetCloseTo: asa.creator,
});
sendPayment({
sender: inbox,
receiver: this.txn.sender,
amount: inbox.balance - inbox.minBalance,
});
}
/**
* Get the inbox address for the given receiver
*
* @param receiver The receiver to get the inbox for
*
* @returns Zero address if the receiver does not yet have an inbox, otherwise the inbox address
*/
arc59_getInbox(receiver: Address): Address {
return this.inboxes(receiver).exists
? this.inboxes(receiver).value
: globals.zeroAddress;
}
/** Claim any extra algo from the inbox */
arc59_claimAlgo() {
const inbox = this.inboxes(this.txn.sender).value;
assert(inbox.balance - inbox.minBalance !== 0);
sendPayment({
sender: inbox,
receiver: this.txn.sender,
amount: inbox.balance - inbox.minBalance,
});
}
}
```
### TypeScript Send Asset Function
```ts
/**
* Send an asset to a receiver using the ARC59 router
*
* @param appClient The ARC59 client generated by algokit
* @param assetId The ID of the asset to send
* @param sender The address of the sender
* @param receiver The address of the receiver
* @param algorand The AlgorandClient instance to use to send transactions
* @param sendAlgoForNewAccount Whether to send 201_000 uALGO to the receiver so they can claim the asset with a 0-ALGO balance
*/
async function arc59SendAsset(
appClient: Arc59Client,
assetId: bigint,
sender: string,
receiver: string,
algorand: algokit.AlgorandClient
) {
// Get the address of the ARC59 router
const arc59RouterAddress = (await appClient.appClient.getAppReference())
.appAddress;
// Call arc59GetSendAssetInfo to get the following:
// itxns - The number of transactions needed to send the asset
// mbr - The minimum balance that must be sent to the router
// routerOptedIn - Whether the router has opted in to the asset
// receiverOptedIn - Whether the receiver has opted in to the asset
const [
itxns,
mbr,
routerOptedIn,
receiverOptedIn,
receiverAlgoNeededForClaim,
] = (await appClient.arc59GetSendAssetInfo({ asset: assetId, receiver }))
.return!;
// If the receiver has opted in, just send the asset directly
if (receiverOptedIn) {
await algorand.send.assetTransfer({
sender,
receiver,
assetId,
amount: 1n,
});
return;
}
// Create a composer to form an atomic transaction group
const composer = appClient.compose();
const signer = algorand.account.getSigner(sender);
// If the MBR is non-zero, send the MBR to the router
if (mbr || receiverAlgoNeededForClaim) {
const mbrPayment = await algorand.transactions.payment({
sender,
receiver: arc59RouterAddress,
amount: algokit.microAlgos(Number(mbr + receiverAlgoNeededForClaim)),
});
composer.addTransaction({ txn: mbrPayment, signer });
}
// If the router is not opted in, add a call to arc59OptRouterIn to do so
if (!routerOptedIn) composer.arc59OptRouterIn({ asa: assetId });
/** The box of the receiver's pubkey will always be needed */
const boxes = [algosdk.decodeAddress(receiver).publicKey];
/** The address of the receiver's inbox */
const inboxAddress = (
await appClient.compose().arc59GetInbox({ receiver }, { boxes }).simulate()
).returns[0];
// The transfer of the asset to the router
const axfer = await algorand.transactions.assetTransfer({
sender,
receiver: arc59RouterAddress,
assetId,
amount: 1n,
});
// An extra itxn is if we are also sending ALGO for the receiver claim
const totalItxns = itxns + (receiverAlgoNeededForClaim === 0n ? 0n : 1n);
composer.arc59SendAsset(
{ axfer, receiver, additionalReceiverFunds: receiverAlgoNeededForClaim },
{
sendParams: { fee: algokit.microAlgos(1000 + 1000 * Number(totalItxns)) },
boxes, // The receiver's pubkey
// Always good to include both accounts here, even if we think only the receiver is needed. This is to help protect against race conditions within a block.
accounts: [receiver, inboxAddress],
// Even though the asset is available in the group, we need to explicitly define it here because we will be checking the asset balance of the receiver
assets: [Number(assetId)],
}
);
// Disable resource population to ensure that our manually defined resources are correct
algokit.Config.configure({ populateAppCallResources: false });
// Send the transaction group
await composer.execute();
// Re-enable resource population
algokit.Config.configure({ populateAppCallResources: true });
}
```
### TypeScript Claim Function
```ts
/**
* Claim an asset from the ARC59 inbox
*
* @param appClient The ARC59 client generated by algokit
* @param assetId The ID of the asset to claim
* @param claimer The address of the account claiming the asset
* @param algorand The AlgorandClient instance to use to send transactions
*/
async function arc59Claim(
appClient: Arc59Client,
assetId: bigint,
claimer: string,
algorand: algokit.AlgorandClient
) {
const composer = appClient.compose();
// Check if the claimer has opted in to the asset
let claimerOptedIn = false;
try {
await algorand.account.getAssetInformation(claimer, assetId);
claimerOptedIn = true;
} catch (e) {
// Do nothing
}
const inbox = (
await appClient
.compose()
.arc59GetInbox({ receiver: claimer })
.simulate({ allowUnnamedResources: true })
).returns[0];
let totalTxns = 3;
// If the inbox has extra ALGO, claim it
const inboxInfo = await algorand.account.getInformation(inbox);
if (inboxInfo.minBalance < inboxInfo.amount) {
totalTxns += 2;
composer.arc59ClaimAlgo(
{},
{
sender: algorand.account.getAccount(claimer),
sendParams: { fee: algokit.algos(0) },
}
);
}
// If the claimer hasn't already opted in, add a transaction to do so
if (!claimerOptedIn) {
composer.addTransaction({
txn: await algorand.transactions.assetOptIn({ assetId, sender: claimer }),
signer: algorand.account.getSigner(claimer),
});
}
composer.arc59Claim(
{ asa: assetId },
{
sender: algorand.account.getAccount(claimer),
sendParams: { fee: algokit.microAlgos(1000 * totalTxns) },
}
);
await composer.execute();
}
```
## Security Considerations
The router application controls all user inboxes. If this contract is compromised, user assets might also be compromised.
## Copyright
Copyright and related rights waived via [CCO](https://creativecommons.org/publicdomain/zero/1.0/).
# ASA Circulating Supply
> Getter method for ASA circulating supply
## Abstract
This ARC introduces a standard for the definition of circulating supply for Algorand Standard Assets (ASA) and its client-side retrieval. A reference implementation is suggested.
## Motivation
Algorand Standard Asset (ASA) `total` supply is *defined* upon ASA creation.
Creating an ASA on the ledger *does not* imply its `total` supply is immediately “minted” or “circulating”. In fact, the semantic of token “minting” on Algorand is slightly different from other blockchains: it is not coincident with the token units creation on the ledger.
The Reserve Address, one of the 4 addresses of ASA Role-Based-Access-Control (RBAC), is conventionally used to identify the portion of `total` supply not yet in circulation. The Reserve Address has no “privilege” over the token: it is just a “logical” label used (client-side) to classify an existing amount of ASA as “not in circulation”.
According to this convention, “minting” an amount of ASA units is equivalent to *moving that amount out of the Reserve Address*.
> ASA may have the Reserve Address assigned to a Smart Contract to enforce specific “minting” policies, if needed.
This convention led to a simple and unsophisticated semantic of ASA circulating supply, widely adopted by clients (wallets, explorers, etc.) to provide standard information:
```text
circulating_supply = total - reserve_balance
```
Where `reserve_balance` is the ASA balance hold by the Reserve Address.
However, the simplicity of such convention, who fostered adoption across the Algorand ecosystem, poses some limitations. Complex and sophisticated use-cases of ASA, such as regulated stable-coins and tokenized securities among others, require more detailed and expressive definitions of circulating supply.
As an example, an ASA could have “burned”, “locked” or “pre-minted” amounts of token, not held in the Reserve Address, which *should not* be considered as “circulating” supply. This is not possible with the basic ASA protocol convention.
This ARC proposes a standard ABI *read-only* method (getter) to provide the circulating supply of an ASA.
## Specification
The keywords “**MUST**”, “**MUST NOT**”, “**REQUIRED**”, “**SHALL**”, “**SHALL NOT**”, “**SHOULD**”, “**SHOULD NOT**”, “**RECOMMENDED**”, “**MAY**”, and “**OPTIONAL**” in this document are to be interpreted as described in [RFC 2119](https://datatracker.ietf.org/doc/html/rfc2119).
> Notes like this are non-normative.
### ABI Method
A compliant ASA, whose circulating supply definition conforms to this ARC, **MUST** implement the following method on an Application (referred as *Circulating Supply App* in this specification):
```json
{
"name": "arc62_get_circulating_supply",
"readonly": true,
"args": [
{
"type": "uint64",
"name": "asset_id",
"desc": "ASA ID of the circulating supply"
}
],
"returns": {
"type": "uint64",
"desc": "ASA circulating supply"
},
"desc": "Get ASA circulating supply"
}
```
The `arc62_get_circulating_supply` **MUST** be a *read-only* ([ARC-22](/arc-standards/arc-0022)) method (getter).
### Usage
Getter calls **SHOULD** be *simulated*.
Any external resources used by the implementation **SHOULD** be discovered and auto-populated by the simulated getter call.
#### Example 1
> Let the ASA have `total` supply and a Reserve Address (i.e. not set to `ZeroAddress`).
>
> Let the Reserve Address be assigned to an account different from the Circulating Supply App Account.
>
> Let `burned` be an external Burned Address dedicated to ASA burned supply.
>
> Let `locked` be an external Locked Address dedicated to ASA locked supply.
>
> The ASA issuer defines the *circulating supply* as:
>
> ```text
> circulating_supply = total - reserve_balance - burned_balance - locked_balance
> ```
>
> In this case the simulated read-only method call would auto-populate 1 external reference for the ASA and 3 external reference accounts (Reserve, Burned and Locked).
#### Example 2
> Let the ASA have `total` supply and *no* Reserve Address (i.e. set to `ZeroAddress`).
>
> Let `non_circulating_amount` be a UInt64 Global Var defined by the implementation of the Circulating Supply App.
>
> The ASA issuer defines the *circulating supply* as:
>
> ```text
> circulating_supply = total - non_circulating_amount
> ```
>
> In this case the simulated read-only method call would auto-populate just 1 external reference for the ASA.
### Circulating Supply Application discovery
> Given an ASA ID, clients (wallet, explorer, etc.) need to discover the related Circulating Supply App.
An ASA conforming to this ARC **MUST** specify the Circulating Supply App ID.
> To avoid ecosystem fragmentation, this ARC does not propose any new method to specify the metadata of an ASA. Instead, it only extends already existing standards.
If the ASA also conforms to any ARC that supports additional `properties` ([ARC-3](/arc-standards/arc-0003), [ARC-19](/arc-standards/arc-0019), etc.) as metadata declared in the ASA URL field, then it **MUST** include a `arc-62` key and set the corresponding value to a map, including the ID of the Circulating Supply App as a value for the key `application-id`.
#### Example: ARC-3 Property
```json
{
//...
"properties": {
//...
"arc-62": {
"application-id": 123
}
}
//...
}
```
## Rationale
The definition of *circulating supply* for sophisticated use-cases is usually ASA-specific. It could involve, for example, complex math or external accounts’ balances, variables stored in boxes or in global state, etc..
For this reason, the proposed method’s signature does not require any reference to external resources, a part form the `asset_id` of the ASA for which the circulating supply is defined.
Eventual external resources can be discovered and auto-populated directly by the simulated method call.
The rational of this design choice is avoiding fragmentation and integration overhead for clients (wallets, explorers, etc.).
Clients just need to know:
1. The ASA ID;
2. The Circulating Supply App ID implementing the `arc62_get_circulating_supply` method for that ASA.
## Backwards Compatibility
Existing ASA willing to conform to this ARC **MUST** specify the Circulating Supply App ID as [ARC-2](/arc-standards/arc-0002) `AssetConfig` transaction note field, as follows:
* The `` **MUST** be equal to `62`;
* The **RECOMMENDED** `` are [MsgPack](https://msgpack.org/) (`m`) or [JSON](https://www.json.org/json-en.html) (`j`);
* The `` **MUST** specify `application-id` equal to the Circulating Supply App ID.
> **WARNING**: To preserve the existing ASA RBAC (e.g. Manager Address, Freeze Address, etc.) it is necessary to **include all the existing role addresses** in the `AssetConfig`. Not doing so would irreversibly disable the RBAC roles!
### Example - JSON without version
```text
arc62:j{"application-id":123}
```
## Reference Implementation
> This section is non-normative.
This section suggests a reference implementation of the Circulating Supply App.
An Algorand-Python example is available [here](https://github.com/algorandfoundation/ARCs/tree/main/assets/arc-0062).
### Recommendations
An ASA using the reference implementation **SHOULD NOT** assign the Reserve Address to the Circulating Supply App Account.
A reference implementation **SHOULD** target a version of the AVM that supports foreign resources pooling (version 9 or greater).
A reference implementation **SHOULD** use 3 external addresses, in addition to the Reserve Address, to define the not circulating supply.
> ⚠️The specification *is not limited* to 3 external addresses. The implementations **MAY** extend the non-circulating labels using more addresses, global storage, box storage, etc.
The **RECOMMENDED** labels for not-circulating balances are: `burned`, `locked` and `generic`.
> To change the labels of not circulating addresses is sufficient to rename the following constants just in `smart_contracts/circulating_supply/config.py`:
>
> ```python
> NOT_CIRCULATING_LABEL_1: Final[str] = "burned"
> NOT_CIRCULATING_LABEL_2: Final[str] = "locked"
> NOT_CIRCULATING_LABEL_3: Final[str] = "generic"
> ```
### State Schema
A reference implementation **SHOULD** allocate, at least, the following Global State variables:
* `asset_id` as UInt64, initialized to `0` and set **only once** by the ASA Manager Address;
* Not circulating address 1 (`burned`) as Bytes, initialized to the Global `Zero Address` and set by the ASA Manager Address;
* Not circulating address 2 (`locked`) as Bytes, initialized to the Global `Zero Address` and set by the ASA Manager Address;
* Not circulating address 3 (`generic`) as Bytes, initialized to the Global `Zero Address` and set by the ASA Manager Address.
A reference implementation **SHOULD** enforce that, upon setting `burned`, `locked` and `generic` addresses, the latter already opted-in the `asset_id`.
```json
"state": {
"global": {
"num_byte_slices": 3,
"num_uints": 1
},
"local": {
"num_byte_slices": 0,
"num_uints": 0
}
},
"schema": {
"global": {
"declared": {
"asset_id": {
"type": "uint64",
"key": "asset_id"
},
"not_circulating_label_1": {
"type": "bytes",
"key": "burned"
},
"not_circulating_label_2": {
"type": "bytes",
"key": "locked"
},
"not_circulating_label_3": {
"type": "bytes",
"key": "generic"
}
},
"reserved": {}
},
"local": {
"declared": {},
"reserved": {}
}
},
```
### Circulating Supply Getter
A reference implementation **SHOULD** enforce that the `asset_id` Global Variable is equal to the `asset_id` argument of the `arc62_get_circulating_supply` getter method.
> Alternatively the reference implementation could ignore the `asset_id` argument and use directly the `asset_id` Global Variable.
A reference implementation **SHOULD** return the ASA *circulating supply* as:
```text
circulating_supply = total - reserve_balance - burned_balance - locked_balance - generic_balance
```
Where:
* `total` is the total supply of the ASA (`asset_id`);
* `reserve_balance` is the ASA balance hold by the Reserve Address or `0` if the address is set to the Global `ZeroAddress` or not opted-in `asset_id`;
* `burned_balance` is the ASA balance hold by the Burned Address or `0` if the address is set to the Global `ZeroAddress` or is not opted-in `asset_id`;
* `locked_balance` is the ASA balance hold by the Locked Address or `0` if the address is set to the Global `ZeroAddress` or not opted-in `asset_id`;
* `generic_balance` is the ASA balance hold by a Generic Address or `0` if the address is set to the Global `ZeroAddress` or not opted-in `asset_id`.
> ⚠️The implementations **MAY** extend the calculation of `circulating_supply` using global storage, box storage, etc. See [Example 2](/arc-standards/arc-0062#example-2) for reference.
## Security Considerations
Permissions over the Circulating Supply App setting and update **SHOULD** be granted to the ASA Manager Address.
> The ASA trust-model (i.e. who sets the Reserve Address) is extended to the generalized ASA circulating supply definition.
## Copyright
Copyright and related rights waived via [CCO](https://creativecommons.org/publicdomain/zero/1.0/).
# AVM Run Time Errors In Program
> Informative AVM run time errors based on program bytecode
## Abstract
This document introduces a convention for rising informative run time errors on the Algorand Virtual Machine (AVM) directly from the program bytecode.
## Motivation
The AVM does not offer native opcodes to catch and raise run time errors.
The lack of native error handling semantics could lead to fragmentation of tooling and frictions for AVM clients, who are unable to retrieve informative and useful hints about the occurred run time failures.
This ARC formalizes a convention to rise AVM run time errors based just on the program bytecode.
## Specification
The keywords “**MUST**”, “**MUST NOT**”, “**REQUIRED**”, “**SHALL**”, “**SHALL NOT**”, “**SHOULD**”, “**SHOULD NOT**”, “**RECOMMENDED**”, “**MAY**”, and “**OPTIONAL**” in this document are to be interpreted as described in [RFC 2119](https://datatracker.ietf.org/doc/html/rfc2119).
> Notes like this are non-normative.
### Error format
> The AVM programs bytecode have limited sized. In this convention, the errors are part of the bytecode, therefore it is good to mind errors’ formatting and sizing.
> Errors consist of a *code* and an optional *short message*.
Errors **MUST** be prefixed either with:
* `ERR:` for custom errors;
* `AER:` reserved for future ARC standard errors.
Errors **MUST** use `:` as domain separator.
It is **RECOMMENDED** to use `UTF-8` for the error bytes string encoding.
It is **RECOMMENDED** to use *short* error messages.
It is **RECOMMENDED** to use [camel case](https://en.wikipedia.org/wiki/Camel_case/) for alphanumeric error codes.
It is **RECOMMENDED** to avoid error byte strings of *exactly* 8 or 32 bytes.
### In Program Errors
When a program wants to emit informative run time errors, directly from the bytecode, it **MUST**:
1. Push to the stack the bytes string containing the error;
2. Execute the `log` opcode to use the bytes from the top of the stack;
3. Execute the `err` opcode to immediately terminate the program.
Upon a program run time failure, the Algod API response contains both the failed *program counter* (`pc`) and the `logs` array with the *errors*.
The program **MAY** return multiple errors in the same failed execution.
The errors **MUST** be retrieved by:
1. Decoding the `base64` elements of the `logs` array;
2. Validating the decoded elements against the error regexp.
### Error examples
> Error conforming this specification are always prefixed with `ERR:`.
Error with a *numeric code*: `ERR:042`.
Error with an *alphanumeric code*: `ERR:BadRequest`.
Error with a *numeric code* and *short message*: `ERR:042:AFunnyError`.
### Program example
The following program example raises the error `ERR:001:Invalid Method` for any application call to methods different from `m1()void`.
```teal
#pragma version 10
txn ApplicationID
bz end
method "m1()void"
txn ApplicationArgs 0
match method1
byte "ERR:001:Invalid Method"
log
err
method1:
b end
end:
int 1
```
Full Algod API response of a failed execution:
```json
{
"data": {
"app-index":1004,
"eval-states": [
{
"logs": ["RVJSOjAwMTpJbnZhbGlkIE1ldGhvZA=="]
}
],
"group-index":0,
"pc":41
},
"message":"TransactionPool.Remember: transaction ESI4GHAZY46MCUCLPBSB5HBRZPGO6V7DDUM5XKMNVPIRJK6DDAGQ: logic eval error: err opcode executed. Details: app=1004, pc=41"
}
```
The `logs` array contains the `base64` encoded error `ERR:001:Invalid Method`.
The `logs` array **MAY** contain elements that are not errors (as specified by the regexp).
It is **NOT RECOMMENDED** to use the `message` field to retrieve errors.
### AVM Compilers
AVM compilers (and related tools) **SHOULD** provide two error compiling options:
1. The one specified in this ARC as **default**;
2. The one specified in [ARC-56](/arc-standards/arc-0056) as fallback, if compiled bytecode size exceeds the AVM limits.
> Compilers **MAY** optimize for program bytecode size by storing the error prefixes in the `bytecblock` and concatenating the error message at the cost of some extra opcodes.
## Rationale
This convention for AVM run time errors presents the following PROS and CONS.
**PROS:**
* No additional artifacts required to return informative run time errors;
* Errors are directly returned in the Algod API response, which can be filtered with the specified error regexp.
**CONS:**
* Errors consume program bytecode size.
## Security Considerations
> Not applicable.
## Copyright
Copyright and related rights waived via [CCO](https://creativecommons.org/publicdomain/zero/1.0/).
# ASA Parameters Conventions, Digital Media
> Alternatives conventions for ASAs containing digital media.
We introduce community conventions for the parameters of Algorand Standard Assets (ASAs) containing digital media.
## Abstract
The goal of these conventions is to make it simpler to display the properties of a given ASA. This ARC differs from [ARC-3](/arc-standards/arc-0003) by focusing on optimization for fetching of digital media, as well as the use of onchain metadata. Furthermore, since asset configuration transactions are used to store the metadata, this ARC can be applied to existing ASAs.
While mutability helps with backwards compatibility and other use cases, like leveling up an RPG character, some use cases call for immutability. In these cases, the ASA manager MAY remove the manager address, after which point the Algorand network won’t allow anyone to send asset configuration transactions for the ASA. This effectively makes the latest valid [ARC-69](/arc-standards/arc-0069) metadata immutable.
## Specification
The key words “**MUST**”, “**MUST NOT**”, “**REQUIRED**”, “**SHALL**”, “**SHALL NOT**”, “**SHOULD**”, “**SHOULD NOT**”, “**RECOMMENDED**”, “**MAY**”, and “**OPTIONAL**” in this document are to be interpreted as described in [RFC-2119](https://www.ietf.org/rfc/rfc2119.txt).
An ARC-69 ASA has an associated JSON Metadata file, formatted as specified below, that is stored on-chain in the note field of the most recent asset configuration transaction (that contains a note field with a valid ARC-69 JSON metadata).
### ASA Parameters Conventions
The ASA parameters should follow the following conventions:
* *Unit Name* (`un`): no restriction.
* *Asset Name* (`an`): no restriction.
* *Asset URL* (`au`): a URI pointing to digital media file. This URI:
* **SHOULD** be persistent.
* **SHOULD** link to a file small enough to fetch quickly in a gallery view.
* **MUST** follow [RFC-3986](https://www.ietf.org/rfc/rfc3986.txt) and **MUST NOT** contain any whitespace character.
* **SHOULD** specify media type with `#` fragment identifier at end of URL. This format **MUST** follow: `#i` for images, `#v` for videos, `#a` for audio, `#p` for PDF, or `#h` for HTML/interactive digital media. If unspecified, assume Image.
* **SHOULD** use one of the following URI schemes (for compatibility and security): *https* and *ipfs*:
* When the file is stored on IPFS, the `ipfs://...` URI **SHOULD** be used. IPFS Gateway URI (such as `https://ipfs.io/ipfs/...`) **SHOULD NOT** be used.
* **SHOULD NOT** use the following URI scheme: *http* (due to security concerns).
* *Asset Metadata Hash* (`am`): the SHA-256 digest of the full resolution media file as a 32-byte string (as defined in [NIST FIPS 180-4](https://doi.org/10.6028/NIST.FIPS.180-4) )
* **OPTIONAL**
* *Freeze Address* (`f`):
* **SHOULD** be empty, unless needed for royalties or other use cases
* *Clawback Address* (`c`):
* **SHOULD** be empty, unless needed for royalties or other use cases
There are no requirements regarding the manager account of the ASA, or the reserve account. However, if immutability is required the manager address **MUST** be removed.
Furthermore, the manager address, if present, **SHOULD** be under the control of the ASA creator, as the manager address can unilaterally change the metadata. Some advanced use cases **MAY** use a logicsig as ASA manager, if the logicsig only allows to set the note fields by the ASA creator.
### JSON Metadata File Schema
```json
{
"title": "Token Metadata",
"type": "object",
"properties": {
"standard": {
"type": "string",
"value": "arc69",
"description": "(Required) Describes the standard used."
},
"description": {
"type": "string",
"description": "Describes the asset to which this token represents."
},
"external_url": {
"type": "string",
"description": "A URI pointing to an external website. Borrowed from Open Sea's metadata format (https://docs.opensea.io/docs/metadata-standards)."
},
"media_url": {
"type": "string",
"description": "A URI pointing to a high resolution version of the asset's media."
},
"properties": {
"type": "object",
"description": "Properties following the EIP-1155 'simple properties' format. (https://github.com/ethereum/EIPs/blob/master/EIPS/eip-1155.md#erc-1155-metadata-uri-json-schema)"
},
"mime_type": {
"type": "string",
"description": "Describes the MIME type of the ASA's URL (`au` field)."
},
"attributes": {
"type": "array",
"description": "(Deprecated. New NFTs should define attributes with the simple `properties` object. Marketplaces should support both the `properties` object and the `attributes` array). The `attributes` array follows Open Sea's format: https://docs.opensea.io/docs/metadata-standards#attributes"
}
},
"required":[
"standard"
]
}
```
The `standard` field is **REQUIRED** and **MUST** equal `arc69`. All other fields are **OPTIONAL**. If provided, the other fields **MUST** match the description in the JSON schema.
The URI field (`external_url`) is defined similarly to the Asset URL parameter `au`. However, contrary to the Asset URL, the `external_url` does not need to link to the digital media file.
#### MIME Type
In addition to specifying a data type in the ASA’s URL (`au` field) with a URI fragment (ex: `#v` for video), the JSON Metadata schema also allows indication of the URL’s MIME type (ex: `video/mp4`) via the `mime_type` field.
#### Examples
##### Basic Example
An example of an ARC-69 JSON Metadata file for a song follows. The properties array proposes some **SUGGESTED** formatting for token-specific display properties and metadata.
```json
{
"standard": "arc69",
"description": "arc69 theme song",
"external_url": "https://www.youtube.com/watch?v=dQw4w9WgXcQ",
"mime_type": "video/mp4",
"properties": {
"Bass":"Groovy",
"Vibes":"Funky",
"Overall":"Good stuff"
}
}
```
An example of possible ASA parameters would be:
* *Asset Name*: `ARC-69 theme song` for example.
* *Unit Name*: `69TS` for example.
* *Asset URL*: `ipfs://QmWS1VAdMD353A6SDk9wNyvkT14kyCiZrNDYAad4w1tKqT#v`
* *Metadata Hash*: the 32 bytes of the SHA-256 digest of the high resolution media file.
* *Total Number of Units*: 1
* *Number of Digits after the Decimal Point*: 0
#### Mutability
##### Rendering
Clients **SHOULD** render an ASA’s latest ARC-69 metadata. Clients **MAY** render an ASA’s previous ARC-69 metadata for changelogs or other historical features.
##### Updating ARC-69 metadata
If an ASA has a manager address, then the manager **MAY** update an ASA’s ARC-69 metadata. To do so, the manager sends a new `acfg` transaction with the entire metadata represented as JSON in the transaction’s `note` field.
##### Making ARC-69 metadata immutable
Managers MAY make an ASA’s ARC-69 immutable. To do so, they MUST remove the ASA’s manager address with an `acfg` transaction.
##### ARC-69 attribute deprecation
The initial version of ARC-69 followed the Open Sea attributes format . As illustrated below:
```plaintext
"attributes": {
"type": "array",
"description": "Attributes following Open Sea's attributes format (https://docs.opensea.io/docs/metadata-standards#attributes)."
}
```
This format is now deprecated. New NFTs **SHOULD** use the simple `properties` format, since it significantly reduces the metadata size.
To be fully compliant with the ARC-69 standard, both the `properties` object and the `attributes` array **SHOULD** be supported.
## Rationale
These conventions take inspiration from [Open Sea’s metadata standards](https://docs.opensea.io/docs/metadata-standards) and [EIP-1155](https://github.com/ethereum/EIPs/blob/master/EIPS/eip-1155.md#erc-1155-metadata-uri-json-schema)
to facilitate interoperobility.
The main differences are highlighted below:
* Asset Name, Unit Name, and URL are specified in the ASA parameters. This allows applications to efficiently display meaningful information, even if they aren’t aware of ARC-69 metadata.
* MIME types help clients more effectively fetch and render media.
* All asset metadata is stored onchain.
* Metadata can be either mutable or immutable.
## Security Considerations
None.
## Copyright
Copyright and related rights waived via [CCO](https://creativecommons.org/publicdomain/zero/1.0/).
# Non-Transferable ASA
> Parameters Conventions Non-Transferable Algorand Standard Asset
## Abstract
The goal is to make it simpler for block explorers, wallets, exchanges, marketplaces, and more generally, client software to identify & interact with a Non-transferable ASA (NTA).
This defines an interface extending [ARC-3](/arc-standards/arc-0003) & [ARC-69](/arc-standards/arc-0069) non fungible ASA to create Non-transferable ASA. Before issuance, both parties (issuer and receiver), have to agree on who has (if any) the authorization to burn this ASA.
> This spec is compatible with [ARC-19](/arc-standards/arc-0019) to create an updatable Non-transferable ASA.
## Motivation
The idea of Non-transferable ASAs has garnered significant attention, inspired by the concept of Soul Bound Tokens. However, without a clear definition, Non-transferable ASAs cannot achieve interoperability. Developing universal services targeting Non-transferable ASAs remains challenging without a minimal consensus on their implementation and lifecycle management.
This ARC envisions Non-transferable ASAs as specialized assets, akin to Soul Bound ASAs, that will serve as identities, credentials, credit records, loan histories, memberships, and much more. To provide the necessary flexibility in these use cases, Non-transferable ASAs must feature an application-specific burn method and a distinct way to differentiate themselves from regular ASAs.
## Specification
The key words “**MUST**”, “**MUST NOT**”, “**REQUIRED**”, “**SHALL**”, “**SHALL NOT**”, “**SHOULD**”, “**SHOULD NOT**”, “**RECOMMENDED**”, “**MAY**”, and “**OPTIONAL**” in this document are to be interpreted as described in [RFC-2119](https://www.ietf.org/rfc/rfc2119.txt).
* There are 2 NTA actor roles: **Issuer** and **Holder**.
* There are 3 NTA ASA states, **Issued** , **Held** and **Revoked**.
* **Claimed** and **Revoked** NTAs reside in the holder’s wallet after claim , forever!
* The ASA parameter decimal places **Must** be 0 (Fractional NFTs are not allowed)
* The ASA parameter total supply **Must** be 1 (true Non-fungible token).
Note : On Algorand in order to prioritize the end users and power the decentralization, the end call to hold any ASA is given to the user so unless the user is the creator (which needs token deletion) the user can close out the token back to creator even if the token is frozen. After much discussions and feedbacks and many great proposed solutions by experts on the field, in respect to Algorand design, this ARC embraces this convention and leaves the right even to detach Non-transferable ASA and close it back to creator. As a summary [ARC-71](/arc-standards/arc-0071)NTA respects the account holder’s right to close out the ASA back to creator address.
### ASA Parameters Conventions
The Issued state is the starting state of the ASA.The claimed state is when NTA is sent to destination wallet (claimed) and The Revoked state is the state where the NTA ASA is revoked by issuer after issuance and therefore no longer valid for any usecase except for provenance and historical data reference.
* NTAs with Revoked state are no longer valid and cannot be used as a proof of any credentials.
* Manager address is able to revoke the NTA ASA by setting the Manager address to `ZeroAddress`.
* Issuer **MUST** be an Algorand Smart Contract Account.
#### Issued Non-transferable ASA
* The Creator parameter, the ASA **MAY** be created by any addresses.
* The Clawback parameter **MUST** be the `ZeroAddress`.
* The Freeze parameter **MUST** be set to the Issuer Address.
* The Manager parameter **MAY** be set to any address but is **RECOMMENDED** to be the Issuer.
* The Reserve parameter **MUST** be set to either [ARC-19](/arc-standards/arc-0019) metadata or NTA Issuer’s address.
#### Held (claimed) Non-transferable ASA
* The Creator parameter, the ASA **MAY** be created by any addresses.
* The Clawback parameter **MUST** be the `ZeroAddress`.
* The Freeze parameter **MUST** be set to the `ZeroAddress`.
* The asset must be frozen for holder (claimer) account address.
* The Manager parameter **MAY** be set to any address but is **RECOMMENDED** to be the Issuer.
* The Reserve parameter **MUST** be set to either ARC-19 metadata or NTA Issuer’s address.
#### Revoked Non-transferable ASA
* The Manager parameter **MUST** be set to `ZeroAddress`.
## Rationale
### Non-transferable ASA NFT
Non-transferable ASA serves as a specialized subset of the existing ASAs. The advantage of such design is seamless compatibility of Non-transferable ASA with existing NFT services. Service providers can treat Non-transferable ASA NFTs like other ASAs and do not need to make drastic changes to their existing codebase.
### Revoking vs Burning
Rationale for Revocation Over Burning in Non-Transferable ASAs (NTAs):
The concept of Non-Transferable ASAs (NTAs) is rooted in permanence and attachment to the holder. Introducing a “burn” mechanism for NTAs fundamentally contradicts this concept because it involves removing the token from the holder’s wallet entirely. Burning suggests destruction and detachment, which is inherently incompatible with the idea of something being bound to the holder for life.
In contrast, a revocation mechanism aligns more closely with both the Non-Transferable philosophy and established W3C standards, particularly in the context of Verifiable Credentials (VCs). Revocation allows for NTAs to remain in the user’s wallet, maintaining provenance, historical data, and records of the token’s existence, while simultaneously marking the token as inactive or revoked by its issuer. This is achieved by setting the Manager address of the token to the ZeroAddress, effectively signaling that the token is no longer valid without removing it from the wallet.
For example, in cases where a Verifiable Credential (VC) issued as an NTA expires or needs to be invalidated (e.g., a driver’s license), revocation becomes an essential operation. The token can be revoked by the issuer without being deleted from the user’s wallet, preserving a clear record of its prior existence and revocation status. This is beneficial for provenance tracking and compliance, as historical records are crucial in many scenarios. Furthermore, the token can be used as a reference for re-issued or updated credentials without breaking its attachment to the holder.
This approach has clear benefits:
Provenance and Historical Data: Keeping the NTA in the wallet allows dApps and systems to track the history of revoked tokens, enabling insights into previous credentials or claims. Re-usability and Compatibility: NTAs with revocation fit well into W3C and DIF standards around re-usable DIDs (Decentralized Identifiers) and VCs, allowing credentials to evolve (e.g., switching from one issuer to another) without breaking the underlying identity or trust models. Immutable Attachment: The token does not leave the wallet, making it clear that the NTA is still part of the user’s identity, but with a revoked status. In contrast, burning would not allow for these records to be maintained, and would break the “bound” nature of the NTA by removing the token from the holder’s possession entirely, which defeats the core idea behind NTAs.
In summary, revocation offers a more interoperable alternative to burning for NTAs. It ensures that NTAs remain Non-Transferable while allowing for expiration, invalidation, or issuer changes, all while maintaining a record of the token’s lifecycle and status.
## Backwards Compatibility
[ARC-3](/arc-standards/arc-0003), [ARC-69](/arc-standards/arc-0069), [ARC-19](/arc-standards/arc-0019) ASAs can be converted into a NTA ASA, only if the manager address & freeze address are still available.
## Security Considerations
* Claiming/Receiving a NTA ASA will lock Algo forever until user decides to close it out back to creator address.
* For security critical implementations it is vital to take into account that according to Algorand design, the user has the right to close out the ASA back to creator address. This is certainly kept on chain transaction history and indexers.
## Copyright
Copyright and related rights waived via [CCO](https://creativecommons.org/publicdomain/zero/1.0/).
# Algorand Smart Contract NFT Specification
> Base specification for non-fungible tokens implemented as smart contracts.
## Abstract
This specifies an interface for non-fungible tokens (NFTs) to be implemented on Algorand as smart contracts. This interface defines a minimal interface for NFTs to be owned and traded, to be augmented by other standard interfaces and custom methods.
## Motivation
Currently most NFTs in the Algorand ecosystem are implemented as ASAs. However, to provide rich extra functionality, it can be desirable to implement NFTs as a smart contract instead. To foster an interoperable NFT ecosystem, it is necessary that the core interfaces for NFTs be standardized.
## Specification
The key words “**MUST**”, “**MUST NOT**”, “**REQUIRED**”, “**SHALL**”, “**SHALL NOT**”, “**SHOULD**”, “**SHOULD NOT**”, “**RECOMMENDED**”, “**MAY**”, and “**OPTIONAL**” in this document are to be interpreted as described in [RFC-2119](https://www.ietf.org/rfc/rfc2119.txt).
### Core NFT specification
A smart contract NFT that is compliant with this standard must implement the interface detection standard defined in [ARC-73](/arc-standards/arc-0073).
Additionally, the smart contract MUST implement the following interface:
```json
{
"name": "ARC-72",
"desc": "Smart Contract NFT Base Interface",
"methods": [
{
"name": "arc72_ownerOf",
"desc": "Returns the address of the current owner of the NFT with the given tokenId",
"readonly": true,
"args": [
{ "type": "uint256", "name": "tokenId", "desc": "The ID of the NFT" },
],
"returns": { "type": "address", "desc": "The current owner of the NFT." }
},
{
"name": "arc72_transferFrom",
"desc": "Transfers ownership of an NFT",
"readonly": false,
"args": [
{ "type": "address", "name": "from" },
{ "type": "address", "name": "to" },
{ "type": "uint256", "name": "tokenId" }
],
"returns": { "type": "void" }
},
],
"events": [
{
"name": "arc72_Transfer",
"desc": "Transfer ownership of an NFT",
"args": [
{
"type": "address",
"name": "from",
"desc": "The current owner of the NFT"
},
{
"type": "address",
"name": "to",
"desc": "The new owner of the NFT"
},
{
"type": "uint256",
"name": "tokenId",
"desc": "The ID of the transferred NFT"
}
]
}
]
}
```
Ownership of a token ID by the zero address indicates that ID is invalid. The `arc72_ownerOf` method MUST return the zero address for invalid token IDs. The `arc72_transferFrom` method MUST error when `from` is not the owner of `tokenId`. The `arc72_transferFrom` method MUST error unless called by the owner of `tokenId` or an approved operator as defined by an extension such as the transfer management extension defined in this ARC. The `arc72_transferFrom` method MUST emit a `arc72_Transfer` event a transfer is successful. A `arc72_Transfer` event SHOULD be emitted, with `from` being the zero address, when a token is first minted. A `arc72_Transfer` event SHOULD be emitted, with `to` being the zero address, when a token is destroyed.
All methods in this and other interfaces defined throughout this standard that are marked as `readonly` MUST be read-only as defined by [ARC-22](/arc-standards/arc-0022).
The ARC-73 interface selector for this core interface is `0x53f02a40`.
### Metadata Extension
A smart contract NFT that is compliant with this metadata extension MUST implement the interfaces required to comply with the Core NFT Specification, as well as the following interface:
```json
{
"name": "ARC-72 Metadata Extension",
"desc": "Smart Contract NFT Metadata Interface",
"methods": [
{
"name": "arc72_tokenURI",
"desc": "Returns a URI pointing to the NFT metadata",
"readonly": true,
"args": [
{ "type": "uint256", "name": "tokenId", "desc": "The ID of the NFT" },
],
"returns": { "type": "byte[256]", "desc": "URI to token metadata." }
}
],
}
```
URIs shorter than the return length MUST be padded with zero bytes at the end of the URI. The token URI returned SHOULD be an `ipfs://...` URI so the metadata can’t expire or be changed by a lapse or takeover of a DNS registration. The token URI SHOULD NOT be an `http://` URI due to security concerns. The URI SHOULD resolve to a JSON file following :
* the JSON Metadata File Schema defined in [ARC-3](/arc-standards/arc-0003).
* the standard for declaring traits defined in [ARC-16](/arc-standards/arc-0016).
Future standards could define new recommended URI or file formats for metadata.
The ARC-73 interface selector for this metadata extension interface is `0xc3c1fc00`.
### Transfer Management Extension
A smart contract NFT that is compliant with this transfer management extension MUST implement the interfaces required to comply with the Core NFT Specification, as well as the following interface:
```json
{
"name": "ARC-72 Transfer Management Extension",
"desc": "Smart Contract NFT Transfer Management Interface",
"methods": [
{
"name": "arc72_approve",
"desc": "Approve a controller for a single NFT",
"readonly": false,
"args": [
{ "type": "address", "name": "approved", "desc": "Approved controller address" },
{ "type": "uint256", "name": "tokenId", "desc": "The ID of the NFT" },
],
"returns": { "type": "void" }
},
{
"name": "arc72_setApprovalForAll",
"desc": "Approve an operator for all NFTs for a user",
"readonly": false,
"args": [
{ "type": "address", "name": "operator", "desc": "Approved operator address" },
{ "type": "bool", "name": "approved", "desc": "true to give approval, false to revoke" },
],
"returns": { "type": "void" }
},
{
"name": "arc72_getApproved",
"desc": "Get the current approved address for a single NFT",
"readonly": true,
"args": [
{ "type": "uint256", "name": "tokenId", "desc": "The ID of the NFT" },
],
"returns": { "type": "address", "desc": "address of approved user or zero" }
},
{
"name": "arc72_isApprovedForAll",
"desc": "Query if an address is an authorized operator for another address",
"readonly": true,
"args": [
{ "type": "address", "name": "owner" },
{ "type": "address", "name": "operator" },
],
"returns": { "type": "bool", "desc": "whether operator is authorized for all NFTs of owner" }
},
],
"events": [
{
"name": "arc72_Approval",
"desc": "An address has been approved to transfer ownership of the NFT",
"args": [
{
"type": "address",
"name": "owner",
"desc": "The current owner of the NFT"
},
{
"type": "address",
"name": "approved",
"desc": "The approved user for the NFT"
},
{
"type": "uint256",
"name": "tokenId",
"desc": "The ID of the NFT"
}
]
},
{
"name": "arc72_ApprovalForAll",
"desc": "Operator set or unset for all NFTs defined by this contract for an owner",
"args": [
{
"type": "address",
"name": "owner",
"desc": "The current owner of the NFT"
},
{
"type": "address",
"name": "operator",
"desc": "The approved user for the NFT"
},
{
"type": "bool",
"name": "approved",
"desc": "Whether operator is authorized for all NFTs of owner "
}
]
},
]
}
```
The `arc72_Approval` event MUST be emitted when the `arc72_approve` method is called successfully. The zero address for the `arc72_approve` method and the `arc72_Approval` event indicate no approval, including revocation of previous single NFT controller. When a `arc72_Transfer` event emits, this also indicates that the approved address for that NFT (if any) is reset to none. The `arc72_ApprovalForAll` event MUST be emitted when the `arc72_setApprovalForAll` method is called successfully. The contract MUST allow multiple operators per owner. The `arc72_transferFrom` method, when its `nftId` argument is owned by its `from` argument, MUST succeed for when called by an address that is approved for the given NFT or approved as operator for the owner.
The ARC-73 interface selector for this transfer management extension interface is `0xb9c6f696`.
### Enumeration Extension
A smart contract NFT that is compliant with this enumeration extension MUST implement the interfaces required to comply with the Core NFT Specification, as well as the following interface:
```json
{
"name": "ARC-72 Enumeration Extension",
"desc": "Smart Contract NFT Enumeration Interface",
"methods": [
{
"name": "arc72_balanceOf",
"desc": "Returns the number of NFTs owned by an address",
"readonly": true,
"args": [
{ "type": "address", "name": "owner" },
],
"returns": { "type": "uint256" }
},
{
"name": "arc72_totalSupply",
"desc": "Returns the number of NFTs currently defined by this contract",
"readonly": true,
"args": [],
"returns": { "type": "uint256" }
},
{
"name": "arc72_tokenByIndex",
"desc": "Returns the token ID of the token with the given index among all NFTs defined by the contract",
"readonly": true,
"args": [
{ "type": "uint256", "name": "index" },
],
"returns": { "type": "uint256" }
},
],
}
```
The sort order for NFT indices is not specified. The `arc72_tokenByIndex` method MUST error when `index` is greater than `arc72_totalSupply`.
The ARC-73 interface selector for this enumeration extension interface is `0xa57d4679`.
## Rationale
This specification is based on [ERC-721](https://eips.ethereum.org/EIPS/eip-721), with some differences.
### Core Specification
The core specification differs from ERC-721 by:
* removing `safeTransferFrom`, since there is not a test for whether an address on Algorand corresponds to a smart contract
* moving management functionality out of the base specification into an extension
* moving balance query functionality out of the base specification into the enumeration extension
Moving functionality out of the core specification into extensions allows the base specification to be much simpler, and allows extensions for extra capabilities to evolve separately from the core idea of owning and transferring ownership of non-fungible tokens. It is recommended that NFT contract authors make use of extensions to enrich the capabilities of their NFTs.
### Metadata Extension
The metadata extension differns from the ERC-721 metadata extension by using a fixed-length URI return and removing the `symbol` and `name` operations. Metadata such as symbol or name can be included in the metadata pointed to by the URI.
### Transfer Management Extension
The transfer management extension is taken from the set of methods and events from the base ERC-721 specification that deal with approving other addresses to transfer ownership of an NFT. This functionality is important for trusted NFT galleries like OpenSea to list and sell NFTs on behalf of users while allowing the owner to maintain on-chain ownership. However, this set of functionality is the bulk of the complexity of the ERC-721 standard, and moving it into an extension vastly simplifies the core NFT specification. Additionally, other interfaces have been proposed to allow for the sale of NFTs in decentralized manners without needing to give transfer control to a trusted third party.
### Enumeration Extension
The enumeration extension is taken from the ERC-721 enumeration extension. However, it also includes the `arc72_balanceOf` function that is included in the base ERC-721 specification. This change simplifies the core standard and groups the `arc72_balanceOf` function with related functionality for contracts where supply details are desired.
## Backwards Compatibility
This standard introduces a new kind of NFT that is incompatible with NFTs defined as ASAs. Applications that want to index, manage, or view NFTs on Algorand will need to handle these new smart NFTs as well as the already popular ASA implementation of NFTs will need to add code to handle both, and existing smart contracts that handle ASA-based NFTs will not work with these new smart contract NFTs.
While this is a severe backwards incompatibility, smart contract NFTs are necessary to provide richer and more diverse functionality for NFTs.
## Security Considerations
The fact that anybody can create a new implementation of a smart contract NFT standard opens the door for many of those implementations to contain security bugs. Additionally, malicious NFT implementations could contain hidden anti-features unexpected by users. As with other smart contract domains, it is difficult for users to verify or understand security properties of smart contract NFTs. This is a tradeoff compared with ASA NFTs, which share a smaller set of security properties that are easier to validate, to gain the possibility of adding novel features.
## Copyright
Copyright and related rights waived via [CCO](https://creativecommons.org/publicdomain/zero/1.0/).
# Algorand Interface Detection Spec
> A specification for smart contracts and indexers to detect interfaces of smart contracts.
## Abstract
This ARC specifies an interface detection interface based on [ERC-165](https://eips.ethereum.org/EIPS/eip-165). This interface allows smart contracts and indexers to detect whether a smart contract implements a particular interface based on an interface selector.
## Motivation
[ARC-4](/arc-standards/arc-0004) applications have associated Contract or Interface description JSON objects that allow users to call their methods. However, these JSON objects are communicated outside of the consensus network. Therefore indexers can not reliably identify contract instances of a particular interface, and smart contracts have no way to detect whether another contract supports a particular interface. An on-chain method to detect interfaces allows greater composability for smart contracts, and allows indexers to automatically detect implementations of interfaces of interest.
## Specification
The key words “**MUST**”, “**MUST NOT**”, “**REQUIRED**”, “**SHALL**”, “**SHALL NOT**”, “**SHOULD**”, “**SHOULD NOT**”, “**RECOMMENDED**”, “**MAY**”, and “**OPTIONAL**” in this document are to be interpreted as described in [RFC-2119](https://www.ietf.org/rfc/rfc2119.txt).
### How Interfaces are Identified
The specification for interfaces is defined by [ARC-4](/arc-standards/arc-0004). This specification extends ARC-4 to define the concept of an interface selector. We define the interface selector as the XOR of all selectors in the interface. Selectors in the interface include selectors for methods, selectors for events as defined by [ARC-28](/arc-standards/arc-0028), and selectors for potential future kinds of interface components.
As an example, consider an interface that has two methods and one event, `add(uint64,uint64)uint128`, `add3(uint64,uint64,uint64)uint128`, and `alert(uint64)`. The method selector for the `add` method is the first 4 bytes of the method signature’s SHA-512/256 hash. The SHA-512/256 hash of `add(uint64,uint64)uint128` is `0x8aa3b61f0f1965c3a1cbfa91d46b24e54c67270184ff89dc114e877b1753254a`, so its method selector is `0x8aa3b61f`. The SHA-512/256 hash of `add3(uint64,uint64,uint64)uint128` is `0xa6fd1477731701dd2126f24facf3492d470cf526e7d4d849fea33d102b45f03d`, so its method selector is `0xa6fd1477` The SHA-512/256 hash of `alert(uint64)` is `0xc809efe9fd45417226d52b605658b83fff27850a01efeea30f694d1e112d5463`, so its method selector is `0xc809efe9` The interface selector is defined as the bitwise exclusive or of all method and event selectors, so the interface selector is `0x8aa3b61f XOR 0xa6fd1477 XOR 0xc809efe9`, which is `0xe4574d81`.
### How a Contract will Publish the Interfaces it Implements for Detection
In addition to out-of-band JSON contract or interface description data, a contract that is compliant with this specification shall implement the following interface:
```json
{
"name": "ARC-73",
"desc": "Interface for interface detection",
"methods": [
{
"name": "supportsInterface",
"desc": "Detects support for an interface specified by selector.",
"readonly": true,
"args": [
{ "type": "byte[4]", "name": "interfaceID", "desc": "The selector of the interface to detect." },
],
"returns": { "type": "bool", "desc": "Whether the contract supports the interface." }
}
]
}
```
The `supportsInterface` method must be `readonly` as specified by [ARC-22](/arc-standards/arc-0022).
The implementing contract must have a `supportsInterface` method that returns:
* `true` when `interfaceID` is `0x4e22a3ba` (the selector for [ARC-73](/arc-standards/arc-0073), this interface)
* `false` when `interfaceID` is `0xffffffff`
* `true` for any other `interfaceID` the contract implements
* `false` for any other `interfaceID`
## Rationale
This specification is nearly identical to the related specification for Ethereum, [ERC-165](https://eips.ethereum.org/EIPS/eip-165), merely adapted to Algorand.
## Security Considerations
It is possible that a malicious contract may lie about interface support. This interface makes it easier for all kinds of actors, inclulding malicious ones, to interact with smart contracts that implement it.
## Copyright
Copyright and related rights waived via [CCO](https://creativecommons.org/publicdomain/zero/1.0/).
# NFT Indexer API
> REST API for reading data about Application's NFTs.
## Abstract
This specifies a REST interface that can be implemented by indexing services to provide data about NFTs conforming to the [ARC-72](/arc-standards/arc-0072) standard.
## Motivation
While most data is available on-chain, reading and analyzing on-chain logs to get a complete and current picture about NFT ownership and history is slow and impractical for many uses. This REST interface standard allows analysis of NFT contracts to be done in a centralized manner to provide fast, up-to-date responses to queries, while allowing users to pick from any indexing provider.
## Specification
This specification defines two REST endpoints: `/nft-index/v1/tokens` and `/nft-index/v1/transfers`. Both endpoints respond only to `GET` requests, take no path parameters, and consume no input. But both accept a variety of query parameters.
### `GET /nft-indexer/v1/tokens`
Produces `application/json`.
Optional Query Parameters:
| Name | Schema | Description |
| -------------- | ------- | ------------------------------------------------------------------------------------------------------------------------ |
| round | integer | Include results for the specified round. For performance reasons, this parameter may be disabled on some configurations. |
| next | string | Token for the next page of results. Use the `next-token` provided by the previous page of results. |
| limit | integer | Maximum number of results to return. There could be additional pages even if the limit is not reached. |
| contractId | integer | Limit results to NFTs implemented by the given contract ID. |
| tokenId | integer | Limit results to NFTs with the given token ID. |
| owner | address | Limit results to NFTs owned by the given owner. |
| mint-min-round | integer | Limit results to NFTs minted on or after the given round. |
| mint-max-round | integer | Limit results to NFTs minted on or before the given round. |
When successful, returns a response with code 200 and an object with the schema:
| Name | Required? | Schema | Description |
| ------------- | --------- | ------- | -------------------------------------------------------------------------------------------- |
| tokens | required | array | Array of Token objects that fit the query parameters, as defined below. |
| current-round | required | integer | Round at which the results were computed. |
| next-token | optional | string | Used for pagination, when making another request provide this token as the `next` parameter. |
The `Token` object has the following schema:
| Name | Required? | Schema | Description |
| ----------- | --------- | ------- | -------------------------------------------------------------------------------------------------------------------------- |
| owner | required | address | The current owner of the NFT. |
| contractId | required | integer | The ID of the ARC-72 contract that defines the NFT. |
| tokenId | required | integer | The tokenID of the NFT, which along with the contractId addresses a unique ARC-72 token. |
| mint-round | optional | integer | The round at which the NFT was minted (IE the round at which it was transferred from the zero address to the first owner). |
| metadataURI | optional | string | The URI given for the token by the `metadataURI` API of the contract, if applicable. |
| metadata | optional | object | The result of resolving the `metadataURI`, if applicable and available. |
When unsuccessful, returns a response with code 400 or 500 and an object with the schema:
| Name | Required? | Schema |
| ------- | --------- | ------ |
| data | optional | object |
| message | required | string |
### `GET /nft-indexer/v1/transfers`
Produces `application/json`.
Optional Query Parameters:
| Name | Schema | Description |
| ---------- | ------- | ------------------------------------------------------------------------------------------------------------------------ |
| round | integer | Include results for the specified round. For performance reasons, this parameter may be disabled on some configurations. |
| next | string | Token for the next page of results. Use the `next-token` provided by the previous page of results. |
| limit | integer | Maximum number of results to return. There could be additional pages even if the limit is not reached. |
| contractId | integer | Limit results to NFTs implemented by the given contract ID. |
| tokenId | integer | Limit results to NFTs with the given token ID. |
| user | address | Limit results to transfers where the user is either the sender or receiver. |
| from | address | Limit results to transfers with the given address as the sender. |
| to | address | Limit results to transfers with the given address as the receiver. |
| min-round | integer | Limit results to transfers that were executed on or after the given round. |
| max-round | integer | Limit results to transfers that were executed on or before the given round. |
When successful, returns a response with code 200 and an object with the schema:
| Name | Required? | Schema | Description |
| ------------- | --------- | ------- | -------------------------------------------------------------------------------------------- |
| transfers | required | array | Array of Transfer objects that fit the query parameters, as defined below. |
| current-round | required | integer | Round at which the results were computed. |
| next-token | optional | string | Used for pagination, when making another request provide this token as the `next` parameter. |
The `Transfer` object has the following schema:
| Name | Required? | Schema | Description |
| ---------- | --------- | ------- | ---------------------------------------------------------------------------------------- |
| contractId | required | integer | The ID of the ARC-72 contract that defines the NFT. |
| tokenId | required | integer | The tokenID of the NFT, which along with the contractId addresses a unique ARC-72 token. |
| from | required | address | The sender of the transaction. |
| to | required | address | The receiver of the transaction. |
| round | required | integer | The round of the transfer. |
When unsuccessful, returns a response with code 400 or 500 and an object with the schema:
| Name | Required? | Schema |
| ------- | --------- | ------ |
| data | optional | object |
| message | required | string |
## Rationale
This standard was designed to feel similar to the Algorand indexer API, and uses the same query parameters and results where applicable.
## Backwards Compatibility
This standard presents a versioned REST interface, allowing future extensions to change the interface in incompatible ways while allowing for the old service to run in tandem.
## Security Considerations
All data available through this indexer API is publicly available.
## Copyright
Copyright and related rights waived via [CCO](https://creativecommons.org/publicdomain/zero/1.0/).
# Password Account
> Password account using PBKDF2
## Abstract
This standard specifies a computation for seed bytes for Password Account. For general adoption it is better for people to remember passphrase than mnemonic. With this standard person can hash the passphrase and receive the seed bytes for X25529 algorand account.
## Motivation
By providing a clear and precise computation process, Password Account empowers individuals to effortlessly obtain their seed bytes for algorand account. In the realm of practicality and widespread adoption, the standard highlights the immense advantages of utilizing a passphrase rather than a mnemonic. Remembering a passphrase becomes the key to unlocking a world of possibilities. With this groundbreaking standard, individuals can take control of their X25529 Algorand account by simply hashing their passphrase and effortlessly receiving the corresponding seed bytes. It’s time to embrace this new era of accessibility and security, empowering yourself to reach new heights in the world of Password Accounts. Let this standard serve as your guiding light, motivating community to embark on a journey of limitless possibilities and unparalleled success.
This standard seek the synchronization between wallets which may provide password protected accounts.
## Specification
Seed bytes generation is calculated with algorithm:
```plaintext
const init = `ARC-0076-${password}-{slotId}-PBKDF2-999999`;
const salt = `ARC-0076-{slotId}-PBKDF2-999999`;
const iterations = 999999;
const cryptoKey = await window.crypto.subtle.importKey(
"raw",
Buffer.from(init, "utf-8"),
"PBKDF2",
false,
["deriveBits", "deriveKey"]
);
const masterBits = await window.crypto.subtle.deriveBits(
{
name: "PBKDF2",
hash: "SHA-256",
salt: Buffer.from(salt, "utf-8"),
iterations: iterations,
},
cryptoKey,
256
);
const uint8 = new Uint8Array(masterBits);
const mnemonic = algosdk.mnemonicFromSeed(uint8);
const genAccount = algosdk.mnemonicToSecretKey(mnemonic);
```
Length of the data section SHOULD be at least 16 bytes long.
Slot ID is account iteration. Default is “0”.
### Email Password account
Email Password account is account generated from the original data
```plaintext
const init = `ARC-0076-${email}-${password}-{slotId}-PBKDF2-999999`;
const salt = `ARC-0076-${email}-{slotId}-PBKDF2-999999`;
```
The email part can be published to the service provider backend and verified by the service provider. Password MUST NOT be transferred over the network.
Length of the password SHOULD be at least 16 bytes long.
### Sample data
This sample data may be used for verification of the `ARC-0076` implementation.
```plaintext
const email = "email@example.com";
const password = "12345678901234567890123456789012345678901234567890";
const slotId = "0";
const init = `ARC-0076-${email}-${password}-{slotId}-PBKDF2-999999`;
const salt = `ARC-0076-${email}-{slotId}-PBKDF2-999999`;
```
Results in:
```plaintext
masterBits = [225,7,139,154,245,210,181,138,188,129,145,53,246,184,243,88,163,163,109,208,77,71,7,235,81,244,129,215,102,168,105,21]
account.addr = "5AHWQJ5D52K4GRW4JWQ5GMR53F7PDSJEGT4PXVFSBQYE7VXDVG3WSPWSBM"
```
## Rationale
This standard was designed to allow the wallets to provide password protected accounts which does not require general population to store the mnemonic. Email extension allows service providers to bind specific account with the email address, and user experience to feel the basic authentication form with email and password they are already used to from web2 usecases.
## Backwards Compatibility
We expect future extensions to be compatible with Password account. The hash mechanism for the future algorighms should be suffixed such as `-PBKDF2-999999`.
## Security Considerations
This standard moves the security of strength of the account to how user generates the password.
This standard relies on randomness and collision resistance of PBKDF2 and ‘SHA-256’. User MUST be informed about the risks associated with this type of account.
## Copyright
Copyright and related rights waived via [CCO](https://creativecommons.org/publicdomain/zero/1.0/).
# URI scheme, keyreg Transactions extension
> A specification for encoding Key Registration Transactions in a URI format.
## Abstract
This URI specification represents an extension to the base Algorand URI encoding standard ([ARC-26](/arc-standards/arc-0026)) that specifies encoding of key registration transactions through deeplinks, QR codes, etc.
## Specification
### General format
As in [ARC-26](/arc-standards/arc-0026), URIs follow the general format for URIs as set forth in [RFC 3986](https://www.rfc-editor.org/rfc/rfc3986). The path component consists of an Algorand address, and the query component provides additional transaction parameters.
Elements of the query component may contain characters outside the valid range. These are encoded differently depending on their expected character set. The text components (note, xnote) must first be encoded according to UTF-8, and then each octet of the corresponding UTF-8 sequence must be percent-encoded as described in RFC 3986. The binary components (votekey, selkey, etc.) must be encoded with base64url as specified in [RFC 4648 section 5](https://www.rfc-editor.org/rfc/rfc4648.html#section-5).
### Scope
This ARC explicitly supports the two major subtypes of key registration transactions:
* Online keyreg transcation
* Declares intent to participate in consensus and configures required keys
* Offline keyreg transaction
* Declares intent to stop participating in consensus
The following variants of keyreg transactions are not defined:
* Non-participating keyreg transcation
* This transaction subtype is considered deprecated
* Heartbeat keyreg transaction
* This transaction subtype will be included in the future block incentives protocol. The protocol specifies that this transaction type must be submitted by a node in response to a programmatic “liveness challenge”. It is not meant to be signed or submitted by an end user.
### ABNF Grammar
```plaintext
algorandurn = "algorand://" algorandaddress [ "?" keyregparams ]
algorandaddress = *base32
keyregparams = keyregparam [ "&" keyregparams ]
keyregparam = [ typeparam / votekeyparam / selkeyparam / sprfkeyparam / votefstparam / votelstparam / votekdparam / noteparam / feeparam / otherparam ]
typeparam = "type=keyreg"
votekeyparam = "votekey=" *qbase64url
selkeyparam = "selkey=" *qbase64url
sprfkeyparam = "sprfkey=" *qbase64url
votefstparam = "votefst=" *qdigit
votelstparam = "votelst=" *qdigit
votekdparam = "votekdkey=" *qdigit
noteparam = (xnote | note)
xnote = "xnote=" *qchar
note = "note=" *qchar
fee = "fee=" *qdigit
otherparam = qchar *qchar [ "=" *qchar ]
```
* “qbase64url” corresponds to valid characters of “base64url” encoding, as defined in [RFC 4648 section 5](https://www.rfc-editor.org/rfc/rfc4648.html#section-5)
* “qchar” corresponds to valid characters of an RFC 3986 URI query component, excluding the ”=” and ”&” characters, which this specification takes as separators.
As in the base [ARC-26](/arc-standards/arc-0026) standard, the scheme component (“algorand:”) is case-insensitive, and implementations must accept any combination of uppercase and lowercase letters. The rest of the URI is case-sensitive, including the query parameter keys.
### Query Keys
* address: Algorand address of transaction sender. Required.
* type: fixed to “keyreg”. Used to disambiguate the transaction type from the base [ARC-26](/arc-standards/arc-0026) standard and other possible extensions. Required.
* votekeyparam: The vote key parameter to use in the transaction. Encoded with [base64url](https://www.rfc-editor.org/rfc/rfc4648.html#section-5) encoding. Required for keyreg online transactions.
* selkeyparam: The selection key parameter to use in the transaction. Encoded with [base64url](https://www.rfc-editor.org/rfc/rfc4648.html#section-5) encoding. Required for keyreg online transactions.
* sprfkeyparam: The state proof key parameter to use in the transaction. Encoded with [base64url](https://www.rfc-editor.org/rfc/rfc4648.html#section-5) encoding. Required for keyreg online transactions.
* votefstparam: The first round on which the voting keys will valid. Required for keyreg online transactions.
* votelstparam: The last round on which the voting keys will be valid. Required for keyreg online transactions.
* votekdparam: The key dilution key parameter to use. Required for keyreg online transactions.
* xnote: As in [ARC-26](/arc-standards/arc-0026). A URL-encoded notes field value that must not be modifiable by the user when displayed to users. Optional.
* note: As in [ARC-26](/arc-standards/arc-0026). A URL-encoded default notes field value that the the user interface may optionally make editable by the user. Optional.
* fee: Optional. A static fee to set for the transaction in microAlgos. Useful to signal intent to receive participation incentives (e.g. with a 2,000,000 microAlgo transaction fee.) Optional.
* (others): optional, for future extensions
### Appendix
This section contains encoding examples. The raw transaction object is presented along with the resulting [ARC-78](/arc-standards/arc-0078) URI encoding.
#### Encoding keyreg online transactioon with minimum fee
The following raw keyreg transaction:
```plaintext
{
"txn": {
"fee": 1000,
"fv": 1345,
"gh:b64": "kUt08LxeVAAGHnh4JoAoAMM9ql/hBwSoiFtlnKNeOxA=",
"lv": 2345,
"selkey:b64": "+lfw+Y04lTnllJfncgMjXuAePe8i8YyVeoR9c1Xi78c=",
"snd:b64": "+gJAXOr2rkSCdPQ5DEBDLjn+iIptzLxB3oSMJdWMVyQ=",
"sprfkey:b64": "3NoXc2sEWlvQZ7XIrwVJjgjM30ndhvwGgcqwKugk1u5W/iy/JITXrykuy0hUvAxbVv0njOgBPtGFsFif3yLJpg==",
"type": "keyreg",
"votefst": 1300,
"votekd": 100,
"votekey:b64": "UU8zLMrFVfZPnzbnL6ThAArXFsznV3TvFVAun2ONcEI=",
"votelst": 11300
}
}
```
Will result in this ARC-78 encoded URI:
```plaintext
algorand://7IBEAXHK62XEJATU6Q4QYQCDFY475CEKNXGLYQO6QSGCLVMMK4SLVTYLMY?
type=keyreg
&selkey=-lfw-Y04lTnllJfncgMjXuAePe8i8YyVeoR9c1Xi78c
&sprfkey=3NoXc2sEWlvQZ7XIrwVJjgjM30ndhvwGgcqwKugk1u5W_iy_JITXrykuy0hUvAxbVv0njOgBPtGFsFif3yLJpg
&votefst=1300
&votekd=100
&votekey=UU8zLMrFVfZPnzbnL6ThAArXFsznV3TvFVAun2ONcEI
&votelst=11300
```
Note: newlines added for readability.
Note the difference between base64 encoding in the raw object and base64url encoding in the URI parameters. For example, the selection key parameter `selkey` that begins with `+lfw+` in the raw object is encoded in base64url to `-lfw-`.
Note: Here, the fee is omitted from the URI (due to being set to the minimum 1,000 microAlgos.) When the fee is omitted, it is left up to the application or wallet to decide. This is for demonstrative purposes - the ARC-78 standard does not require this behavior.
#### Encoding keyreg offline transactioon
The following raw keyreg transaction:
```plaintext
{
"txn": {
"fee": 1000,
"fv": 1776240,
"gh:b64": "kUt08LxeVAAGHnh4JoAoAMM9ql/hBwSoiFtlnKNeOxA=",
"lv": 1777240,
"snd:b64": "+gJAXOr2rkSCdPQ5DEBDLjn+iIptzLxB3oSMJdWMVyQ=",
"type": "keyreg"
}
}
```
Will result in this ARC-78 encoded URI:
```plaintext
algorand://7IBEAXHK62XEJATU6Q4QYQCDFY475CEKNXGLYQO6QSGCLVMMK4SLVTYLMY?type=keyreg
```
This offline keyreg transaction encoding is the smallest compatible ARC-78 representation.
#### Encoding keyreg online transactioon with custom fee and note
The following raw keyreg transaction:
```plaintext
{
"txn": {
"fee": 2000000,
"fv": 1345,
"gh:b64": "kUt08LxeVAAGHnh4JoAoAMM9ql/hBwSoiFtlnKNeOxA=",
"lv": 2345,
"note:b64": "Q29uc2Vuc3VzIHBhcnRpY2lwYXRpb24gZnR3",
"selkey:b64": "+lfw+Y04lTnllJfncgMjXuAePe8i8YyVeoR9c1Xi78c=",
"snd:b64": "+gJAXOr2rkSCdPQ5DEBDLjn+iIptzLxB3oSMJdWMVyQ=",
"sprfkey:b64": "3NoXc2sEWlvQZ7XIrwVJjgjM30ndhvwGgcqwKugk1u5W/iy/JITXrykuy0hUvAxbVv0njOgBPtGFsFif3yLJpg==",
"type": "keyreg",
"votefst": 1300,
"votekd": 100,
"votekey:b64": "UU8zLMrFVfZPnzbnL6ThAArXFsznV3TvFVAun2ONcEI=",
"votelst": 11300
}
}
```
Will result in this ARC-78 encoded URI:
```plaintext
algorand://7IBEAXHK62XEJATU6Q4QYQCDFY475CEKNXGLYQO6QSGCLVMMK4SLVTYLMY?
type=keyreg
&selkey=-lfw-Y04lTnllJfncgMjXuAePe8i8YyVeoR9c1Xi78c
&sprfkey=3NoXc2sEWlvQZ7XIrwVJjgjM30ndhvwGgcqwKugk1u5W_iy_JITXrykuy0hUvAxbVv0njOgBPtGFsFif3yLJpg
&votefst=1300
&votekd=100
&votekey=UU8zLMrFVfZPnzbnL6ThAArXFsznV3TvFVAun2ONcEI
&votelst=11300
&fee=2000000
¬e=Consensus%2Bparticipation%2Bftw
```
Note: newlines added for readability.
## Rationale
The present aims to provide a standardized way to encode key registration transactions in order to enhance the user experience of signing key registration transactions in general, and in particular in the use case of an Algorand node runner that does not have their spending keys resident on their node (as is best practice.)
The parameter names were chosen to match the corresponding names in encoded key registration transactions.
## Security Considerations
None.
## Copyright
Copyright and related rights waived via [CCO](https://creativecommons.org/publicdomain/zero/1.0/).
# URI scheme, App NoOp call extension
> A specification for encoding NoOp Application call Transactions in a URI format.
## Abstract
NoOp calls are Generic application calls to execute the Algorand smart contract ApprovalPrograms.
This URI specification proposes an extension to the base Algorand URI encoding standard ([ARC-26](/arc-standards/arc-0026)) that specifies encoding of application NoOp transactions into [RFC 3986](https://www.rfc-editor.org/rfc/rfc3986) standard URIs.
## Specification
### General format
As in [ARC-26](/arc-standards/arc-0026), URIs follow the general format for URIs as set forth in [RFC 3986](https://www.rfc-editor.org/rfc/rfc3986). The path component consists of an Algorand address, and the query component provides additional transaction parameters.
Elements of the query component may contain characters outside the valid range. These are encoded differently depending on their expected character set. The text components (note, xnote) must first be encoded according to UTF-8, and then each octet of the corresponding UTF-8 sequence **MUST** be percent-encoded as described in RFC 3986. The binary components (args, refs, etc.) **MUST** be encoded with base64url as specified in [RFC 4648 section 5](https://www.rfc-editor.org/rfc/rfc4648.html#section-5).
### ABNF Grammar
```plaintext
algorandurn = "algorand://" algorandaddress [ "?" noopparams ]
algorandaddress = *base32
noopparams = noopparam [ "&" noopparams ]
noopparam = [ typeparam / appparam / methodparam / argparam / boxparam / assetarrayparam / accountarrayparam / apparrayparam / feeparam / otherparam ]
typeparam = "type=appl"
appparam = "app=" *digit
methodparam = "method=" *qchar
boxparam = "box=" *qbase64url
argparam = "arg=" (*qchar | *digit)
feeparam = "fee=" *digit
accountparam = "account=" *base32
assetparam = "asset=" *digit
otherparam = qchar *qchar [ "=" *qchar ]
```
* “qchar” corresponds to valid characters of an RFC 3986 URI query component, excluding the ”=” and ”&” characters, which this specification takes as separators.
* “qbase64url” corresponds to valid characters of “base64url” encoding, as defined in [RFC 4648 section 5](https://www.rfc-editor.org/rfc/rfc4648.html#section-5)
* All params from the base [ARC-26](/arc-standards/arc-0026) standard, are supported and usable if fit the NoOp application call context (e.g. note)
* As in the base [ARC-26](/arc-standards/arc-0026) standard, the scheme component (“algorand:”) is case-insensitive, and implementations **MUST** accept any combination of uppercase and lowercase letters. The rest of the URI is case-sensitive, including the query parameter keys.
### Query Keys
* address: Algorand address of transaction sender
* type: fixed to “appl”. Used to disambiguate the transaction type from the base [ARC-26](/arc-standards/arc-0026) standard and other possible extensions
* app: The first reference is set to specify the called application (Algorand Smart Contract) ID and is mandatory. Additional references are optional and will be used in the Application NoOp call’s foreign applications array.
* method: Specify the full method expression (e.g “example\_method(uint64,uint64)void”).
* arg: specify args used for calling NoOp method, to be encoded within URI.
* box: Box references to be used in Application NoOp method call box array.
* asset: Asset reference to be used in Application NoOp method call foreign assets array.
* account: Account or nfd address to be used in Application NoOp method call foreign accounts array.
* fee: Optional. An optional static fee to set for the transaction in microAlgos.
* (others): optional, for future extensions
Note 1: If the fee is omitted , it means that Minimum Fee is preferred to be used for transaction.
### Template URI vs actionable URI
If the URI is constructed so that other dApps, wallets or protocols could use it with their runtime Algorand entities of interest, then :
* The placeholder account/app address in URI **MUST** be ZeroAddress (“AAAAAAAAAAAAAAAAAAAAAAAAAAAAAAAAAAAAAAAAAAAAAAAAY5HFKQ”). Since ZeroAddress cannot initiate any action this approach is considered non-vulnerable and secure.
### Example
Call claim(uint64,uint64)byte\[] method on contract 11111111 paying a fee of 10000 micro ALGO from an specific address
```plaintext
algorand://TMTAD6N22HCS2LKH7677L2KFLT3PAQWY6M4JFQFXQS32ECBFC23F57RYX4?type=appl&app=11111111&method=claim(uint64,uint64)byte[]&arg=20000&arg=474567&asset=45&fee=10000
```
Call the same claim(uint64,uint64)byte\[] method on contract 11111111 paying a default 1000 micro algo fee
```plaintext
algorand://TMTAD6N22HCS2LKH7677L2KFLT3PAQWY6M4JFQFXQS32ECBFC23F57RYX4?type=appl&app=11111111&method=claim(uint64,uint64)byte[]&arg=20000&arg=474567&asset=45&app=22222222&app=33333333
```
## Rationale
Algorand application NoOp method calls cover the majority of application transactions in Algorand and have a wide range of use-cases. For use-cases where the runtime knows exactly what the called application needs in terms of arguments and transaction arrays and there are no direct interactions, this extension will be required since ARC-26 standard does not currently support application calls.
## Security Considerations
None.
## Copyright
Copyright and related rights waived via [CCO](https://creativecommons.org/publicdomain/zero/1.0/).
# URI scheme blockchain information
> Querying blockchain information using a URI format
## Abstract
This URI specification defines a standardized method for querying application and asset data on Algorand. It enables applications, websites, and QR code implementations to construct URIs that allow users to retrieve data such as application state and asset metadata in a structured format. This specification is inspired by [ARC-26](/arc-standards/arc-0026) and follows similar principles, with adjustments specific to read-only queries for applications and assets.
## Specification
### General Format
Algorand URIs in this standard follow the general format for URIs as defined in [RFC 3986](https://www.rfc-editor.org/rfc/rfc3986). The scheme component specifies whether the URI is querying an application (`algorand://app`) or an asset (`algorand://asset`). Query parameters define the specific data fields being requested. Parameters may contain characters outside the valid range. These must first be encoded in UTF-8, then percent-encoded according to RFC 3986.
### Application Query URI (`algorand://app`)
The application URI allows querying the state of an application, including data from the application’s box storage, global storage, and local storage. And the teal program associated. Each storage type has specific requirements.
### Asset Query URI (`algorand://asset`)
The asset URI enables retrieval of metadata and configuration details for a specific asset, such as its name, total supply, decimal precision, and associated addresses.
### ABNF Grammar
```abnf
algorandappurn = "algorand://app/" appid [ "?" noopparams ]
appid = *digit
noopparams = noopparam [ "&" noopparams ]
noopparam = [ boxparam / globalparam / localparam ]
boxparam = "box=" *qbase64url
globalparam = "global=" *qbase64url
localparam = "local=" *qbase64url "&algorandaddress=" *base32
tealcodeparam = "tealcode"
algorandasseturn = "algorand://asset/" assetid [ "?" assetparam ]
assetid = *digit
assetparam = [ totalparam / decimalsparam / frozenparam / unitnameparam / assetnameparam / urlparam / hashparam / managerparam / reserveparam / freezeparam / clawbackparam ]
totalparam = "total"
decimalsparam = "decimals"
frozenparam = "frozen"
unitnameparam = "unitname"
assetnameparam = "assetname"
urlparam = "url"
metadatahashparam = "metadatahash"
managerparam = "manager"
reserveparam = "reserve"
freezeparam = "freeze"
clawbackparam = "clawback"
```
### Parameter Definitions
#### Application Parameters
* **`boxparam`**: Queries the application’s box storage with a key encoded in `base64url`.
* **`globalparam`**: Queries the global storage of the application using a `base64url`-encoded key.
* **`localparam`**: Queries local storage for a specified account. Requires an additional `algorandaddress` parameter, representing the account whose local storage is queried.
#### Asset Parameters
* **`totalparam`** (`total`): Queries the total supply of the asset.
* **`decimalsparam`** (`decimals`): Queries the number of decimal places used for the asset.
* **`frozenparam`** (`frozen`): Queries whether the asset is frozen by default.
* **`unitnameparam`** (`unitname`): Queries the short name or unit symbol of the asset (e.g., “USDT”).
* **`assetnameparam`** (`assetname`): Queries the full name of the asset (e.g., “Tether”).
* **`urlparam`** (`url`): Queries the URL associated with the asset, providing more information.
* **`metadatahashparam`** (`metadatahash`): Queries the metadata hash associated with the asset.
* **`managerparam`** (`manager`): Queries the address of the asset manager.
* **`reserveparam`** (`reserve`): Queries the reserve address holding non-minted units of the asset.
* **`freezeparam`** (`freeze`): Queries the freeze address for the asset.
* **`clawbackparam`** (`clawback`): Queries the clawback address for the asset.
### Query Key Descriptions
For each parameter, the query key name is listed, followed by its purpose:
* **box**: Retrieves information from the specified box storage key.
* **global**: Retrieves data from the specified global storage key.
* **local**: Retrieves data from the specified local storage key. Requires `algorandaddress` to specify the account.
* **total**: Retrieves the asset’s total supply.
* **decimals**: Retrieves the number of decimal places for the asset.
* **frozen**: Retrieves the default frozen status of the asset.
* **unitname**: Retrieves the asset’s short name or symbol.
* **assetname**: Retrieves the full name of the asset.
* **url**: Retrieves the URL associated with the asset.
* **metadatahash**: Retrieves the metadata hash for the asset.
* **manager**: Retrieves the manager address of the asset.
* **reserve**: Retrieves the reserve address for the asset.
* **freeze**: Retrieves the freeze address of the asset.
* **clawback**: Retrieves the clawback address of the asset.
### Example URIs
1. **Querying an Application’s Box Storage**:
```plaintext
algorand://app/2345?box=YWxnb3JvbmQ=
```
Queries box storage with a `base64url`-encoded key.
2. **Querying Global Storage**:
```plaintext
algorand://app/12345?global=Z2xvYmFsX2tleQ==
```
Queries global storage with a `base64url`-encoded key.
3. **Querying Local Storage**:
```plaintext
algorand://app/12345?local=bG9jYWxfa2V5&algorandaddress=ABCDEFGHIJKLMNOPQRSTUVWXYZ234567
```
Queries local storage with a `base64url`-encoded key and specifies the associated account.
4. **Querying Asset Details**:
```plaintext
algorand://asset/67890?total
```
Queries the total supply of an asset.
## Rationale
Previously, the Algorand URI scheme was primarily used to create transactions on the chain. This version allows using a URI scheme to directly retrieve information from the chain, specifically for applications and assets. This URI scheme provides a unified, standardized method for querying Algorand application and asset data, allowing interoperability across applications and services.
## Security Considerations
Since these URIs are intended for read-only operations, they do not alter application or asset state, mitigating many security risks. However, data retrieved from these URIs should be validated to ensure it meets user expectations and that any displayed data cannot be tampered with.
## Copyright
Copyright and related rights waived via [CCO](https://creativecommons.org/publicdomain/zero/1.0/).
# xGov Council - Application Process
> How to run for an xGov Council seat.
## Abstract
The goal of this ARC is to clearly define the process for running for an xGov Council seat.
## Specification
The key words “**MUST**”, “**MUST NOT**”, “**REQUIRED**”, “**SHALL**”, “**SHALL NOT**”, “**SHOULD**”, “**SHOULD NOT**”, “**RECOMMENDED**”, “**MAY**”, and “**OPTIONAL**” in this document are to be interpreted as described in [RFC-2119](https://www.ietf.org/rfc/rfc2119.txt).
### How to apply
In order to apply, a pull request needs to be created on the following repository: [xGov Council](https://github.com/algorandfoundation/xGov).
Candidates must explain why they are applying to become an xGov Council member, their motivation for participating in the review process, and how their involvement can contribute to the Algorand ecosystem.
* Follow the [Rules](https://github.com/algorandfoundation/xGov/blob/main/README.md) of the xGov Council Repository.
* Follow the [template form provided](https://raw.githubusercontent.com/algorandfoundation/ARCs/main/assets/arc-0083/TemplateForm.md), complete all sections, and submit your application using the following file format: `Council/xgov_council-.md`.
#### Header Preamble
The `id` field is unique and incremented for each new submission. (The id should match the file name, for `id: 1`, the related file is `xgov_council-1.md`)
The `author` field must include the candidate’s full name and their GitHub username in parentheses.
> Example: Jane Doe (@janedoe)
The `email` field must include a valid email address where the candidate can be contacted regarding the KYC (Know Your Customer) process.
The `address` field represents an Algorand wallet address. This address will be used for verification or any token distribution if applicable.
The `status` field indicates the current status of the submission:
* `Draft`: In Pull request stage but not ready to be merged.
* `Final`: In Pull request stage and ready to be merged.
* `Elected`: The candidate has been elected.
* `Not Elected`: The candidate has not been selected.
### Timeline
* Applications will open 4-6 weeks before the election. A call for applications will be posted on the [Algorand Forum](https://forum.algorand.org/).
### xGov Council Duties and Powers
#### Eligibility Criteria
* Any Algorand holder, including xGovs, with Algorand technical expertise and/or a strong reputation can run for the council.
* Candidates must disclose their real name, have an identified Algorand address, and undergo the KYC process with the Algorand Foundation.
#### Duties
* Review and understand the terms and conditions of the program.
* Evaluate proposals to check compliance with terms and conditions, provide general guidance, and outline benefits or issues to help kick off the proposal discussion.
* Hold public discussions about the proposals review process above.
#### Powers
* Once a proposal passes, the xGov council can block it ONLY if it doesn’t comply with the terms and conditions.
* Expel fellow council members for misconduct by a supermajority vote of at least 85%.
* Also, by a majority vote, block fellow council members’ remuneration if they are not performing their duties.
## Rationale
The xGov Council is a fundamental component of the xGov Program, tasked with reviewing proposals. A structured, transparent application process ensures that only qualified and committed individuals are elected to the Council.
### Governance measures related to the xGov Council
* [Governance Period 13](https://governance.algorand.foundation/governance-period-13/period-13-voting-session-1).
* [Governance Period 14](https://governance.algorand.foundation/governance-period-14/period-14-voting-session-1).
## Security Considerations
### Disclaimer jurisdictions and exclusions
To be eligible to apply for the xGov council, the applicant must not be a resident of, or located in, the following jurisdictions: Cuba, Iran, North Korea and the Crimea, Donetsk, and Luhansk regions of Ukraine, Syria, Russia, and Belarus.
## Copyright
Copyright and related rights waived via [CCO](https://creativecommons.org/publicdomain/zero/1.0/).
# xGov status and voting power
> xGov status and voting power for the Algorand Governance
## Abstract
This ARC defines the Expert Governor (xGov) status and voting power in the Algorand Expert Governance.
## Specification
The key words “**MUST**”, “**MUST NOT**”, “**REQUIRED**”, “**SHALL**”, “**SHALL NOT**”, “**SHOULD**”, “**SHOULD NOT**”, “**RECOMMENDED**”, “**MAY**”, and “**OPTIONAL**” in this document are to be interpreted as described in [RFC-2119](https://www.ietf.org/rfc/rfc2119.txt).
### xGov Status
xGovs, or Expert Governors, are decision makers in the Algorand Expert Governance, who acquire voting power by securing the network and producing blocks.
These individuals can participate in the designation and approval of proposals submitted to the Algorand Expert Governance process.
An xGov is associated with an Algorand Address subscribing to the Algorand Expert Governance by acknowledging the xGov Registry (Application ID: 3147789458).
Once the xGov Registry confirms the acknowledgement, the xGov is eligible to acquire *voting power*.
### xGov Voting Power
The *voting power* assigned to each xGov is equal to the number of blocks proposed by its Algorand Address over a past period of blocks.
### xGov Committee
An xGov Committee is a group of eligible xGovs that have acquired voting power in a block period.
An xGov Committee is defined by the following parameters:
* xGov Registry creation block `Bc` (`uint64`);
* Committee period start `Bi` (`uint64`), it **MUST** be `0 mod 1,000,000`;
* Committee period end `Bf` (`uint64`), it **MUST** be `0 mod 1,000,000`, and `Bf > Bc`, and `Bf > Bi`;
* Selected list of xGovs, each element is a pair of address and vote (`(bytes[32], uint64)`);
* Total committee members (`uint64`), is the size of the selected list;
* Total committee votes (`uint64`), is the sum of votes in the selected list.
The xGov Committee selection is repeated periodically to select new xGov Committees over time.
### xGov Committee Selection Procedure
Given the xGov Committee parameters `(Bc, Bi, Bf)`, the selection is executed with the following procedure:
1. Collect all proposed blocks in the range `[Bi; Bf]` to build the `potential_committee` (note that not all the Block Proposers are eligible as xGov). For each Block Proposer address in the `potential_committee`, assign a voting power equal to the number of blocks proposed in the range `[Bi; Bf]`.
2. Collect all the *eligible* xGovs in the range `[Bc; Bf]` to build the `eligible_xgovs` list by:
3. Filter `potential_committee` ∩ `eligible_xgovs` to obtain the final `committee`.
### Representation
The xGov Committee selection **MUST** result in a JSON with following schema:
```json
{
"title": "xGov Committee",
"description": "Selected xGov Committee with voting power and validity",
"type": "object",
"properties": {
"xGovs": {
"description": "xGovs with voting power, sorted lexicographically with respect to addresses",
"type": "array",
"items": {
"type": "object",
"properties": {
"address": {
"description": "xGov address used on xGov Registry in base32",
"type": "string"
},
"votes": {
"description": "xGov voting power",
"type": "number"
}
},
"required": ["address", "votes"]
},
"uniqueItems": true
},
"periodStart": {
"description": "First block of the Committee selection period, must ≡ 0 mod 1,000,000 and greater than registryCreation + inceptionPeriod",
"type": "number"
},
"periodEnd": {
"description": "Last block of the Committee selection period, must ≡ 0 mod 1,000,000 and greater than periodStart",
"type": "number"
},
"totalMembers": {
"description": "Total number of Committee members",
"type": "number"
},
"networkGenesisHash": {
"description": "The genesis hash of the network in base64",
"type": "string"
},
"registryId": {
"description": "xGov Registry application ID",
"type": "number"
},
"totalVotes": {
"description": "Total number of Committee votes",
"type": "number"
}
},
"required": ["networkGenesisHash", "periodEnd", "periodStart", "registryId", "totalMembers", "totalVotes", "xGovs"],
"additionalProperties": false
}
```
The following rules aim to create a deterministic outcome of the committee file and its resulting hash.
The object keys **MUST** be sorted in lexicographical order.
The xGovs arrays **MUST** be sorted in lexicographical order with respect to address keys.
The canonical representation of the committee object **MUST NOT** include decorative white-space (pretty printing) or a trailing newline.
An xGov Committee is identified by the following identifier:
`SHA-512/256(arc0086||SHA-512/256(xGov Committee JSON))`
### Trust Model
The Algorand Foundation is responsible for executing the Committee selection algorithm described above. The correctness of the process is auditable post-facto via:
* The block proposers’ history (on-chain)
* The xGov Registry history and state (on-chain)
* The published Committee JSON (hash verifiable)
Any actor can recompute and verify the selected committee independently from on-chain data.
## Rationale
The previous xGov process see [ARC-33](/arc-standards/arc-0033) & [ARC-34](/arc-standards/arc-0034) has shown some risk of gamification of the voting system, lack of flexibility. A flexible community funding mechanism should be available. Given the shift of the Algorand protocol towards consensus incentivization, the xGov process could be an additional way to push consensus participation.
## Security Considerations
No funds need to leave the user’s wallet in order to become an xGov.
## Copyright
Copyright and related rights waived via [CCO](https://creativecommons.org/publicdomain/zero/1.0/).
# Algorand Smart Contract Token Specification
> Base specification for tokens implemented as smart contracts
## Abstract
This ARC (Algorand Request for Comments) specifies an interface for tokens to be implemented on Algorand as smart contracts. The interface defines a minimal interface required for tokens to be held and transferred, with the potential for further augmentation through additional standard interfaces and custom methods.
## Motivation
Currently, most tokens in the Algorand ecosystem are represented by ASAs (Algorand Standard Assets). However, to provide rich extra functionality, it can be desirable to implement tokens as smart contracts instead. To foster an interoperable token ecosystem, it is necessary that the core interfaces for tokens be standardized.
## Specification
The key words “**MUST**”, “**MUST NOT**”, “**REQUIRED**”, “**SHALL**”, “**SHALL NOT**”, “**SHOULD**”, “**SHOULD NOT**”, “**RECOMMENDED**”, “**MAY**”, and “**OPTIONAL**” in this document are to be interpreted as described in [RFC-2119](https://www.ietf.org/rfc/rfc2119.txt).
### Core Token specification
A smart contract token that is compliant with this standard MUST implement the following interface:
```json
{
"name": "ARC-200",
"desc": "Smart Contract Token Base Interface",
"methods": [
{
"name": "arc200_name",
"desc": "Returns the name of the token",
"readonly": true,
"args": [],
"returns": { "type": "byte[32]", "desc": "The name of the token" }
},
{
"name": "arc200_symbol",
"desc": "Returns the symbol of the token",
"readonly": true,
"args": [],
"returns": { "type": "byte[8]", "desc": "The symbol of the token" }
},
{
"name": "arc200_decimals",
"desc": "Returns the decimals of the token",
"readonly": true,
"args": [],
"returns": { "type": "uint8", "desc": "The decimals of the token" }
},
{
"name": "arc200_totalSupply",
"desc": "Returns the total supply of the token",
"readonly": true,
"args": [],
"returns": { "type": "uint256", "desc": "The total supply of the token" }
},
{
"name": "arc200_balanceOf",
"desc": "Returns the current balance of the owner of the token",
"readonly": true,
"args": [
{
"type": "address",
"name": "owner",
"desc": "The address of the owner of the token"
}
],
"returns": {
"type": "uint256",
"desc": "The current balance of the holder of the token"
}
},
{
"name": "arc200_transfer",
"desc": "Transfers tokens",
"readonly": false,
"args": [
{
"type": "address",
"name": "to",
"desc": "The destination of the transfer"
},
{
"type": "uint256",
"name": "value",
"desc": "Amount of tokens to transfer"
}
],
"returns": { "type": "bool", "desc": "Success" }
},
{
"name": "arc200_transferFrom",
"desc": "Transfers tokens from source to destination as approved spender",
"readonly": false,
"args": [
{
"type": "address",
"name": "from",
"desc": "The source of the transfer"
},
{
"type": "address",
"name": "to",
"desc": "The destination of the transfer"
},
{
"type": "uint256",
"name": "value",
"desc": "Amount of tokens to transfer"
}
],
"returns": { "type": "bool", "desc": "Success" }
},
{
"name": "arc200_approve",
"desc": "Approve spender for a token",
"readonly": false,
"args": [
{ "type": "address", "name": "spender" },
{ "type": "uint256", "name": "value" }
],
"returns": { "type": "bool", "desc": "Success" }
},
{
"name": "arc200_allowance",
"desc": "Returns the current allowance of the spender of the tokens of the owner",
"readonly": true,
"args": [
{ "type": "address", "name": "owner" },
{ "type": "address", "name": "spender" }
],
"returns": { "type": "uint256", "desc": "The remaining allowance" }
}
],
"events": [
{
"name": "arc200_Transfer",
"desc": "Transfer of tokens",
"args": [
{
"type": "address",
"name": "from",
"desc": "The source of transfer of tokens"
},
{
"type": "address",
"name": "to",
"desc": "The destination of transfer of tokens"
},
{
"type": "uint256",
"name": "value",
"desc": "The amount of tokens transferred"
}
]
},
{
"name": "arc200_Approval",
"desc": "Approval of tokens",
"args": [
{
"type": "address",
"name": "owner",
"desc": "The owner of the tokens"
},
{
"type": "address",
"name": "spender",
"desc": "The approved spender of tokens"
},
{
"type": "uint256",
"name": "value",
"desc": "The amount of tokens approve"
}
]
}
]
}
```
Ownership of a token by a zero address indicates that a token is out of circulation indefinitely, or otherwise burned or destroyed.
The methods `arc200_transfer` and `arc200_transferFrom` method MUST error when the balance of `from` is insufficient. In the case of the `arc200_transfer` method, from is implied as the `owner` of the token. The `arc200_transferFrom` method MUST error unless called by an `spender` approved by an `owner`. The methods `arc200_transfer` and `arc200_transferFrom` MUST emit a `Transfer` event. A `arc200_Transfer` event SHOULD be emitted, with `from` being the zero address, when a token is minted. A `arc200_Transfer` event SHOULD be emitted, with `to` being the zero address, when a token is destroyed.
The `arc200_Approval` event MUST be emitted when an `arc200_approve` or `arc200_transferFrom` method is called successfully.
A value of zero for the `arc200_approve` method and the `arc200_Approval` event indicates no approval. The `arc200_transferFrom` method and the `arc200_Approval` event indicates the approval value after it is decremented.
The contract MUST allow multiple operators per owner.
All methods in this standard that are marked as `readonly` MUST be read-only as defined by [ARC-22](/arc-standards/arc-0022).
## Rationale
This specification is based on [ERC-20](https://eips.ethereum.org/EIPS/eip-20).
### Core Specification
The core specification identical to ERC-20.
## Backwards Compatibility
This standard introduces a new kind of token that is incompatible with tokens defined as ASAs. Applications that want to index, manage, or view tokens on Algorand will need to handle these new smart tokens as well as the already popular ASA implementation of tokens will need to add code to handle both, and existing smart contracts that handle ASA-based tokens will not work with these new smart contract tokens.
While this is a severe backward incompatibility, smart contract tokens are necessary to provide richer and more diverse functionality for tokens.
## Security Considerations
The fact that anybody can create a new implementation of a smart contract tokens standard opens the door for many of those implementations to contain security bugs. Additionally, malicious token implementations could contain hidden anti-features unexpected by users. As with other smart contract domains, it is difficult for users to verify or understand the security properties of smart contract tokens. This is a tradeoff compared with ASA tokens, which share a smaller set of security properties that are easier to validate to gain the possibility of adding novel features.
## Copyright
Copyright and related rights waived via [CCO](https://creativecommons.org/publicdomain/zero/1.0/).
# ARC Category Guidelines
> ARCs by categories
Welcome to the Guideline. Here you’ll find information on which ARCs to use for your project.
## General ARCs
### ARC 0 - ARC Purpose and Guidelines
#### What is an ARC?
ARC stands for Algorand Request for Comments. An ARC is a design document providing information to the Algorand community or describing a new feature for Algorand or its processes or environment. The ARC should provide a concise technical specification and a rationale for the feature. The ARC author is responsible for building consensus within the community and documenting dissenting opinions. We intend ARCs to be the primary mechanisms for proposing new features and collecting community technical input on an issue. We maintain ARCs as text files in a versioned repository. Their revision history is the historical record of the feature proposal.
### ARC 26 - URI scheme
This URI specification represents a standardized way for applications and websites to send requests and information through deeplinks, QR codes, etc. It is heavily based on Bitcoin’s [BIP-0021](https://github.com/bitcoin/bips/blob/master/bip-0021.mediawiki) and should be seen as derivative of it. The decision to base it on BIP-0021 was made to make it easy and compatible as possible for any other application.
### ARC 78 - URI scheme, keyreg Transactions extension
This URI specification represents an extension to the base Algorand URI encoding standard ([ARC-26](/arc-standards/arc-0026)) that specifies encoding of key registration transactions through deeplinks, QR codes, etc.
### ARC 79 - URI scheme, App NoOp call extension
NoOp calls are Generic application calls to execute the Algorand smart contract ApprovalPrograms. This URI specification proposes an extension to the base Algorand URI encoding standard ([ARC-26](/arc-standards/arc-0026)) that specifies encoding of application NoOp transactions into [RFC 3986](https://www.rfc-editor.org/rfc/rfc3986) standard URIs.
### ARC 82 - URI scheme blockchain information
This URI specification defines a standardized method for querying application and asset data on Algorand. It enables applications, websites, and QR code implementations to construct URIs that allow users to retrieve data such as application state and asset metadata in a structured format. This specification is inspired by [ARC-26](/arc-standards/arc-0026) and follows similar principles, with adjustments specific to read-only queries for applications and assets.
## Asa ARCs
### ARC 3 - Conventions Fungible/Non-Fungible Tokens
The goal of these conventions is to make it simpler for block explorers, wallets, exchanges, marketplaces, and more generally, client software to display the properties of a given ASA.
### ARC 16 - Convention for declaring traits of an NFT’s
The goal is to establish a standard for how traits are declared inside a non-fungible NFT’s metadata, for example as specified in ([ARC-3](/arc-standards/arc-0003)), ([ARC-69](/arc-standards/arc-0069)) or ([ARC-72](/arc-standards/arc-0072)).
### ARC 19 - Templating of NFT ASA URLs for mutability
This ARC describes a template substitution for URLs in ASAs, initially for ipfs\:// scheme URLs allowing mutable CID replacement in rendered URLs. The proposed template-XXX scheme has substitutions like:
```plaintext
template-ipfs://{ipfscid::::}[/...]
```
This will allow modifying the 32-byte ‘Reserve address’ in an ASA to represent a new IPFS content-id hash. Changing of the reserve address via an asset-config transaction will be all that is needed to point an ASA URL to new IPFS content. The client reading this URL, will compose a fully formed IPFS Content-ID based on the version, multicodec, and hash arguments provided in the ipfscid substitution.
### ARC 20 - Smart ASA
A “Smart ASA” is an Algorand Standard Asset (ASA) controlled by a Smart Contract that exposes methods to create, configure, transfer, freeze, and destroy the asset. This ARC defines the ABI interface of such a Smart Contract, the required metadata, and suggests a reference implementation.
### ARC 36 - Convention for declaring filters of an NFT
The goal is to establish a standard for how filters are declared inside a non-fungible (NFT) metadata.
### ARC 62 - ASA Circulating Supply
This ARC introduces a standard for the definition of circulating supply for Algorand Standard Assets (ASA) and its client-side retrieval. A reference implementation is suggested.
### ARC 69 - ASA Parameters Conventions, Digital Media
The goal of these conventions is to make it simpler to display the properties of a given ASA. This ARC differs from [ARC-3](/arc-standards/arc-0003) by focusing on optimization for fetching of digital media, as well as the use of onchain metadata. Furthermore, since asset configuration transactions are used to store the metadata, this ARC can be applied to existing ASAs. While mutability helps with backwards compatibility and other use cases, like leveling up an RPG character, some use cases call for immutability. In these cases, the ASA manager MAY remove the manager address, after which point the Algorand network won’t allow anyone to send asset configuration transactions for the ASA. This effectively makes the latest valid [ARC-69](/arc-standards/arc-0069) metadata immutable.
## Application ARCs
### ARC 4 - Application Binary Interface (ABI)
This document introduces conventions for encoding method calls, including argument and return value encoding, in Algorand Application call transactions. The goal is to allow clients, such as wallets and dapp frontends, to properly encode call transactions based on a description of the interface. Further, explorers will be able to show details of these method invocations.
#### Definitions
* **Application:** an Algorand Application, aka “smart contract”, “stateful contract”, “contract”, or “app”.
* **HLL:** a higher level language that compiles to TEAL bytecode.
* **dapp (frontend)**: a decentralized application frontend, interpreted here to mean an off-chain frontend (a webapp, native app, etc.) that interacts with Applications on the blockchain.
* **wallet**: an off-chain application that stores secret keys for on-chain accounts and can display and sign transactions for these accounts.
* **explorer**: an off-chain application that allows browsing the blockchain, showing details of transactions.
### ARC 18 - Royalty Enforcement Specification
A specification to describe a set of methods that offer an API to enforce Royalty Payments to a Royalty Receiver given a policy describing the royalty shares, both on primary and secondary sales. This is an implementation of an [ARC-20](/arc-standards/arc-0020) specification and other methods may be implemented in the same contract according to that specification.
### ARC 21 - Round based datafeed oracles on Algorand
The following document introduces conventions for building round based datafeed oracles on Algorand using the ABI defined in [ARC-4](/arc-standards/arc-0004)
### ARC 22 - Add `read-only` annotation to ABI methods
The goal of this convention is to allow smart contract developers to distinguish between methods which mutate state and methods which don’t by introducing a new property to the `Method` descriptor.
### ARC 23 - Sharing Application Information
The following document introduces a convention for appending information (stored in various files) to the compiled application’s bytes. The goal of this convention is to standardize the process of verifying and adding this information. The encoded information byte string is `arc23` followed by the IPFS CID v1 of a folder containing the files with the information. The minimum required file is `contract.json` representing the contract metadata (as described in [ARC-4](/arc-standards/arc-0004)), and as extended by future potential ARCs).
### ARC 28 - Algorand Event Log Spec
Algorand dapps can use the [`log`](https://developer.algorand.org/docs/get-details/dapps/avm/teal/opcodes/#log) primitive to attach information about an application call. This ARC proposes the concept of Events, which are merely a way in which data contained in these logs may be categorized and structured. In short: to emit an Event, a dapp calls `log` with ABI formatting of the log data, and a 4-byte prefix to indicate which Event it is.
### ARC 32 - Application Specification
> \[!NOTE] This specification will be eventually deprecated by the [`ARC-56`](https://github.com/algorandfoundation/ARCs/pull/258) specification. An Application is partially defined by it’s [methods](/arc-standards/arc-0004) but further information about the Application should be available. Other descriptive elements of an application may include it’s State Schema, the original TEAL source programs, default method arguments, and custom data types. This specification defines the descriptive elements of an Application that should be available to clients to provide useful information for an Application Client.
### ARC 54 - ASA Burning App
This ARC provides TEAL which would deploy a application that can be used for burning Algorand Standard Assets. The goal is to have the apps deployed on the public networks using this TEAL to provide a standardized burn address and app ID.
### ARC 72 - Algorand Smart Contract NFT Specification
This specifies an interface for non-fungible tokens (NFTs) to be implemented on Algorand as smart contracts. This interface defines a minimal interface for NFTs to be owned and traded, to be augmented by other standard interfaces and custom methods.
### ARC 73 - Algorand Interface Detection Spec
This ARC specifies an interface detection interface based on [ERC-165](https://eips.ethereum.org/EIPS/eip-165). This interface allows smart contracts and indexers to detect whether a smart contract implements a particular interface based on an interface selector.
### ARC 74 - NFT Indexer API
This specifies a REST interface that can be implemented by indexing services to provide data about NFTs conforming to the [ARC-72](/arc-standards/arc-0072) standard.
### ARC 200 - Algorand Smart Contract Token Specification
This ARC (Algorand Request for Comments) specifies an interface for tokens to be implemented on Algorand as smart contracts. The interface defines a minimal interface required for tokens to be held and transferred, with the potential for further augmentation through additional standard interfaces and custom methods.
## Explorer ARCs
### ARC 2 - Algorand Transaction Note Field Conventions
The goal of these conventions is to make it simpler for block explorers and indexers to parse the data in the note fields and filter transactions of certain dApps.
## Wallet ARCs
### ARC 1 - Algorand Wallet Transaction Signing API
The goal of this API is to propose a standard way for a dApp to request the signature of a list of transactions to an Algorand wallet. This document also includes detailed security requirements to reduce the risks of users being tricked to sign dangerous transactions. As the Algorand blockchain adds new features, these requirements may change.
### ARC 5 - Wallet Transaction Signing API (Functional)
ARC-1 defines a standard for signing transactions with security in mind. This proposal is a strict subset of ARC-1 that outlines only the minimum functionality required in order to be useable. Wallets that conform to ARC-1 already conform to this API. Wallets conforming to [ARC-5](/arc-standards/arc-0005) but not ARC-1 **MUST** only be used for testing purposes and **MUST NOT** used on MainNet. This is because this ARC-5 does not provide the same security guarantees as ARC-1 to protect properly wallet users.
### ARC 25 - Algorand WalletConnect v1 API
WalletConnect is an open protocol to communicate securely between mobile wallets and decentralized applications (dApps) using QR code scanning (desktop) or deep linking (mobile). It’s main use case allows users to sign transactions on web apps using a mobile wallet. This document aims to establish a standard API for using the WalletConnect v1 protocol on Algorand, leveraging the existing transaction signing APIs defined in [ARC-1](/arc-standards/arc-0001).
### ARC 35 - Algorand Offline Wallet Backup Protocol
This document outlines the high-level requirements for a wallet-agnostic backup protocol that can be used across all wallets on the Algorand ecosystem.
### ARC 47 - Logic Signature Templates
This standard allows wallets to sign known logic signatures and clearly tell the user what they are signing.
### ARC 55 - On-Chain storage/transfer for Multisig
This ARC proposes the utilization of on-chain smart contracts to facilitate the storage and transfer of Algorand multisignature metadata, transactions, and corresponding signatures for the respective multisignature sub-accounts.
### ARC 59 - ASA Inbox Router
The goal of this standard is to establish a standard in the Algorand ecosystem by which ASAs can be sent to an intended receiver even if their account is not opted in to the ASA. A wallet custodied by an application will be used to custody assets on behalf of a given user, with only that user being able to withdraw assets. A master application will be used to map inbox addresses to user address. This master application can route ASAs to users performing whatever actions are necessary. If integrated into ecosystem technologies including wallets, explorers, and dApps, this standard can provide enhanced capabilities around ASAs which are otherwise strictly bound at the protocol level to require opting in to be received.
# Algorand ARCs
> To discuss ARC drafts, use the corresponding issue in the issue tracker.
Welcome to the Algorand ARCs (Algorand Request for Comments) page. Here you’ll find information on Algorand Improvement Proposals.
## Living Arcs
| Number | Title | Description |
| ------------------------------- | ----------------------------------------------------------------------- | ------------------------------------------------------------------------------------------------------ |
| [0](/arc-standards/arc-0000/) | [ARC Purpose and Guidelines](/arc-standards/arc-0000/) | [Guide explaining how to write a new ARC](/arc-standards/arc-0000/) |
| [72](/arc-standards/arc-0072/) | [Algorand Smart Contract NFT Specification](/arc-standards/arc-0072/) | [Base specification for non-fungible tokens implemented as smart contracts.](/arc-standards/arc-0072/) |
| [83](/arc-standards/arc-0083/) | [xGov Council - Application Process](/arc-standards/arc-0083/) | [How to run for an xGov Council seat.](/arc-standards/arc-0083/) |
| [200](/arc-standards/arc-0200/) | [Algorand Smart Contract Token Specification](/arc-standards/arc-0200/) | [Base specification for tokens implemented as smart contracts](/arc-standards/arc-0200/) |
## Final Arcs
| Number | Title | Description |
| ------------------------------ | ----------------------------------------------------------------------- | -------------------------------------------------------------------------------------------------------------------------------------------------------- |
| [1](/arc-standards/arc-0001/) | [Algorand Wallet Transaction Signing API](/arc-standards/arc-0001/) | [An API for a function used to sign a list of transactions.](/arc-standards/arc-0001/) |
| [2](/arc-standards/arc-0002/) | [Algorand Transaction Note Field Conventions](/arc-standards/arc-0002/) | [Conventions for encoding data in the note field at application-level](/arc-standards/arc-0002/) |
| [3](/arc-standards/arc-0003/) | [Conventions Fungible/Non-Fungible Tokens](/arc-standards/arc-0003/) | [Parameters Conventions for Algorand Standard Assets (ASAs) for fungible tokens and non-fungible tokens (NFTs).](/arc-standards/arc-0003/) |
| [4](/arc-standards/arc-0004/) | [Application Binary Interface (ABI)](/arc-standards/arc-0004/) | [Conventions for encoding method calls in Algorand Application](/arc-standards/arc-0004/) |
| [5](/arc-standards/arc-0005/) | [Wallet Transaction Signing API (Functional)](/arc-standards/arc-0005/) | [An API for a function used to sign a list of transactions.](/arc-standards/arc-0005/) |
| [16](/arc-standards/arc-0016/) | [Convention for declaring traits of an NFT's](/arc-standards/arc-0016/) | [This is a convention for declaring traits in an NFT's metadata.](/arc-standards/arc-0016/) |
| [18](/arc-standards/arc-0018/) | [Royalty Enforcement Specification](/arc-standards/arc-0018/) | [An ARC to specify the methods and mechanisms to enforce Royalty payments as part of ASA transfers](/arc-standards/arc-0018/) |
| [19](/arc-standards/arc-0019/) | [Templating of NFT ASA URLs for mutability](/arc-standards/arc-0019/) | [Templating mechanism of the URL so that changeable data in an asset can be substituted by a client, providing a mutable URL.](/arc-standards/arc-0019/) |
| [20](/arc-standards/arc-0020/) | [Smart ASA](/arc-standards/arc-0020/) | [An ARC for an ASA controlled by an Algorand Smart Contract](/arc-standards/arc-0020/) |
| [21](/arc-standards/arc-0021/) | [Round based datafeed oracles on Algorand](/arc-standards/arc-0021/) | [Conventions for building round based datafeed oracles on Algorand](/arc-standards/arc-0021/) |
| [22](/arc-standards/arc-0022/) | [Add \`read-only\` annotation to ABI methods](/arc-standards/arc-0022/) | [Convention for creating methods which don't mutate state](/arc-standards/arc-0022/) |
| [23](/arc-standards/arc-0023/) | [Sharing Application Information](/arc-standards/arc-0023/) | [Append application information to compiled TEAL applications](/arc-standards/arc-0023/) |
| [25](/arc-standards/arc-0025/) | [Algorand WalletConnect v1 API](/arc-standards/arc-0025/) | [API for communication between Dapps and wallets using WalletConnect](/arc-standards/arc-0025/) |
| [26](/arc-standards/arc-0026/) | [URI scheme](/arc-standards/arc-0026/) | [A specification for encoding Transactions in a URI format.](/arc-standards/arc-0026/) |
| [27](/arc-standards/arc-0027/) | [Provider Message Schema](/arc-standards/arc-0027/) | [A comprehensive message schema for communication between clients and providers.](/arc-standards/arc-0027/) |
| [28](/arc-standards/arc-0028/) | [Algorand Event Log Spec](/arc-standards/arc-0028/) | [A methodology for structured logging by Algorand dapps.](/arc-standards/arc-0028/) |
| [32](/arc-standards/arc-0032/) | [Application Specification](/arc-standards/arc-0032/) | [A specification for fully describing an Application, useful for Application clients.](/arc-standards/arc-0032/) |
| [35](/arc-standards/arc-0035/) | [Algorand Offline Wallet Backup Protocol](/arc-standards/arc-0035/) | [Wallet-agnostic backup protocol for multiple accounts](/arc-standards/arc-0035/) |
| [36](/arc-standards/arc-0036/) | [Convention for declaring filters of an NFT](/arc-standards/arc-0036/) | [This is a convention for declaring filters in an NFT metadata](/arc-standards/arc-0036/) |
| [47](/arc-standards/arc-0047/) | [Logic Signature Templates](/arc-standards/arc-0047/) | [Defining templated logic signatures so wallets can safely sign them.](/arc-standards/arc-0047/) |
| [54](/arc-standards/arc-0054/) | [ASA Burning App](/arc-standards/arc-0054/) | [Standardized Application for Burning ASAs](/arc-standards/arc-0054/) |
| [55](/arc-standards/arc-0055/) | [On-Chain storage/transfer for Multisig](/arc-standards/arc-0055/) | [A smart contract that stores transactions and signatures for simplified multisignature use on Algorand.](/arc-standards/arc-0055/) |
| [56](/arc-standards/arc-0056/) | [Extended App Description](/arc-standards/arc-0056/) | [Adds information to the ABI JSON description](/arc-standards/arc-0056/) |
| [59](/arc-standards/arc-0059/) | [ASA Inbox Router](/arc-standards/arc-0059/) | [An application that can route ASAs to users or hold them to later be claimed](/arc-standards/arc-0059/) |
| [62](/arc-standards/arc-0062/) | [ASA Circulating Supply](/arc-standards/arc-0062/) | [Getter method for ASA circulating supply](/arc-standards/arc-0062/) |
| [65](/arc-standards/arc-0065/) | [AVM Run Time Errors In Program](/arc-standards/arc-0065/) | [Informative AVM run time errors based on program bytecode](/arc-standards/arc-0065/) |
| [69](/arc-standards/arc-0069/) | [ASA Parameters Conventions, Digital Media](/arc-standards/arc-0069/) | [Alternatives conventions for ASAs containing digital media.](/arc-standards/arc-0069/) |
| [71](/arc-standards/arc-0071/) | [Non-Transferable ASA](/arc-standards/arc-0071/) | [Parameters Conventions Non-Transferable Algorand Standard Asset](/arc-standards/arc-0071/) |
| [73](/arc-standards/arc-0073/) | [Algorand Interface Detection Spec](/arc-standards/arc-0073/) | [A specification for smart contracts and indexers to detect interfaces of smart contracts.](/arc-standards/arc-0073/) |
| [74](/arc-standards/arc-0074/) | [NFT Indexer API](/arc-standards/arc-0074/) | [REST API for reading data about Application's NFTs.](/arc-standards/arc-0074/) |
| [78](/arc-standards/arc-0078/) | [URI scheme, keyreg Transactions extension](/arc-standards/arc-0078/) | [A specification for encoding Key Registration Transactions in a URI format.](/arc-standards/arc-0078/) |
| [79](/arc-standards/arc-0079/) | [URI scheme, App NoOp call extension](/arc-standards/arc-0079/) | [A specification for encoding NoOp Application call Transactions in a URI format.](/arc-standards/arc-0079/) |
| [82](/arc-standards/arc-0082/) | [URI scheme blockchain information](/arc-standards/arc-0082/) | [Querying blockchain information using a URI format](/arc-standards/arc-0082/) |
## Last Call Arcs
| Number | Title | Description |
| ------------------------------ | -------------------------------------------------------- | ---------------------------------------------------------------------------------------------------------------------------- |
| [53](/arc-standards/arc-0053/) | [Metadata Declarations](/arc-standards/arc-0053/) | [A specification for a decentralized, Self-declared, & Verifiable Tokens, Collections, & Metadata](/arc-standards/arc-0053/) |
| [86](/arc-standards/arc-0086/) | [xGov status and voting power](/arc-standards/arc-0086/) | [xGov status and voting power for the Algorand Governance](/arc-standards/arc-0086/) |
## Withdrawn Arcs
| Number | Title | Description |
| ------------------------------ | ---------------------------------------------------------------- | ------------------------------------------------------------------------------------------------------------------------------------------------------------------ |
| [12](/arc-standards/arc-0012/) | [Claimable ASA from vault application](/arc-standards/arc-0012/) | [A smart signature contract account that can receive & disburse claimable Algorand Smart Assets (ASA) to an intended recipient account.](/arc-standards/arc-0012/) |
## Deprecated Arcs
| Number | Title | Description |
| ------------------------------ | ---------------------------------------------------------------------- | --------------------------------------------------------------------------------------------------------- |
| [6](/arc-standards/arc-0006/) | [Algorand Wallet Address Discovery API](/arc-standards/arc-0006/) | [API function, enable, which allows the discovery of accounts](/arc-standards/arc-0006/) |
| [7](/arc-standards/arc-0007/) | [Algorand Wallet Post Transactions API](/arc-standards/arc-0007/) | [API function to Post Signed Transactions to the network.](/arc-standards/arc-0007/) |
| [8](/arc-standards/arc-0008/) | [Algorand Wallet Sign and Post API](/arc-standards/arc-0008/) | [A function used to simultaneously sign and post transactions to the network.](/arc-standards/arc-0008/) |
| [9](/arc-standards/arc-0009/) | [Algorand Wallet Algodv2 and Indexer API](/arc-standards/arc-0009/) | [An API for accessing Algod and Indexer through a user's preferred connection.](/arc-standards/arc-0009/) |
| [10](/arc-standards/arc-0010/) | [Algorand Wallet Reach Minimum Requirements](/arc-standards/arc-0010/) | [Minimum requirements for Reach to function with a given wallet.](/arc-standards/arc-0010/) |
| [11](/arc-standards/arc-0011/) | [Algorand Wallet Reach Browser Spec](/arc-standards/arc-0011/) | [Convention for DApps to discover Algorand wallets in browser](/arc-standards/arc-0011/) |
| [15](/arc-standards/arc-0015/) | [Encrypted Short Messages](/arc-standards/arc-0015/) | [Scheme for encryption/decryption that allows for private messages.](/arc-standards/arc-0015/) |
| [33](/arc-standards/arc-0033/) | [xGov Pilot - Becoming an xGov](/arc-standards/arc-0033/) | [Explanation on how to become Expert Governors.](/arc-standards/arc-0033/) |
| [34](/arc-standards/arc-0034/) | [xGov Pilot - Proposal Process](/arc-standards/arc-0034/) | [Criteria for the creation of proposals.](/arc-standards/arc-0034/) |
| [42](/arc-standards/arc-0042/) | [xGov Pilot - Integration](/arc-standards/arc-0042/) | [Integration of xGov Process](/arc-standards/arc-0042/) |
| [48](/arc-standards/arc-0048/) | [Targeted DeFi Rewards](/arc-standards/arc-0048/) | [Targeted DeFi Rewards, Terms and Conditions](/arc-standards/arc-0048/) |
| [49](/arc-standards/arc-0049/) | [NFT Rewards](/arc-standards/arc-0049/) | [NFT Rewards, Terms and Conditions](/arc-standards/arc-0049/) |
## ARC Status Terms
* **Idea** - An idea that is pre-draft. This is not tracked within the ARC Repository.
* **Draft** - The first formally tracked stage of an ARC in development. An ARC is merged by an ARC Editor into the ARC repository when properly formatted.
* **Review** - An ARC Author marks an ARC as ready for and requesting Peer Review.
* **Last Call** - This is the final review window for an ARC before moving to FINAL. An ARC editor will assign Last Call status and set a review end date (\`last-call-deadline\`), typically 14 days later. If this period results in necessary normative changes it will revert the ARC to Review.
* **Final** - This ARC represents the final standard. A Final ARC exists in a state of finality and should only be updated to correct errata and add non-normative clarifications.
* **Stagnant** - Any ARC in Draft or Review if inactive for a period of 6 months or greater is moved to Stagnant. An ARC may be resurrected from this state by Authors or ARC Editors through moving it back to Draft.
* **Withdrawn** - The ARC Author(s) have withdrawn the proposed ARC. This state has finality and can no longer be resurrected using this ARC number. If the idea is pursued at a later date it is considered a new proposal.
* **Deprecated** - This ARC has been deprecated. It has been replaced by another one or is now obsolete.
* **Living** - A special status for ARCs that are designed to be continually updated and not reach a state of finality.
# Creating an account
Algorand offers multiple methods to account creation, in this guide we’ll explore the various methods available for creating accounts on the Algorand blockchain.
Algorand supports multiple account types tailored to different use cases, from simple transactions to programmable smart contracts. [Standalone accounts](#standalone) (single key) are ideal for basic transfers, while [KMD-managed accounts](/nodes/reference/artifacts#kmd) offer secure key storage for applications. [Multisignature accounts](/concepts/accounts/multisig) enable shared control with configurable thresholds, and Logic Signature accounts allow for stateless programmatic control by compiling TEAL logic into a dedicated address. This section will explore how to utilize them in `algokit-utils` , `goal`, `algokey`, `SDKs`, and `Pera Wallet`, the reasons you might want to choose one method over another for your application.
Another approach to account creation is using logic signature accounts, which are contract-based accounts that operate using a logic signature instead of a private key. To create an logic signature account, you write transaction validation logic and compile it to obtain the corresponding address, and fund it with the required minimum balance.
Accounts participating in transactions are required to maintain a minimum balance of 100,000 micro Algos. Before using a newly created account in transactions, make sure that it has a sufficient balance by transferring at least 100,000 micro Algos to it. An initial transfer of under that amount will fail due to the minimum balance constraint. Refer [funding an account](/concepts/accounts/funding) for more details.
## Standalone
A standalone account is an Algorand address and private key pair that is not stored on disk. The private key is most often in the 25-word mnemonic form. Algorand’s mobile wallet uses standalone accounts. Use the 25-word mnemonic to import accounts into the mobile wallet.
| **When to Use Standalone Accounts** | **When Not to Use Standalone Accounts** |
| ------------------------------------------------------------------------------------------------------------------------------------------------------------------------------------------------------- | -------------------------------------------------------------------------------------------------------------------------------------------------------------------------------------------------------------------------------------------------------------------------------------- |
| Low setup cost: No need to connect to a separate client or hardware; all you need is the 25-word human-readable mnemonic of the relevant account. | Limited direct import/export options: Developers relying on import and export functions may find kmd more suitable, as [Algokit Utils TypeScript](algokit/utils/typescript/overview) or [Algokit Utils Python](algokit/utils/python/overview) provides import and export capabilities. |
| Supports offline signing: Since private keys are not stored on disk, standalone accounts can be used in secure offline-signing procedures where hardware constraints may make using kmd more difficult. | |
| Widely supported: Standalone account mnemonics are commonly used across various Algorand developer tools and services. | |
### How to generate a standalone account
There are different ways to create a standalone account:
#### Algokey
Algokey is a command-line utility for managing Algorand keys and it is used for generating, exporting, and importing keys.
```shell
$ algokey generate
Private key mnemonic: [PASSPHRASE]
Public key: [ADDRESS]
```
#### Algokit Utils
Developers can programmatically create accounts without depending on external key management systems, making it ideal for lightweight applications, offline signing, and minimal setup scenarios. AlgoKit Utils offers multiple ways to create and manage standalone accounts.
##### Random Account Generation
Developers can generate random accounts dynamically, each with a unique public/private key pair.
* Utils (TypeScript)
[ Source](https://github.com/algorandfoundation/devportal-code-examples/blob/refs/heads/main/projects/typescript-examples/algokit-utils-ts/accounts/creating-accounts.ts#L7)
```ts
/**
* Create random accounts that can be used for testing or development.
* Each account will have a newly generated private/public key pair.
*/
const randomAccount = algorand.account.random()
const randomAccount2 = algorand.account.random()
const randomAccount3 = algorand.account.random()
```
* Utils (Python)
[ Source](https://github.com/algorandfoundation/devportal-code-examples/blob/refs/heads/main/projects/python-examples/algokit_utils_py_examples/accounts/creating_accounts.py#L10)
```py
"""
Create random accounts that can be used for testing or development.
Each account will have a newly generated private/public key pair.
"""
random_account = algorand_client.account.random()
```
##### Mnemonic-Based Account Recovery
Developers can create accounts from an existing 25-word mnemonic phrase, allowing seamless account recovery and reuse of predefined test accounts.
* Utils (TypeScript)
[ Source](https://github.com/algorandfoundation/devportal-code-examples/blob/refs/heads/main/projects/typescript-examples/algokit-utils-ts/accounts/creating-accounts.ts#L26)
```ts
/**
* Create an account from an existing mnemonic phrase.
* Useful for recovering accounts or using predefined test accounts.
*/
const mnemonicAccount = algorand.account.fromMnemonic('mnemonic words...')
```
* Utils (Python)
[ Source](https://github.com/algorandfoundation/devportal-code-examples/blob/refs/heads/main/projects/python-examples/algokit_utils_py_examples/accounts/creating_accounts.py#L37)
```py
"""
Create an account from an existing mnemonic phrase.
Useful for recovering accounts or using predefined test accounts.
"""
mnemonic_account = algorand_client.account.from_mnemonic(mnemonic="MNEMONIC_PHRASE")
```
Caution
You can also create an account from environment variables as a standalone account. If it’s not LocalNet, the account will be treated as standalone and loaded using mnemonic secret. Ensure the mnemonic is handled securely and not committed to source control.
#### Pera Wallet
Pera Wallet is a popular non-custodial wallet for the Algorand blockchain.
[Create a new account on Pera Wallet ](https://support.perawallet.app/en/article/create-a-new-algorand-account-on-pera-wallet-1ehbj11/)Getting started on how to create a New Algorand Account on Pera Wallet
#### Vault Wallet
Hashicorp Vault implementation can also be used for managing Algorand standalone accounts securely. By leveraging Vault, you can store private keys and 25-word mnemonics securely, ensuring sensitive data is protected from unauthorized access. This implementation provides a streamlined way to create and manage standalone accounts while maintaining best practices for key management.
The integration is particularly useful for developers and enterprises seeking a secure, API-driven approach to manage Algorand accounts at scale, without relying on local storage or manual handling of sensitive credentials.
Note
More details coming soon
## KMD-Managed Accounts
The Key Management Daemon is a process that runs on Algorand nodes, so if you are using a third-party API service this process likely will not be available to you. kmd is the underlying key storage mechanism used with `goal`.
| **When to Use KMD** | **When Not to Use KMD** |
| ------------------------------------------------------------------------------------------------------------------------------------------------------------------------------------------------------------------------------ | --------------------------------------------------------------------------------------------------------------------------------------------------------------------------------------------------------------- |
| Single Master Derivation Key – Public/private key pairs are generated from a single master derivation key. You only need to remember the wallet passphrase/mnemonic to regenerate all accounts in the wallet. | Resource Intensive – Running `kmd` requires an active process and storing keys on disk. If you lack access to a node or need a lightweight solution, [Standalone Accounts](#standalone) may be a better option. |
| Enhanced Privacy – There is no way to determine that two addresses originate from the same master derivation key, allowing applications to implement anonymous spending without requiring users to store multiple passphrases. | |
Caution
KMD is not recommended for production.
### How to use kmd
#### Start the kmd process
To initiate the kmd process and generate the required `kmd.net` and `kmd.token` files use [`goal kmd`](/nodes/reference/artifacts#goal) or [`kmd`](/nodes/reference/artifacts#kmd) command line utilities. To run kmd, you need to have the kmd library installed which comes with the node.
Start kmd using goal with a 3600-second timeout.
```shell
$ goal kmd start -t 3600
Successfully started kmd
```
Kmd can directly be used using the following command
```shell
$ kmd -d data/kmd-v/ -t 3600
```
Once the kmd has started, retrieve the kmd IP address and access token:
```shell
$ echo "kmd IP address: " `cat $ALGORAND_DATA/kmd-v/kmd.net
kmd IP address: [ip-address]:[port]
$ echo "kmd token: " `cat $ALGORAND_DATA/kmd-v/kmd.token
kmd token: [token]
```
#### Create a wallet and generate an account
Wallet and account can be created using different ways.
##### goal
Following are the commands to create a new wallet and a generate an account using goal,
```shell
$ goal wallet new testwallet
Please choose a password for wallet 'testwallet':
Please confirm the password:
Creating wallet...
Created wallet 'testwallet'
Your new wallet has a backup phrase that can be used for recovery.
Keeping this backup phrase safe is extremely important.
Would you like to see it now? (Y/n): y
Your backup phrase is printed below.
Keep this information safe -- never share it with anyone!
[25-word mnemonic]
$ goal account new
Created new account with address [address]
```
##### Algokit Utils
###### KMD client based Account creation
We can also use the utils to create a wallet and account with the KMD client.
* Utils (TypeScript)
[ Source](https://github.com/algorandfoundation/devportal-code-examples/blob/refs/heads/main/projects/typescript-examples/algokit-utils-ts/accounts/creating-accounts.ts#L34)
```ts
/**
* Get or create an account from LocalNet's KMD (Key Management Daemon)
* by name. If the account doesn't exist, it will be created.
*/
const kmdAccount = algorand.account.fromKmd('ACCOUNT_NAME')
```
* Utils (Python)
[ Source](https://github.com/algorandfoundation/devportal-code-examples/blob/refs/heads/main/projects/python-examples/algokit_utils_py_examples/accounts/creating_accounts.py#L18)
```py
"""
Get or create an account from LocalNet's KMD (Key Management Daemon)
by name. If the account doesn't exist, it will be created.
"""
kmd_account = algorand_client.account.from_kmd(name="ACCOUNT_NAME")
```
Other operations like creating and renaming wallet can also be performed.
* Utils (TypeScript)
[ Source](https://github.com/algorandfoundation/devportal-code-examples/blob/refs/heads/main/projects/typescript-examples/algokit-utils-ts/accounts/creating-accounts.ts#L42)
```ts
/**
* Create a wallet with the KMD client.
*/
await algorand.client.kmd.createWallet('ACCOUNT_NAME', 'password')
/**
* Rename a wallet with the KMD client.
*/
await algorand.client.kmd.renameWallet('ACCOUNT_NAME', 'password', 'NEW_ACCOUNT_NAME')
```
* Utils (Python)
[ Source](https://github.com/algorandfoundation/devportal-code-examples/blob/refs/heads/main/projects/python-examples/algokit_utils_py_examples/accounts/creating_accounts.py#L45)
```py
"""
Create a wallet with the KMD client.
"""
algorand_client.client.kmd.create_wallet(name="ACCOUNT_NAME", pswd="password")
"""
Rename a wallet with the KMD client.
"""
algorand_client.client.kmd.rename_wallet(
id="PX2KLH4IVQ25DIU2IVGDWRPJ66RJKOCJ6F7CBCBQA4IXL2GAX645WSG3IQ",
password="new_password",
new_name="NEW_ACCOUNT_NAME",
)
```
###### Environment Variable-Based Account Creation
To create an account using environment variable will load the account from a KMD wallet called name. When running against a local Algorand network, a funded wallet can be automatically created if it doesn’t exist.
* Utils (TypeScript)
[ Source](https://github.com/algorandfoundation/devportal-code-examples/blob/refs/heads/main/projects/typescript-examples/algokit-utils-ts/accounts/creating-accounts.ts#L17)
```ts
/**
* Get or create an account from environment variables.
* When running against LocalNet, this will create a funded wallet
* if it doesn't exist.
*/
const envAccount = algorand.account.fromEnvironment('MY_ACCOUNT', (1).algo())
```
* Utils (Python)
[ Source](https://github.com/algorandfoundation/devportal-code-examples/blob/refs/heads/main/projects/python-examples/algokit_utils_py_examples/accounts/creating_accounts.py#L26)
```py
"""
Get or create an account from environment variables.
When running against LocalNet, this will create a funded wallet
if it doesn't exist.
"""
env_account = algorand_client.account.from_environment(
name="MY_ACCOUNT", fund_with=AlgoAmount(algo=10)
)
```
#### Recover wallet and regenerate account
To recover a wallet and any previously generated accounts, use the wallet backup phrase also called the wallet mnemonic or passphrase. The master derivation key for the wallet will always generate the same addresses in the same order. Therefore the process of recovering an account within the wallet looks exactly like generating a new account.
```shell
$ goal wallet new -r
Please type your recovery mnemonic below, and hit return when you are done:
[25-word wallet mnemonic]
Please choose a password for wallet [RECOVERED_WALLET_NAME]:
Please confirm the password:
Creating wallet...
Created wallet [RECOVERED_WALLET_NAME]
$ goal account new -w
Created new account with address [RECOVERED_ADDRESS]
```
An offline wallet may not accurately reflect account balances, but the state for those accounts e.g. its balance, online status is safely stored on the blockchain. kmd will repopulate those balances when connected to a node.
Caution
For compatibility with other developer tools, `goal` provides functions to import and export accounts into kmd wallets, however, keep in mind that an imported account can not be recovered/derived from the wallet-level mnemonic. You must always keep track of the account-level mnemonics that you import into kmd wallets.
#### HD Wallets
Algorand’s Hierarchical Deterministic wallet implementation, based on the ARC-0052 standard, enables the creation of multiple accounts from a single master seed. The API implementations are in TypeScript, Kotlin, and Swift, providing a consistent and efficient solution for managing multiple accounts with a single mnemonic.
HD wallets are especially beneficial for applications that require streamlined account generation and enhanced privacy. By using this approach, developers can ensure all accounts are deterministically derived from a single seed phrase, making wallet management more convenient for both users and applications.
# Funding an Account
To use the Algorand blockchain, accounts need to be funded with ALGO tokens. This guide explains different methods of funding accounts across Algorand’s various networks. You can also transfer ALGO tokens from an existing funded account to a new account using the Algorand SDK or through wallet applications. All Algorand accounts require a minimum balance to be registered in the ledger. The specific method you choose will depend on whether you’re working with MainNet, TestNet, or LocalNet.
## Choosing the Right Funding Method
The appropriate funding method depends on your specific needs:
* Development and Testing: Use TestNet faucet or LocalNet’s pre-funded accounts
* Production Applications: Use MainNet on-ramps to acquire real ALGO tokens
* Automated Deployments: Use AlgoKit’s ensureFunded utilities
* CI/CD Environments: Use TestNet Dispenser API with appropriate credentials
By selecting the right funding mechanism for your use case, you can streamline development and ensure your Algorand applications have the resources they need to operate effectively.
## LocalNet Funding Options
LocalNet provides pre-funded accounts for development and testing. You can use these existing accounts or create and fund new ones using various mechanisms.
### Retrieving the Default LocalNet Dispenser
This utils function retrieves the default LocalNet dispenser account, which is pre-funded and can be used to provide ALGOs to other accounts in a local development environment. The LocalNet dispenser is automatically available and is designed for testing purposes, making it easy to create and fund new accounts without external dependencies.
* Utils (TypeScript)
[ Source](https://github.com/algorandfoundation/devportal-code-examples/blob/refs/heads/main/projects/typescript-examples/algokit-utils-ts/accounts/funding-accounts.ts#L8)
```ts
/**
* Get the default LocalNet dispenser account that can be used to fund other accounts
*/
const localNetDispenser = await algorand.account.localNetDispenser()
```
* Utils (Python)
[ Source](https://github.com/algorandfoundation/devportal-code-examples/blob/refs/heads/main/projects/python-examples/algokit_utils_py_examples/accounts/funding_accounts.py#L20)
```py
"""
Returns the default LocalNet dispenser account.
This account can be used to fund test accounts on LocalNet.
"""
localnet_dispenser = algorand_client.account.localnet_dispenser()
```
### Environment-Based Dispenser
The below function retrieves a dispenser account configured through environment variables. It allows developers to specify a custom funding account for different environments (e.g., development, testing, staging). The function looks for environment variables containing the dispenser’s private key or mnemonic, making it flexible for dynamic funding configurations across various deployments. The dispenser here is managed by the developer and is not a public dispenser that already exists.
* Utils (TypeScript)
[ Source](https://github.com/algorandfoundation/devportal-code-examples/blob/refs/heads/main/projects/typescript-examples/algokit-utils-ts/accounts/funding-accounts.ts#L15)
```ts
/**
* Get a dispenser account from environment variables.
*/
const environmentDispenser = await algorand.account.dispenserFromEnvironment()
```
* Utils (Python)
[ Source](https://github.com/algorandfoundation/devportal-code-examples/blob/refs/heads/main/projects/python-examples/algokit_utils_py_examples/accounts/funding_accounts.py#L28)
```py
"""
Returns an account (with private key loaded) that can act as a dispenser from environment variables.
If environment variables are not present, returns the default LocalNet dispenser account.
"""
dispenser = algorand_client.account.dispenser_from_environment()
```
## TestNet Funding Options
### TestNet Faucet
Algorand provides a faucet for funding TestNet accounts with test ALGO tokens for development purposes.
1. Visit [Lora Explorer](https://lora.algokit.io/) and choose the network(localnet or testnet) or visit the [Algorand TestNet Dispenser](https://dispenser.testnet.aws.algodev.network/)
2. Sign in with your Google account and complete the reCAPTCHA
3. Enter your Algorand TestNet address
4. Click “Dispense” to receive test ALGOs
### TestNet Dispenser API
For developers needing programmatic access to TestNet funds, AlgoKit provides utils to interact with the TestNet Dispenser API.
#### Ensuring Funds from TestNet Dispenser
The `ensureFundedFromTestNetDispenserApi` function checks if a specified Algorand account has enough funds on TestNet. If the balance is below the required threshold, it automatically requests additional ALGOs from the TestNet Dispenser API. The dispenser client is initialized using the `ALGOKIT_DISPENSER_ACCESS_TOKEN` environment variable for authentication. This is particularly useful for CI/CD pipelines and automated tests, ensuring accounts remain funded without manual intervention.
* Utils (TypeScript)
[ Source](https://github.com/algorandfoundation/devportal-code-examples/blob/refs/heads/main/projects/typescript-examples/algokit-utils-ts/accounts/funding-accounts.ts#L38)
```ts
/**
* Ensure an account has sufficient funds using the TestNet Dispenser API
* The dispenser client uses the `ALGOKIT_DISPENSER_ACCESS_TOKEN` environment variable
* to authenticate with the dispenser API.
*/
const dispenserClient = algorand.client.getTestNetDispenserFromEnvironment()
await algorand.account.ensureFundedFromTestNetDispenserApi('ACCOUNTADDRESS', dispenserClient, algo(1))
```
* Utils (Python)
[ Source](https://github.com/algorandfoundation/devportal-code-examples/blob/refs/heads/main/projects/python-examples/algokit_utils_py_examples/accounts/funding_accounts.py#L70)
```py
"""
Ensure an account is funded from a dispenser account retrieved from the testnet dispenser API.
Uses a dispenser account retrieved from the testnet dispenser API, per the ensure_funded_from_testnet_dispenser_api method, as a funding source such that the given account has a certain amount of Algo free to spend (accounting for Algo locked in minimum balance requirement).
"""
testnet_dispenser = algorand_client.client.get_testnet_dispenser()
algorand_client.account.ensure_funded_from_testnet_dispenser_api(
account_to_fund=random_account.address,
dispenser_client=testnet_dispenser,
min_spending_balance=AlgoAmount(algo=10),
)
```
#### Directly Funding an Account
The below utils function sends a fixed amount of ALGOs (1,000,000 microALGOs = 1 ALGO) to a specified account using the TestNet Dispenser API. Unlike the ensureFundedFromTestNetDispenserApi method, which checks the balance before funding, this function transfers funds immediately. It is useful when you need to top up an account with a specific amount without verifying its current balance.
* Utils (TypeScript)
[ Source](https://github.com/algorandfoundation/devportal-code-examples/blob/refs/heads/main/projects/typescript-examples/algokit-utils-ts/accounts/funding-accounts.ts#L48)
```ts
/**
* Directly fund an account using the TestNet Dispenser API
*/
const testnetDispenser = algorand.client.getTestNetDispenserFromEnvironment()
await testnetDispenser.fund('ACCOUNTADDRESS', 1_000_000)
```
* Utils (Python)
[ Source](https://github.com/algorandfoundation/devportal-code-examples/blob/refs/heads/main/projects/python-examples/algokit_utils_py_examples/accounts/funding_accounts.py#L84)
```py
"""
Directly fund an account using the TestNet Dispenser API
"""
testnet_dispenser = algorand_client.client.get_testnet_dispenser()
testnet_dispenser.fund(address=random_account.address, amount=10, asset_id=0)
```
### Using AlgoKit CLI
The AlgoKit CLI provides a simple command-line interface for funding accounts. This command directly funds the specified receiver address with the requested amount of ALGOs using the TestNet Dispenser. It’s convenient for quick funding operations without writing code.
```shell
algokit dispenser fund --receiver --amount
```
## MainNet On-Ramps
For MainNet transactions, users must acquire real ALGO tokens through cryptocurrency exchanges or other on-ramp services. Required for real-world transactions and decentralized applications. Some of the common On-Ramps are centralized exchanges like Coinbase, Decentralized Exchanges like Tinyman, other DeFi protocols like Folks Finance.
## AlgoKit Utils Funding Helpers
AlgoKit provides utility functions to help ensure accounts have sufficient funds, which is particularly useful for automation and deployment scripts.
### Ensure Funded
The below code checks the balance of a specified account and transfers ALGOs from a dispenser if the balance falls below the required threshold (1 ALGO in this example). It ensures the account has enough funds before executing transactions, making it useful for automated scripts that depend on a minimum balance.
* Utils (TypeScript)
[ Source](https://github.com/algorandfoundation/devportal-code-examples/blob/refs/heads/main/projects/typescript-examples/algokit-utils-ts/accounts/funding-accounts.ts#L22)
```ts
/**
* Ensure an account has sufficient funds by transferring
* Algos from a dispenser account if needed
*/
await algorand.account.ensureFunded('ACCOUNTADDRESS', localNetDispenser, algo(1))
```
* Utils (Python)
[ Source](https://github.com/algorandfoundation/devportal-code-examples/blob/refs/heads/main/projects/python-examples/algokit_utils_py_examples/accounts/funding_accounts.py#L47)
```py
"""
Funds a given account using a dispenser account as a funding source.
Ensures the given account has a certain amount of Algo free to spend (accounting for Algo locked in minimum balance requirement).
"""
algorand_client.account.ensure_funded(
account_to_fund=random_account.address,
dispenser_account=localnet_dispenser.address,
min_spending_balance=AlgoAmount(algo=10),
)
```
### Funding from Environment Variables
This code combines the ensure-funded mechanism with an environment-configured dispenser. It retrieves a dispenser account from environment variables and uses it to top up the target account if its balance is below 1 ALGO. This approach makes the code more flexible and portable by allowing different dispensers to be used across various environments without hardcoding account details.
* Utils (TypeScript)
[ Source](https://github.com/algorandfoundation/devportal-code-examples/blob/refs/heads/main/projects/typescript-examples/algokit-utils-ts/accounts/funding-accounts.ts#L30)
```ts
/**
* Ensure an account has sufficient funds using a dispenser account
* loaded from environment variables
*/
await algorand.account.ensureFundedFromEnvironment('ACCOUNTADDRESS', algo(1))
```
* Utils (Python)
[ Source](https://github.com/algorandfoundation/devportal-code-examples/blob/refs/heads/main/projects/python-examples/algokit_utils_py_examples/accounts/funding_accounts.py#L59)
```py
"""
Ensure an account is funded from a dispenser account configured in environment.
Uses a dispenser account retrieved from the environment, per the dispenser_from_environment method, as a funding source such that the given account has a certain amount of Algo free to spend (accounting for Algo locked in minimum balance requirement).
"""
algorand_client.account.ensure_funded_from_environment(
account_to_fund=random_account.address,
min_spending_balance=AlgoAmount(algo=10),
)
```
# Keys and Signing
Algorand uses **Ed25519 elliptic-curve signatures** to ensure high-speed, secure cryptographic operations. Every account in Algorand is built upon a **public/private key pair**, which plays a crucial role in signing and verifying transactions. To simplify key management and enhance security, Algorand provides various tools and transformations to make key handling more accessible to developers and end users.
This guide explores how public and private key pairs are generated and transformed into user-friendly formats like Algorand addresses, base64 private keys, and mnemonics. It also covers various methods for signing transactions, including direct key management through command-line tools like Algokey, programmatic signing using AlgoKit Utils in Python and TypeScript, and wallet-based signing with Pera Wallet integration.
By understanding these key management and signing methods, developers can ensure secure and efficient transactions on the Algorand network.
### Keys and Addresses
Algorand uses Ed25519 high-speed, high-security elliptic-curve signatures. The keys are produced through standard, open-source cryptographic libraries packaged with each of the SDKs. The key generation algorithm takes a random value as input and outputs two 32-byte arrays, representing a public key and its associated private key. These are also referred to as a public/private key pair. These keys perform essential cryptographic functions like signing data and verifying signatures.
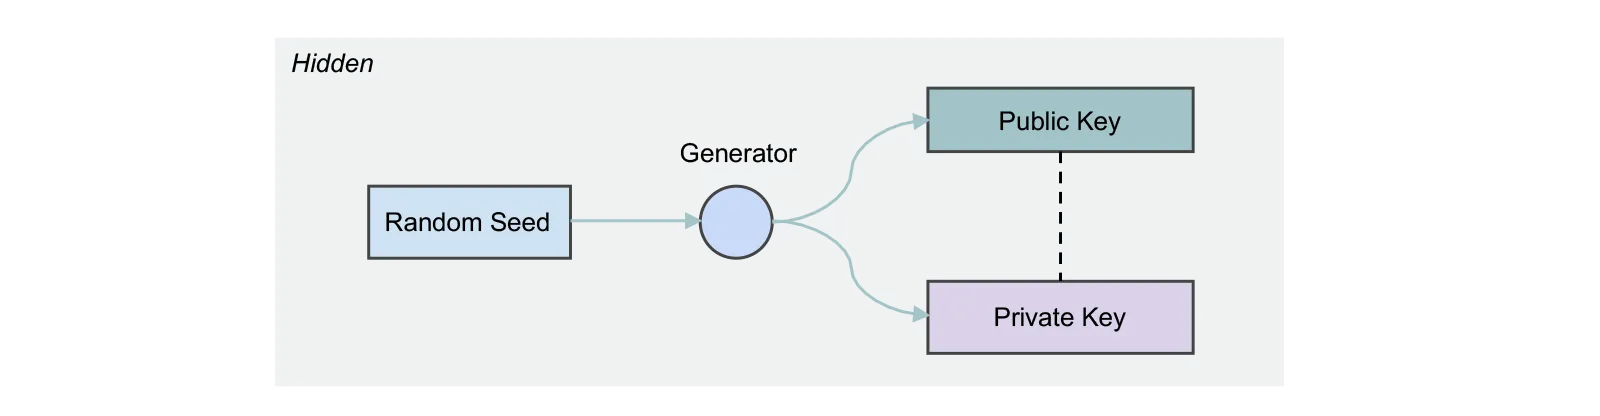
Public/Private Key Generation
For reasons that include the need to make the keys human-readable and robust to human error when transferred, both the public and private keys transform. The output of these transformations is what most developers, and usually all end-users, see. The Algorand developer tools actively seek to mask the complexity involved in these transformations. So unless you are a protocol-level developer modifying cryptographic-related source code, you may never actually encounter the actual public/private key pair.
#### Transformation: Public Key to Algorand Address
The public key is transformed into an Algorand address by adding a 4-byte checksum to the end of the public key and then encoding it in base32. The result is what the developer and end-user recognize as an Algorand address. The address is 58 characters long.
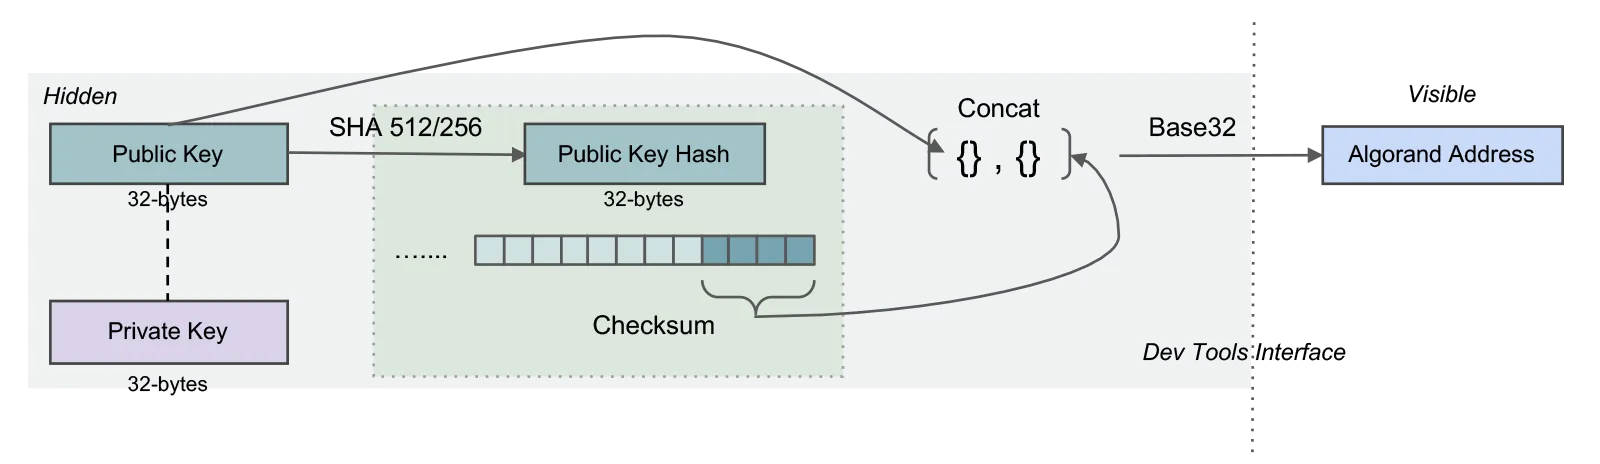
Public Key to Algorand Address
Note
Since users almost never see the true public key, and the Algorand address is a unique mapping back to the public key, the term public key is frequently (and inaccurately) used to mean address.
#### Transformation: Private Key to base64 private key
A base64 encoded concatenation of the private and public keys is a representation of the private key most commonly used by developers interfacing with the SDKs. It is likely not a representation familiar to end users.
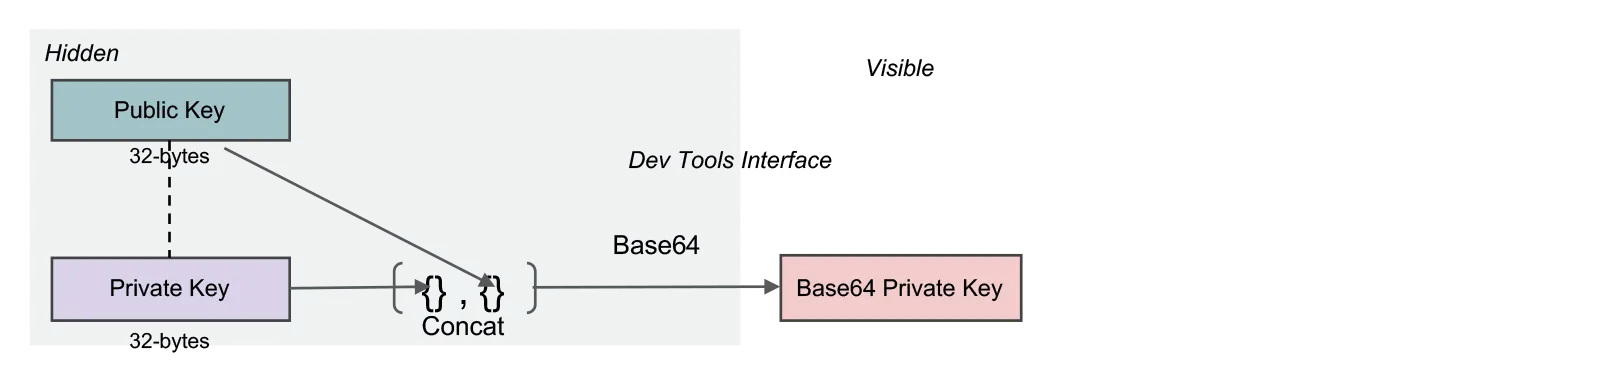
Base64 Private Key
#### Transformation: Private Key to 25-word mnemonic
The 25-word mnemonic is the most user-friendly representation of the private key. It is generated by converting the private key bytes into 11-bit integers and then mapping those integers to the [bip-0039 English word list](https://raw.githubusercontent.com/bitcoin/bips/master/bip-0039/english.txt), where integer *n* maps to the word in the *nth* position in the list. By itself, this creates a 24-word mnemonic. A checksum is added by taking the first two bytes of the hash of the private key and converting them to 11-bit integers and then to their corresponding word in the word list. This word is added to the end of the 24 words to create a 25-word mnemonic.
This representation is called the private key mnemonic. You may also see it referred to as a passphrase.
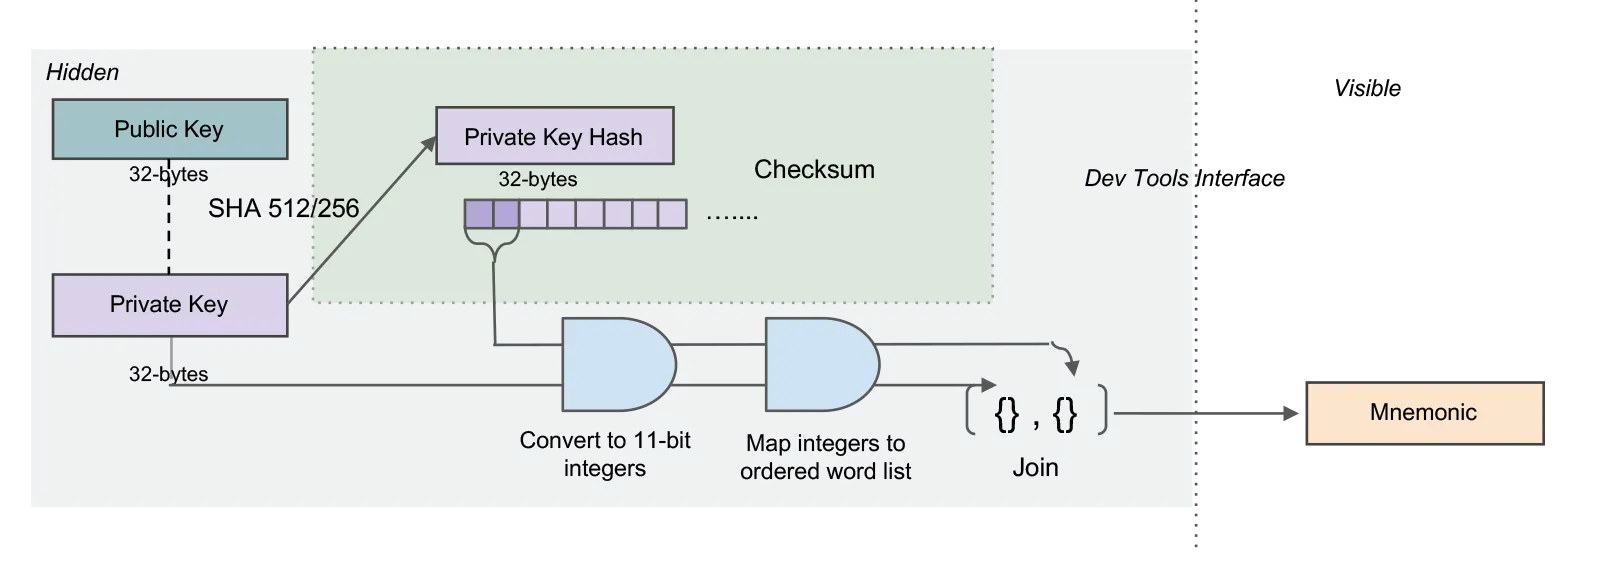
Private Key Mnemonic
Note
Both the base64 representation of a private key and the private key mnemonic are considered private keys. Disambiguating them in contexts where the representation is important.
To manage keys of an Algorand account and use them for signing, there are several methods and tools available. Here’s an overview of key management and signing processes:
## Signing using accounts
### Using algokey
Algokey is a command-line tool provided by Algorand for managing cryptographic keys. It enables users to generate, export, import, and sign transactions using private keys. To sign a transaction, users need access to their private key, either in the form of a keyfile or mnemonic phrase. The signed transaction can then be submitted to the Algorand network for validation and execution. This process ensures that transactions remain tamper-proof and are executed only by authorized entities. To sign a transaction using an account with algokey, you can use the following command.
```plaintext
algokey sign -t transaction.txn -k private_key.key -o signed_transaction.stxn
```
[Algokey ](/nodes/reference/artifacts#algokey)Algokey reference
### Using Algokit utils
AlgoKit Utils simplifies the management of standalone Algorand accounts, signing in both Python and TypeScript by abstracting the complexities of Algorand SDKs, allowing developers to generate new accounts, retrieve existing ones, and manage private keys securely. It also streamlines transaction signing by providing flexible signer management options:
#### Default signer
A default signer is used when no specific signer is provided. This helps streamline transaction signing processes, making it easier for developers to handle transactions without manually specifying signers each time.
* Utils (Python)
[ Source](https://github.com/algorandfoundation/devportal-code-examples/blob/refs/heads/main/projects/python-examples/algokit_utils_py_examples/accounts/keys_and_signing.py#L20)
```py
"""
Sets the default signer to use if no other signer is specified.
If this isn't set and a transaction needs signing for a given sender then an error will be thrown from get_signer / get_account.
"""
algorand_client.account.set_default_signer(account_a.signer)
```
* Utils (TypeScript)
[ Source](https://github.com/algorandfoundation/devportal-code-examples/blob/refs/heads/main/projects/typescript-examples/algokit-utils-ts/accounts/keys-and-signing.ts#L8)
```ts
/**
* Set up a default signer for transactions.
* This will be used when no specific signer is provided.
*/
algorand.account.setDefaultSigner(randomAccountA)
```
#### Multiple signers
In certain use cases, multiple signers may be required to approve a transaction. This is particularly relevant in scenarios involving multi-signature accounts, where different parties must authorize transactions before they can be executed. The below code registers multiple transaction signers at once. The `setSignerFromAccount` function tracks the given account for later signing. However, if you are generating accounts via the various methods on AccountManager (like random, fromMnemonic, logicsig, etc.) then they automatically get tracked.
* Utils (Python)
[ Source](https://github.com/algorandfoundation/devportal-code-examples/blob/refs/heads/main/projects/python-examples/algokit_utils_py_examples/accounts/keys_and_signing.py#L29)
```py
"""
Register multiple transaction signers at once.
Demonstrates the fluent interface for registering signers.
"""
algorand_client.account.set_signer_from_account(account_a)
algorand_client.account.set_signer_from_account(account_b)
algorand_client.account.set_signer_from_account(account_c)
```
* Utils (TypeScript)
[ Source](https://github.com/algorandfoundation/devportal-code-examples/blob/refs/heads/main/projects/typescript-examples/algokit-utils-ts/accounts/keys-and-signing.ts#L16)
```ts
/**
* Register multiple transaction signers at once.
* Demonstrates the fluent interface for registering signers.
*/
algorand.account
.setSignerFromAccount(randomAccountA)
.setSignerFromAccount(randomAccountB)
.setSignerFromAccount(randomAccountC)
```
#### Get signer
Get signer helps to retrieve the Transaction Signer for the given sender address, ready to sign a transaction for that sender.If no signer has been registered for that address then the default signer is used if registered and if not then an error is thrown.
* Utils (Python)
[ Source](https://github.com/algorandfoundation/devportal-code-examples/blob/refs/heads/main/projects/python-examples/algokit_utils_py_examples/accounts/keys_and_signing.py#L40)
```py
"""
Returns the TransactionSigner for the given sender address.
If no signer has been registered for that address then the default signer is used if registered.
"""
signer = algorand_client.account.get_signer(account_a.address)
```
* Utils (TypeScript)
[ Source](https://github.com/algorandfoundation/devportal-code-examples/blob/refs/heads/main/projects/typescript-examples/algokit-utils-ts/accounts/keys-and-signing.ts#L27)
```ts
/**
* Retrieve a transaction signer for a specific address.
* Returns the registered signer or throws if none is found.
*/
const signer = algorand.account.getSigner('ACCOUNT_ADDRESS')
```
#### Override signer
Create an unsigned payment transaction and manually sign it. The transaction signer can be specified in the second argument to `addTransaction`.
* Utils (Python)
[ Source](https://github.com/algorandfoundation/devportal-code-examples/blob/refs/heads/main/projects/python-examples/algokit_utils_py_examples/accounts/keys_and_signing.py#L61)
```py
account_a_signer = algorand_client.account.get_signer(account_b.address)
"""
Create an unsigned payment transaction and manually sign it.
"""
payment_txn = algorand_client.create_transaction.payment(
PaymentParams(
sender=account_a.address,
receiver=account_b.address,
amount=AlgoAmount(algo=1),
note=b"Payment from A to B",
)
)
"""
The transaction signer can be overridden in the second argument to `add_transaction`
"""
algorand_client.new_group().add_transaction(
transaction=payment_txn, signer=account_a_signer
).send()
```
* Utils (TypeScript)
[ Source](https://github.com/algorandfoundation/devportal-code-examples/blob/refs/heads/main/projects/typescript-examples/algokit-utils-ts/accounts/keys-and-signing.ts#L35)
```ts
/**
* Create an unsigned payment transaction and manually sign it.
*/
const accountASigner = algorand.account.getSigner('ACCOUNT_ADDRESS')
const paymentTxn = await algorand.createTransaction.payment({
sender: randomAccountA,
receiver: randomAccountB,
amount: algo(1),
note: 'Payment from A to B',
})
// The transaction signer can be overridden in the second argument to `addTransaction`
const txnGroup = algorand.newGroup().addTransaction(paymentTxn, accountASigner)
await txnGroup.send()
```
## Signing using Logic Signatures
Logic signatures provide a programmable way to authorize transactions on the Algorand blockchain. Instead of relying solely on private key-based signatures, LogicSigs allow transaction approvals based on predefined conditions encoded in TEAL. It allow users to delegate signature authority without exposing their private key. LogicSigs allow fine-grained control over spending by defining transaction rules such as only allowing transfers to specific recipient addresses.
Only use smart signatures when absolutely required. In most cases, it is preferrable to use smart contract escrow accounts over smart signatures as smart signatures require the logic to be supplied for every transaction.
[Logic Signatures ](/concepts/smart-contracts/logic-sigs)More details about logic signatures
## Signing using wallets
### Using UseWallet Library
The UseWallet library provides an easy way to integrate multiple Algorand wallets, including Pera Wallet, without handling low-level SDK interactions. It simplifies connecting wallets, signing transactions, and sending them using a minimal setup.
To integrate Pera Wallet and other Algorand wallets with minimal setup, follow these steps:
1. Install UseWallet using the command: `npm install @txnlab/use-wallet`
2. Configure UseWallet Provider by wrapping your application in the `UseWalletProvider` to enable wallet connections.
3. The useWallet hook provides two methods for signing Algorand transactions: `signTransactions` and `transactionSigner`.
[Signing Transactions ](https://txnlab.gitbook.io/use-wallet/guides/signing-transactions)Guide to signing transactions using UseWallet
### HD wallet
(coming soon)
# Multisignature Accounts
Multisignature accounts are a powerful, natively-supported security and governance feature on Algorand that require multiple parties to approve transactions. Think of a multisignature account as a secure vault with multiple keyholes, where a predetermined number of keys must be used together to open it.
For example, a multisignature account might be configured so that any 2 out of 3 designated signers must approve before funds can be transferred. This creates a balance between security and operational flexibility that’s valuable in many scenarios:
* **Treasury management** for organizations where multiple board members must approve expenditures
* **Shared accounts** between business partners who want mutual consent for transactions
* **Enhanced security** for high-value accounts by distributing signing authority across different devices or locations
* **Recovery options** where backup signers can help regain access if a primary key is lost
## What is a Multisignature Account?
Technically, a multisignature account on Algorand is a logical representation of an ordered set of addresses with a *threshold* and *version*. The threshold determines how many signatures are required to authorize any transaction from this account (such as 2-of-3 or 3-of-5), while the version specifies the multisignature protocol being used. multisignature accounts can perform the same operations as standard accounts, including sending transactions and participating in consensus. The address for a multisignature account is derived from the ordered list of participant accounts, the threshold, and version values.
Some important characteristics to understand:
* The order of addresses matters when creating the multisignature account (Address A, B, C creates a different multisignature address than B, A, C)
* However, the order of signatures doesn’t matter when signing a transaction
* Multisignature accounts cannot nest other multisignature accounts
* You must [send Algos](/concepts/accounts/funding) to the multisignature address to initialize its state on the blockchain, just like with any other account
## Benefits & Implications of Using Multisig Accounts
| **When to Use** | **When Not to Use** |
| ---------------------------------------------------------------------------------------------------------------------------------------------------- | -------------------------------------------------------------------------------------------------------------------------------------------------------- |
| **Enhanced Security:** Requires multiple signatures for transactions, adding an extra layer of protection against compromise of a single key | **Added Complexity:** Requires coordination among multiple signers for every transaction |
| **Customizable Authorization:** The number of required signatures can be adjusted to fit different security models (e.g., 2-of-3, 3-of-5, etc.) | **Key Management:** All signers must securely manage their private keys to maintain the security of the multisig account |
| **Distributed Key Storage:** Signing keys can be stored separately and generated through different methods (kmd, standalone accounts, or a mix) | **Transaction Size:** Multisig transactions are larger than single-signature transactions, resulting in slightly higher transaction fees |
| **Governance Mechanisms:** Enables cryptographically secure governance structures where a subset of authorized users must approve actions | **Not Always Necessary:** For simple use cases where security and governance are not critical concerns, a single-signature account may be more practical |
| **Integration with Smart Contracts:** Can be paired with Algorand Smart Contracts for complex governance models requiring specific signature subsets | |
## How to Generate a Multisignature Account
There are different ways to generate a multisignature account. The examples below demonstrate how to create a multisignature account that requires 2 signatures from 3 possible signers to authorize transaction:
* Utils (TypeScript)
[ Source](https://github.com/algorandfoundation/devportal-code-examples/blob/refs/heads/main/projects/typescript-examples/algokit-utils-ts/accounts/multisignature-accounts.ts#L5)
```ts
// Initialize an Algorand client instance and get funded accounts
const { algorand, dispenser, randomAccountA, randomAccountB, randomAccountC } = await setupLocalnetEnvironment()
// Create a 2-of-3 multisig account that requires
// only 2 signatures from the 3 possible signers to authorize transactions
const multisigAccountA = algorand.account.multisig(
{ version: 1, threshold: 2, addrs: [randomAccountA, randomAccountB, randomAccountC] },
[randomAccountA.account, randomAccountB.account, randomAccountC.account],
)
// Fund the multisig account
await algorand.account.ensureFunded(multisigAccountA, dispenser, (10).algo())
// Send a payment transaction from the multisig account
// which will automatically collect the required number of signatures
// from the signing accounts provided when creating the multisig account
await algorand.send.payment({
sender: multisigAccountA,
receiver: randomAccountA,
amount: algo(1),
})
```
* Utils (Python)
[ Source](https://github.com/algorandfoundation/devportal-code-examples/blob/refs/heads/main/projects/python-examples/algokit_utils_py_examples/accounts/multisignature_accounts.py#L10)
```py
env: LocalnetEnvironment = setup_localnet_environment()
algorand_client = env.algorand_client
dispenser = env.dispenser
account_a = env.account_a
account_b = env.account_b
account_c = env.account_c
"""
Create a 2-of-3 multisig account that requires
only 2 signature from the 3 possible signers to authorize transactions
"""
multisig_account = algorand_client.account.multisig(
metadata=MultisigMetadata(
version=1,
threshold=2,
addresses=[
account_a.address,
account_b.address,
account_c.address,
],
),
signing_accounts=[account_a, account_b, account_c],
)
algorand_client.account.ensure_funded(
multisig_account.address, dispenser, AlgoAmount(algo=10)
)
"""
Send a payment transaction from the multisig account
which will automatically collect the required number of signatures
from the signing accounts provided when creating the multisig account
"""
algorand_client.send.payment(
PaymentParams(
sender=multisig_account.address,
receiver=account_a.address,
amount=AlgoAmount(algo=1),
),
)
```
* goal
```bash
$ ADDRESS1=$(goal account new | awk '{ print $6 }')
$ ADDRESS2=$(goal account new | awk '{ print $6 }')
$ ADDRESS3=$(goal account new | awk '{ print $6 }')
$ goal account multisig new $ADDRESS1 $ADDRESS2 $ADDRESS3 -T 2
Created new account with address [MULTISIG_ADDRESS]
```
# Overview of Accounts
An Algorand Account is a fundamental entity on the Algorand blockchain, representing an individual user or entity capable of holding assets, authorizing transactions, and participating in blockchain activities. Accounts on the Algorand blockchain serve several purposes, including managing balances of Algos, interacting with smart contracts, and holding Algorand Standard Assets.
An Algorand account is the foundation of user interaction on the Algorand blockchain. It starts with the creation of a cryptographic key pair:
* A private key, which must be kept secret as it is used to sign transactions and prove ownership of the account.
* A public key, which acts as the account’s unique identity on the blockchain and is shared publicly as its address.
The public key is transformed into a user-friendly Algorand address — a 58-character string you use for transactions and other blockchain interactions. For convenience, the private key can also be represented as a 25-word mnemonic, which serves as a human-readable backup for restoring account access. Refer to [Keys and Signing](/concepts/accounts/keys-signing) to understand on how transformation happened from public key to algorand address.
An address is just an identifier, while an account represents the full state and capabilities on the blockchain. An address is always associated with one account, but an account can have multiple addresses through rekeying.
## Account Types:
Algorand accounts fall into two broad categories: Standard Accounts and Smart Contract Accounts.
## Standard Accounts
Accounts are entities on the Algorand blockchain associated with specific on-chain data, like a balance. Standard accounts are controlled by a private key, allowing users to sign transactions and interact with the blockchain. After generating a private key and corresponding address, sending Algos to the address on Algorand will initialize its state on the Algorand blockchain.
### Single Signature Accounts
Single Signature Accounts are the most basic and widely used account type in Algorand, controlled by a single private key. Transactions from these accounts are authorized through a signature generated by the private key, which is stored in the transaction’s `sig` field as a base64-encoded string. When a transaction is signed, it forms a `SignedTransaction` object containing the transaction details and the generated signature. These accounts can be created as standalone key pairs, typically represented by a 25-word mnemonic, or managed through the Key Management Daemon, where multiple accounts can be derived from a master key.
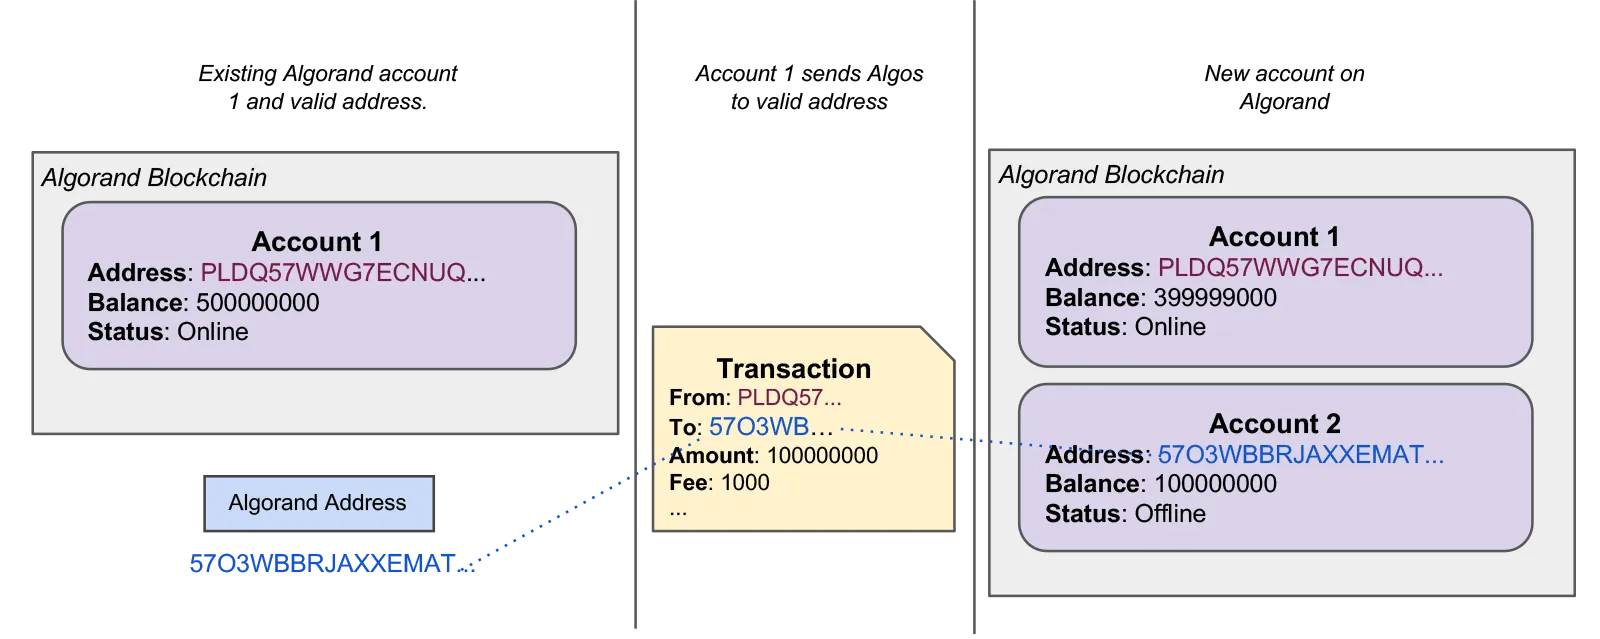
Figure: Initializing an Account
#### Attributes
##### Minimum Balance
Every account on Algorand must have a minimum balance of 100,000 microAlgos. If a transaction is sent that would result in a balance lower than the minimum, the transaction will fail. The minimum balance increases with each asset holding the account whether the asset was created or owned by the account and with each application, the account created or opted in. Destroying a created asset, opting out/closing out an owned asset, destroying a created app, or opting out of an opted-in app decreases the minimum balance accordingly.
[Costs and Constraints ](/concepts/protocol/protocol-parameters)More about assets, applications, and changes to the minimum balance requirement
##### Account Status
The Algorand blockchain uses a decentralized Byzantine Agreement protocol that leverages pure proof of stake (Pure POS). By default, Algorand accounts are set to offline, meaning they do not contribute to the consensus process. An online account participates in Algorand consensus. For an account to go online, it must generate a participation key and send a special key registration transaction. With the addition of staking rewards into the protocol as of v4.0, Algorand consensus participants can set their account as eligible for rewards by including a 2 Algo fee when registering participation keys online. Read more about [Registering an account online](/concepts/protocol/registration).
#### Other Attributes
Other attributes of account are as follows: Additional metadata and properties associated with accounts:
##### **Asset & Application Management**
* `assets`: List of Algorand Standard Assets (ASAs) held by the account.
* `createdAssets`: Assets created by this account.
* `totalAssetsOptedIn`: Number of opted-in ASAs.
* `totalCreatedAssets`: Number of ASAs created.
* `createdApps`: Applications (smart contracts) created by this account.
* `totalAppsOptedIn`: Number of opted-in applications.
* `totalCreatedApps`: Number of applications created.
##### **Account Status & Participation**
* `status`: Current status (`Offline`, `Online`, etc.).
* `deleted`: Whether the account is closed.
* `closedAtRound`: Round when the account was closed.
* `participation`: Staking participation data (for consensus nodes).
* `incentiveEligible`: Whether the account is eligible for incentives.
##### **Balances & Rewards**
* `minBalance`: Minimum required balance (microAlgos).
* `pendingRewards`: Pending staking rewards.
* `rewards`: Total rewards earned.
* `rewardBase?`: Base value for reward calculation.
##### **Metadata**
* `round`: Last seen round.
* `createdAtRound`: Round when the account was created.
* `lastHeartbeat`: Last heartbeat round (for participation nodes).
* `lastProposed`: Last round the account proposed a block.
* `sigType`: Signature type used (`sig`, `msig`, `lsig`).
##### **Box Storage**
* `totalBoxBytes`: Total bytes used in box storage.
* `totalBoxes`: Number of boxes created.
### Multisignature Accounts
Multisignature accounts in Algorand are structured as an ordered set of addresses with a defined threshold and version, allowing them to perform transactions and participate in consensus like standard accounts. Each multisig account requires a specified number of signatures to authorize a transaction, with the threshold determining how many signatures are needed. Multisignature accounts cannot be nested within other multisig accounts.
[Multisignature Accounts ](/concepts/accounts/multisig)More details about multisignature accounts
## Smart Contract Accounts
Smart Contract Accounts do not have private keys; instead, they are controlled by on-chain logic. They can hold assets and execute transactions based on pre-defined conditions.
### Smart Signature Accounts (Contract Accounts):
Smart Signature Accounts are Algorand accounts controlled by TEAL logic instead of private keys. Each unique compiled smart signature program corresponds to a single Algorand address, enabling it to function as an independent account when funded. These accounts authorize transactions based on predefined TEAL logic rather than user signatures, allowing them to hold Algos and Algorand Standard Assets. Since they are stateless, they do not maintain on-chain data between transactions, making them ideal for lightweight, logic-based transaction approvals. However, its recommended to use use smart signatures only when absolutely required as smart signatures require the logic to be supplied for every transaction.
### Application Accounts (Smart Contracts):
Application accounts are automatically created for every smart contract (application) deployed on the Algorand blockchain. Each application has a unique account, with its address derived from the application ID. These accounts can hold Algos and Algorand Standard Assets (ASAs) and can also send transactions (inner transactions) as part of smart contract logic.
## Special Accounts
Two accounts carry special meaning on the Algorand blockchain: the **FeeSink** and the **RewardsPool**. The FeeSink is where all transaction fees are sent. The FeeSink can only be spent on the RewardsPool account. The RewardsPool was first used to distribute rewards to balance holding accounts. Currently, this account is not used.
In addition, the ZeroAddress `AAAAAAAAAAAAAAAAAAAAAAAAAAAAAAAAAAAAAAAAAAAAAAAAAAAAY5HFKQ` is an address that represents a blank byte array. It is used when you leave an address field blank in a transaction. Check the fee sink and reward pool addresses in [Network](/concepts/protocol/networks) section to know more.
### Wallets
In the context of Algorand developer tools, wallets refer to wallets generated and managed by the Key Management Daemon process. A wallet stores a collection of keys. kmd stores collections of wallets and allows users to perform operations using the keys stored within these wallets. Every wallet is associated with a master key, represented as a 25-word mnemonic, from which all accounts in that wallet are derived. This allows the wallet owner only to need to remember a single passphrase for all of their accounts. Wallets are stored encrypted on disk.
[Wallet-derived (kmd) ](/concepts/accounts/create)
### HD Wallets
Hierarchical Deterministic wallets, following the ARC-0052 standard, provide an advanced method for key management. HD wallets derive keys deterministically from a single master seed, ensuring consistent addresses across different implementations. Using the Ed25519 algorithm for key generation and signing, they support BIP-44 derivation paths. It allows private key and mnemonic-based account generation, enabling deterministic recovery, automated address creation, and compatibility with Algorand’s address formats.
Note
More details coming soon
## Wallets
In Algorand, a wallet is a system for generating, storing, and managing private keys that control accounts.
* **Key Management Daemon (KMD) Wallets:**
* Managed by Algorand’s Key Management Daemon (kmd), these wallets store multiple accounts and allow signing transactions securely. Each wallet is protected by a 25-word mnemonic, from which all accounts are derived. Wallets are encrypted and stored on disk.
[Wallet-derived (kmd) ](/concepts/accounts/create)Create accounts using kmd
* **Popular Mobile Wallets:**
* **Pera:** Non-custodial, user-friendly wallet with a built-in dApp browser.
* **Defly:** Designed for DeFi users, offering DEX support, insights, and multi-sig security.
* **HesabPay:** Global mobile payment app for top-ups, cash-outs, bill payments, and transfers.
* **Exodus:** iOS and Android mobile wallet solution.
* **Popular Web Wallets:**
* **Lute Wallet:** Web-based Algorand wallet.
* **Exodus:** Chrome/Browser-based extension wallet.
* **Hardware Wallet:**
* **Ledger:** Secure offline storage for Algo and other crypto assets.
# Rekeying accounts
Rekeying is a powerful protocol feature that enables an Algorand account holder to maintain a static public address while dynamically rotating the authoritative private spending key(s). This is accomplished by issuing a transaction with the `rekey-to` field set the authorized address field within the account object. Future transaction authorization using the account’s public address must be provided by the spending key(s) associated with the authorized address, which may be a single key address, multisignature address, or logic signature program address. Rekeying an account only affects the authorizing address for that account. An account is distinct from an address, so several essential points may not be obvious:
* If an account is closed (balance to 0), the rekey setting is lost.
* Rekeys are not recursively resolved. If A is rekeyed to B and B rekeyed to C, B will authorize A’s transactions, not C.
* Rekeying members of a multisignature does not affect the multisignature authorization since it’s composed of Addresses, not accounts. If necessary, the multisignature account would need to be rekeyed.
The result of a confirmed `rekey-to` transaction will be the `auth-addr` field of the account object is defined, modified, or removed. Defining or modifying means only the corresponding authorized address’s private spending key(s) may authorize future transactions for this public address. Removing the `auth-addr` field is an explicit assignment of the authorized address back to the “addr” field of the account object (observed implicitly because the field is not displayed).
To provide maximum flexibility in key management options, the `auth-addr` may be specified within a `rekey-to` transaction as a distinct foreign address representing a single key address, multisignature address, or logic signature program address. The protocol does not validate control of the required spending key(s) associated with the authorized address defined by `--rekey-to` parameter when the `rekey-to` transaction is sent. This is by design and affords additional privacy features to the new authorized address. It is incumbent upon the user to ensure proper key management practices and `--rekey-to` assignments.
Caution
Using the `--close-to` parameter on any transaction from a rekeyed account will remove the `auth-addr` field, thus reverting signing authority to the original address. The `--close-to` parameter should be used with caution by keyholder(s) of `auth-addr` as the effects remove their authority to access this account thereafter.
## Authorized Addresses
The balance record of every account includes the `auth-addr` field, which, when populated, defines the required authorized address to be evaluated during transaction validation. Initially, the `auth-addr` field is implicitly set to the account’s `address` field, and the only valid private spending key is created during account generation. The `auth-addr` field is only stored and displayed to conserve resources after the network confirms an authorized `rekey-to` transaction.
A `standard` account uses its private spending key to authorize from its public address. A `rekeyed` account defines the authorized address that references a distinct `foreign` address and thus requires the private spending key(s) thereof to authorize future transactions.
Let’s consider a scenario where a single-key account with address `A` rekeys to a different single-key account with address `B`. This requires two single key accounts at time t0. The result from time t1 is that transactions for address `A` must be authorized by address `B`.
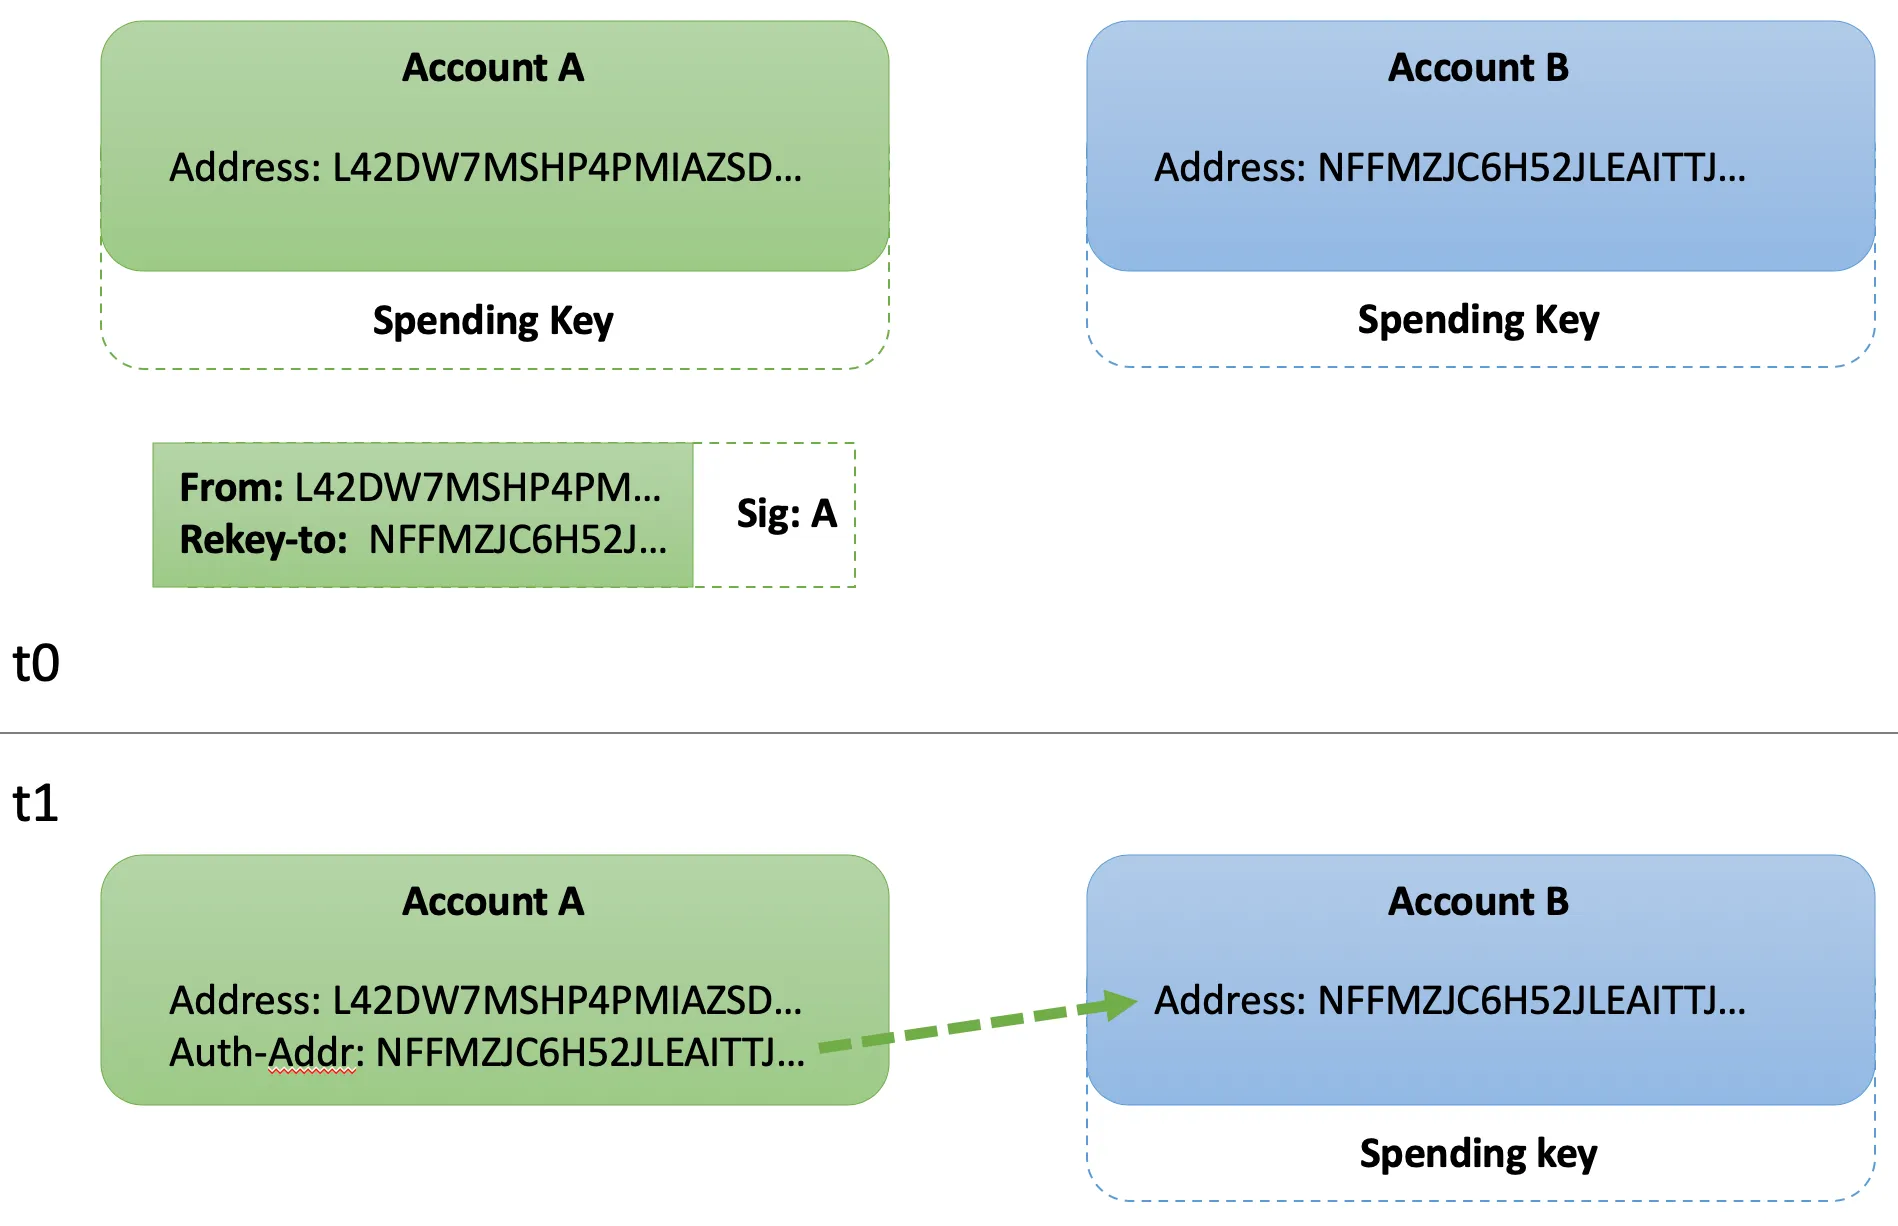
Figure: Rekeying to a Single Address
Refer to [Creating Accounts](/concepts/accounts/create) to generate two accounts and [Funding Accounts](/concepts/accounts/funding) to fund their addresses using the faucet. This example utilizes the following public addresses:
```shell
ADDR_A="UGAGADYHIUGFGRBEPHXRFI6Z73HUFZ25QP32P5FV4H6B3H3DS2JII5ZF3Q"
ADDR_B="LOWE5DE25WOXZB643JSNWPE6MGIJNBLRPU2RBAVUNI4ZU22E3N7PHYYHSY"
```
Use the following code sample to view initial authorized address for Account `A` using `goal`:
```shell
goal account dump --address $ADDR_A
```
Response:
```shell
{
"addr": "UGAGADYHIUGFGRBEPHXRFI6Z73HUFZ25QP32P5FV4H6B3H3DS2JII5ZF3Q",
"algo": 100000,
[...]
}
```
The response includes the `addr` field, which is the public address. Only the spending key associated with this address may authorize transactions for this account.
Now lets consider another scenario wherein a single key account with public address `A` rekeys to a multi signature address `BC_T1`. This scenario reuses both Accounts `A` and `B`, adds a third Account `C` and creates a multisignature Account `BC_T1` comprised of addresses `B` and `C` with a threshold of 1. The result will be the private spending key for `$ADDR_B` or `$ADDR_C` may authorize transaction from `$ADDR_A`.
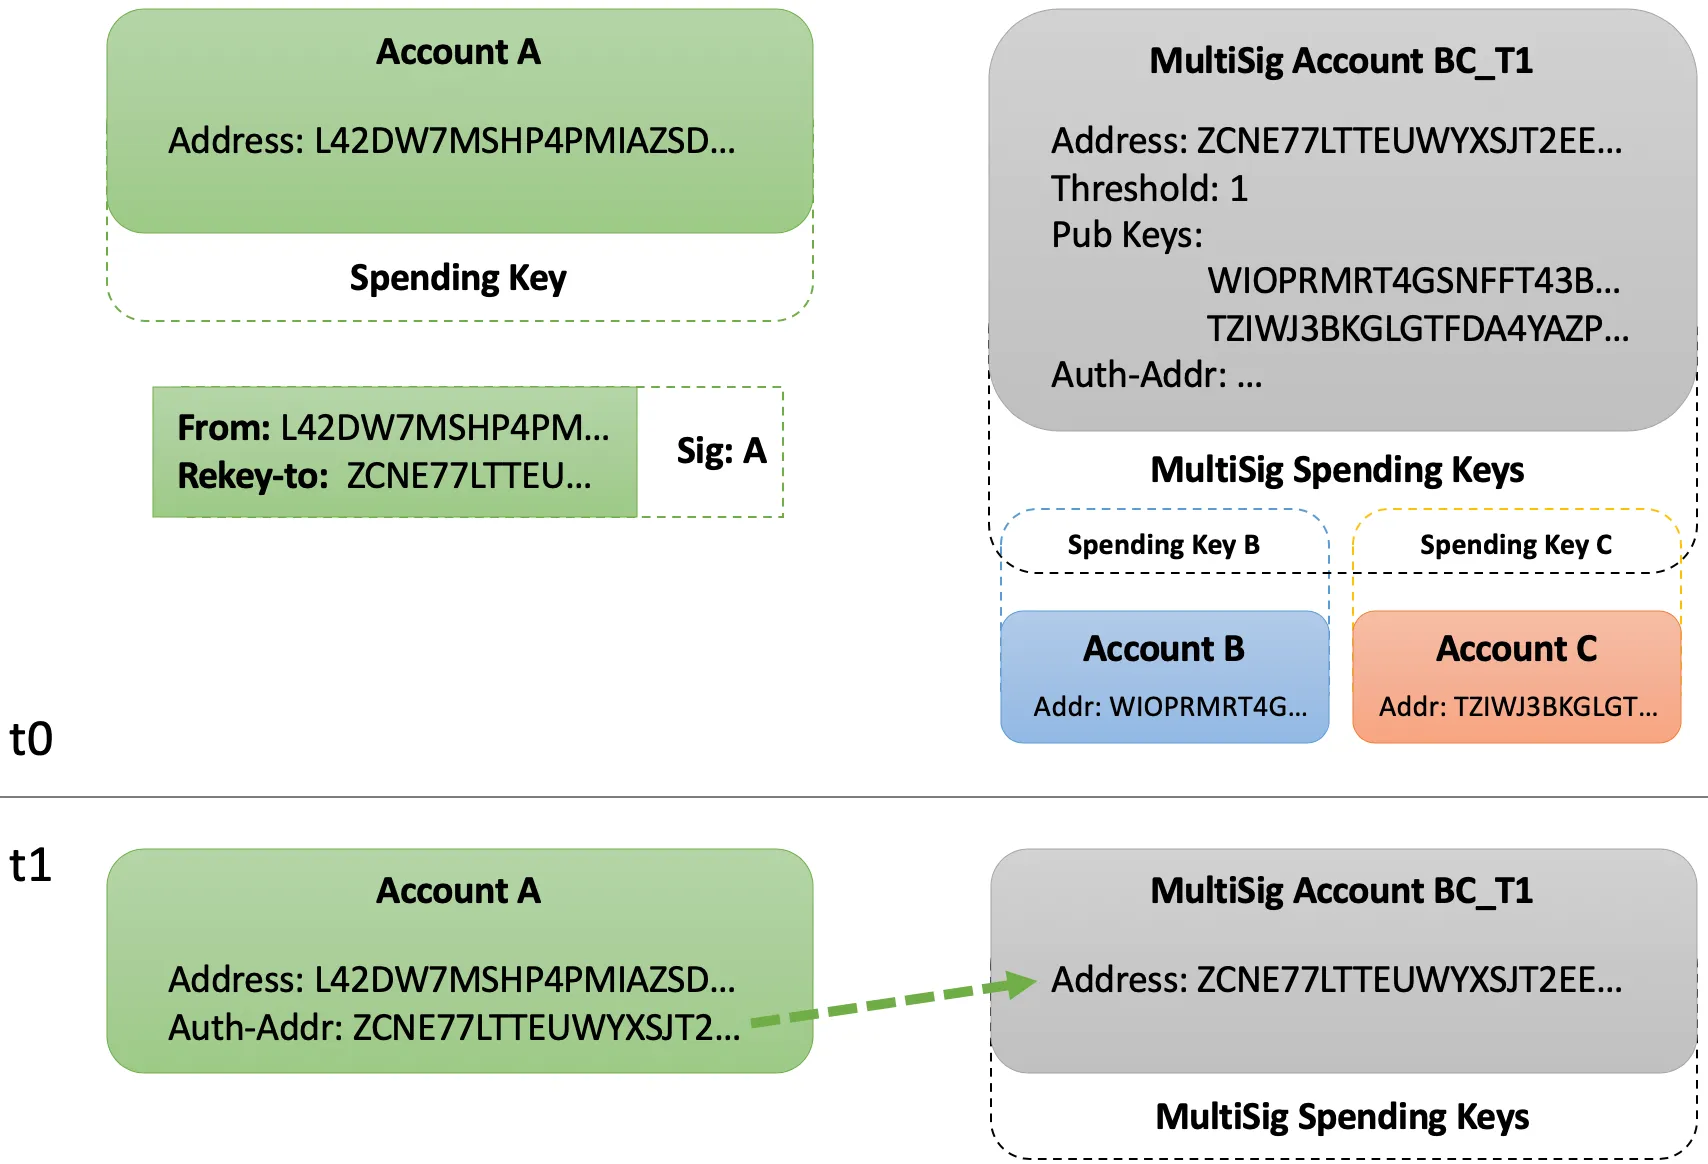
To create a new multisignature account, refer to [Generate a Multisignature Account](/concepts/accounts/multisig). Ensure it uses both `$ADDR_B` and the new `$ADDR_C` with a threshold of 1 (so either `B` or `C` may authorize). Set the resulting account address to the `$ADDR_BC_T1` environment variable for use below.
## Rekey-to Transaction
A `rekey-to` transaction allows an account holder to change the spending authority of their account without changing the account’s public address. A rekey-to transaction enables an account owner to delegate their spending authority to a different private key while maintaining the same public address. This means the original account can transfer its authorization to sign and approve transactions to a new key without creating a new account or changing the account’s address. The existing authorized address must provide authorization for this transaction.
Account `A` intends to rekey its authorized address to `$ADDR_B,` which is the public address of Account `B`. This can be accomplished in a single `goal` command:
```shell
goal clerk send --from $ADDR_A --to $ADDR_A --amount 0 --rekey-to $ADDR_B
```
Now, if we view account `A` using the command:
```shell
goal account dump --address $ADDR_A
```
Response:
```shell
{
"addr": "UGAGADYHIUGFGRBEPHXRFI6Z73HUFZ25QP32P5FV4H6B3H3DS2JII5ZF3Q",
"algo": 199000,
[...]
"spend": "LOWE5DE25WOXZB643JSNWPE6MGIJNBLRPU2RBAVUNI4ZU22E3N7PHYYHSY"
}
```
The populated `spend` field instructs the validation protocol to only approve transactions for this account object when authorized by that address’s spending key(s). Validators will ignore all other attempted authorizations, including those from the public address defined in the `addr` field.
The following transaction will fail because, by default, `goal` attempts to add the authorization using the `--from` parameter. However, the protocol will reject this because it is expecting the authorization from `$ADDR_B` due to the confirmed rekeying transaction above.
```shell
goal clerk send --from $ADDR_A --to $ADDR_B --amount 100000
```
The rekey-to transaction workflow is as follows:
* Construct a transaction that specifies an address for the rekey-to parameter
* Add the required signature(s) from the current authorized address
* Send and confirm the transaction on the network
### Construct an Unsigned Transaction
We will construct an unsigned transaction using `goal` with the `--outfile` flag to write the unsigned transaction to a file:
```shell
goal clerk send --from $ADDR_A --to $ADDR_B --amount 100000 --out send-single.txn
```
For multisignature account, the rekey transaction constructed requires authorization from `$ADDR_B`.
```shell
goal clerk send --from $ADDR_A --to $ADDR_A --amount 0 --rekey-to $ADDR_BC_T1 --out rekey-multisig.txn
```
### Add Authorized Signature(s)
Next, locate the wallet containing the private spending key for Account `B`. The `goal clerk sign` command provides the flag `--signer`, which specifies the proper required authorized address `$ADDR_B`. Notice the `infile` flag reads in the unsigned transaction file from above and the `--outfile` flag writes the signed transaction to a separate file.
```shell
goal clerk sign --signer $ADDR_B --infile send-single.txn --outfile send-single.stxn
```
Use the following command to sign rekey transaction in multisignature account:
```shell
goal clerk sign --signer $ADDR_B --infile rekey-multisig.txn --outfile rekey-multisig.stxn
```
### Send and Confirm
We will send the signed transaction file using the following command:
```shell
goal clerk rawsend --filename send-single.stxn
```
This will succeed, sending the 100000 microAlgos from `$ADDR_A` to `$ADDR_B` using the private spending key of Account `B`.
Next, send and Confirm Rekey to multisignature account using the following command:
```shell
goal clerk rawsend --filename rekey-multisig.stxn
goal account dump --address $ADDR_A
```
The rekey transaction will confirm, resulting in the `spend` field update within the account object:
```shell
{
"addr": "UGAGADYHIUGFGRBEPHXRFI6Z73HUFZ25QP32P5FV4H6B3H3DS2JII5ZF3Q",
"algo": 199000,
[...]
"spend": "NEWMULTISIGADDRESSBCT1..."
}
```
Now we will send with `Auth BC_T1` using the following command:
```shell
goal clerk send --from $ADDR_A --to $ADDR_B --amount 100000 --msig-params="1 $ADDR_B $ADDR_C" --out send-multisig-bct1.txn
goal clerk multisig sign --tx send-multisig-bct1.txn --address $ADDR_C
goal clerk rawsend --filename send-multisig-bct1.txn
```
This transaction will succeed as a private spending key for `$ADDR_C` provided the authorization and meets the threshold requirement for the multisignature account.
## Utils Example
Rekeying can also be acheived using Algokit Utils. In the following example, account\_a is rekeyed to account\_b. The code then illustrates that signing a transaction from account\_a will fail if signed with account\_a’s private key and succeed if signed with account\_b’s private key.
* Utils (TypeScript)
[ Source](https://github.com/algorandfoundation/devportal-code-examples/blob/refs/heads/main/projects/typescript-examples/algokit-utils-ts/accounts/rekeying-accounts.ts#L7)
```ts
/**
* Rekey an account to use a different address for signing.
* This allows account A to be controlled by account B's private key.
*/
await algorand.account.rekeyAccount(randomAccountA, randomAccountB)
// Send a payment transaction from account A
// which will automatically sign the transaction with account B's private key
await algorand.send.payment({
sender: randomAccountA,
receiver: randomAccountC,
amount: algo(1),
})
```
* Utils (Python)
[ Source](https://github.com/algorandfoundation/devportal-code-examples/blob/refs/heads/main/projects/python-examples/algokit_utils_py_examples/accounts/rekeying_accounts.py#L10)
```py
env: LocalnetEnvironment = setup_localnet_environment()
algorand_client = env.algorand_client
dispenser = env.dispenser
account_a = env.account_a
account_b = env.account_b
"""
Rekey an account to use a different address for signing.
This allows account 1 to be controlled by account 2's private key.
"""
algorand_client.account.rekey_account(account=account_a.address, rekey_to=account_b)
payment_txn_result = algorand_client.send.payment(
PaymentParams(
sender=account_a.address,
receiver=account_b.address,
amount=AlgoAmount(algo=1),
)
)
unsigned_payment_txn = algorand_client.create_transaction.payment(
PaymentParams(
sender=account_a.address,
receiver=account_b.address,
amount=AlgoAmount(algo=1),
signer=account_b.signer,
first_valid_round=algorand_client.get_suggested_params().first + 1,
)
)
"""
The unsigned transaction can be signed by the signer when sending with the `add_transaction` method.
"""
result = (
algorand_client.new_group()
.add_transaction(transaction=unsigned_payment_txn, signer=account_b.signer)
.send()
)
```
# Asset Metadata
* [ ] Working with IPFS for asset data?
* [ ] Standards - cover main ARCs that people should know about for ASAs
*
# Asset Operations
Algorand Standard Assets (ASA) enable you to tokenize any type of asset on the Algorand blockchain. This guide covers the essential operations for managing these assets: creation, modification, transfer, and deletion. You’ll also learn about opt-in mechanics, asset freezing, and clawback functionality. Each operation requires specific permissions and can be performed using AlgoKit Utils or the Goal CLI.
## Creating Assets
Creating an ASA lets you mint digital tokens on the Algorand blockchain. You can set the total supply, decimals, unit name, asset name, and add metadata through an optional URL. The asset requires special control addresses: a manager to modify configuration, a reserve for custody, a freeze address to control transferability, and a clawback address to revoke tokens. Every new asset receives a unique identifier on the blockchain.
**Transaction Authorizer**: Any account with sufficient Algo balance
Create assets using either Algokit Utils or `goal`. When using Algokit Utils, supply all creation parameters. With `goal`, managing the various addresses associated with the asset must be done after executing an asset creation. See Modifying an Asset in the next section for more details on changing addresses for the asset.
* TypeScript
[ Source](https://github.com/algorandfoundation/devportal-code-examples/blob/refs/heads/main/projects/typescript-examples/algokit-utils-ts/assets/asset-create.ts#L6)
```ts
/**
* Send an asset create transaction creating a fungible ASA with 10 million units
*
* Parameters for creating a new asset:
* - sender: The address of the account that will send the transaction
* - total: The total amount of the smallest divisible unit to create
* - decimals: The amount of decimal places the asset should have, defaults to undefined
* - defaultFrozen: Whether the asset is frozen by default in the creator address, defaults to undefined
* - manager: The address that can change the manager, reserve, clawback, and freeze addresses, defaults to undefined
* - reserve: The address that holds the uncirculated supply, defaults to undefined
* - freeze: The address that can freeze the asset in any account, defaults to undefined
* - clawback: The address that can clawback the asset from any account, defaults to undefined
* - unitName: The short ticker name for the asset, defaults to undefined
* - assetName: The full name of the asset, defaults to undefined
*/
const createFungibleResult = await algorand.send.assetCreate({
sender: randomAccountA.addr,
total: 10_000_000n,
decimals: 6,
defaultFrozen: false,
manager: randomAccountA.addr,
reserve: randomAccountA.addr,
freeze: randomAccountA.addr,
clawback: randomAccountA.addr,
unitName: 'MYA',
assetName: 'My Asset',
})
console.log('Fungible asset created with ID:', createFungibleResult.assetId)
/**
* Send an asset create transaction creating a 1 to 1 unique NFT
*/
const createNFTResult = await algorand.send.assetCreate({
sender: randomAccountA.addr,
total: 1n,
assetName: 'My NFT',
unitName: 'MNFT',
decimals: 0,
url: 'metadata URL',
metadataHash: new Uint8Array(Buffer.from('Hash of the metadata URL')),
})
console.log('NFT created with ID:', createNFTResult.assetId)
```
* Python
[ Source](https://github.com/algorandfoundation/devportal-code-examples/blob/refs/heads/main/projects/python-examples/algokit_utils_py_examples/assets\(ASA\)/asset_create.py#L15)
```ts
"""
Send an asset create transaction creating a fungible ASA with 10 million units
Parameters for creating a new asset.
- sender: The address of the account that will send the transaction
- total: The total amount of the smallest divisible unit to create
- decimals: The amount of decimal places the asset should have, defaults to None
- default_frozen: Whether the asset is frozen by default in the creator address, defaults to None
- manager: The address that can change the manager, reserve, clawback, and freeze addresses, defaults to None
- reserve: The address that holds the uncirculated supply, defaults to None
- freeze: The address that can freeze the asset in any account, defaults to None
- clawback: The address that can clawback the asset from any account, defaults to None
- unit_name: The short ticker name for the asset, defaults to None
- asset_name: The full name of the asset, defaults to None
"""
txn_result = algorand_client.send.asset_create(
AssetCreateParams(
sender=account_a.address,
total=10_000_000,
decimals=6,
default_frozen=False, # optional
manager=account_a.address, # optional. Can be permanently disabled by setting to None
reserve=account_a.address, # optional. Can be permanently disabled by setting to None
freeze=account_a.address, # optional. Can be permanently disabled by setting to None
clawback=account_a.address, # optional. Can be permanently disabled by setting to None
unit_name="MYA",
asset_name="My Asset",
)
)
"""
Send an asset create transaction creating a 1 to 1 unique NFT
"""
txn_result = algorand_client.send.asset_create(
AssetCreateParams(
sender=account_a.address,
total=1,
asset_name="My NFT",
unit_name="MNFT",
decimals=0,
url="metadata URL",
metadata_hash=b"Hash of the metadata URL",
)
)
```
* goal
```shell
goal asset create --creator --total 1000 --unitname --asseturl "https://path/to/my/asset/details" --decimals 0 -d data
```
[Asset Standards ](/arc-standards)Learn about the Algorand Request for Comments (ARCs) standards that help your assets work with existing community tools.
[Asset Creation Transaction ](/concepts/transactions/types#create-an-asset)Learn about the structure and components of an asset creation transaction.
## Updating Assets
After creation, an ASA’s configuration can be modified, but only certain parameters are mutable. The manager address can update the asset’s control addresses: manager, reserve, freeze, and clawback. All other parameters like total supply and decimals are immutable. Setting any control address to empty permanently removes that capability from the asset.
**Authorized by**: [Asset Manager Account](/concepts/transactions/reference#manageraddr)
To update an asset’s configuration, the current manager account must sign the transaction. Each control address can be modified independently, and changes take effect immediately. Use caution when clearing addresses by setting them to empty strings, as this permanently removes the associated capability from the asset with no way to restore it.
* TypeScript
[ Source](https://github.com/algorandfoundation/devportal-code-examples/blob/refs/heads/main/projects/typescript-examples/algokit-utils-ts/assets/asset-update.ts#L6)
```ts
/**
* Send an asset config transaction updating four mutable fields of an asset:
* manager, reserve, freeze, clawback. This operation is only possible if the sender is
* the asset manager and the asset has all four mutable fields set.
*
* Parameters for configuring an existing asset:
* - sender: The address of the account that will send the transaction
* - assetId: ID of the asset
* - manager: The address that can change the manager, reserve, clawback, and freeze addresses, defaults to undefined
* - reserve: The address that holds the uncirculated supply, defaults to undefined
* - freeze: The address that can freeze the asset in any account, defaults to undefined
* - clawback: The address that can clawback the asset from any account, defaults to undefined
*/
const txnResult = await algorand.send.assetConfig({
sender: randomAccountA.addr,
assetId: 1234n,
manager: randomAccountB.addr,
reserve: randomAccountB.addr,
freeze: randomAccountB.addr,
clawback: randomAccountB.addr,
})
console.log('Asset update transaction ID:', txnResult.transaction.txID)
```
* Python
[ Source](https://github.com/algorandfoundation/devportal-code-examples/blob/refs/heads/main/projects/python-examples/algokit_utils_py_examples/assets\(ASA\)/asset_update.py#L16)
```py
"""
Send an asset config transaction updating four mutable fields of an asset:
manager, reserve, freeze, clawback. This operation is only possible if the sender is
the asset manager and the asset has all four mutable fields set.
Parameters for configuring an existing asset.
- sender: The address of the account that will send the transaction
- asset_id: ID of the asset
- manager: The address that can change the manager, reserve, clawback, and freeze addresses, defaults to None
- reserve: The address that holds the uncirculated supply, defaults to None
- freeze: The address that can freeze the asset in any account, defaults to None
- clawback: The address that can clawback the asset from any account, defaults to None
"""
txn_result = algorand_client.send.asset_config(
AssetConfigParams(
sender=account_a.address,
asset_id=1234,
manager=account_b.address,
reserve=account_b.address,
freeze=account_b.address,
clawback=account_b.address,
)
)
```
* goal
```shell
goal asset config --manager --new-reserve --assetid -d data
```
[Asset Reconfiguration Transaction ](/concepts/transactions/types#reconfigure-an-asset)Learn about the structure and components of an asset reconfiguration transaction.
## Deleting Assets
Destroying an ASA permanently removes it from the Algorand blockchain. This operation requires specific conditions: the asset manager must initiate the deletion, and all units of the asset must be held by the creator account. Once deleted, the asset ID becomes invalid and the creator’s minimum balance requirement for the asset is removed.
**Authorized by**: [Asset Manager](/concepts/transactions/reference#manageraddr)
Created assets can be destroyed only by the asset manager account. All of the assets must be owned by the creator of the asset before the asset can be deleted.
* TypeScript
[ Source](https://github.com/algorandfoundation/devportal-code-examples/blob/refs/heads/main/projects/typescript-examples/algokit-utils-ts/assets/asset-delete.ts#L6)
```ts
/**
* Send an asset destroy transaction destroying an asset with asset id 1234
* All of the assets must be owned by the creator of the asset before the asset can be deleted.
*
* Parameters for destroying an asset:
* - sender: The address of the account that will send the transaction
* - assetId: ID of the asset
*/
const destroyResult = await algorand.send.assetDestroy({
sender: randomAccountA.addr,
assetId: 1234n,
})
console.log('Asset destroy transaction ID:', destroyResult.transaction.txID)
```
* Python
[ Source](https://github.com/algorandfoundation/devportal-code-examples/blob/refs/heads/main/projects/python-examples/algokit_utils_py_examples/assets\(ASA\)/asset_delete.py#L15)
```py
"""
Send an asset destroy transaction destroying an asset with asset id 1234
All of the assets must be owned by the creator of the asset before the asset can be deleted.
Parameters for destroying an asset.
- sender: The address of the account that will send the transaction
- asset_id: ID of the asset
"""
txn_result = algorand_client.send.asset_destroy(
AssetDestroyParams(
sender=account_a.address,
asset_id=1234,
)
)
```
* goal
```shell
goal asset destroy --creator --manager --asset -d data
```
[Asset Destroy Transaction ](/concepts/transactions/types#destroy-an-asset)Learn about the structure and components of an asset destroy transaction.
## Opting In and Out of Assets
Before an account can receive an ASA, it must explicitly opt in to hold that asset. This security feature ensures accounts only hold assets they choose to accept. Opting in requires a minimum balance increase of 0.1 Algo per asset, while opting out releases this requirement. Both operations must be authorized by the account performing the action.
**Authorized by**: The account opting out
The asset management functions include opting in and out of assets, which are fundamental to asset interaction in a blockchain environment.
Note
To see some usage examples check out the [automated tests](https://github.com/algorandfoundation/algokit-utils-ts/blob/main/src/asset.spec.ts).
### optIn
**Authorized by**: The account opting in
An account can opt out of an asset at any time. This means that the account will no longer hold the asset, and the account will no longer be able to receive the asset. The account also recovers the Minimum Balance Requirement for the asset (100,000 microAlgo).
When opting-out you generally want to be careful to ensure you have a zero-balance otherwise you will forfeit the balance you do have. By default, AlgoKit Utils protects you from making this mistake by checking you have a zero-balance before issuing the opt-out transaction. You can turn this check off if you want to avoid the extra calls to Algorand and are confident in what you are doing.
AlgoKit Utils gives you functions that allow you to do opt-ins in bulk or as a single operation. The bulk operations give you less control over the sending semantics as they automatically send the transactions to Algorand in the most optimal way using transaction groups.
An opt-in transaction is simply an asset transfer with an amount of 0, both to and from the account opting in. The following code illustrates this transaction.
* TypeScript
[ Source](https://github.com/algorandfoundation/devportal-code-examples/blob/refs/heads/main/projects/typescript-examples/algokit-utils-ts/assets/asset-optin-optout.ts#L6)
```ts
/**
* Send an asset opt in transaction for randomAccountA opting in to asset with asset id 1234
*
* Parameters for an asset opt in transaction:
* - sender: The address of the account that will opt in to the asset
* - assetId: ID of the asset
*/
const optInResult = await algorand.send.assetOptIn({
sender: randomAccountA.addr,
assetId: 1234n,
})
console.log('Asset opt-in transaction ID:', optInResult.transaction.txID)
```
* Python
[ Source](https://github.com/algorandfoundation/devportal-code-examples/blob/refs/heads/main/projects/python-examples/algokit_utils_py_examples/assets\(ASA\)/asset_optin_optout.py#L16)
```py
"""
Send an asset opt in transaction for account_a opting in to asset with asset id 1234
Parameters for an asset opt in transaction.
- sender: The address of the account that will opt in to the asset
- asset_id: ID of the asset
"""
txn_result = algorand_client.send.asset_opt_in(
AssetOptInParams(
sender=account_a.address,
asset_id=1234,
)
)
```
* goal
```shell
goal asset send -a 0 --asset -f -t --creator -d data
```
### `assetBulkOptIn`
The `assetBulkOptIn` function facilitates the opt-in process for an account to multiple assets, allowing the account to receive and hold those assets.
* TypeScript
[ Source](https://github.com/algorandfoundation/devportal-code-examples/blob/refs/heads/main/projects/typescript-examples/algokit-utils-ts/assets/asset-optin-optout.ts#L46)
```ts
/**
* Opt an account out of a list of Algorand Standard Assets.
*
* Transactions will be sent in batches of 16 as transaction groups.
*
* @param account The account to opt-in
* @param assetIds The list of asset IDs to opt-out of
* @param options Any parameters to control the transaction or execution of the transaction
*
* @returns An array of records matching asset ID to transaction ID of the opt in
*/
const bulkOptInResult = await algorand.asset.bulkOptIn(randomAccountA.addr, [1234n, 5678n])
console.log(
'Asset bulk opt-in transaction IDs:',
bulkOptInResult.map((r) => r.transactionId),
)
```
* Python
[ Source](https://github.com/algorandfoundation/devportal-code-examples/blob/refs/heads/main/projects/python-examples/algokit_utils_py_examples/assets\(ASA\)/asset_optin_optout.py#L56)
```py
"""
Opt an account in to a list of Algorand Standard Assets.
:param account: The account to opt-in
:param asset_ids: The list of asset IDs to opt-in to
:param signer: The signer to use for the transaction, defaults to None
:param rekey_to: The address to rekey the account to, defaults to None
:param note: The note to include in the transaction, defaults to None
:param lease: The lease to include in the transaction, defaults to None
:param static_fee: The static fee to include in the transaction, defaults to None
:param extra_fee: The extra fee to include in the transaction, defaults to None
:param max_fee: The maximum fee to include in the transaction, defaults to None
:param validity_window: The validity window to include in the transaction, defaults to None
:param first_valid_round: The first valid round to include in the transaction, defaults to None
:param last_valid_round: The last valid round to include in the transaction, defaults to None
:param send_params: The send parameters to use for the transaction, defaults to None
:return: An array of records matching asset ID to transaction ID of the opt in
"""
txn_results = algorand_client.asset.bulk_opt_in(
account=account_a.address,
asset_ids=[1234, 5678],
)
print(txn_results[0].transaction_id, txn_results[1].transaction_id)
```
### optOut
An account can opt out of an asset at any time. This means that the account will no longer hold the asset, and the account will no longer be able to receive the asset. The account also recovers the 0.1 Algo Minimum Balance Requirement for the asset.
* TypeScript
[ Source](https://github.com/algorandfoundation/devportal-code-examples/blob/refs/heads/main/projects/typescript-examples/algokit-utils-ts/assets/asset-optin-optout.ts#L24)
```ts
/**
* Send an asset opt out transaction for randomAccountA opting out of asset with asset id 1234
*
* Parameters for an asset opt out transaction:
* - sender: The address of the account that will opt out of the asset
* - assetId: ID of the asset
* - creator: The creator address of the asset
* - ensureZeroBalance: Check if account has zero balance before opt-out, defaults to true
*/
const optOutResult = await algorand.send.assetOptOut({
sender: randomAccountA.addr,
assetId: 1234n,
creator: randomAccountB.addr,
ensureZeroBalance: true,
})
console.log('Asset opt-out transaction ID:', optOutResult.transaction.txID)
```
* Python
[ Source](https://github.com/algorandfoundation/devportal-code-examples/blob/refs/heads/main/projects/python-examples/algokit_utils_py_examples/assets\(ASA\)/asset_optin_optout.py#L34)
```py
"""
Send an asset opt out transaction for account_a opting out of asset with asset id 1234
Parameters for an asset opt out transaction.
- sender: The address of the account that will opt out of the asset
- asset_id: ID of the asset
- creator: The creator address of the asset
- ensure_zero_balance: Check if account has zero balance before opt-out, defaults to True
"""
txn_result = algorand_client.send.asset_opt_out(
params=AssetOptOutParams(
sender=account_a.address,
asset_id=1234,
creator=account_b.address,
),
ensure_zero_balance=True,
)
```
### `assetBulkOptOut`
The `assetBulkOptOut` function manages the opt-out process for a number of assets, permitting the account to discontinue holding a group of assets.
* TypeScript
[ Source](https://github.com/algorandfoundation/devportal-code-examples/blob/refs/heads/main/projects/typescript-examples/algokit-utils-ts/assets/asset-optin-optout.ts#L68)
```ts
/**
* Opt an account out of a list of Algorand Standard Assets.
*
* Transactions will be sent in batches of 16 as transaction groups.
*
* @param account The account to opt-in
* @param assetIds The list of asset IDs to opt-out of
* @param options Any parameters to control the transaction or execution of the transaction
*
* @returns An array of records matching asset ID to transaction ID of the opt out
*/
const bulkOptOutResult = await algorand.asset.bulkOptOut(randomAccountA.addr, [1234n, 5678n])
console.log(
'Asset bulk opt-out transaction IDs:',
bulkOptOutResult.map((r) => r.transactionId),
)
```
* Python
[ Source](https://github.com/algorandfoundation/devportal-code-examples/blob/refs/heads/main/projects/python-examples/algokit_utils_py_examples/assets\(ASA\)/asset_optin_optout.py#L85)
```py
"""
Opt an account out of a list of Algorand Standard Assets.
:param account: The account to opt-out
:param asset_ids: The list of asset IDs to opt-out of
:param ensure_zero_balance: Whether to check if the account has a zero balance first, defaults to True
:param signer: The signer to use for the transaction, defaults to None
:param rekey_to: The address to rekey the account to, defaults to None
:param note: The note to include in the transaction, defaults to None
:param lease: The lease to include in the transaction, defaults to None
:param static_fee: The static fee to include in the transaction, defaults to None
:param extra_fee: The extra fee to include in the transaction, defaults to None
:param max_fee: The maximum fee to include in the transaction, defaults to None
:param validity_window: The validity window to include in the transaction, defaults to None
:param first_valid_round: The first valid round to include in the transaction, defaults to None
:param last_valid_round: The last valid round to include in the transaction, defaults to None
:param send_params: The send parameters to use for the transaction, defaults to None
:raises ValueError: If ensure_zero_balance is True and account has non-zero balance or is not opted in
:return: An array of records matching asset ID to transaction ID of the opt out
"""
txn_results = algorand_client.asset.bulk_opt_out(
account=account_a.address,
asset_ids=[1234, 5678],
)
print(txn_results[0].transaction_id, txn_results[1].transaction_id)
```
[Asset Opt-In Transaction ](/concepts/transactions/reference#asset-optin-transaction)Learn about the structure and components of an asset opt-in transaction.
## Transferring Assets
Asset transfers are a fundamental operation in the Algorand ecosystem, enabling the movement of ASAs between accounts. These transactions form the backbone of token economics, allowing for trading, distribution, and general circulation of assets on the blockchain. Each transfer must respect the opt-in status of the receiving account and any freeze constraints that may be in place.
**Authorized by**: The account that holds the asset to be transferred.
Assets can be transferred between accounts that have opted-in to receiving the asset. These are analogous to standard payment transactions but for Algorand Standard Assets.
* TypeScript
[ Source](https://github.com/algorandfoundation/devportal-code-examples/blob/refs/heads/main/projects/typescript-examples/algokit-utils-ts/assets/asset-transfer.ts#L6)
```ts
/**
* Send an asset transfer transaction of 1 asset with asset id 1234 from randomAccountA to randomAccountB
*
* Parameters for an asset transfer transaction:
* - sender: The address of the account that will send the asset
* - assetId: The asset id of the asset to transfer
* - amount: Amount of the asset to transfer (smallest divisible unit)
* - receiver: The address of the account to send the asset to
*/
const transferResult = await algorand.send.assetTransfer({
sender: randomAccountA.addr,
assetId: 1234n,
receiver: randomAccountB.addr,
amount: 1n,
})
console.log('Asset transfer transaction ID:', transferResult.transaction.txID)
```
* Python
[ Source](https://github.com/algorandfoundation/devportal-code-examples/blob/refs/heads/main/projects/python-examples/algokit_utils_py_examples/assets\(ASA\)/asset_transfer.py#L15)
```py
"""
Send an asset transfer transaction of 1 asset with asset id 1234 from account_a to account_b
Parameters for an asset transfer transaction.
- sender: The address of the account that will send the asset
- asset_id: The asset id of the asset to transfer
- amount: Amount of the asset to transfer (smallest divisible unit)
- receiver: The address of the account to send the asset to
"""
txn_result = algorand_client.send.asset_transfer(
AssetTransferParams(
sender=account_a.address,
asset_id=1234,
receiver=account_b.address,
amount=1,
)
)
```
* goal
```shell
goal asset send -a --asset -f -t --creator -d data
```
[Asset Transfer Transaction ](/concepts/transactions/types#transfer-an-asset)Learn about the structure and components of an asset transfer transaction.
## Clawback Assets
The clawback feature provides a mechanism for asset issuers to maintain control over their tokens after distribution. This powerful capability enables compliance with regulatory requirements, enforcement of trading restrictions, or recovery of assets in case of compromised accounts. When configured, the designated clawback address has the authority to revoke assets from any holder’s account and redirect them to another address.
**Authorized by**: [Asset Clawback Address](/concepts/transactions/reference#clawbackaddr)
Revoking an asset from an account requires specifying an asset sender (the revoke target account) and an asset receiver (the account to transfer the funds back to). The code below illustrates the clawback transaction.
* TypeScript
[ Source](https://github.com/algorandfoundation/devportal-code-examples/blob/refs/heads/main/projects/typescript-examples/algokit-utils-ts/assets/asset-clawback.ts#L6)
```ts
/**
* An asset clawback transaction is an asset transfer transaction with the
* `clawbackTarget` set to the account that is being clawed back from.
*
* Parameters for an asset transfer transaction:
* - sender: The address of the account that will send the transaction
* - assetId: ID of the asset
* - amount: Amount of the asset to transfer (smallest divisible unit)
* - receiver: The account to send the asset to
* - clawbackTarget: The account to take the asset from, defaults to undefined
*/
const txnResult = await algorand.send.assetTransfer({
sender: randomAccountA.addr, // Must be the clawback address for the asset
assetId: 1234n,
amount: 1n,
receiver: randomAccountA.addr,
clawbackTarget: randomAccountB.addr, // account that is being clawed back from
})
console.log('Asset clawback transaction ID:', txnResult.transaction.txID)
```
* Python
[ Source](https://github.com/algorandfoundation/devportal-code-examples/blob/refs/heads/main/projects/python-examples/algokit_utils_py_examples/assets\(ASA\)/asset_clawback.py#L18)
```py
"""
An asset clawback transaction is an asset transfer transaction with the
`clawback_target` set to the account that is being clawed back from.
Parameters for an asset transfer transaction.
- sender: The address of the account that will send the transaction
- asset_id: ID of the asset
- amount: Amount of the asset to transfer (smallest divisible unit)
- receiver: The account to send the asset to
- clawback_target: The account to take the asset from, defaults to None
"""
txn_result = algorand_client.send.asset_transfer(
AssetTransferParams(
sender=manager.address,
asset_id=1234,
amount=1,
receiver=manager.address,
clawback_target=account_to_be_clawbacked.address, # account that is being clawed back from
)
)
```
* goal
```shell
goal asset send -a --asset -f -t